Transcripts
1. Introducing.... Me!: Hi everyone. My name is Dan and I've been a creative since
I was a little girl. As a team, I took art classes privately
as well as in school. But being the oldest of
four daughters growing up on a sheep and dairy
farm on Vancouver Island, aren't really took a backseat to Barn chores and farmwork. It wasn't until I was
in my late 20s that I really started to feed
my artistic needs. I created costuming prompts and sets for local
theater productions, and even turned my hand
at theatre and special effects up when my
daughters were old enough, I opened a small arts and
crafts instruction studio for homeschool rz, where we would puddle in
dabbled to our heart's content. This is where I realized that
I really love teaching art. I truly believe that with
the right instruction, a bit of patience and a lot of encouragement that
everyone can be an artist. I opened foxglove hollow
studio in 2016 in this small studio and open
the doors to adults as well. Since then, I have shared the joy of painting with
thousands of students, teaching babies step-by
baby step, encouraging, coaxing and yes, sometimes badgering my students
into creating. It's something they never
thought they could do. Something they are proud of. So many people come to me with low expectations
of their talents. I even once had a
student tell me that she came to prove me wrong on her way out the door with
a green stretched across her face and her prize tucked
under her arm. I asked her. Now, what else did you
think he couldn't do?
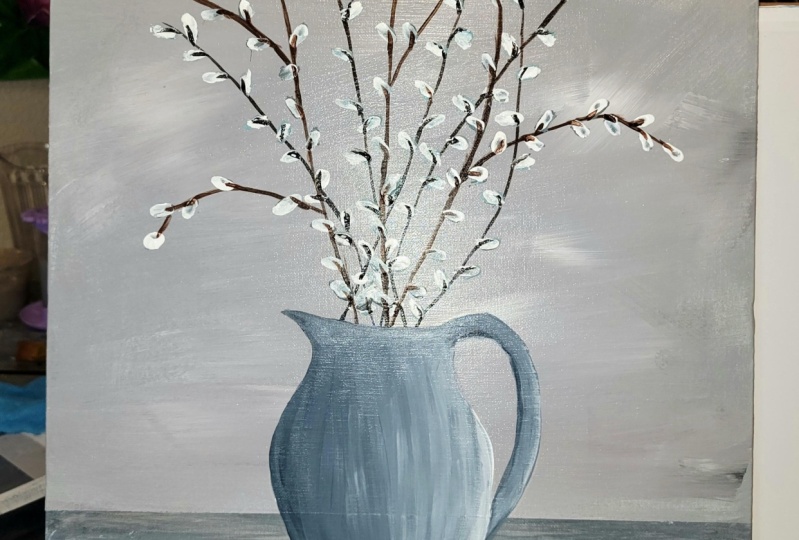
2. Pussywillow supplies: Hi, welcome to Fox calls studio. Today we're painting
this ***** willow phase. We'll need a few supplies. Q-tips, a liner brush, flat brush, a kitchen
sponge, pencil paper, carbon paper, masking tape, a blow dryer, clean
water, and a canvas. And of course we're
going to need our paint. For this one, I've used
blue, black, brown, and white acrylic paint, but feel free to choose
your own colors. I'm going to teach
you how to create this beautiful soft background
is in your kitchen sponge. You will also learn
how to draw and transfer your veins
to your Canvas. Using carbon paper. Teach you how to make these sweet little
***** willows using only a liner brush
and acute hip. This painting is great for any size canvas and it's
easily customizable. Your own particular colors. Well, what are we waiting for? Let's get painting.
3. Mixing our paint: To start this painting, we're going to want
little puddles of white. I've got four petals
of white here, a bit of black. And I'm going to mix
it into a puddle. Just use a little bit at a
time because you can get very overpowered. There we go. So I've got a puddle of a
nice gray, nice light gray. Now I'm going to still
with the same paintbrush. I'm going to dip
it into the brown. Put us in this pebble here. What I'm looking for is
about the same value. A tan color. If you squint your eyes up, should look close to the same
brightness or lightness. A little less pink. Just going to dial it down with, whoops, it
might be too much, just a little tiny bit of black in there to pull it down a bit. Not quite so pink. Maybe a little tiny touch more. Just use a bit at a
time because it can get carried away really easily. There we go, has stalled
it down quite a bit. Now with the same
brush, scoop into blue, I'll use this puddle here
and you can make some blue into it a little bit more. What these three all
sort of BCCI colors, really little bit more blue. I think I'll add just a
touch of that brown into That's dulled down a bit. Then I'm just gonna
take this and I'm gonna pull a little
bit of white over here. And I'm going to basically
wipe my brush off. And now I've got
four paddles here. Paint. As usual, probably
way more than necessary.
4. Applying the base: I'm going to dip my sponge into my pink and put
it on the background. But I like to do is have a
little bit of a damp sponge, squeeze it out on my cloth here. This is just one of those
old kitchen sponges. Synthetic kitchen sponge
from the dollar store. I'm going to just dip in
and I'll take a bit of this gray bit of the
blue bit of brown, and I'm just going to wipe
it all over the facts. Just so we've got a
wife is all covered. Paint over top of this. I'm just going to
give us background. We don't see him
white. Solid, can be streaky, way down. Let's give that a dry.
5. Tabletop: We've got that all
nice and dry now, we can take a piece of tape and put it across here
where we want the height of our tabletop to be. I'm gonna put my
tabletop roughly here. I think that looks
like to me to be about a quarter of the
way up to do just fine. I'm going to take my sponge and with dividends are some gray. I'm just going to bring the sponge from one side all
the way over to the other. Maybe it's something that
brownie color in it. Now, we're looking at
for streaks in here. That's all we're looking for. Nice streaky top, but
some blue in there too. Good and streaky. I think what I'm going to
do is just take a tiny, tiny, tiny touch of that black. I'm going to run it right
along the top here like that. Street fat into. And this is going to
simulate what Greene want. This really, really apparent. A little bit more of
that dark I think. You'll find as the paint dries, it will stick as you pull the sponge across and it leaves you with this
really nice texture. Finish that off with just
very, very, very light. Dab it off there. Just skim of this white and it's going to actually make it look like
it's almost pickled. Tabletop. There we go. Should do just fine. It nice and streaky. These will all turn out completely differently
because we're mixing paint on our
Canvas when I take this off now, there's
our tabletop. I'm going to dry this
drive that well, you can take your tape, you can stick it on this way because we're going to want
to preserve that mine. There. We go.
6. Painting the wall: Sorry, go back to
our sponge again. I like to start with the gray
and I'm just going to put the gray here and they're
all over the back. Doesn't matter which
color you start with. I just usually start with
the darker one. There we go. Little bit here and
there. Now we'll go up into this color here. Some of that on here and there. Just going in-between the gray. Now, as usual, it's mixed up far
too much paint. There we go. And that will dip
into that blue here. And they're kind of aiming
for any of the spots that don't have
any painting them. There we go. Let me shrink it right up along the edges to the Canvas has kind of wrap around
the edges here. So it's not a, not
a sharp corner. If you want to finish off
the edges of your painting, you'll want to make sure all the way to wrap down
the edge of that and make sure you
get along the bottom to be a little bit more
of that blue in here. Lovely colors together. Now I'm going to jump
right into that white, that almost white and put it. Any place that
might have missed. This time. Your entire canvas should
be pretty much paint it. I'll just keep going
around there like that. When it got all
those spots covered. I'm just going to go around, see how I keep
turning my sponge. Little choppy motions. The more you blend this more
all one color it will get. So it's up to you how much
blending you want to do. I like to leave it, so
I've got a little bit of color action
in the back here. If you find, you get to light, just give it a try and put
on another coat of paint. Let me shrink it right down
along the bottom here, so I have a good good sharp
blind for her tabletop. We go That's looking
pretty good. The harshness away. Make sure everything's covered.
That should be covered. Looking good. One right there. I'm going to call that done. I'll give this a blow
dry and it's going to darken up a little
bit as I dry it.
7. Drawing the vase: There we go. Nice soft background. It. Take this tape off. Now, we'll have the edge
of our tabletop as well. Excellent. Now we're going
to make herself a vase. I'll take my paper and I'm
gonna put it right here. I'm going to look at this
line that goes across here. Kind of eyeball it across
because that'll give me Where am I. Vase
will be sitting. You can you can freehand
a circle on if you like. Or you can use circle. Smaller one, whatever you like. It's all going to depend on
how big you want this false. This one here should be
just about right for me to put it on here. Half on, half off the line. Smack in the middle here. Trace around it like that. Then I'm going to
come down here. And I'm making a straight
line as I can cam. A rectangle. Comes through there, comes out the bottom here. Comes on the top there. These are just lines that
are going to make it helpful for us to balance our Voss. I'm going to go down here
onto this line here. And I'm going to bring those
two lines in like that. And that will form the
bottom of her boss. Up here. I'm going to make
a scoop like fat. And this is going to be
the spoke over here. And I'm going to make
a roundish handle that it'll join on right
in there somewhere. I'm just going to sketch
these in any shape you want. They can be tall and skinny
or they can be short and fat. It doesn't matter totally
what you would like. So now I'm just going to go around and find the
outside interests. And my boss was picture these as a those are now Moe
old enamel pictures. Bring it up a little
bit at the corners here. And then here. I'm gonna come down, go up and that'll give
us that like that. A little bit less there. There's our vase shape. Now, I'm gonna take this
and stand it up over here and I can erase
all of the stuff. We don't need. That little bit in here, down a little bit there. Just check it over and see make sure it's even where
you want it to be. I think I might just bring this just
a little bit thicker. And through here. I think that'll work just fine. Now we have to get
this onto this. How are we going to do it? We're going to do it with
a piece of carbon paper. I'm going to center
this like that. I'm going to stick
a piece of tape. Make sure your boss
looks like it's sitting level on the surface. Fair? I think. Good old fashioned carbon paper. This is the side that
actually transfers. So we're just gonna go in here, this under here like
that, and trace it. Now, I'm never anchor my whole picture down on all the corners because
I like to be able to lift it up and check
underneath it. You tape it down, you'll have to untamed that. And then if this moves when you're using
your carbon paper, you'll never get
it back on again. Anyway. There's that. Let's check
and see how it's doing. Yes, it's doing just fine. I'm going to come down here. Would have to move the carbon
paper because it's a short piece down along
the bottom here. That's got it all. There we are. Now we have our
transferred onto Canvas.
8. A little favour: Gonna do ourselves a
little favor here. You see this line here. Just kind of take a take
a bit of paint here. Probably this gray
and white in it. I'm just going to scrub
over it like that. It will disguise that line because we don't want that
showing up through our paint. Doesn't have to be everywhere. Just blending that in,
just scrubbing it over. It's not even a thick coat, but that will
disguise that line. Cover it all up
and hide it so we don't see it afterwards.
There we go. That's all we need
to do for that. I want to flip this up this
way and we're gonna start talking about our thumbprint
on it down there. Amazing What Spit will get off.
9. Background branches: Now we're going to make our ***** willow
branches to make them lighter in the back and the ones in the foreground
are going to be darker. I'm going to take one of
my little brushes here. I'm just using this one here. Little flat one. But I'm not going to
paint with it going this way like that. I'm going to paint
with it going this way with the chisel
edge of my flat brush. What I need to do is I need to have a little bit of slack. I'll put it over here. A little bit of brown in it. Black and brown. And then I'm going to
lighten that up with a little bit of white
because I don't want these branches that are in the background
really, really dark. I don't want them
to be quite subtle. Put a little bit
of water in there. I think I might put a little
bit more brown in there. There we go. So it's a
really warm a kind of a gray and I've put water in it because my paint will flow
off my brush better. Long line that
there's water in it. Now the trick here is to not to put any branches
sticking out of her hand off. Let's be clever about this. I'm going to take
a piece of tape. I'm gonna put it right here. Maybe even in a little bit. None of my branches can
stick out that way. And we don't want
any sticking out, like getting coming
out of here either. So I'm just going to stick
this tape here like this. My branches are all
going to come out. This area here. You can make straight branches, you can make crooked branches. It's totally up to you. What I like to do is
start off here on the edge and I balance my bounce my brush as I go
up and then lift it up. When I get to the very end. Try to keep those
vessels together. That's what's going to give
you a nice sharp line, balancing it to give it
just a little bit of texture it up as
you get to the end, you get a nice thin end on that. You can get super carried away with making these branches. So be careful because
every branch you put in is going to have
placebos on it. I think I'll put
five of them here. I'm gonna move this tape down just a little bit because I do want to get that area. I'm not going to have
this one crossover here. Like that. I just want to get
into that area. Come up here and it
will come up this way. There we go. That's
all I need to do.
10. Background buds: Now we're going to put some ***** willows
on these branches. Take those off. What we're going to do first
off is for going to put in a dark or a darker center. I'm going to use this gray here. I'm going to add a little
bit more blue to it. A little bit more black. It's got a little bit of a
darker darker blue gray there. Just with my Q-tip. I'm going to go in and I'm
going to put, start over here. I'm gonna put a little like a little jelly bean shape out either side of
these branches. I'm kind of painting with the
like the edge of the Q-tip, not the point side of
the Q tip. I guess. That will go a
little bit too blue. That's okay. Mix that in a bit. I'm trying to be
random about this too, is B score on. We've got lots of
these to go on, so don't get too
carried away with them. I don't put them
very often anyway. I don't put them directly
opposite each other. Kind of alternate color we're putting on rent now is the shadow color
of our placebos. So fast to do that one. There we go. Those
are all on now. We'll give it a blow dry. And then we're
gonna come back in, which the morning. Here's that. Well, it's not quite
white, grayish white that we mixed
up in the beginning. I'm gonna put it
right in the center, going to give it a little scrub. What it does is it pushes the paint out of the
center and do pauses. It, deposits it on the outside. And that's what gives you
that little sort of a corona of fuzz around the course Ebola. You want to push
it. So you can't see the harsh line if
the upside of the blue. There we go. These ones are quite faint because
they're in the background. We are now maybe a little
bit on that one to dry this.
11. Background collars: Now we need to attach our little *****
willows to the stem. So I'm gonna flip
this up this way. I'm going to start
at this side so I don't drag my hand through it. Take that grayish color
we used for the back. And this is that
gray from the stem. Just going to pull from a
stem into the possibility. Just this little joining, joining color sort of thing. They have a way to connect
it onto the system. I think this is what
makes it look the most like. Me get this one. These are the faraway,
putting a loss. To try these in a minute. Close-up fun. And there'll be much, much easier to see. Just going to make
them look closer. That's what gifts are
painting dimension. There we go. Let's give that a try.
12. Foreground branches: That should be enough. Now we're just gonna
do the same thing again, but this time, our paint is going
to be a bit darker. I'll take some of this red or brown and mix some
black into it. Just a little bit. Still watch it. Kind of red because the festival of branches are a
little bit red. A little bit of water to it. I'll try that out and see
if we need to darken it up. There we go. It keeps those crystals with
your paintbrush together. Start here. Bounce that Bristol. Remember to be careful
about where you're going to put the stems. I'll stick them in here. Let it cross over the branches between or the branches behind. These can be straight
or it could be crooked. They can be winding. Whatever you like. I'm gonna go this way
with this one because I can this one I think will
come from over here. Just to add some sort
of interest down there because they're never all coming out of exactly the
same spot. Lined up. Take a look and see
do I want I think I want to close branches to
get reprisals together. I think I want like a branch
that comes off this one. Maybe it comes down
here a little bit. Maybe went off here too. Always gets thinner. The further down
the branch they go. Maybe can help on that
comes out down in here. There we go. Why do I think maybe I need one more where you can
get carried away folks. So I probably done way too many. I'll be sitting here painting buds on till
tomorrow morning. Okay. And call it quits. That's it. That's enough. I'm stopping there. Okay, so now what
I'm going to do is blow dry that again
because we've got to put the ***** willows
on trends again.
13. Foreground buds: Now we're going to go back
into blue color we were using. I'm going to have a little
bit more black to it, a little bit more blue and dark and Madoff him a
little bit more. Somewhere in that
vicinity there. And off we go Again. I'm going to make
more ***** willows on our stems just like that. And they'll overlap the
***** willows in behind. Sometimes you'll
paint complete the old for them, and that's fine. Because that's the way it
will go in nature anyway. This is also a good chance if you've got a blob
somewhere that you didn't particularly want
covered up with a post-Ebola. Nobody will ever know
that it was there. Very easy to get carried
away with branches. Probably could've done with half as many as
I've got on there. Okay. Time to dry again. This time we're going to go
back in with straight white. You push that paint right
out edges of those placebo. So they just overlap. Over, overhanging
the background. Flip this around. I think it might be a little
bit easier to get to those. I think I've got them all. Looks like I have them all. The white tends to dull
down a bit as it dries. You might want to
go back on a few, kind of have to give it
another little pop. White. Now I'll blow dry that again.
14. Foreground collars: The same as we did before with the little colors gonna take the same color that
we used for the stem. We're going to put our
little callers on, drag it up from the stamp, from the stem and then
up onto the pushing on. Pushing on gets confusing in here. Just a little bit
of water in there. The paint flow with it easier. Too much water and
not got a blob. One in there. Him. Sphynx, they're
all in there now.
15. Painting the vase: Now we'll go back
to our flat brush. We're going to say the light's coming from this side
of our painting. We want this side in
here to be darker. I'm going to go in and
I'm pretty assist gray. Scoop some of that gray into it. Just going to mix ourselves up. Darkish bluey gray here. It's probably not
quite dark enough yet. We're still going to use all of these colors that
you've got mixed up on that background tray as well. So everything's
going to be really cohesive. Start off here. I'm going to paint down the edge of the false
or the picture. Keeping us nice
and close to that. Linus, I can bring it
down, right down here. Bottom. I'm going to fill
in the spout like that. Basically like that. Switch brushes to whatever makes your hand happy. There we go. So generally that sort of shape is what we're
looking for here. Maybe a little bit up here too. Something like that. Then I'm going to go
into this color here, a lighter color anyway, I'm not even brought
washing my brush. I'm gonna start sort
of tapping this on. As I tap it on, it's going to blend into the color that
you've already got down. Down around the bottom here. The more tap, the more
dented this looks. You could smooth it all out really nicely if you wanted to. Like this dented. Go into here and
get a bit more of that because we want this
to be lightening up. We go towards the other side. The more I tap with my brush. Let's put some put some of
this blue into. Why not? The more I tap with my
brush dented, it looks nice to put a little bit
of the background colors into using this to lighten
up what we can use. Use a bit of this blue. We could use a bit of the gray just to kind of make
everything excessive. Just the idea being
that as we come closer to this side here, it gets lighter and lighter. Oops, there's gonna be
a big dent right there. Acrylic paint is
wonderful stuff. It dries very quickly, which can also make
it a real pain. The only way this is going
to blend is if it's wet. Work fairly quickly
through here. It's going in different
directions with my brush all the time
when I'm working on this. Now to get up to this side where it's going
to be quite light, I'm going to dip
right into the white. Still using that
same dirty brush. Come down this side
of the vase with the white little bit more shadow to the bottom here. There. I'm trying to keep my lines not a stark white. It will mix with the
rest of the colors. But it will be definitely lighter than the other
side of the vase. Or if the picture, I'm going to put a little bit
more light right there. There we go. It gives us a real texture. Then I'm going to dip
into my gray again. Used for the shadow. I'm going to go right
around my handle here. All the way around the
handle on the inside of it. Bring it down in here
a little bit too. I'm going to take
that light again. Light sort of sandy
color we had. And I'm gonna do the
outside of my handle. Then my brush off, then I can just go right down on the where the two meet and
just tap over top of it. And that will blend the dark into the light and
the dark light into the dark gives us dimension
going around our handle. That come over here
a little bit more. That in there. Now we'll come back
into here with a bit more white in
a minute or two. Take a bit of that. Right there. I'm going to bring
it just sort of like a lip on the picture,
calling it a boss. And it's really a
bit, I'm going to kind of let it fade out as it gets the front here is from,
I think girlfriend. Then I'll bring this down. Just on the outside here. Down around. They're going
to run my finger down at that little bit of a blend. So it's not quite a
harsh line there, but you still want it quite
bright along that edge. There we go. Then it can feed down as it comes
down around the bottom there. More white in this area here
to give it a bit of a belly. Hit more of a belly
on that picture. Pretty good. I'll give that another
little touch of white now that's
probably close to being fry little bit in there. Then we want to drop
just a little bit of that shadow color
down under there. I'm going to turn it this way. Pick up that shadow
color mixture. My bristles are stuck
together really well. I'm just going to come
down just under here. Like that barrier.
16. Shadows: Let's take a bit of this. A bit of water in that
gray we've got mixed up. You're going to put
a very light line right down around
the bottom here. Under chug. Gonna cast just the tiniest
little bit of a shadow there. Anchors it down into the, it into the table. We'll just turn this this way. We can trust a little bit of a shadow coming out this way. Anchored that down
into the taper too. We're onto the tape down a little bit. Wash my brush out, dampen that down a little
bit. That's still wet. I can pull it out a little bit more too high with that. There's our cushy well of us.
 Anne Clarkson, Inspiring the reluctant artist