Transcripts
1. Intro to the Carnduff Coo: Hi. Welcome to foxglove Hall studio. Let's have a little chat. I've been an artist since
I was a little girl growing up on a dairy
farm on Vancouver Island, I now teach classes online in-person and through video
tutorials from my studio. Bought strong Paula. Over the years, I've taught thousands of new
artists of all ages. And the unifying thread through
the years has been this. Somewhere between childhood
and being a grown-up. Many seem to lose confidence. If we actually do venture
out of our comfort zone. We expect to be
experts immediately. We've lost the ability to simply enjoy the app without
questioning the process, judging the outcome,
and even worse, comparing ourselves to others. I want you to think
of your inner child. Speak with kindness and
encouragement and that child in turn will reward you with the joy that can be found
in trying something new. No matter if it's
learning an instrument, writing a book, or
painting a picture. My tutorials have
been designed for maximum impact with
minimal challenge. I carefully designed and pair the paintings down
to easy steps. For even the most
inexperienced artists, you'll learn simple
techniques and unusual tricks using
minimal tools and supplies. I take the fear out of
trying something new and guide you to create something
you will be proud of. There's nothing like success
to inspire confidence. Are you ready? Let's get started.
2. Supplies: For this painting,
we're going to be using an 11 by 14 canvas. White, black, yellow, brown, and red acrylic paint. This is just Dollar
Store acrylic paint. You don't need anything fancy. You will also need a
jar of clean water. Nice soft rag to wipe
your brushes off on. Handful of Dollar
Store paint brushes. This is about a quarter inch. This is a half, and this is a nice
little fine liner brush. You'll need a piece
of carbon paper. Piece of printer paper, a pencil, and a
dollar store sponge. These are just the
synthetic sponges from the dollar store. They come in a rainbow pack. And I think there's
six in a pack. I cut mine up into
about six pieces and I use them for
almost everything. You'll also need a pallet
to mix your paint on. I'm just using a
Styrofoam plate. The last thing we'll need
is a plastic gift card.
3. Let's draw a coo: Alright, let's draw our cap. Shoot out of this book.
We're going to go an inch and a half
off the bottom using our bank card or your
husband's air miles card. We're going to go
around it like this. Just like that. We're
using this for scale. We're using this to measure. We know that our cows head
will be the same distance. You won't end up drawing a
freehand and going ahead, top his hand here, just
makes life so much easier. I'm gonna stick this about halfway this way and hanging
off the card up there. Like that around there. Like that. They're
kind of like a cross. We're going to go
up here one more. There's our measurement. And then we're going to flip
it this way, like this. And we're going to go like that. And then we're just going to go generally this
direction here. Then of course it'll
just carry on here. Now we've got we've got
his head mapped out. We've got all
components we need. So the first thing we're
gonna do is go down here and we're gonna make a
little scoop in that area. And then we're going
to scoop up this area. You see, I'm drawing
over and over it. Kind of make it even
don't need to erase, just, just draw
over it like that. Then we're going to
come out here that age, they're going to go back in
up and around like that. Make a little mark
over here like this. And so I've got
some into aim for. We know that this
comes up in here, probably actually goes
farther up that way. Come around. The idea is we want to get this pretty much
mirrored over this side. Something similar to that. Good enough. Maybe that needs to be a bit
deeper, they're pretty good. Now, on this bottom part, I'm just going to come
down in this area here. Could just little chin on. Whereas all Chain Forum. Easy as that. His horn
and his ear up here, I come up into this top square
here about what's that? There's things but
an inch maybe. This is whereas
ears gonna go this direction. Something like that. And then his horn comes
out this direction. Remember horn is going to be, it's going to be thicker at this end than it is at this end. Here's the toughness
head in this area here. Just like that. Then we're going
to take him we're going to take case of tape. We're going to take a piece of our carbon paper,
shiny side down. Take them to our Canvas. Carbon paper underneath it down, then transfer him
onto your Canvas. Don't be tempted to stick tape all over it
because we wanted to be able to lift it up and make sure that is
transferring underneath.
4. Coo snoot: I'm just going to take
this and you can see that this one's
already transferred, but I'll show you
how to do it because my camera pumped out. Just to get some Macau. Now here, I've just taken Macau. I put them on here, tape them down with one
piece of masking tape. Just like that. One piece is all you need
to tilt this slightly. Now you're going to slip
your carbon paper under him. You want the shiny side down. Then just go over
all of your lines. Just like that. Maybe I'll put top of his head in here too
because we've got it. Yeah. Just go over
all your lines. If you just put the tape
at the top like this, you can lift it up
and check underneath. If you tape it all
the way down around, you won't be able to lift
it up and put it back from the same spot on the
tape it here so we can use it for
hinge. There we go. That's it. We need
transfer that over. Then what we're going to do, we're going to get up some
paint, some paint here. And this is just acrylic paint. You can get it for. I think it's I think it's
dollar the dollar store, the little bottles of it. You don't need anything fancy. You don't need to have
high-quality to paint. The important thing is that
you just do something, you just, you just take the bull by the
horns and do something. Put some paint on the canvas. So I've got some black and
some white and some yellow and some brown and sort
of a pinky red there. And the only reason that
I have pinky red is because that's the
bottle that was there. So I just took that. Your brown could be different, your yellow could be different. Black and white are
generally always the same. You read
could be different. It doesn't matter as long as you've got a yellow,
a yellow, brownie, brown, red, you're fine. We need some pinky
color first nodes, we're going to put
two coats on it. Let's take a scoop of our white and one of
the things we want to remember when we're painting, and I'm pretty sure this goes right across the
board for anything else. You don't want to mix
directly into that into your what I call
the mother paddle. Because if you do, then you could end up with like half a gallon of paint
the wrong color. This way, if you take
a little bit off the side and add a
little bit to that, you still have loads of
clean paint left to mix in. There we go. I've
got a pinky color. I want to brown it up a bit up a little
bit of brown in there. That may be a little
bit more brown. Something like
that. Looking good. The color? No, kind of looks like an old pencil
eraser, really, doesn't it? I'm going to go down here and
I'm just going to fill in. And this is just this flat
brush, small flat brush. I'm going to fill in this
little snooty tree here. Now if you're one of my homeschooled kids,
it's watching this. I want you to make sure
your parents do this too, because chances are
your parents are too scared to paint this because
they think they can't do it. Well, they would be wrong. Some reason, when you grow up, you end up thinking,
can't do anything. You end up looking at your stuff and
thinking it's not good, as good as the other person's. Simply not true. We go got a nice pink nose. They're lovely pink nose. Now we're going to want
to coats on his nose. I'm just going to put
that to the side. I'm going to find my blow dryer was handy to have a blow dryer. We're going to give
that a bit of a zap. There we go. That should do it.
If you try to put another coat on while it's wet, it's just going to
take the paint off, so make sure it's
dry and let's put another coat of paint
on there before you actually will take a little
scoop of this off the side, going to add a little bit
more brown to that puddle. Just like that. A bit more maybe. And maybe just a
tad touch of black. Be careful with
that black though. I always say using
black as like patting your own banks bit at a time. There we go. I'll take a cloth and wipe
this off on his cloth here. Got to start in the
center of my nose again. I'm going to fill that up
with that lovely pink color, eraser, pink like that. Then I'm going to
dip in. I'm not even going to wash my brush off. I'm going to dip into my brown and I'm going to go
around the edges. Oops, I'm looking at,
I'm thinking it's going to have to be a
bit darker than that. Little bit more brown and a
little bit of more black. There we go. If you don't have
the right color mixed up, just go in and mix it
up a little bit more, mixed a bit more into it. There we go. So we want to kind of
darker on the site. Can come down to center. See how to do that again, I'm gonna put this
blocked it there, that around that side. Now you see how it's got
this harsh edge here. I'm just going to tap
it off like this. And that's going to help
that's going to help blend it like that or wipe my
brush off In-between. You should have that over
here so you can see it. We don't want any hard lines that I could put a little bit
of that dark down here too. Now remember that acrylic
paint when it dries, it's dry, you can't
reactivate it. The only way to blend
as if this is wet. You've got this little
blob belong here. I'm just going to wait my
finger on it like that. Something like that. I'll put a little bit
more of that dark room, the bottom circle
around the edges, it's going to give us a
bit of dimension in there. Got pink inside. Rico. Now if I'm moving really fast, faster than you are, which are probably sometime this cow, I don't know how many times. Just put this on pause. Still showing up in Chapter. There we go. Now. This is still wet. I want to take with modernity
brush, it's still dirty. I'm going to take a
little bit of white, dip it in the white here. I'm gonna put it down on the either side
here in the middle. And I'm always blending,
blending, blending, blending, constantly blending
that alphabet. They are just these
little sort of tapping flat strokes like that. And then we've got kind of a little bit of
dimension on that. No, so it's not just one
sort of flat flat color. Might put a little bit of,
a little bit down here to where I know
it can't do that. You see how that that little
bit more dimension in there, a little bit more
appear maybe still that white into the wet. Even drives up. Just put some more of the under
color paint on that pink. Or again, sometimes we'll
see if this works this time. I select clause because
it's quite naturally. Just like to put it on
like that and dab it. Get a little bit more of that nobly count rows
texture with that. Oops, my worried about that. No, it's going to
be covered out for pizza site. Not going
to worry about.
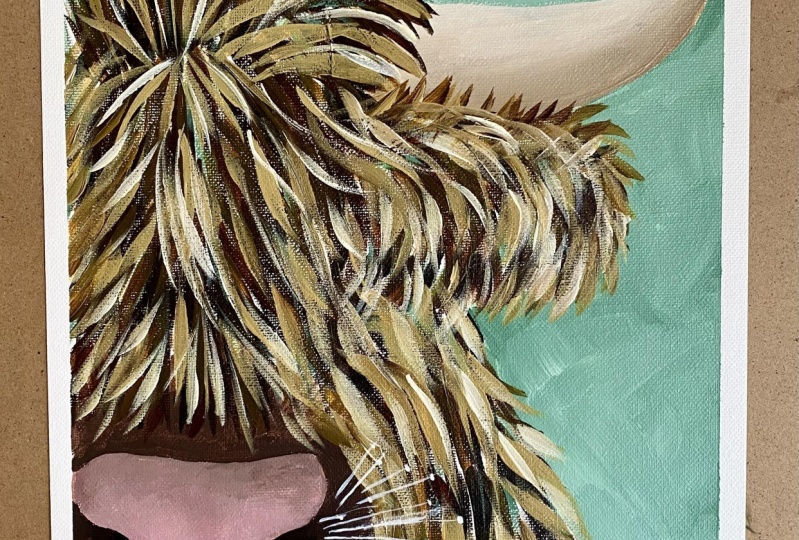
5. Muzzle: All right, so now what
we're going to do, gonna work on this
cow is muzzle, whole nose part here. I think what I
shall do is I will take some more fat around, mixing me a little bit
more black, mix that in. We get even darker version
of that shadow me, color we mixed up before. Like that. I'll put this brush to
the side, temporarily. Pick up smaller hopes
that needs to water. Pick up this pointed brush because I want to get
into these little crevices here of his nose. Heads not in the way. So we'll find out might
have two cows painted. I'm just going to
go, Oops, sorry. I'm just going to go in
here like this and fill in this part here. This brownie dark color. Don't worry about
this outside edge. Come out here. And I'll do the same thing in this little nose
hole right here. That make it fairly even. When you hit the edges
of your canvas here, try to take the paint down over it a little bit because
they're a little bit rounded. And so when you go
to paint the edges, I like to paint the edges
of my canvas because in it, it really finishes
it off nicely. Make sure you come down the
edge just a little bit. Because then the the edge
will be completely painted, not a white street coming down. There we go. There's that. We can come right down in here. This part here. Fill that part in there as well. Just fill it in like
that and we're going to give it another
little blow dry. We go we're going to come right along the
top here as well. Little bit lopsided
methods, chewing his cut. We go Come up here. I could switch brushes,
I probably should. I'll switch to this one. Don't meet those paint brushes, unwashed them
because that acrylic will dry in them, in
the Neo, lose them. Not come up just like in
this sort of area here. Nothing fancy in
a few feather off the ends of it like that. It's easier to blend when
we get to that area. There's no harsh line for it. There we go. Can you see
the cows nose already? Like a cow's knows?
Just like that. Now what I'm going
to do is get back to blow drying. All right guys. We're gonna go right back
into his nose again. And we want this part
here, right in here. We want that quite dark. I'm going to mix in
that dark color again. I'm just mixing a bit
of black into it. Came in there and then
I'm just going to come right in here like this. Then I'll wipe my brush off and dip into
that brown again. And the idea is we want
this to ease its way out. This way. We want to darkest in their common
lighter as it comes out. I can switch my brushes, grab that brown and
bring it out again. That might actually take
a tiny touch of black. Right at that right
at that corner there. Just so that is the darkest part of his nose. There we go. We're gonna do
this side to that. And then dipping back
into that brownie, back into that brownie color. Whoops, got some of
that pink in it. Am I worried? No. My blocking my camera. There we go into
they're not smoking. Pretty darn fine. I'll take just that
tiny little bit of black and stick
it in there too. Then his little chin down here. Let's give him a little bit darker underneath his
lip and that sort of makes his lip shadow
or no shadow his chin, I guess. I'll do that. It's darker along there. Then I'm just going to
dip into what I felt left of this gray look, I'm mixing a little
bit of thinking to it even just because I've run out. It doesn't matter because we're going to be
blending it anyway. There we go. There we go. That is our cows muscle done.
6. Horns: Now what do we need to do? We need to do that horn. Let's get ourselves. I'm just going to use
this paint brush here. I'm gonna take some
white and I'll put it over here because we need kind of a yellowy brownie color. Ivory color, I guess is
what we're looking for. So I just mixed a bit of brown, pretty yellow, bit of white. I'm thinking maybe a bit more white because it's got
quite a bit of horn here. I'm going to stick some grain to it to gray it down a bit or some black to gray
it down a bit. There we go. Then off I go. I'm just going to
fill in that horn. Just like that. We're going to
give this to coats because well, I'll cover better. If you've got if you've
got thick paint, might not need to do two coats of this paint isn't super thick. So I'm going to do
two. There we go. And then of course now that
we've got that filled in like that, didn't like that. We're going to want to
dry it because if we go a little bit of
blob on the edge, if we go to put more
paint on top of this. The second coat, you'll just
take it back off again. Good enough. Looking at this now and it's
dried a bit darker. I think what I'm gonna do
is lighten it up a bit. I'll put a little more
white in that puddle. I'm nothing. I'm put a little
bit yellow in there to be careful when you do this, because strangely enough, black and yellow
will make green. We don't want a green horn. This is looking a little
on the greenish side. How am I going to combat that? We're going to add the brown to it because the
brown is quite red. And red is the
opposite of green. That'll make it dollar. I think that'll probably do
back in again with our hoard. Look at that, I can see
it's still a bit green. So we can add a
little bit more red to blue or brown to it. There we go. That should do is I'm
gonna go down around here. Like this. I'm just kind of ignoring
the ear overlap. Like that. I'm going to wipe my brush off. Just wipe it off like
I'm tapping and off each side I'm going to pick
up some of that white. I'm going to go away in
here along here. Now. The same sort of idea that
we did with the nose, which is going to kind
of tap, tap, tap it. We don't have harsh line. Wipe that off again, back
into my white again. I'm right against there. And it's going to
get lighter and lighter as we go
towards the top, which is going to give us
a really nice dimension. We go because the lights at the top and it gets
shaded at the bottom. So I'm just going
to tap over it. And if you use little
strokes like this, you'll get some
texture in there which looks quite like a horn. Well, but more white in there. Maybe. There we go. Just the idea being
you want a lighter at the top and the bottom. Nice, gradual, nice
gradual little change. Whoops, that's a bit harsh. Am I kidding? A lot harsher. Okay, there we go. That's good. It's still dark
along the bottom. What I want I'll go into
here a little bit lighter. I'm just tapping. Give us
quite a nice texture there. I think that'll probably
do just about right. I'm gonna wipe my brush
off and wash it off. Like a good girl. There we go. And then I'm going to
blow dry that again.
7. Hair do: Can you use this flat
brush to put it on? And we're just going to dip
right into our black here. Maybe I'll take a scoop of that brown out and put
that over here. I'm going to mix our
black into a bit of black and brown, quite dark. Just like that, something
in that sort of dark area. Basically we're really
just painting shadow here. We've got to remember that the cows hair grows in
a certain direction. You don't want to go sideways. You want to think about
this cow growing hair. We know that the top of his hair is hair will come
out from the top of his head, like that, sort of funky. Now, horn might be
too far in this way, which is fine because
we can drag our hair out until it makes sense. There are some dragging
that outwards. This is really just some shadow. Then we know that
his ear hair will come down this direction. And we can adjust this part here and this part here
to make it make sense. We'll do that as we go. And then we're going to just
come down his head here. We're just going to
come down like that. There we go. Now we've got a map here of where our
cows hair is going. You notice ear will all
come down in this way. This is like the
outside of our cow. Now, this part here we're
gonna say right here, is it sort of moral on
the top of his head, whereas hair comes
from molecule, look how lucky sort of thing. We know now that his hair
will come down this way. Wraps around his face
a bit here. Like that. Comes down here like that. So now we've got our map. Now, when I'm painting this, I'm not painting it with a
flat of the brush like that. I'm painting it with a brush
pointed the other direction. So you get this nice long
pointed effect with the brush. Down here. I want to be
careful around here. Just so that it's
all going down. I'm going to try to be
careful on his chin here. All right, now we've got something that looks a bit
like a highland cow. Don't we? Looking pretty good. I'm just going to build up
a little bit more here. Around here. I'm
going to pull it down over his muzzle
down in this area. See how what's coming straight
down the middle here. Then it kind of curves around
that general direction. They're not little strokes are
quite long strokes see how far up my paint brush, I'm
holding my paintbrush. Thinking that needs to be brought out a little
bit more this way. That's better. I think. I think that's what I'm gonna do now is choose
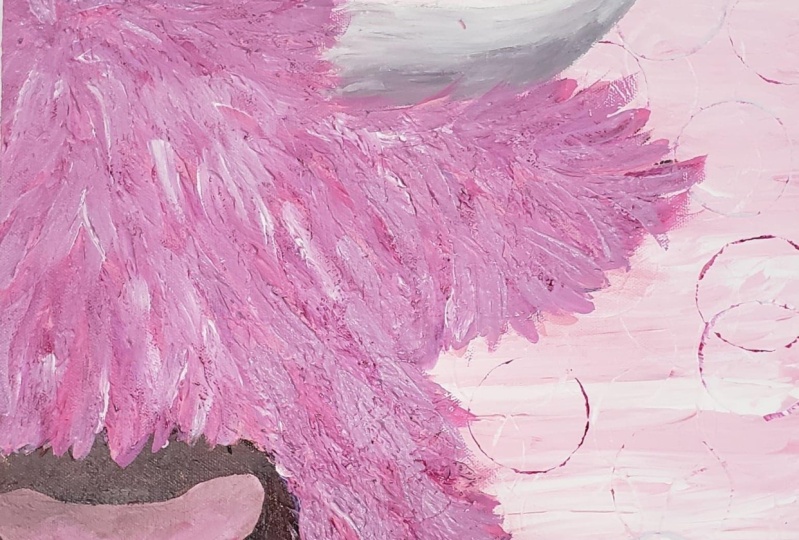
what background I want. I think the background
color I'm going to use is going to be green. You guys can make
whatever color you like.
8. Background : I'm going to use this green. Sometimes I make them gray, I've made them think before. Sometimes they're purple. All depends where you want
to put your painting. Maybe you're doing
it for certain room. Want to make it match
the colors in there. Totally up to you. Washing my brush out over here. Drip it on my paint brushes
ago or my paintings. Now what I'm going to do is
I'm gonna take a scoop of this green and a
scoop of this white. And I'm going to
mix them together because I think that
would be quite a nice, quite a nice background color. So I'm just going to be like
really loosely coming in. I'm not going to bring it
up into the cow like that. Like that. Every once in awhile into
some white material, come right down over
the edges here. And I'm doing sort of
a slip slapped stroke, side-to-side crisscross. Making kind of like a
mottled background color. You can make the
solid if you want, totally up to you,
this is your painting. Feel free to adapt it. Anyway you want. These are all going to look
different and you know what? They're supposed
to look different. They're all original paintings. If you wanted to look
this to look exactly the same as everybody else's, then you could use
a paint by number. I suppose. That's no fun, is it ourselves? Here? I'm going to dip it
into a bit more green. I'm going to be careful when I come down around the edge of this horn though. Light. A little bit lumpy there. There we go there and slip
slop in it on down under here. We're getting into
a 0 a little bit. Got a little bit of
a guide left Still. Here we go. Put some white in it too, so it's not one flat color. Just to make it interesting. There we go. Maybe I'll put a
little bit more white around his body here too. There we go. I'm going to flip them
upside down because it's easier to reach
this end of my cow, flip them upside down me, they'll pull up a
white in there too. Now, just going to dip into
some white and I'm going to carefully go along the top of this fat little bit farther. Thinking I might shorten
his worn off a little bit, I think I might like
it and shorter. Drag that in. I tend to
kind of make it go a little bit lighter as we go up
towards the top of painting. But it's up to you. This could be a completely solid background
if you wanted it. We go Almost done that part. Take a look, dab it
off here and there. I like it when the brushstrokes go in different directions. A little bit more.
Life, I think. I'm going to drag this down into his little hair a little bit. That's quite fun. Run another wait, am
I going to make it? Want to make it this? I am. Just want to take a look at his
horn there because I'm thinking I might want
it shorter than it is. I think I might
think I'm just going to shorten it off here. Like that. I don't want it completely and perfectly
pointed on the tip though. So I'm going to round
it off a little bit. Like this is all
totally up to you. How long you want that
according to go, your cow. Blend that a little bit. Just the idea being you
don't want any harsh lines. This also when it's dry, tries a slightly different
different color, maybe a bit darker. There we go. I think that's
fine. Just like that. Now we're gonna do
something really radical and we're
gonna go in here into our green
that we've been or whatever color we used
on the background. And we're just going to put
some in coat like this. I'm using that same
stroke. Like that. Bring it down. Follow that the the direction
that you're not hair. Just like that. Don't worry about covering
up all the white. You don't need to worry
about that at all. Because we're gonna come back in a few different colors here. Getting a little bit lighter
and maybe a bit redder. Just kind of pulls the
whole painting together when you've got a little bit of that background color in there. Some of this down
onto his nose here. Little bit down along
the bottom here. Right in there with that green. That's personal
phone on my brush. There we go.
9. Hairy chinny chin chin: Alright, there we go. Now we've only got a couple
of things left to do on him. One of the things just so you
need somebody to whiskers, just some little tiny whiskers. We're going to use
little sharp brush over here with a
different palette there. But all of their weight
on their going to add some water to that little bit of white and then the
water quite inky. Now the reason we're
going to add water to it is because this is what is going to make these lines easier
to make, make thin. Now I'm going to show
them sideways like this. And I'm going to aim
right in this area here. You can see that this area here, not down into here, sort of out into this area here. We don't want to
stick straight out. We don't want super long
whiskers that looked like a cat. I'm just going to go
here and I'm resting my hand on my canvas. I'm only touching the very, very tip of my brush. I'm not using the
edge like this. Using the tip like this. Try not to let that tip bend. So brace your hand because that's the only way
you're going to do it. A couple of little thin lines. I'm going to put them. They're not coming up
from the same hole. Them out a little
bit, they can cross. Just a little bit. Just like that. Carefully. Don't get too long. These might be getting
a little long. I'll put some short
ones in disguise them. Few little whiskers on
your cow like that. We're gonna do the same thing on his chin because they do have a few little whiskers
on their chins. I know this because I was
brought up on a farm. They have this little, little whiskers
coming another chin. And I'm anchoring my hand again. These ones can be these
ones can be shorter. We go resting my hand, not pressing very hard at all. Sometimes a good practices. Holding your little brush
on a piece of paper. I've got kind of a loose row. I'm just going to
put some on this. Not bouncing all over here. Going from the bottom up, building it from the bottom-up. And these are not very long. Not quite into the dark part. I'm just going to
run the finger long. They're kind of blend that out. Now he's got some little,
little chin whiskers. And then we're gonna
take a little dot of paint on the end of my brush. And important to put a
few of these in here. So it looks like he's got some some steamy
breath coming note. Scotland is cold August. Everybody's wearing
puffy jackets. We know there can be some steam going out
there. That's for sure. I'm going to put a few of
those on his chin as well, just on the hairs on his chin. Painting has done so much
with them with a big brush. We really don't have
the opportunity to do any sort of fine detail work. It's nice to put this
little additional sin with the little tiny brush. Our cow is done. Except for one last thing.
10. Cleaning up: I like to do this. Take the finger, like to
put it around my finger. Like this. I'm going to dip my cloth into
the black like that. Then this strange way
makes the most difference. I don't know why. But it just cleans
everything up. It's almost like
you've framed it. I'm just running my cloth
down the edge like that. Loading it up with
paint as I need to put a good Two Coats, maybe three coats on here. But if you just run it down, like get a nice straight edge, a little bit more paint when we need it. Last little bit. More than likely do
two coats on there. We go. There we have almost this
needs now a signature. I shall put on my brush.
11. Wrapping it all up: You make sure you
sign your paintings. Nice to it's nice. It's nice to put the date and
stuff on the back as well. That's a rather bold signature. That's fine. Good enough. Absolutely adorable. I hope you enjoyed
painting that. I did. I don't know how many
of these I painted now. But remember there's not a
whole bunch of tools you need. There's not a whole bunch
of materials you need. Important thing is to ignore the housework and get
some paint on the canvas. See you next time.
 Anne Clarkson, Inspiring the reluctant artist