Transcripts
1. Introduction and Supplies You Will Need: Hi friends, how are you? I hope you're having
a great day today. I'd like to introduce
you to this project. This is a drawing and
watercolor painting project that I designed
especially for kids. Students do not need to have
any drawing or painting experience at all to be
successful with this project. I will guide students
step by step through all the steps
that they need to take. They will feel
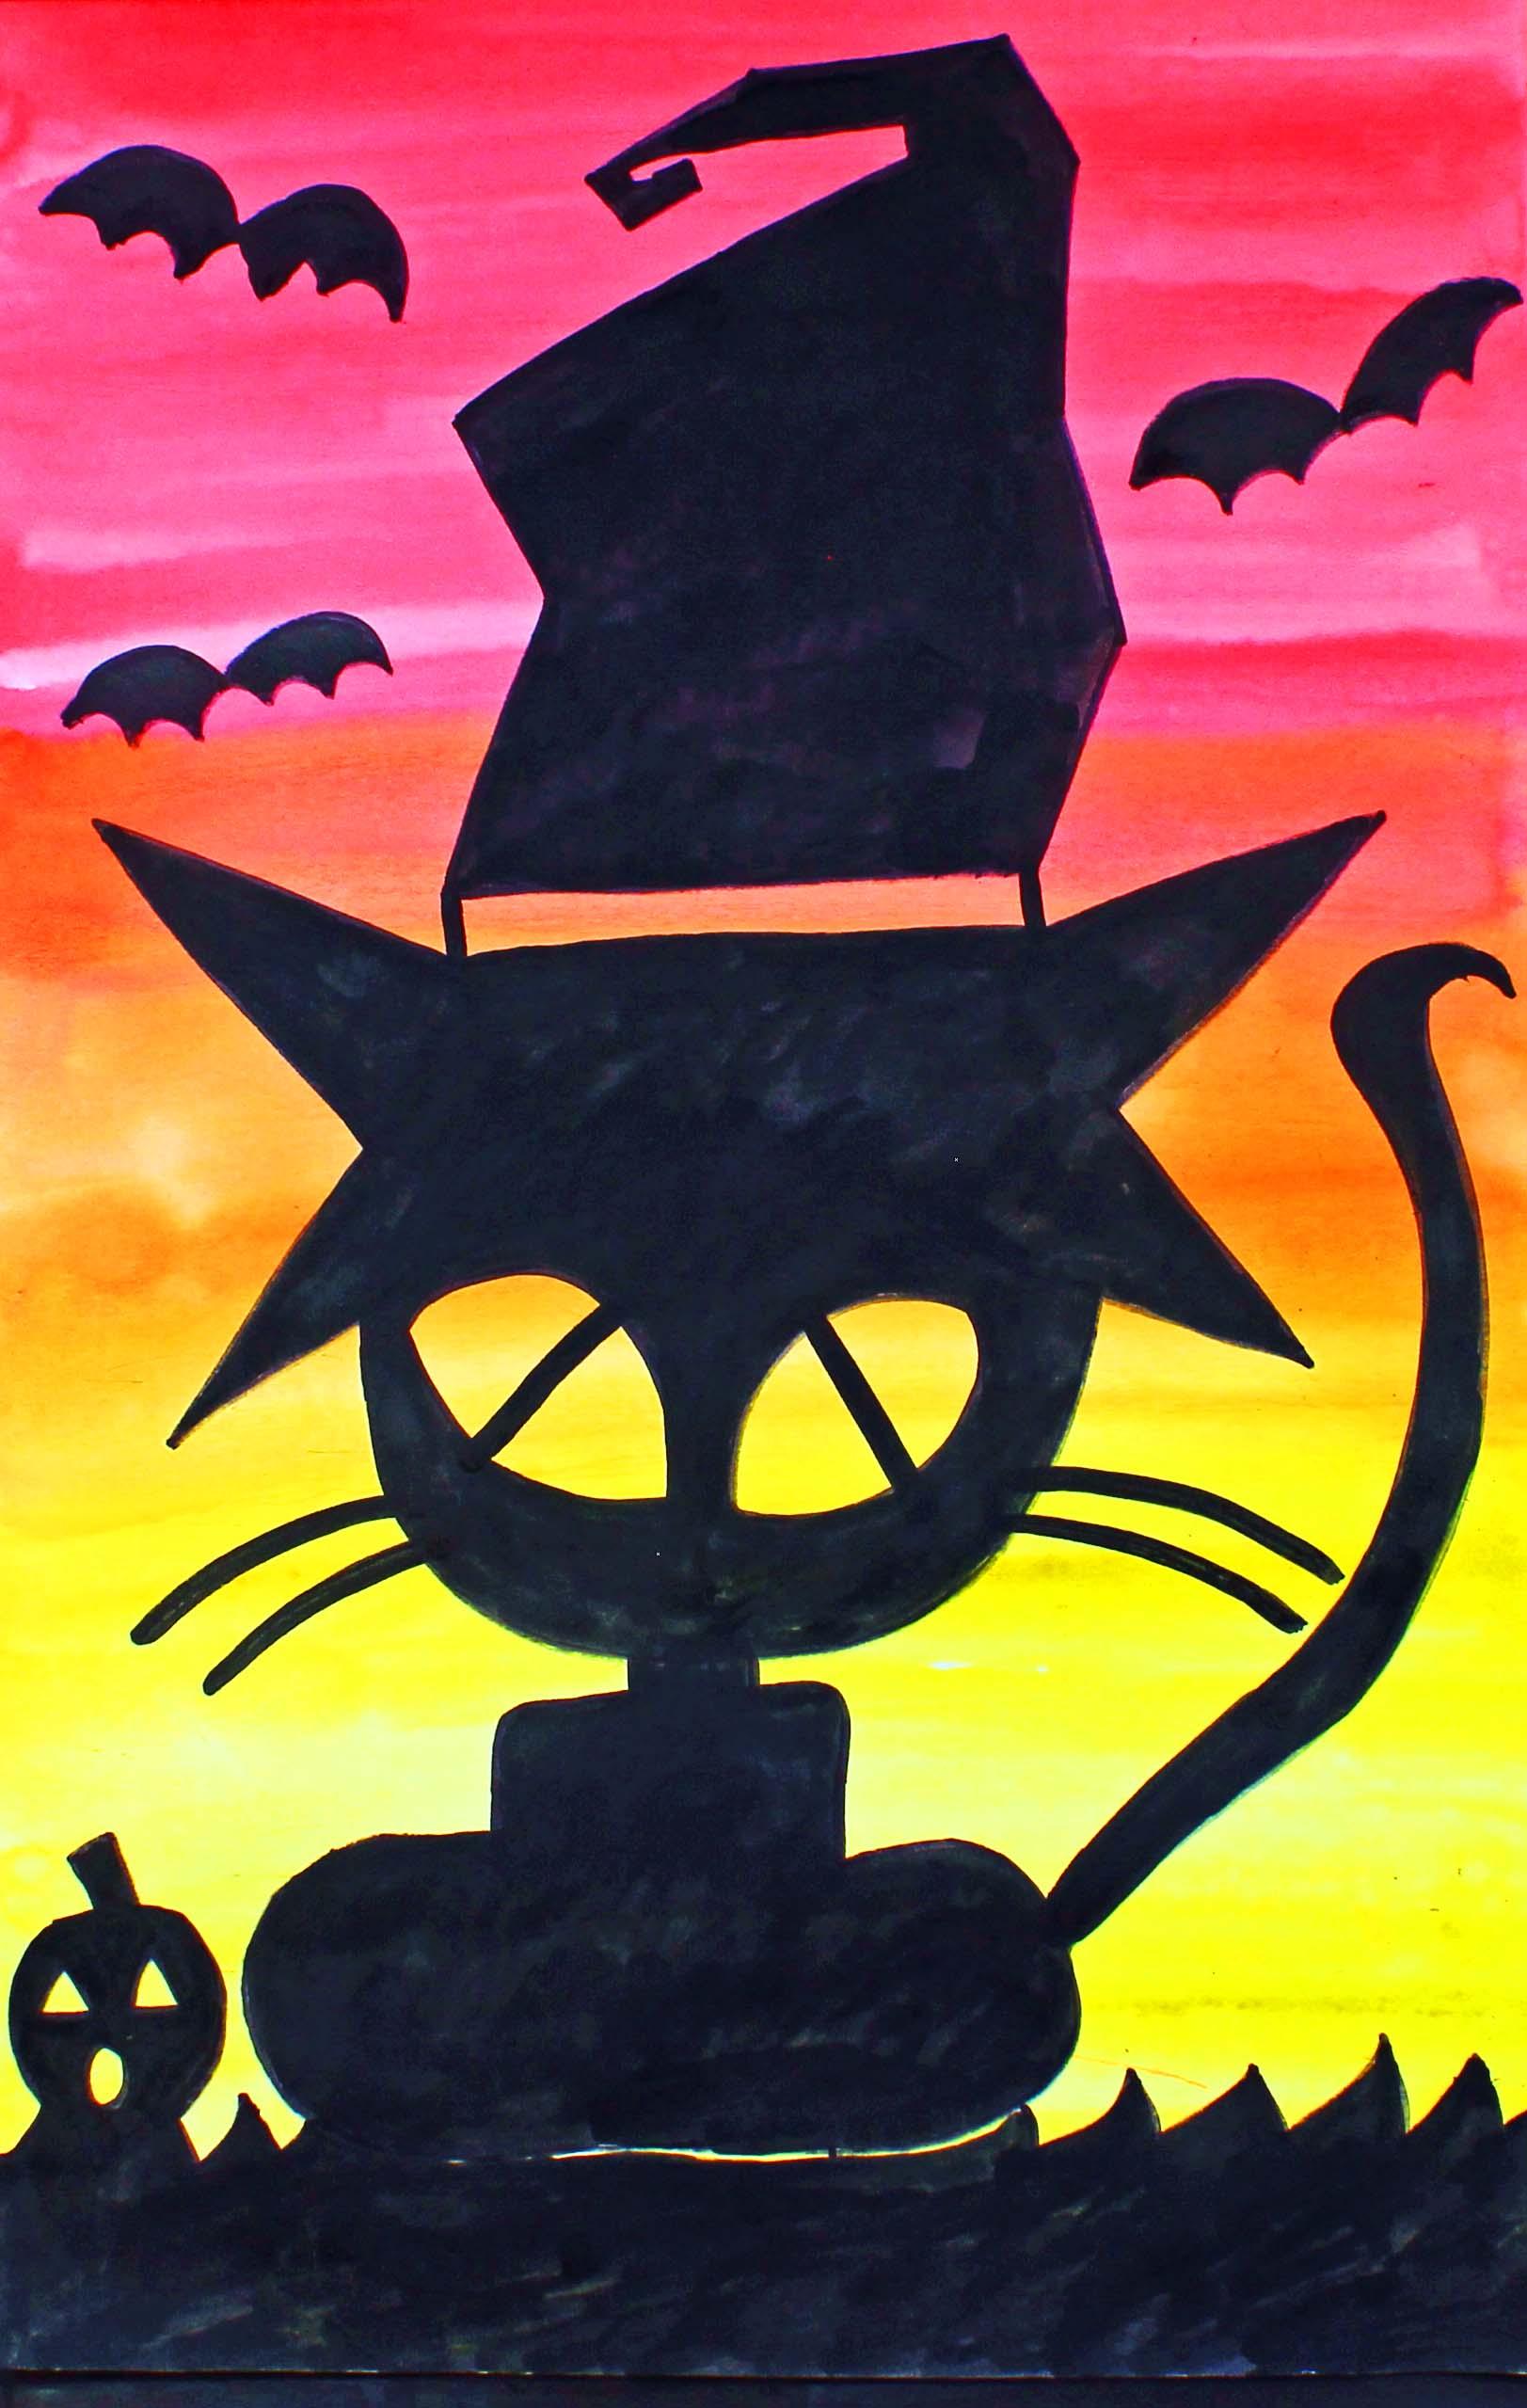
comfortable at all times. Today we are going to be
creating this cat silhouette. And this cat is going to
be wearing a crazy hat. Let's talk about
the supplies and the materials that you will
need for this project. The first thing
that you'll need is a sheet of watercolor paper. You will need a set
of watercolor paints. You will need some
paint brushes. I'm going to be
using these sizes, but just use what you
have available to you. You will also need a cup or
a bowl with clean water. Permanent marker.
Permanent means that the ink in the marker will not run around on your piece of paper If
you add water to it, the last thing that you'll
need is a little paper towel. Go ahead and gather all of
those supplies and materials, and I'll see you back
here in the next video.
2. Step 1: Paint the Background: In this step, we
are going to add some watercolor paints
to our piece of paper. Let's get started. The first thing that
we're going to do is we're going to add a drop or two water into each of our
pans of watercolor paint. What this will do is it will soften up our
paints a little bit. It is much easier for us to use. I do encourage my
students to take that step because it does
make it a lot easier to use. All right, now that our
paints are softening up, let's turn our attention
to our piece of paper. Here we have a piece of
paper and we are going to add some red paint up here
at the top, in the middle. We're going to add
some orange paint down here at the bottom. We're going to add
some yellow paint. When we add our paint, we're going to make
sure that we have quite a bit of paint on our paint brush and a
little bit of water. And we're going to
remember that if we run out of paint or water, we are just going
to get some more. Okay. Just don't be afraid to load up that paint
brush with a lot of paint. We're going to start at the top. We're going to go in a back and forth motion like this
on our piece of paper. We're not going to
go around and up and down and swirlies
for this project. We're just going to go back and forth and we're going
to start at the top. When we get to our next color, we are going to blend it
into the first color. In other words, when
we get to our orange, we're going to blend
that into the red. When we get to our yellow, we're going to blend
that into the orange. I'm going to show
you what I mean. All right, let's get some
water on our paint brush then let's load our paint
brush with a bit of red paint. Yes, that's what I like to see. Now as you can see
as I'm painting, my paint is going to run
out on my paint brush. I go ahead and I
just add more paint. I'm going to go to
about right here. If you don't go exactly
this same distance that I go, that's okay. Just going to go down about a third of the way
down your piece of paper. Going slowly, carefully, I do my best work and I'm
going back and four. All right. So now I have my red paint on my
piece of paper. Now I'm going to apply
my orange paint here. And like I said before, I'm going to blend
it in with this red. So I'm going to start here on
my red here at the bottom. And I'm going to go
over my red with my orange. See how I did that? Because I want those two colors to blend in with each other. Al, right now I have
my red and my orange. And I'm going to add my yellow. And I'm going to bring
my yellow all the way to the bottom of
my piece of paper. And I'm going to remember
that I'm going to start here inside the orange paint, because I want these two
colors to blend as well. I'm going to start
here in the orange, then I'm just going to
move right on down, already. Friends. So I'm
finished adding my paint, my red, my orange and my yellow paint onto
my piece of paper. What we're going to
want to do now is allow this paint to dry completely before we start our next step, that's
really important. In the next step, we're going
to draw our design onto our dried background and we want to make sure
it's completely dry. I will see you back
here in the next video, after our paintings
are completely dry.
3. Step 2: Draw the Design: In this step, we are going
to draw our cat design. Let's get started. You want to make sure that your background piece of
paper that you painted on is completely dry before you start this step. All right. What we're going to do
first is we're going to find the middle of our piece of the middle of my piece of paper is approximately
right here. What I'm going to do
is I'm going to go up a little bit from the middle. About right here. I'm going to make a straight line
with my marker. This line will be a nice
guideline for the upper part of my hat and the lower part of
my hat and the actual cat. Okay, so that's why we're starting out with
this straight line. All right, now up
here at the top, we're going to start by making
the top part of our hat. You can make any
shape for your hat. I'm going to make a shape
that looks like this. It's going to be a little
bit crazy. Slanted line. Slanted line, then I'm going
to slant the line back. Then I'm going to
go, maybe this way. Then I'm going to come over like this with another
straight line. Then I'm going to come up, then I'm going to make some
lines that are straight, but are going to
go into a spiral. Then I'm going to
close up that shape. I'm going to come straight here, up a little over like this. It's a crazy shape for a hat. All right, now what we're
going to do is we're going to make the
bottom part of our hat. I'm going to make another line, straight line coming down on either side of
that initial line. And then close that up, that turns into a rectangle. Now I'm going to make
a sideways letter, V, that's pretty big. Another sideways letter,
that's pretty big. Then two more Vs coming down. And then what I'm going to do is I'm going to connect these two V's with another
line going this way, and this way it comes up to a point right
here in the middle. This is going to be our
crazy cat hat, okay? All right, The next thing
that I'm going to do is I'm going to make a curved
line right here. And this is going to be
my cat's head and face. I'm going to make a
curve line coming down and then going back up and then touching the hat right there inside of the cat's face, I'm going to make two big eyes. Now when I say big, they're going to be giant an
eye here and an eye here. Then I'm going to
make some lines for the pupils inside those
eyes and double those up. Now remember we're not
going to be able to see the details because this is
going to be a silhouette. Then I'm going to want
to make some whiskers. Just going to make two
whiskers coming out from the side of that face. Then what I'm going to do is I'm going to make a small neck, very small neck, two
lines coming down. Then I'm going to
make some shoulders. The body on this cat might
be smaller than the head. And that's okay, because this
is a cartoon cat, right? Bring these lines down
a little bit farther. So these are the
shoulders of the cat. Remember this is silhouette. So we're not going to be
able to see the details now. We're going to make the knees. These are the knees. And then we're going to close
up at the bottom. Now that we have the hat, and the face, and head, and the body of our
cat, let's make a tail. You can make your tail on the left side or the
right side of your cat. I'm going to go onto
the right side. I think I'll make a tail here. I want it to be a little bit pointy and then come back
in. There's my tail. There we go, there's my cat. Now I'm going to add a
little bit of detail. I'm going to add some grass
down here at the bottom. Just some zigzag lines
going across like this. Remember we're not going to
put any detail down here at the very bottom because
all of this is going to be filled in
with black paint. You can put something else here. You can maybe I'll put a
little Jack 0 ' lantern here. Jack 0 ' lantern,
that looks like this. I have two curve lines
close up at the top. And then I'll make
a small space here, just a mouth, because I don't have that much space
on my jack of lantern. I really like to make bats when I'm making Halloween
drawings or paintings. So I'm going to make
two curve lines, and then I'm going to close those up with more curve lines. It's my favorite
way to make a bat. We'll make another
bat here, then. One more bat here. Do you see how I connect this line that's curved
to the center here? If there's anything else that you'd like to add
to your drawing, go ahead and do it right now. Remember, we are going
to be filling in a lot of these ******
with the black paint. We're not going to be adding
a lot of detail. Sound Good. All right, in the next step what we're going to
do is we are going to apply some black
paint to our design. Go ahead and make sure that
you put your cap back on your marker all the way
so it doesn't dry out. And I will see you back
here in the next video.
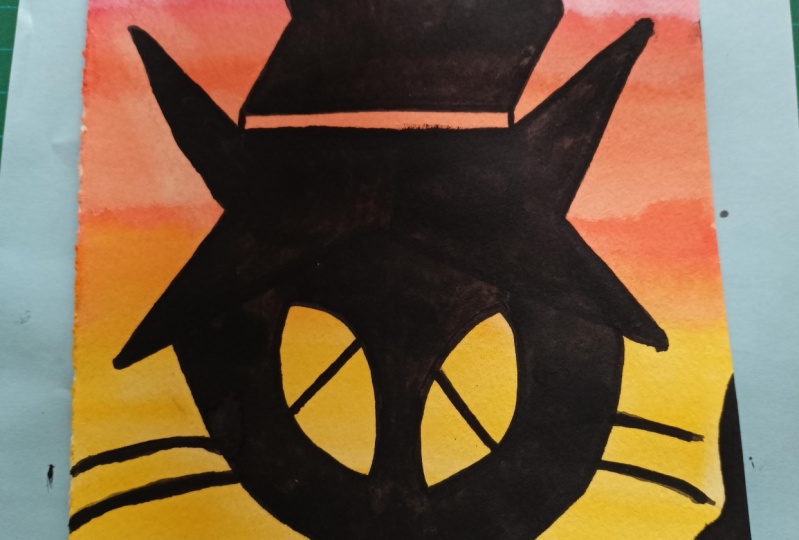
4. Step 3: Paint the Design: In this step, we
are going to add some black paint to our cat, silhouette design. Let's get started. The first thing that we're
going to do is we are going to add a drop or two of water into
just our black paint. Because we're only going to be using our black paint today. While this paint
is softening up. Let's turn our attention
to our design, because this is a silhouette. We are going to be painting most of this design
with black paint. There are going to
be a few areas where we're not going to
apply the black paint, and I'm going to talk to
you about that right now. Do you see this
stripe right here? We're not going to apply black paint to this
stripe on the hat. We're not going to
apply black paint to the eyes or the pumpkins eyes, nose and mouth. All right. All the other areas that are
inside the bat, the hat, the cat's head and
body, and the grass, all of those areas are going to have this black
paint applied to it. Okay? So you can use your larger paint brush or
your smaller paint brush. It's completely up to you
for this type of a design. I usually like to use
my smaller paint brush, but I like to have my larger
paint brush available. Just use what you
have available to you and it will work out
just fine. All right. I think that my black
paint is ready to go, so I'm going to use
my smaller paintbrush to get into the smaller areas. I'm going to make
sure that I have quite a bit of paint
on my paint brush. Load my paint brush up
with this black paint. I want it to be nice and dark, and black because when we're
creating a silhouette, it's nice to have that
dark look, all right. What I'm going to
do is I'm going to try to stay in these lines. But if I go outside of the lines a
little bit, that's okay. I'm not going to worry
about it too much. I'll just do my best. All right. What I'm going to
do is I'm going to speed up this video
and you get to watch me apply this black
paint to my design. Right, friends, I'm finished
painting my cat silhouette. And I'm really happy with
the way that it turned out. I wanted to mention one thing. As I was painting down
here at the bottom, I did leave a little bit
of yellow showing through, so you can see a little bit of separation between the
cat and the grass. But you certainly don't have to do that if
you don't want to, I hope that you had a lot
of fun with this project. I will see you next time.
 Em Winn, Teacher, Art Instructor, Artist