Transcripts
1. Welcome!: Hi friends, and welcome
back to my studio. Today I prepared a
very special class. We are going to
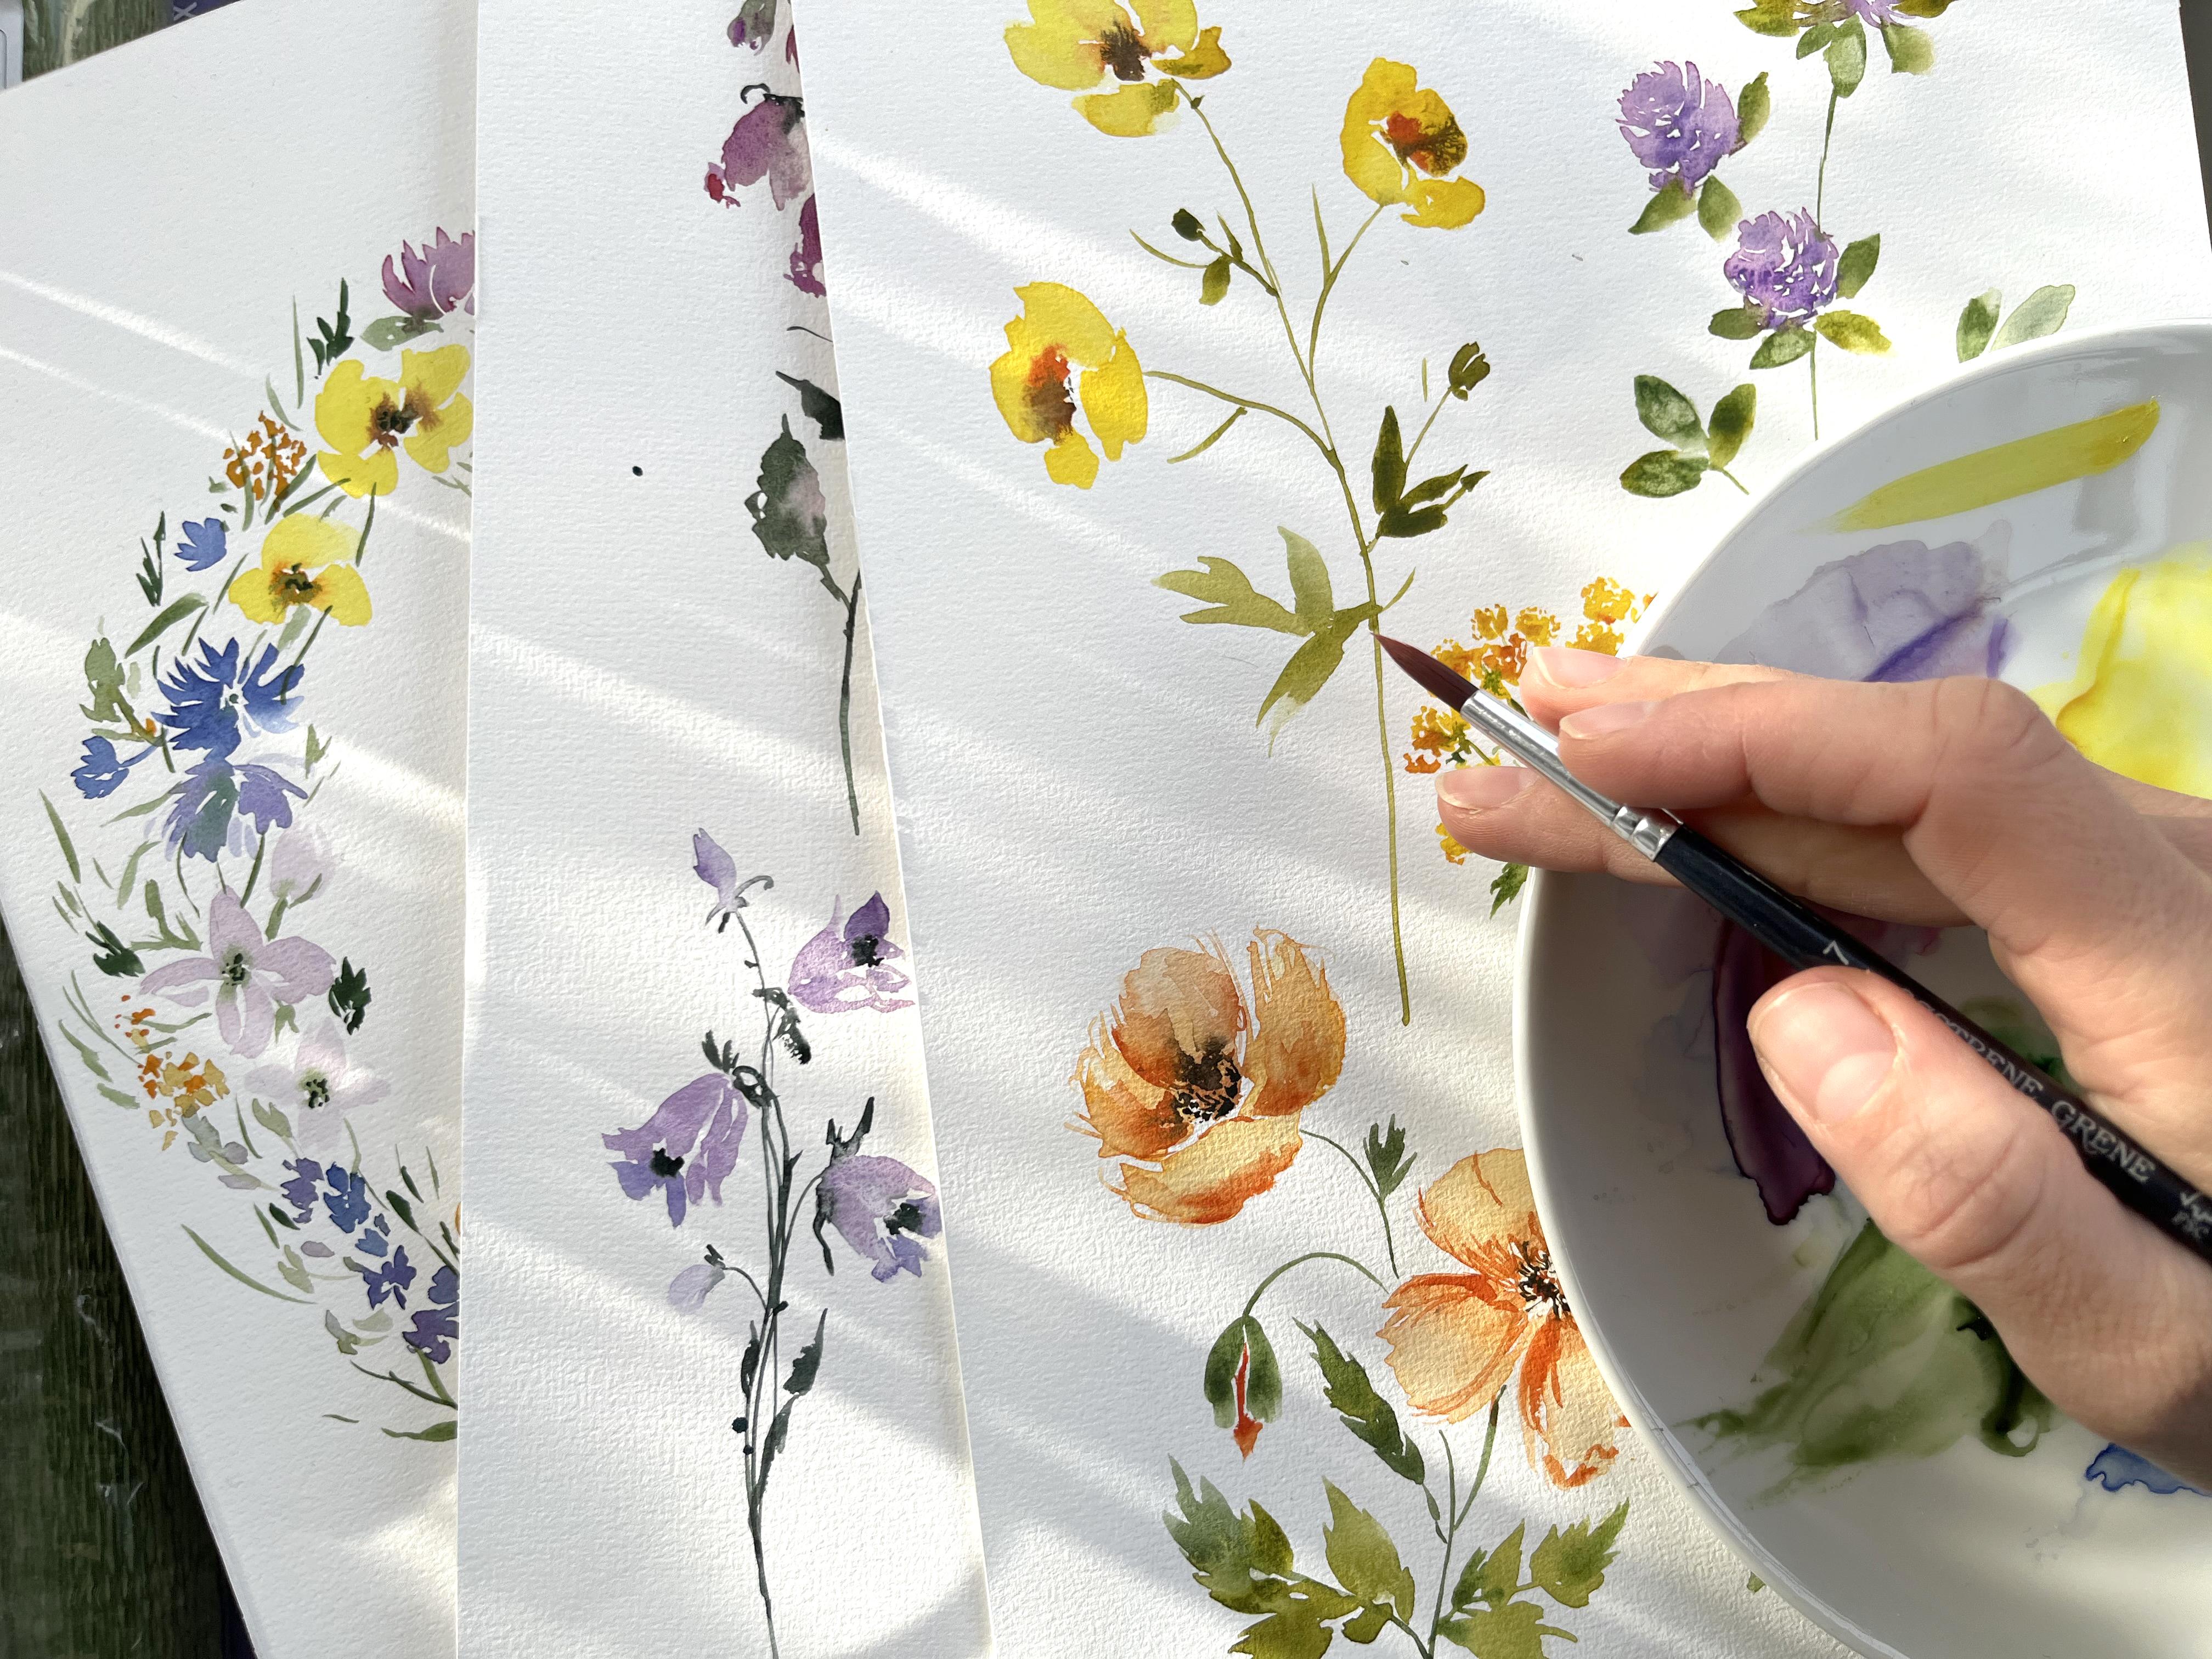
paint wildflowers. I know that this is a very popular topic for
artists because of diversity of wild flowers and their
shapes and their colors and the beauty of our class
will be that we are going to paint these flowers, just simple, simple
brush strokes. So if it is your first
time when you open your watercolor books and took a vertical brush,
you will manage. And if you're
experienced artist, I'm invite you to
give it a try and try this loose technique because
it's very mindful painted, It's very relaxing painting
and I hope you will like it. And as a result of the class, we are going to arrange
flowers in a beautiful reef, which you could use
for greeting cards, for Easter cards, for
some wedding invitations. So many things you could do. You could paint
with wild flowers. So let's start.
2. Foxglove: I will start painting
with foxglove. And what I'm doing is
painting the stem. Now, I combine
quinacridone rose, and I just mix a little bit, take a little bit of color
from the green part. I want to add maybe
a hint of wireless. So I just prepare palette. So I could combine colors
that you are in the process. At the top. Flowers actually has
small green clusters which have paint just with
the tip of the brush. I have prepared already my
another brush, find one. And I add some tips with the second brush
with violet color. While it is still,
while still wet, and colors code flow
into each other, intersect with each other. And foxglove. The more it goes from
the top towards, the more we could see actually this small little bells and water I'm
painting right now. With just small moves off
the tip of the brush. I make the head, the head of the flower. With violet. I paint the actual, I press on the
belly of the brush. The more we go to the bottom, the more the bigger gets
all these little bells. Just with the tip of the brush. Our aim is to catch the shape
of these bell, correct? Here it will be just to to
to separate them a bit. I clean my brush. And just with a clean brush, I remove a little bit
of color from here. To add some volume. I want to add more. You see, I just use the
colors from my palette. I think you could find everything you
need on your palette known to be precise
with the colors. Our goals. Just to catch the
shape, the color. Make it a one more
bell would be nice. Sometimes I paint
with the tip of the brush to show
some directions. Foxglove has such a
lovely bottom shape. Again with the tip of
the brush with very, very delicate moves. I paint these. And I want to add
something and warm, reddish just for variety. And now coming back
to the green week, bought some greenery around. And I painting the
leaves, I just paint. I start with the
tip of the brush. I press on the
belly of the brush. We go the brush route. That's how I get I
get this leaves. And maybe one. Again tip of the brush, some wiggle, wiggle, wiggle. And it's always nice to have some intersection
of four leaves. So again, with the
tip of a brush, some wiggle, wiggle, wiggle. A little bit of photo, even with a little bit of wire. Let it go. We go and connect to the Stam. Our folks loafers ready?
3. Cornflower: Our next flower
will be corn flour. And again, I will
make a cluster. So I start from the
top where the bots are very small and delicate
and go a little bit dull. And at the same time
with the second brush, I'll add some blue shades. And corn flour has
very specific battles. I paint them just with the
tip of the brush and I use ultramarine blue because I
think that's the best match. With a second brush, I immediately connect
these blue BOD with the main stem
at some greenery, wrong with, just with
the tip of the brush. Now, I want to paint
the bigger flower. I paint the middle with a tip of the brush and then with the belly
of the brush, I paint the flower petals. It's a little bit tricky
because they are very delicate and has a very
recognizable shape. We will try our best to
emphasize the middle. So I just go again with,
with a green color. Here. I would like to
start immediately the second flower,
the second OpenFlow. And I add a little bit of
wireless to add some variety. In the chest, a little bit
difference in the shape. But first of all, it divides one flower from the author at some variety. And again, greenery needle. In actual flowers. It's maybe not that
green, more yellowish, but we Painting artistic manner and we need a little
bit of contrast. Here. I want to connect
everything to one stem, stem with the tip of the brush. And I want to add
some deep here. I start with with a tip of the brush and weaken the brush. Vary randomly and connect. Always nice to add some color from the
flowers, violet, e.g. to unite all these details, we need a green really
here, a longer stem. And never find a flaw or
flower stem like this, like a straight line. If, even if you look at the
reference and it is straight, it looks a little bit childish. Always try to add some curvy
glory parts on each leaf. Would be nice to add. Some half open bots. I just mix a little bit of purple color and
ultramarine blue. I'm thinking of
adding 1 bar here. Just a bit of
greenery around here, not to talk a little bit
to fill in this space. And this is each.
4. Cuckoo FLowers: Bonds should be funny,
it called cuckoo flower. We have a lot of these cuckoo
flowers here in Norway. Right now. They're very tiny, lonely. So I use very diluted purple, purple color of
this Coco flowers. They have four petals. So keep this in mind
just for petals around. And while it is still wet. I add greenery to the stem
and some closed boards here. And I don't paint the
middle of this BOD and connect everything
into, into one stem. And do not forget to
make it curvy, oval. In the real life, it might be very straight. But it's important. It's pleasant for RI, when I, for some curve, straight line. When you paint flowers in
these loose technique on, on 142, you could think, Oh, it's very simple. No need to bother about details. And that's true. Although it's
important to preserve the flower and try to show them most specific
elements, e.g. the amount of petals, shape of greenery, e.g. the scope of flower, it has these small branches with a
lot of leaves in college. And it's important to show it simply it would be recognizable. So anyway, you have to
observe the flowers and this is so lovely,
absolutely pleasant. Same types of flowers. Last thing I would like, just to a little bit emphasize some petals
to add some depth. Just use the same violet color. Here and there. I just
add some extra tears.
5. Bellflower: Now it's time to paint. I mix with chromatin,
blue, purple. And I will be using
this mixture. And start again with some
top with some boards. I wash my brush a little bit, dilute the color, and with a second brush,
I paint greenery. Just connect. I have, let's say, put these bought on, then. The whole stem. Here Comes. Everybody knows all of them. And both flower, looks
like I say Bell flower. I, I think in many places
call it hair band. For somebody knows
what's the correct name. Just leave some feedback. Just write main comments. I'm very curious and flowers, names and their meanings. And another, and another
bond will be here. I use more purplish
color for the top, for the top leads, petals. And I use more the hint of
trauma for the button flowers, for the bottom petals. Just like this. And I leave the middle to add stores and steam
is just on the top. And I want to connect. I think food be nice to add maybe one more purple colors. I say I like when colors flows, flowing to each other and
makes a wall painting, a tasty Quibi, interesting. Maybe. I add a tiny
little closed bud here just for the composition, just to make it looks twisting. Add some little tiny
details. Greenery. Done.
6. Guess what a flower?: Next one. I'm curious
if you could recognize these flower while I'm painting. I am not telling you what the
voters for a few minutes, of course I will tell you just, just in a moment. You'll probably already
good sport and could guess, what, what is it? And of course it is, forget me, not flower. Now. I just add some greenery,
some green middles. And I said all the
flowers into int1 stem. Monod flowers, they have
very long shaved curvy. Very specific form for
this type of flower. Maybe. When you paint,
you keep in mind, so what will be on the front? What will be on the bottom? E.g. I. Would like to this green leaf
goal beneath of the flower. So that's highest stopped
and painted quickly. The flower itself. And of course, it's nice. Some little bots. And maybe one more. Yes, one more. One more cluster. Here. I want to add all these flowers. I'm mixing purple color and ultramarine like in
the previous flowers. Just to add some variety. It's always interesting when some mixing one with each other. Really. The difference. Instead of you paying just
one color. Cough, open. Open. Good. Curators, forget minute.
7. Buttercup Flowers: I prepared very bright lemon yellow to paint
middle Buttercup. And I'm starting from the top. And as we paint very loose, I mainly paint as you see, brushstrokes just to
imitate the flower. And I leave a little bit
of space in the middle. And for the middle, I'm taking bone or brownish orange colors. And with small TP, I create the middle. And I distribute these
orange color into the petals to make the imitation of a
depth of a flower. And to emphasize it, just few tubes of dark brown. And I would like immediately start with the second flower. I guess. I just imagine it could be here. The belly of the brush. I'm painting petals around. And this one will be
looking to the right. I want to leave a little
bit of whitespace. Do not forget to leave. Whitespace is in-between petals, makes the painting a re
and more interesting. So this one will be
look into that side and maybe another one to the
other side, to the left. Again with the
belly of the brush. Very delicate, very
soft, and very random. While it is still wet, we could easily, you could very easily add some contrast colors. I hope you could see, well, I don't make it
a little bit closer. Just in a little bit
of darker color. And now we will pay greenery. In this painting. We do not really much
care about green color. You could take any green from your palette to mix. Bod. Yeah. And these flowers, they have very
specific greenery. Some leaves. And now i, with the tip of the brush and using some
belly of the brush, I'm painting different strokes
just to imitate these. These interesting greenery. Would like to add some green. Here. I use olive green
for this painting. For this green, I use
olive green, its form. And it gives the feeling that everything is covered
with the sunshine. Maybe one more small
little BOD chest here. And we're done.
8. Clover: For clover, I prepared a
mixture of quinacridone, rose and purple column,
rather dilute it. And I'm painting
just with the tip of the brush with these strokes. And important that all
goes to the central point. To make it more interesting, I mix purple and a
Quinacridone Rose. And I put some strokes. Make it smartly. Another bar, another, but I will try to make a
little bit more closed. And to imitate that, I'm making a smaller and more roundish
brush strokes like this. And you see, we get
these feelings. And in some places I
just a little bit of purple I think would be nice. Yes, I would like to
make one more just here. Same same moves. Small, very small, and round. Brush strokes around. And I leave a lot of white
space in the flour to make. Every and fluffy. White space really plays a big role in
watercolor painting. And once you learn, not too afraid to leave
a lot of whitespace, it really improves
your hand, your style. Now, let's add some green. With cheap and
belly of the brush, I add some green. Usually on clover, green
leaves grows right underneath the bark
and hi toward. So I try to imitate this. I paid with their middle side of my brush and I tried to
make the chips sharp. Basically, all these leaves
I get when I just put my brush on the paper
and it grows by itself. Here, make it neutral. Now, the fun part is
to connect everything. Green here. Once. I imagine that it
goes like this, always try to make the
stem a little bit thinner. Rather than thicker. It will look much nicer and more elegant. And so I painting the leaves, the greenery of Clover, just with the side of my brush. And I connect everything. Maybe one, yes, I would like
to paint one big leaf here. Sometimes it's not
very convenient to paint in this direction. So I, even with the bottom
of the brush to paint rather sharp strokes. Something I would like to remove. Just a little bit of color in some of the greenery pots
to make it look smooth. More close to them. Clover leafs. Because in the middle of
their lives they have these very special white areas. And that's why I just with
the clean and dry brush, I remove a little bit of color
in the middle of the leaf. Nodes. In every war. Mainly on those which are on
the top, on the sunshine. Like this. It is done.
9. Isclandic Poppies: For Wild Poppies, I
prepared a orange mix. We have a lot of
Wild Poppies which grows in our garden
in all the streets. They are usually here no way the orange and yellow
might be read in your, in your country, in your place. And with very diluted
mixture with the belly. Just with the belly
of the brush. I paint rather thick strokes. For Poppy. Wild Poppies have four leaves, four petals, sorry. They have very petals. So I'm trying to imitate this. And with dry and clean brush, I make some white areas
to add more contrast. And the inner part
is rather dark. I will come back a little
bit later to the inner part. Right now, I'll just
add some sepia, brownish color to make
the base of these. I will be back here
a little bit later. And one more. I think it's always
nice to have one more. I will paint it more open. This one will be more
open, one petal. Second petal. Bit more
orange for, for the variety. And to imitate these very
tiny structure of the petal. Sometimes I just
keep the white area and paint lines with
the tip of the brush. Very random. I will propose is to paint
The recognizable shape, but not to go into the details and make it
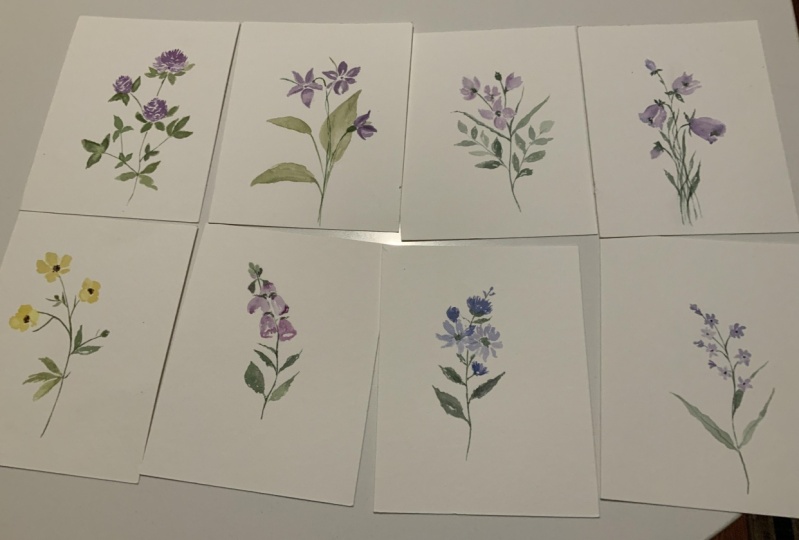
just artistically nice. And if you paint it on each flower on a
separate piece of paper, you could have a very nice, lovely collection for
your summer cottage, for your summer house. Them and frames. It will really, really nice. Dry and clean brush. Something. Sometimes I just add
something with orange juice. Just like this.
Now, we altogether, into the green, into the
greenery, into the stems. Stems are very weak. And now I want to
add just one small, little, tiny bod here. Almost closed. As in the petals, are very, very dense. So the color also
could be more intense. No need to use that
diluted color. Just like this. Some greenery, greenery, these very
specific enthalpy. With the tip of the brush. I just go for some greenery
and paint it like this. One, big nice leaf. Look very interesting here. I combine several
freights of green. It's warm, green, olive
green, and bluish green. For the, for the
variety because it depends on the color
of four greenery, depends on how it look on, on the light, how light
goes through the leaves. So it's always nice when you add at least two different
greens from your palette. Of course, you could mix your own greens or use
the greedy one greens. Just to note, stock
with one color. Once you think you're painting too long
with the same color, just change it and switch
to something else. And now lost details. I take Van ****, It's very dark brown. I try to avoid black
colors in the painting. Tiny, tiny strokes. With the tip of the brush. I paint details in the middle. See it's still not dry enough. So it's a little bit
goes to the sides. The color. That's actually, that's that's 22 petals. It would be nice
if we divide them. Example with darker shade. Same. Wet. Where is the contrast? There? I, I really likes
contrast and Nice. Same here. I just randomly paint with
the tip of the brush. Smaller, more look like I'm painting shapes like this. And we're done.
10. Sweet Violet: I'm painting Sweet Violet. This, they're very tiny, cute, very soft flowers. Adorable. The very pleasant to paint. Five leaves, five petals. Just five petals. And to add variety, I had some quinacridone
rose in some parts. And we've tip of the brush. I, the middle, I add the
middle. Like to add one. Basically it's just
the brush strokes with the tip of the brush
with the belly of the brush. Middle part would be a
little bit darker here. And we draw out the color
where the petal makes this curve sunshine into each and make the volume I add. I keep it wide this
area and paint darker. Here. This may be one flower we'll
be looking aside. Let's put everything on a stem. Stems where we,
tiny and delicate stems are delicate, but
the greenery is rather big and rather big volume. If you compare the greenery
to the top of the flower pot. For us, it's important to
make greenery, in this case, very light, not too heavy. And to get that, we use very diluted green and even remove some
color from e.g. from this sleep where I went
a little bit too hard with, with colors 12, maybe
the third leaf here, so it will make the
composition finished. I want to put these, these third leave behind. I use very diluted
color and I try not to touch the stem here. So it would not dissolve scenarios here. What else we could
bring to our long one? I do not like that. It's true parallel
one to another. So I very carefully
extend this leaf here. And once it dry, I will just go one more time on the stem to emphasises so we see that it goes or in the
foreground of the leaf. But now we are alone.
We're not done. It looks a bit weird
when two flowers, and they are not
connected to something. Something. Now it's done.
11. Tansy: Here in these small, little tiny place left, I will paint TNC. And of course, you could
take a white blank paper. I kind of like to squeeze
everything in one paper. Maybe later on I just create
a pattern with these. And for me it's kind of fun
to find the place in-between. But of course, for you, it's absolutely fine if
you paint each and every flower on single piece of paper. And actually could be
very lovely collection. Fancy has clusters of flowers. And I connect all of them
with the tip of the brush. I will probably add
a little bit more. And TNC has relatively
thick stem. But as I told, better to paint stamps
scenery than thicker. So it will look really nice and pleasant for I,
and more elegant. And of course, we add
in some greenery. You see, I could even make this term loan girl and add
some greens here around. The greenery has
very sharp edges. So I was careful moves just
with very tip of the brush. I tried to imitate these these sharp spots. Not try to paint them. Just neat feeling. When everybody could say, Aha, I know this flower. And that's it. That's important. Nobody will call really, if that's a right
amount of leaves. They grow. They painted through
an accordion tool, the flowers scheme, etc, which are painting an impression and
make it recognize some cream and connect
to the main stem. Now, in this case, could be a little bit thicker. But just on the bottom
part, some greenery around. So now I am coming back
to the yellow part. Because right now it's, you could see much
nicer what is missing. And I want to add these
tiny little details. And just with the
tip of my brush, I paint these round, small, round petals, round
and I could add more. Always nice to add
some contrast, e.g. with orange color around, especially for
some bottom parts. I keep my brush vertical
90 degrees to the people. Make these tiny little dots. Don't try to page just the so-called
circles with plain color. It will be childish in a way. Really spent a little bit
of time for these TP. At the end, you will
get really, really, really nice, fluffy, sunshine. Beautiful effect. So here it is.
12. Wreath part1: Now we have ten
beautiful wild flowers. And now let's arrange
them in a reef. So I map out the circle around which I
will arrange all the items. We could just use any, any plate for this ice, often, the pencil marks. Let's start. You could have your flowers
next to yourself and just decide from
which you will go. I think I will start
with bottle prompts. I will use the same colors as I did for painting the flowers. And of course, we could
also use your own. Let's start with Butter Cups. The principles are the same. And painting a reef or
another composition is just great to practice. To practice bought you managed to achieve in the
previous lessons. And of course, also trains a little bit your
composition skills. So as we paint in Butter
Cups with painting, with the side of the brush
and arrange flowers. Now a little bit, according to our so-called, once I'm painting flowers, I really think to which
side it will look like. And also, I think how I will, I will organize it
one by the other. I'm going to add all the
greenery a little bit later. I like to add contrast. That's why I have a loop. And I think nice cone
flowers would be very great. Next to Butter Cups,
blue and yellow. That's one of the
nicest contrast. Let's paint a few flowers
where the tip of the brush. Same principles. You could wash your
brush and dilute a little bit. Metals. Always nice to add some
variety into your drawings. Could add few dots
overlapping with water cups. So future butter cups. So it's always nice to
add some outstanding. Was around maybe like this. And we had, we had
a purple flower. And let's also played bass. And you see, I'm just following
my own, my own tutorials. I just rage everything
in one place. One purpose. It's always nice to add
very contrasting areas. Let's think about the next step. I suggest we will go to this
direction a little bit. And clover. Clover would be very nice. Again, next to yellow, something purple, something
blue, something dork. Let's play into clover. One of my favorite
simplest flowers to paint, because you just brush strokes. They turned to be a very,
very beautiful flower. I, why? I provide the dilution. Of course, the colors itself. I add quinacridone,
rose to my purple mix. You could check out
the previous lessons for the mix names. Or, and of course, I believe that you
paint it also with your old paints and maybe
change a few things. So just try to be
consistent and use what's, what works better for you. Right now, I would like
to add some greenery. I postponed it, but now
it feels like it's time. Because I want to make
a little bit off. And I like when bottom
vertical flows. From one, from petals, two stems from, I'm not
painting stems exactly. I paint some leaves, visible parts of the leaves. And we will add a lot
of details a little bit later right now
we'll keep two range. Now it would be nice to add
this when **** poppies, I called, I called them
Icelandic poppies. Sometimes they
called Wild Poppies. We have a lot. In your weight. Again, it's a brushstroke with the
side of the brush. I bring all the brushes, are all the strokes to one
point where all the petals meet and where they
attach to the stem. Of course, it's important
to paint the middle, the middle area with a lot
of lot of Poland's inside. Some greenery around. I want to keep this one and
I will come back for now. What about forget me
not forget the notes. Ultramarine blue with
with ultramarine violet. And just with the
tip of your brush, I arrange small
clusters of flowers. Some of them, I
make a rather bold. Some of them didn't eat it. Often the points of the petals. It's nice to try to balance. Try to think about real
proportions between the flowers. I think my, forget my notes. I slightly bigger
than in real life. If I compare to
the other flowers. So keep this in mind. Shouldn't be too big. About these. To make painting Interesting, I will start with
the bottom area. I think you can't add too
many of forget me nuts. Just brush strokes. The beauty of painting loose
florals that it's really, it's a Lacey brush strokes
in the right place, in the right directions,
create something better. Some greenery. Small branches,
stance. Same here. When you paint a wreath, It's nice when it has
the logic move, e.g. from a clockwise when
everything moves clockwise. So if I think that the main stem of my
forget the notes is here. And for this branch, the main stem will be here
and a top of the flower. We'll look in this direction. It's small, little tiny details. Of course, you could
paint a wreath which floor was Luke in
different directions. It will build so nice, but you need to think about
the little bit in advance. Small little clusters. It really feels something
yellow would be nice. And now I would
like to add tenses, tenses very small little
clusters of flowers. And remember that, that
the flower then look, right now it will look
a little bit downside. Of course, you could turn the paper and paid in
the normal direction, but I recommend you work with
your wife to move your arm. Rest. First row, to train your hand, train your tuition, where you would look at
your composition. Indifferent from
different angles. Which flower? Violet, Sweet Violet. Right now feels nice. Flowers like wireless
that we tweet. You look a little bit
from, from the top. You could range in
different angles, not necessarily straight. So the more variety
you will add to your width owe to your
other composition. The bedroom. For that purpose, you
could little bit more. I can reverse the
direction of flowers. Middle for middle. So it's nice to use just some green bold mix
where we think tick, tuple for flower
would start to add some greenery and leaves. I, very often, I wash my
brush and I soften the edges. Another tweak with painting, shapes and compositions
is about contrast, not only between colors, bottom, between
shapes, beak, shape, small cluster, big
petals are small. Small, small, small flowers. Let's page. Here we have this
contrast between shapes. Now, let's paint another bottle. I painted these
directions to the bottom. And I painted a
little bit lighter. Some orange, nice
middle yellow column. If it's the tricky
color to add shades. The only thing you could do not to make it dirty
and they shades. Use different molto boldness. So this is very diluted, yellow and suddenly
just normal yellow, not very diluted,
looks much bolder. Just like this.
13. Wreath part2: We keep, we keep range. Now, I would like to
add focus groups. Focus groups. Let's
make this cluster. It's small, little
bells, let them down. No need to paint the whole bunch of the
flower. You could use. You could use just
a few of bots. And that would be actually
really, really nice enough. I'm just looking at maybe one. As you saw. I did not
prepare any sketch. I am planning. I like to plan my toe, my painting, my composition
in the process. This is a really good
training for your, your skills, for your vision. Which flower? I really would like to paint
another Icelandic. First of all, to
balance the composition and add something, something, something, OH, now
I will paint it. Looking inside the leaf. I will add small little bud. I will add a little
bit more details. We've painted the
Icelandic poppies and we add few strokes later on. I will make the same. I don't get the same. Here. Another clover. The
clover and now clover. It's very well to see on clover example it looks
from left to the right. And if we could move clockwise it another cluster
should look like, should look, should
look to this direction. Not overthink it. In some small little flowers. I could bet that on this stage, your width is completed. It looks completely
different than mine. If you really follow
step-by-step, and that's the
beauty of painting. Watercolor. Barely. It's very unique. Each and every time. Interesting paths comes
when we try to knee, try to arrange flowers
one next to another. We could overlap at
some green details. Now, what we will paint, like the last one, if you both flowers
or another tendency. Flour cauliflower? Yes. Um, maybe it's now
you see we have, the problem we
have is that blue, blue flower, blue flower. And it's very
tempting to add TNC, we might do it, but I would like to add cocoa flower for the
variety because the purpose of these reef really
to practice alarm, alarm lessons, to put
them into practice. Just to practice,
practice, practice. The paper is still wet. I add some greenery. I like how these
mixes this flow. I paint with the
tip of the brush. I just arrange few brushstrokes. And now I will add a
small little cluster of tenses to balance and
to add some contrast. It will be very,
very small. One. You see how it sparkles around these blue,
blue, purple area. Now let's move to the fun part, tweeting greenery and stems. I keep my brush
about 30 degrees. I keep my brush in the middle, about the middle to
make it more free. And I randomly create. I moved my brush in my way. Kind of add different stamps
from different flowers to emulate that
impression of the world. So I hope you got the point. The more random, but the more, the more free you
have your brush, the more random is your, is your brush or
your brush strokes, the more interesting, the more tricky or
composition you will get. Just remember about
these flow clockwise. It's okay when few leaves look, look on the different direction. That's absolutely neutral. But somehow it
should be very easy to read the move clockwise. Or some contrast. I'm going to take
much bolder green. I mix the color green and CPM to get something
very sage, dark green. You could use any, any shade of gray. It should be just a
little bit different. One a few small details, leaves. Try to add various of elements. You could always look and choose some nice interesting leaves
to add on this state. It's not really, I
will honestly say too, It's not really important tool which leaves the
lungs to each flower. We are creating right now, a nice composition with a
lot of details and moves. A few dots in the
middle of the flowers for Boolean areas,
where it's necessary. Almost everywhere. Add more depth to the flowers. Final contrast tool. It's landed opiates,
few little strokes, few little details, and you
see how it looks different, it looks more risky. Don't be afraid to go
with the second layer. But not too much. One more extra layer is enough
to make them composition. Nice. Nice thing that you always could add a little bit more
of details in between. To make the reef really
really beautiful. And eyeballs around. Our beautiful reef is ready.
14. Final Thoughts: Thank you so much for
joining my class. I hope you enjoyed the process, which is the most
important thing. And I'm looking forward
for your feedback. Which flower was the most
complicated to paint? Which flower you liked? Best of all, maybe which flowers you would
like to paint next. I encourage you to
paint as much as you like and bring these exercises, all these lessons into practice. And looking forward to see
your beautiful pictures. See you next time. Bye-bye.
15. Join my Membership!: Hi friends, I'm
going to be killed. And I welcome you to
joy, to my membership. I know that we all somehow
at different stages of our painting skills
and that's fine because I split my
membership classes, my membership offers
into sudden bundles. And you could start
either from the very, very basic steps and then short-time get to another step
and then to another step. And as my favorite thing, we could paint together complex botanical illustrations or loose floral compositions. It, somehow, it takes time to realize what you're more into, either into loose painting or
some more precise painting, it's okay to give
yourself a try. And another thing I
would like to stress out that most of my classes, you could stop at
any moment, e.g. when a baby cries or
dog needs to go out. So really at any
moment and heavy, just 15 min daily practice. Good. Bring you into really nice progress with
watercolor painting, withdrawal away,
anything basically. So I invite you to
try out free classes, to try out churn
membership, e.g. for a month and feel how
how does it feel here. So I hope you will like
it and we could make, we could create a
really nice together. I hope I see you there. Bye bye.
 Olga Koelsch, Watercolor artist and Pattern Designer