Transcripts
1. Introduction To Class: Hello everyone. I'm on good. And I'm welcoming you all on my new skin shirtless. Before elaborating the class, let me tell you something about myself. As you know, I'm an artist based in India, followed my passion for more than ten years and I'm uploading our videos on my social media platforms where I have more than 350 thousands of subscriber family who are getting knowledge of art and drawing through various medias. I have already uploaded three classes on skill share as well. So now let's just talk about this particular glass. This class is all about drawing using light and shapes technique and how to draw like an artist. But this class is basically mean for those beginners who really want to excel themselves from beginners to artists, and how to basically use lightened sheets technique in the portrait drawing on still life, our wildlife art styles. So in this class, we're going to talk about graphite drawing and how to basically use graphite for getting lighten shades technique into the action and how to use them. By the end of this class, I'm sure that you are going to benefit it about many techniques which you haven't came across till now. And like blocking techniques, like how to basically use gradation in the particular drawing, how to evolve, drawing from using the eraser. So these are the things which are really important and key factor in the particular this class. So let's have a beautiful beginning of this class. We will start with the introduction thing. So let's have a beginning of it.
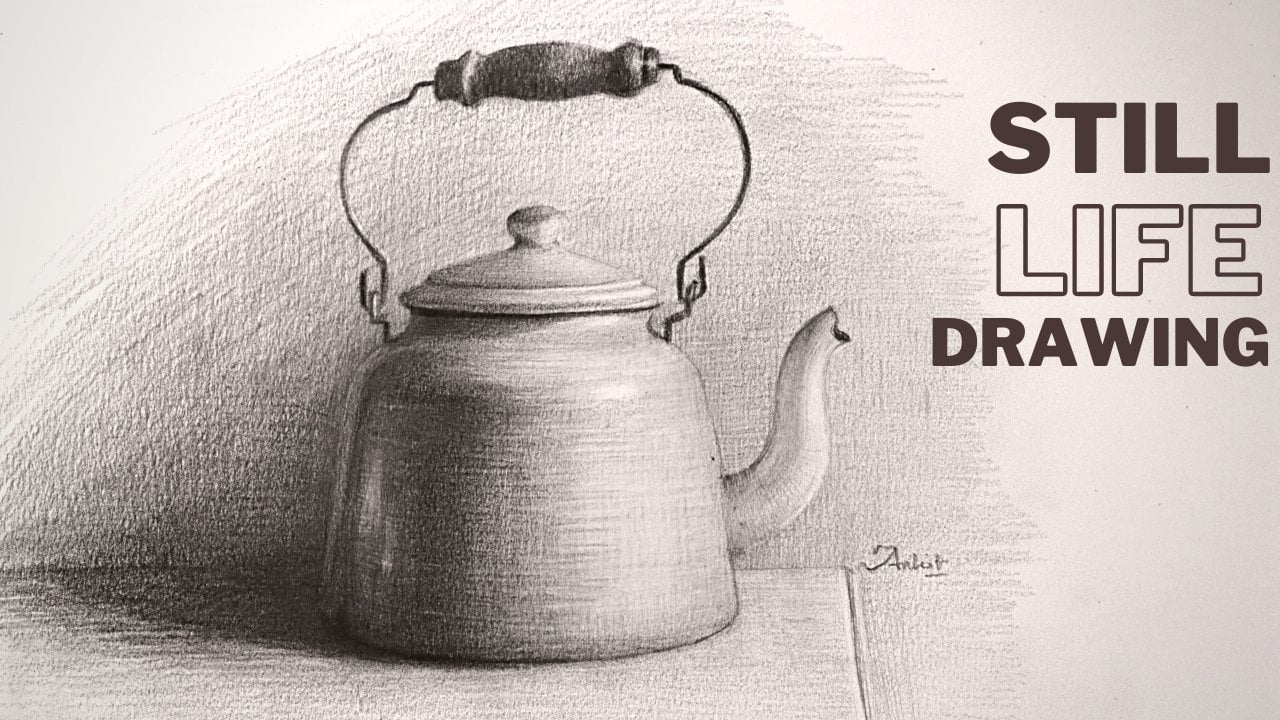
2. About Tools: In its first lesson, we will discuss about the tools and apprentices, what we're going to use in this particular class. And what are the required or mandatory tools which are very much required like rootless pencil and why these pencils are pretty much preferred by artists and how they actually use these pencils onto the drawing. So this is a very important thing to basically know about the right tools and how to basically use them. So there are very few tools which are basically required for having a good drying. Like in the background you can see or hear. I have drawn using the technique what I am going to tell you in this particular glass. So let's understand about tools and techniques, what we're going to use in the upcoming lessons of this class.
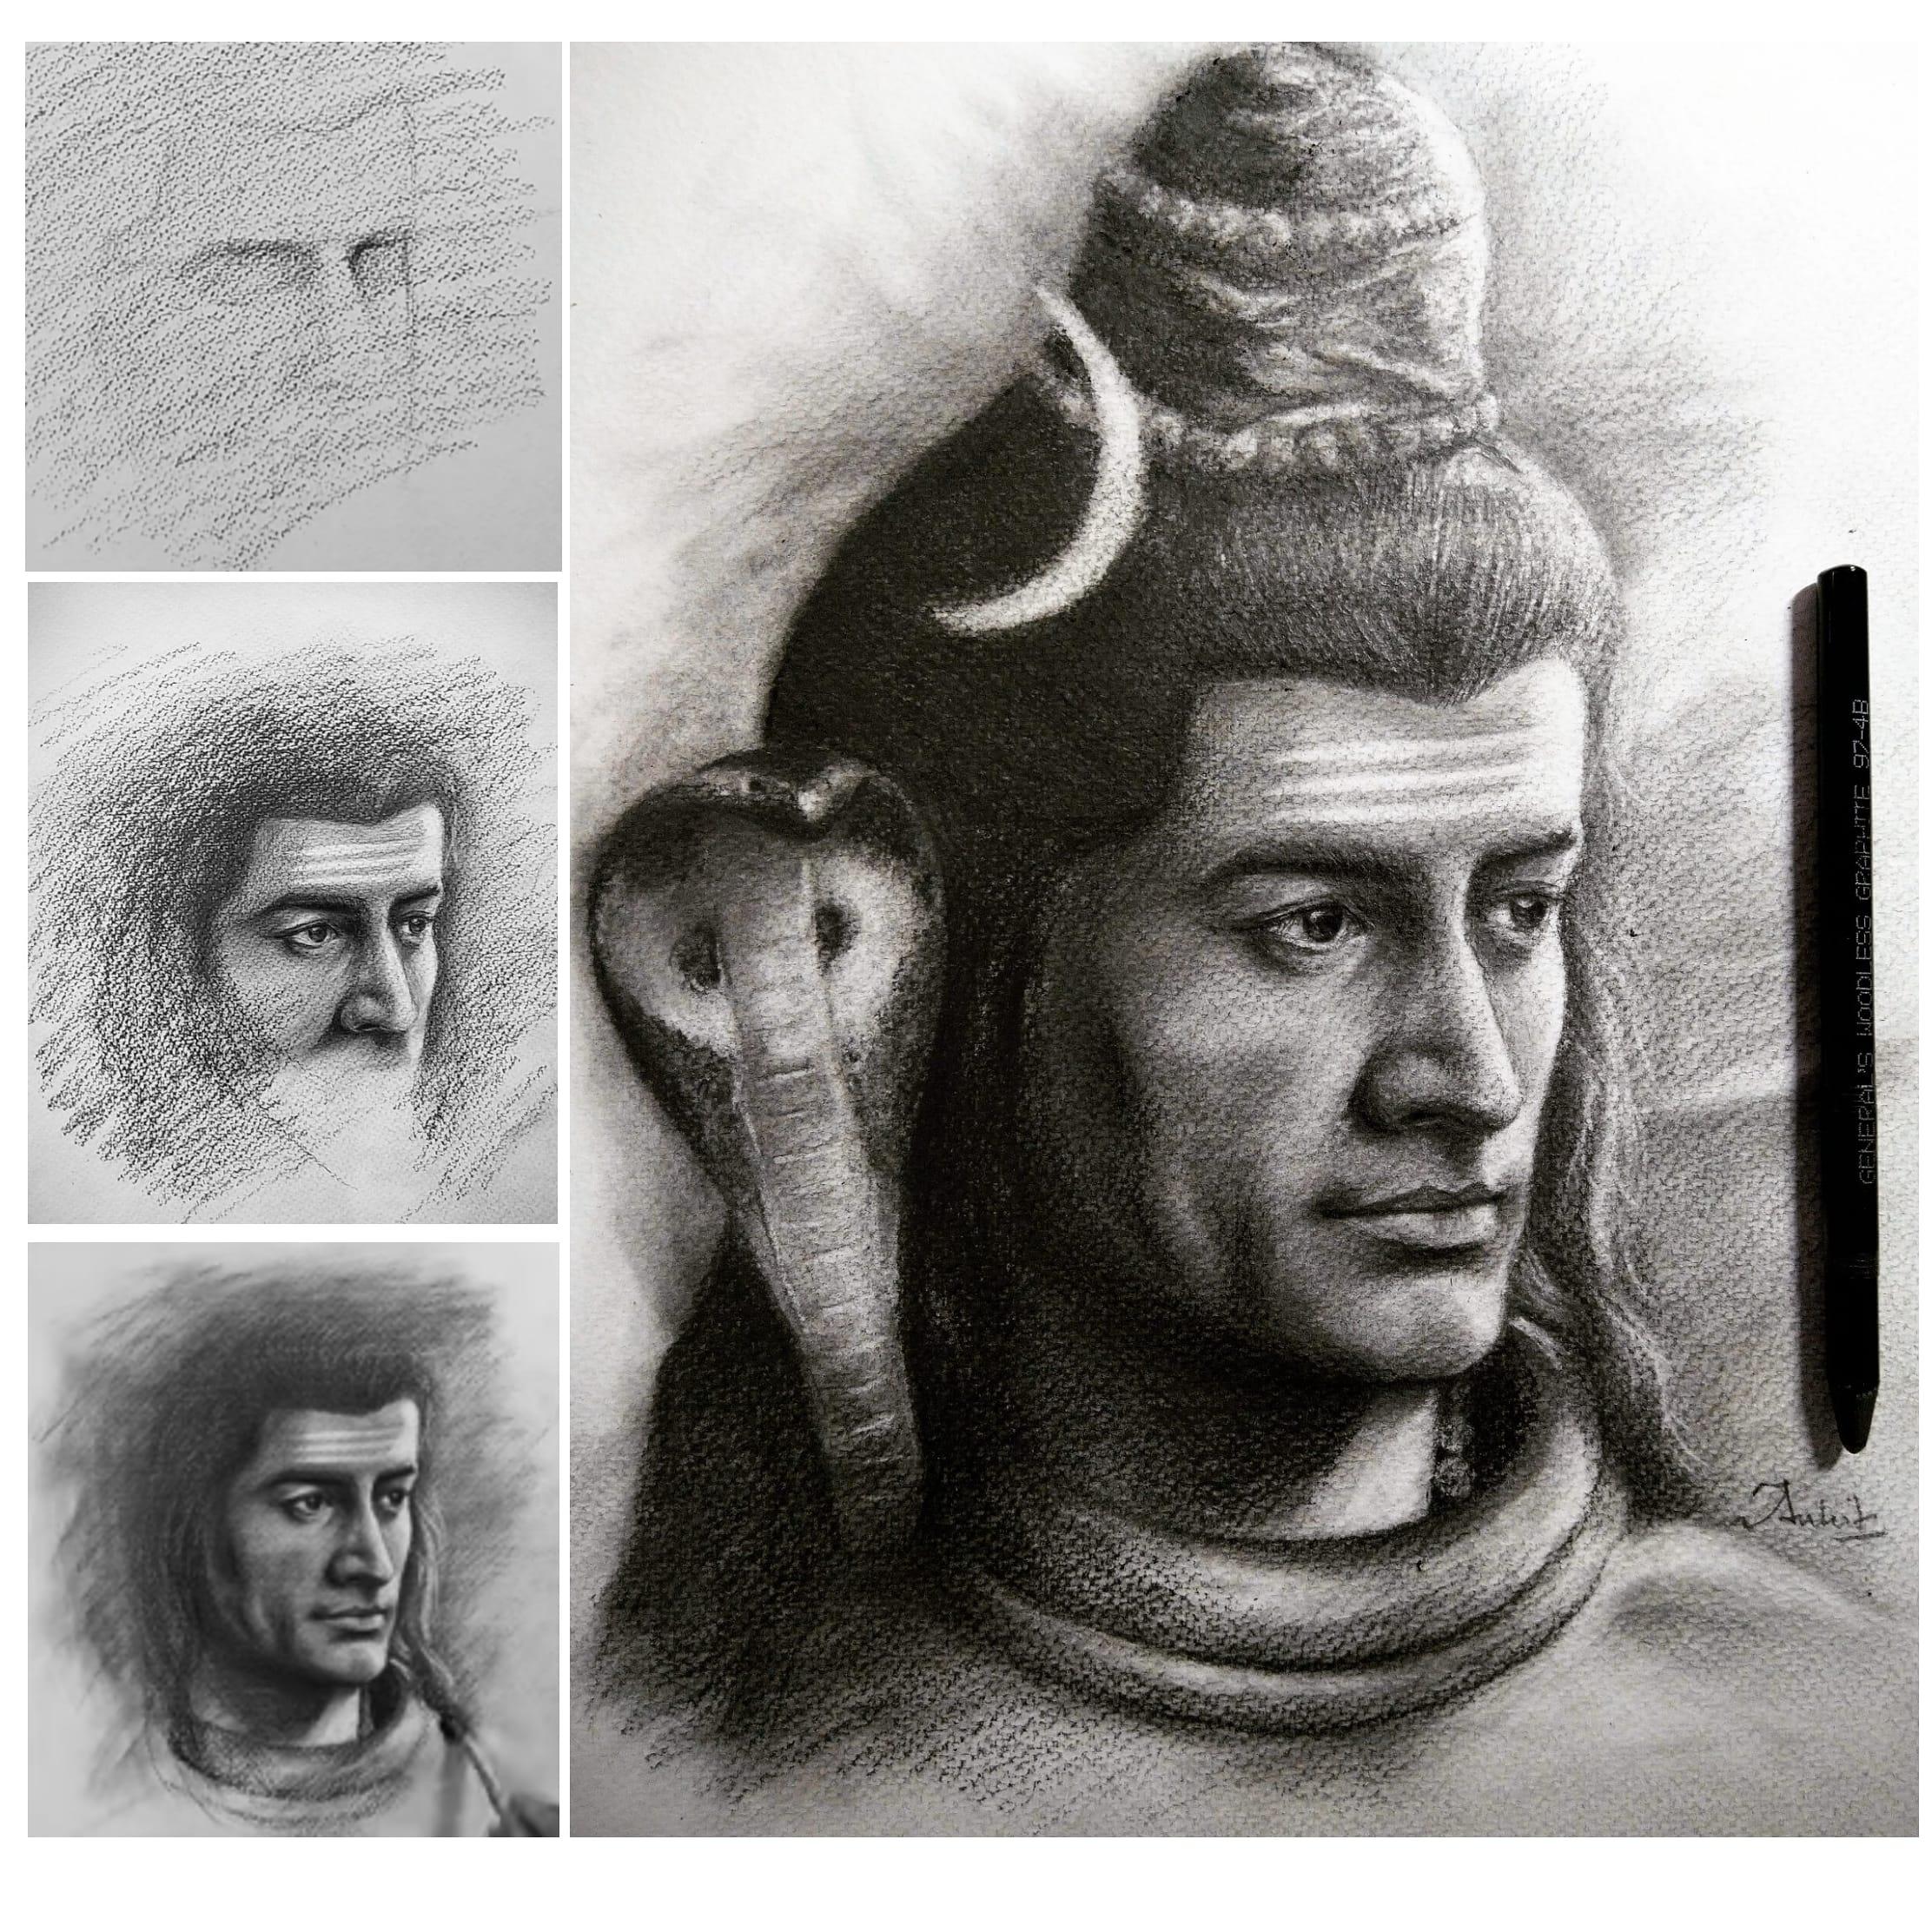
3. Familiarization With Pencils: As we are in the first lesson of this class, we're going to talk about the product, what we are going to use in this particular glass. So the pencils, let's just talk about the pencils first. What are the pencils and what are their properties and why we are using these is only this much what I have shown it over here. And let's just talk about Pencil by Benton so that we can actually understand the use of that particular pencil and why we are using them. So the heading of this title would be tools used in this class. And preliminary, we should talk about the pencils, which is the foremost important factor when we are drawing something using light and shapes. So lets us understand that why we are using the high-grade pencil. So the suggestion would be that you use the high-grade pencil, which ranges from 4210 b. And this is the basic range that we should use in these kind of drawing. And it should not be like that. You should have all the grades and between them. If you do have 4B or 6P or nine B, it would be great for you. So here I'm showing you some of it, like 6P, I'm showing here. And the another pencil which is very important and very play a very key role in this particular triangle, in this pencil, but I am holding or here this is the Woodlands pencil from journals. And this is the forbidden Coby Benson. Which definitely plays a very important role because you have the benefit of capturing the largely why we are using it. Let's just discuss that as well. Because the pencil is worthless. It it is not having the wood. Okay. So the sides of the pencil can also be use you can use it in the lay down position in only to use the only the tip of that. So you can see or hear that why we are using these would less fun. Because it's, it's, it's a very useful from the sides of it, not only from the tip of it. So you can see the close-up scene that you can see that the sides, sides of the pencil is being made up of graphite? No. There is another example of overdress pencil, which is more thick in dementia in diameter. And it's a tool B1. So this can also help us to basically capture the large any of the paper. And as clearly as you get the gray scales on the paper, it will be easier for you to basically go towards the finishing part. So it's very important for you to capture a whole lot of India using the graphite and then identifying the other other highlights as well that we will going to discuss in the next, next episode. So lessons. So it's very important to use the sides of the Bentsen as well as the tip. And for that, the woodlot Spencer plays a very important role. So this one is another one is a model. It depends on what I'm showing over here. These pencils are also very useful when we are going to capture the dark, the black portion of the particular drawing. There is another pencil that is the ten B. That can also be used, just very dark, marginally dark. And we can identify the black areas by using them. So why I'm showing you the all, all the high-grade pencil that, that is very important thing and that we're gonna learn in upcoming lessons in this particular class. So the range of the graphite that we're gonna use in this particular class is ranging from four to ten B on a and b. So the higher the grade, the better the results. This is the particular phrase that you can use in the class. So this is all about the pencils that we're gonna use in this class. And next thing, we're going to talk about the reserves and the sharpeners. What are the tools, other tools that we're going to use that we will discuss in the next lesson.
4. Erasers: Now let us talk about it is. So in the field of it is, we're going to use a needle. It is. As you can see over here, that it's very, pretty much flexible in terms of changing its shape. And I hope that you all are pretty much aware about these products. As I have already mentioned in my previous classes on Russia. So these needed is or can be used as a drawing tool and it's not air using as it is into. So it's very important to you to basically see that how can I basically gonna use it onto the paper? So just draw few marks on the paper using the, I greatly affect pencil and then I'm smashing it using the brush. Now you can see that I am directly using the needle razor and finding some highlights. So over here I am just giving you a very small illustration thing. But in upcoming episodes, we're going to discuss in detail that how we should use this, this tool as a drawing tool and not as an it is intuitive. Identify the highlights so that we will see in the upcoming lessons. So let's just focus on that aspect.
5. All Other Tools: So we are continuing with a laser and we had a discussion on needed it is or in the previous episode, previous lesson. There are other kinds of reasons as well. Like pencil, it is a we can say more, no, it is there as well. So there are two other guys know, erasers accept that needed one. And these results are very much useful in the process of getting the fine highlights under the subject, what we are going to draw. So this is the pencil eraser. What I am showing over here. This one is according your brand you can buy or purchase of any other branch. What really suits you or what is the basically of Lebanon in your local marketing. So I'm just showing you the, the effect and how actually we should use it. So you can just leave, actually get the hands-on on it. So I just draw a few dark areas using the penicillin. Then I'm smashing it using the brush. Now I am using until it is on the left side of the particular paper. So you can see that I am really easily get the white lines under the particular area. And in the similar way, I can use the monoid is there as well. So as you know, and I do maybe very much familiar with this tool as well as I have already discuss these tools in the previous class. So you can see them as well. And you can use anyone if you do not have them always and or if you do not have the pencil eraser. But if you have one of them, it's, it's, it's the best thing for you to basically get these tools. So get anyone of them, ok, that will help you a lot. Then we will talk about the sharpness. And what are the sharp, sharpness we can basically use for getting the sharp edges? So first you know the general sharpness, the local shop, none that we actually get from any local market. And then there is another ism, mechanical sharpener bits actually get you the prolonged edges. So this is very handy and this is very useful. And many of the artists are using these sharpness as when the mechanical one and many others are using the electric one. So if you do have electric When You can also use them if you do not have the mechanical basically for you. So the sharpness can be used. And at the end you can also use the knife. Sharpening pencils.
6. Shading Tools: So in this lesson we're gonna talk about shading. So shading is a very important aspect as far as the lighting shapes strings are concerned, and it plays a major role in defining the values from dark to light. So what are the tools that can be actually used in this session? So the options for us, our brushes and the stumps, paper stamp. And then we have other options like like we can use our own fingers or enhance. Two basically is pretty much the literal fight onto the paper. Then we have option of tissue paper as well. So the most important thing that we need to understand what here is that when we went to draw anything using the light and shade its technique, we have to identify the dark portion first and then we have to basically IS much that our portion to the whole paper for that, we need some tool. The tool is here. We can use is the brush, which is very, very driven and very proper for this particular function. What is basically required because it's, it allows us what value gradation. And it won't allow the sudden change in the article. Or really, I liked the people stumping. Paper stamp is more rough and more rigid and it makes the paper more, more towards more damaged condition rather than it's making the gradation in equal proportion. So Stan, this is why I recommend stamps. But if you want to use them, you can use them. It is good for basically getting the real strict dawns route as well as Latin sheets techniques are concerned. These realistic sting skin texture or lamination is, isn't that required? This is why I am not recommending this particular stumping. Also, it can damage the people as it is a very, very important thing, in particular dry. So I don't recommend it to use. And if you really want to use, you can use it to generate the strokes, just like a pencil thing. So if you want to use stamps, you can use them in generating the strokes. Does like a pencil. That will definitely change the whole scenario. Now, we have optional fingers and fingers and your hands are basically very useful in these kind of drawing because it allows you to have a very light change in a particular rate. And you basically had a, have a freedom to basically have a freedom of generating even tones onto the paper. So many of the artists, including me, are really find it really handy when it comes to using your own hands and fingers for smudging thing. Then there are many artists who are using the tissue peppers. And that can also be used if you are not really comfortable with your hands like you are, if you are having the sweating on your hand. So it is not suggestible to use your hand, rather using the tissue peppers. So these are the basic tools we can use for shading thing. And if you do not have all these tools, you can go for the brushes that measures what you have, whatever branch or a makeup brush. So that can be used. And these only tools the, we're going to use in this whole, in this whole class. You don't actually rely on more tools. So this is very important thing and a very important aspect for drying anything artistic. You don't need to rely on tools rather than to use your own skills, which is very important. And this is all about the tools thing and begun to move towards that grain things in the next lesson.
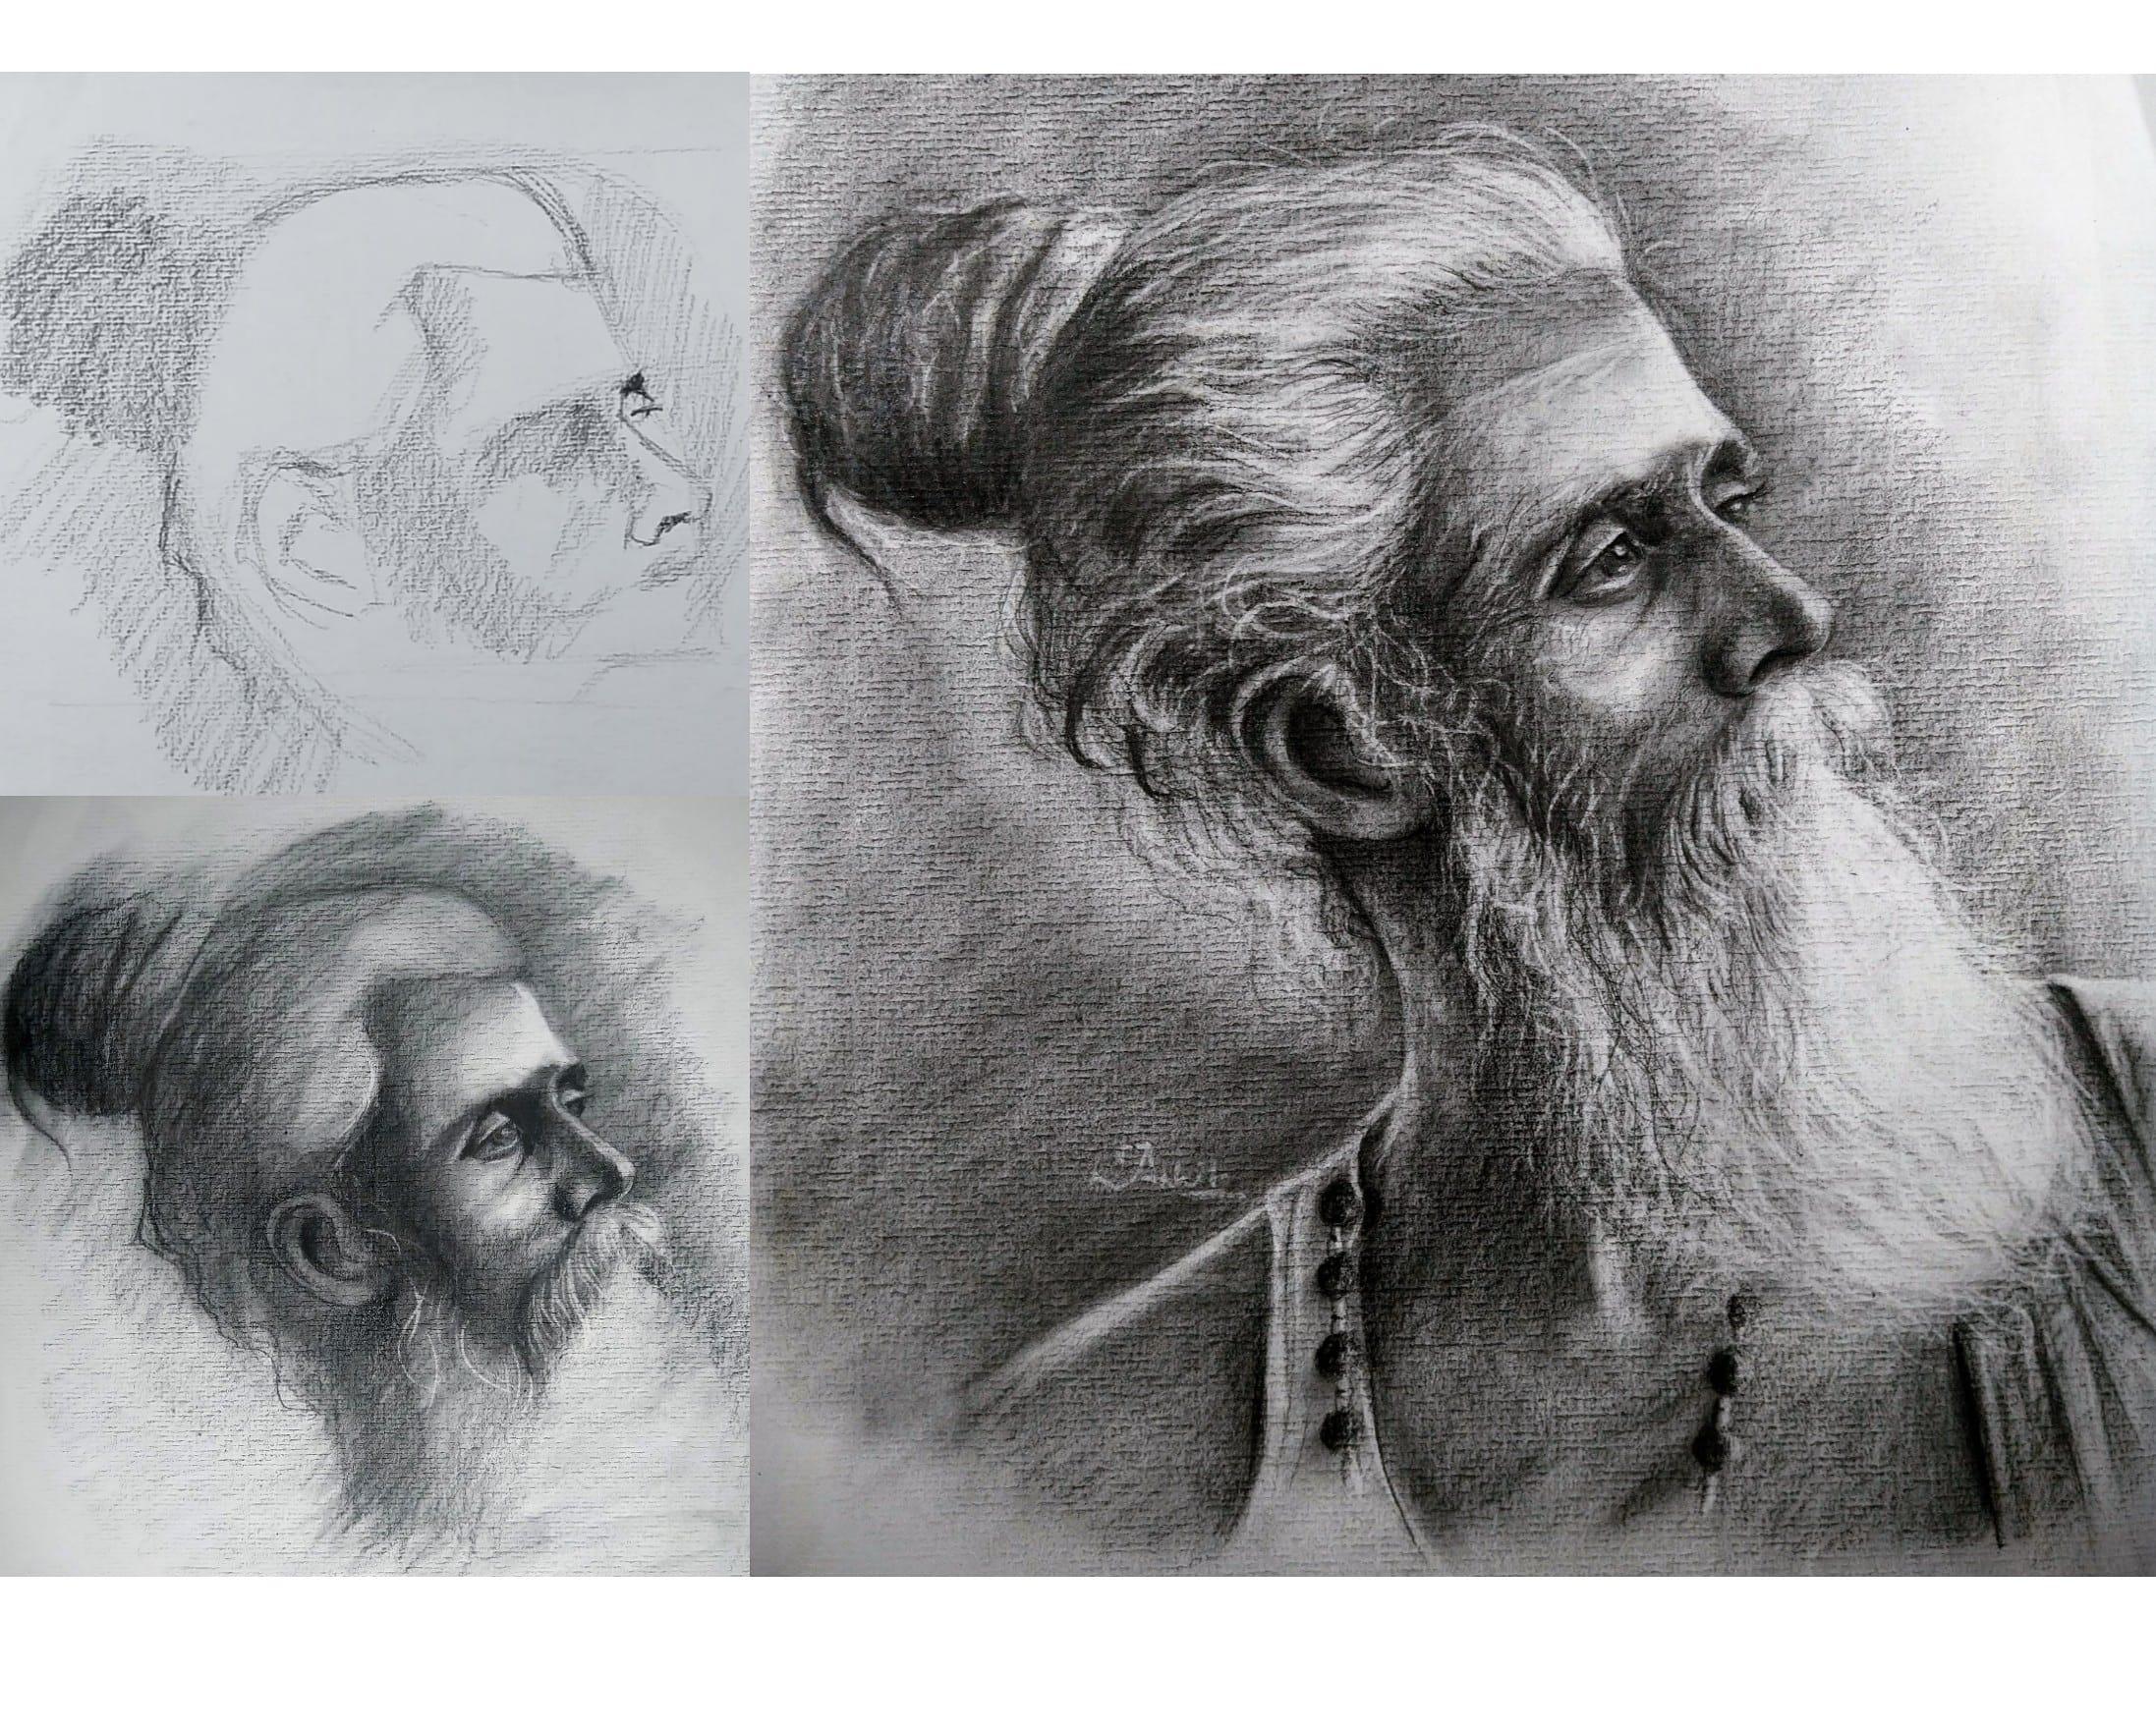
7. Paper Types & Their Uses: Now let's talk about the papers. What are the papers that are being used for growing like using light and shades? So let's first talk about types of papers. What are available in the market though? Let's talk about first kind of paper. That is a smooth paper, okay? The smooth paper means it's textures are smooth, teeth are smooth and maybe having no teeth at all. Then the other kind of paper is the rough paper. Profit per is a very layman language. So we make it, technically we called it Green's paper, greening paper, or the textured paper. So these are more technical words or of its name. And then the other one is in grace paper. So this is a different kind of paper. There are many kind of, many other kinds of papers as well. Like cartridge paper as well. Carter's dipper are also the very local market name as well. You can find it in the local market with this name, cartridge paper and rock paper. That mean it's having some 2Ts and a is having. These kind of paper can be used for drying, for drawing using lighten shades. It's not something which is very much used. And the rough paper, the textured paper or paper haven't tooth is mostly being used. Okay? So these kinds of papers are the first choice for artists to which he uses this as y. Artists really want to create his own paper using and applying different layer of layer of different kinds of elements. Because they want to create a new one to create a surface for them to basically, which uses more comfortably. And this smooth paper is having no use. So paper like Bristol papers or which are available in the local market. Many instruments are asking about ivory charts paper. So these paper having no use in this kind of drying where we are working on light and shapes because it's very difficult for any artist who basically spread during fight or any other thing onto the smooth paper because these people are our BY having no teeth so it won't allow themselves to have rarefied onto the teat. But it's very difficult for to get the refined is spread into that program. So this paper, this paper is having, you can see that the greens are visible, but a very few rings are relevant, okay, over here, you can see that there are very few grains onto this paper. So this is the basic one. Now let us see another kind of wrapper which is having a different texture. So there are many people which are having different textures and different applicability as well. But paper most would have look at this. This is having a heavy textures. And these tetra really help us to basically create more depth in our drawing and indefinitely allow us to do more layers onto them. And this is another texture different action can see. So there are variety of texture you can actually find on the market. And you can use your, your kind of paper, find your kind of, but it's not that difficult thing. So highly textured paper is having high recommendation from the artists. Texture can be seen in different name like honeycomb texture or dam and texture. So they may came in different name, but the same things, but having a different textures. Now, let's talk about in grace paper. So these kind of river are mostly used for pistols, as I have already told in my previous class, unscrew shear. And they are most being used by artists for charcoal drawing as well. But I have used these in Greece B and C, you will orient that is as written in gray space still this is drawn by me and this paper do have a lot of texture and in a, in a horizontal direction. This really helped me to basically draw nice portray. And I have used this technique, lightened sheets technique and destroying. And you can see the results. The results are very good and it's a very good paper for basically draw a portrait like this. So you have the auctions like this and you can use these papers as much as you want. But don't use a smooth paper or paper that does have no teeth. Don't use those papers. Okay, see you in the next lesson.
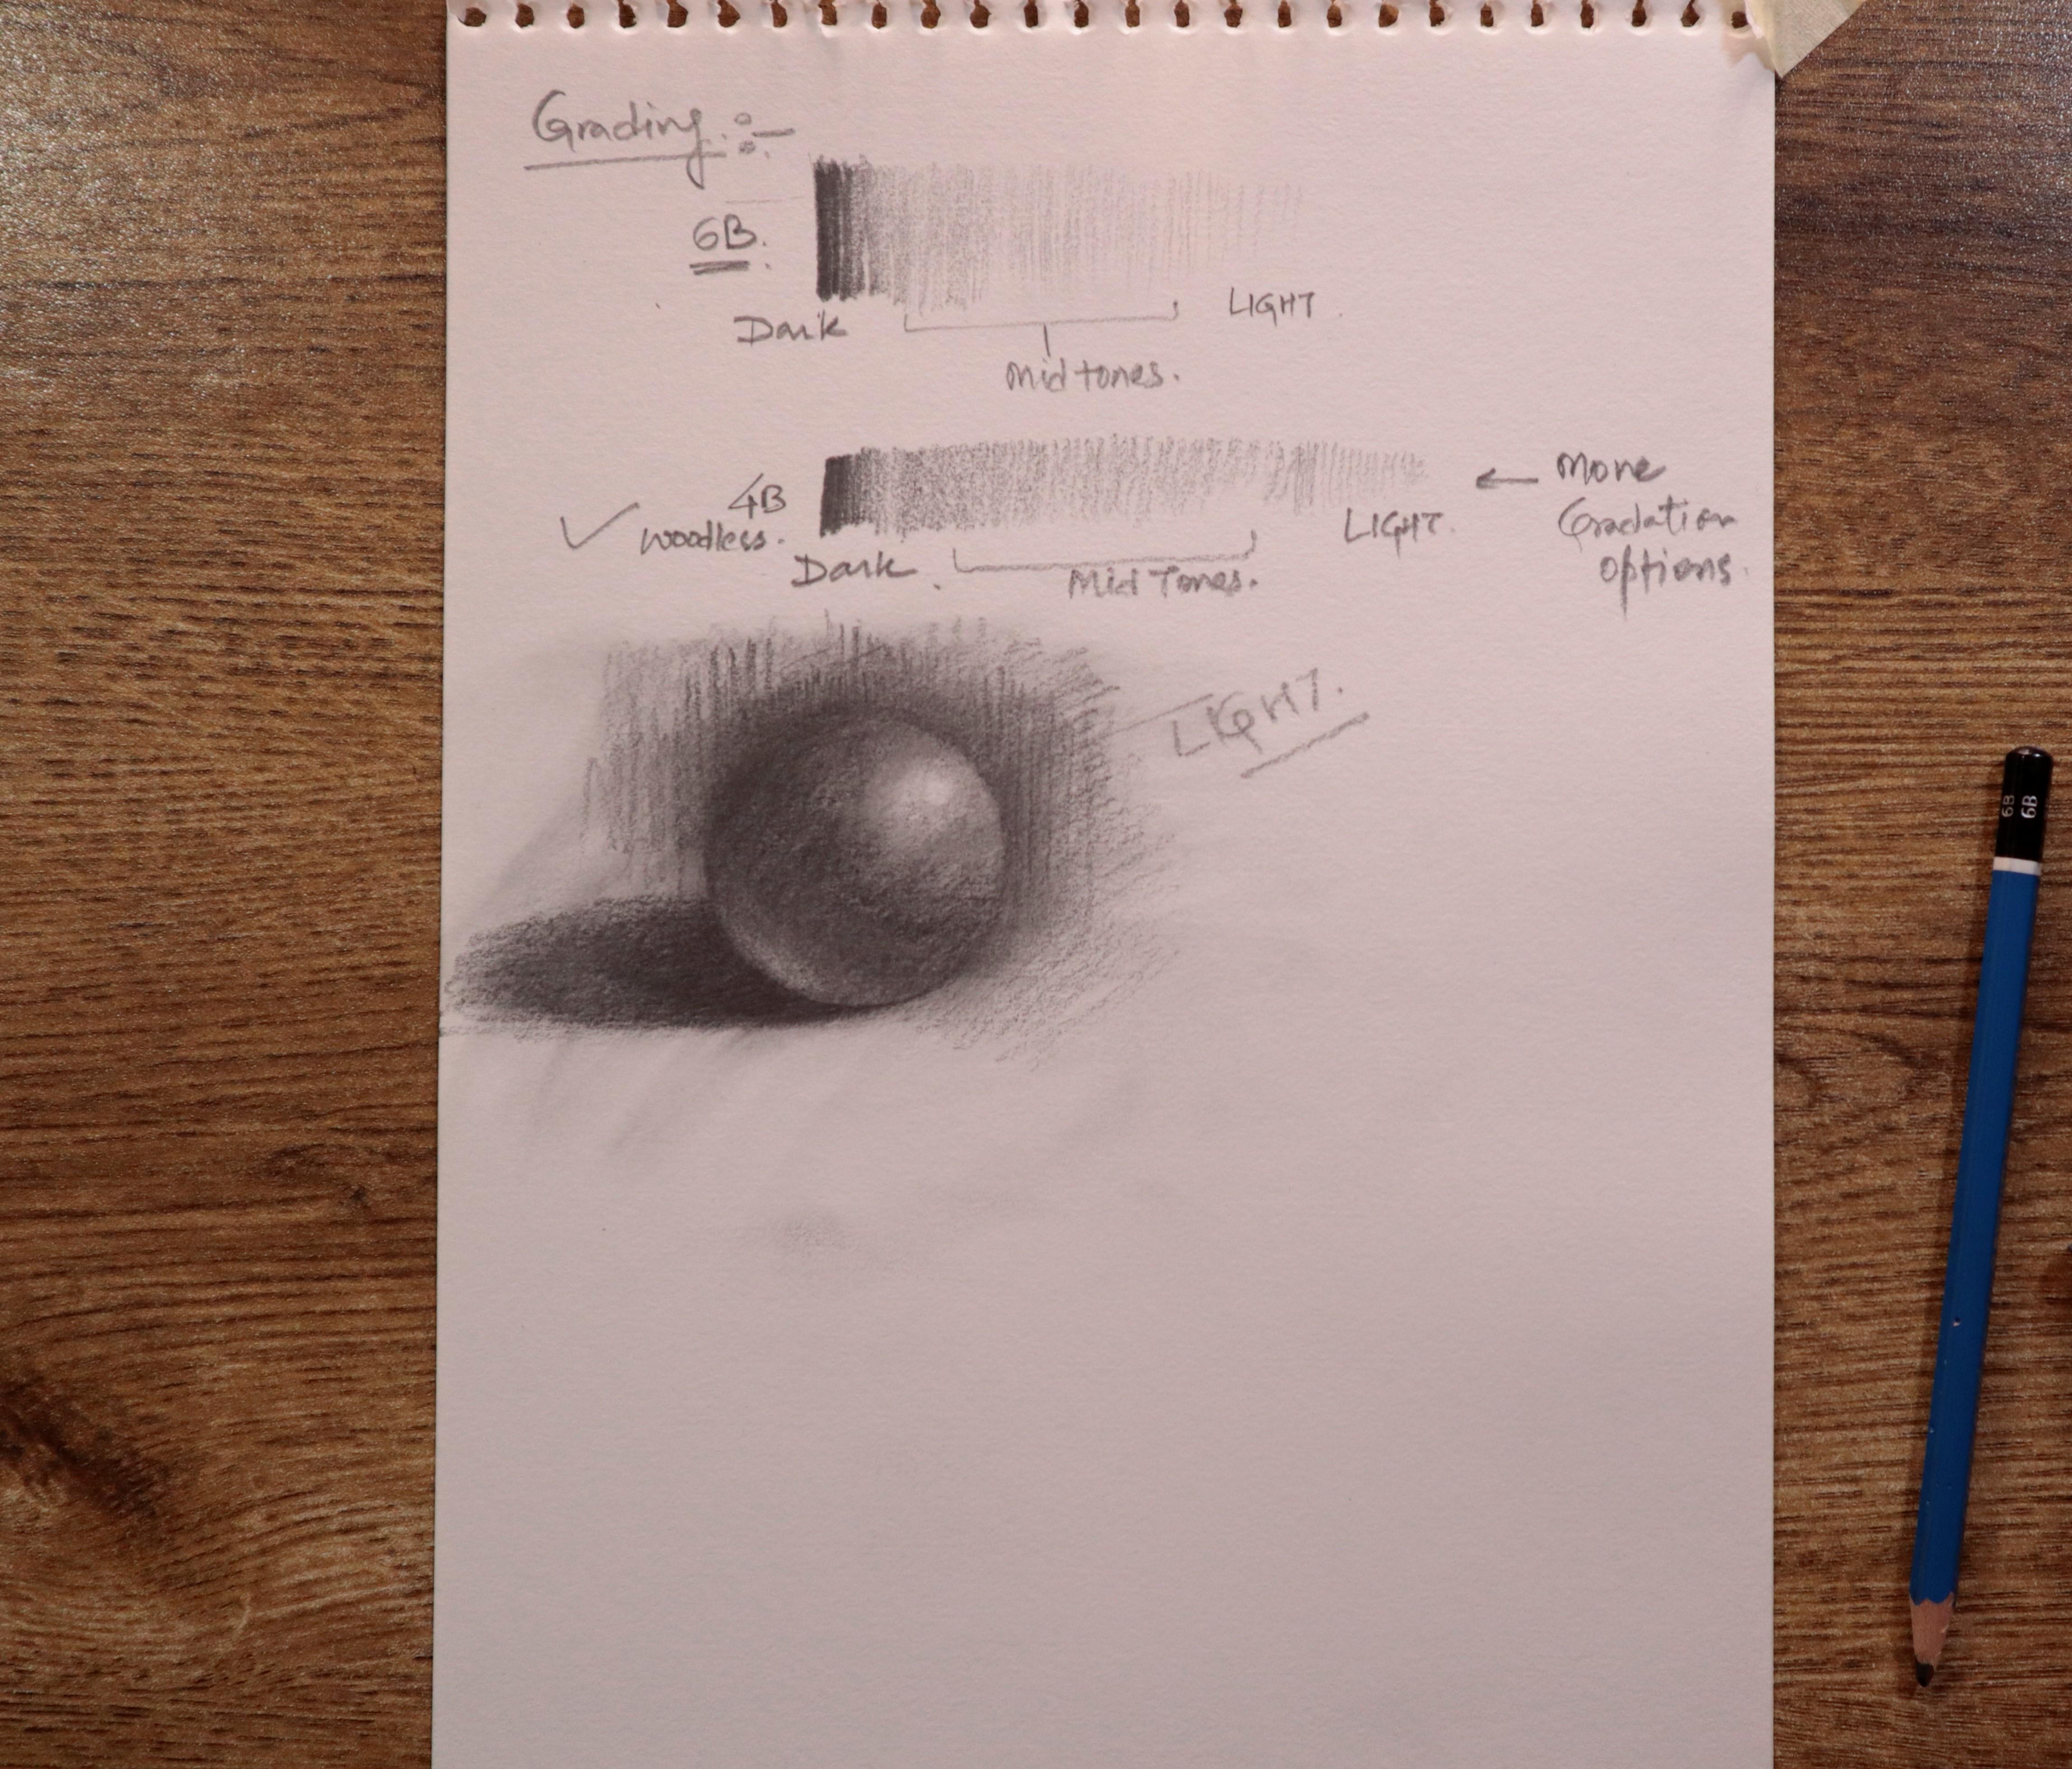
8. Introduction To Gradation: After having a knowledge of tools and appliances, what we're going to use in this class. We're going to understand about the gradation technique, which is very important, how to grade from dark to light, and how to basically use a single pencil for particular dark portion. And the same pencil for the light portion says, well, so by understanding of this technique, you don't need to switch your pencil from one to another. Rather you can use a single pencil and get the most of the results using the same pencil. Like if you are going to use a 6B pencil in the whole ring, you don't need to change it from 6B to 2B or 4B. So this is a very technical portion of this particular glass. So just have a deep understanding of tradition.
9. Understating Gradation: Now let's talk about the grading. How grading is the most important factor. What we need to learn in grading is very important as far as alight and sheets are concerned. So understanding light and chips and understanding the creating thin one, Benson, we will, we are going to draw a band and band of having the darkest one of the pencil. And gradually it's going towards its lightest don't capability. So the single pencil is capable of producing the darkest and the lightest as well. And it's very important for any artist to basically understand the fundamental of using single pencil for different tones. So you can see over here that I am using the 6B pencil. It's not the consenting that whether I'm using six Bureau 4B can see I'm using the another pencil as well. This one is aboutness one. And I am gradually changing the value of this one is for B1. So the dark portion, and then gradually I am reducing the pressure onto the pencil so that I can get the effect of 2B RB pencil as well. So I don't need to change the pencil from one to another or need, don't need to switch the pencil from one to another. So this is definitely enhance my capability and enhance my productivity in terms of saving the time and also in terms of saving the materials as well. So the single pencil is that much helpful if you just change the pressure of the benzene? I have shown you two examples. You can use them in anywhere. Now let's just have a small glimpse of the Stegun example, how we can change our circle into sphere using light and shade stat mech and how actually I am going to use this in the pencil from the beginning and minimum uses of pencil, minimum of changing of plants. That is definitely going to enhance our capability. So I suppose that the light is coming from that source where I put the arrow. And then gradually I am using the sides of the pencil, lined out a pencil and bring the shading thing. The purpose of this particular lesson is just to let you understand that a single pencil is so much powerful that you do not need to have lot of pencils and materials. If you do have only one planted, that will definitely changed the whole game. So we don't need a lot of material uses need summed up pencils like 4B, 6B. And that's that, that's enough for your portrait drawing using latent sheets technique. This is the most advantageous thing as compared to the older methods, what we had already discussed in previous classes on the sushi. This is why artists actually loved to draw using Leiden sheets because they don't need to change their pencils a lot. And the single pensions can do miracles and can be used. And the lightest area and also the darkest area. So you can see that I've actually done this using just a single wordless pencil. If you want. If you want, you can actually change the pencils and you can get more details. But here, I'm just letting you understand that single pencil can be more than enough to basically get the details. Also, you can see over here that are doing use any bending material till now. Rendering or shading materials. Now I am just highlighting using the it is a. So you can see that for the highlighting thing, I used eraser or the Dow portion, I am using the single pencil. It's all about generating the strength, generating the strokes. I am also using cross settings and, as well as the secularism as well. So if you want, you can actually use the brush as well. But I think that we also need to do or here so that you can actually see the finishing portion as well. So I am using the brush and see and doing the centralism thing in CME, circulating the brush and just so that I can get this Smoke Layer. And doing it so quickly because lapse in the few portion so that you can actually see the main portion. Now you can see that I am using the eraser for the highlighting thing. And you can see that I find the smallest spot over there. And this is the beauty of that particular thing. This is why I said that using the eraser for highlighting the things, not for erasing something. The reflective shadows I already mentioned over there on the bottom of that sphere. Now I'm using a different pencil. This is a 60 Benson. So only if woodlands one and 6B pencil are enough to basically get these details. And there's no to be no events Illinois HB pencil, nothing else. Just the four just to 6B and then we'll be even you can do it with a single pencil as well. So it's not that thing which is very important as far as the materials are concerned. But you need to understand the pressure phenomena, how to change the pressure onto the pencil, and how to get the desired shape. So for that, you need to practice the bands. What I have mentioned over here, the two bands onto the top of this vapor. You also need to practice a lot using these thing. Try to change the pressure. See you in the next lesson.
10. Forms & Shapes: In this lesson, we're going to learn about the forms and how to actually evolve the form using the blocking technique or using the blocks. And how to basically use the dark portion of the particular subject and how to use the light portion of the particles subject. So in this particular lesson, we're gonna learn about this thing that how we can actually get the still lifeline for that we actually have an example of a still life drawing and how to basically use Still Life for understanding of light and shapes thing. Let's have started off with.
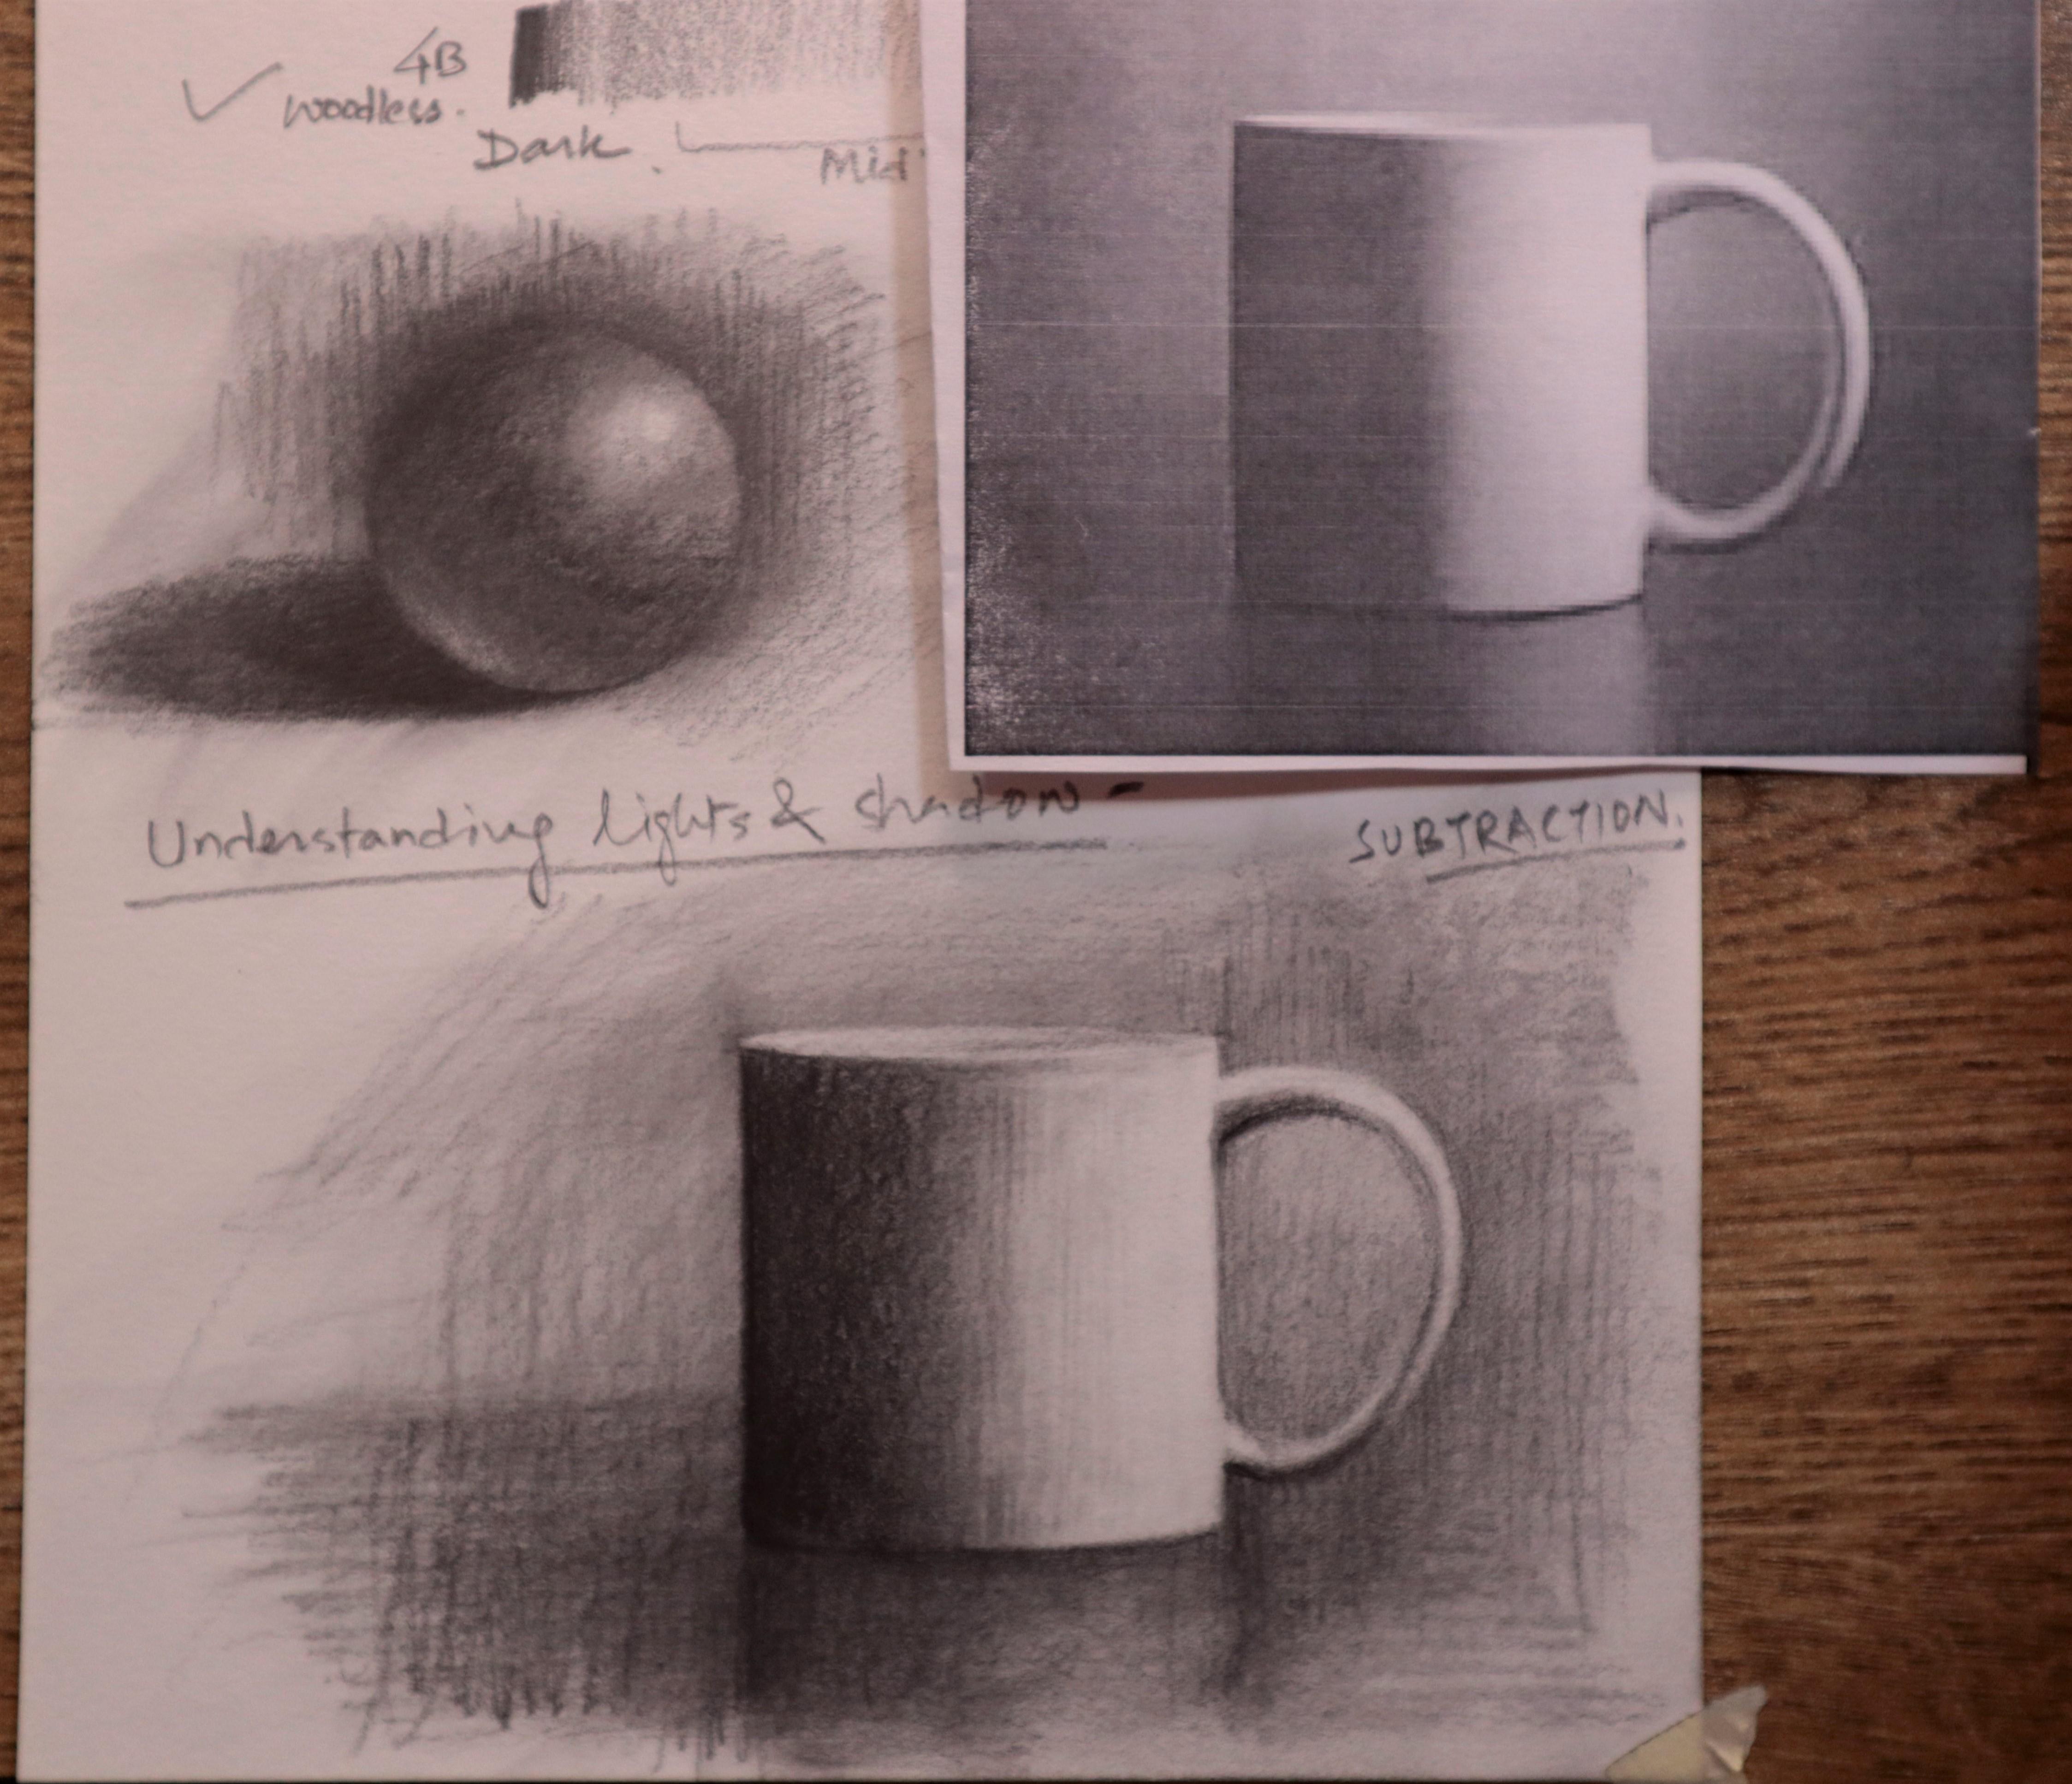
11. Approaching Forms : Now let's talk about the forms, how we need to get the forms and using us. Taking a simple example of this mug that you can see in this original pig. And we are referring this monk too are drying and getting the phone. So you can see in the drawing that and this image, the dark portion and then the light portion on the same block. So this square is actually having a two tones. So I'm initiating with my pencil and I'm not going to draw the outlines of this particular image. This is what it makes a different in, it makes a different game altogether as compared to the other going techniques. So I am just finding the darkest portion that is pretty much visible in the real image. And initiating from there. Then I am going towards the light of dawn. So I am using the grading technique as I have already an average and in the previous lesson and tried to get an even tone all over the paper, on, over the drawing paper. Okay, so by this, I just came up to this results. What you can see or hear. The low I have just find that portion and then I leave the lightest ocean with no pencil efforts. And father dog effects. I am repeating the Dow Jones using the same pencil and not changing them from one to another, as I've already mentioned. And try to get the darker tones as well. So the browsers is gradually layer by layer. And It's not the outline technique. What we heard already discussed in the previous classes on the skin share has, but it's a matter of finding the dark portion, the light portion. This is the method called lightened shape string techniques. This is just an example. Simple example. We will move towards a more complexity things as well in the coming lessons of this particular thing. But this example, it's the most important example for anyone to basically understand that what we need to actually do and how we should initiate the things. So you can see that I am applying more layer onto the same segment, which is pretty dark. To know that we can see that I haven't used any smuggling tool. But if you want, you can leave the train or here as well. But if you really need something which is very finished up, you can definitely use shading tools or branding tools that I'm going to use here as well. Technique for that is user from the lightest portion. Then move toward the dark ocean. Don't start with the Democrats were, okay. Otherwise your brush will be completely filled with the dark layers. And when you are moving towards a lighter portion, it will definitely renewed the lightest portion. So always from light to dark. First applied or the light portion and then applied for the dark portions. And then you can actually play with that. Just keep the similar thing, same thing all over the paper. Ok. A gradual or I should say the more similar, more similar or there's some thing have to be a very specific part for that. A uniform, Yes, a uniform layer on every part of the paper. This is something which really makes it pretty much challenging. And at the same time, you can actually went up to the, to the worst results as well. But this is the beauty of this drying technique. So you can see that I have I have spread the graphite all over the paper. And then I just haven't small idea of the main object from where I started. That idea definitely helped me to finish things up. Now I'm using arrays and then remember that I have told you that a laser here is just as a drawing tool. So I'm going to substract the lighter portions, substract the dark portion to the light portion. This is known as subtraction method that is pretty much popular and, and artist. So I am subtracting the value of the light portions and using the kneaded eraser, finding a tip and then applying onto the paper. And you can see the beauty of that. That will definitely came out. I am just not going to pressurize it much. Just applying a very, very low pressure application of the razor. Don't try to apply it hard, otherwise it will ruin the things. Then I'm smashing it using the brush so that I can find the intones. Same thing I'm doing with the handles of the MOOC. So you can see I have found the subject from subject onto the paper. Now the next task is to finish the things and tried to. Create a beautiful MAC. That's the features and forms have been already formed. Process has been already explained to you. Now it's just a matter of finishing things. And for finishing, I would suggest you to rule some sharpening pencils. Okay. What I'm using 6B pencil, it's not that shopping. But for you. If you want to create something which is very finished, you use some sharpen pencils. Should you use some shopping and see? Now I'm using the pencil eraser for getting the small portion of the small highlighted portion and do my drawing. Even many artists actually found it very easy to use the pencil eraser initially. And at the end they create a mesh, mesh kind of thing using the pencil eraser. And it really create beautiful effect onto the drying. So you can do as well with the background thing. You can actually get that gradation thing meshing using the pencil eraser. That will definitely create a beautiful effect. But these are the matter of finishing. And the thing which is very important for learning that I've already explained to you. And finishing thing can be discussed. And it should have a separate discussion forum that we will discussed in the last lessons of this class that why finishing and how much finishing is basically required and actually how to finish the things. Because in artistic approach, finishing is completely different in as compare to the realistic drying approach. For any artists who cooperate, you don't need to finish the things add up to that level, which, which is acquired on the realistic corporate grind techniques. Both are different and we will discuss them as well. You can see that I already finished it. That can be done. More certain levels. But the aim is just to let you understand the process thing more and how to basically get the details that is more important from now prospective. So this dry by your own, put a pen holder, glass or ban our mock kind of thing onto the table. And then try to find the light and shapes thing onto that. That will definitely help you to achieve and understand light and shapes much better. Wait. See you in the next episode.
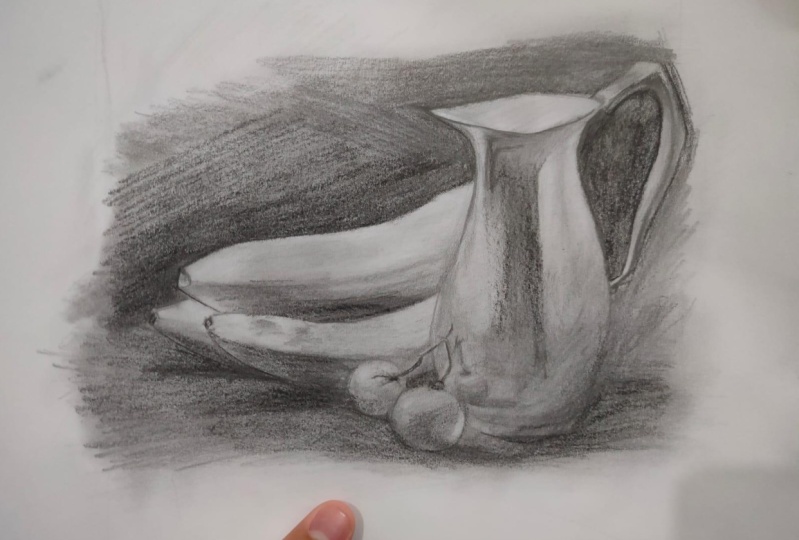
12. Still life art Technique: Now I'm going to do still life using latency hits techniques. So I am here putting the reference triangles well for you to basically see how I'm going to start it negotiated. So I am identifying its shape using light and shapes values. First, my aim is to find some doubt dawns, dark lights venues where I can find the dark dots. And using the Woodlands pencil, as I already mentioned. Doing the natural hedging actually for finding the whole pattern into the drawing. I'm just doing it in one direction. So initially my aim is not just to find the likeliness and just taking this to live as a reference triangle. And I am going to draw my own interpretation onto that. So I'm not following it line by line. And this is not actually the purpose of lighten shade storing a study. You actually do have a freedom of getting your own drying or having your own interpretation into action. So whatever we the reference that you were going to draw it as a reference only daughter tried to copy the exact image. Otherwise, it would be pretty much similar to the line-by-line approach, what we did in past. So here that this is very important, that you need to take. The reference is only made for the difference and it's not for the copying T. Reference lines only mean for referring something. Like if you want to draw something like this, not the exact copy eating. Okay. So this is the first thing that you need to see. The difference only for dereferencing, getting the idea, using the image. Draw your own interpretation. That is the main motive of lighten shade system and this kind of drain. So here you can see I have roughly good diarrhea. And then I am using the pencil on, completely onto the paper. Each and every part. This is the way I got a uniform layer. The first uniform layer, single layer on the complete paper. I'm making the paper Gray deserves a second step using my hands. Getting the complete paper gray. And you can see that the first, initial outlines are not that important here because they are actually erased. And omit the third process here. And using that is known as subtraction. I'm subtracting the light values from the dark ones using the eraser. Findings highlights. So here you can see that eraser is actually working as a drawing tool and snot I'm erasing two. This is what I have already mentioned. Using the razor is our most important and essential part of this complete grind technique. And mastering into two. That is, it's all about understanding it in more profoundly. So you need to actually create the strokes using the razor. Don't use them thoroughly, are. Don't let those fear came into the action, game, into the strokes. So use them pretty freely. Then again, getting the breakdown dark Using the implants. And so this is the second layer. First layer is just to make the paper grade. And the second layer is mean for getting more darker tones. You can do that thing in the first layer as well. But again, that actually comes after certain kinds of experiences. So if you want to do on altogether in this single layer, you need to get practiced onto that. But, but initially, you have to have a light tones. And then you find the dark tones. That would be easier if, if something went wrong, you can actually change them. And before using the eraser thing, you had to have that kind of thing that if something that doc you draw, that would be difficult for you to basically erased and getting the bedroom dark. And now you can see that I am using only single pencil. Getting initial dawns. And you don't need to actually have switching more pencils. Rather, finding the same pencil for all degrades. What is there in the particular train? Can use realism as well. You can use the cross-sections as well. Diagonalizing says, well, or I straight vertical or horizontal lines as all that is required only to have our tones, dark tones onto the paper. Now I'm using the brush and finding some mid tones and mixing the stones with the other, other doubt don't suspect. So you can see how I'm using it. We need completely on the paper and without a fear can sign off here. And I know that I can finish it up to any level even if something went wrong. Because some more, some more advance level of drawing's not that that previous thing that we draw the outlines and then we filled up the values and we are afraid everytime that whether things, if things went wrong, what should we do? These kind of doesn't have any sense. And again, you can see that after doing that, brushing onto the, the rank and again using the eraser and finding the highlighted portions. So this is continuous layer process in which we, we add layers, then smudge it, then again use the eraser thing. This is the continuous punishment. What we actually do to the paper. And the paper should have that kind of resistance, that kind of extinct. Or what should I say? It should have enough quantity of in terms of GSM so that it can actually retain its original structure. Otherwise, the paper is getting damage layer by layer. And it produced, producing some, some kind of of Russia's onto that. So for avoiding that, do not pressurize a pencil eraser or any other tool. Do those stops pretty lightly so that you can actually retain the texture of the paper. If you damage the structure of the paper. Bouldering don't seems that code. Also you can see or hear that I am trying to change the shape of the jug as well. If I didn't find something pretty proportionate. We have that kind of possibility that we can actually change the shape of that particular thing. So this option is also there. Now I'm going to use then be pencil for the background thing. As you can see, the background is pretty much black in nature. So far, using very high-grade pencil. The background that will definitely help us to achieve it quickly and won't take much of time and space. So I am using ten B directly. Instead of enhancing the layer of six b, I'm just trying to use ten B or 90 pencil directly under the bed down. If you do not have that kind of pencil, you can do the other stuff's using the 6B, but we'll definitely take some more time and efforts. So you can see that I'm using the pencil into the background thing so that I can find the black portion bag background quickly and easily. But here my purpose is actually to get the, get the texture and get the, get the strokes live. So I'm not going too much the textures of the pencils as well. That will definitely help me to afterload relate my drying due to the hatching perspective as well. I have created a pattern onto the background that you can see. This is the, this is something which is very attractive in terms of drawing and in terms of trying something using your own creation or on innovation. You can also do that. Create your own interpretation. Don't follow the real image completely, blindly and just tried to copy that image. Rather make your own creation using your own style and designs. That will definitely enhance your skills and enhance your trying 3s1. So you can see that how I actually find the shapes. Now how I am finalizing the shapes as well. There are certain things which are not in the proportion, but that we will take care of them onto the later finishing state. So you don't need to worry about them as well. And as you can see that both the both the bananas are distinct from each other. I'm just highlighting those values in-between them and try to get more details onto them. So I think we should do this drying in two parts, because if I do it to single particle, it will definitely escape few details. So I don't want to skip those details. I want to let you see all those things that is mandatory and that is, that is required to understand these techniques. I will take this lesson to the next video. And that coming lesson, same subject. I'm going to tell you about how to basically finished them to more extent, to the more extent. Because this is also finished one as of now, but we can do it more. So we will see in the next lesson as well.
13. Still Life Art Detailing: So we're in the second lesson, second part of the same lesson of still life and how to get the details. So I am zooming it up and showing you the detail portion. You can see over here there are two fruits lying on the table. And how to basically get the details by using and the pencils. And the reason I am applying eraser for the highlighting thing. And then I'm using the brush to smudge the things. And again, I'm redoing the highlighting portion. So this is a continuous process of getting highlights and out portions. Okay. And it is very much helpful for you to use needed a reason for that because it's suddenly change its shape. And by changing it shapes, you can actually get the minute details using this eraser. I'm just showing you closely to see the details. And when you are seeing it from a certain distance, you'll find it very, very defined and very detailed. But when you see in the Migros up ten, then you find that it doesn't even need that kind of details to be elaborated or they're just need few few strokes to basically shore highlight the required portion. So you don't need to follow it line by line. You all you need to understand lighten shades and follow the lead and shapes onto the train. If you get two things, two basic thing. First is the most darkest portion and the other thing is the most lightest portion. And all the details in between them are mid tones. So if you get to things in line, the tide will definitely come by itself. And the most doctors and then the most lightest. And then you can use pencil eraser as well for some minute details where you find that it's very difficult for you to do in a laser used nowadays are so that when that portions you can actually use pencil it is. And here I am using 2B pencil as well. On some minute areas. You can actually use them to basically get the details then as your other pencils are not that sharpened enough. So you can use one sharpened pencil of 2B or 4B grid. To basically get these details as well. So here you can actually see that it details things. And then the rest of the thing has already been taken up. Now the finishing portion is only there to get the details have been captured. And how much details can you give to the certain drying? And it's up to you to decide my venue are going to finish it up and at what kind of details you actually required and the growing. So both the things are very important. And it's up to you to basically decide this thing. Which kind of details and how much details that you are visiting medical heading in the particular point. And believe me, you don't need to actually finish it up to a certain extent. If you had a command on your growing skills, you don't need to finish such things. Now you can see again on another fruit and showing you the is the strokes that development using the, using the eraser. So you don't need to erase the things. You actually create the things, okay? Using the, using the area where you need to actually create the strokes of the white highlights and do not try to erase like you do in the previous thing. Here you need to basically get the eraser work like a drawing tool. So tried to create the strokes using the, using the eraser. Rest things are finishing things. And I believe that you are pretty much aware about the detailing things as I have already elaborated in my previous classes as well. So I think that you are pretty much confident in finishing of the things. I'm trying to get. The most darkest portion as well, where you can find the the blue portion on which the bananas are rested, the table and banana contact point, that is the most darkest portion for my reference drawing. So I am just darkening it up. Using this expensive. You can directly do with the ten events in here, what I am already doing, or here, you can do the same with the NB pencil as well. Also, you don't need to sharpen each and every pencil. Like you can see your here, the ten be pencil. I didn't shop that much because it really doesn't even require that sharpening thing onto the bands. And you only need two. Make a blend of top of the pencil, bland tip of the pencil. And then you can actually use them. And to the right. You can use the small size brush has when what I'm actually doing here. So this is why the two different size of pressures is pretty much required. And this is why I have included this pressure as well because it's a very fine brush. And you can actually get the fine and minute details by using dispersion. But initially you need to use the thick brush and then you can go with the inverse as well. For the TT instinct. I think I've almost finished data. So I hope you'll really understand what I have elaborated here. And try your own. Post that in the project section so that I can also see that, that what you have actually drawn and let me help you to actually achieve it to more extent levels. So always do your projects and submit it in the project section, on the discussion section, then we can actually discuss those things, those stuffs, and help each other do develop ourself in a better artist. So see you in the next lesson of this class.
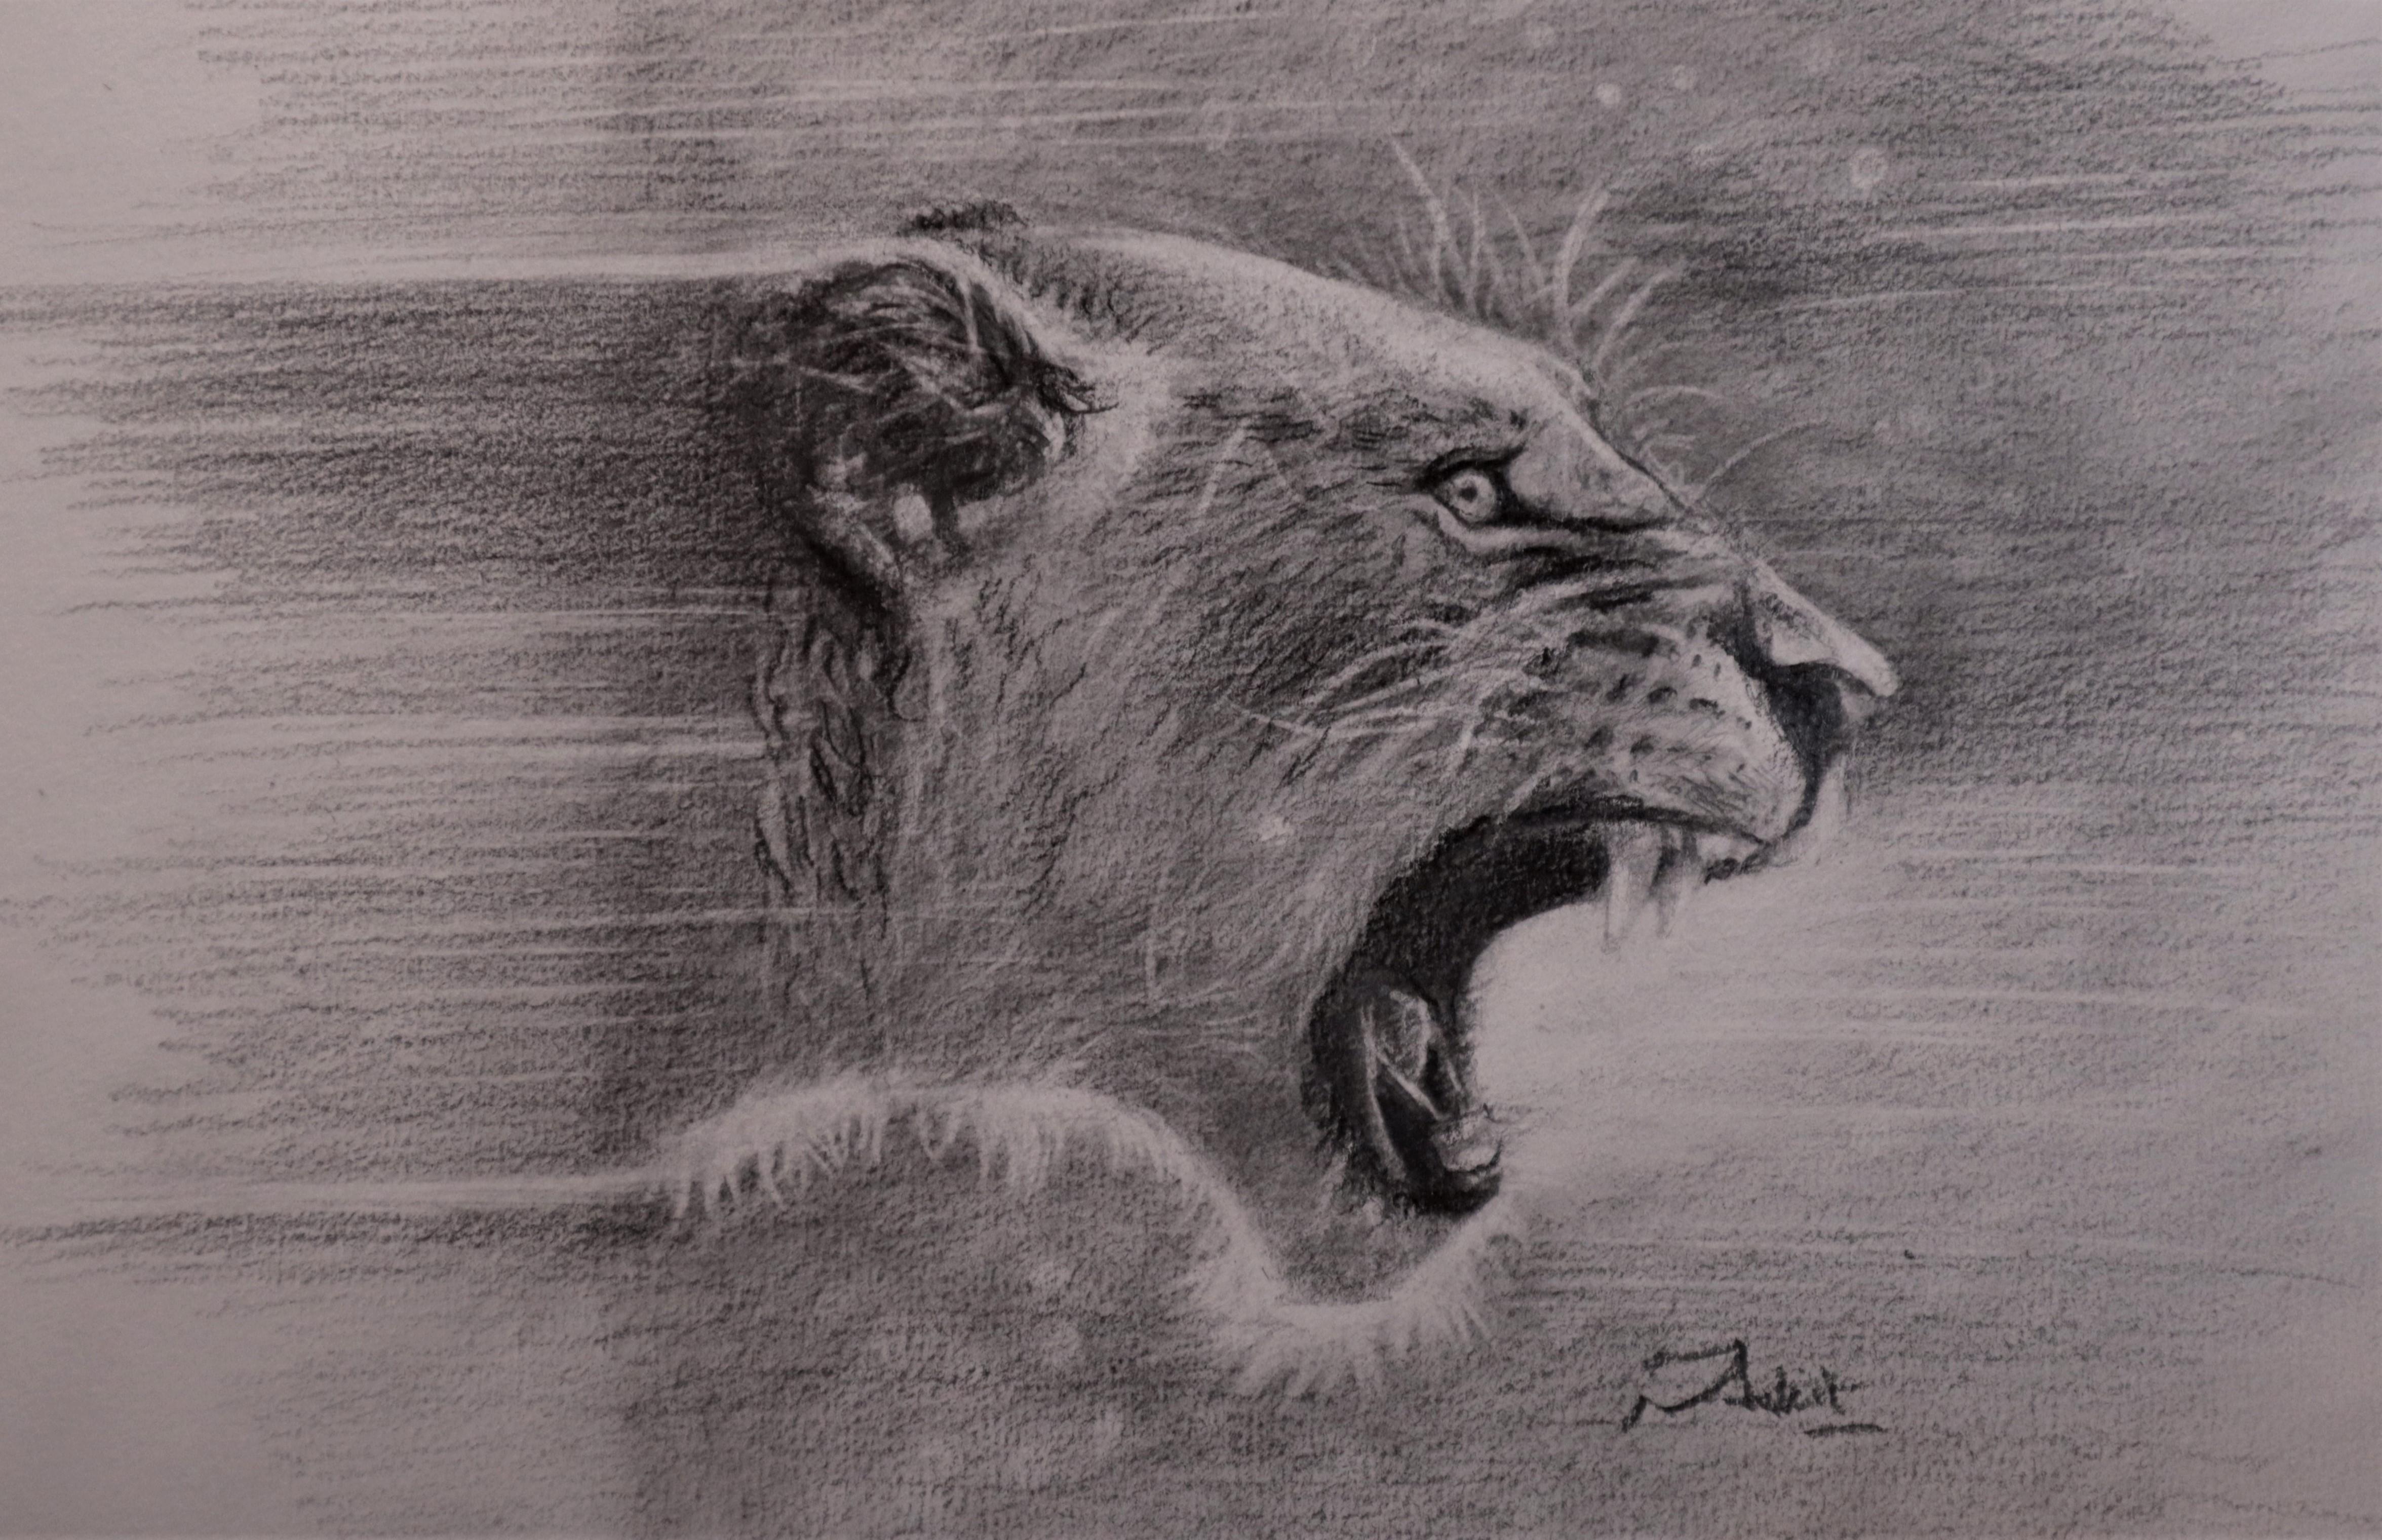
14. Getting Feature : An Intro: This is also a very important lesson in which we're going to draw wildlife drawing and how to basically express the emotions of particular wildlife creature and how to find the dark portion and then how to find the light portions. We're going, we're not going to draw the outline of the particular subject. We just have to see the dark portion and then see the light portion and then find the blocks. Then we're going to draw it accordingly.
15. Base Layers: Wildlife Art : Now let's just take another example. And this time we're going to take over my life creature and how to use technique of light and chiefs to give the results of this. Knowingly, I took away challenging creator and the action that has been enrolled in this fourth grade. That is something which is very challenging and list creating. But I'm going to do this and using the same pencil as you can see. And I'm, first of all, I am Identify the most darkest portions and going to identifying the most darkest portions like here, starting from the ER thing, you can see there are many dark layers. Are there some initiating with there? And then I am going to the other portion as well. Or here. I'm also using a pencil measurement thing because in this kind of creators are in this kind of operates in it portrays our enemy walk breaks. You. You actually need to have some kind of measurement so that you can make the thing proportionate. It does not mean four resemblance thing, but it doesn't actually mean for the proportionate thing. It means that it has to be in the correct proportion, otherwise it won't look like. And either, if you want to draw, attract either the proportions of the office space should be in correct order. So for that I am using the pencil measurement thing. Okay. And initially I'm doing I'm going with this portion. Ok. One can also do that, that if somebody wanted to do another approach, he can actually do the first great ONE layer onto the paper and then find that out this portion. That is also correct. How are if you want to draw it like this is actually what I am doing. I'm finding the novice motion and then doing the great don't give great onto the autocomplete paper. So both the things are correct. Okay. And using the same Benson's waterless graphite pencil is off-center and spread. And using the cross hatching thing, using the diagonal hedging thing. Trying to get the lives. Now I am just trying to get them completely and what I have discussed earlier. So again, no border thing. You can do first this thing and then find the most darkest area. Are first, find the doubt Australia and then do the great, great dawning relation thing under the paper. Both are correct and both let you paid to the current. Now you can see I'm using my fingers and complete hand too much and spread the whole graphite on paper so that I can get an event surface. And then the highlighting things came. The subtraction matter. Using my reason needed is to basically find the most highlighted portion, which is the forehead. Applying the first layer. And you don't need to be afraid with the proportion thing. Initially. You just try to get as close as you can. Do not try to spend lot of time on to that because after than that, you have to have certain kinds of changes on your drain. So don't be afraid in initial list, okay. You can change certain things. If you don't put pressure onto the Ryan, you always had to have a chance to basically change the things. So don't be afraid of that. And you can see the building as well and just highlighting a few areas. And the drawing would have already big on to the paper that you can see over here. This is just a layout, okay? It's not finalized. So many genius can be done. So this is why I say depends on measurement only help you to let you understand the correct proportions. If you really want to learn the Pentagon measurement thing, you can watch my first class honours kinship, that has been dedicated for beginners guide to Puerto doing that. You can see there I have to do everything about mental measurement thing. How to do that until the measurement outcome measure using the offensive that I have elaborated in a very, very easy in temporary. So you can see that as the that is why I am not telling you here again that particular thing and using the same name. So you can see that a single pencil can do a lot of miraculous thing. You don't need any edge B2B or too expensive for getting the outlines first and then what the basic thing, what we did and what many artists used to do. Here. That isn't required. You just directly start with a, the high-grade pencil and find the light and shapes thing. This is the most advanced technique. What artists actually used to do. These techniques are blocking technique. These techniques are very advanced as compared with older techniques of trying. What we already discussed. This is my artists love these techniques because these techniques are, first of all, they are very comfortable for the artists. Because the artists are more comfortable for getting the lighting sheets things rather than that of the outline things. And then it allows artists to make their own creation and not going to copy the original thing. It helps their freedom and liberation as well. And it's a most amazing thing is that time-saving thing? This is the most important thing. A lot of time has been saved as you are not going to draw the outline thing. Many of the artists I have seen the total hours and hours to get the outlines using the ten pencils, the lower repentance. And then they start shading thing. So here you get the shading altogether, but out LinkedIn and you have a lot of time being saved by doing this technique. So it's, it's, the most important aspect is that it is time-saving. So I have, I have took this class to do all three parts. So this lesson will continue in the next part. So this is just the first part of it. And then in the next part of this lesson, I'm going to finish this particular drawing and you can see the changes, how I am going to do that changes as well. So see you in the next part of this lesson.
16. Evolving Features: Wildlife Art: So we are in the second part of the previous episode. And here I am going to finish it up. By life hard work, what we took in the last part as well. So presently I am going to draw and using the brush to directly smudge all the details and get more even don'ts purpose of using the brush is just to even surface, even gray surface on the paper. And then we can actually identify the, the highlight tools. The resulting comes into action and then finalizing things. If someone wants to do it earlier at IIT. Firstly, there are many artists who actually get the first gray paper and then draw something that, that is also a good idea of doing that thing. But altogether the purposes theme. Now again, I'm using my kneaded eraser and finding, finding the highlighted area. If you understand the fundamental of it, you can't draw anything, whether it's an animal drawing are still like crying or a human portrait as well. All the things that can be done. But the resemblance thing is not that a key factor thing in this kind of Planck's. These kind of techniques actually take you towards more your own style of grinding, rather copying anything. So this thing always you should keep in your mind that whenever you are using these techniques, don't try to copy the things. Otherwise it will be very, very basic thing again. So if you want to advance your techniques and skills and your artworks, you must understand this thing that you are going to use this technique only for creating something which really inspire yourself and to create something which is, which is your own creation. And it's not copied from, it's not something which is, which has been copied from the reference thing. Okay? Reference line is only mean for having a reference. Just to dig inspired from the particular image and then draw your own, your own thing, okay? Or own stylus. But this is very important to understand. Now you can see that I am going to use pencil erase, some highlighting portion minute highlighting Gothenburg. And then I'm using Adobe pencil for very small details in which six BR, phobia, not that capable of doing so. And this is very easy to understand. And, but at the same time, it's very difficult when you're going to do, when you're going to do it by your own, then you will find the difficulties and some, some of the things I look very easy when you see them only, but when you're going to actually do them, that, then you find the real difficulty thing. But again, if you want to draw, if you want to extend your art style, you definitely have to follows these things. Otherwise, you will stick to your own way of drying like if you want to. If you draw in the grid method, obtain R. If you just copying things from one to another using projectors or not, then it's not. The student is not for you. Distributed is only for those who really want to excel themselves form a basic do the advanced level in the drain. So I think that whatever I am, I am telling you here and it's completely understand by switching the pencil is something which is very important. But here, switching the pencil is not a very, very important thing to do. So here you just stick to one pencil that how I did, I used woodlands to initiate the things and then finishing for finishing thing I am using 6B pencil, sometimes 90 pencil for bedroom thing and do Women's Reserve due to few minute areas flow. My new chairs that can be used using the two events. Okay? So this is the procedure to actually understand. So you can see that the pendulum is actually to get the, get the hairs on the creator. So it's very important to use. These tools are very crucial for the drying using graphite. And it's also very important for charcoal as well. So always use these pencils, pencils, pencils to basically hit the highlights. Ok. Now I mean enhancing few more details, few more layers so that I can actually get the real expression on that line. Now you can see it from the grocer and how actually I'm doing the the finishing offered and how many Using the dark rentals and then the razor pens in simultaneously to getting the full details, details of the four. But it's, again, it's not bad important thing to really understand. The main important thing is that I have already told you how to actually get the shape of the particular obtain, then finishing something which is not that important as far as the, the initial thing. Because I know that many of my followers and many of my students are basically, are very good in getting the, the finishing done. Difficulty I have seen in my written with my students is that they actually don't know how to initiate the things. So far, initiating things. It's very helpful to really understand these things. As always saved that initiation is something which is very crucial for learning anything. So I think that my hope that my, my classes really help you basically initiate things and how to actually get in the sky. And a vector would be the only help you to get the drying time. Getting these details in this kind of crying, it's very important for you to use the right tool on the right place. So here, growing hears and firms and all the details are very complex. Using the pencil eraser will definitely help you to basically get these details. I'm zooming in to let you see the things that is actually happening and how I'm using these pencils for getting each and every detail you can see. It's very important to really understand the details, how I'm getting the details using these pencils. So already deals are being captured using these pencils. And then the black pencil, the angry, afraid pencil surrounding to them so that it can actually reflect and how it will definitely come out. The details things. So I think that things have been discussed or here regarding the finishing thing. Now I'm waiting time lapse into things routine so that we can finish it up and move towards the human corporate thing. For the background thing that you can see, there are many options, have labels which are available for you. And one of them is to just copy the real background thing in which contouring had been done. Other options are also available that I'm going to explore in in this particular part only. So far, just copying the old server. You just need to use pencil and then use the brush. You can very easily find the exactness of the real image. Okay? But for finding your own way of creating something new, that is something which is very challenging. And that really made a lot of experience, a lot of afford experiment isn't. Okay. That is something which is very important and I'm going to show it to you that how you can actually get the relevance, the portrait into the bedroom thing. Which is very important. If you don't want the original way of triangle or the traditional way of trying, just copying things. You can use your own creation, your own creativity. Just like I'm showing you here. So as you can see that either isn't angry and rolling and and there is a lot of force enrolled in it. So it's a good idea to basically get the force through the lines, show short to the lions from the background thing, which will really reflect the real expression of this particular creation. So like that, like this simple example, you can also add background. Thanks as well. Actually, which, which, which really relates with the original contact, what created, which is relatable thing for you. I'm just using the horizontal, horizontal hatching things so that I can actually show the force and the action and the speed that is involved in the drying process, which really reflect the way of working. This is just an idea. You can make your own creation as well. Not the very difficult thing, but at the same time it's very, very fun, loving, very creative, very innovative. And I think artists love to do that kind of expressions into their drawing. So I hope that you really like the way I did this smallest pediment into the background thing. Okay, so I'm going to see you in the next lesson, which is basically based on four credits towards a portrait things. So see you in the next lesson.
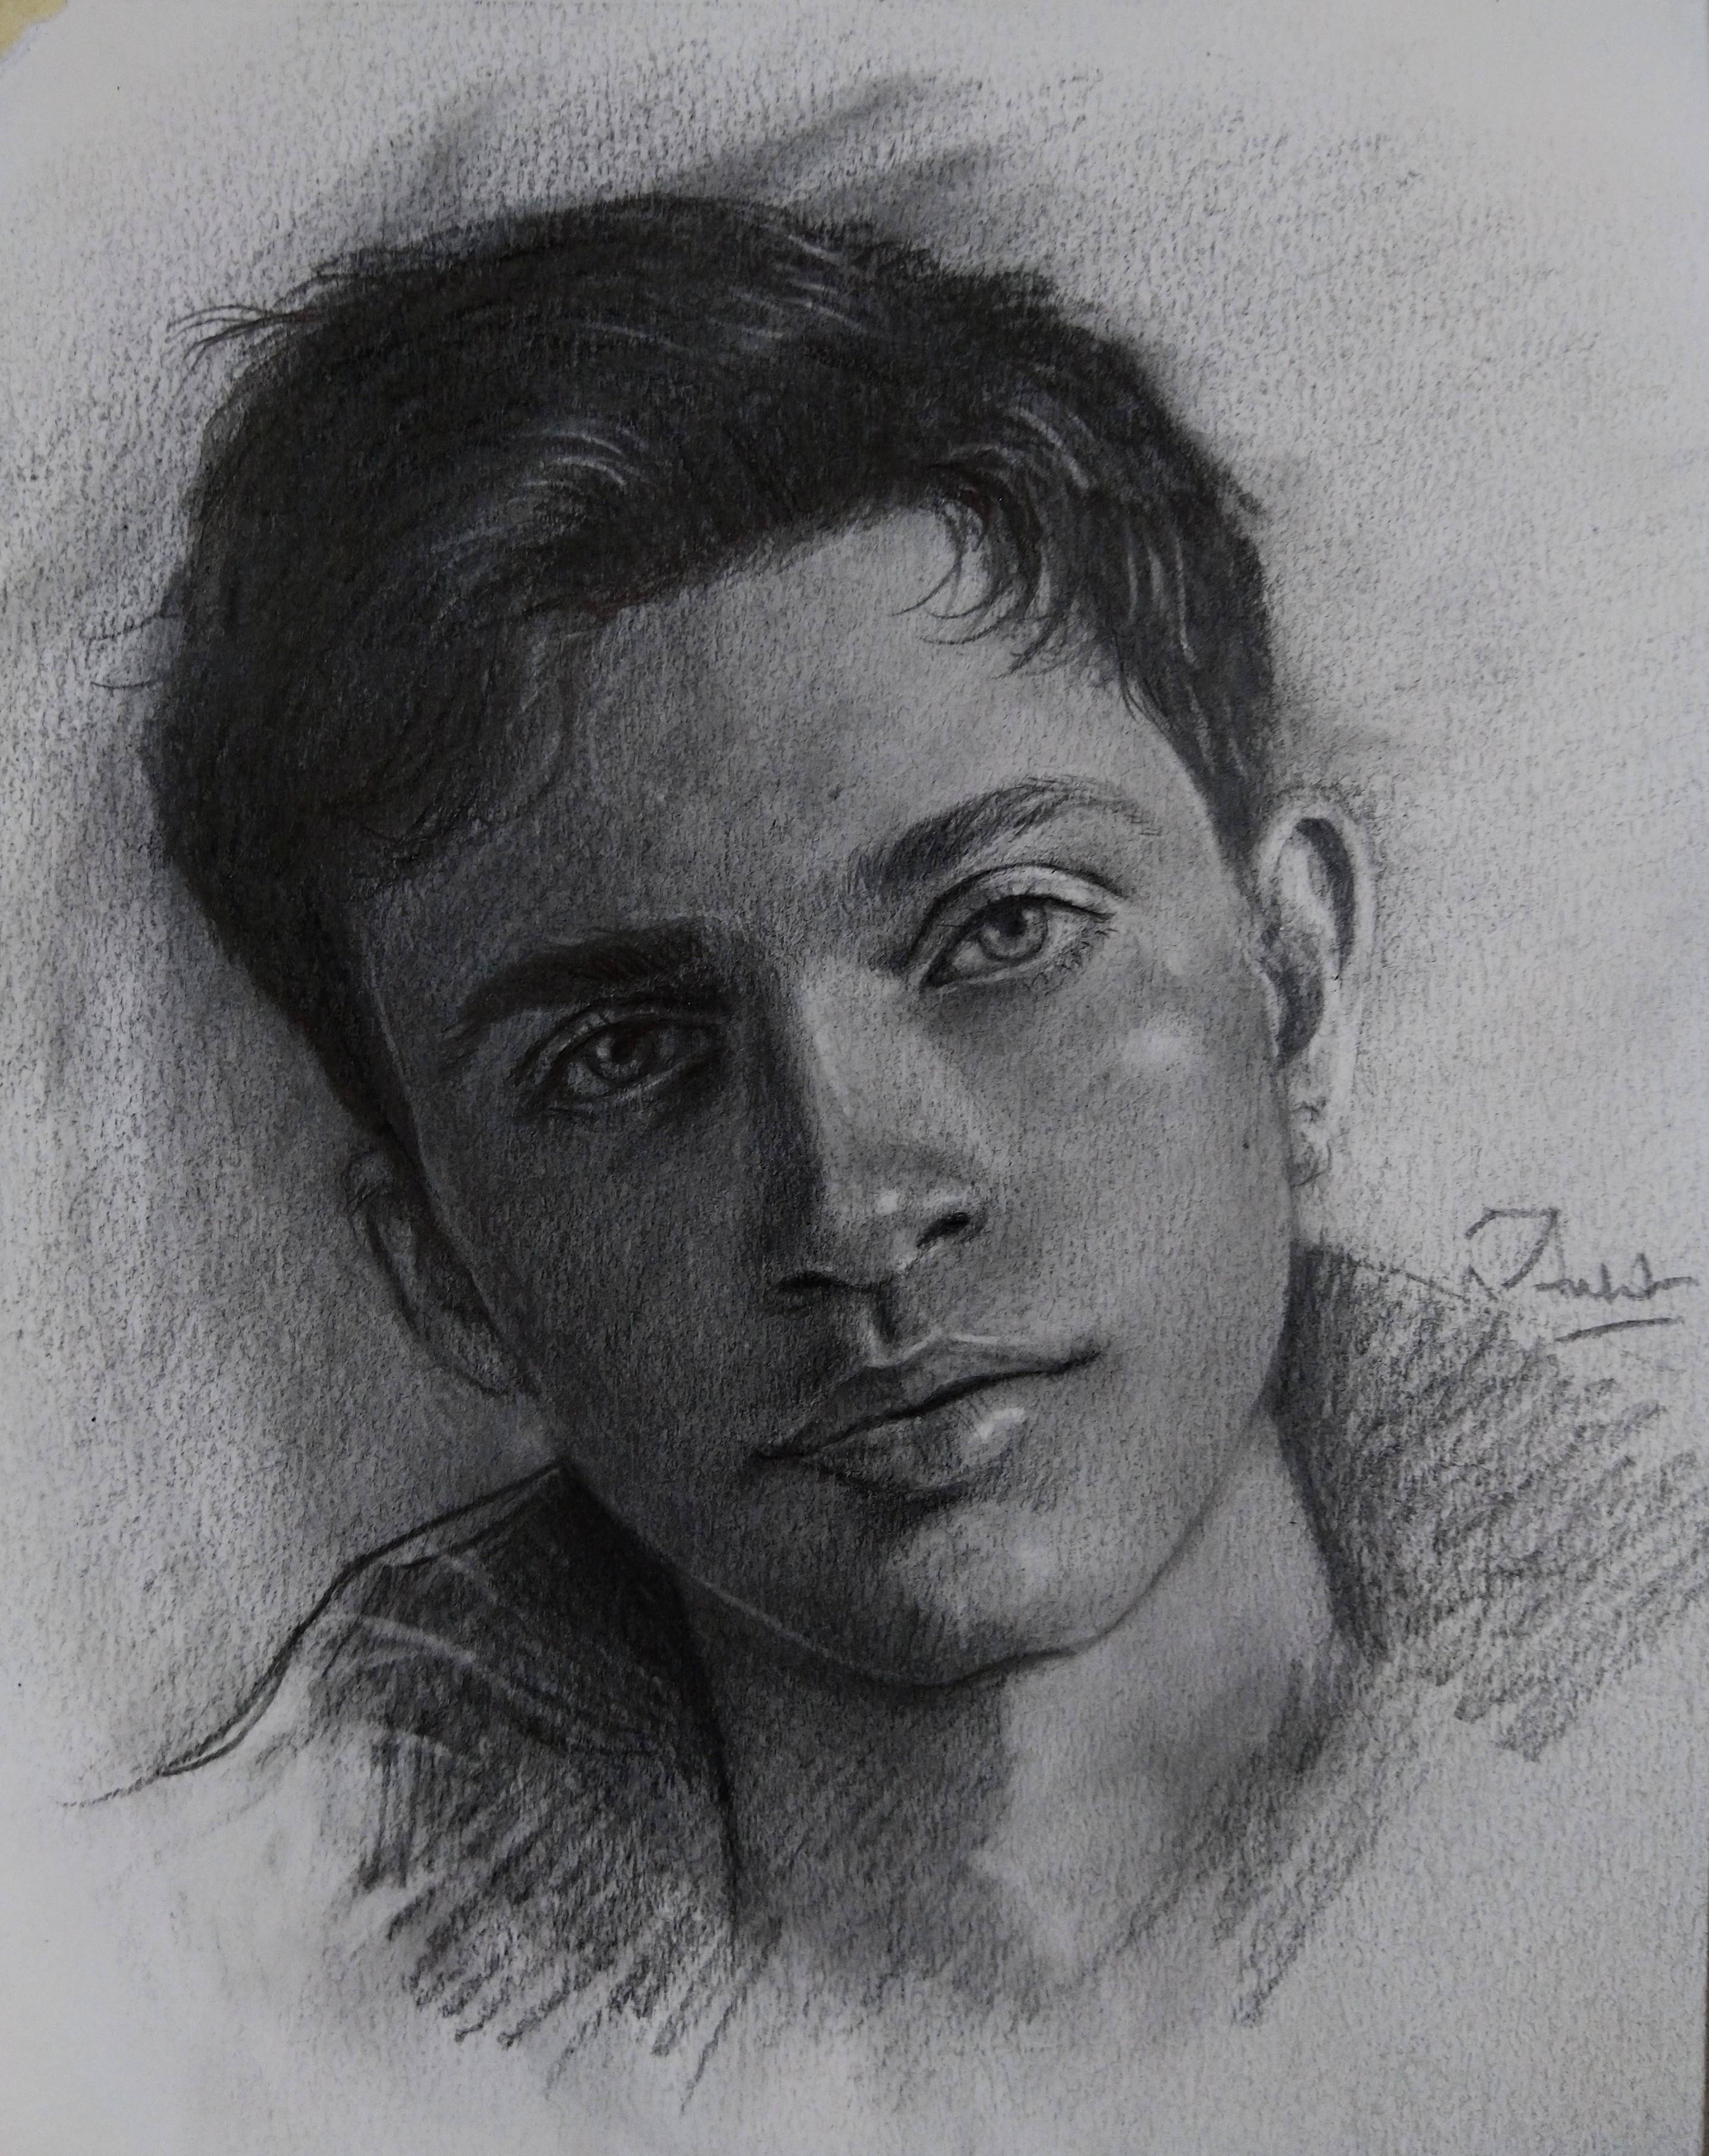
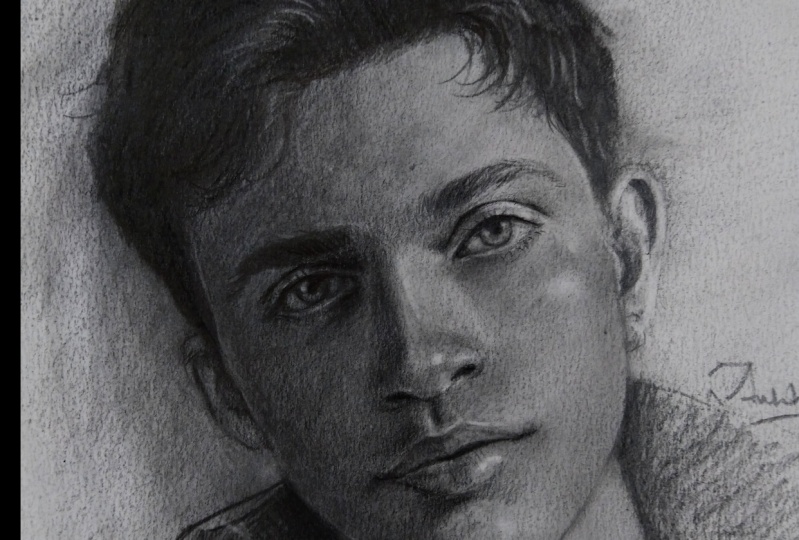
17. Human Portrait: Base Layer: So as we move towards the human portrait, as mentioned in the previous lesson, I'm just going to first discriminate the dark portion and then the light portion for that. And just seeing the angle of the particular fields. But I'm going to draw it here. So, and for that, I am just drawing the two lines on top line and the maneuvered lumen. And then I am finding as, as parallel to the vertical line and just finding the portions which are dark in nature. So you can see the real image, then you can see what I'm actually doing the right side. And see that I'm using the Bentsen measurement technique has, but at the same time because I need to have proportionally phase so far of getting the proportionate phase, I am just trying to measure such things so that I can relate my drive to the proportional. Then that is only purpose of this particular measurement. Because you need to actually draw the complete Austenite phase and you don't want to actually get the proportions out of its way. So for that, just tried to get the dimensions and then just follow the dao patches, dark parts. So as you can see on here of this particular model is computed out. So I just identify that. And then I am actually getting the shape of the face. Just a rough idea. So we are not clear about whether we're going in the direction or not. Just following the, the, the part of the dorms and living the light dawns. Meaning by doing that, we actually get the dark portions first. And you may have this kind of portions as well that whether we are able to draw only these kind of lead and sheets real images on. We can draw a monolithic one as a light on grinders where you can draw both of them. But for understanding them in a better way, you must start with this kind of language in which you will find dark bones as well as the lighter tones. So now you can see I'm just applying all the graphite using the same moonless Benson from which I have started it. And applying the layer for getting the grape paper so that I can actually find the lighter tones later on. So you can see that I have applied all the doubt dawn's first, and then I am. Applying more leaves, more layers of doubt dawns and not get trying to copy the real managers try to get the positions correct. For this is first and foremost thing to get the positions proportions in line with the real enough so that you can draw a proportionate phase. Just the purpose of stack saw the initial process is more important and crucial to let you do understand in a deeper manner. Because later things are only subject to finishing pin and those are not that important as well as the initial months. So comparing the interesting techniques with the initial states techniques. So ancient states that make is always have a deep understanding. It should have a more deeper understanding because that basically all from renewed until again their foundations. And if your foundations are correct, so you can build them beautiful thanks to the strong foundation. So always remember to get the foundations correct. So you can see that I have measured the real image, has been reframed them for just having a proportionate face. That's it. And then I am just applying that applying the same Benson onto the paper. And I haven't changed brands. And now you can see, and I think I have completed 20%, 30 percent of what appropriate. Now I'm using my own hands as I have already told you in previous lessons. Just applying the gray dawn before meeting the paper Gray actually. Okay, for further subtraction of the nitrogens. Now, I am using the eraser. We're actually subtracting the values and finding the nitrogen ions. So this is a very evolvement ethnic. And if you are able to do that, and if you finding the VI for this kind of crime, you can definitely achieve in the drawing section are very artistic way of growing anything. So initially I just have found few white portions. I just highlighted those motions. Then again, I am coming up with minds in the aboutness one. And again, making the tanks more dark and playing more layers onto one. So now this is just a layer by layer process. I am applying more and more layers onto that. And actually the key for the particular drawing like this is to don't be afraid using the Benton's Dow Jones. So you lose stroke should, should be fearless and it should not be, it should not be like that you are not confident enough to draw anything dark to it should actually reflect in stock assessment and adapt onsets, but always this is always listed to not do actually follow the real image. Line may lane. Anyway area. Just try to get the values correct and draw your own interpretation. Okay? So do not try to copy this same thing as now. I actually, I'm using the another pencil prevented for getting more governments, the warblers, one pencil is forbidden. In the dome surface, softness and darkness. It was for me, this one is what I have actually using, it's 06 b1, so it is more darker as compare to the previous map. And you can see I am applying pencil measurement technique as well for having a proportionate face. If you really want to learn mental measurement technique. You can see my first class on skin share in which I have told and fleeting about density measurement techniques. So you can watch that particular lesson and particular glasses, Mississippi mean for understanding of better understanding of mental measurement technique. The class name is Beginners Guide to populate brine that you can actually see. Now you can see I'm using the brush. Should always apply brush with a minimum pressure. Okay? If you apply more pressure onto the paper, then the grains will damage and runs again and start getting damaging. Then there is no such possibility to applying layer onto them. So this is very important to understand. Now you can see I'm using the eraser for getting more lighter tones. So I am actually using my eraser as a drawing tool, but I have already mentioned you in my previous lessons. This is very important, basically find anyone and everyone can understand it. Like how you can utilize your eraser for drying right eyelid today, the US. So you can see now I am start finishing the array abortion. And I'm not afraid of following the real image and just referring the really meant just as a reference thing. And I'm just trying to draw my own interpretation on to them. And I'm not afraid of actually. And I'm copying the real museum, getting the values in line with the gentleman and just having that in front of that and trying to get my own creative trying. Okay? And this is very important to understand when you are drawing something from your own interpretation thing. And we can get the semblance as that. But if you follow the resemblance thing, you will lose all the beauty that has been deal in this process. So my first let you make free actually our bigger image rather to make more fun, loving and creative style of art parking that so that you can actually walk yourself as a creative artist. Ok. For that purpose, needed to do makers and free and we should not afraid of mishandling payments are opting the real image. The first, understand things, the basic things. Then we can actually move toward the next stage. So you can see the details, how I am getting the details using the same Pentland, not when do you use any great pencils like do we'll be Benson orange ribbons and I'm just using the six VPNs and 4B events and for these kind of crime and getting the results far more cookie as compared to the previous way of working. Maybe we'll see. So just making it part by part obesity yet you understand on the process that has been involved into it and not in a hurry to basically time-lapse The important thing. So this is why I just want you to basically see each and every day did you can see how I am using the Elazar as well or getting the highlights and done. So I hope you understand each and every thing that I have elaborated on in this part of this lesson. See you in the next part of this lesson.
18. Human Portrait: Finishing: So we are in the second part of that particular lesson in which we are going to learn how to draw a portrayed using Latin sheets technique. So in the previous lesson, I have to only about outdoor B, get the base layers and base foundation. How to create the base foundation for any baud rate. And then basically how you actually manage lightened shapes using subtraction method and getting more and more layer onto the paper using bushes, your fingers, and all the techniques that I told you. So here you can see that I am using small hair brush and a thin brush. And by actually I'm using it to get the small and tiny details that are difficult to basically getting by the use of that didactic brush, what I used previously. So for that I am using this thin brush. Okay? Now, after you using every brushstrokes are smudging, you actually, your second step for that to basically use the eraser and find that lighter tones are the highlighting two tones. So by doing this, you can actually get the exact details what is actually required. So this is the continuous process. First you need to get the Dow Jones, then you smudge it out and then find the highlighting portions in the particular section. Whether it's a midtone, highlighting tones, that is not that important, but the important thing is this only that you need to get the details in this chronological thing. And using this exponential only here as also in few minute details like this, I am using the 2B pencils as well, just to get the small hint of it, kindof graphite. Now you can see that how I am basically using these needed razor for highlighting something on the north side, center of the north. And then I'm using my finger to basically mix those extra highlighted portion with the real limits. So you have promote this thing as well. You don't need just to don't just go with the highlight ending and limit, limit leg disorderly. You just have tools mixed that thing, that thing, that the horizontal tail so that it can actually don't look awkward. I have seen many of the artist actually, many of the bigness as when we're just finding it difficult to get the highlight. They are not able to match that highlight into the, into the drying so that it looked like a part of this particular booklet. So this is very important and for that you actually need to use your fingers. Are tissue papers. Like I am just drawing it here as well so that you can actually see how I'm using the dispense laser and the eyebrow sections where many of the artists actually draw here by here thing back here. We can see that how that data smart way of blocking actually help you do actually get the lighter don't later. Under the product like graphite. There are many others who actually say that it's not that possible thing. But here you can actually see that practically it's pretty much impossible to basically get the light return to later on in any drawing. And it's not that difficult thing uses, no, you should know that technique thing elsewhere. If you know that technique, you can actually get the results. Now I am continuously using the eraser and finding some, some patches, some patterns of highlights, and trying to get margin on the graphite and getting the smooth transitions from dark to light. It's very important in this kind of triangles, but now I'm zooming it up. So basically you can see that how I am actually using the areas that I'm just tapping onto the paper and just tap small dabs, small circular tabs so that I can actually make the evenness cleared, the evenness of sheets. It should not be a drastic edge, should not be at one volt. It should be smooth and even so that you can actually get the, get the more smooth results and as well as it should look like or elastic skin texture as well. So Bob, the thing is very, very required in the style of drugs. This is why these techniques are more important and more relevant as compared to the to the different drying strikes. Now, I'm doing the same thing using the pencil eraser. What I did with the neorealism. Now, the same thing is being done by using the pencil, the resulting. Then I'm using the small brush. Now again, I'm using Google for getting my new details around a Bartlett. And Lord, I am using small. I'm actually making small size circle by using dispenser to be city, get the minute details. And try do actually get the details as close as possible and as actually, as required as possible. Actually as close as possible. As actually as much a portrait is requiring these detail. I am just trying to give it to them for all other area and just doing the bucketing on the hatching thing that you can see. The condoning lines that has been created. So all these techniques you can also use by using different grade of pencils. You can actually get this kind of car doors line. To that you can actually have your own style of working and you can actually roll your own style. Which is a very important for any artist to actually get, actually understand and actually create music to six people answer, try to get the darkness into the hair thing. I'm just trying to copying the real texture, real texture here. By seeing the real image, this trying to follow that thing as well, only because I'm pretty interested in using something with my own on creation for here to learn that important for me here for a year. And my main focuses for the features thing. And here an other other details like T-Shirt or not. It's the second written for me for this kind of portrait. So I'm not just focusing on to them more. Rather I am just trying to have a focus on the main feature thing and I'm just trying to get it more dry to make it more artistic as, as possible. So you can basically see that how actually I have done all these things as of now. And the portrait is in pretty much decent condition. And I hope that whatever I tried here to basically let you understand, I make make it clear to you all. And hope that it's really helpful for you to basically understand that this technique, this technique has as many dimensions as the other colored oil colour techniques or other watercolor techniques. Because there are many artists who are using this technique in their own various v's. As I have seen that different artists who are using the pipe powder first to basically create the paper. And then the gist, come up with the, with the areas of thing and then trying to get the highlights first. So there are many artists who are using different approaches for this light and shapes thing. But the basic fundamental seem, the basic fundamental of it is, you know, that very much that elaborately here that you need to actually identify any new form using land sheets technique. And you need to just identify the portions who are darker in nature and lighter in nature and in between them. The old tones are, we don't. And this is the only way to basically get the gradation correct. And then you upgradation are correct. You actually can even get the get any kind of grain, whether it's appropriate, it's a landscape, are, it's a viral life art, what I've shown you. And then it's a still life. So anything can be, can be obtained using these techniques. The important thing is that that whether you understood that ethnic or not, if you have a technique, if you have ideology about that, then you can actually can create knitting. 19. See that I'm just finishing it up with some other tiny details like growing eyelashes and trying to get some more small, fine details as well. So if you ask me that whether finishing is that much important or not in this kind of artist tiles. So my solution to you is that, that finishing is not a very key important thing in this kind of grind. I'm not talking about the realistic drawing techniques. But here, finishing is something which is a different thing, okay? Fishing is not something that you have created, something which is very realistic in this kind of trite. Rather finishing you something which really, which really make the portrait we have predicted by someone. Okay? And it's not, it's not something that look realistic or that look photographically created. Rather it should, it should look like and artistic or scripting. So whenever you try to finish these kind of artwork, you can actually create patterns, textures are clouds, sometimes. Menu data's, I have seen that the cross hatched or the background. And sometimes the artists made the things unfinished fun portion of the portrayed unfinished 1.5 of the portion is finished. I've seen many things. I've been experimented by many of the artists. And they actually found that bring helpful when, when it comes to create your own art style of working. So for you as well distinct that I suggest you wanting, that I can actually suggest you that you should also think in the same way and find this thing that you don't need to actually finish anything. Rather you, you define the finishing in your own way. Working OK. So you don't need to basically follow the real enemies and just tried to be a very listed as realistic as possible. Rather you just have to create your own style using different patterns, different approaches. Sometimes I've seen that literally in whole-brain menu darkness also using water for creating a different, different atoms are different style and the bedroom tip. So it's basically a Purdue to be how you actually come up with your idea of innovation and how you actually create it. So you must keep this thing in your mind and then follow your heart. What, whatever it is thing. Do you put your drying it? Basically it's your own brain so you don't basically don't need to, need to have any instruction formats. You can use your own creation, your own interpretation, and then you can evolve your own way of working style of working. That would be I think, the best justification with this kind of styles. And I hope that whatever I have told you here and that being that being understood by you in the same way that the way I have explained. Then I think I have finished it up to a certain Lebanon's when it is required. By in my way of thinking, your may be different. So I think that you really understand whatever I have told you here. And it's all about this particular lesson. Thank you. You can also try this portrait and try your effort and posts it on to the projects section. And I will see that.
 Ankit Jasmatiya, Fine Artist