Transcripts
1. Introduction To Class: Hi friends. I'm your friend AND
gates and I'm welcoming you all on my new
Skillshare class. This class is all mean
for those who really want to express their
art through lines. So what are these lines? These lines may be cross. I think it's diagonal heading, vertical heading, or there are
many other kinds of atoms. What we have included in
this class so that we can understand the still-life
artwork in more amazing be. The main objective of this
class is to understand the still-life through
the expression of cross hatching techniques. What we are going to
learn in this class, in this class we are
going to learn about the techniques of cross writing and how to basically
understanding the processing using
different parameters, using different tools,
and basically how to get the final product using
the cross etching technique. This is very normative class. We will discuss about
the kettle product and understand how
basically we can draw the outlines of the product
and then how to literally get the cross settings done
by the end of this class, I am pretty much sure that
you will learn the process. You will understand
the techniques. And this may be the possibility
that this technique will be your first choice
for any shading techniques. I hope that you will
enjoy this whole class. And let's enjoy the
beautiful journey of cross hatching
technique on still-life. Stay with me.
2. An Intro to Required Tools : The first lesson we will
understand about the tools and the familiarization
with different kinds of tools and when to use them. The pencil is the
most important tool for this particular class. So talking about the tools, we don't need that much of tool for this particular
drawing technique. You only need two
or three duels. That is mandatory. And we will discuss
about the must have DLD in this
particular class and what you can
have it if you do have a sufficient
amount of budget. Let's understand this.
3. Familiarisation with Desired Pencils: So in the first lesson
we're gonna talk about the tools that we're gonna
use in this particular class. And what are the tools
that is important and should have all those tools to draw the crosshatching
techniques. There are so many tools
in the market and you also may have that much
kind of stuffs with you. Do you need them? I don't think so that you
need that all the stuffs for our growing something which is governed by the cross
hatching things or not. So what are the tools that
are mandatory and what are the tools that may have if
you have a budget video. But if you are having
the shortage of budget, you must have
certain tools that, that has to be there. So we're going to
talk about that. Let's understand first lesson, my understanding
the desired tools. So this is the first lesson. Here. We are going to talk
about the tools. Here we're going to talk
about the desired tool. First of all, we will
talk about the graphite. What are the pencils
that we need? When we are talking about the
graphite pencil technique. V are not going to
talk about here about the charcoal drawing technique because it is
different one here, we are aiming to understand
the graphite first so that beginner can have
knowledge of tech tools. The graphite pencil
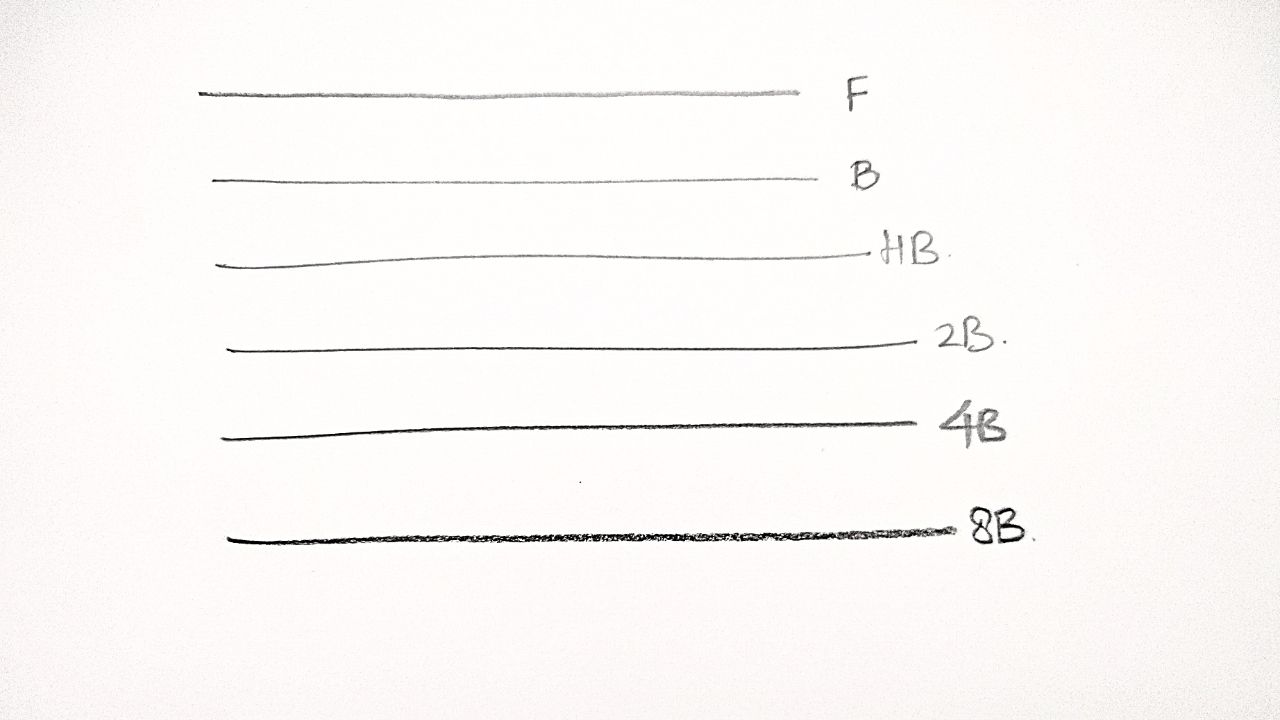
techniques section. The first one is the basic one, which is the pencil. Which kind of pencils
that you actually need. So you need certain
range of pencil in the graphite section that
is starting from the HBI, that is hard black, then you need be six big. You need that much
pencils with you. Here. Let you understand
that if you do have HB pencil for B pencil
or six big ones, that will solve your problem. So mandatory thing that
you should have here is only six SPE, only two of the pencils that are something which
is, must desire. These pencil you should, must have video for drying something like this that
we're gonna talk about here. What are the other pencils
that you may have used? These are our wood
pencil dependence that I'm having over here. This is the vote pencils. This is also afford pencil. So you may have another pencils that is
the mechanical pencil. So why the mechanical
pencil is required? Because mechanical pencil,
something like this, is having a very small diameter, let's say 0.5 or 0.7. The desired thing over here, you can see the tip is
very, very, very fine. And you don't need to
actually shop it every time. This is why you actually need this kind of
pencil so that you can have a very firm
crosshatching lines. Because in grosser things, you must have
understand the lines. You must have to have
a presence online. This kind of pencils
also create the lines, but you have to
sharpen it enough. Say for, for B, you may
have the lead like this. So after doing so much
of crosshatching, it won't be able to
do the processing. Then again, you need to
sharpen it enough to get the fine tip like
this or like this. So this is the only advantage that we can have with
the mechanical pencil. We don't need to
sharpen it enough. And also it's very fine. You can use it from
the top and create multiple layers of processing's without stopping yourself
from doing that. So you, it is the suggested one. This one is the suggestion.
This is suggest. You can have this pencil if you have certain kind
of budget video, but if you are not that
kind of budget with you and you are running short for
those stuffs you do have. So you may have the wood pencils that is the most
TAB until video.
4. All Kinds of Erasers Required: Now we will talk about
the various Elazar's, why they're so unique
in their users. Let's understand it. What would be the next
thing that you need? You need eraser. What are the users
that you need? Razors are coming in different
brand, different types. But here in the cross
hatching technique thing and understanding
the still-life, you need few erasers and
most of your investment. The mean of budget will go in this eraser and other
tools, not in the pencils. What are the reasons
that you need? The first is, you need
is kneaded eraser. Kneaded one. What are kneaded eraser? They are rubbery
element with them and they are so elastic that you can actually stretch
them and try to, you can change their
shape as well. Then rebuild their shape to the desired
thickness and width. And you can actually
get the erasing things so easily and
effectively. Like here. You just have to make a fine sharp edge
of that and you can see that you don't actually get even a small dust
particle onto that paper. So this is the only
advantage that it is having against these kinds of rubbers because it
is very much dusty. And when you are using them, it create some kind of
dust on your paper. You can see like this. You don't want to
actually those stuffs on your drawing and this would
be the most suggestible one. So use them and
have them with you. Whenever you are going to draw, you can get in this
kind of packaging. This is one, this one is
a favorite castle bond. So you can use them as well. This is very, very cheap
and you can get it. Not a very expensive
thing for you. But it's a biggest hack one
artist should have with them. Most would have tool. I suggest you to have it. What is the next one? The next
one is the pencil eraser. Mono Eraser. What are those erasers? Pencil areas are
and mono eraser. I think this whole lot of still-life thing
are very much relying onto those erasers because they actually help you to get the even a single
minute details. You will get many kinds
of results in the market. But which one you need to buy. I'm going to tell
you where here. So let's see. I'm just getting
the sum dark area so that we can work on to them. First one is the modal eraser. This one is a motor areas
are then pencil eraser. This one is a pencil eraser. This is mono areas are
these two kinds of erasers. You do have a, you do have another
reason in the market, but this is not going
to use over here. So I'm not going to
discuss this kind of eraser and this is
not at all required. So I'm not going to use it and not going to share
its experience with me, which is not at all Very good. Here, the pencil,
the reason this one is from your brand and
this is very reliable, very cost effective than
another one is the Mono Eraser. This is also a very
beautiful eraser and the manufacturer has created it so well and it works very fine. And you can actually
change the lead of it so you can reuse it. And you don't need to purchase every time this device rather
than to just refill it using the refilling eraser that is actually
coming in this form. You can see over here, this is the refill that particular
eraser can have. This. This is how you can actually use them as
many times as you want. And this actually a very, very, very amazing tool. I would suggest you
to actually use them. So these are two tools
that you may have. The first one is a
pencil eraser like this. You can see actually it is very effective for the minute
areas and minute lines. This one is very also
very effective one. You can see how this
one is helpful for you. You can see there are very minute lines you
can actually get. Also you can chiseling it using
the knife and then again, getting the exact shape of that particular needle
so that you can actually get the minute to minute detail. So if I'm going to
suggest you between them, if you do have a good
amount of budget, you may go with this. But if you're not having that
much of money to invest, you may use this going over one, and this is cheaper
than this one. So you can use that as well. But if you are
going to buy this, you will definitely
love this product. I'm pretty much sure
about that as well. You may have used these
stuffs and how to use them. I will, I'm going to tell you in the upcoming lessons
of this class. Now, let's quickly talk
about the other tools. See you in the next episode.
5. Introducing shading Tools: Now let's talk about the shading and this is
very important and what is shedding when it comes to understanding across setting. Because cross, I think, is not the normal
shading technique. What do we can use
in the realism or altruism or hyperlink
awesome technique. Here, shedding means
something different. You are going to get the
details of flight and shades using the lines and
not the shades or grades. So how we can achieve that? And what are the principles
for getting the shading, the cross setting, and what
are the types of processing. This is also very
important because all the processing does not
really mean that the x thing, it all means about how to get the lines and what are the strength of the
particular line. This is very
important lesson for all the beginners who really want to understand
and explore the cross any technique, Let's see this.
6. Shading Tools Overview : In this particular lesson, we will talk about the shading tools and what are the tools
and how we use them. This is the very important
lesson of this class. I am saying this why? Because we actually don't
need that much of tools, sharing tools specifically,
because we have to rely on our pencil rather
than the tools itself. Also, you shouldn't
have tools like this paper stump and something because you don't need them. You don't need to finish each and every part
rather than you have to show your skills on the pencil and to show that
cross hatching thing, you have to show the
strength and the foods that you actually
developed onto the pencil. So what are the
tools that you are actually using for
the shading thing? And so one is the pencil
itself that you are using. The other tool is the brush. We're going to use the
brush because there are so many gross adding lines
on which we need to rely on. The use of the brush
is very minimal. And where you're going
to use these brushes, these kind of stuffs. These brushes are makeup brush. You can see over here. You can actually see them in the previous class that I've already uploaded
on Skillshare, you can use a seed. You will actually
see those uses and how I effectively use them to
get the shading thing done. But here we are, we are going to use that is something which is very
important to understand. So let's say you do
something processing like this and you want to enhance the weight of the line and
you want to enhance the, the, the darkness of
the particular thing. How it actually help
it actually enhanced the darkness without
actually removing the lines. So you can see over here the
lines that is still there. All you need to do after
you don't need to put the pressure too much
onto those stuff and don't try to mix
everything rather than just to enhance the darkness. So you can see over here, this portion is without brush. This motion is with the brush. You can see that there is a marginal
difference between them. And then again, you come with
the closet and then adding the values so that you can actually get more darker tones, more darker values
across settings. You don't need to
change the fundamental of crosshatching is rather than mixing it completely
and just do. These tools will
help you to add on more and more depth and darkness in the drawing
contrast in the drain. So that is all about the
shading tool that is only to sharing
tool that you need. I didn't want to
that you may use some erasers for
the shading thing or getting the
highlights like this. And you kind of brush,
watercolor brush or whatever be the
Brush tool may have. You can use them. Design about the shading thing.
7. The types of Papers: Whether the papers do have significance in this
kind of drinks. What do you say? I would have to suggest
do something about this. So let's see this paper. This paper is very
smooth by saying that you are not able to
understand what the paper is, whether this paper
is smooth or rough. But you're going
to understand with the field and see
the, another paper. That particular blame had
been done on to that. This paper, this paper is
the rough paper. Okay. The another paper. Look at this figure over here. There is also a drain. And you can see this is
also a very smooth paper. Is smooth paper gives a smooth rendering and
smooth shadings like this. But the rough paper is something which actually worked for
processing techniques. Why? Because it's having some
small amount of textures and those structures and
those undulations will help you do actually create that particular
line onto them so that the line is very
much significant. When you are using
the smooth paper, it actually does the rates. And you need some brush kind of thing going or you
need some newspaper, some kind of thing to actually allow the paper to gain
more and more layers. But this particular thing is not there in the rough paper. Always you should have
a rough paper and that will automatically create the beauty of that
cross-cutting thing. Let's see about
the paper things.
8. Understanding Paper: In depth: Now let's talk about the
paper and why they are having so much of importance when it
comes to cross setting. Let's have a discussion. Now. I am going to discuss about the papers because this is very important and very crucial. Which kind of paper
that you actually use for running something which is using the
processing technique. Especially in this still life. The paper should not be smooth. This is a forest and
the foremost thing that you need to understand the paper should not be the smooth paper for
realistic drawing. You actually need
the smooth paper, but here, you don't need
to have a smooth paper. It should not have
less, less D8 paper. Should not be there. The paper should have greens. In the simple language,
it should be rough. Paper should be rough. Having teeth. Whenever you do this, you can hear that sound. This is very important. Someone is going to
use smooth paper. It doesn't sound like this. It is very, very smooth
and let me show it to you. This one is the smooth paper. And here you can see this is different sounds because it's having no teeth, very elastic. This is, this is different. We can see you can
see the difference. This is why I am not
going to suggest you to use a very smooth
paper chart paper. Distal papers should
not be there. Rather than to use
some rough papers that you can actually get the
cross settings effectively. So I think I have clarified
you about the paper thing. You should use the rough
paper, textured paper. In Greece, paper,
cartridge paper. You can use any kind of debt. The best option, I think I suggest you to use the
February Uno Academy of paper that is a
very textured one and a very medium surface grain. Or if you want to use
the Strathmore when you can use a Bristol
vellum surface, which is having some surface, you can use a Strathmore
drawing paper, Canson paper, that tariff one. You can use them. See a green paper, that kind of paper actually
having some grains on having some texture that
would be nice for you. The local market if you
want to go purchase those papers nearby a, you, you may ask for the
cartridge paper, so they will provide you
the paper like this, which is having some surface, some rough surface, can use
the dove and paper as well. I think that I have
clarified you about the papers and all the tools
that we're going to use. Next, we will talk about the, about the process that
we're going to use in the crosshatching and how
to basically begin them, how to use them, how to utilize them in the
particular class, this one. So I will see you in the next episode of
this class. See you.
9. Defining Hatching: If I ask you one thing, what does the heading in your definition?
What would you say? I think most of the people will say this thing that it does. Lines, continuous set of lines, parallel lines to each other. And that's how actually they define the cross
hatching technique thing. Or if you want to define
the hatching thing. Mostly people really take
hatching like across I think, but heading and does have so many other dimensions
as well like cobe hedging, this curve hatching thing or a contour hatching thing will definitely improve your drain rather than just scraped lines. So when you are
changing the arc, the arc of that particular line, it converted into a
beautiful goal hat. So this is all
about the hedging. Again, I think the
coming lesson, we'll learn about that to understand what is
hatching and what are the types of heading that we will going to
understand this lesson? Let's see this.
10. Details About Types of Hatchings: Now let's talk about the heading and its various
aspects in a deeper manner. Now let's talk about the type of things which is the
most important part of this particular class. Like how we are going to do
the heading and how to get the exact and accurate shading
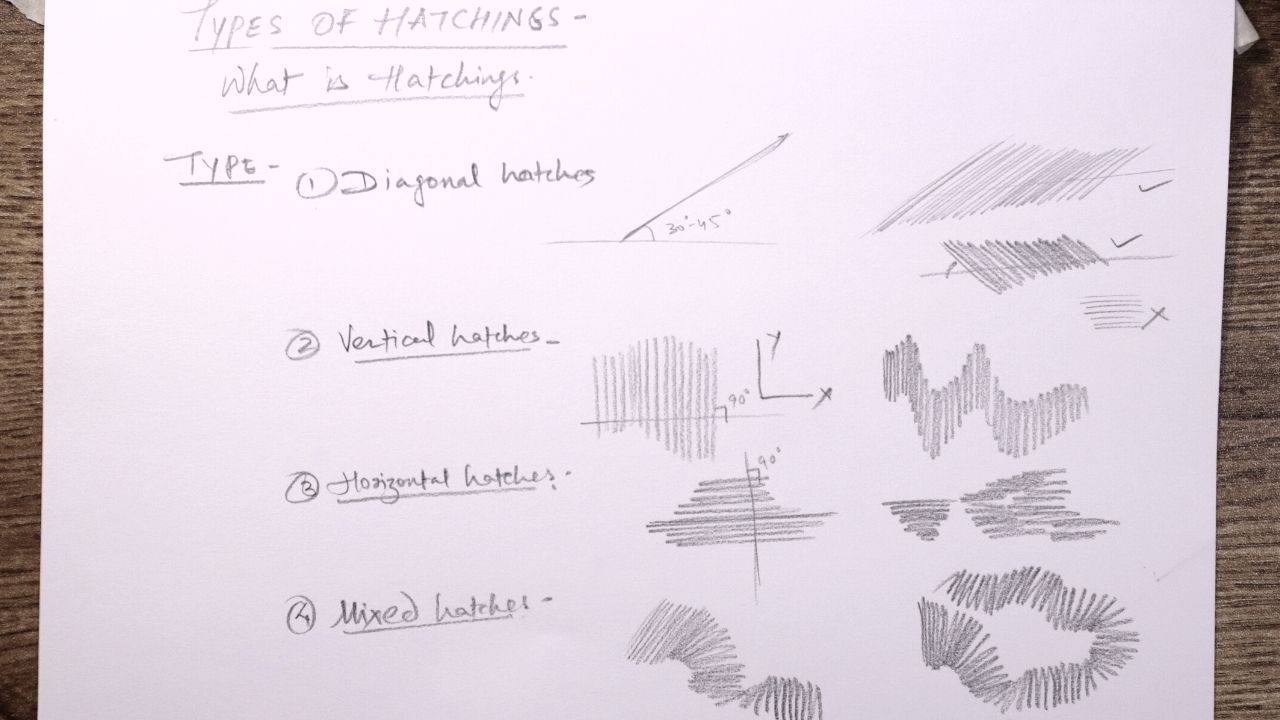
on the particular portion. First of all, let's
understand what is hitting. So if we're going to
define the hatching, hatching comprises of
lines and it is the act. It is actually the
accumulation of various parallel lines which
are parallel to each other. And they may have equal distance between
them, may not have. Also the direction
can be changed and that action can the same. So let's understand this is the basic one that is
the diagonal hitting. I'm just taking another
pencil that is, let's say this mechanical pencil that you can actually see the, the hatches diagonally
heading is something which is actually on a certain angle from the horizontal
or the vertical. So this line actually
is the hatching, which is the diagonal
from the horizontal one. And it's having the
degree from 30 to 45. So 30 to 45 degree line
from the horizontal. That is the dominant hedging. This line is basically
the headline. How to basically understand
it and how do we use it? That is something which
needs to be discussed. Here I am showing
the some example of that non hedging when
I'm doing it like this. So what I'm doing here, I am basically drawing
various lines which are parallel to each other and they are having a certain angle
from the horizontal line. This is the form of
the diagonal hedging. How to use it. We
will discuss later, but just let's understand
the basic type of headings. You can use this pencil also to understand
diagonal thing. Also, the direction can
be this or can be this. So this DataFrame can also
be used in the form of diagonal adding all we
need to understand it having a certain angle
from the horizontal. I'm going to do this. This
is not the diagonal one. This is not the element, this is the diagonal,
this is the diamond. Now let's understand.
Do another one, which is the vertical hedges. Vertical hatches. The hatches which are parallel
to the y-axis of x, y. The vertical heads
would be like this, parallel to the word,
to the vertical line, and they are 90 degrees
from the horizontal lumen. These are the vertical
hatches and you can actually use in the
different form, in the different pressure. Also, you can create
a pattern using this for the background thing. Now the third form
of the heading is the horizontal heading. So horizontal hatches,
as its name suggests, it is actually parallel to the horizontal line
to the x-axis. This is basically the
horizontal hedges which is perpendicular to
the vertical heads is two the vertical line. This also again we
create like this. And then you change the
area like this, this. All these are the form
of horizontal hats. So basically there are
three kind of hatches, what we actually understand
or hear vertical, diagonal and the horizontal. Then the last one is the
mixture of all these headers. Which one is the mixed? What is mixed? Stating in mixed hurting
you use some kind of diagonal one
and then you start changing it to diagonally
to horizontal, and then you start
changing it to vertical. In the same particular
object or drawing, we change the direction
of the hatching. Like this. You can actually generate
various kinds of hedges. These kinds of hedges
are basically used to form our other objects
like still-life object. We will discuss in that
there are four kinds of hatches written which is
known as diagonal headsets, vertical axis, horizontal axis, and the mixed attaches. But all of these hatchlings
can be used in the hatching. So let's quickly
understand what is the process basically to use the detaches to create
a smaller objects. Let us understand this.
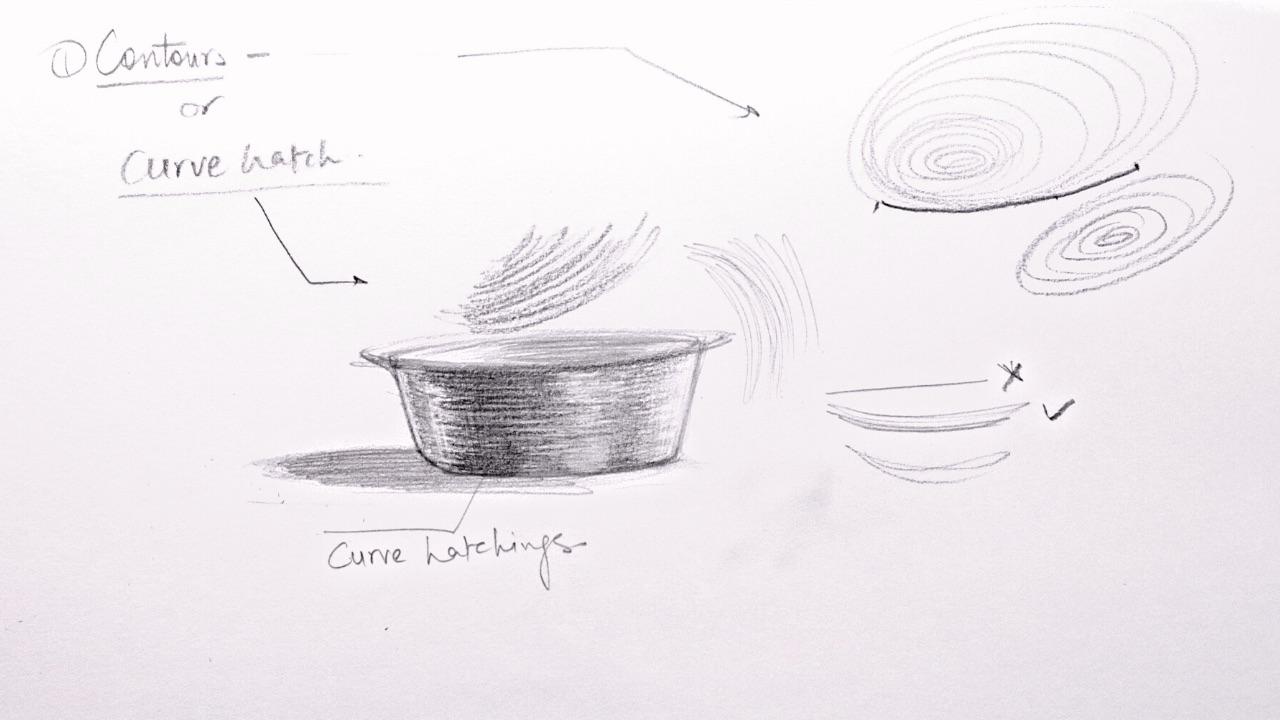
11. Significance of Curve hatching: Not all the lines
are always a script. There are few lines go in each. Now we will talk about them. They play an important
role in processing. Now we will talk about
another kind of hatching, which is not the accumulation
of straight lines, rather it is having the
accumulation of curves. And these are known as contours. Control may be defined as a
bunch of ellipse or a circle, which actually form grade, which actually form
a shade or a grid. This is not going to use
over here, not that much, but the co-head basically
that we will use, which actually a
form of a contour. And it's, it's basically
a part of a condo, let's say this part
of that contour that may be used in this so-called hatches,
maybe like this. You can see or hear. We can do the same
with the penicillins. These are the bunches
of globe lines. And it actually can be used
in the circles like this. And let's say this is an object. This one is the
darkest portion here. Then I'm going to do
the hatching thing. I am going to use the hatches, which is which is not
the straight line. It is not the straight line, it is the curved
line. Like this. You can see or hear the
difference between them. It's not a straight line, but it is the curved line. These lines here, you
can see like this. You can see that I'm just adding on and the lines
are not straight. So this is the major difference. Then. Change the direction
on the curve is also we are changing the pencils
simultaneously like we're using the Forbes and then I'm
using the to be itself. So this is how we actually change the grades
of the pencil so that we can find the exact
among the curve hatches. And this is just
a simple example. We will discuss
this technique in detail in the coming
episode of this class. This is something which is
just the most tremendous. Using. These are hatchlings
is your project. You have to create these
kinds of headsets on any of the object of your choice and post it in the
project section. I will see and review them.
12. Process of Hatching : Now let's talk about
the process involved in cross hatching technique
or hedging technique. The process is very simple. You lay down some layers, the horizontal layers, the vertical layers
and layers as well. But to really understand it
in a more efficient manner, you must understand
each and every line. Say something about
the product thing. You must understand the action of that particular product. Then you are actually
identify the shading thing, what really need to be adhered
in the particular process. For that, you should have an understanding of that
particular product. Let's say this is the product
if I have to draw this. So this is a circular one, but the texture you can see here is a bit different. Here. This is the product and
it hasn't been painted. The crowd-sourcing
thing would be more towards the gold lines rather
than the straight lines. And that will be the more efficient manner to really express the real product, which is a timber one. So this will
definitely help you to improve your understanding and observation at the same time.
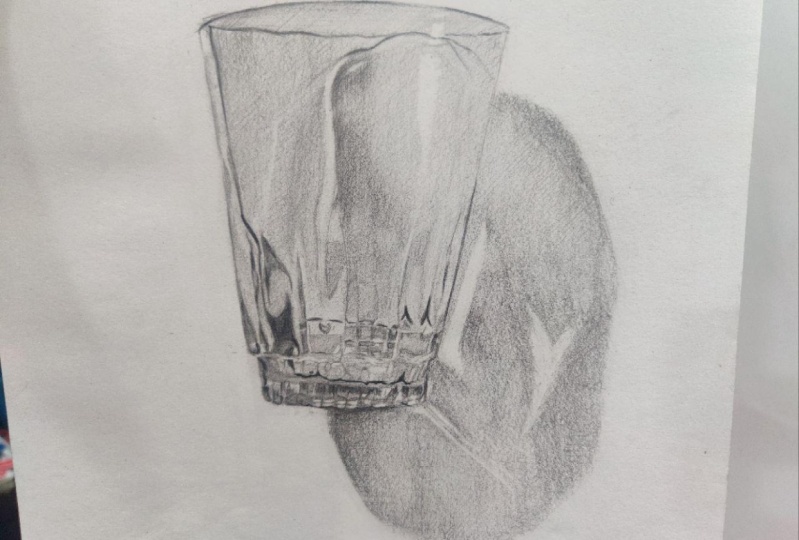
13. Identifying Hatching for Various Objects: So I'm super excited for
this as we are going to discuss the curve heads is and how to mix them with
a particular answers. Let's see, come to
the studio room. Let's see this object. You're going to draw this. You're going to use the
vertical hatches and we're going to use
the horizontal edges. So in this example, we're going to draw it roughly. When I'm drawing this. Just try to kep kept all
these things very light in the foster damped so that if any change I actually
wanted to do later, I can actually do that. I'm using the mechanical
pencil for that. You can see orient because
the lead in that pencil is B. And that B pencil, it's very, very light and I can easily
tackle that as well. This is the form that
has been created. Now see me, we need to do
which kind of headings. As you see, the form of this is in the form
of this direction. Here I'm making few
things stop so that you can actually see the particular product
more time drawing. Actually, this is in reality,
you don't need that. But when I'm shooting
something from the camera and I just wanted to let you
see all the details. That is why I'm doing the
dark layer lines initially. Actually, we need
to understand this, that the original form lines
are like this. Like this. The direction would
be the curve. This would be like this. The principal hatching. The main heading of this drawing should be
in the form of curves. Let's understand this. First. These are the
principle lines, okay? But actually if you
want to see it closely, you can find the texture of this is some work, The vertical one. So we are adding the
vertical lines also. Very less pressure. Similarly here also, I am only
using the vertical lines. Then adding with some
scopes, headers. Now I'm mixing all these
goblins using multiple lines. Here also here there
is no surgical, but there's a few
little details there. I'm just adding
these lines as well. I am doing the exact thing for
the backside of that tape, you can see the classic
thing has been written. The same dark lines
are also there. So I'm just adding that particular stuff
we're there as well. Here the aim is not to
resemble the actual product, but to understand the
process that we need to use while creating cross
etching and contouring heads and go Bejing. Everything. You can see over here, there is a dark space. So understanding the
dark, yes, over here, that we can actually get the realistic one asset using
the matching principle. What is the learning that
we actually get from this? These, these are
fuel vertical lines. These are a few guidelines. These are all so-called lines. These vertical lines,
vertical lines. And overall the shape
of this is like this. The form of the curve. What actually we understand
from this is this that whenever we are going to
draw any still-life or anything from
studying from life. We need to add, mix all these styles. Here you can see
there is go hatches, go heading n plus
vertical hatchlings. Here we added both. Then we will found this product. You need to understand
how to add in few techniques and creating
the final product. We should not think that
it should be relying on the one type of shading. Let's say if someone wanted
to draw like this, this, this, if, let say if someone wanted to draw with that diagonalizing, pick a pencil and then using
the diamond hedging thing. Then adding more than letters to make it more dark
and some more grids. You can see here that this
won't look that effective. The whole process is along the diagonal hatches
have been used. But the product itself, it's not explaining this. There's no such diagonal
thing in the octet things. Let's say this one
is another example. Maybe your project. I'm just putting that
here that you can take a snapshot of
this object and try to basically understand what are the hatches and
where the hedges are coming. And then put your homework into the project
section where I will see that thing and help you to understand and we will
discuss the particular thing. So now I'm going to see you in the next episode of
this photo grid class.
14. Finding References for Still Life Drawing: How do you find the particular
product for your drain? This is not a very
complicated quotient. You can actually see
and explore nearby you and you will find so many products in
your household as well. You'll find some older
kettles, some old mugs, or a new product which
recently came in your house. You can use your
water, water, water, see detection on it, and then try to draw it
for finding the product, you can go to Google, search for particular items, let's say still-life
drawing objects, high-quality still-life
drawing objects. You can find some
indeed pieces as well, and then you start
draining into it. I have also downloaded few of them and uploaded
in the attachments. You can see that in the
project section as well.
15. Still life Drawing: An intro: So this is the most
important lesson of this particular class. Here we will talk
about understanding the brain and how to basically
understand the key tool. First, we will draw the
outlines of that ghetto. And then we will
understand the layer by layer inclusion and we
will understand pressure. What do we need to apply on the pencil to get
the desired details? We will do work layer by layer, and then we will see how we are going to
finish that thing. And I will see you in
the conclusion as well.
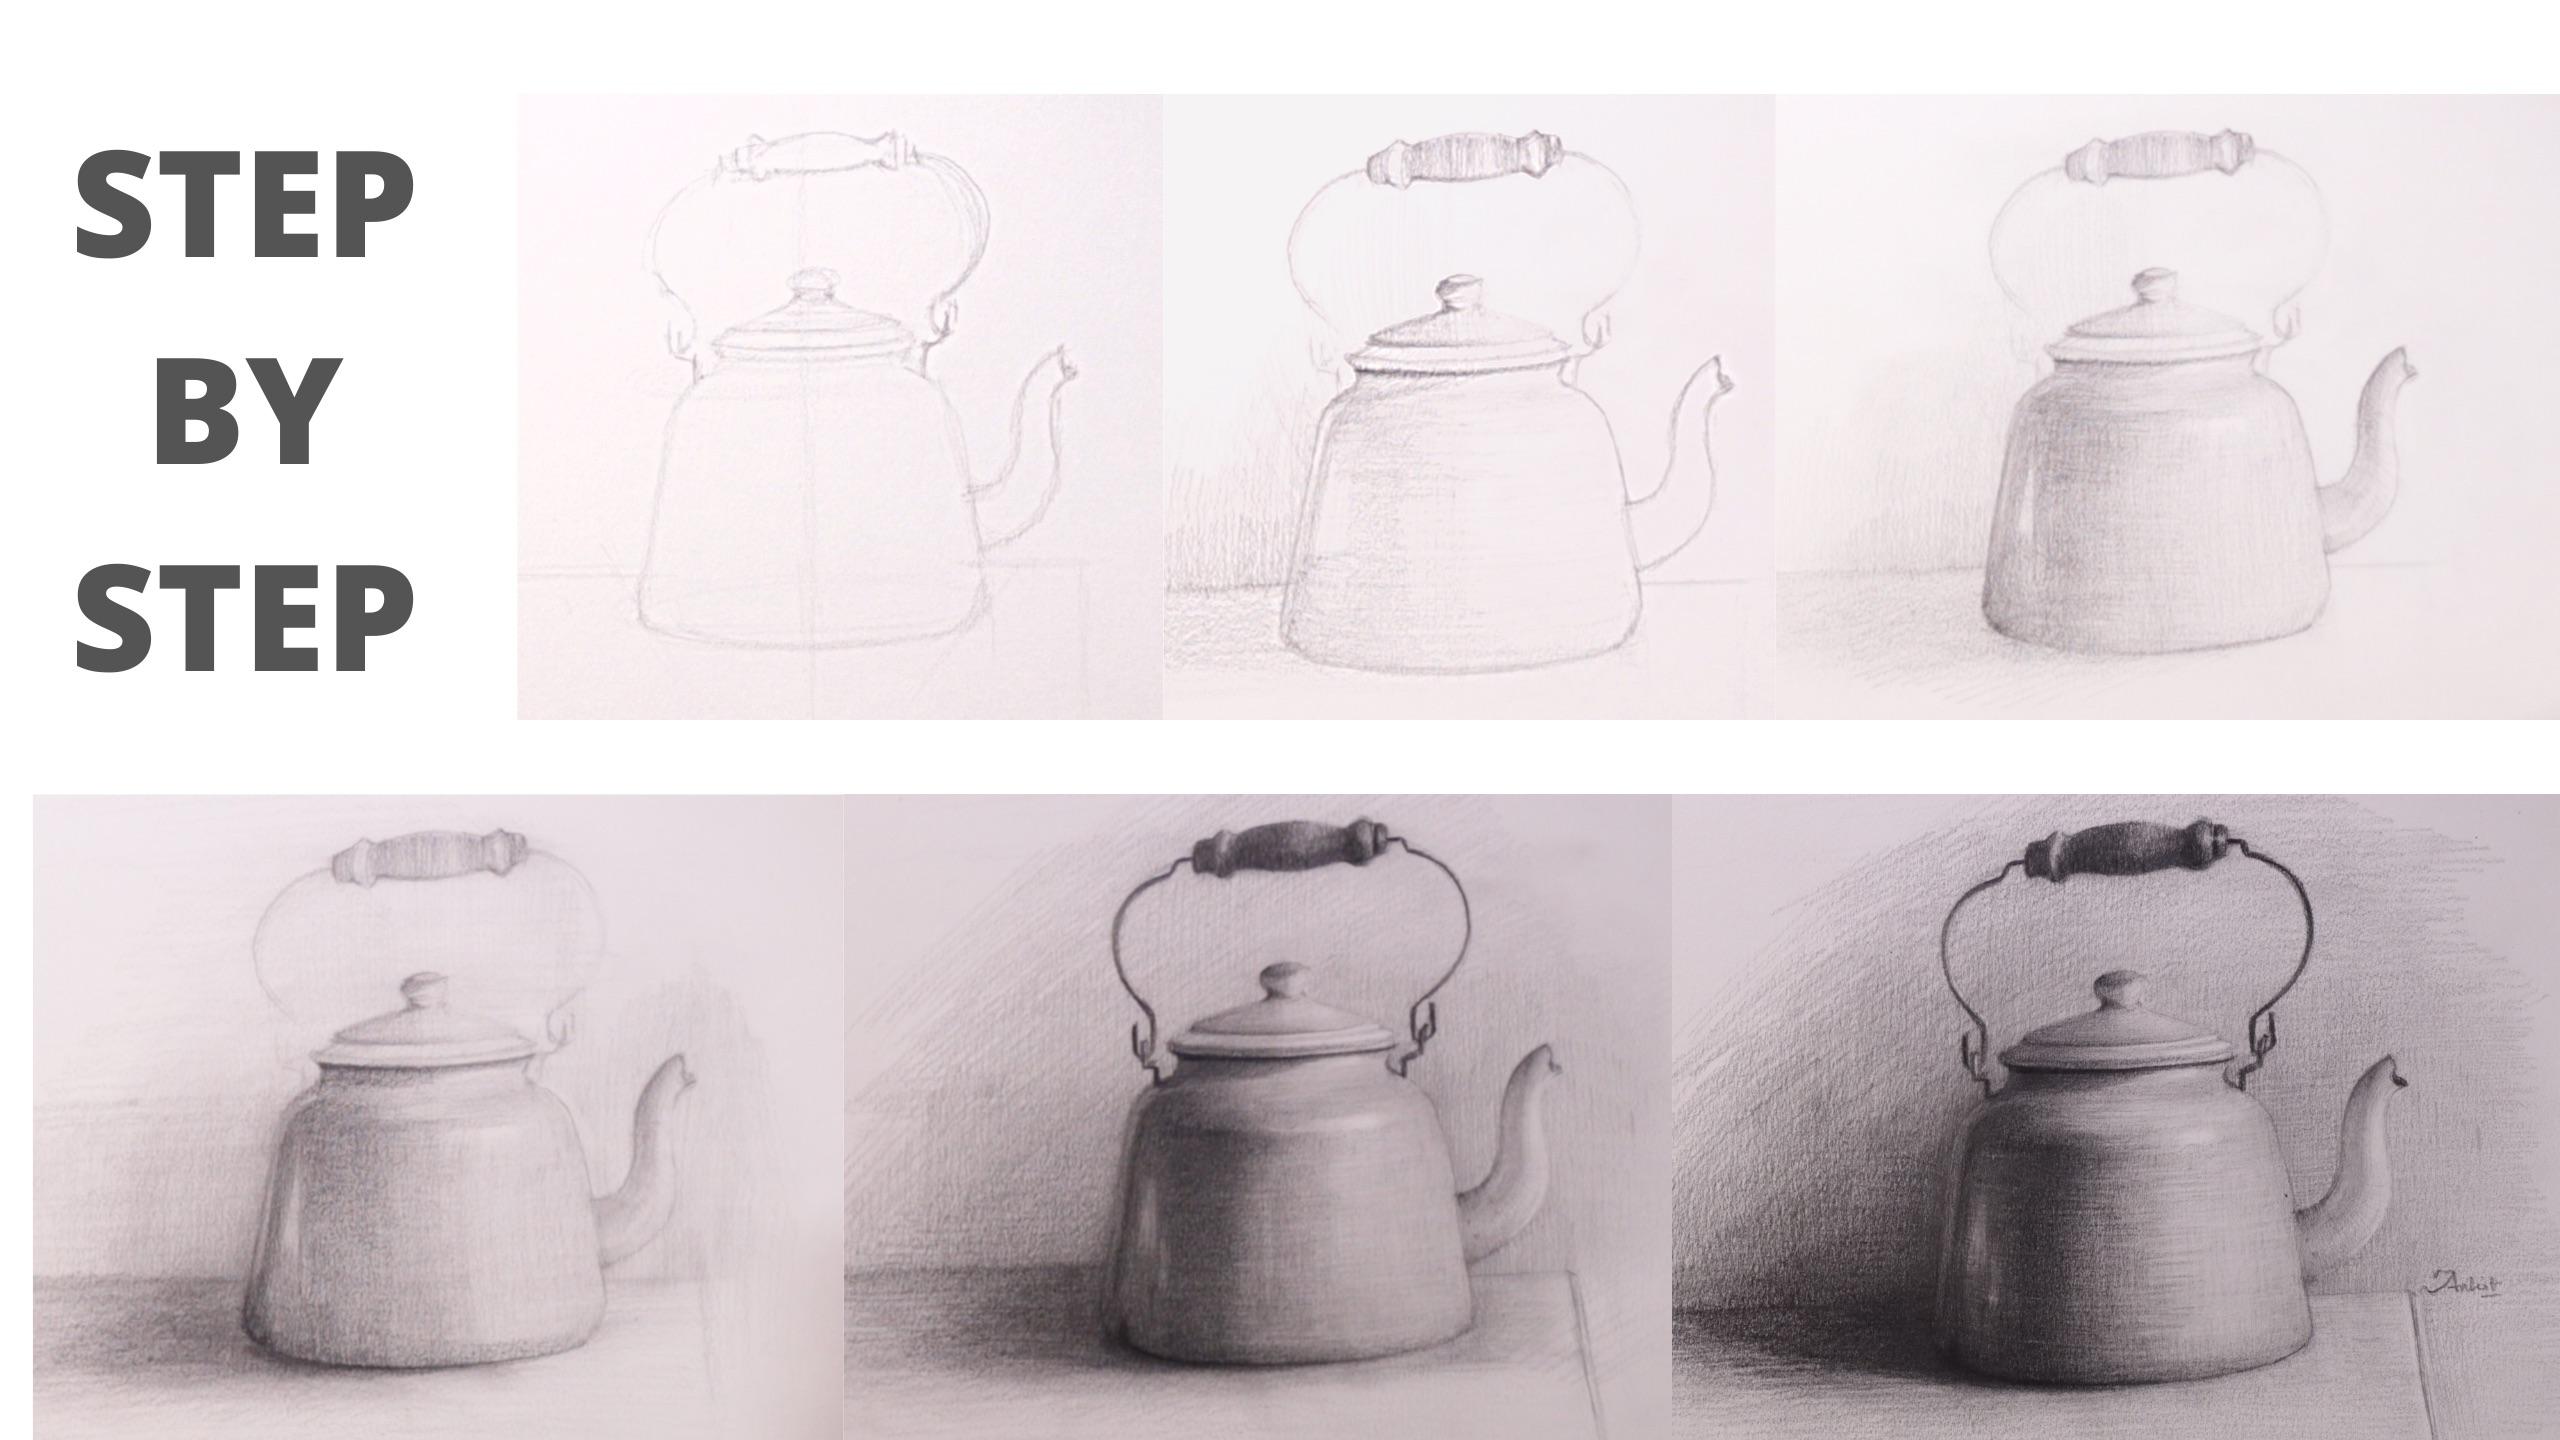
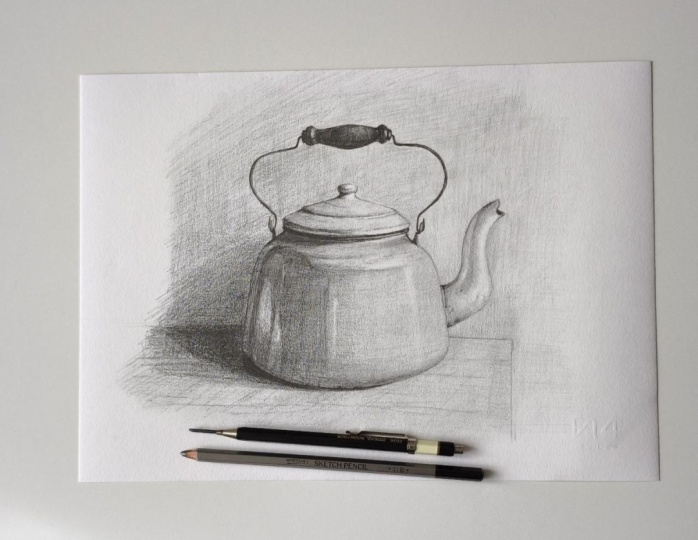
16. Outlines Drawing Techniques: All that beautiful creations. Take time, patience,
and effortless process. Blossom. Let's see. Now we will talk about the most important
episode of this class. Here we're going to take
this exactly sampled of the still-life drawing
and how we can actually do the cross hatching
thing by drawing it. First, I am getting
the outlines. And for the outline thing, I am using the pencil
measurement technique. I have already told that particular pencil
measurement technique in my previous
Skillshare classes, which are already there. If anyone wants to learn
that particular thing, he can actually see
that Skillshare class of Menzel measurement technique wherever liberated each
and everything in detail. Now here I just
have vertical axis. Then I am simply drawing the
outlines of that tea kettle. This is a very old style cattle, what you are actually
seeing or I don't know what exactly the
name of that thing. I'm just saying the tea kettle, whatever be the name. And irrespective of that, see the material of that
particular object and how we can actually achieve the crosshatching
with the realism. That is something
which we need to talk. First, I'm using
a for loop runs. And over here you can see I'm definitely using
the fully pencil. I haven't used any to be B or HB pencil or two pencil
for the outline. Directly using the
phobic pencil while I'm doing this because I find myself very much
comfortable when I'm using the Fourier pencils
because I am using it very lightly with a
very less pressure. And I want a pencil would
be like where I put the very low amount
of prefer and I get the results so
the mode is softer, the pencil, the better
would be the result for me. If you're not that comfortable, you can use the B
pencil to B pencil or some lower gate
pencil for the outlines. But just remember one thing
that you don't need if shouldn't need to put the pressure altogether
on the first layer. So these are the first layer. This is, these are the outline, the basic outline, the fundamental of that
particular drawing. I'm just getting
some idea of that. I'm not finishing
anything over here. Just having a simple idea
of the particular object. Because there are so many
things that we are going to take care of when we
are finishing it up. Just draw the outlines. Do not worry about
anything and don't be feared up about getting
the outlines thing. Just having a small
amount of pressure, do not apply that much pressure. And I also asked you to do basically with the higher
grade pencil that will be easier for you to erase and
you will have a great command of it onto that
particular pencil. Fun advise if I want to, if I have to give
it to you regarding the outline thing,
that shouldn't be. Don't put pressure
in initial layers. This is the most
important suggestion what one should have when he's a beginner or
he or she's a beginner. You have to understand,
don't put pressure, whatever be the density we're
using, get the outlines. And I would suggest you to not to trace out
the things rather than trying to find out the way to
draw from the observation, that would be the best thing. Slope. I'm stopping that particular
lesson over here. And the next lesson would be the most important lesson
where we're going to build the initial
layers of crossings. Already started doing that, but that we will discuss in the next episode of this class. I will see you in
the next episode.
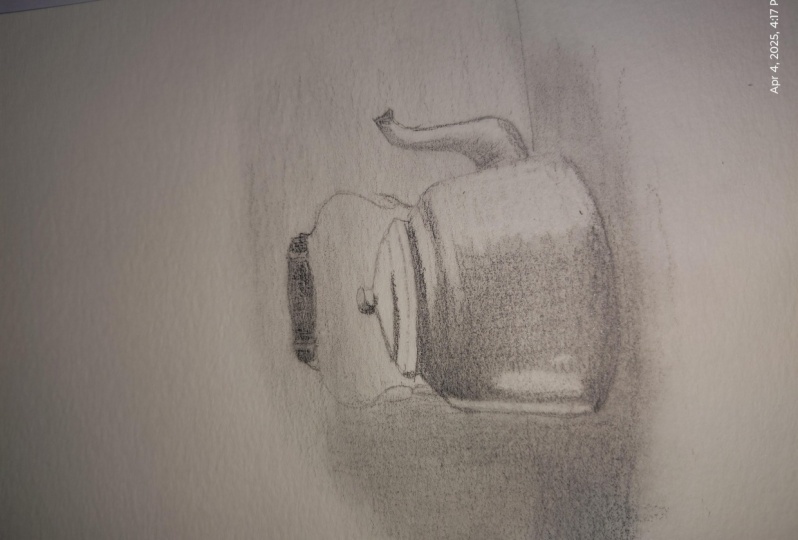
17. Base Layer for Still life using Hatchings: Adding layer is the most
fundamental process in the cross setting. Let us see how. Here we will talk about the
first layer of crosshatching. So as of now, I have actually
created some outlines using the technique that I have elaborated in the
previous episode. Now, I'm just starting with
a 4-bit pencil as 40 pencil does have lots of clay
and graphite in its lead. And it is very easy for
someone to basically darken up those areas which are pretty much relevant in
the original image. As you can see. Getting
those dark areas using 4-bit pencil directly is a nice option when it
comes to save your time. This is very clear that
these areas are very dark. You don't need to basically do the initial layer using
the lighter pencil. I'm just doing the same
with the darkest pencil. That is for B, or here in
this particular drawing. And then I am using
the to-be pencil. You can see over here
using the Ruby pencil, getting some highlights, you
can use HB pencil as well. So don't need to worry
about that SP or to be for the initial
vertical lines. We can see the lines what
I am drawing over here, it's vertical in nature. It's not the circular one. Basically what we
actually need to do, we create a complete
mesh for that. And I'm just doing
the same thing. That's creating the mesh with the horizontal and
the vertical lines, then the darkest area, as I've already told you, using 4-bit pencil directly. As it will save lots
of time. Same time. You don't need to rework
on the same area, which is a document. You can see that now
I am just getting fuel shadowing thing for that and just getting some dark layers are there
as well on the table. Now I'm using the
full pencil and doing the same vertical hedges. But one thing is very
sure that I'm not putting any kind of
pressure onto the pencil. I'm just using the layers. And very light layers. Do not try to basically down the details and try to get that details
as early as possible. I'm just trying
to take it's time to get the layers of lines. Now the main, main course has been actually
started. From now. You can see that I am using some horizontal lines and
doing the same strokes. That is actually the
co hedging thing in trying to fill
up those areas. The same thing I'm doing
with the to-be pencil. And just trying to get a little bit harder than little
bit more pressure line. The curve lines. You can see this trying to
get the get that patch. Patch is very important. That dark patch you can see on the original image as well, so that they're dark. But you say it bad or
you say it some spot. All those things. The meaning is same, actually. Just trying to finish it
up, using that thing. Now. Just moving towards the
mouth piece of that. And you can see how I am actually getting
the details over here. I'm just trying to get the shading as in
the form of lines. So actually I do not have that option as well in which I'm just trying to smudging things. So I have to be
very much patient. And at the same time
I am using the lines, a small piece of line you can
see or hear and trying to actually getting the
horizontal line and then mixing it up a bit with
the vertical managers. I've already told you in that initial episode
in which I have told you how to mix the
horizontal and vertical edges. Here is the simple
example of that as well. I'm mixing the horizontal
and the vertical on the same portion of trying and
trying to get the details. These are very few small details that you need to add
onto your drawing. And that will take you to the
next level of the drawing. And you will understand the
strength of the pencil. The purpose of the
crowdsourcing is that you have to create or
build strength, hold the pencil, whatever be the whatever be the way you actually generate
that strength. That will definitely help
you to grow your art. 11 here. Just following that
thing and trying to get the shading thing then
using the cross etching thing. And now it is the first layer that has been created on the
drawing used for pencil, and that will be pencil
for that particular thing. You can use it to Bibi until
as well with a phobia. So this is the
first layer and we will definitely come again and again under this drawing and adding more and more layers, I'm using the fingers
also to getting some more layers down so
that we can add more layers. So I will see you
in the next episode of this class to
add more layers.
18. Second and Third layer: Mid Tones: Using the correct pencil, exact Wenzel required time. It is very important
to understand. Let's see, which told needs
to be used at what time. So now we are here to
basically generate that depth. What does the depth, how to basically get
the dark layers? This is very important. I'm using this small size brush you can see for
the handle thing. And you can see the handle
is very, very dark. There are few more things
which actually need to understand over here. And implementation of these
kinds of brushes are very crucial for drawing
something which is very minute and delegate. Now you can see I am started
using the mono Zero eraser. Dust, finalizing few edges. Now I'm using the same for the vertical hatches,
using the eraser. Here. I haven't elaborated
this technique, but this is very, very useful and
handy because, uh, you, now you are basically subtracting from dark to light. You are basically subtracting
the lighter portion and getting the highlights
using the brush directly. And these lines are
very, very dominating. And I would say that
it actually enhances the values as well because
they are very bright. You can see the
portion which is the most highlighted
in the real limits and who are here as well. This has been created using
the brush that will actually create the sense of light and shades in the
particular drawing. This is why these tools are very important and you
should have in your, in your collection
of art supplies. This is why I
mentioned that tools, human should not have
so much of pencils or human should not have so much of equipments
other governments. But you should have at least these kind of erasers or you may have
a pencil eraser as well. If you do not have both of them, you may create using
creating your own, using the knife and chisel. It results in small pieces. Then you will find
these kind of fine. It is as I'm zooming it up and trying to let
you understand that how I am using this it is and trying to get the
the curve hatches. Now, I'm using the darkest
pencil that is, for a warrior, for the timing, and getting some more dark values,
more dark areas. I'm not basically
pressurizing it till now. I haven't pressurize
any of the portion in the drying is accepting
that portion, which is that our cousin, which is pretty much
prevailing in the real image. Other than that, I haven't used much pressure onto that pencil for any area, specific area. Now I'm basically finalizing and trying to create
more effective, in fact, full curve edges
using the four events. As you can see, the lines are more contrast and it's having more depth into that, that particular way. Which actually come from
layer by layer technique. It didn't came like this only that you have created
in the first layer. You should work for
the first layer, the second layer,
the third layer. Likewise, you should
not do it in one layer. I have seen many
artists who did this, the single layer
and then they fill. This is my clear
suggestion to you that you should use it layer by layer and try to get the darkest
one in the final layers. I think that I have mentioned
these stuffs to you. Now. I am just generating few
backgrounds as well, so that the product, the still-life, should came out itself and pop out
from the background. And for that I am using the pencil eraser on
mechanical pencil as well. Mostly mechanical pencil
help you to get the, get the vertical hatches all
nicely and very quickly. It will fill up the area
in the background area. If you are doing the dark
values in the product itself, you should do the light
hedging in the background, will not do the dark
hedging in the background. If you do that, that will
reduce the contrast. Net will let us not go into, pop out your drawing. What is the main subject? So try to get the values, the background values of one grade or two grid lighter
than the real drawing. Now, I am again trying to get a few of the
values more dark. Likewise, in the mouthpiece
of that particular thing, you can see I'm just
adding the final touches. I am giving the final
touch and trying to get more dark values that it
should be defined itself. Using the mechanical
pencil for that, that will definitely
the financed one. And it will help you to
find the minute details. Then I'm adjusting
the values using the kneaded eraser and pencil. It is mono eraser. Doing the same stuff. All over onto the drawing
will help you to find the realism and using the
cross hatching technique, this is very important. You are, your aim
is getting the, if your aim is getting the realism by the
means of crosshatching, that is something which
is more attractive. And this basically
require more of the skill rather than just a process that has
been remembered to you. I would say this is
more challenging and you will have a
more fun with that. Now I'm using the brush,
the minute brush, and then it is simultaneously working with
all these three stops, the brush, the
mechanical pencil, and it is our hope that you'd like to see
you in the next episode.
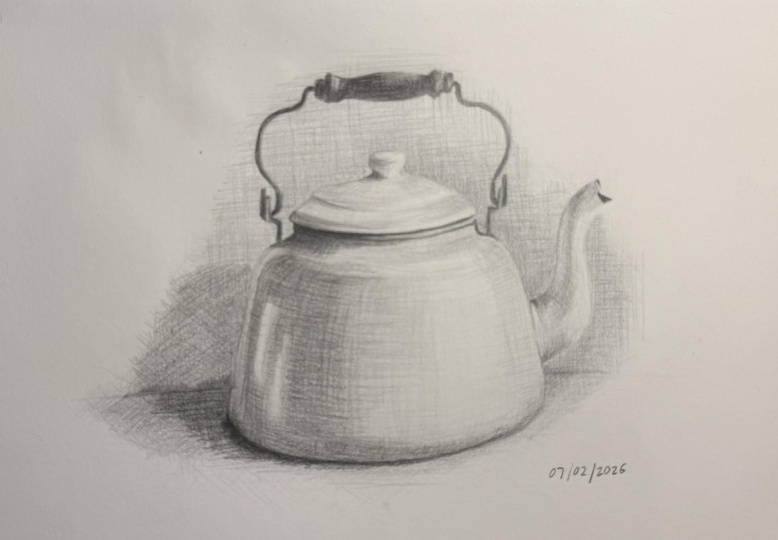
19. Finishing the Still life Artwork: There's no point
in doing something if you are not able to
finish it successfully. Here we haven't
talked about that. Using these techniques
to help you to create an awesome and
successful life growing. I will tell you how
to finish that and enjoy this final
session with me. You're drunk it. Let's see this. Now, we are in the final finishing episode of this particular class and in which we are going
to discuss about the minute details and
how we can actually add more layers and finalize few drinks that needs
to be accomplished. Without that, we are
not able to say this, that this is the
finished artwork because 80% or 70% of work had been
done in the previous classes. But that 30% is something which makes this going
to the next level. Here you can see that
till now we haven't created that dark
grid and graphites. Those tools which actually
need lot of effort. And you need to add
more and more layers for getting the exact
detail, exact dark values. So here I am doing the same. I'm using the six
B pencil for that. And starting bid the handle. Here, you, as you are aware that my aim is not to basically
to copy the real images, to take that thing
as a reference, image, as a reference. And I am basically trying to
draw something like that. So if you also want to
draw something like that, you can do the same thing. Understandable thing is that, that we should understand about the values and how we should achieve using the
cross hatching technique. Now I'm doing the
same same principle under sides of the handle, which is the wired one. And you must understand the particular element
that has been used. And accordingly you should
had lines and layers. I'm doing the same on the
one side of that kettle. And we'll do the same for the
other side as well. Here. As I have already told you, the resemblance is not that
important rather than to understand the process
which is involved into it. Because if you understand the process and why
I'm emphasizing that if you understand
the process thing deeply, you can draw anything. But if you don't understand
the process and you understand particular
drawing to how to draw that, you may not be able to draw it for the other,
another drawing. So understanding the processes
are more way more crucial than understanding
something which how to copy or how to really
exactly draw something. My, all my concentration is
onto the particular thing. The finishing of any product. You need to add
highlights as well. For highlighting thing,
I'm using the mono or areas that you may use
the pencil it inserting. You can see how I'm
actually using that. How I'm trying to get
the horizontal lines, the horizontal hedges,
throw the resulting. Then when you find the lines, you may add more depth onto that using the pencil or
the to-be pencil. In that way, you actually create the still-life thing or
you may create something, some any product using the
cross hatching technique. This will adding more
and more life into the particular portrait
rather than just making it realistic one and just
smudging is and everything. Expressing your lines
through the cross hatching and making something which is realistic is very important. And this is something
which makes you towards the perfect artist. So this is what the
aim is all about. This is where all the
finishing is all about. Now I'm using the mechanical
pencil and trying to get the table details as well. This is not at all
very important, but I'm making a
complete composition. You need to add a few
layers or there as well. You may also leave
that to some extent. But if you are doing that and creating that background
and all the stops, which is including the which
is there in the real image. This will definitely
help you to get more and more refined
product at the end. And now I'm using
the same pencil and just trying to get
some diagonal edges so that I can show it. Freedom that I do
actually implemented in driving that
particular still-life. Why I'm doing that and
just help you to make the final product
more towards that, how actually it
has been created. Because the way in the
backgrounds and all, each and everything are
just there to help you to express your way of working or express your way of just
what is your style. Basically, these
are the only things which will help you
to create them. For background thing you can
make some rough patches. Also, I have seen many other artists who
are doing the same thing. We're doing it in a
different manner. They use different products
like plant-based tills. They use the user mistakes to basically getting
those details. So this is your audio
ground, the background, and just trying to play with
that as much as you want. So I think that I
have finished it. I hope that you liked it and you have learned a lot from
that particular example. Tell me this is your project
and you have to finish it. You can see the project section. I have mentioned
each and everything, how you should initiate it
and how you should finish. Try to make your own, and just put in the project section so that
everyone can see that. And we'll get motivated from you and also you will
also encouraged by it. I will see you in
the conclusion.
20. Concluding Remarks: This class is dedicated for the beginners who really want to explore the cross
hatching technique. I would say that I have given my best to let you understand the principles and the process
and how we can approach the particular
step-by-step procedure to understand a drain, to understand the still-life using the cross
setting technique. And I can say that you should implement these techniques in your brain wherever
you be drained. Like let's say someone is
drawing the board regarding technique and someone is drawing the landscape
techniques. There are so many artists who are basically drawing from life. And they are basically
drawing the nature itself, mountains and then the
glaciers, anything. You can actually use the processing technique
there as well. And you can see that how the artwork has been enhanced from this
level to this level. And this is just a
one-day process. Let's say you start thinking from now about the growth
searching technique. You will implement it for short
from the next day itself. And you can say, and you can see also the changes that has been made
and that growing. The expression has
been more created, the force has been changed. You are now not at
all dependent on the tools like brushes
or paper stump, but rather you are more
dependent on the pencil itself. So this will create genuine freedom in you and the lesser the
product you'll need, the mode free you are. By saying like this, I'm going to give you a best
wishes for all the efforts that has been made
creating this class. And this is all for you. Now. Thank you so much for
your patients and seeing the glass till
the last episode, I will see you in
the project section where you are going to
upload your artwork. And we'll help each other to understand the art in a more
better than profoundly. Thank you so much. See you in the next class.
 Ankit Jasmatiya, Fine Artist