Transcripts
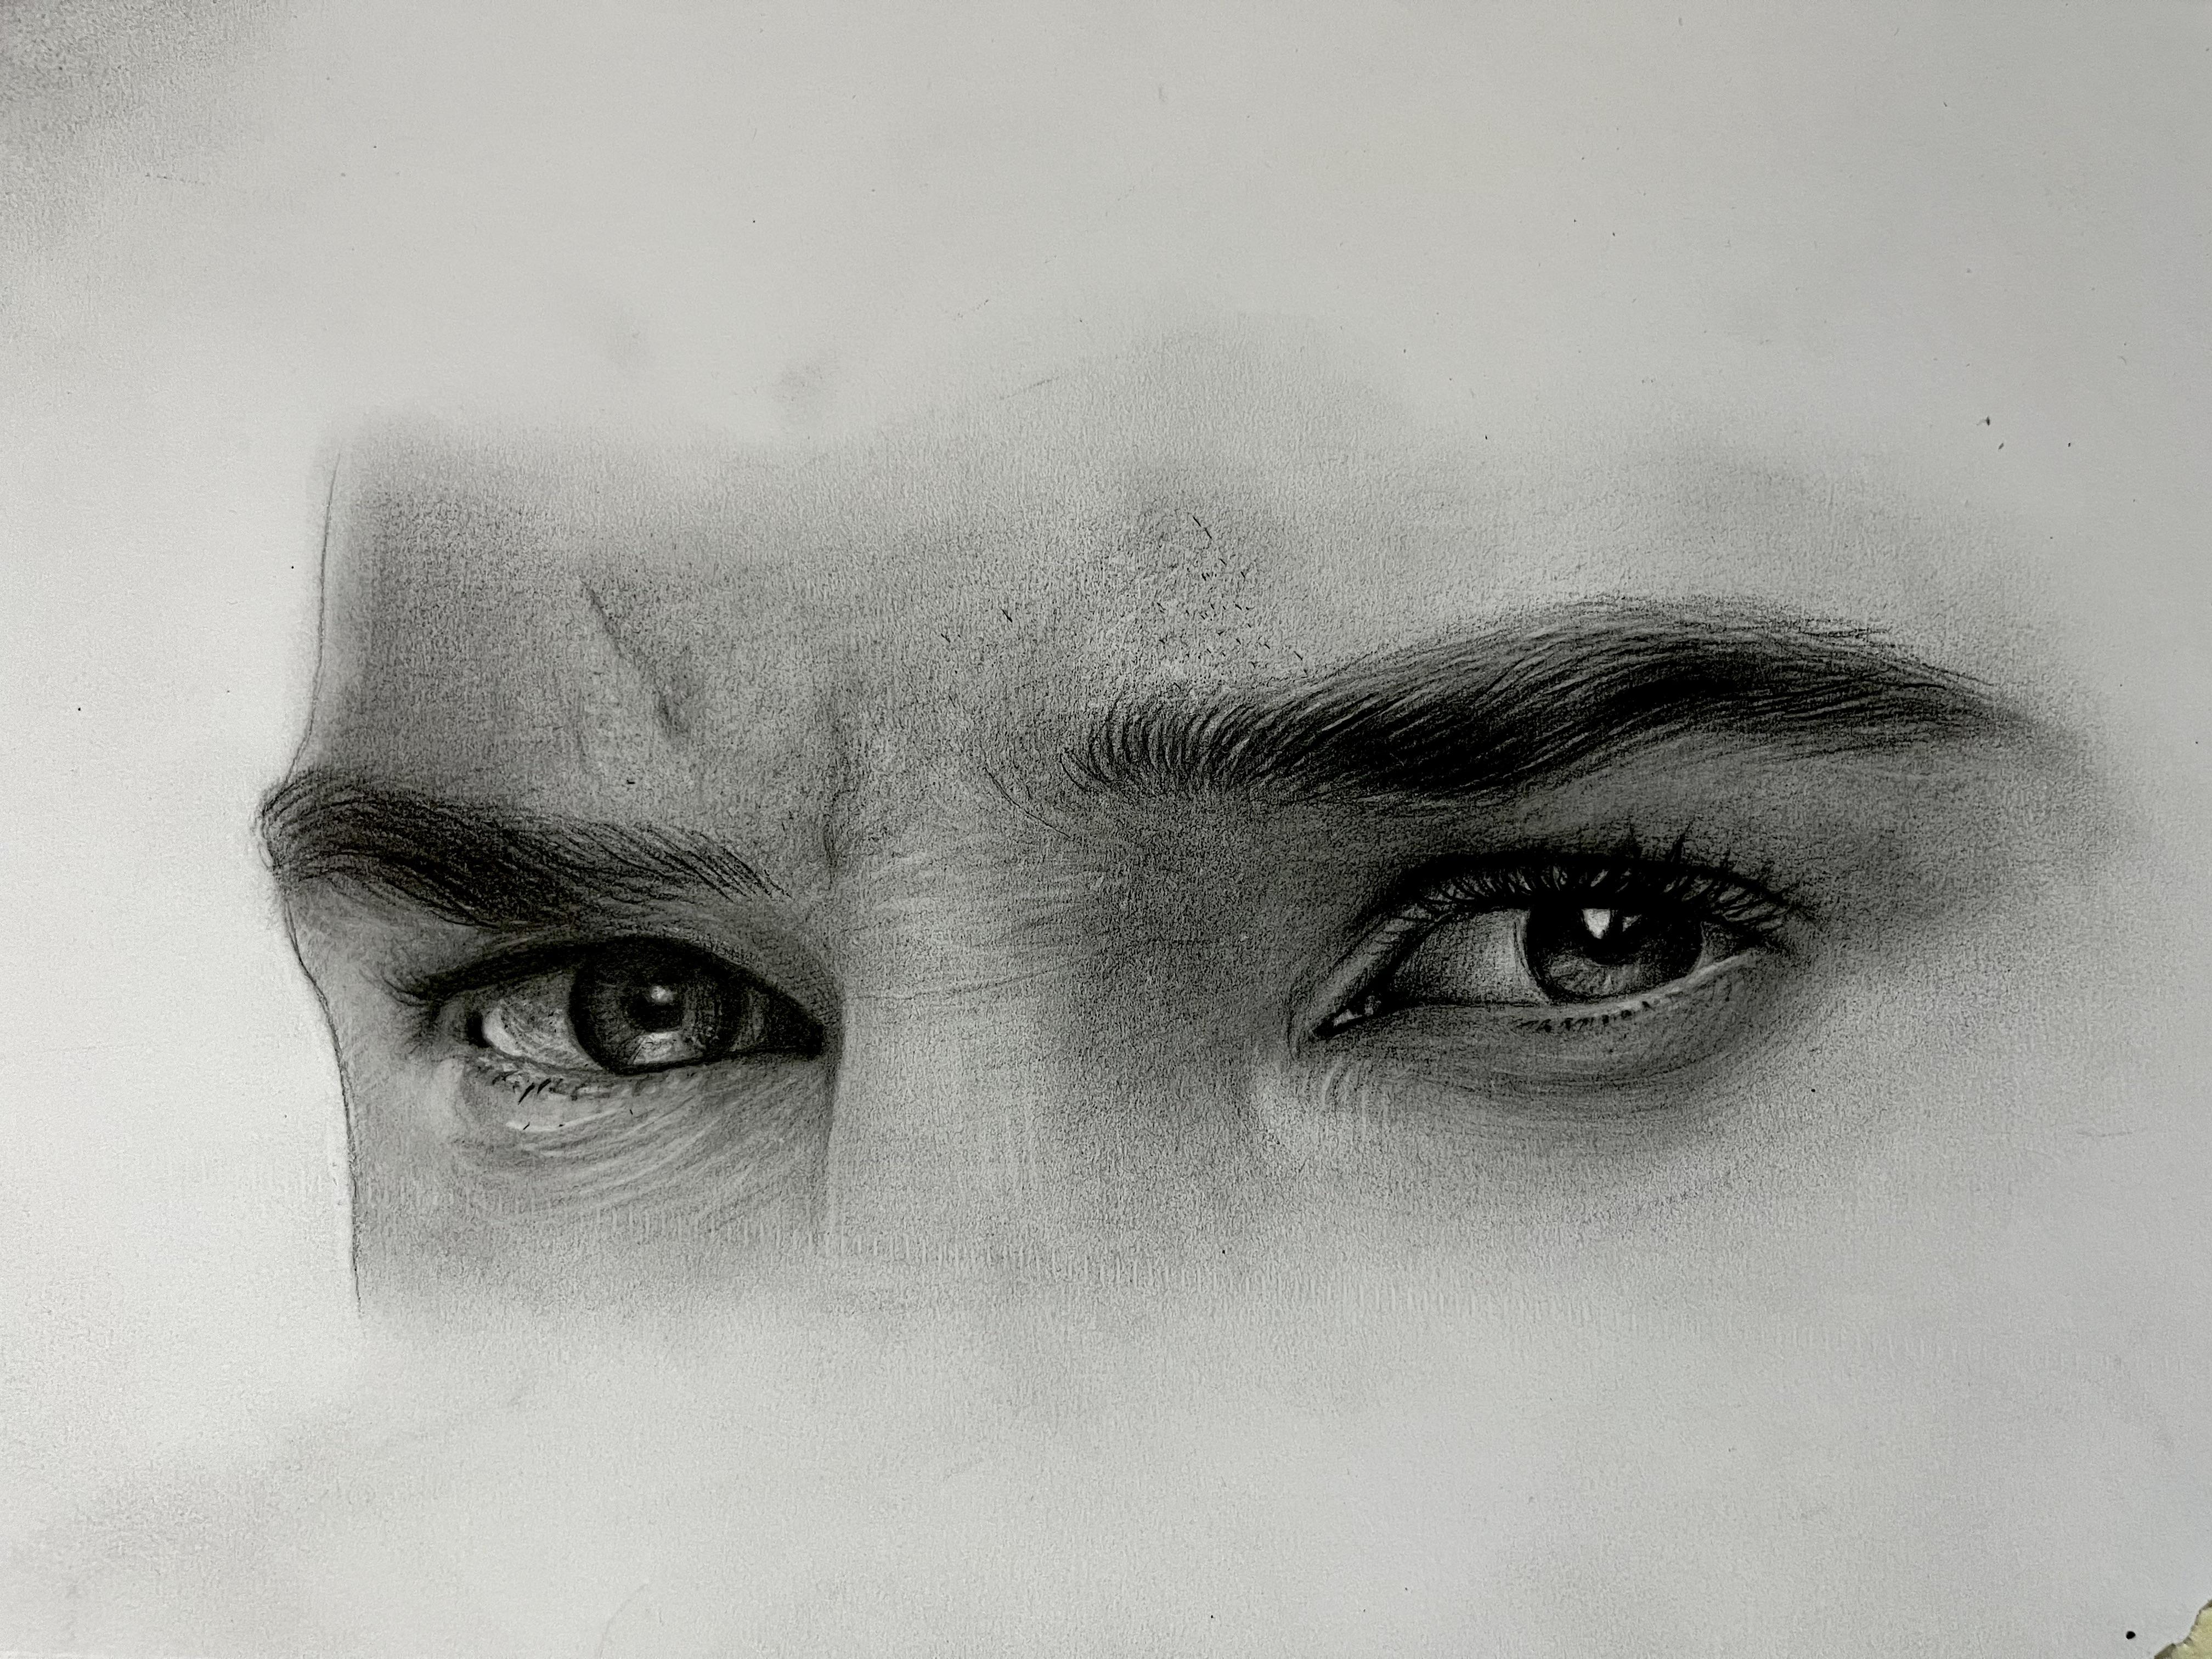
1. Introduction: Creating our capturing
the exact emotion of the face is the most challenging
task for any artist. It takes years for an artist to learn the exact and
current process to draw a portrait which is full of expression and eyes plays
a major role in it. Hi, my name is Ankit. I am an artist based in India, grinding something that helps
me to find my inner peace. I have been following my
passion for drawing for almost ten years to spread
the learning of finance. I have a YouTube channel with the name of artists and
business math here, where I have more
than three lakh, 70 thousand subscribers. I love to work on to trade rank. In an academic matter. This is my sixth class. And this could share, after Duane more than 5
thousand portraits. I can say that the most
complex part to draw any portrait is to capture
the exact emotion. Almost 60% emotion of any phase can be easily
captured through the eyes. And in this class, we are going
to learn these techniques of how to first observe
the emotion of that i, and then how to draw it. We are going to learn
five major emotions, which are happy. I said I excited, I suspicious, I angry eyes. All these emotions
are very common. And foreign artists
is very important to learn all these
emotions step by step. We're going to first observe
that particular image. Then we're going to
understand shape, draw the outline of the eye is, and then add the
shading process to make it more
realistic so that app portrayed look at expressive
Andrea in a simple way. I can say that one can easily
daughter portrait if he or she captured the exact
expression of that eye. Even if you do not
draw the portrait, are considered
yourself as an artist. This class will give you
practice for observing something and translating that observation
into that drawing. Whether it'd be I's hand. Dance places. This class is for beginners and artist for one to learn how to capture the emotion of the human face by
observation techniques. I'm super excited to
see you in the class. Let's dive in.
2. Project & Materials: The project for this class is to learn the observation that will help to draw the emotion
of the particular eyes. You can take the references that I have drawn in this class, which you can find in the
project gallery section. Or you can find your own
reference image from anywhere. Here's what all you need to complete this
project for pencils, you must have a
pencil or grade HB. Then you may have for B. So these are the two
essential pencil for this particular project. And additionally, you
may have pencils like six or eight be like something, but these are only
the add-on pencil. You may also have some
mechanical pencils as well. But here I am not including into it As I'm not going to use them. Erasers. Erasers. You may have a
kneaded eraser like this. This is a kneaded eraser
which can be flexible and can change the shape
from one to another. This is the new kneaded eraser which came into this
kind of packaging. And then you may have mono
Zero eraser like this, which will be
helpful for getting the details and very
minute and find areas. For sharpness. You may use this normal
sharpener to sharpen the pencil. This sharpener that we all use. And for some quick
and better results, you may use the
mechanical sharpener, which will help the process quickly to sharpen off pencil, the brushes are the essential
tool for shading purpose. So here we are going to use these makeup brushes
of different sizes. This will definitely help us to blend and smudge
the pencil evenly. The paper that we're
going to use, a rough, medium textured paper, which is having a small
event teeth on it. And that will definitely help us to basically smudge and
do the shading thing. So this is the rough paper. This one is the Fabriano
academy or paper of 200 GSM. You may use Darwin drying
paper or smooth paper. You can also use some
smooth papers as well, like cancer and Strathmore
Bristol papers. So there is a possibility of using different
papers in this class. For beginners, I would suggest
to use some rough paper, which will definitely
help them to get the shading things more
easily and evenly. If you do not have all
that much of material. And you want to learn
these techniques. All you need to have
a single pencil, HB grid like this, a normal eraser like this, and a normal
sharpener like this. You can watch my other
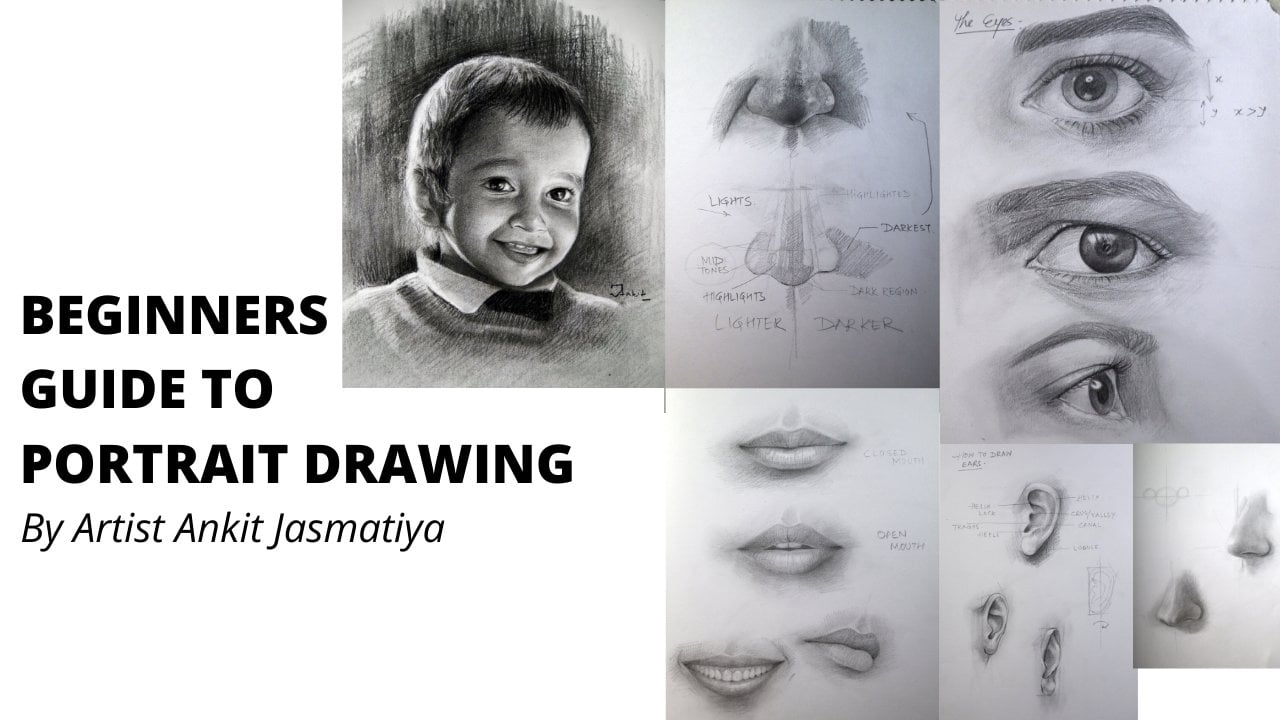
Skillshare class on beginner's guide
to portrait drawing. To learn in-depth knowledge
about drawing tools. I'm so excited to see you in the next lesson in which we are going to unveil the
process step-by-step.
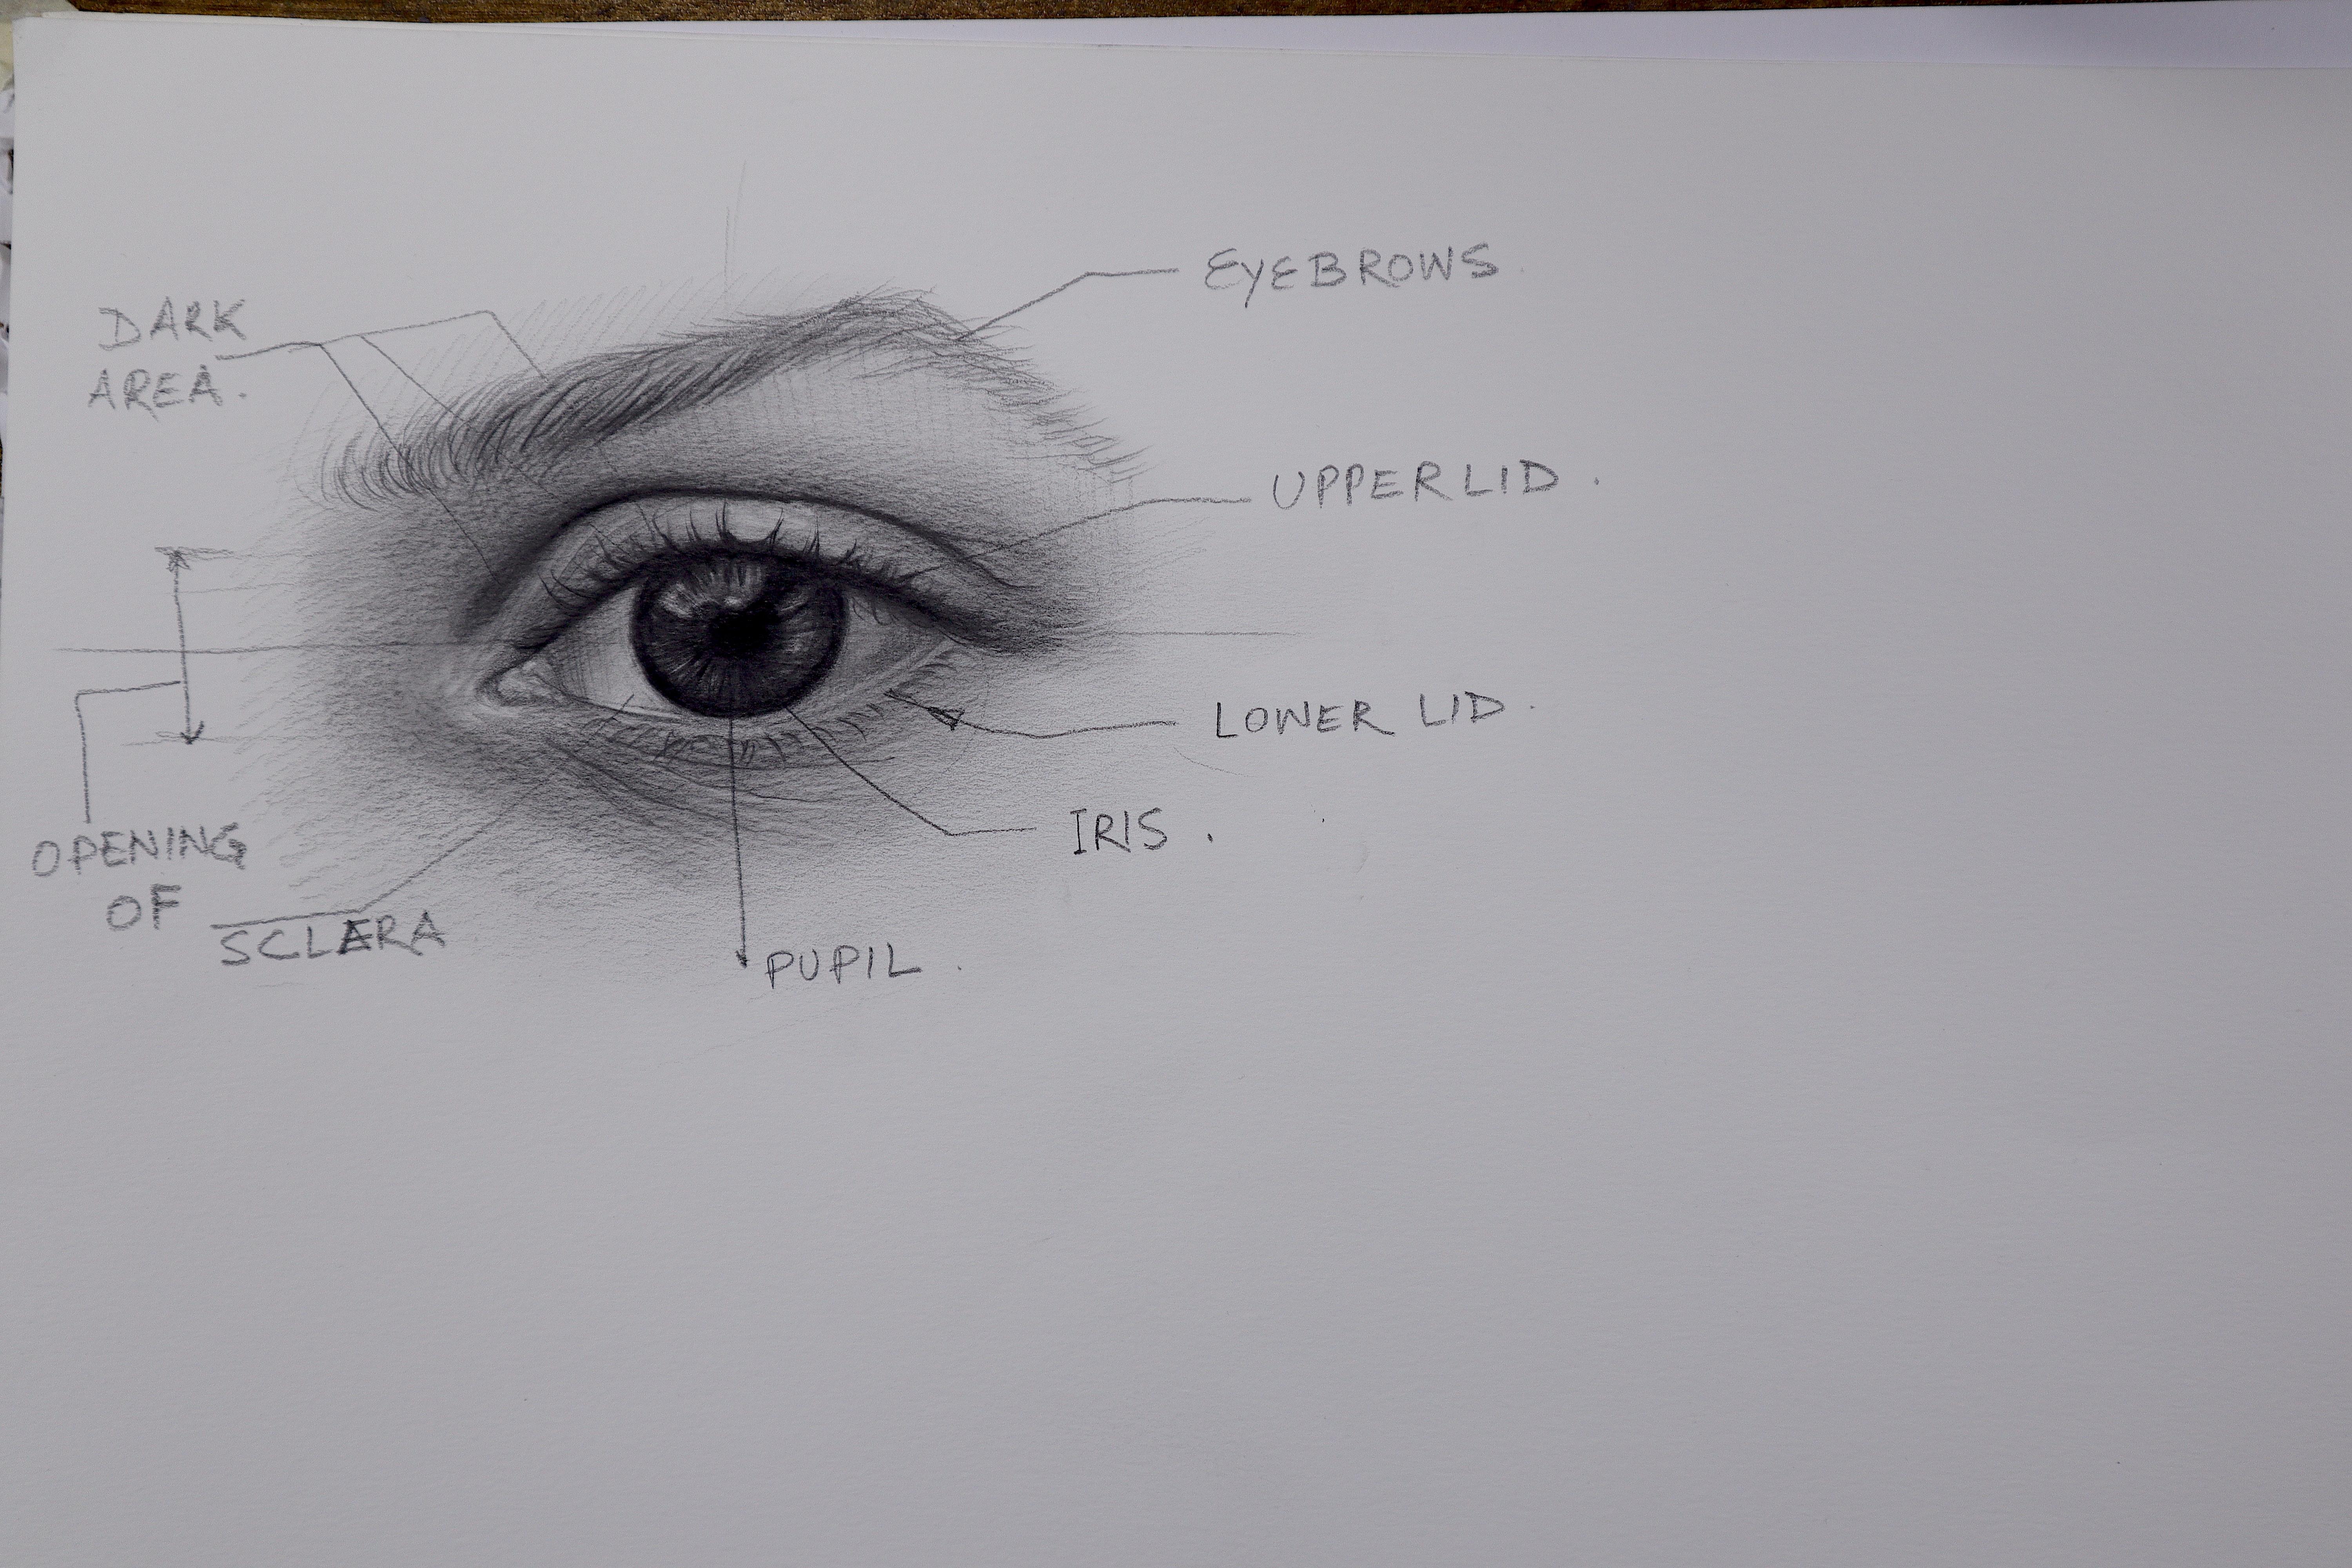
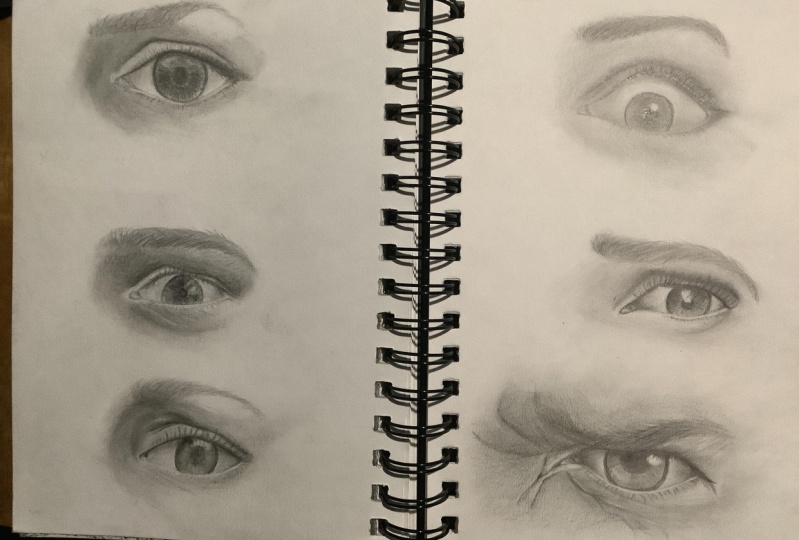
3. Understanding Eye Anatomy: In this lesson, we're
going to understand the anatomy and how
to draw a simple way. So let's get started. Just have a look at the
image and the drawing. What I'm showing here, I
have chosen this image as it is very simple
and easy to understand. The eyelashes are very natural and the emotions are neutral. Let's understand that each
and every element of the eye, the elements or the sclera, Iris, pupil, upper
eyelid, lower eyelid, edges of the eye, then last but not
the least, eyebrows. The aim here is to understand each and every
element of the eye so that artists can easily
grasp the correct emotions. In the next part, we
are going to draw these pods and understand
the anatomy of the eye.
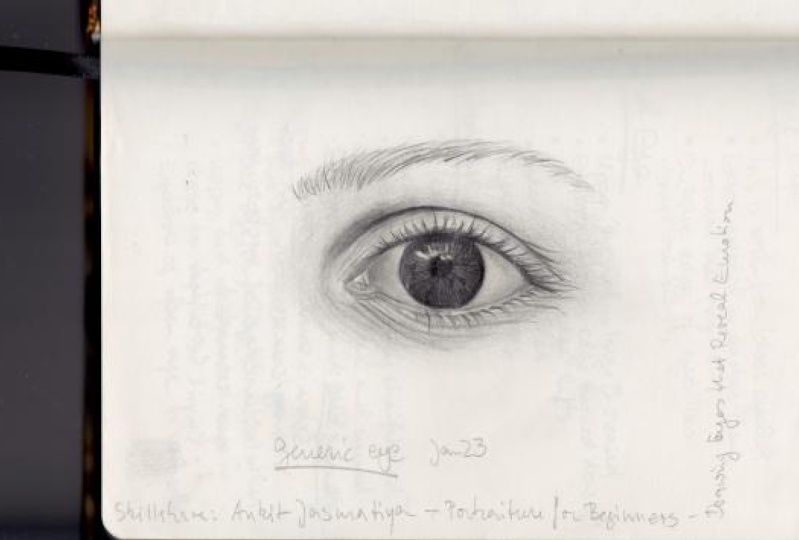
4. Drawing a Basic Eye: Use your pencil with a very light pressure and do not try to
pressurize it when you're drawing the
outlines of the eye so that if you have n
changes in the outline so you can actually
erase it and it should not create any
mark on the paper. Now, let's draw a normal eye without having any
specific expressions. So this is the reference image. Image is very simple. Having no such makeup. I'm going to draw
the horizontal line. First of all, we have to
draw the horizontal line. That line has to be very light. In terms of darkness. Don't need to worry about how much it's straight
or horizontal it is, but just try to make it as
horizontal as possible. Then we are going to
draw the vertical line, which is perpendicular
to this horizontal line. On the center of
these two lines. Draw a circle that
will be the iris of the eye and pupil of this I. So the inner circle
is the pupil. The outer circle is the iris. And create a block from
shapes like Almand hexagon, lotus leaves, whatever be the shape of the reference eyes. Here, the reference eyes, It's more like the almond
shape would be like this only. It is more similar to
the Almand shamed. I am using the B and HB
pencil for the outlines, as I've already told you. Then I am going to draw the fold that is above the upper eyelid. After that, I'm going
to draw the eyebrow, as you can see the
reference image also. And try to draw according
to the reference image. Also, you don't need to copy the exact image and just take
it as a reference image and try to make your own drawing rather than just to try
to copy that image. Now, I am going to
dark in a few values, like inside the eye,
this the pupil. So for that I'm using
the FOB pencil here. I am darkening the pupil. And then gradually I'm going to darken up the iris as well. Here again, I'm not putting
that much of pressure, just using the light pressure of the pencil as the
pencil is very dark. And you don't need to
pressurize it more. And keep on adding the layers. Gradually. Afternoon that I am
working on the eyelashes. As the eyelashes are pretty natural in this reference image. I don't need to put that
much effort onto them, rather to, just to highlight
it with a few details. As we are moving towards
the shading part. Pr, trying to adding more
dark values with FOB pencil. After darkening
all these values, I am again coming up with a
lighter red pencil and try to do the hatching part
All around the eyes. And then we will gradually
create some gradation as well. So you can see that in the results using the
hatching technique and I'm using the B pencil. You can also use B2B for
cross hatching thing. Now, I am adding more layers using B pencil and Toby Benson. So whenever we are
going to add layers, we must start with a
lower grade pencils, so that if there is any changes, we can actually erase it
accordingly and then change it. Then gradually we will add the higher rate pencil
relations as well. After doing that, I
am using my finger to basically smudge that
layers, initial layers. Then I am working on
the eyebrows as well, using it very lightly
and tried to create the eyebrow using the lower
red pencil for that as well. After the first layer, all around the eye, I'm adding the second layer. So that with a little
bit more pressure as compared to the previous. As of now, I didn't use any shading tool and
just using the pencil. Now I'm introducing
this thick brush, makeup brush and then try
to smudge these values, blend these values
to a certain level. Now you can see that there are, all these grapes have
been gradually smudging. But I'm here, I'm again not putting that much
of pressure and try to make it more
gradual and uniform. So whatever be the shading
technique you are using, it has to be gradual
and uniform. Then only we can find
the realistic results. After that first
course of smudging. I'm going to, again using
that for B pencil for darkening up the
pupil, the iris. After doing that, I
am introducing the, another brush, which
is thin in size. And it's a finer brush as
compared to the previous one. And it is used for the
detailing portion. And how to basically add more and more layers
in the minute areas. So that brush will help us to achieve those minute details. Now I'm using the eraser for highlighting few areas
inside the eyes. The upper eyelid, then the iris, also inside the pupil. So all these minute white areas we're going to
capture with this. Then I'm using this
pencil eraser or mono Zero eraser as well for
getting those details. All the hairline
adjustments are here. Ln highlights that we
are going to implement. And for that I am using this this kind of tool that
is known as mono eraser. Now I am adding more
layers, more dark layers. And then finalize. I hope you understand
the basic structure of dye and how to draw it
using the reference image. In the next lesson, we are
going to talk about how to observe the emotions
lie inside the eyes. I'm so excited to
see you out there.
5. Observing the Emotion: In this lesson, we're
going to learn how to observe the eyes through
the reference images. Let's get started. Just to have a closer look
into my eyes and see how the emotions are changing
from happy to sad, excited, suspicious, and angry. For observing the motions, you need to observe certain
things such as eyebrows, upper lid, lower lid,
position of Eigen, size of pupils for begging
understanding of emotions. We need to keep in
mind certain things. First of all, you need to totally see the reference image. This is the first step. You need to see the reference
image thoroughly from one side to the other side for capturing the emotions
are expressions. You need to understand
the eyebrows as well. Then see the size of the pupil. Is it big or small? Also, you have to see the opening of sclera
or opening of the eye. And last, but not the least, you have to observe the dark area and the
contours as well. After we observe these points, we need to draw the particular. For drawing the
particular right, we have to draw the
outlines of that I first by using XP or any lighter grade pencils like HB B to be something like that. Then we moving forward towards the dark portions and using the Furby benzyl or
six B pencil for that. Then we will start
the shading process, and then we will finish it by using razors,
mono lasers, etc. In the coming lesson, we are going to draw each
and every motion one-by-one. So let's see this.
6. Drawing Happy Eyes: One can easily observe
the happiness of anyone by just
seeing they arise. Now let's take a look to
these reference images. The reason behind choosing these reference images are
these images are clear, sharp so as to see the details which will help us to draw all possible details. Images can be colored
or black and white, but with high-quality, preferably it should
be front-facing. But later we can try eyes in
different angles as well. Just observe the eye and see the expressions
residing below the eye. In the form of
fold and wrinkles. And the wrinkles on the
edges of the eyes as well. Also, the center line. And I&S is basically lying
to the lower eyelid, more towards the lower eyelid. And it is a little bit downward
from its normal position. So now let's draw this. Draw the horizontal line first. It should be very light. Then the vertical line. As similar we have discussed
in the previous lesson. Then on the center of this, you're going to draw
this small circle. And then the bigger circle. So these 23 steps are
going to be similar. And all these techniques
so that we can have a uniformity and must have a
process which we can follow. Every time we are
going to draw the eye. You have to observe
the radius of this. So it's completely a video. Then I'm going to draw
that shape of this. I, this is pretty much
similar to the normal eye, but the lower eyelid is quite straight as compared
to the upper eyelid. Just observing by seeing
the reference image. Here you can see the one
portion of the iris is lying downward,
the lower eyelid. So you can see that that portion is hiding
behind the lower eyelid. Then I'm going to erase
that portion which was lying below to
that lower eyelid. Raised that and then I'm adding the lower eyelid details as it's shown in the
reference image. I'm here trying to representing those fold
in the form of lines. And then later on I'm going to add those shades under them. So here are the outlines
that we have finished. Now I am doing exact process. I'm adding the
darker layers using the phobia pencil in sign
the iris and the pupil. So far any dark area, I'm going to use
the fovea pencil. And for the lighter areas, I'm going to use the
to-be pencil B pencil, HB pencil, whatever be the case. Then again, I'm going to
darken in those areas, which is pretty dark in
the reference image, just adding more and
more darker values. So from making any i, our process is pretty similar, but the results every
time is different. That is only possible when
you do have a certain ideas. How to basically capture
those expressions and how to get that emotion
from the reference. Now I'm darkening
the upper eyelid, the fold, the edges. And then I'm going to draw the eyebrows and
eyelashes as well. The eyelashes here are not that prevailing and it is very little in
terms of its size. Then I'm going to do the
cross hatching thing. That does have some values, some grades on which we are going to add
more and more layers. And this is the
first layer and I'm smudging it using my own hands. You can use tissue
paper says well, or some kind of
brushes well for that. But it has to be very
gradual and uniform. That is why we are using
those kinds of tools. Now. Similarly, I'm going to
darken up the lower eyelid, which is the most prominent area in this particular expression. So as you can see, the eyes are happy. And when it's happy, the lower eyelid
actually comes into action rather than
the upper eyelid. The upper eyelid, It's pretty much similar to the anomaly, but the lower eyelid and this area really
comes into action. Now I'm also darkening
up the eyebrows, then finishing up with the lower grade pencil so that hairline details
can be achieved. Here I'm going to
use the ten brush. And this is the makeup brush, as I told in the
previous lesson. And trying to smudge the initial layers so that
we can do the other layers. Now I am again coming up with a higher rate pencil,
that is for B. And we start darkening those areas which has been
smashed in the previous layer. So here you can find
the dark values. And that will help us to
basically achieve that realism. Only lower eyelid, you
can see that there is automatically some
highlights and some dark areas being created. So that is what happened when we actually create some outlines and then we are
adding few details. So you can see here
that there is a small hairline kind of a
thing has been created. And that will give us an advantage to get that
realism in our shading. I'm just adding a few more
layers in the lower eyelid, then try to smudge
those layer without disturbing that highlight that has been already created
in the form of hairline. And now I'm adding few more
darker lines as referred in the reference image you can see the difference
I mentioned there is a lot of dark area
in the lower eyelid. So I am just trying to capture
those dark areas that will basically help us to create the exactness or create a similarity of that
particular expression. And you can also
see that there is a very less effort that we have put in the
upper eyelid portion. Rather we are more concerned
about the lower eyelid. Now I'm coming up with a 0. It isn't that mono Zero eraser. And try to get some
minute highlights. So really helped me to capture those minute details,
minute highlight details. Now I'm moving towards the last layer and I'm again
using the phobic pencil, try to darkening a few areas so that we can achieve
that realism as well. And then we will smudge
those things, be the brush. There are so many dark areas inside that I raised portion, then the eyebrows as well. And then eventually we are
going to finishing it up. Finally we have finished the first die and I
hope you enjoyed it. Try from your own and just do your exercise
by drawing them. In the next lesson,
we are going to talk about another emotion. See you there.
7. Drawing Sad Eyes: This is the emotion that
nobody wants in their life. But life is all about balancing all the emotions,
including the sadness. For any artists, it is very important to learn this
particular emotion. First, let's understand
this emotion by watching its reference image. So you can easily see how the expressions have changed
from happy to sad eyes. Now, let's draw the
horizontal line. The line need to be very
light in terms of pressure. Then we are going to draw
the vertical line as well. The process will be as similar
as in the previous one. So on the center of this
horizontal and vertical line, where this line actually meet, we're going to draw a circle, the small circle, and
then the bigger circle. So the smallest circle
represents the pupil of the eye and the bigger circle represents the iris of the eye. You can see that I'm
using the sides of the pencil and not the tip
of the pencil when I'm going to draw the
outlines because it will definitely help us to have a very light pressure so that
if you find any changes, we can do it using the eraser. Now, I am just having an idea of drawing the sides and the shape of
that particular eye. So for that I'm
marking two points. This from the imagination thing. I'm doing this, having some hints using pencil
measuring techniques. Then I'm going to
draw the shape. You can see that
I am not changing the pencil pretty often. Because I know that if I'm just not putting
that much of pressure, hardly matter to which pencil
you are actually working. Now has a phone that shape. Starting to observing
the the portions which are dark in nature so that the line, the upper fold. And you can see there are
so many expressions which are predominantly on
the upper eyelid. And the lower eyelid
is not that much. With the expression. Here. You can see how the
expressions have been changed. In the happy I, most of the expressions were
in the lower eyelid, but here the
expressions for the sad I have been shifted from the lower eyelid to
the upper eyelid. And this is the way to basically observe the particular
reference thing and the particular emotion. So whenever you are
going to draw any side, you have to have focus on
the upper eyelid portion and do not focus on the
lower eyelid as much. The eyebrows are quite normal, but the edge of the eyebrow
be added to actually start. You can find there are
few folds in terms of darkness that also we need
to have keep in mind. So now the shading
parts that we started, and I'm just having the cross
hatching thing, few lines. And then we're going to add more layer of dark
layers inside the iris. I'm using the phobic
pencil for that. As I know that I am
going to is much all that dark area. I'm not. Really concerned
about the the flow or the direction
of that shading. I'm just trying to make it
dark as much as possible. But with a very less pressure that you need to keep in mind every time when
you are going to draw, not pressurize that pencil, otherwise the paper
will be damaged. And if there is
anything erroneous, you do not have
able to change it. See, the right portion
is pretty dark. So I am doing the same
in my drawing has been using the bowl events in to
getting some dark layers lie. I'm working on that foil, which will definitely help
us to create that emotion. I'm using my fingers to
basically smudge those values. For that, you can use some
lower grade pencil as well. Do not directly go
with the four women. As the pencil is pretty dark. It may damage feel things, it may darken a few things
much more as expected. Therefore, you can use some
lighter gate pencil for that. I have used some fingers then. Using the thick
brush as I'm seeing, the reference image is filled
with gray tones. Okay? So here we have to do the same. Have to create some
gray tones for that. The thick brush. The more the thicker the brush, it can help us to create more
even gray tones on paper. So whenever you find
some gray tones, some even gray tones, you should use more tech brush. For my new details. You can use these
kind of thin brushes. Like inside the eye rays are some minute areas near the tear duct or the
lower eyelid portion. For that, you have to
use this kind of Tinder. Now I am coming up
with a final layers. I'm adding more dark values. Now here I'm using
the pen tool as well as destroying basically need more dark values because the reference image is
pretty sharp, pretty dark. And here I'm going to
use that dark pencil, which help us to quickly
get those dark areas. I'm adding more layers
and trying to get more dark tones for
capturing that emotion. Now here I am coming up
with the kneaded eraser, trying to getting
some highlights on to that upper eyelid fold. And also the lower eyelid. Then I'm using the eraser for getting the iris into shape. Then few highlights. These tools certainly
help you to achieve that. Aim, to achieve that
minute details. And sometime they will help
you to create cross settings, highlighted row
settings as well. What I'm actually doing
here, some tubes. That is why these two are the most helpful
tool for any artist who are basically drawing into graphite or
charcoal medium. Now I'm using the
thick or thin brush for some more dark
even surfaces. After adding those details, we have came up with this
satisfactory result. And I hope that you liked this lesson and understand the key
factor involved in it. In the next lesson, we are going to talk about another emotion
that is excitement. How excited are
you to learn that? I will see you in
the next lesson.
8. Drawing Excited Eyes: Hey friends, we
are going to learn another emotion
that is excitement. I'm so excited to let you understand about this
particular emotion. Let's get started. Just see these references
and see how the iris of i's are resting on the lower eyelid and
the pupil has enlarged. To an extent. The sclera is quite visible as compared to the
normal eye emotion. Excitement is pretty similar
to the shocking expression, but the hybrids seems different. Let's start to draw it. To better understand
these emotions. Draw the horizontal line. That line has to be very light. Then draw the vertical line. That is also with a
very light pressure using the HB pencil
or B pencil for that. Then on the center of
that, those lines, I'm going to draw a small
circle and then the big circle. The small circle
represents the pupil, and big circle basically
represents the iris. So here you can see as
the eyes are excited, the pupil has been enlarged. This is the
scientific phenomena. Whenever we shock or excited
Our actually pupil enlarge. To some extent. That is not always the case, but here it is. Now, moving from
the science to art. We are going to basically
draw the shape of that ice. So here you can see the lower
eyelid is quite straight, but the upper eyelid
doesn't have the shape, which is quite similar
to some leave. Leave. I don't know. Maybe it looked like a lotus. It more look like a fish. I can say that. Now. I erase the portion that is behind the lower
eyelid, that iris portion. It is that. And then I'm going to draw the
upper eyelid fold. You can see the sclera
is quite largely open. I have discussed in
the initial lesson of this class that
the opening of sclera is play a major role basically to identify
the emotions. And here you can see that
opening is big, therefore, the iris has been dropped down and it's basically lying on the lower
eyelid portion. It is quite similar to the happier the
position of that iris, but the opening of sclera, the opening of the eye
is quite enlarged. And now I am basically shading
across etching thing all over around this
side so that we can get that gray background. And then I'm using my
hands to basically, It's much the value so that we can find a even great tone. Now I am going to
draw the eyebrow. Here. The eyebrow is pretty smooth and much more developed
as compared to the sky. What difference we
took were there? But here, the eyebrow is quite grown-up and we're
going to darken up. Therefore. Now similarly,
I am darkening the inside of the iris portion and try to get more dark values. So I'm using the phobia pencil
here for basically getting the dark tone of the pupil doesn't effect to focus
on that angle of shading. Rather we just need some good dark tones
inside that iris. Now similarly, I am darkening a few areas of upper eyelid. Now I am adding few dark layers around the upper eyelid area. As It is seen in the
reference image. You can see I'm
using this brush. We can do the same exercise with this thick brush as well. And that will help us to create that gray don't
even toned paper. And that will
definitely help us to create the more
realistic results. Now I'm working
on the eyelashes. Here. The eyelashes are more dominating and they are
very clear and crisp. So that is why we have to
create that accordingly. And I'm using that dark pencil
for that directly because I can see that there is
a lot of eyelashes here, which is pretty dark. I'm using the six B
pencil for creating that dark upper eyelid
portion as well. Then the same pencil
I'm using for the iris and the pupil area. Now here I'm using
that thick pressure in to smudge the
previous layers, what we have opted. Now, I am darkening
the eyebrows. I'm following the exact flow of the hair or fibro so that we
can get the exact results. And this will eventually help us to create more
realistic preserved. So I am just creating
some strokes, downward to upward direction. And with the inclination. Now I'm coming up
with the mono eraser and trying to get few. Here. It is. As it will help me to create that smooth transition
from a skin to here. Then I'm smudging the details. So that is how we can actually do some of the
corrections as well. Keep on smudging that
eyebrows with the skin tone. And here you can see that
I have found that is smooth transition
of the eyebrows. So 34 layers will help us
to get the exact details. So always try to add
more than three layers. Always do get those
realistic shadings and do not try to do
it on the one layer. Here is a task for you to go in the front of the
mirror and try to have those exciting emotions
in your eyes and observe the difference from
the eye in normal condition. I hope you liked this lesson and understand the art behind
the exciting eyes. In the next lesson, we're going to talk about another emotion
that is suspicion. Say you with a suspicious eyes.
9. Drawing Suspicious Eyes : Have you seen
Sherlock Holmes size? Those eyes are full of
suspicion and mysteries. Let's see how to
draw this fantastic, mysterious and suspicious
emotion on the paper. For many people, expressing
this particular emotion is by lifting of one eyebrow and narrowing gone
down under been. For other people, it may be narrowing down
both the arrows. These are the very common ways to express this
particular emotion. You need to read both the eyes, the eyebrows play a major
role in this expression. So we're going to have
focus more on it. The eyelid seems normal and the upper eyelid is
mixing with the eyebrows. So we are here to draw on
the suspicion in the eye. This is the reference mentioned that we are going to draw. Now, let's draw the
horizontal line and then the vertical line. Here, we're going to draw
two vertical extra lines, which actually represents
the vertical axis of the eye separately. So on the right vertical line, I'm going to draw the pupil
and the iris as well. That is pretty
similar to what we actually did in
the past lessons. Now I'm going to draw the
shape of the right eye. The right it is
right for myself. And then I am going to
draw the upper eyelid. And then the lower eyelid. Then I'm removing
the access iris, which actually behind the lower eyelid or
the upper eyelid. Now, similarly, I'm going to actually get some outlines
for the eyebrows. Now I'm going to
darken up the pupil. And then the arrays using the four B pencil or
the to-be Benson. We can use alternatively both. Then and just doing the
cross hatching thing. All around eyes. The hedging should be smooth so that it can
easily be smudged. Same time it has to
be very uniform. Now I'm using my
own fingers too. It's much again,
I'm coming up with darkening few areas using the to-be pencil and the pencil for
darkening those areas. So here, now I'm using the four will cancel
and try to finish, tried to darken up those values using the cross
hatching technique. And I haven't used till now, I haven't used any
smudging tool. I'm just using the pencil
and adding more layers to get those dark areas around the upper eyelid and
the lower eyelid as well. Hedging be uniform and
it should be in the, in the form of lines, which basically
represents darkness. Now I am moving
towards the eyebrows and adding few lines, few initial lines to
get the eyebrows. I'm using the to-be
pencil for that. We can directly use of
all the pencil as well, but we need to be very specific when it comes
to selecting the pencil. And for beginner, it
is very important to use exact pencil
for the exact area. Here you can see the
edges of the eyebrows are a little bit lifted
in the upward direction. So that will help us to
find this expression. Now you can see that I am using the pencil and
trying to getting those. Lines which are basically represents the texture
around the eyes. To my aim is to basically
get those wrinkles as well. Now I am moving towards the
another I and I'm doing the same process what I have
done with the previous. I am just drawing the outlines and then coming
up unto the shading part. So here you can also see
that the outlines are pretty light and I'm not pressurizing
onto the outlines. But I just want to express
here that the expression, you can see here, it is pretty much similar that
we are discussing. That one eyebrow is lifted and the other eyebrow is in
the downward condition. Using the fall we benzyl for
the pupil and the iris area. And try to darkening
up those things than I am quickly moving towards the shading thing using the thin brush to basically
It's much fuel values. Then I'm just doing
the same process that I did in the right. I am just doing the same
for the left eye as well. Now I'm drying the eyebrows and I'm using the same
technique what I did. I'm just trying to
get some lines, some hairs of the eyebrow. And then darkening those values. You can see here the Agile, this I, it's pretty dark. And you can see the black spot is also
there on the edges. So that is something
which really express this particular
emotion because it shows the darkness that is
there inside the eye and then you can easily capture
TO suspicion in the eye. Now I'm going to focus on the wrinkles that is untestable. The eyebrows. Those are encodes
basically work for the, that particular
expression to draw. I have already told you
that how to basically get those signs which are there
in the reference image. So just try to capture those
small signs or small hints. And then you can easily captured
that particular emotion. So here you can see the eyebrows
and the upper wrinkles, what is basically
residing on the forehead. And it's just about the eyebrow. So if you captured that emotion, that expression, you
can actually find it by drawing those small hints. Now I'm going to use a kneaded eraser and
find some highlights, which is very much showing
in the reference image. There. You have to find
these tools very helpful. Like I'm just doing some
dots, creating some, some spots so that I can actually find that
texture of the skin as well. So this is basically
up to you how much you want to get that drawing finished or
getting that realism. Artists can easily draw this expression or emotion by
blocking technique as well. First find the block and then put the darkness
accordingly. They may use the
charcoal as well. So I hope that you
liked this lesson and understand all the mystery
behind the suspicious eye. In the next lesson, we're
going to talk about another emotion
that is angry eyes. See you there.
10. Drawing Angry Eyes: We all know this famous
game called Angry Birds. The eyebrows are
thick and pointing downwards and showing
this particular emotion. Now let's see the
reference images first and observe
its expression. The moment you see this image, you find that there is
a contraction between the eyes and there are few lines moving upward in between
the central or the aura may be defined as
a central point between both the eyebrows. The eyes are squeezed
a little bit, and the upper and lower eyelid are filled with lots of lines. So here there is
an equal amount of expression visible
on both the lids. Although there is a shift of eyeball towards
the upper eyelid, which is oppose it to the
emotion call excitement. Now, let's draw this
emotion on paper. My drawing the horizontal line. And then the vertical line. Then we find the center where these lines
cross each other. So over there I'm going
to draw the pupil. And then I'm going to
draw the iris as well. So this process is the exact same as we are
basically doing for every I. And the similarity is there to have a similar kind
of process every time, whenever you are
going to draw it. Anyway, I like that it will help us to have a process
that is remember to us. Then we start drying
that emotion. Now I'm going to
draw the upper lid. And similarly the lower lid. Here, the aim is not
to copy the exact one, but rather to get the
emotions correct. So I'm going to draw
the edges as well. This shape is more
similar to the, to any kind of leaf
of a tree or a plant. And I'm going to, you can
see here I have eight is the iris that was behind
the upper eyelid. So I erase that. Then I'm filling it using the pencil and the forgiven
cell for the dark areas. Using the raw setting, you can see very thinly that I'm using this cross hatching
technique all around the eye. For cross hatching
or diagonal legend, you need to understand one thing that stroke should be fun. And there has to
have a force in it. So that force will
help to create the particular expression of
anger, sadness into these. The lower eyelid,
you can see there is a lot of expression, lot of anger,
bitterness has been shown through the wrinkles. And we're going to
capture those as well. I'm just doing some cross hatching all around
the eye so that we can get the gray
surface on the paper. Now I'm just trying
to find those lines. In the lower eyelid. There are so many expressions. And these expressions help us
to basically achieve that. Anger, sadness in the eye. Not only in the eye, we can say this, that for angry I, it is very important
to basically, you have to work
all around the eye, rather just showing it inside
the IRI raise or pupil. There has, there is nothing
that much in the eye. Rather, all around the eye. There are so many things
what you can capture. Now here I'm using
the thin brush, which will help us to layer down more and more values and to
make the surface more even. And that will help us to basically achieve the
realism into our drawing. So here you can see that
I'm just as smudging few values all around the eyes and trying to
get some events surface. I'm using my fingers as well. Smudging fuel hard values
which can be raised, which can be smudge
using these brushes. Right to put dark
values gradually, not to do it in one go
or just laying down certain values in
just one layer. That will definitely create
some chaos in your drawing. Or if you do not
do it gradually, there maybe the
possibility that you are not going to finish it as it
is required in the realism. So that is why this process
of gradual adding on layers will definitely help
any beginner to achieve such realism with
the correct expression. After adding those layer, I am coming up with a thick
brush and smudging down few values more and more so that we can have more gray
tones are in our drawing. That will definitely help us
to create more realistic. Hi. So these brushes, the quantity of these
brushes is that it is very, very smooth and do not
basically damages the paper. Rather, it, it is very
gentle on the paper. So here we have
finished our eye, and now I'm basically using the mono Zero
eraser to identifying some highlights or skin
textures or white spots. What we can identify in the form of maybe sweat or
something like that. So this brush or this eraser will definitely help us to achieve that realism. Here I'm doing it all around the upper eyelid and then decides also in
the lower eyelid, you can go up to
beyond that thing as well and achieve that
hyperthyroidism in the eye as well. It is just about how much time you are
spending over there and how much you are aware towards the
light and the shades, and how much you can actually achieve using
the reference image. I hope that you liked this
lesson and understand all the reasons behind why
the angry eyes look so scary. This is the emotion
that is having maximum expression in
terms of lines and depth. In the next lesson, we are going to talk about
the concluding remarks. Let's conclude the whole
experiences of this class.
11. Conclusion: You made it. Congratulations my friend for completing this
particular class. I am so happy and
how you can also see that happiness in my eyes
through that emotion. So we have learned how to draw different emotions
and expressions. I showed you how
to basically draw each and every emotion and
the science behind that. I must say the observations
are the key factor for any artist to understand
and to draw any emotion, I request you all to draw these emotions and
upload the same on the project gallery
section so that your fellow artists can
also see your efforts. I can also give you feedback
and encouragement as that. I hope you enjoyed this class. If you did, please make
sure to leave a review. If you are interested in
learning for red wine technique, you can watch my other
Skillshare class as well, which is a beginner's
guide to portrait drawing. Its link is provided
in the description. Goodbye reference. I hope to see you in my
upcoming Skillshare class.