Transcripts
1. INTRO TO CHARCOAL CLASS: Hello everyone. I am on good and I'm welcoming you all on my news. Can share Glass. So friends, first of all, let me tell you something about myself. I'm Ankit and basically based in Nevada, India and following my art passion for the last almost ten to 12 years. And I'm basically working for dry medias, like software sales holds, graphite and colored pencils as well. So these are the areas on which I'm focusing on myself. And I actually have already uploaded a class on Skinner share for the bigness to basically get started with the graphite pencils. So this class, this class is basically mean for the charcoal lovers and how you should initiate yourself and how you should prepare yourself for charcoal. So the title of this class is charcoal for beginners and artists. So basically we are covering the whole thing from the beginning and to the end and how you should dry out like a pro artist and how you should basically begin the chapel thing and how you should familiarize yourself for the whole thing. So let's have a beautiful Start and beginning of this awesome class. There are many interesting topics in the class that how you should use your areas or as a drawing tool and not erasing dude. This is very interesting episode as well. And also there are many techniques like how you should draw any portrayed by using lighten shades media and how you basically begin the portrayed using the balloon job holding as well. So there are many things which is included in the slab and you will definitely learn many things in this class as well. By the end of this class, you will definitely learn chapel in a deeper manner and you will definitely use it concept in your drawing. And this is basically for beginners also, who don't even understand what is below charcoal and what is compress cold, and how you should basically used them. So this is a very important class for everyone who wants to learn, understand cellphone in a better way. So let's have a beautiful Beginning of it.
2. EPISODE 1 INTRO: And the first episode you will learn about the familiarization with a different tool that we're gonna use in this class as well. And these tools maybe like below charcoal, compress, apple, chow hall pencils and other tools like smudging tools, lending tools that all the tools what we are going to use over here, and we will have an introductory video on it. So let's have a big enough first episode.
3. EPISODE 01: So in the first episode, we will learn about the different tools, what we're going to use in this class and the significance of these tools. We will also understand about the willow charcoal and then the pencils. We will also discuss about these kind of chart also which are from the different brand and how to use them. We will also discuss about these thing. So let's begin with it first. Let's just understand about the jock all in a deeper manner. So basically tau, all is the pencil or a dual, which is used from many years ago for many artists and its most preferable tool that can be used and that can be, and can be utilized as it allows you to basically get toward the most darkest value and also towards the most lightest value as well. So we will characterize all in the following manner. Lets say, first one is the, we can say this is willow charcoal. Or someone says it wind job pool as well. So if someone says We know chop all and mine juggle both are the same things. And what are these? These are like these. Jock or logistics. These are very lightweight as these are below. So this is very light one. And these are also similar to this one and produces similar kinds of effects. So whenever you use these village Jaguar and why you should use it, it basically it allow you to first outwardly few outlines of the baud rate and anything, whatever you want to draw. So by using this, you can easily change it or is it very easily and then redraw it again. So this will definitely help you to create, structure. Our preliminary lines. What is a use in the portrayed or drawing mechanism? Also, it is, as it is very dusty, so it produces much of light mic dawns also. Similarly, these tools are also very helpful and these are very similar to the willow Zhao hold one, but density and the opacity is very difficult like that. This one is the soft one, and this is the softest one. And this is the most software. Again, in this one is the harder ones. This is very hard. You can listen that noise as well. It's very hard. And this one is also the harder one. So there are two which are pretty hard and the other two are very soft. These are from the other brands and this can be used in our different way. What we will discuss income coming episodes as well after than that. And we have another chalk or thing that is known as, suppose this one is a fast run. So second one is the compress circle. So what our campus are called compressed apple is basically very dark, very dense, and it came in, in this shapes like a circular cylinder, cylindrical shape. And you basically get the darkest and most deepest value by using this. And you can see or hear. So if you want to, it is it R, if you want to keep changes on it, it's very difficult for you to do such thing as it is very dark, very dense as I told you already. So you can smudge it. You can see here that you can smudge it up to a certain level, but it won't end goal. Like like this. 0101 is a very light form, so it vanishes very quickly. But here you can have to have a lot of effort to actually it is it actually move it a certain dimension. This basically uses for the most darkest portion of the portrayed like here and some background thing. So there you can see and this will really help you to reduce your time in a most significant manner. It will allow you to give more time towards the main feature and for the other features like that portions of hair and beard, you can use these chunks directly and get the Dow Jones as well very quickly. So these are very helpful for getting the Dow Jones as well. You can see that these values are also coming on my hands as well.
4. EPISODE 01 cont..: Now let's come towards the pencils thing, charcoal pencils. And we will discuss about it in an orderly manner, shall hold pencils. So chow hall pencils are being manufactured by different companies, whether different terminology, what they wanted to use, like few of them are using it like soft, medium and hard. And few other companies having their terminology like simple graphite pencils like HB, 2B for b, six b. So they are also manufacturing pencils like this, like this one, this pencil, the orange one pencils are of different company and then these are for B to B. This one has to be, this one is for B, and this is XB. And another one is this one mystics b. So let's just moving toward it. And also, if you do not have that kind of pencils. So the soft one of different company is pretty similar to 6B and for B, OK. So this software one is pretty similar to four. We end 6B and the medium one is pretty much similar to 2B and the Harden is pretty much similar to H b. So if you have this, these pencils, I will with you. So you can actually relate it like this. And over here we can easily understand that how these pencil actually produces the doc will use, I have created four boxes, and this one is attribute. So you can see or hear the lightest as compared with the other ones. This one is the lightest one. And then this one is, this one is 2B. So for two we, you can see on here this one is darker as compared to the upper one. And then the 4B, this is far more darker as compare to the upper two. And then in the end, this one is six b, and which is the most darkest as compared to the all three, as mentioned above. So you can see over here in the lightest, too dark as, and in the similar manner. If you have these kind of nomenclature video pencil, you can relate these pencils with them in a very easy manner.
5. EPISODE 01 other tools: Now let us quickly understand about the, It is so amazing thing we're going to use these needed erasers. And as you know that it can be created in any form and any shape, you can create any shape using these kneaded eraser. And it's very helpful for any artists to basically get that values and further it is the value. So you can see or hear that how I am doing. Let's say I'm just the opening these value and then I'm just trying to smudging it using the brush. So you can see or hear that how I am using these needle user to getting the white lines. Have you seen it? You can change this sheep, change this sharpness or U, and then actually get the white highlights. So whenever we use subtraction method, we are going to use it as a drawing tool, not ideas in June we can see and we can discuss these things later on in this coming episodes. Now let's talk about that. And other areas are what we're going to use or here, this is the pencil eraser. And you can use it in getting the fine lines and find highlighted values. So just quickly understandable to desert C or here you can just drag it and get the white highlighted tonal values. And how you actually get these white highlighted values. It's a very simple thing and it's a very beautiful thing for any artist TO basically and rely on these tools and get the correct and Required Values and highlights on the drain. Now let's talk about the sharpener. For sharpening a charcoal pencil. It's a quite difficult task to do. Actually. It's not that easy as you sharpen the normal graphite pencil. So for that, if you find it difficult to shop these pencil, you can use a knife like this. One. You can see over here. And this is the knife that you can use to sharpen the pencils. Basically, if you are not very comfortable or whatever depends on you are using, if they are not getting sharpen you using the simple sharpener like this one. So if you're not very comfortable with this, you can use these kind of sharpness as well. These are mechanical sharpeners and is when the lower there you can see. And you have to have fixed these charcoal in charcoal pencil insight into it and then you just move it like this. So it will going to sharpen the pencil in a very easy manner. But if you do not have that much of comfort with these as velocities also break the pencil very frequently. You can see over here that these pencil break very frequently. If you are going to sharp it using the normal sharpeners. If you do have a good brand pencils like these ones, so these won't break so often. So if you do have these kind of mantle, you can sharpen it with the sharpeners like these. But if you do not have that kind of maintenance, you do have only this kind of entity. You can use a knife as well. And sharp pencil like this as well. Many artists do such thing as well. So these are all about sharpening tank. We can use our normal sharpness and you can use mechanical. So these two are, if you do not have that much of comfort on those sharp now you can use the knife. Blade. So this is all about sharpening tools. Now let's move the word shading thing.
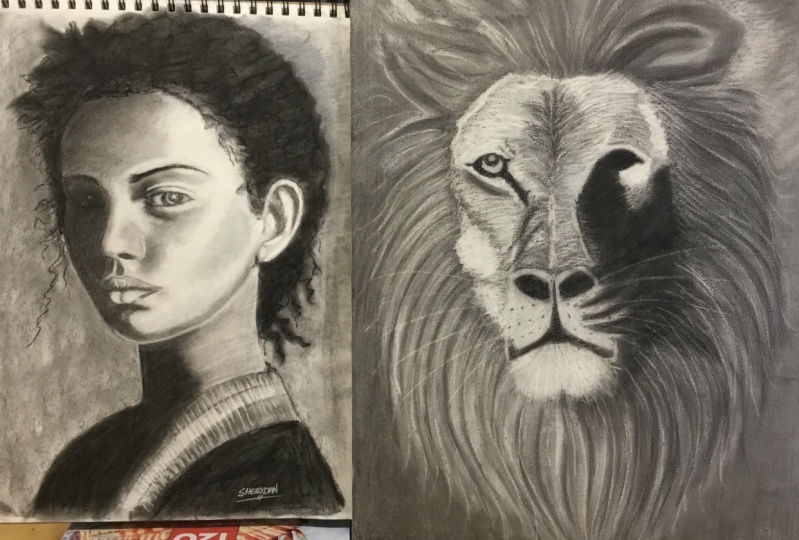
6. BONUS : WHITE CHARCOAL: Now let's just talk about different charcoal pencil. This one is the white South hold Manson. And you have seen that many of the artists are using these white circle when cells. But the most important thing is this, that you can only use it on the paper who is having some tonal values like a tone papers, okay? So whenever you want to use these white pencils, you have to have a different paper with a colored tonal values. Okay? So if you are using the white paper and black charcoal pencil, so these white hole is not going to use or there. But if you do have a paper like this paper, don't papers, you can see my few of my drying, so are there and these are the dawn papers. Okay. You can see or hear as well that I have used white chalk holds and white charcoal pencil for getting the highlights. So these are used only for that don't paper thing. So it's not that significant for here.
7. EPISODE 2 INTRO: And the second episode you will learn about how you should basically is much Jiao hold and how you should basically spread the charcoal element or powder to your whole drawing and how you should use your fingers and hands as well for smudging thing. So we will discuss these things as well. Like there are many quotients and many doubts the bigness do have in their mind that whether they should use paper to stump or not and what are the best tools which is suited for the smudging and the blending of the Chow holding. So we will cover all these ideas and questions of yourself as well in this class.
8. EPISODE 02 SHADING : Now we will discuss about the shading tools. So for shading, chow hall is a very soft media as you know it. And he can actually smudge these chop all dusts in a very easy manner using your own fingers. But actually you really find it difficult for every time to use the use your fingers and getting the things very messy. So if you are not comfortable in using your fingers, you may use paper stumps. Are you may use cotton birds. Are you can also use Russia's. But for using brushes, you have to be very careful as it move all the dust from the drain. So don't do those things as well. So let's just see how the shading actually work when you're going to use these on the. So I'm just making some cubes to actually check that how the Schrodinger to evoke much alcohol. So here I have made three boxes. And first and just using the My own finger or here to see how much smudging that I can do using my fingers. So you can see over here that the smudging is smooth. Shading is mode but dough or original content. And what I have created using the pencil that has not been moved than the markets is still there. And if you're gonna use these paper stumps, we have to be very careful about the papers as it really pressurize the tanks on the paper. And it may be possible that paper can be damaged. But you have to really understand it. So you can see over here, the visibility is sports are there. You can see over here, there are many kinds of spots are there. But the smudging thing is more better than as compared to when you are using your finger. And at the end, suppose if you wanna use the brush and see the things, how things actually work. So you can see over here that this one is the, the best option for you to basically do it. Again sewer here that by using brush, you basically, it's magic very comfortably and you didn't find any kind of spots are there. So using brush is quite better as compare to using the paper stamp or using your own fingers. So v will utilize all these tools, all these tanks in the coming episodes and we will see where your fingers are more comfortable and where the other two tools are more comfortable. And all these tools can be used and will be used by us.
9. EPISODE 03 INTRO: This is a very important episode of this class. Basically, we will learn about the approaches and how you should basically begin and initiate a job. Alright, so in this class we will take two examples and how you should start with amino charcoal and how you should dedicate. You start with a chalkboard Benson. So there are two different approaches and we will discuss both of them in detail. So let's have a stack of it.
10. EPISODE 03 APPROACH: Now let's talk about the approach, what we are going to use, the blending. And there are different approaches for that. Or you can do it in a different way. So first and just using the village all and see how I can blend the things and how I can initiate the thing. So I'm gonna draw a circle or a sphere. Or here, you can see that and just roughly draw a circuit, I just throw food also I can, and then just seeing this thing that suppose the light is coming from this source so that, that salts and the shading, it would be like this. So for that, for, for using the willow charcoal and you will understand this thing, that these initial lines may not be retained for long. And also you should see that and just using the sides of the sides of that thing and try to darken fewer leaves. Unnoticed smudging at all, right, now, just getting some darker tones. Then, say, thus creating a background or there as well so that it can evaluate itself in a better way. Okay, so this is the first approach, what we're going to draw. And then I'm going to use my fingers to basically IS much dismantle charcoal. So you can see over here that I'm just smudging fewer US and more here as well. So when I'm doing this, you can see that the original shape has been dissolved and a new shape has been formed. Again, you need to find certain values. Okay? So just changing the pressure of the, of your own fingers and getting different layer of shooting. So this is the first approach, what we can do here. And then again, trying to get few more values. And for that you can use charcoal pencil assessment or you can go with holes as well. You can see over here that I have used few, few hints of shading. And then an Bina using the second layer, enhancing few more values. So whenever you are using these reloads our whole, you should have another pencils as well. Because whenever you are going to add layers, whenever you are going to again smudge it out. It will altogether as much the previous values. So for retaining those values, you need some other pencils which will help you to retain the original Manasseh hole inside that drying and put that right. So After the second layer, don't smudge the values, just go with some other tools like this, like some pencils. And then you can use your fingers or you can use these brushes as well for getting some event domains on the table. So the most advantageous thing for JavaScript that you can get dark where you saw quickly, which is very difficult for graphite. As graphite is not that, that soft dark. Which allow you to do such experiments. Just a smudging few values so that or even a small bone Gambia. So have you seen it that how I change certain venues and again, I'm fishing fuel more values. So you can see all the data and just manipulating few values so, so as to get more dark bones are lighter tones as well. And using my fingers as this for that. Or if you are not that comfortable or not their confidence by using your finger, you can use other tools like brushes. And I hope that you understand my point, my vision, what I have told you earlier. And then I am just using some highlighting things to get the highlighted portion more and more visible. So you can see this would be the first approach of our brain. And there are other approaches as well. What we are going to discuss in the coming section. So this will be the first approach of getting the values Nussbaum's and late-onset. This is the first approach. There may be say two below. Charcoal approach.
11. EPISODE 03 cont..: Now let's talk about the different approach in which we are going to draw a using the charcoal pencils and we're not going to use any pillow charcoal thing. So for that I'm just triangles, circles like this, and then supposing that shedding its coming from that side, the same thing and light is coming from this side. So I am just directly doing the shading portion using the stencils only. Some just not putting any pressure onto the paper. I'm just using the sides of the pencil and just laying the first layer very evenly and very softly and gently. Bring the same things, same copying upper drawing so that you can really relate those things with this one. And for the damn thing. And also using the same Benzer's leaned on the layers gently and smoothly. And then after doing such thing and just using my fingers to making smudging effect more effective. Getting those events office anymore, doing such things. Then when you do that thing, then go for it some darker tones. And four that used high, High gave pencil next 6P. And if you're using the other manufactured charcoals, then you should use the software runs soft charcoal. Start with hard or medium, and then you can steal software. In the end. I am not using any other tools like below charcoal or compression hello here. And just using my own pencil and just trying to get the shading values. Now, when you do this, then you can use your own fingers admin and then try to get that even surface. Once again. By this, you can get the different approach over here. And then you can use these brochures as well to get more events. So you can see different approaches over here. And you can actually understand that why the approach is different and why they're different approaches come into action for different requirements. Charcoal pencil approach. So it's up for you now. You, whether you want to go with a village algal approach or you want to go with Chao Haldane's leverage. Both these approaches are very good and very interesting to do. And you can, if you want a very realistic ten, you again go with the shower benzene approach. Or if you want a very artistic approach and very freedom kind of approach, you can use the village, our whole approach, more, more contemporary style of, or more toward the liberal style of artwork, you should go for loads our whole approach. Also, there is one more important thing whenever you are going to understand about lighten shades and how to use these tools for getting the subtraction matter, Dan, so you must understand this thing like we draw this. So you must understand is that if suppose a light is coming from the source and you have to draw it. So this is the portion what you can see over here or here and also in this way. So this bed is known as the core shadow bird. Ok. This is the core shadow. This one is the core shadows, okay? And then this is the highlighted portion, so this is known as highlight area. And then all the tones which belong in between them, like this, these stones or these tones. These are known as party over here. These are known as mid tones. Designers mittens, or here as well. These tones area in which we're going to use a little lighter values, these may be referred to as mid tones. And then these are, again, the most darken areas. So these are the shadows. And though lighter portion over here or here you can see over here as well to these, these portion are known as reflected light. Reflected lights. And these light actually reflect from the surface on which the ball or the sphere has been put into. So the reflection which is coming from the disabled and getting lights or here. These are the reflected one. These are the reflected wave.
12. EPISODE 04 INTRO: And this force episode we will discuss about how you should use your eraser as a drawing tool and not erasing tool. So basically we will discuss about lighten shades and how you should basically initiates with a darker area. And then you should use your eraser for the drawing of white highlights. This is very important and most of the baud rates, whatever being drawn using the chapel is being based on this concept of flight and shapes. So this is very important for anyone who wanted to learn this technique. This is very pro artist technique. So basically this is very important technique WHO really want to go deeper into charcoals and who want to draw like an artist. So this episode is basically mean for them as well. So have a deeper insight into it.
13. EPISODE 04 ERASER AS DRAWING TOOL: Now let's understand how we use these tools as a drawing tool. In this episode, we will learn about the understanding of how we should use this for the drawing thing rather than it is anything. So I'm just, when I draw an apple here. See that? How am I going to draw an Apple Store rough sketch and rough idea about it. So this would be the shape of that apple. And over here the stem. And then here is a leaf. We can draw and then just finding some dark over ellipse. So in this method, what we need to do actually we should first identify the weird dark values are. Once we identify this, our process for doing such things became easier. So this is how we should draw it and then just smudging it using our own finger so that we can get an even surface. And then subtracting t. We can use this tool to actually get some highlights. And just starting with a leaf. Just highlighted. Do. Thanks. Okay, you can see over there. And then over here this is the most highlighted portion, so I'm just getting a spot or there. And then this side is also just getting some highlights. Can do like this way. So this is the way we should initiate anything or drain. And then I'm just going to get more alpha values by using pencils like this, darkening it up. And then over here as well and just putting some more alcohol use. So you can see like that. And then you can use it for getting more even don'ts. Ok. So this would be the process and just targeting fewer values. Then we just again need to use this stole from getting the highlighted portion. Mid tones and lightest tuners with. So these are the lightest tone and then all other don't sound the mid tones. And this is the most highlighted down. Here. You just get some tabs. Can actually hear more highlighted venues. Much fuel use. Actually, smudging is the most important part of any doing. If you want to draw something realistic, you must understand the fundamentals of getting the shading. So for here you can see that the eraser is actually using as a, as a growing dollar and rather is not being used by the smart in the generic form is usually used as a reason to it, but we're here, it's work as a growing media.
14. EPISODE 05 INTRO: In this episode, we will discuss about how you should initiate any portrait and how you draw if you want to draw a wildlife park or a still life art. So this episode is basically dedicated for them who really want to draw something from visualizing it and how you should use the whole thing as a preliminary tool and finding the lights and states. So this is very important for anyone who wanted to really learn lighten shades technique for drawing the portraits of human or wildlife. So that can be used in both the things. So let's have a beginning of it.
15. EPISODE 05 LIGHT & SHADES: In this episode we will learn about laden sheets approach and how to use using military HoldTime just identifying the most darker, darkest value on the real image. And you can see that these are the most darker value and image. And then I'm just trying to get these values and then getting the lightest value N. Also you can see that the lighter light values are on the left side and the dark one is on the right side of the face on the line. I'm just using the willow job pool. It's a very small piece of philosophical and just trying to get there now called dawns and do my paper. This is the first approach that we need to follow. If Vienna, we're going to draw using willows are all n. Using the lion shifts techniques. As a very important technique for any artists do to really understand and draw like this. And using the site of the charcoal and also sometimes the tip of the sample as well as many small piece. So not putting a lot of pressure on the paper, but the production of that willows Oculus stood. And using the Windows icon is just a basic thing that you need to start that you can change certain reuse. Many easy mirror. So you can see or hear that draws our ball is really helpful tool, which generally allows you to get some darker dots and getting a hint of the correct proportions. So I am just having an idea, trying to, getting an idea of where darker values are actually. And here I am using, as you see that here I am using the velocity also. I'm very comfortable if I need to change the dimensions or the proportions, I can change it very easily using the fingers and removed the mistaken area. Ok, so this will be very easy for a person to do sustain, but it looks very easy, but when you are going to do it, it makes a little bit difficulty as compared to the normal January glee of grain. But this is only beauty that you can find in charcoal as well. So now I am just using the charcoal pencil. After having a little bit hint about the proportions by using the Lazzaro. Now I am just initializing fuel. Now go and use using the twofold pencils. That ugly. So then the error in the proportional value can be mitigated. If identity is start with an example pencil. That would be the different approach by using drying the outlines of the face. And then I'm just trying to get the darker values. That is different approach. But all here, if you want to use the balloons are holding, then you must do like that, that first you just try to get the enlightened sheets value and then finding the correct proportion insight into it. So now I am using a two beats or what Benson and that is of this brand is a very known and you know that wherever. And now I'm just measuring by means of my own pencil them just trying to get into some pencil measurement thing. If you're not really aware about what that density measurement thing is all about. You can see my previous class on the school share. That is bigness guy to Puerto drying. Or there I have no new about this thing. That how you should take measurement from your own pencil and get the correct proportional values. And we'll share the link in the project description. Or there you can see that Lincoln join that classes, but I'm just trying to continuously moving my eyes to the real image and my own brain and seeing whether I am correct or not. So as of now you see that there are many differences you found in my growing in the original image. But as long as we go with this and in this way, we will definitely, if our approach and process is correct, then it will definitely get the real proportional values as well. Whenever you are drawing, using the whole thing, you have to believe on your own strokes and you have to have a confidence and patients that you will definitely find the correct values and proportions. You can see that I am using my fingers and getting some plain and a smooth surface or which I want to work afterward. Now I am just coming up with a needle razor and now I'm just trying to get some highlights. And this is known as subtraction method. I am just subtracting few BellKor values into the lighter value and by means of the areas. So we're here, as I already told you it is, it is worth as a drawing tool, not as erasing. Basically it's drawing the white lines might highlighted portions. I am just trying to identifying the way we're actually the the highlighted values are there in the red image. This is a very challenging approach, but this will definitely in, certainly bring your inner real artist. By growing like this, you will definitely have a certain kind of confidence built into your personality and you will definitely become a better artist day by day if you draw in this way. Just trying to identify, just trying to matching with real images, trying to seem the lightest portion on the real image. And thus trying to, trying to following the same discipline certainly help you to understand about light and shapes in a better way. And also by understanding lighten shades in a better way, you will certainly become a bigger and bigger artist day by day in and getting and getting promotions by using my means of light and shapes approach. Also you can see on the darker side, there is some highlights or the, which is known as the reflection of the lights which are coming into the here of this line. And then it will reflect it to their darkest genuine portion of the line. So that, that also you need to maintain. And you can see that I have also mentioned that highlighted portion on to the Latin darkness portion cheek. So have you seen that? I have I have maintained promotion values very close to the original one, London, not just copying the exact values of just trying to get as close as possible to the real image. Using the sides of the willow and just trying to get some rough patches that went definitely enhance the quality of the TOEFL for an option and charcoal blueprints. Always, whenever you want to draw a chalkboard water donor try to make things very finished. As this is not the style which actually chop all required. Chow Hall watersheds are need to be very, very rough, very viewed. And that Personality should have come in your portrait. So I can continued doing it in the next episode as well.
16. EPISODE 05 cont..: Now we are continuing the same growing in this episode as well. And here you can see that I have laid down flow values of lightened sheets. And now I'm just trying to finalize Lulu's and finishing the sport rate. But not finishing it up, do the most realistic arrival, realistic world. And, and an artistic effect. And charcoal required effect is hot about that as required in this blank session. And using the needed is or you can see to try to get the real feather, real texture on the floor here. I'm just using the needed sites and trying to find it up. Whenever I'm gonna draw it. Trying to squeeze it up and make a fine point. Then try to get the lines, the highlighted values as well. Now I'm using the charcoal stick that has been mentioned in the last episode. So this stick is really helpful in getting some finite values are very, very Hartman. And let's try and get fuel, fuel, fine lines or there. Now I'm using the, the pens and charcoal pencil. So for B1 and trying to get the drug abortions has where you can also use the compressor pool as well for the doubt portion, if you want to draw something pretty quickly. And if you are so sure about that album now ketones, you can directly use the compressor Hall, but be very aware if you are using the Congress rule as it want. It is so easily as I have told you in the previous episodes. So always be very conscious whenever you're not gonna use that. Compressor ballistics. So now I'm refining few values. May the means of charcoal pencil, this is via the chat hold. Benson is also very important part of charcoal drawing. And you can't say that only Blow Job would lead you to the best on the appropriate. You need some hard job wool sticks or Java or pencil as when foreign refinishing, dawning of fuel of the non-chord tones as well. So all of these tools are valuable, much required irrespective of the brand, whatever you are using, that is not that important thing. Whatever brand you have, you may use it. Now I'm using the brush, obtain rush to actually finishing a few of the values and tried to getting some smoother values as well. Also, if you're not very comfortable in using the fingers, you can use these pressures or you can use the people stamp asthma or tissue paper assessment. So options on options are open. Faults are for portraits. I have seen that many of the artists are also using growth as really, and what should I say? A bundle of growths in which the friend of the jar full powder and then they are trying to use it for dusting flow values or Darwinian few values in a different manner. We will also discuss these thing in some other classes when an upcoming classes as well. So you can see that I am just trying to get in more real stick approach and more real, real dawn says when using the brush, trying to getting some smooth values. So you can also finish it up to a certain level. That is not the main important thing. You can finish it up to any level, even the hyper-realistic level. You can also do that thing. But the point is this, that your approach, your, how you begin the booklet and how the approach is, has been made by u. That is something which is very important. Just wonder reserved visceral really make great ontos as something that what the process that you have used that will really help you to make a better artist labor he did. Now I am using the, here's a pencil for getting some, some Tamerlane light lines as well. And I'm using the sixth Beach or hold pencil and trying to get some darker tones, darker values. So this approach is one of the approach that is being used. Many of the great artists, many of the professional artists who really want to draw something on the big size papers and who will really want to draw in the line says four trips as well. And also those artists who are really wanna have a freedom in that approach. We really want to show their talent by using these techniques that has been used by those artists. There is another approach in which we basically draw the outlines of the portrait and then we finishing up the values. But as far as my knowledge is concerned and those approaches are not that my dad up to that mark. As far as SAR, cold brines are concerned, basically, if you're gonna draw using the graphite thing, you can use those things as well, dead there or there. You're going to get the outlines of the booklet and then you filling up certain renews into it. So that can be used in the Greek fighting. But as far as a whole are concerned, you have to have a very structured way of doing certain things. Also, if you want to draw a commissioned artwork, you can use that approach as well by drained outlines on the board, Great, and then filling up the values. That's it that you can do if you want to have a commissioned artwork thing. But if you want to draw something for your own self and far apart in that, that is something which really express your style. So you must try these approaches as well. There is another approach that is structured, getting the structure of the phase. That is a different approach in a liberal talk in upcoming classes as when our there that you have to really fight or follow the the principle leg Andrew luminous matter and are some burnout that metal so that we can we can really understand those things as well. And I am just trying to finishing up flow values and trying to finishing it up. You can see that I am not trying to really copy the exact image and just trying to draw in my own way and trying to get the proportion values so corrupt that it should look very proportionate thing, it shouldn't look like a disproportionate rate. It should look up a proportionate. Does that really relate to the realistic portraits as well? I'm just using the right. It is a pencil and just trying to getting flew here mine's finished lines. And you can see that how I can really get these lines as well on the folder it. If we do not have that tool that you can use, kneaded it is there as well for that. And just finalizing a more and more and more values, more and more data values onto the right side of the Great and just trying to get more darker tone staffer may use. So I hope that that really help you to basically understand and fundamental and how you should process it. That will really help you too, draw it in certain ways. You're going to submit your entry. And the projects as well as trying to suddenly get diamond definitely see. And will help you do visit the endless tired in a more medically nuns or just making some backgrounds as well. I'm just having a having a Stein of horizontal hatching as well. So that I can make it more toward an artistic water acting. Just trying to get somehow horizontal, horizontal hedges and using the plants Elizabeth. And the next step is already understand about how to make a finished opiate use Interpol. And this will certainly help you draw something commissioned artwork. So that would be very helpful for you to really understand how you can actually make a very finished portrait using the champ thing. So we will start that episode after episode. So let's have a beginning of it.
17. EPISODE 06 INTRO: In this last episode, that a sixth episode, we will learn about the human face drawing and how you should structure the things, and how we should create a structure for growing any bolt rate. So this is very important for anyone who want to draw the baud rate using charcoal. And basically it's very important for them who wanted to draw using the BlueJ ah, hold first and then they want to draw it as our events. And this is very challenging when it's been as many of the artists use direct pencil and then they draw the outlines of the board read and then they filled up the values inside into it. So that is a different approach. But here we will discuss about, you should basically begin using the Village ah, horn and draw the structure of the head and then finding out the values into it using the light and shade. So technic, I also want to request you all to submit your project in the project segment and whatever you have drawn using these classes. By the help of these classes, please try to submit in, in the comment box or in the project description marks so that I can also see that as well. And I will try to help you to finding out that difficulties on the edit, whatever you have done in the portrait as well. So please submit your entries as spin.
18. EPISODE 06 HUMAN PORTRAIT STUDY: So in this episode, we will learn about how to basically get the proportion for human faeces and how we basically framed up the things using the widow charcoal has been so I am just using a cell phone and just trying to get some lines is cultural lines to really get the proportions and fix the proportional values or the, you can see that the phase is little bit tilted and have a perspective three-fourths perspective, view. But it's looking towards us as it's not looking the sidewalk. So it's a very, very difficult and very different under different, it's very different portrait to basically draw. Start every January quantity which actually see in the front side. It's a little bit tilted towards the left and looking the foreign car. So I'm just basically getting some adult dawns and light tones as well. Just trying to get a few now gardens that getting the blocks, getting the dark blocks as you can see and you can really relate to the real image that how I am basically initializing queue will use. But there's one more thing that you cannot do in the beginning, that you cannot really get the exact values and exact proportions as compared to the other end, other techniques as well. But this is very ruthless approach and so very, very beautiful artistic approach. So you must really learn distance there. So I have done this episode for you and just, you can see that I'm just getting some data don't, and then I'm just erasing those darker reuse to really get the second linear on the portrait as let nine, just applying the second layer, re-identifying the values which are the actual darker values. This is the way we should actually do whenever we're gonna draw using the BlueJ unfolding, we just draw the initial starter, they lose and then we go with doors values if we found it correct. Otherwise, if you do not found it correct, we change, certainly lose. This is the basic basic beauty of that little town hall. Okay? If you have something which is not correct and which is not up to the mark as a requirement, you can really change that. Using your fingers. You just trying to change those values in a very easy manner, which you cannot do by using the toehold Benson's. So you can also see that I am taking some measurement as well, so that I can really relate and make some proportionate values on the faces. On this pencil measurement technique is very helpful and very useful. I have done that technique. We do not know this detonate. You can see my previous class and Beginners Guide to draw portraits that you can see. And you can really learn this technique. How do you use it in your booklets, things as well. So you can see that I do not care about how much value they're getting. As of now, I am just trying to get darker tones and lighter tones and just seeing, whereas actually the diaper concert there and try to get the darker values or dear. I'm not very careful about that whether I'm wearing are correct or not. As this, we can do that, that thing in the later on. Okay, so first, first approach is that you must see that Lear, the darker tones are actually data in the appropriate. And then take some measurements using your own charcoal or straight or pencils. So that agree, easier for you to basically learn distinct, that you should really relate such things. These are also only meet four. To draw a correct proportionate face. I knew proportion should have correct values as well. You can see that left portion of this for credit is very darker as compare to the right portion. So I'm just doing some darker tones. And to the left side, that image and leaving the right side of the border. And as it is, I'm still using the village often. Haven't used any Bent says, well now I am using the sharpened pencils, introducing jumbo pencils. Now, I am using the HP and do events are basically insulating few values and using pendulums technique as well. So that my proportional values can be obtained in a very correct manner, in a profound manner. So this is the point where you need to really try to resemble the real image. This is the point where you actually think about whatever you want to draw and whether the values are coming, whether than lighter tones are coming. This is the place that you need to really stop yourself and see whether you are going correct or not. And now I'm using that brush thing as well for getting an even don't under paper. Now, I am changing few values of loads up will you can see I'm using my finger and just trying to change VOA News and finalizing it by using the jumbo pencils as well. Basically measurement really help you to grow our stem. Very poor credit. If you do not want to draw something which is very assembled, you can use no measurement thing as well and try to draw it again your own way. But if you really wanna draw someone's portrayed our knew, anyone do it the original one. You should really follows. That measurement tendency. Using teen line graphs really helped you to, to lay down the chalkboard dusty powder on the paper. And which will create a very Events Office on the paper. On which you can really work. Using lights and shades approach are highlighting few values. As you can see that I'm using the kneaded eraser to basically highlighting few values. Where are the actually lighter values? Are they are in the poker dam, just identifying those values using the new data is us. This is the time where you basically need to resemble the real image. If that step you take with a very conscious approach, you will definitely end up with a very beautiful portrait which really is assembled from original limits. Are at the same time. It's very, it's not very easy. It's a little bit difficult and artists to basically prefer to grow in such a way. Really wonderful challenge onto the drying, a drop-off in such a way. And using the shuffled Benson now, for generating few more values. Normal credo put pressure on productivity. This is very important. Don't put pressure. And so on is very darker and its own nature. So you don't need to put pressure on the paper and getting values, you just try to minimize the pressure on and sin and you will start only get the upper tones by dying. Tried to add layers. Rather than you want to draw in a single layer. Tried to add in the layers two, layer three, layer four years as well. So for that you should take your time and you draw the portrait. And you can see that I am using frequently in this brush as well as really helped me to basically get some values in the correct manner. And annoying and say that I am just generating some highlights and the tip of the nose as well. And inside the eyes in Islam. I'm just so that I can also get some smelter dawns on which I can work later on. Always have a very rough paper for the charcoal portrait. Do not have a very, you should not have a very smooth People for the sample. As a whole is a very dusty element as you know. And paper is, if the paper is rough, it really, really captured that dust and do that. So you need a very textured paper, graph paper, which really allows two or more and more layers onto that, that surface. But if you're not draw on the smooth paper on something that is ivory or something that is an that is Bristol member. So that that won't really allow you to go layer by layer things. And as it does not have that Teton the paper, so it won't allow to retain that dust undoing. I can see that how I'm just shipping up the nose thing as well. It's really important, basically give some time to really get the correct proportion of the north. As it really changes the, you're drawing from two-dimensional to three-dimensional. It's the only thing that really comes out from the surface of the plane of the face. So you need to be very careful whenever you wanna draw knows thing as well. Ego trying time domain B in a hurry. And this will take your maximum to maximum two to three hour as I rotate, three hours to four hours to basically draw any baud rate, maximum. This is the maximum thing. And if I do talk about the usual thing, I average on an average I do take two hours on most for any portrait. So I will basically continue doing this for great in the next episode as well. So that you can really get step-by-step understanding of the bore grain grain here. And we have discussed about eyes and nose and lips. We will discuss about lips as well in the next episode as well. And how do basically finish bubble breaks that we will see in the next episode as well. And this is the initiation, actually how you should really start any more grit. And how we should basically get the proportional values so so defined and so beautifully. To really understand it, you can see that I'm changing.
19. EPISODE 06 cont..1: So here we will talk about the finishing of the features, like how to finish the lips and how to finish the highest, and then the streamline resolve. And we will discuss about these things as well. So I'm just, you can see that I'm just tapping few values using the needed it is that this is very important for all thing and also for grip fighting as well. If you want to draw something which is very unrealistic and very smooth skin texture. So you need to have needed reserve, which is very smooth and which allow you to tap into the writing aspect. Now you can see that I am just using a thin brush, that is makeup brush and just getting a few smooth surfaces. Now I'm using the thick brush, okay? For thick brush, it's basically really, really helpful for getting smooth, even dawn on larger area in one go that you have seen all here that how I actually get the donor they use, which is pretty dapper as compared to the highlighted tones. So it's basically a midtone and light to me don't think that is being achieved by means of using the thick brush. Now I'm just creating a jaw line. And it's very important for any drying for any portray that you have to have a pretty descent approach toward the joel lane grinding. As you see that as of now the proportion is not bad, resembling with the original one. But in the end we will live nearly founded. Partly the sample one. I am just trying to put some values and not trying to reassemble it as of now, just trying to get a few now quite loose and lighter videos. And the end of this portrait, we will definitely do that resembling thing as well that we will see. And then next step is good. But over here, and you can see, I'm just trying to see the real imagine just trying to get the accurate tonal values of the portrayed. As far as soft fold wines are concerned, your biggest challenge is just to basically get the dominant values in a correct manner. And how much your paper does really allow you to draw, to smudge that thinks this is also a very big factor for someone to draw John Paul portrayed, as I told earlier in the previous episode, that you should always have a actual paper on a rough paper cartridge people say, which is having some teeth or some texture on the paper, which all dreams on the. Which actually allows us to uphold, to settle down and absorbed charcoal in a certain way. Then only you can really get layer by layer concept. If you really want, you can directly use the compress our hole on the hair thing that we will do also. But initially, we're actually here, start to growing up on the forehead portion. You should be very conscious to use a compressor holding. Because if you draw it once, you won't, we raise it. So you have to be very careful. And my solution is basically you should draw using the charcoal pencil near the forehead portion. And and at the top of the head, you can use a complex sample as you can see that now I am using the whole thing as well in here portion as well to basically get some boundary element onto the paper. Now I am just smudging few values onto the forehead portion that you can see that there are certain Dover dawns on the left side of the forehead. And you really have to manage those darker tones by using the Java will Benson, and will also vary. And now I'm using the razor pencil as well for getting some, some highlighted here as well and to the left side. And then I'm using the brush on the forehead. But be very careful about using the bursting as well as it really refined up to people and could be very difficult if the paper grains are damaged ones, then you won't be able to draw redraw earliest. So now you can see that I have almost created certain values onto the forehead as well. And the lighter tone as well. And see I'm constantly enhancing flu and lose onto the forehead side. I hope that that you really understand the processed in Islam. And in the last episode of this orbit, I will going to finish the whole booklet. So we will see that how we should do this and we use this compressor hole also, you can see over here, this is chunk. And we really get the thing like this.
20. EPISODE 06 cont..2: So this is the last episode and in which we are going to discuss about how to finish the portrait and how we should actually use the compressor whole thing. So you can see here that I am using the compressor food and basically try to get the most darkest altered August w of the poor grit. And I'm very consciously doing it as it really ruined the whole ring. You do not follow certain rules and regulations. And by using into it, and I'm just following the real paradigm of the real image. So I am just following the real texture of the hair and using the tip and the sides of the compressor phone and just trying to get the Tao Dong values and to the paper. So this is not that difficult thing for anyone to basically understand it. It is just that you are have to have a very conscious approach while using the compressor boiler as it really, if you do not follow certain things, it will really make things worse as well. So after doing such thing, I'm just trying to basically TkInter is matching thing, none onto that compressed sample. So I'm using and fingers you can see or hear and just trying to go settle down that the darkness of the compressible, this pressurizing the, the darkness onto the paper so that paper really absorbed certain darkness onto it. And using the deleterious results very helpful for fueled areas at wherever it is required that fuel sports have been visible. So I am just putting those values of now I'm using the brush and again try to dark and certain values and using that doubt values onto inside the ear thing as well. So we can utilize these values as well. And different areas of the here or here, you can also see that there are certain kinds of darkness. So we just put those values onto that brush and then transmitting these value to the required areas. You can see that I am also using that darkness on to the different areas wherever it is required. But be very careful because it really all such things. So me very conscious and very alert while using these thing. Now I'm drying the year as the changing Q value is not that difficult. I'm using using a kneaded eraser or a pencil eraser for that to change certain dimension. Again, see or hear that I'm just and broadening the values of the ear. Enhancing the fuel dimensions of the ear has been using Benson Nesbitt on chalkboard. Benson has been for creating some, some values inside the ear. It's very complicated as, as far as the ear is concerned. It's not that easy thing. Withdraw. I'm using my hands as well for getting some isolated values and some returns has been. Now you can see that I have created a shape of the year. And this is the way you should actually do certain things. And I also think that upto a certain level I have achieved, There's emblems as well, but there are still feel things left which really require you to basically get them, get more resemblance and do it. So basically resemblance is not that important key for, for so called running and basically running in this fashion in where we use a willow John hold first and then finalizing few values as emblems can be opted. But I think that you should really understand the process thing that is more important and more and more significant in these kind of things. You can see or hear that I'm again using subtraction method and putting off your values from the drying and getting some highlights. So these things can be done multiple times is, but it's not something that is a onetime exercise. You can do it as much as you want as the paper. If the paper is of good quality, of good GSM, let's say by TCS and 150 gs. And at least it should have that much of Jesus. Then it will be very helpful for you to basically change certain things time and again. I'm just trying to getting the resemblance thing as well. As I intended. I have almost done with the features, things that went. So knowing just focusing on resemblance, using negative reason for, again, using some subtraction, return mattered and putting it somewhere lose out of they're trying. If you are a beginner, so you definitely have to have follows her paintings and I'm sure that you will definitely achieve it by constantly working on it. But at the beginning you find it very difficult to basically drawing this in this manner. As it really requires some Buddhist skills to basically work on these things. But if you really work on these things, you will definitely achieve it and will definitely become better artists. If you do it on a daily basis and practice it for at least two to three hours in a day. So you will definitely find it very helpful and very understanding. No, I'm just creating a little much of backgrounding as using the pencils, sides of the pencil and getting some darker tones. I can also use the little chapel as well for the background thing. As I slept at whatever you want you can use. And that is also not that important thing as far as the learning process is concerned, I think the main features are more important and more significant as compared to the background things, et cetera. That can be learned that and we operate any day. Most important and most crucial thing is the features of the face and how you basically get these features. This is, I think rather more important. And also you can see that how highlights basically work for you that you can see in the lips portion, I have created 22 highlights on the upper limb and the lower lip as well. It really generate, generate a three-dimensional thing in a very easy manner. Now very understanding manner. So using and understanding light and shapes in this manner will really help you to basically, to understand ball grids in a better way. I really hope that you really understand the process and try to do it from your own and get the values, can the proportion things, all the things in a better way after having this class as well. I will also try to make more semblance and do it and we'll put that drawing into the net Projects section. You can see the final work or inside the project description thing. And you also try to do a portrait in this manner and tried to upload it on the projects. So that I can also see that whatever we did, difficulty you find you wouldn't do that discretion thing. I will see that thing. So I think that this is all about, this is the final outcome that you can see or hear that this is something which has been created. Few more things are there left. I will try to do those things as well into the train.
 Ankit Jasmatiya, Fine Artist