Transcripts
1. Introduction of class: Hello friends among GIP and I'm welcoming you on my news. Good shared goals. First of all, let me tell you something about myself. I am an artist based in India and I'm following my passion for the last almost ten to 12 years. And I am mostly working in human portraiture and using a dry media mostly like software. Stills, chalk holds, graphite anode. I'm shading my artwork on my social media handles where I have more than 300 k plus followings. And I mostly making our tutorials so that everyone can understand and learn in a easy and a prosperous way. So now let's talk about this course. This course is all about human portraiture and human head anatomic. How to get correct proportion of human head might step by step. Procedure will help you to understand art in most easiest to me. I will tell you about each and every thing, like how to draw eyes, nose, lips. We will cover all the features of the face and then how to get the outlines in very simple manner and how do get it like pro artist. So I am a 100% confidence that you will definitely learn many things about getting the correct proportion of the human head and face anatomic. I'm sure by the end of this session, you will surely understand about how to get a grip or pencil in a most efficient manner. And you will evolve yourself in a better artist and will definitely achieve more and more in the field of portraiture.
2. Episode 1 Intro : different tools required in this class : In this first episode, we will discuss about different time for pencils and it's great. And it's very important to understand about each and everything, about the pencils and the tools, what we are going to use. So we will discuss about pencils and scraped like graphite, charcoal and its different grades and different dunes like shop nurse erasers, blending tools, different shading tools, and how to use it and utilize it in a most efficient manner. So let's begin with this episode.
3. Episode 1 : different types of pencils: In this first episode, we're going to learn about different pencils and it's grades and other tools, what we are going to use in this class. So let's begin with a pencil thing. Different type of tools, different type of density. So there are two type of pencil basically. One is graphite and other one is charcoal. So these are two very basic pencils. And what we are going to use, we may use in this. And the graphite is bit shinier, does more shine producing, and Chow Hall is more towards darker values. Now we have to see how the graphite is gonna shine. So I'm just making a box or hear and see. This is how you can see how the graphite shines on the paper. And then for Jiao halting, you can see it's too dark. And don't shine on the paper. Don't create any shine, any kind of shine on the paper. So this is the basic difference. What we understand about the DO different pencils and what we may use. So let's talk about graphite pencil. Graphite pencils are the normal pencils what we are using. Let's talk about the grades of graphite pencil. First of all, we understand about HB at stand for hard and b stand for black. And when we, There are two options. We go forward like this and we come backward. So forward bends, it'll become more software like B plus B to B, four B, 6B and so on. We are going towards nine B. And few are the other companies were making 12 B also. So penciled become more softer, more soft, and more dark. And values like this is 6B pencil. What I am using correctly, you can see or hear the darkness is there, how much of darkness is there? And when you are going towards the reverse direction, it is like edge to which forage, 66 and so on doors nine edge pencil become more towards hard and less dark values production. Like we can see an example here. So this is 2x pencil mode you are seeing earlier. And this is very, very light in terms of values, but it's very hard on paper. So we don't need to use it as much as we are going to use in other software pencils for drawing as it produces more and graphite and less pressure is also mean achieved by using these pencils. So these are the pencils what we're not going to use in this class. And the pencils are HUB for generating some outlines our fingers and we can use attribute also. Then we're going to use to be, which is more softer than Sb. Then we're going to use for we Benson. And at the end, we do have a sixth events, Alonso forgetting some more software values. So basically we're going to use these pencils. And if you do not have that much of mental, only 4B pencil or do we pencil candle walk for you also if you are having only six and that will, that will be also very easy for you. So only this much of pencils you'll need for this class are now we are moving towards the chalk holds. So charcoal pencils are being manufactured by different manufacturers companies and whether different tagging and grading a few companies make it like soft, medium and hard. And few companies like this one, generals charcoal. They are making bend, jog, hold pencils in the similar manner like the rarified one, b, two b for b, six b. So these are the different ING, what different manufacturer company is doing. But if you try to understand in a simpler way, software depends on the soft pencil is going to work like 6B, your 4B and medium and hard bends l is going to work late to be an Dolby. Okay? So this is a very simple thing to understand. These are the two different graves and what I have discussed about these benzenes may be used for this glass. And you can understand in a better way.
4. Episode 1: Other tools: Now let's talk about other tools like a razor. So it is or can be formed in a different way and found in a different way like normal eraser, like these agents, these are normally reserves what use as a dusting tool like this. But it creates a dust, something like this on the paper. And then we have needed, it is a needle users like these erasers. These are found in market in a different packaging and these are very soft. So these results are very last Acadia is a, and you can do it like this. And then again, you can put in the same way. So these areas are very flexible erasers and you can create any shape whenever you use it. Known dust is phone, so you need not to worry about dust and extra things on the paper. So these, these erasers are very useful and very much comfortable with the artists requirement. So there are two other areas, or pencil eraser or mono eraser. And what these erasers are, let me show it to you. So this is a mono, it isn't can see over here that this is mono a, 0 is a, and it's having a lead. Or here you can see, and it is our actually it's an eraser, Then another one is a pencil eraser. And this is also a very good areas are, and you can see or hear how we're going to use this like this, and this is also like this. So fine lines for ten lines, we're going to use these tools as well for raising things. Now, there is one more areas that is electric heaters. But this is not going to use in this workshop and this one is not as much required as the other is Rs, R. Now, let's move towards sharpeners. Sharpeners are basically three types, normal, mechanical and electric one. So normal sharpness are like this. Cheap sharpness, what you get in the shops, local shops and these sharpness are also very handy to use. You can travel with anywhere else. So these ShoppingList can also be used. Other than that, mechanical sharpeners, our most preferred by artists like this one. It's a Chrome one and there is a spindle over there. And you can, you can get the jet out here and takes the pencil like this, and you can shop it out like this. So this is something that can be very handy for artists to use. All the dust. Whatever you create over here is going to collect in the below chamber given and then after the collecting it, you can dispose it off. And there is another, it is unlike electric razor. Electric razors are also similar to these, but they are not manual when they are the electric power driven. Now let's talk about the shading part. Shading tools. Why the shading is required and what is shading? Shading is basically mean for creating a 2D plane into the 3D plane whenever we are going to draw on the paper, the paper is a 2D paper and we have to create a portrait which looks more like a realistic one or the more towards like three-dimensional way. So these shading is very handy and very helping in by creating the 2D plane into 3D plane. So what are the tools when I'm going to use over here? So let's discuss about it. The first one is the brush. Brush can be a makeup brush or the watercolor brush. What we are using. First, let us discuss about the brushes. So these are the brushes which are makeup pressures. And these tools are very handy and very easy to smudge or blend anything. So let's have a look over here how it works. You can see how smooth shading has been created by using these tools. So these tools can be used somewhere in the glass and that is preferably can be used. Then other tools are people to stumps. But these stumps are not going to use in this class and it's not allowed for anyone to use these tools because these tools create dependency on these particular thing. And also papers also can be damaged by using these stumps. So it would be great if you do not use these thing rather than use brushes. Then, and the other one is fingers, your own fingers exactly. Fingers can be used for a smudging things and getting the shades. What I do preferably. And this is very handy for made to do such thing. But if you are having sweating on your hands and don't want to use these fingers directly on the drawing. Then at the end. You have gotten birds also. But gothenburg is also not that preferable adults very harsh on the paper, and it may damage the paper completely. Then in the last tissue papers. So tissue papers can be used and it's widely being used in drawing. So if you are having those tissue paper so you can use it anywhere, forgetting the shading thing then.
5. Episode 2 Intro : Different shading techniques: In this episode, we will discuss about different shedding and its technique and its utilization in this course, especially. So it's a very important episode to understand each and everything about shading techniques and processing techniques. There are various shading like secularism, contouring. So we will discuss each and everything also, we will discuss about how to hold your pencil in a correct manner. There are different type of grips to hold your pencil like an artist and like a beginner. Also, we will discuss about various type of exercises, what we're going to use over pencil to strengthen your grip or pencil.
6. Episode 2 : Different Shading techniques: So in this episode we will discuss about basic shedding and hit utilization. So first of all, we will understand what is shedding. Shedding is basically mean for getting the two-dimensional thing into the three-dimensional thing. And it, it, it helped us to get more realistic and more towards more resemblance of values. So this is why shading is more important. And for shading such thing, you can use your pencil also for getting the shaming thing done completely. If you do not have that much off his strengthen your pencil. You can use other tools like pressures, etcetera. But if you do have that much of a strength on your pencil, you can do it very easily without having any other tool. And with only the single pencil that you can create. Very good shading thing. Now let's talk about the type of shading. And so the first shading techniques that can be used is hedging. One, hedging can also be categorized into three different forms, like diagonal. The other one is vertical, and the third one is crosshatching. Now let's talk about the diagonal hedging tape. So I am going to use, I'm going to create three boxes over here. And let's see these three boxes. And for the first box, I'm going to use a diagonal lines like this. This form is the eta, that is diagonal hedging. And then the other one is vertical hedging in which field is value with the vertical lines, strong force, two vertical lines. So this is vertical hatches. It can also be horizontal when if we use the horizontal line like this. Now the third one is cross settings, which can be used different direction lines like when is diagonal. And the other one is to then perpendicular to it. Like this. So this one is across hedging. So there are three different forms of hedging. What we can use in this class are, and also we introduce few more values with using these things. Now, let's understand the diagonal hedging more in a profound way. So the angle for the diagonal hedging is somewhere around 45 degrees. Okay? So 45 degrees off line, this line should be somewhere around 45 to 50 degree. It can be in a different direction, but it would be nice if you put this direction so profoundly. And for the vertical, it's completely vertical. For the cross hatching thing, you have two lines perpendicular to each other, like 90 degree to each other. So it would be very effective and more convenient for you to do such thing. Now let's move towards controlling what is contouring. Contouring lines are basically similar to cross hatching lines, where the lines should not be straight. Rather, it should be INCOSE, indifferent goes like this. So these lines are contour lines, and this is known as contours. It can also be blows one are the open one. So it can be used mixing with the diagonal when also in the next coming episode, we will discuss about it. Now. There is another technique that is localism. Now I am just family arising you with these techniques. It's not necessarily that we are, we are going to use all these things, but there should be some glimpse of each and every thing in the coming episodes. Secularism is all about getting the values in a very long time. Digging thing is, it should be like this. You create small zircon, small-sized circuit like this and this, and then you're filling it with doing a continuous process like this. So here also you can do it, ladies. So it's it's attain that require lots of patience and time also. But the results are more towards realistic. And you can keep creating circles as much as you want, as much as the realistic shedding you have created using the pencil only. So circle ism is not going to use in this class because this is only for the realistic thing and nothing else. We are more focused towards the outline things and how to create shapes of different things. So that is more important rather than this one.
7. Episode 3 Intro : Generic head anatomy: In this episode, we will discuss about generic head face ring and the correct proportion. And what are the methods to draw correct head proportion? There are many artists who use many different methods. I will also tell you about my method to draw a correct face.
8. Episode 3 : How to draw generic head/face: Now let's draw a generic face. First of all, just draw a silicon. Searching. It may be completely perfect or not. That is not an issue. This draw RLC circuit. Then draw our vertical line. And the horizontal line. Now slice the circle from the toe corners like this. This is our video that how much you want to slice it up and now match the two points on this edge of the circle. So we oughta Esquire. And if we measure h has to be equal in three parts. And the vertical line, it has to be equity differentiated in three parts. And then the center line is the eyebrow line, and the center line of the circle is the IPO line. Then the bottom line. Second bottom line is the nose line and the lowest bottom line is the chain line. And the top of the length that we are here starts the forehead doc. So now we need to draw the eyebrow. First of all, we understand about soccer thing really is actually the socket is the isochoric. And I don't really draw an eye. Similarly m doing it for the other eye. And this is a generic base. All you need to understand. A, it's just a generic base. And the distance between the i is equal to one i. So this is also a very important point to understand. Now if you put a vertical line at the edge of the i, you will get the width of the nodes. So what exactly am? I'm also putting some shading things so that you can understand the depth and the values. But this is just sort of take for nips and the bottom two lines and the most important lines in between, you will find the lips. Also, if you want to know the width of the ellipse, you will have to get the vertical line on each of the eye center and you will find the widths in between them. So this is how you compose a ellipse. The bottommost point is the chin point. So I am just drawing the dough lengths, making the points and edges what we have already known. So this is how we draw the outline of the face. Now for the ear, the distance between the eyebrow line and the nose line. This is the completely hide all the year here. And this is very simple thing. And I don't think there's anything required for knowing the dimensions. You can draw it as per your requirement. I'm just going to define some area for the lips thing also, so that it looks pleasant also. Now I am just trying to put more values and make it more pleasing looking thing. So this is the generic phase. And what do you need to understand? How to draw it and how to get the features and the values. And the most. Effectively. You can draw any phase. So you can draw different phases using different measurements also. And if you change the measurement things, you will find different phases also. So this is how we should draw a face. Always remember to put lighter values first and then try to get the dark values. First. You need to understand the light portion of the portrayed, the light venues, and then go with the alkali ions. Do not try to create doubt. We'll use cost as a won't change and don't allow you to apply a layer. Two. I hope you liked it.
9. Episode 3 : Various head angle drawing: Now let's draw head from the different head angles. First of all, we are drawing it from the front view. So we are just applying the similar pattern. We draw a circle and then a vertical line, and then the horizontal length. Then we draw two more points on the same vertical line. This is the shorter way to draw it. Either you draw a square or you draw these two lines randomly. And then I'm just slicing it from the, both the coordinates on the surface. Now I'm matching the all the points which I have received by cross session in the face. You can also practice like this and draw different head proportions. Brain and under view, side view face. So for sideview pace, I draw a circle and then a vertical line and the horizontal line. This is very similar to the previous one also. Now I am also bring us internal circuit of having half the diameter of the outer circuit. And now I am using two tangents from the cycle, internal cycling and getting the points and the outer circle. And then I'm just trying to match all the points by using similar methods that I have used in the last, in the previous phase. So this is very simple and approachable things what you can do, it is very easy to understand and can be very easily understood. Now in that 3 fourth quadrant, I draw a year. So year should always be in the fourth quadrant. Now I am drawing another angle of the head that is in the perspective, three-fourths perspective. And for that, I draw a circle and then again, I draw a vertical line, which is an art form, the center and slightly electrons. And then also the horizontal line is also slightly upward from the center. So these two lines are very important, the vertical and the horizontal line. This really defines the proportion and the angle of the phase. So if you turned it up, you will definitely change the proportions and the direction of the head. By doing this, you can change the angles, genes, or direction of the phase. The procedure should be used in a similar manner as in the previous one. But that it is, it is different. So you can get different results using the same technique. What I am doing it here also. So you can see it very easily that at the beginning and just using the side of the Pentagon and then for finishing or darkening the values I am using the tip of the pencil. I'm going another view, another view of the head. Let's just try upward direction phase. The phase is looking upward and it's in three-fourths proportion. So it's a very complicated one. But at the same time we can very joyful to draw it as it is having very much learning. A lot of practice to blue. So I am just changing the vertical and the horizontal angle from 90 degree and they got inclined in this condition. So have you seen it? It's very simple and understandable. But all you need to do our practice on it and draw various angles of the head using the same method. And do not try to finish it. The outlines of the angle from the head so that you can understand about the fundamentals of drying the heads and the different angles. Now I'm drawing from a different angle and drying the circling. And let's try using upward direction. So this phases are forward looking and it's from the side of the face. Similarly, I am using the similar method. I just draw a circle and then I draw a vertical line and the horizontal line, this time the vertical line is also inclined to a certain angle at which I want to draw the upward direction. Then I am just marking the points and then uniting the point by using the simple lanes. So it's very understandable and very simple that you can also do it from your own. Now the last one, let's try that downward direction. Looking face. For that, I draw a second and then a vertical line should be inclined in the different angle so that you can draw in a downward direction looking face. You can create your own way to draw certain angle, but the fundamental should be same and similar like this. So this is, I hope you like it and understand all those approaches. What I have told you here, some practice on your own and try to make it as much as possible.
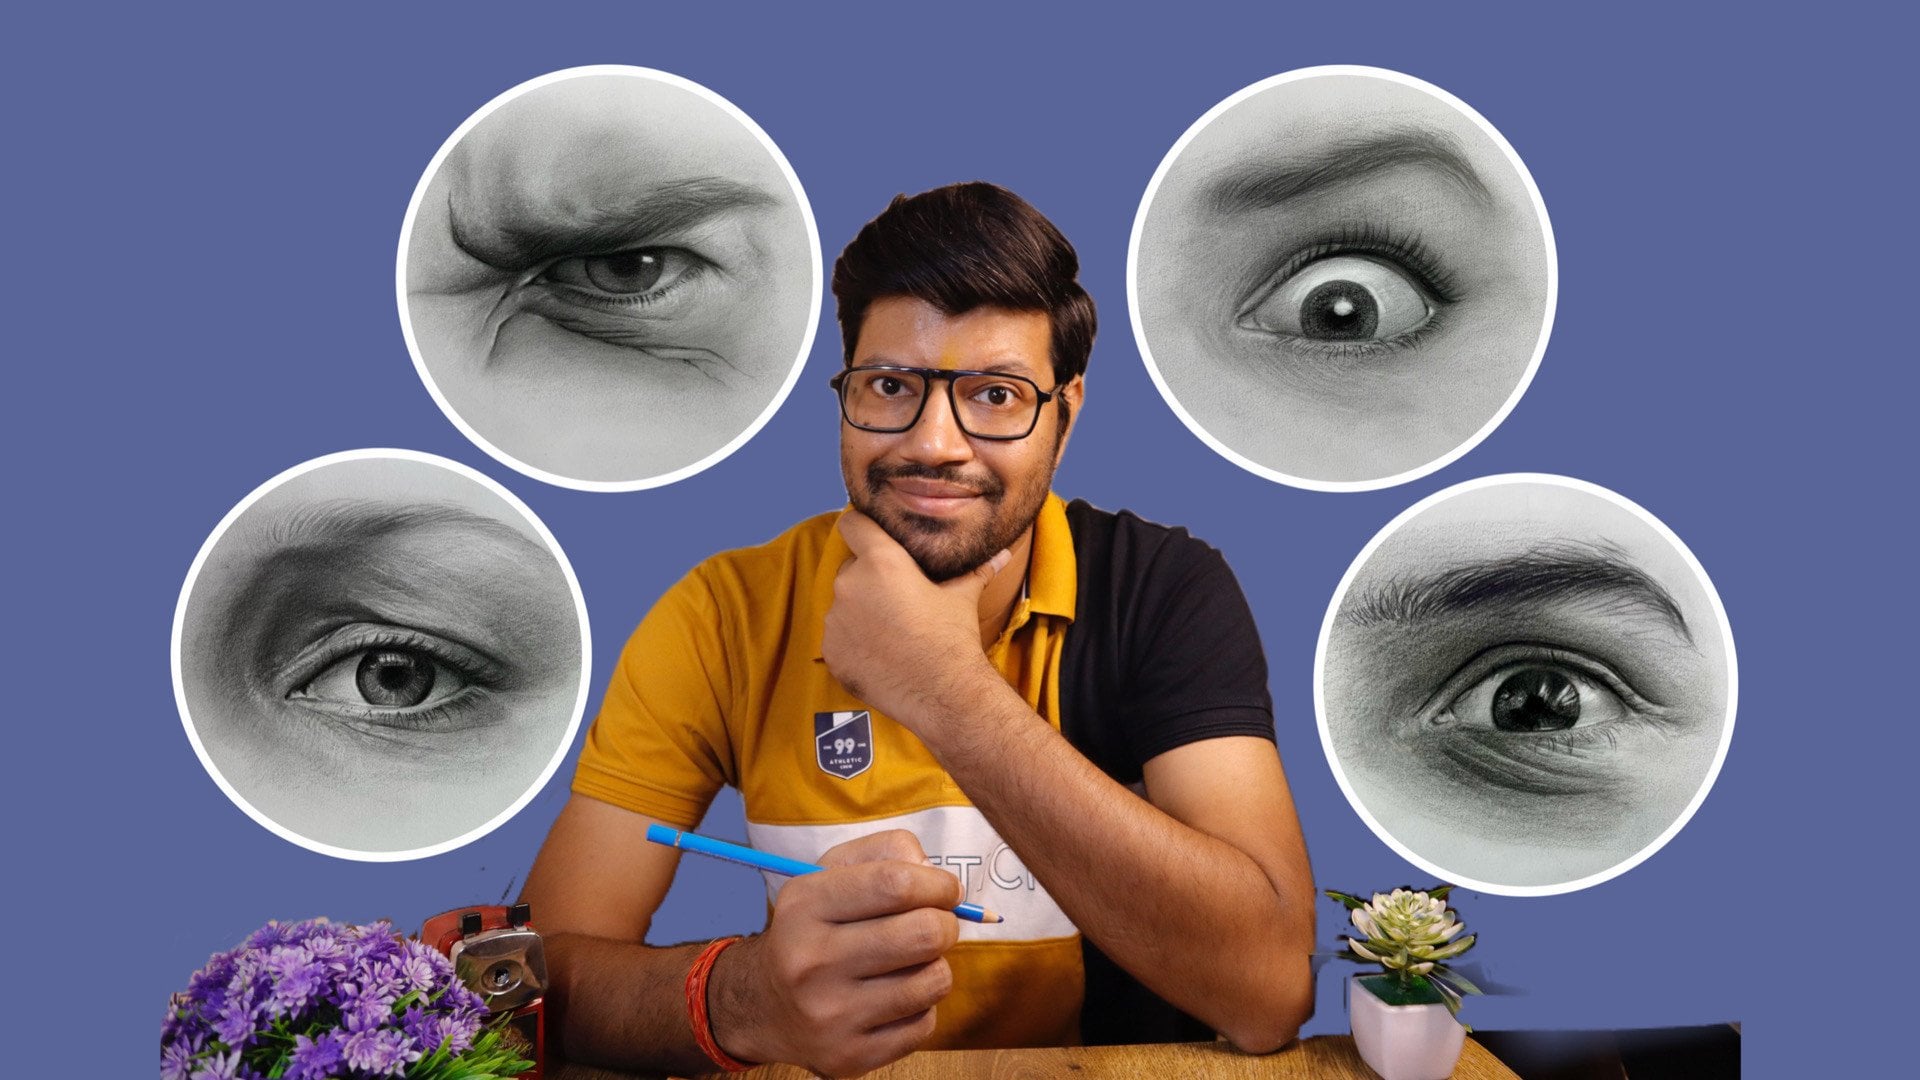
10. Episode 4 Intro : Eyes, nose, Lips, hair : In the coming episode, we will discuss about how to draw eyes, nose, lips, and other features of the face like here. So let's have a begin with.
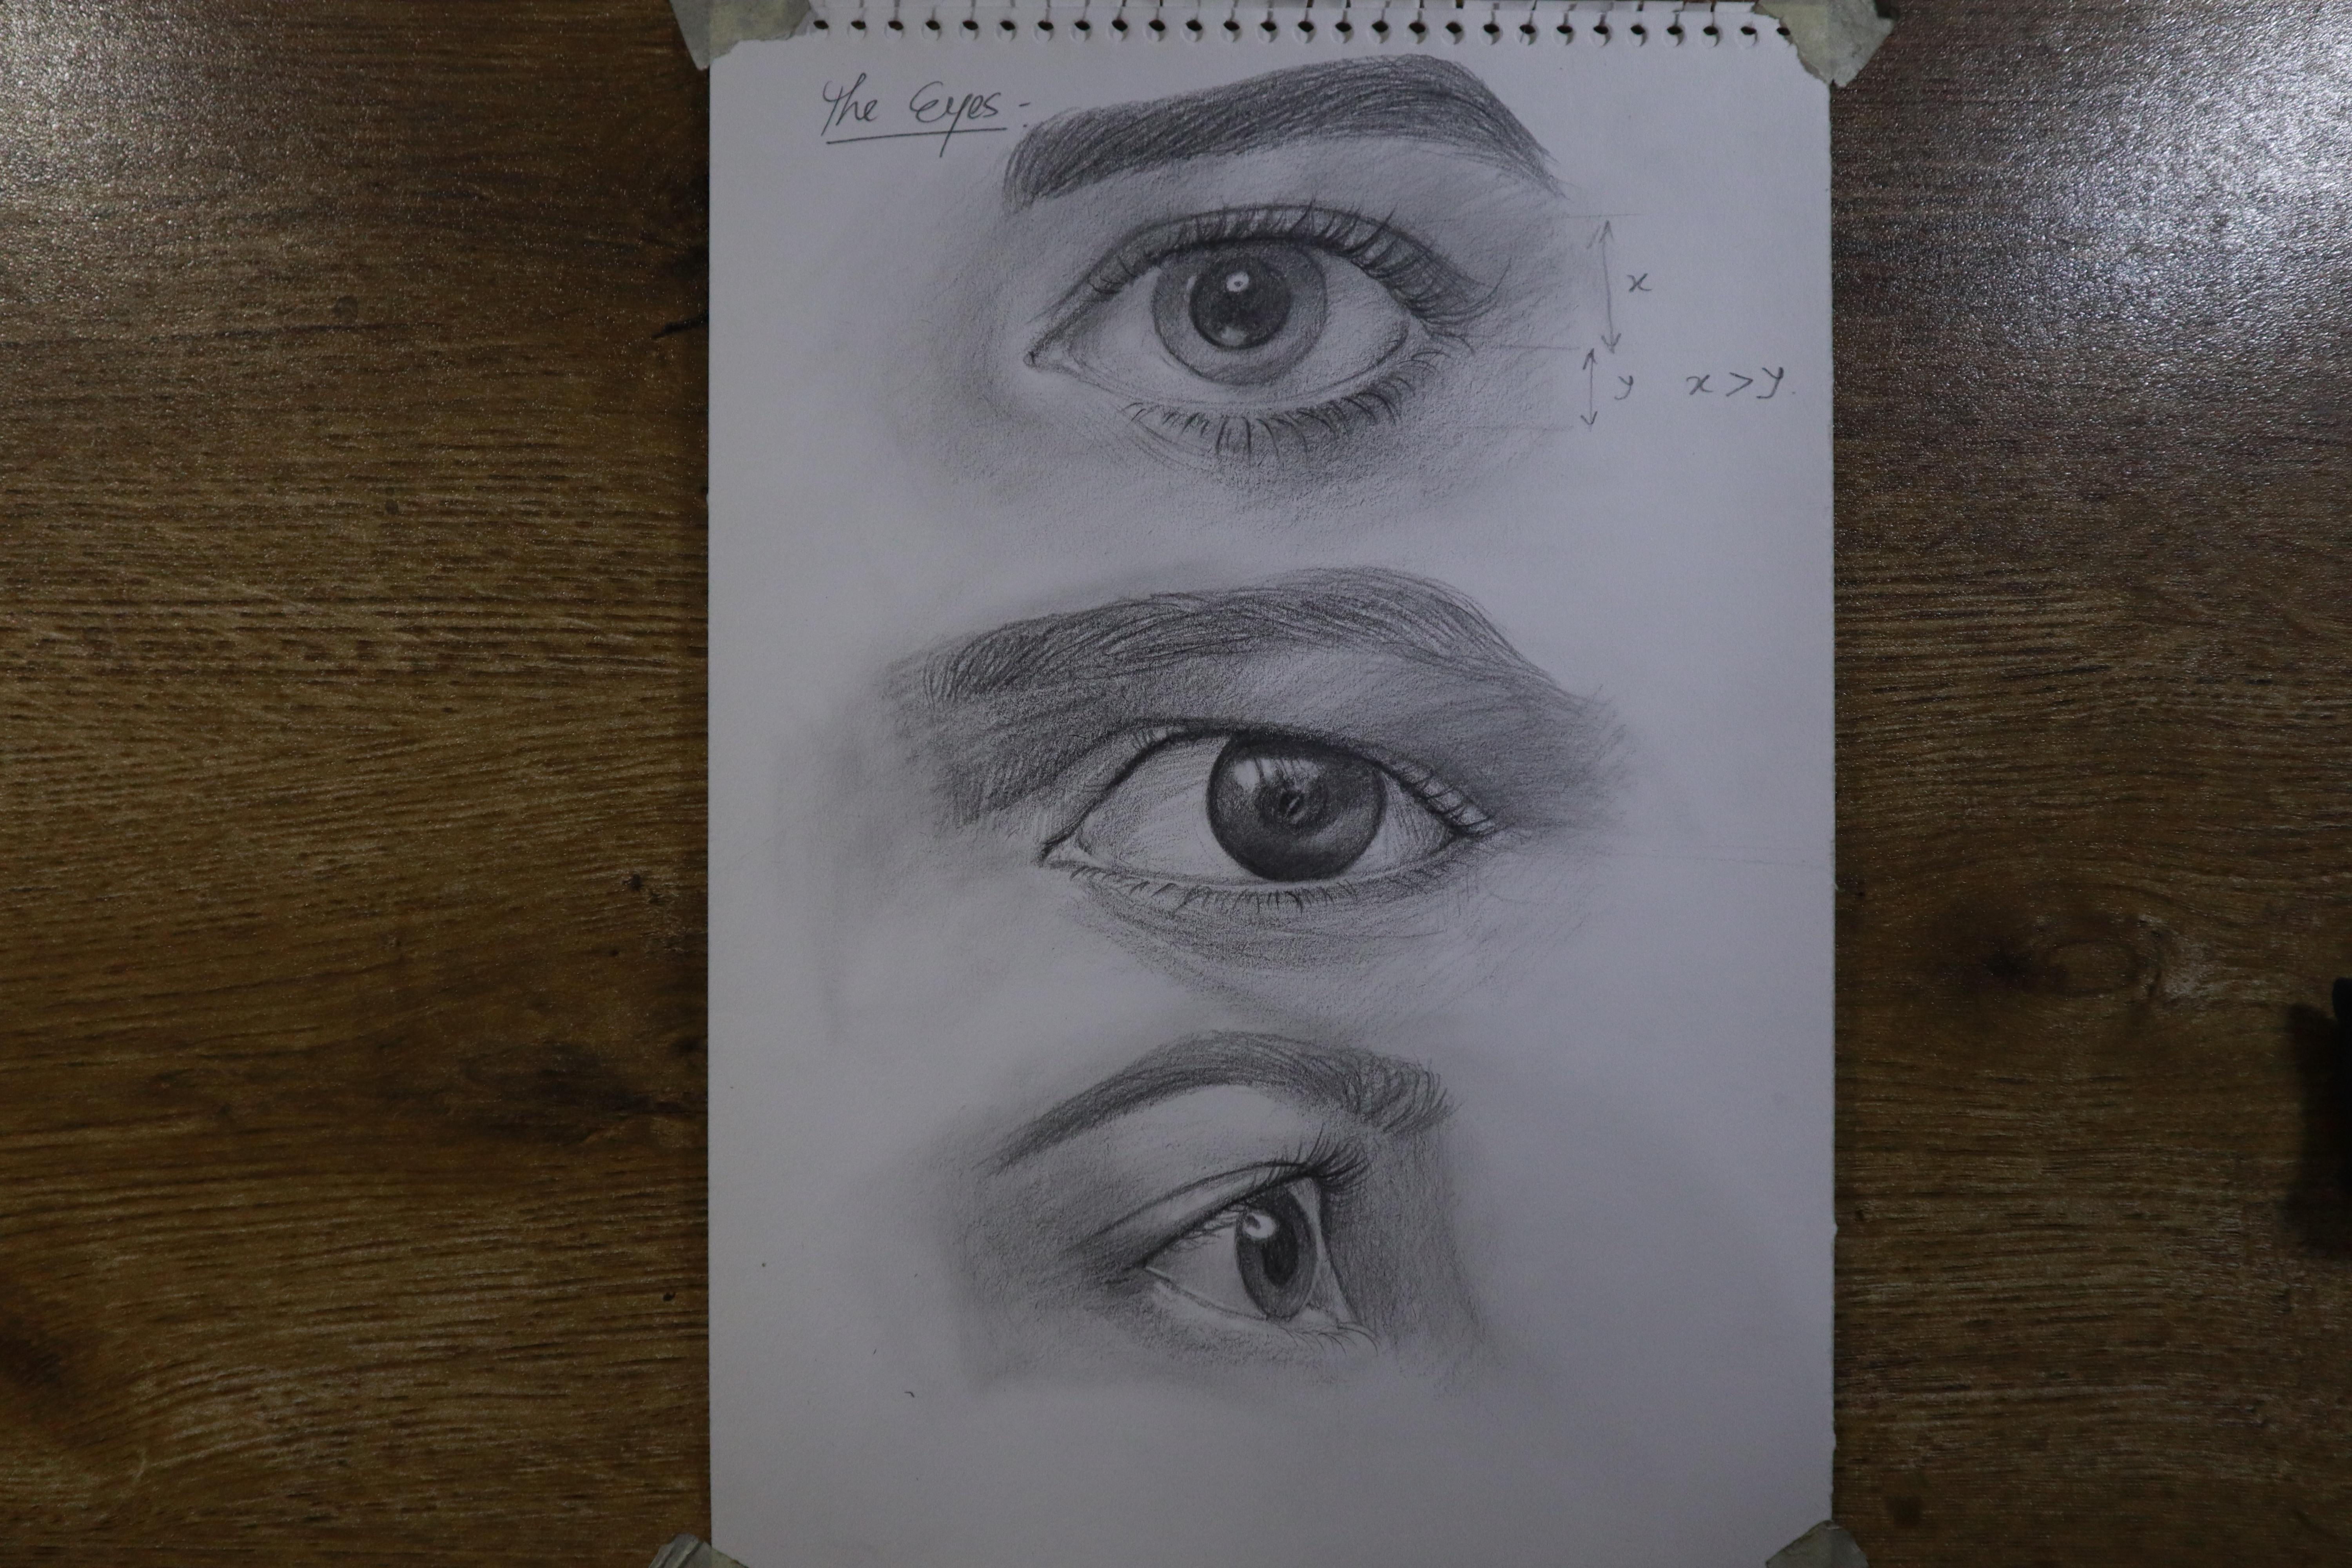
11. Episode 4 : How to draw Eyes: Now let's talk about I. So for understanding, we need to understand the nomenclature of it. So the upper portion of the identities upper eyelid, upper limit on the lower lid of it that is known as bottomless. And then the white portion of the eye that is known as the sclera. And the black portion, the major black portion is known as Iris. The left corner is the deer. And the main core, central area is known as pupil. So these are a few names which are very important to remember it so that we can express it using their names. Now, there's one more important name to loan that is eyelashes, that is very common. So these are the names what we use for baking these class also. And this is a very common thing. I think most of us know it very well. Now, moving toward the drawing and the anatomical die for that, I have taken a reference i. And we will understand the structure of dye so that every beginner can draw it in a easy way. So for that, I am drawing an hexagon. So growing a hexagon is not a difficult thing for anyone and tried to draw accidentally reaches having upper portion is more than the lower portion, what I am showing it here. So x is always greater than y. Okay? So the distance is very much important. And then I am grinder up earlier. And then the lower limit, the upper portion of the hexagram touches the upper limb and the lower portion is going to budge, no law. So this is the basic shape of an eye, which is like an automobile also. And some diamonds, lake, lotus leaf. So this is the basic ship. Now, what do you need to do? Try to practise like this only for ten to 15 II. And then draw on the center of the eye center line so that you can draw a circle insight into I. So you can watch in the, in the image also like how the shape of this circuit has been formed as circle is not in the center of the accident. It is somewhere upward towards the upper limb. And I'm following now in following the image and try to dock and the values and do the shading thing also then. So I think outlined thing has been clearly understood by, you know, I am drawing the eyebrow. It's not a very difficult thing to draw. You can draw it in any shape. Just try to follow the real image also, so that it would be look more realistic and more easier for you to grow. I'm using the site of the pencil to add in some leaders. Now I'm just trying to feed the things and so that it looks more doors, the realistic thing. But I think the important part is the outline part. If you draw the outline correctly, you can take the fading thing later on also. But first try to understand about the shape of it. Now I am just trying to have some random eyelashes so that we can also understand about it. So for drying the eyelashes just prior to broader tick mark, that trick tick mark is the key for drying the eyelashes. For lower I initials also lordly dilutions also unit to do the same thing. Try to get the go, try to get the curve of the lashes, each and every lashes and try to match the shape of it. Then I have already more earlier using 4B Benson. So this is how you should draw and do shaded. Doing it layer by layer is the key for getting the shading. Here. I'm not trying to copy the reference, I am just referring it as a reference thing. And just to let you understand how the shape can be understood and how I am doc and I am using the site of the pencil, do add some fields. As of now, I haven't used any tool. I am just using the pencil to get the fading kingdom. You can also use tools like watercolor brush or some other digital pertained. You can use them to always try to remember this thing that you need to work. If you want to have a real shooting, you just try to have layer by layer process. Do not try to do it in one layer thing. Otherwise, you'll want to have some changes into it. So it would be very difficult for you to have some changes as it lays a mock. And the paper doing it layer by layer is the most important key. Photorealistic shading. Now I am also using the bentonite is forgetting some highlights. So I hope you understand it in a simpler way and understand the shape and then add the layers so that it can be more realistic one. And just adding layers by layers so that you can, again, more surrealistic reasons. I'm also using my fingers go smudge fighting. You can also do that if you're not comfortable videos in the fingers, you can use watercolor brushes also. So I hope you understand the process of growing the eye.
12. Episode 4 : Eyes continues: Now let's understand few more eyes and it shapes. So we change accordingly. Now here you can see that I have changed the shape of the I. I make it shrink it towards the end on one side of the eye and the other side it's more open, so it's different shape. So you can get the values by using the same method. I draw a hexagon, but the shape of the hexagon, and this time is little bit different from the upper one. So this is how you can change it. And now I am drawing the iris portion insight into it. I will draw the puke it also. So this is a very efficient way to change the shape of the eye by using the similar method, the same method. And you will get different results for different I now am just tried to finishing it up, grind the eyebrows and other important features and doing the shading thing by using the sides of the pencil, not the tip off depends on that is very important to always remember whenever you are going to shoot something, tried to use the sides of depends on. So if you want to draw, I enter different shapes and different angles. All you need to understand just to draw the hexagons in a different manner in the required shape and you will differentiate on different angular. I'm just using 4B pencil and good luck and few areas. Try to go with layer by layer, as I have already told you, do not try to make the lives in one go. Try to do it layer by layer. So then the rendering should be smooth and fatalistic. Also, I need, I want my drawing to be more sketchy, so I'm not using any tools also domain the shading thing. I'm just using the pencil, double the shading thing if you want. You can also use brushes to make the shading more smooth. And even. So have you seen the shape and the angle of the eye is pretty different from the upper I, what we draw in the previous episode. Now, let's draw another angle of the nine. Here. We prefer to draw it from the side view as it is requested from many of the historians. So this would be easier for them to understand whenever they draw the side view, I, they all need to draw a triangle. And here I didn't draw the x. So then you can see I draw the triangle and then I am putting the value into it. So this is how you need to understand the shape of the eye and changing it by using different shapes like a square, triangle hexagon. So you can utilize the shapes and get your required shape accordingly. I'm just using some cross hatching thing so that shading can be often. And then after the Achieving the required dawns, I just used the US to have smudging thing done also so that it makes more smelter even surface. So to divert my point, whatever Sayed who hear sideview for side muting, you need to understand the shape is pretty much different from the previous one. But all you need to do is just to understand the shapes from the generic shapes like triangles, spear, and hexagons. So these will help you to get the real shape of the train. And I hope you got my point.
13. Episode 5: How to draw Nose: So in this episode, we're going to learn about how to draw a nose and how to understand the anatomic of it. Because it's very important to understand the anatomic on the nose. So for that, we need to learn the shape of the nose. And I have taken a reference photograph as you are seeing over here. And for drawing, this knows what I need to draw. I'm going to draw an alternative line. And then the vertical line. After drawing the horizontal line, I'm gonna draw a circuit that anywhere in the, this horizontal line. And then I'm drawing the vertical length says as well. So it became an vertical axis, horizontal axis, and then the circle in the center of it. And then I'm going to draw two more circles alongside with the main circuit, which are smaller in the diameter as compared to the largest center circuit. So this is basic understanding of getting the shape of the nose. Now I am just going to darken the lines so that you can really understand how to evolve the shape of the nose using these circles. So this is the one way you understand the shape of the nose. There are many, certain other ways to getting the nozzle exit and drawing a triangle. Or few people also brought a seven to get the shape of it. Number seven and a few other are using different methods. But I think growing from the circle is the best and the most fundamental way to draw the nodes. So you can see that I have gotten the most basic shape of the nodes. Like how a beginner draw the nose. Whenever you say to a big net that please draw a nose, he will definitely going to draw it like this. But then what you need to do, need to understand the shading thing so that you can get the realistic one also. So for that I'm just adding some layers using the four we Benson and sides of the pencil as always, and getting some tonal values. So now here you can also see there is a white highlight portion in the center of the nose. And what I am socket ing over here so that you can understand the abortion, what is, what need not to be added layers. So for leaving those portions, I am just created a sulci and just created a circuit. And, and leaving back, I'm going to adding layers for the darker tones. I will elaborate it in a more easier way in this video only. But please first understand the shading things so that you can really have a sense of it. So you can see over here that how I finished it up. So this is not a difficult thing to finishing it up. I just escaped to three things. But that is not a big issue that we will go, we're going to draw in the next episode, complete knows. But here, what you need to understand about the shape and how to achieve the shading thing. For that, I'm just letting you understand another way to understand a nose trading using the blocking thing. So if you know, if you're under draw like this, all you need to do is just to do in the same way and just redoing it for you so that you can understand the, the process, the blocking process of the nose, and it's shedding understanding of light and shade. So it's very important for anyone who wanted to draw a realistic shapes shading and want to get the realistic shading on the paper. Now you understand the thing that I draw, circles and then the shape. And now I am letting you understand the blocking of the plains and the blocking of the things like, I am just drawing some few planes or here so that you can understand the different changes in the shading thing. So this just follow these things. You will really understand each and everything. I am just trying to differentiating different planes on the paper. Now I am differentiating different planes. So this plane is the highlight when the highlighted, but you can see in the real image also. And these are the darker tones. So they can be seen as dark regions. Okay? So all you need to understand about lights and shades or blocking thing, you need to understand about the don'ts. So this is like a midtone. So you have three different tones, like highlighted tones, then the dark tones and semitones. Those only three things are the most important thing in any drawing, in any understanding of lights and shoot things. If you are drawing using the pencil or graphite, charcoal, whatever be the medium, even in the color. Also, you have to understand these three don'ts up mostly. This is again the darker portion. So you can draw the realistic knows as money, as time as you want. But if you know the fundamental thing, you can draw it in a simpler way. This is the most darkest as I'm showing, and the light is coming from the left side. So all the darker portion should have been on the right side of the paper. So you can differentiate the people in this form it like lighter on the left side and the darker on the right side. This is the way you should approach in any drawing an arrow for understanding the planes, for understanding the blocking thing. And this is all you need to understand. So I hope you understand whatever I have told you. This is the process by which you can achieve the opponent knows what I have drawn over here. And this is the only thing. What do you need to understand? What you need to know for getting the proper shapes and figures. So I hope you understand the points. In the next video, I'm going to draw few more knows in different perspective.
14. Episode 5 : Nose from different angles: Now we're going to draw different shapes and different perspective of nodes and how we should achieve it. So for Frank facing north, all we need to do in the last episode, last video, we did this lead drying the three circles with sides to each other. Getting into the perspective thing, all we need to understand, we draw this semicircle in the same manner like in the previous one. Or here you can see. So draw in the same manner like in the previous one. But the other two circles may change its position from the previous one, like the right one is in the same place. But the left circle, there's gonna govern out behind the mean central circle. So this is what you need to understand whenever you are going to draw the different perspective knows or indifferent sides or angles of the nose. So all you need to keep in your mind distinct that whenever you draw, just see the things and the apparent way. So here I did in this way, I draw a nose from three-fourths perspective. And then I'm just adding few layers and getting the correct proportion using the shading thing. So this is the quickly understanding of the different shapes. Whenever you want to draw a shape or different shape of the nose or a different angle. So this is all you need to keep in our mind whenever we want to draw. You can see we're here that I'm only using the 4B pencil for the outlines and for the shading thing, using some cross hatching thing. And then I'm mixing it with my fingers. And then I'm subtracting some values. I'm subtracting some values to getting the highlighted thing. I am just using the cross attempting to waiting realistic shedding and proper is merging thing. And now I am also using some watercolor brush or a makeup brush to getting more smoother values. So if you want a really smooth value or smooth transition on the values, you can use these pressures for getting the most. Is smooth or smooth transitions on the values. So this is the way you should also do. And you can see or hear that how realistic the results can be opted by using these pressures. So if you want to draw the like, most realistic thing, most hyper-realistic portraits, you can use these tools to getting released to trading things. Now I am using the needed it is and then the pencil eraser thing. Using these tools like it is, repents are whether it's someone who has a, will really help you for getting the realistic shedding. At the same time, you will also maintain some time to retain it from the detailing thing. So reducing the time, it is also very helpful in getting drawing on the bigger paper or the larger papers. Now i am keep on doing the cross hatching thing and adding more layers. So yeah, this is the way you should draw. If it is in the perspective thing. Now, let's say a, we can take some other examples like if the nose is in the another perspective, ok. It's not the three-fourths. It's a little bit the cider view. Okay? It's not, it's just a phase that moving towards, from its, from, towards its left. And then what will be the shape of the nodes? You can get it by using the circles. The rear circle came out a little bit and showing itself from the center socket. So you can get the shape like this. Now you can see that I have already drawn and outlines using the same technique. And then I'm just adding some and shading thing too. I'm just finding out some blocks for the shading of this laws and forgetting it. I'm just adding layers. And doing the cross hatching thing will help me to allow more and more layers. After getting furious. I can smudge it as well. And if I don't want to smudge it, I can retain it as it is in the original form. Now I am using the brush and I'm just smudging the value as I need the realistic shooting thing. So I'm just, it's merging the values for getting the smoother surface. So you can see that you can transform our 2D plane into the 3D plane using the pencil and the shading and the pressures tools. This is not something that is very difficult for you, but for getting the shape thing that is the most important thing. And after that, the shading thing is also the mandatory thing to do. So if you follow these steps and whatever I have told you here, you can definitely get the shadings. And in the most realistic form, I am just trying to find some highlighted area. And then the smudging it again so that the layers can be formed. So I hope that you understand whatever I have told you. And you will also practice in that same manner. And this is all about nodes.
15. Episode 6 : how to draw lips: Now let's talk about lips for drying the lives. You all need to understand and to put into the various shapes and just using some circles over here. So I am drawing the horizontal line and then the vertical line. So these are the two accesses, what I'm going to draw. And then understanding the upper Lee, I'm just drawing the two circles you can see over here very easily. And then the third circle for the bottom lips or the bottom lip portion. And you can draw centers are located and the two more circles besides it. Now and just joining these circles from the tangent and getting the correct proportion. For this link. The upper lip should always be darker and low in the height as compared to the lower lip. So the height of the upper lip is always, usually it is lower than the lower loop. Now I am just an edge joining all the points. What I have drawn. So here I got shaped quarrelling. Now for finishing it out, I'm just trying to rendering it using the two defenses as ellipse are very softer portion of the features. So using low-grade pencils is very preferable and suitable. Also, you need to draw the dip between the upper lip so that you can actually eyes and realize the real proportions of the live. Now I am using the 4B pencil to darken some of the area like I just off the lift and the central line, which is adjoining both ellipse. I am trying to do this hedging in ASP or the actual image like and just copying the flow and the shading direction of the real image and trying to copying them on the paper. You can also do a variable, things like doing surrealism or different other approaches of shading. But over here I think the most suitable and the most easiest is just to follow the real image. Shading style. I am darkening the values of the lower limb and for getting the correct proportions. Now I am smudging using my own fingers to settle few values so that I can add more value to it. So now I am adding the second data directly using the phobia to always keep in mind that at joining points for the upper lip and the lower lip is always the most darkest as compared to other features of the live. Now I am using the breath to its molten few venues of the graphite and getting more layers onto it. I'm using secularism technique. You can see that I am smudging the brush in the style of getting the circuit. I'm also using the small size brushes as the features of the leaves are very refined. So you need to use these tools as well for getting the realistic shading technics. You can also do similarly as I have to get a realistic shading thing. Now I'm again using the movie vented to getting more layers onto it. So always remember to work rather than to putting all the layers out when I'm using a medium textured paper as it allows me to go layer by layer. Now I am using needed. It is getting the highlights on the upper left portion. And this is very important, very crucial for big understand the highlights things or the lips. Also I am using the pencil eraser to finding the most highlighted feature on the lower lip. Always remember that lower lip are always lighter in comparison to complexion of the upper limb. Upper limbs are always darker. If the light is coming from the front view. If the light changes its position, it may vary. But in the generic way, the upper limit is always to occur as compared to the lower layer. Now I'm finishing it using their 2B pencil and getting more and more realistic values. So this is how you should do and you should draw lip. Now let us draw another LIP. This one, what we draw, it's a closed mouth. And if, suppose the lips are open ended and you want to draw it, so what would be the procedure? So over here, I'm just showing you the procedure of the same. And I'm just draw the horizontal line and the vertical line and then I am drawing the circles. What I have told you in the previous ellipse drawing. And I am just again following the same phenomena for drawing the lip, the upper lip. And then similarly I would go for the lower lip thing. And just amazing spew values for getting the correct proportions. Now you can see for openly if the upper label should go a little bit up in upward direction as compared to the lower left. We can see how I take the guidance from the circles so that the proportion would be correct and in the most efficient way. Now as I have, create the shape of the lip and just trying to add layers to get the shedding thing there. So this is how you should understand both the things like brain, the shape, how to, how you should draw the shape of some, some lip. And then again, how you should do the shading thing. Support open mouth. You always remember about the tee thing that these are not that easy thing for any artists to do. But if you observe the image closely, you can get the correct proportion of the lips, incorrect dimension of the lips. Now I am adding more for the lower lip also, so that I can easily understand the lightened shape, what we are getting. The lip portion. I'm using the fingers, too few values so that I can get more even domes. I'm just following the real image and doing the shading in the same direction as the real image. Now I am using pencil eraser to highlight few lines, a few highlighted portions, What is showing in a real image. So you can do it very easily and understand the process and learn the process in a simpler manner. So I did. And I'm forwarding it to a little bit that you know that how to add more, more and more layers toward the getting the real image shading thing. And I hope that you understand the lip portion and how to draw it. And this is called the open mouths options. I hope you, I hope you like it.
16. Episode 6 : more lips angles: Now let's talk about the lips in the perspective 3 fourth proportion, or any other proportion of the lip. So for drying it, I'm just following the angle. What angle I'm seeing over here, and the real image and just transferring this angle and the vertical and the horizontal line are being transferred accordingly. Now I am just again drawing the circles what we had drawn in the previous one. In a similar manner, I am drawing the circles. And for lower lip Also I'm just playing a bigger circuit. So these are the three circles and this is the way you should initiate the drying of the lip. And then then at joining the points on the circle and meeting up into the end of the edges of the circuit. So just understand fucose like if you see the phase in lips in the perspective or phase and the perspective, you find that the lip water from the upper left portion and the lower left portion and the edges of it being jam Ford and being in the core portion, like what I'm growing over here. So you can also do in the same manner. And then I'm joining all the points. And this is the last process that you need to do. But always remember to follow the course, like you can see over here as well. So by doing it, you will get a real structure. And then all you need to understand the shading thing. Then for shading it, you only need to understand the real flow of the image, real flow of the shading. You can see the vertical hatches in the upper lip and the lower lip also. Similarly, I just copied the heating pattern texture on the real image and transferring it to my own drawing. Then I'm smudging using my fingers and then putting some highlighted value using the kneaded eraser. Adding here is the key and fundamental to draw realistic lips or any features of the face. Just try to add more and more layers. Now I'm using the brush and its merging the values so that I can get the event at a smooth surface. Or there I can highlight few lines and values and then degenerating few layers later on. So you can see very easily that how I achieved it. And the perspective angle or the three-fourths proportion angle. It's a various head angles that allow you to draw in a different manner. And change your approach, change your brain things. Now I am just talking about the smiling face. So what you need to do whenever the phase is in the muted, muted way, just, just try to add the edges somewhere on the upward direction. And I'm just doing the same thing and draw the vertical line and the horizontal line. And then I'm going to go, what is the main feature of the smiling face? Then I am drawing the horizontal line or Dina as well. For that I can measure it that the lips in the correct proportion. Now I am drying the upper lip and then I'm going the lower lip as well. So you can see drawing a smiling face. It's the most difficult features of the phase and is the most difficult thing that all the art artists want to avoid it. If they founded writing with a smiling face, they always try to not to do with it. And they always preferred to have a mutant phase or phase, which is having no smile because it's very difficult to draw. At the same time, it will also cause you to put you in the difficulty of getting the correct proportion. But if you follow these, these tricks and techniques, what I am, what I am telling you are here, you can easily get this smiling face has been. So you can see over here, I'm doing the same principle thing like I did in the previous ellipse, drawing. Adding layers and getting the likeliness of the real image. Then I am drawing the teeth. And every tooth is very delicate. And if you were doing it or if your doc and the values, it reviewed your drawing as well. So always try to get the very light values of the teeth. Do not try to put the dial tones first and do not pressurize your pencil. Cannot put pressure on your pencil and just have a small, small glimpse on the beat to not try to draw it completely, just to get some few highlighted things. Like you are showing it and not showing it, Desmond. So you can see that I did it and then foreign governments, Well, I am just adding fuel layers or the PDZ thing. And on the coordinates I'm just doc and few values as in a real image also. It's very difficult, very complicated also. And most of the artist tried to avoid it to draw this smiling face, but you need to understand it unit to learn it. Before going into it. I'm just using the brush tool, smudging the values. Now I am putting some highlights or the teeth and the lips as well. Now again, I'm adding more layers using the full Benson. So I hope that you worked my point, what I have told you all here. And you can also draw the smilingly as we're smiling face is the most challenging one I'm telling you again and again. Because I have seen many of the artists try to avoid this smiling face trying whenever they are going to draw a lifeboat rate or they're doing using some reference image. So always a difficult thing when they are doing using the observation to give drawing it with a different technique, leg grid method and all. They can do it very easily. But if it is mean, then by observation thing they always try to avoid it. So this is how you should do smiling lip. I'm just putting off some value where I have dark in the things and just using the needed razor to lighten up a few values so that I can achieve the likeliness of the real image. So well here, there is not a likeness is not the aim. And just trying to get, let you understand the proper incorrect features and genetic smiling face growing.
17. Episode 7: How to draw ears: For during the year, you need to first understand the nomenclature of the helix portion, the cross and the valley, and then the canal portion. Then this one is Nobel portion. These are the hills just below the canal portion is are the heels. And then elected portion is crevice and the outermost portion, left portion is the helix lock. Now let's talk about how to draw ears. For drying year. You must understand the basic structure of the year. And forgetting the structure. All you need to understand and see or hear or how I am getting the real proportion and the structure of the year. So I'm just drawing a shape, or here you can see the vertical and the incline lanes are mixed with. And then you can easily draw and here inside this structure. So whenever you are going to draw the ear for January faces and understanding its shape, you need to understand this fundamental that how you should get the shape, current shape of the year. If you understand the correct shape of the year, you're not going to make any mistake whenever you are drawing it. Now I'm just growing the helix, the helix portion. And it actually depend on what you are drawing. Its thickness actually depend upon what exactly your drain and this had to follow the real image steps it. And then for the canal, there is a code insight into it. And for the pragmas thing, there is another car in the different direction. So these are mixture of, mixture of different probes. The most complicated portion is the crust, where you need to understand where the lights are coming in, where the shapes have to be there. So for grind the cross or the bad Valley thing, you just have to observe the real image very closely. If you do a stake into it, you're not going to get the realistic shedding thing or realistic here. So you need to understand the crust portion and the valley portion. This is very complicated portion. Also you can observe from your own ear that take a snapshot of your ear and see how the Coase and the valleys have been formed over there. And the crust portion, the value portion is the way it is the most complicated one. Lobule can be drawn in a very easy way. This you'll need to have some fitting and then put some highlights on. So when x is also not that complicated, helix can be drawn in a very simple manner. And similarly canal is also not. The only difficult portion for the eardrum is that crust portion and the valley portion. Now I am adding more layers and more fitting m using the 4B and 60 pensive for that there. And then I'm using the fingers has much fewer used and I'm using the whatever numbers are, makeup brush, whatever you have just tried is much these values. The brief actually helps you to get a small tenements office. Or they're, you can add more layers and get the highlights also related. So now I am drawing the grass. Grasses actually below the Alix locked thing. I'm adding more layers and try to get more darker values all around as and when required. I'm trying to darken the venues around the hair thing. Usually in growing you. Whenever you are going to draw a front-facing space, you only need to grow the side faces of the ear. So ballooning to worry about that much. But if you want to go ahead and draw a side face of any human head or phase, then you need to learn the thing very closely and to draw it very neat and clean way so that it can be shown and draw perfectly. This is the way you should draw. And here from the side view. And now I am using the pencil eraser to highlight few of the portions of the year, year over here. I'm not copying the elements. That is for sure. I am just referring the image, forgetting the generic ERE thing so that you can relate the things. It is not for copying it or drawing in the same way, on the same manner. Just a real image exist for only for the sake of understanding how to begin on drawing the shape of it. If you want to draw and copy it exactly, you can also grow it in the copying minimum. But over here, I am not trying to copying it and using it as only the difference thing. So that you can easily understand where I'm enriched portion I am talking about envelope and how to begin by seeing and drawing. So I hope from this episode video you understand about the end of the year and how to begin it for getting the structure thing and every day.
18. Episode 7 : Ears different angles: Now let's understand the year from the different perspective. So for the front perspective thing like if you're seeing from the side phase on the phase, withdraw a year like this, like I have drawn in the previous video. So this is the front face for a year to draw. And if you want to draw in, if it didn't in the three-fourths perspective or a perspective on the side view of the ear, like Frankfurt's on the face. So what you need to understand to have a twist in the angular of it and forgetting the understanding of the twist, you had to draw the structure and the perspective way. You can see or hear that how I rotated from the axis of repair like this. So all you need to just rotate the oldest structure to the certain angle which you want to draw. So this is the structure what you get after rotating the front-facing here. So if you rotate it, rotate the structure. You will understand that every aspect of it, every feature sulfate like helix or grass or Ghanaian, everything is going to rotate and at the same angle on which their structure had been loaded. So this is also very common to draw whenever you gonna withdraw perspective phase or three-fourths proportion profile phase, you have to draw ear in this way. So this will really help you to understand the correct proportion of the year or the following word there. So now I am just doing the shading thing and fitting. I think that you really understand in the previous video that how to actually do the shading thing for getting the every aspect of the year. So what you need to do that you need to practice a lot. And by using this technique and transfer the structure to the certain angle whenever you want to draw in the certain angle, suppose you draw a head in the different angles. So the IR worlds or in the same way, then try to molded structure in that way and try to draw it. This would really help you to understand. Here is structure and ends and a dog. I hope you understand this structure now I am just going to draw the side view of the year. Suppose if a phases front-facing, This is a very common one, a friend facing phase you want to draw. So the ear is going to be the in from the side face and from the site of the ear. You will only understand now I'm rotating the structure though, sides of it and only this much portion is visible. And this is the most common thing. Suppose whenever you are going to draw a front-facing phase, you have to follow this history, all of this structure only. As this is most required, you need to practice it a lot. When you are going to draw a front-facing face. This is all you need to draw. Only this much of the year is showing and the front-facing case. So if you do not draw it correctly, it falls very odd. And I have seen most of the artists don't focus on the year thing and then the door slightly mistake or there, and the whole thing looks weird. So this is the way you should practice and understand the shape of the different years. I hope you got my point.
19. Episode 8 Intro: How to draw hair : In this episode, we're going to discuss about types of hate of styles and how to achieve it by using shading techniques and different methods to understand about curly hears, Coby hears on v, v heres and then straight here. So there are many types of here, what we need to understand and how to draw it. So this episode is very important for that. So that's have a understanding of.
20. Episode 8 : How to draw different Hairstyles: Now let's talk about the care and different hairstyles and how to achieve it for the drawing thing. So I am just taking the foster friends as a straight hears. Okay. He scraped hears and how to draw it and how to achieve the layers of it. So we will understand about outlined Handan though shading processes. Because shading another important as compared to the outlines of the hearing. So I'm just getting fewer or glands first. So outline you can draw in any way. You just need to follow the real image outlines and then just see what are the dark portions of the here. So for all the dark portions, you need to have a dark outline. I'm using the tube events and experiences for that. Now I'm starting on darkening fuel use and following the real image. I'm just going to draw the dark lines using the dummy and the 4B Benton. You can directly use 6B pencil as well, 400 up portion. As you see there in the real image, there is a lot of darkness at the end of this, here. At the top also and at the bottom also. So I'm just applying the dark layers cost. And also I am following the real image that share of the here. What is the texture? You can see? We can understand it that these are the straight lines which have been found to create a bunch of here. So what all you need to do is just to follow the real image, texture of the hair, follow the flow of it and gently enhances the layer. By doing it layer by layer, it will definitely going to enhance it step by step. And do not try to put all the pressure of the pencil at one's, always striving to do it gently and easily so that you will get a small to and even rendering author shades of varying tonal venues. I'm using the 4B events repetitively and then I'm using the six beers that are getting the more darker values and the edges like the top of the whole ahead. And also adding more layer will help you to get the realistic training. But always try to get the flow of the air and use the pencil and forceful detection, not in the slow on an easy Dacian tried to get the flow with the force of the air. Do it forcefully. A simple stroke and stroke, draw the straight forwardly strokes. And you can see very easily that in the middle of the air you find some highlights. So I'm just, I'm not going to hard on Central Asia here. Leaving some highlights or they're naturally. So that after doing the shedding thing, I'm can achieve the shading condemn nine, using the brush TO actually is much W's and getting the small, tiny man's office. Adding more earlier will help you to achieve more dense, unrealistic shooting. So am not copying the elements here also, I'm just referring it for the reference point of view and writing on my own hair style technique. And just to let you understand that how you should do a video, straight hair things, okay? And it would be easier for you to have a reference photograph and how you should follow the fitting things. Now I am using the ventilator is obtained due some more highlights on the highlighted portion of the hair. And just doing the similar thing what I have done in the past videos as well. Trying to getting some high lands using the pencil. So by this, you really get the highlighted portion of the hair. And this will help you to achieve those highlighted lanes. Now I'm again, I'm using some area portion or you for getting the dark blue area abortion. I am just using the 4V Benson and enhancing the value and then I'm using the brush to get a smooth surface on it. So this is the way you should do for the state head. Now I am talking about VV hears, okay? So there are different, different waves and bouncy here. So you can say bouncy hair. So really his. So how to do it? I'm going to tell you or here. Now for that, what I am going to do is store Uganda outlines of the hair Foster. And then I am just adding new layers and lines using the Shooting thing as well. Now I'm using the home events in 06 prevented for getting the ages of the hair like I do in the previous one. I'm just starting from the top of the hill and getting some doubt. Don't hold there and just leaving the middle portion of the hair. So that highlights can be altered later on. And again in the, in this section we're here, you can see I'm using again the dark portion by filling it using the 4B events, it just try to follow the real image. That's it. That is the only fundamental of growing the here. You just need to follow the real image texture of the hair. Whatever is in the image, lets try to follow it. And if you want to draw a generic case, then what I have applied over here, but the edges should be dark and the middle portion we have the lights are coming to the center portion of the head where the lights are coming. You need to leave it like this only. And then later on you will create highlighted portion or they're like I am doing in this one answer. No, I am again, using another layer of being another layer will add Morley news to hear. And also using the site of the pencil faraway, adding more layers if you want to do it quickly, you can use the Tsai Dr. pencil as well so that you can easily get the graphite value quickly and drastically. Now in mixing the values with the Apollo upper portion of the hair. I haven't used any other tool as well. No. I'm also going to use a brush 400, mixing it up and getting those small, tiny when surfaces. But now I am using the brush as I told you earlier, and just mixing and smudging the whole Bei Lu so that I can get even surface on the people who smooth surface on the group and so that I can create some highlight and add more layers onto it. Now I am using the engineers in or is it isn't Benton. Forgetting that highlights ocean of decade. Maybe you can see in the real images to the highlighted portion is very, very light and very white as compared to the other portion of the hair. So I'm just directly uplifting few of the fight from the adding the height apes model. So this is the most easiest, I'm wonderful way to draw anywhere and any texture of the hair, you can really easily understand it. I'm adding mornings. For getting more layers you have to work on fully Benson and takes me Benson. And then later on. If you do not have that much of pencils, you can use. The 2B pencil has been forgetting their dark values, but I would definitely suggest you to have at least 4B pencil. This will help you to add layers. Quick manner and easy manner. Now we will talk about the curly. Here's how to do it, and it's the most complicated one to draw for as far as here are concerned. Because it gets very complicated and domains of hardware is required for getting the curves on the here to draw it. So for that I'm just a fringe off it and understanding for the single friends how you do it so that you can continue with this process to do a complete curly hair drying. For that, there are a few peaks and valleys of the columns. So understanding in these are the highlighted portions and these are the edges of it. Every peak or every edge has the highlighted portion and every valley or inward portion is a darker portion. So understanding it into this pattern will help you to draw a curly here in a most easiest manner. Now mixing these dark dawn values with the highlighted portion, like mixing it with the peak would help you to draw it. And at the same time, it will create a concept for you. Could draw curly is every time when you encountered with it. So if you do it on the single French, you can do it for the whole curly hair thing. The fundamental would be the same as I am applying over here. Initially, whenever you draw it, it looks like a snake. But hey, it's not like that. Whenever you are willing to do the fitting thing and then you are adding few highlights, you will get the texture of it. And also whenever you are going to grow, are complete. A bunch of here, like a bunch of fringes, you will definitely get the realistic one also fundamental would be this only what I am doing over here. You have to do this and do that. Then all you need to have a mixture of a and try to adopt the surrounding environment down here. Now I'm also creating some backgrounds so that you can easily understand how would look like whenever you are going to draw. Visa covers other goods also. Now I'm using the ventilator is in blue for some highlights creation of some highlights. On that is also, you can also look and draw some random calls also because curves are not fixed, they have to change according to the according to different styles and shapes of the face. So I'm also randomizing the team using some random lines also. So this is just a glimpse how you should do and you have to do it in a very properly. I'm just giving you a little idea about it. How will you should practice? This will help you understand here.
21. Episode 9 : Outline drawing using Pencil measurement techniques: This is the most important episode to understand about Pencil measuring techniques. And it's a very important thing to get the proportion in a correct manner and outlines of anything, whatever you want to draw. So this is very important and I want that everyone of you should understand this technique as it is very important. Suppose if you want to draw something in life and live demonstration thing, suppose someone is there to stand in front of you and you want to draw he's portrayed on your paper. So this only technique can be utilized over there by using your own pencil and getting the correct proportion from the particular subject and transferring the value to your drawing. So this is very important and I wish, and I hope that everyone of you should be very clear about this class. And to understand it is step-by-step. So let's have a beginning of it.
22. Episode 9 : How to do Pencil measurements: Now let's have a discussion about Pencil measurement techniques and how to use your pencil as a measuring tool. And how you should actually measure and the dimension of anything, whatever you want to draw. So here I am digging a bird, a beautiful barn, and how to actually measure and compose it on the paper. So this is very important Arizona and you need to learn this fundamental thing very accurately and understand it completely so that we can do it for the board ratings as well. So here I am drawing a circuit must follow this arc in like in the previous video, I have shown you that form the shapes using the differentiates from different structures, you can achieve the real shape of data dummy. So that small circuit. And then they'll learn cope Circuit and the below to the elliptical one. So the upper circle actually forms it heads. Now just see what here I am just trying to draw it and imagining from the original image and engrained same dimension growing over here. If you want to draw it on the knowledge and skill, you need to doubled it up using the similar benzene measurement technique. So I measured the whole picture width from head. And then I am measuring the eyes from the right corner. So I gotta and I were there. So this is the way we should measure using your own Benson, our own pencil, and getting the correct proportion. So this is how you should strengthen your techniques or measurement. Now I am measuring the length of the word, the whole height of the word, and getting a mark. And do that. And do that. Just keep on measuring unless and until you achieve the correct measurement thing. Also again, i'm began different measurement and digging dairy friends thing from the same point and the top of the head. And now I'm just aren't growing the thing. So my DAC, you reduces the error and you achieved realism and resemblance and up to the required mach. So you can see that I am taking all the measurements like width of the bone and then the length and the height of the word. Everything you have to measure. And whenever you are measuring your use your own pencil. Pick your pencil like that. I have what I have shown you in this set episode. So this would be very easier for you to measure each and everything. This is a small example of achieving the value outlines of anything, whatever you want to draw in a most simplest manner. Using your own pencil for the measuring thing. Are. You can also use bamboo stake on wooden stake called soap or that if you are not going to draw using the charcoal, you can use your notes on pole for measurement thing. Oh, if you're a drain using pencil, you can use the pencil thing. So this is the way we shouldn't measure the things and transfer our required value to the paper from the difference. This is the most convenient way to draw. If you want to draw on the larger side, you just have to double the measurement things that if you want to draw out what their real image a single value, you just transfer it to the w value, multiplying it by two. Like we do in crafting with similar things can be done over here as well. So now again, let's have another example of growing a vast and with flowers. It's a jug Actually it's a jug. Motors, again. Flowers are there or what I'm doing. So I'm drawing the vertical line, the vertical axis of it, and then I'm just transferring the horizontal dot value of it. Then I measuring from the Doppler value and what is the depth or height of this jug? By using this my using my own Benson, I'm just measuring the values. And I mark a bottom line as well. Now I am just measuring from the difference the width of modern groups of the jug and also will do the same with the upper deck. As you can see, it's an astronomer shape on that jug, conical shape on the joke. And just start defining it using the measurement thing. So for any dimension, you can use this technique, whether it is a, it's still-life composition or into my life art. Well, let's say for animal drying. And then for them a portrait thing as when human and autonomy tend as when human face and autonomy are other features of the finger human figure, you can use this technique and many of the artists had been using it and getting correct proportion by every time. Also in the live dying demonstration, most of the artists use this technique only as any other technique isn't not worked for or the length grid method. And Alex, you cannot use a grid method or they're implemented draw something from the life. So this is the only method which will help you out there to actually engage the correct measurement. So now I'm drying the Handle object using the same technique. So this is the way we should draw the outline of anything around us. So this would be the practice for you. Draw it and practice it accordingly. Pick any, any, any object near or around you and try to use this method for drawing the correct proportion of it. Transfer the value is the key for growing correct proportion. So this is the way we should learn in a week. This is just an example. You can do it and refined it. Much matter. I'm just showing you some idea so that you can do it in a proper way and completed in a proper way. So I hope that you really understand whatever I have told you are here and really get benefited from it. Well, let's move into the next episode.
23. Episode 10 : how to draw outline of face using pencil measurement: In this video, we're going to learn about how to measure through your pencil and getting the correct reference and transferring the value from the image to the drawing. So for that, I'm using here the pencil measuring technique and I'm drawing a vertical axis and which is going from the center of this portrayed like it is going from the center of the nose and the lips as the portrait is front-facing phase. So the line should go from the center of the lips and from the center of the nodes, and also the center of the eyebrows. So it's a political center line. This is the first thing, what we need to assume or what we need to do whenever we draw such kind of portraits that front-facing pieces. And then I am drawing on a horizontal line. And this horizontal line should go from the center of the eyeball dogs, like going from the center of the pupils of the eyes. Sometimes you find a completely front-facing phase, which is perfectly symmetrical from the left and the right proportion. Sometime you'll find little disk discrimination or differences in between the left and the right. So what do you need to do to fix the horizontal line from the one I centered. Ok. So that doesn't mean if the other eye it's a little bit high or low. That is something not not your concern. Just try to get the horizontal line, completely horizontal line, which is perpendicular to the vertical line as well. And it should go from the center of the one eye. One eye. Okay. So now I'm just drawing these lines like vertical line and then the horizontal line also on my paper on which I'm going to draw these reference image. So these two lines of these two reference lenses is going to help us to draw the perfect image. And this is the only way you can enhance on understanding your, your perfection towards the observational skills of the growing. Most of the artist used these technique to actually draw the unassembled image. Now I'm using my pencil to actually measure the distances from this vertical line and how much it is far from the vertical line, the I, the initial point of the eye. And for that, I am just marking the point and using the another principal marking the pine. You can also use the same pencil. Whenever you are going to have a little bit experience over on it. Then I am just measuring the distance of the pupil center. The pupil center of the boat, the eyes. For both the eyes, I'm just measuring the center distance between the pupil and the vertical line. So this is going to be the island, the central line. Okay. So somewhere around here, the eyeball should come. So these are the two high-born squared we're going to draw. Now I am measuring the height of the eyeball, whether m ok or not. I'm reconfirming the values. Now. I am actually measuring the width of the eye and again, reconfirming these values what I have already taken on the people, whether I am correct or not. So it's very important to take as many measurement as possible. At the beginning whenever you gonna draw watering because it's very important. Lay down perfect things onto the paper. So take your time and let's understand the border it what you're going to draw. And if you want a complete resemblance thing, otherwise, if you do not want that, you can go with minimum measurement requirements. But if you're not draw it completely assembled with the real Emma and tried to draw the accurate measurements. You have to take measurements as close as possible. I'm just now getting that tear duct position and just trying to get that distance as well. And then the edges of the eye from this central pupil line for both the eyes. So initially whenever you're going to draw this thing, this will take time. But when you're going to have an exercise and practice to work on it, you don't need to take that much of measurements. And you can go with only 23 measurements. That's it. And then that's enough for any artist to do initiate the bolt rating. But initially as an artist, as a beginner, if you're going to learn this thing that you have, then you have to take more measurements. Now I am just getting the shape of the eye. So this mattered is far better men served as compared to the grid method. As grid methods, day cutoff or time in calculating mathematics thing. But here you don't need to do that thing. You just need your pencil to actually measure such thing and get the correct proportions outlines. Now I am also measuring the eyebrows. So this is very important to, for any beginner, that he should take a print out of the image so that he can see such things and every dimension on the paper. And he can relate that he's going to dairy elements. Now I'm doing the same thing for the other IS complete applicability of pencil measurement technique. And if you do have a method of anything, you can work on it and enhance these practices will let you understand hard and proportion in a better way. Now I'm drying the another eyebrow in a similar manner. And I'm just transmitting the horizontal axis and getting the parallel axis is horizontal line. And getting the proportion, transferring the proportion of the already drawn I, and I rose to darn near drawing. Whatever I have I want to draw for outline thing. I think the best pencils would be XB, B, or to be Benson's. These three pencils are very helpful getting the outline things at these pencils are very smooth pencils and also very firm point can be obtained very easily. Point of the pencil that can be obtained very easily and you can find a fine lines, ten lines. So these Pencil are very helpful for beginner to really get the outlines. Always tried to draw the outlines very fine and should be very light. Also, do not try to make the dark line set cost. Otherwise it would be very difficult for you to, oh, actually reads it. So again here I am reconfirming few values and dark in it so that I can actually see the whether I am correct or not. So I hope that you understand about how to actually initiate with pencil measurement technique. And in the next episode I'm going to discuss about other features of the piece.
24. Episode 10 : continues: Now let's understand about the moles. So for measuring the laws, Degas difference from the horizontal line and measuring and down to the depth to the bottom of the nose. And putting a mark on our drawing was now from the bottom of the nose and just measuring the value for the top of the lips as well. For the upper lip balm. Now, for the lower lip, am also measuring from the same place, from the bottom of the nose and just measuring the bottom of the lips and then the bottom of the chin line. So I had measured all the values, what come around the vertical axis and transfer these values to my own grain. Now I just have to value on these measurements and tried to grow it using these references. Now one more thing I am just going to do here and getting the forehead column reorder here actually start and just measuring it from the center line S1. Now for the edges of the nodes, we can do one thing. We can directly measure it from. Similarly, what I am doing over here from both sides. If the face is symmetrical around the axis, then it should be equal. Like all here, it's very, pretty similar. It's very symmetric as compared to the vertical axis. So now I am just grinder laws inside the measurements. Will they have to? But I have taken. Now, I'm also getting some sheets so that I can actually conceptualize whether my nose dimensions are correct or not. Then darkening some value, some cross hatching things. So that I can actually relate it from the reference images with. Now, for the lips, the top of the list. You can see or hear. Open mouths land for the width of the lips. Or you need to do is to measure it from the vertical axis. And you will find the edges of the live. I'm just comparing it as reaffirming the values. This is actually all about plotting things. Suppose some, someone want to plot, going onto the paper. He had something like this. So exactly the same way. I'm also plotting the real image though my drawings so that I can get the realistic and most and assembled for the Center of dumb mouth. Hammer on, measuring it from the bottom of the North. Now, reading slowly and just drawing the lines are the ellipse. But always be very conscious about because do not try to draw it very hardly on very pressurizing the Benson. Always try to get it very lightly and with very less pressure on the pencil so that if any changes is required, you can do it very easily and there should be no any mark on the paper left. Now and writing the details and the lower lip insulin. So you can see over here that I am making some changes to the dimension and try to get the real outlined and try to draw the accurate values of the features of the face. Similarly, you can also do it in the same way for outlined. Practice it more as much as possible. If you didn't get the paint out of the image, tried to draw it from using from magazines, our newspaper cuttings. You can have lots of lots of phases in the newspaper. So you can use them as of now I am having some day, some mark for the chin as well. And hoping some mock all day. And then I am drawing the actual outline of the face to hold for this. So this is what you need to do first. Should it start from the features? And then at the end, you should actually draw the outlines of the face. This is the process of using the pencil measurements. If you want to draw in a different way, let's say if you're on a draw from the height to width ratio thing, then you have to actually first fix the shape of the head, and then you need to actually fix that features. So there are two different processes. But over here, what we are talking about, we are talking about depends on measuring thing and we first draw the features. And then we actually come up with the outlines of the face or the head. For business. It is very helpful if they draw the features was and then go with the outline team as it helped them do, really understand each and every features of the face. And then they actually resemble it as close as possible. Because deciding the shape of the head, it's not that easy for any beginner to actually draw him. And the postcode. We actually draw that technique also in the later coming, being sold our videos on this plate formats. And in my next class, maybe I'm just telling you about those techniques as well. Now I'm measuring the distance between the ear and the central line. So I am just opt in the year. So this is actually the way our big national practice and also many of the artists are doing such a way and not, and not necessarily they are actually taking that much of measurements, but they usually need to utilize these techniques in their portrayed bringing also for very important thing, for the live demonstration thing. If you want to draw from life drained from labor, or if you want to draw someone standing or sitting in front of you and you want to dry it. You just, you'd need to use these techniques like measuring and observing the real phase using your pencil. So I hope that you understand my point, whatever I have, say two or here. In the next episode, we're going to learn about the shading thing of this image and how do actually assembled the image.
25. Episode 11 : How to do shading on face : Now let's understand about the shooting team. How to actually meet your shade so that we can actually get the real shooting thing, whatever is in the real image. So I have drawn the outlines as you've seen in the last episode. In this episode, we're going to discuss about shooting thing. So first of all, I'm just darken some features which are very much clear and I am starting from the eyes as it shows a very dark value. So I am using the forward Benson and directly governing the abortions, which are very much dab as compared to the other bones. I'm doing it very slowly for you, as you can see and understand each and every step. And you shouldn't just escaped many of the step. What I have taken over here, you can see that there is a small glimpse of highlights in the eye. And we should avoid to put their dog videos onto it as it will be very difficult for you to regain the highlights or make the dark values onto that. So try to avoid that place and left that place with the highlighted thing. And then you make all the monopolies all around. As you see that I can directly start with a 4B pencil. If you are not that confident you have high-grade pencils you can use to be mentioned as well at the beginning. And then you regain your confidence. And then if you will find the shooting thing is perfect, then you can add more darker tones and use for events in North expensive. But if you are confident enough in your outlines, you can directly vote for with pencil. And at least for me, mental is quite enough now. And it allow you to, again, those darker portion on the drain. Now similarly, I am doing for the eyelashes thing and just trying to put some tick marks for getting the lashes. And then the upper eyelid portion. Just try to change the pressure or the pencil and get differentiates. Donor will use different domain values. Now I am using the 2B pencil for the surrounding of the eye and getting some McDonnell using the side of the pencil and do not try to use the tip of the pencil, as I have already mentioned in the previous episodes, as men do not try to use the tip of the pencil whenever it's on our concern about the shading thing, try to use the sides of the benzene, the side tip of the pencil, and tried to add layers evenly in the same direction like cross etching thing. First layer should be smooth and even. So that whenever you draw, whenever you want to. Shade it using different goals. You will find a very smooth shading thing. And then I am just getting the eyebrows. For ambrose also, I'm using the 4B pencil and tried to match the flow of the air of Hebrew. And tried to get the exact values. Like dark values and the McDonald's and the Dow Jones is try to get the real flaw of the eyebrow. As you see, I'm now uplifting flu values of dawns so that our mic Don can be op-ed or IR0 here. Now I am darkening or where I'm going very slowly and layer by layer so that you can actually see the process, how the shading can be obtained. If you're good at your art skills, you can do it pretty much randomly and do it in a quick manner, and save your diamonds well. But if you're not confident enough and you adjust to being that you are about to start their artwork thing. Try to dope small time digging processes. Do not try to skip the process thing. Follow each and every step should be the key. Now I'm using the same process for the other eye and spin. And just now getting some video using the 4B pencil, always remember, there is one important thing that you should sharpen your pencil before going to the very small minute areas. As it will allow you to do some minor changes into the crying and you can go more refined and more faint. Things can be achieved by using the finer dip. So always. Now I'm also doing the similar pattern thing. Do the eyebrows as well. And just darkening and following the flow of the here as it shows in the real images when I'm just following the previous principle, what I have used in the other eye. And then I'm also again adding a few more layers to the surrounding of the ions when I'm using the two events. And for that, it's a very important thing to understand. And there are Bartlett lower lid of the i must have the debt in a very delicate manner. As it reveals a very minute and very delicate shading things that you must consider before going to the shading. Now I am just adding some layers using the crosscutting thing around the eyes. Getting the event, don't know, merging it using the finger as well. If you're not comfortable enough with finger shading thing, you can use tissue paper as well for that. And you can see that for opting even don't on the surface, I am just adding you need don't, uh, using the 2B pencil all around the left side of the baud rate. As you've seen, the unanimous also, there is a light towards the right side of the portrait and Data's a darkness and to the left side of the portrait. So for the left side thing and just getting the event on using the 2B pencil and just evenly spreading complete graffiti thing onto the paper using the fingers. So for my lab, I'm just adding more layers and more darker tones so that I can actually relate to the real image. And just observing and my eyes are transmitting from the real image to my own drawing and just keep on looking to the drying and then I'm seeing my own brain. This is the continuous process. This, this should be the way for any artist or want to draw a Boardreader refrence portrait and wanted to get the resemblance. So he should do such practices. I am now getting more and more and more values using graphite pencil. Here I am using the 4B pencil as well for getting more even don'ts. Forest mood surfaces and for a portrait like this, we shouldn't be very careful about the shading thing. Suppose if you want to draw an old man with having lots of lots of wrinkle on it. So it's very simple for you to observe such things, but for the smooth faces, that transition of reuse, it's very difficult for getting the correct observation for the changes in the grades of the graphite or the, the bones. You must have a great knowledge of shapes. So many artists are really tried to avoid a very even skin tone on a smooth skin dawns. And they surely opt for when to draw. Or an old man. And this is why you have seen so many artists are growing for all men drain because they have the opportunity to actually grasp the unevenness on the face and they can form layers, wrinkles on the faces. But here you have, you do not have that much of opportunity for you to actually explore the don'ts donor values or the wrinkles. So it is very difficult for any artist to draw this mode. Even surface, a very pretty face. And it would be very difficult for any artist. So as you see, I am using here, this is the density you can find in the market. So that is actually used for forgetting the getting the exact draw. So I hope that you understand about the shading process, what we're going to use for any board ready for when a drawing for great debt that has to be implemented in every step and beefy follow in a synchronous in the same manner, we should achieve the fitting, fitting as well. And just trying to get more resemblance as much as I can. And I've read a few of the differences, what I have seen OR here, but I will definitely work on it and we will try to get the, get our drawing as much resembled as possible. And we're going to go in the coming next week you off our next episode of it. Or resemblance for getting the most realistic images, realistic grinds. You should keep on getting the values and try to adding and subtracting few walk the values by using the pencil eraser or the needed it is. Now you see over here I am just adding more layers as I am smudging, fuel them. And the last process, now I am just adding more and more earlier sandwich. And then again I will do the same process and just I'm gonna smudge it out. So this is the layer by layer process of train such things. And you can see or hear that I'm using that may compress. Or you, if you have that watercolour brush as well, with flat headed, you can use them as well for getting even, don't even surface.
26. Episode 12 : How to finish a portrait: Now let's talk about the here and how to finish a portrayed as, as there are many things which are required to finish up. Ok? So we are going to discuss about those things as right and how to draw them here thing for that you actually, and just using the 4B and 6P Benson for leading it down and tried to get the real flow octahedron and just seeing the flow of the air as I have told you in the episode of algebra here, just trying to catch the flu. And wherever there is straight years and there are some maybe hears also. So I'm just trying to capture the real flew one. What I am seeing in a real image. And just try and go smashing it down using the gross. Or here you can also see and just trying to get the flow, just trying to copy the flow using the reference image. It is not that very difficult part of the portrayed, but if you do it wisely and correctly use table lots of time, which is very precious or an artist so that it can be implemented somewhere else. And you don't need to draw up here by here. One thing you, all you need to understand though, here, the bunches. And here you can see that how I'm using the sites of the pencil so that I can fill that dark portion area quickly and very effectively. You can use for weep until six people answer directly on the paper, whatever you need and which you are drying and trying to get the flow and using the order hand grip or you can see or hear. And now the final area dedicated, yeah, I'm using the tip of the penicillins. Have just zoomed in so that you can actually see how the layer should be obtained and how you should actually draw. And the hair concept, because it's very important. And at the same time you should know the way that will actually reduce your time of drying here. Actually, it's the most complicated thing that it takes a hell of a time when an artist to draw here, and most of the artists to get very lazy when it comes to broader here. But if you know devise techniques, if you know the things, you're going to have to draw it in the proper way. You can see or hear that how I'm Brian, the goals of the goals and currents of the hair. And you can see the forums. Our, I'm just following the law. The current. And actually you can actually find the waves. Might just allowing your hands to read the floor. Just following the real image and just transmitting him this trying to actually transferring the real image. Flow here, flow and let's transmitting it onto the handle, my paper. Or here you can see that I have skipped one or two process and then I am just focusing on basic structure now or here you can see I'm just working on blocks. Here. I'm not following the previous year. I am doing a few wanna draw using the block technique. So I am just trying to capture a few of the block so you can see the two different approaches, but you can get the results pretty make purely on both of the waves if you see the website and also the right-side approach is different, the process is different, but the result will be more pretty similar to each other if you follow the principle rules accordingly. So here you can see I'm logged on the blocks and then I'm adding more layers using the sides of the pencils. Whatever I am using all here, and just darkening the venues. As you see in the real image also, data's highlighted portion onto the right side. As far as my thing are concerned from the right side, you can see there's a lot of highlights or undo the hair thing as well. So I use the block technique so that I can actually get the highlighted portion. You can see here. Now you can see it's pretty dog. All you need to see the flow Madame actually doing and just trying to get the real flow of the image and gently trying to get the knob portion. So this will really help you to reduce your time, reduced the process time, what you wanted to draw, what you want to take to draw the portrait. And it will also help you to find the darkest orphan lambda portrait pretty decently. Can see main. This is the way you should actually adding more layers on doing, doing the similar thing. I'm adding using. And then I'm using. Now I am adding. Inside the eyes. Defining, defining the shape's gonna draw that few of the things have been reduced. Its where you ended storable values as compared to the other area. So that is something what you need to do at the end of the book that I always try to finish the portrait and the n addicts. And whenever you think that now it has been completed, then allow yourself to finish it out and see the things, what the differences are there. That will help you to actually add teammate, resemble it from the real ones. So you can see here, again, I'm using come up to that much of present and which looks pretty centers as far as the artists concerned. And now I'm highlighting few values through pretty much highlighted values using the areas of concern. And you can see that we have achieved it up to a certain level as well as the artistic approach, our concern that I think that that's enough for this corporate data. You like it and you understand the process thing. Resemblance can be opened abdomen ward level if you want to. But I think this is pretty decent.
 Ankit Jasmatiya, Fine Artist