Transcripts
1. Introduction: Hey, my name is arruniya and welcome to our drawing class. I'm an artist that specializes
in drawing and painting, and I love experimenting with different media in this class will be breaking
down how to draw the Poppies into
different components, including how to draw the
petals, stems and leaves, as well as different
drawing techniques based on the media
will be using. This project is beginner friendly and guided
step-by-step. Our goal is to practice our
drawing fundamentals and use the creative process and
a Drawing Method you can apply to different Art
projects in the future. Over the span of these
bite-size lessons, you'll learn not only
How to Draw Poppies, but how to break down complex floral shapes into simpler ones. Unique techniques for pencil, pen and coloured pencil drawing. By the end of these lessons, I hope you're justice ductus. I am to have an illustrated
and coloured to poppies and feel more confident withdrawing other types of
flowers and plants. I'd love to see your artwork, so feel free to share
your completed pieces with me for online feedback. Now let's jump in
and get started.
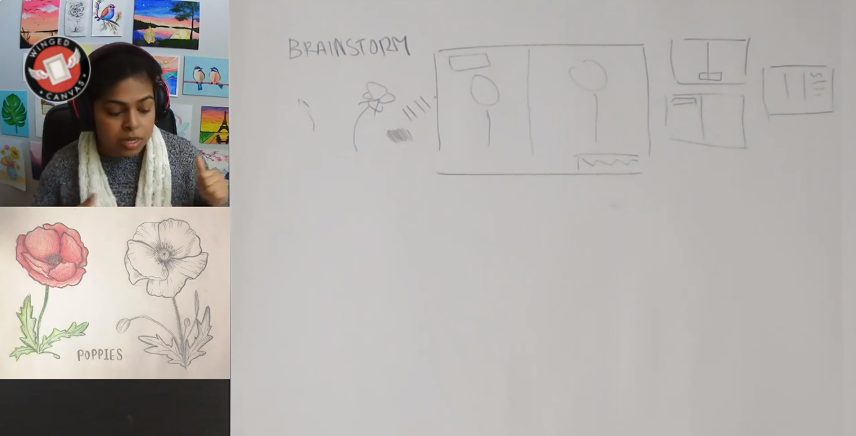
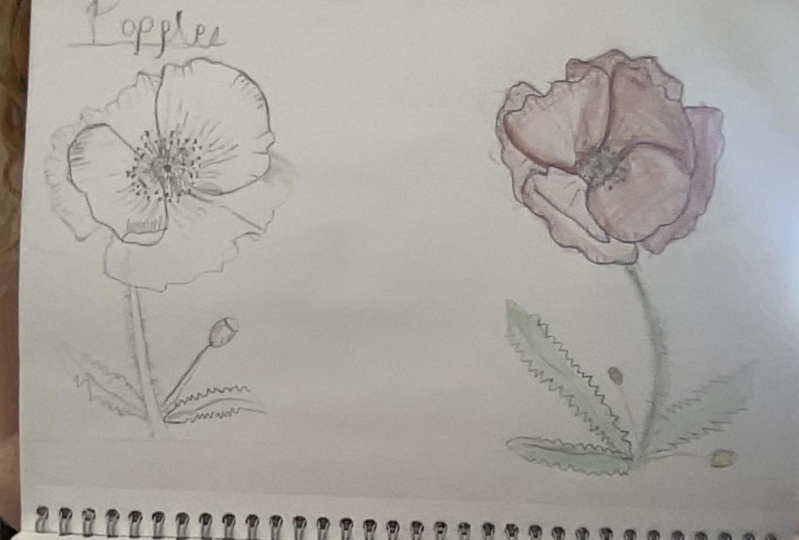
2. Brainstorming the Poppies: Welcome to our
joint foundations. We're gonna do
something related to remember and stays to remember the people that
have maybe fighting the war are still fighting,
are, have come back. We're gonna get to make poppies. I'm just going to share a
couple of pictures here. This is what a Poppy
it looks like if anyone's not 100% sure. But we're gonna do something
called a poppy study. What you're thinking
about free Gore, steady. Today's you're gonna get
to create to Poppies. Before we get started, I do want to go over the
materials will need. So just to double-check, just make sure you do have
paper and some scrap paper. I do have my pencil. I just sharpened it. So if you need a sharpener,
you can get that. I have an eraser
and I'm going to use my colored pencils today. And if I did want to use
a pen, I have the ten. So those are my
materials for today. You might just want to
think about where you want those poppies to
go on your sheets. For example, if I'm brainstorming
here really quickly, a quick little brainstorm. You're just thinking
about how you're space is gonna be
on your artwork. So for example, if
this is my sketch, I'm going to work side to side. Where do you want
your Poppy to go? Do you want to have
any labels on them? So labels are like
little titles and stuff. This is another one that
also has a label on it. So you can see it
says Poppy on it. You might want to
figure out which way you want your poppies to face. So are they facing
towards the inside? So that's like the stem. And you might have
like the inside there. Do you want to face the
other way you can decide? Do you want to have
a title somewhere? Do you want to have a
description somewhere? Usually what the study
you are trying to look at it and draw
exactly what it is. And then you can change
it up afterwards or you can make it look a
little different. Arts aren't gonna be
exactly the same, but we're going to be drawing
by looking at a picture, will be trying some
different lines today, building up some of
the shapes and then trying different values as well. I've a couple of examples
I want to show everyone, so I've got another one here. What's kinda cool
about this one? Does this all black and white. There's lots of contrast
from the background to what's actually being
shown on the inside. I also like these because
for darker areas, they don't really shaded there, kinda playing with lines. So if you put lots of lines
really close together, it looks like it's kinda shaded, but I didn't shade. But if I space them out, it looks a little lighter
than the darker area, right? So some things you can try. I wanted to show this
one because this one has lots of value changes. Dark areas, light areas,
areas in between. This is the one that
I made the other day. So you can kinda see the shapes
and stuff that came out. At the end of the
day. You can decide what you want yours
to look like. If you want to space
them out the way I didn't put one on each side. You can do that if you'd like. You can see I put the little
label right in the middle. So today I might do
something similar, but I might want to change
up where the label goes, and then I'm going to change up what material I use as well. So for this one I just use
pencil and coloured pencil. I want you to figure out
what your space looks like. So an example is
you can have them kinda the way it
is my sketch here, where there's like
two on each side and then there's a
label in the middle. So I put like a
rectangle for the label. You can do two on each side, but maybe the labels on the top. Maybe you put them
both on the side. But then you have some writing
about something on there. So you can decide which
way you want to have it. I just want you to make
sure you know what it looks like or what your plan
is when you start. For me, I think I'm gonna
put it in the middle, right? I'm going to have
a label somewhere. Okay, So just as a sketch, I'm going to keep
one on both sides and pretend this is my Flower. We're going to draw
the flowers together. So I don't want to really
draw too much detail in them. They just want to figure
out if you want to add any other details in there. So maybe you want to have
some writing at the bottom. Just to reminder, even if we're using different
materials today, I would recommend
starting in pencil, because if you do make
any mistakes or you want to change something
up, you can erase it. Once you've finished
base sketch, you can go over it with
different materials. So please start with pencil. So this is my good
Copy Sheet here. We're now what I'm
gonna do is I'm just going to split it
down the middle. So you can use a ruler
for this if you want, but you don't have
to, because remember, these are gonna be erased later. I'm just going to go a little
bit darker so you can see. But since I'm erasing these, I don't wanna go too dark. I'm going to show it zoomed in picture of one of
our references here. Is there any shapes that you do see in here
where you're like, Oh, I can see if I was
going to break it down. So there's a circle in
the middle for sure. I want both of my Flowers
to face the middle. And what that does for
the eyes are like when people see it as it keeps
their eyes on the sheet, you're just going
to find the middle or that circle first. Remember you want
a good amount of space to put your Flowers. So if this is the middle, like the middle going this way, I'm gonna put that
dot a little bit close to the middle, okay? So that circle, so
somewhere in here, I'm just gonna do
a little circle. I'm going to keep it
small and light for now. It looks like an oval. I can go a little bit
lower actually because I wanted to make sure my
petals have enough space. None and erase the first circle. So this is like the middle. I'll add some details later. So I'm going to find
the easy petals first. The two on the top
that are like more U-shaped are gonna be the easier ones because you
can see all of it, right? The other two on the back are
a little bit harder to see Because they're
underneath the top two. So those ones we'll do later, the ones on top will do first. So the first thing I'm gonna do is I'm actually
just going to find a U-shape from one of the
petals that top pedal. And it is going to
touch this circle. So when you're ready,
if you'd like, just keep it really light. You'll see when it gets to
the circle, I don't go over. If you go over it, you'll
just erase it later. Solaris that later. And then what's
nice about trying these petals today is
there's a very neat, interesting line
that goes up top. So there's almost
like a wavy line. I usually the top of the petals. If you look at the circle here, I point to the top middle. I'm going to leave a big
curve somewhere there. Okay, so just as reminder,
if this is the you, this is the middle
circle from the middle, I'm going to point out
somewhere in here. I'm just going to
make a big curve. And then basically
all the curves that attach or bumpy little curves. That's like the little
pattern I would follow. These salts can be like
half circle bumps. But I've got a pedal. You are going to
explore different kinds of lines States I would recommend making some
decline something lines. I'm going to do that once
this is close to them, I'll just go a little bit
bigger just so I can help them. I space. If you need to do that, you can. But the next shape I'm
going to look for is that other easy pedal, that other petal. It's almost like this U-shaped. Yes. I'm going to make it
like an oval to start. So instead of making a U-shape, we're going to make
an oval shape. Okay? Because we're looking at
it kinda facing upward. This oval shapes are already
going to touch the circle. But make it really
light because remember, we are going to change
it a little bit. Okay? So you'll see me
here, make an oval that's kinda touching
the circle here. You'll see it's like a
long circle or oval. I'm going to attach to the oval, to the circle with a couple of curved ones. You're
gonna see it here. I'm just going to curve
and I'm going to attach. So it's kinda like I'm
building that you. And then because I can kinda see this a little
bit differently, It's kinda curved upwards. I'm still going to
find that wavy line that goes across
the middle here. I'm going to build
it in big wavy line. Start a little bit later if
you'd like, around the edges, I am gonna go a lot lighter because I'm going to
build one that curves in just a little bit to show one that's built-in with a little bit of a
curve on the inside, making them really bumpy and
kinda make a curved line if you'd like, less bumpy. And then you'll just build in a wavy line on the
inside, on the edge. So take a look here,
if you're curious, I'm going to build a bumpy
line. Come back out. That makes it looks like it's
curved in just a little. And then remember our oval, you can kind of erase
the guidelines if you still have some of that
oval showing through. So it's more just to help
find our shape, right? If you guys want to
have more of a curve, you can curve it inside a
little bit if you'd like. If you want to have more
curves, you don't have to. I'm just gonna leave a little
more space in the middle so it's not close together. So I'm gonna do the bottom
one first because we can see more of the bottom
one than the top one. To do the bottom one on
both sides of my flower, I'm just gonna make two
lines that come outward. So anywhere near
the bottom here, it's gonna make line
that comes out. And then another one on the
other side that comes out. And think of its petals, It's
really big petals right? Somewhere. If this is the
middle, it comes out. Someone here is gonna be a big
wavy line or little waves. If you want to make a section
that bends in a little bit, kinda like an a reference photo. You're going to make
the top of a rectangle. Okay, so look here, this is where I want it. I'm making the top of a
rectangle. You guys see it? Hello to my rectangle top. It's like it's a
little bit softer. There's no points. That's going to help
me build in the top of a rectangle, the curve. So if anyone wants
to build a curve in, I'm gonna put it closer
to the right side. Just kinda looking
at our picture. Let's just like the
top of a rectangle. And instead of making
it point to you, I'm just going to
curve it a little bit. It's almost like a bump. If you want to find
the little bumps underneath it comes to
add a little extra line. So same thing on the other side. But instead of
making it this big, make a little bit
smaller and like a wavy line, it comes
to the other side. So for the other side, instead of going
down with the one, I'm just gonna come
up with a line. Now continue like a bumpy line. Are like little
waves all the way. The other pedal that's a little
bigger than I want to go. So I'm just gonna make
it a little smaller. Then as long as you're
going light enough, you can erase any lines that
you don't want to keep. Find what, which direction
you want the stem to go. I'm gonna come straight down to it to curve, to want
to go the other way, I'm going to curve
it like a seed because I want the flower
to face the inside, as I mentioned, from the circle, I can pretend it goes this way. Then I just added gentle,
gentle one occurs. Kinda faces the inside. I'm going to double it up. Strong comeback to
the stem later.
3. Finish Drawing the First Poppy: There's a couple of dark, empty spots near the middle that we're going to fine tune. So you can see there's about
three in this picture here. So it's almost like
a little U-shape. I'm just going to
gently shade that. Just sits a little
darker. I'm going to start to build in the
details in the middle. So just out on your circle, if you're going to
keep that circle, if you want to change
a little bit, you can. You'll notice these
dark areas that I'm colouring Art really
close to the middle, leaving a little bit of space. Most like the pollen, right? If I can pull up our
picture from before. Or like the little dots, 17 little dots there. That's what we're
going to draw next. Okay. So before I draw that end, if you want to add any details, the little circle I'm
just going to colour and a little circle in
the little circle. And I'm just going
to add a short lines that come out from the middle. Kinda reminds me of
like the sections of an orange, right? If you're ready to
start adding circles, you kinda add the little
circles in a giant circle. If that makes sense. I'm shouting little circles and I'm just bringing
it around the edge. So I'm just building
little circles. Try them to go too close
to the middle because he got to draw them
lines that connect them. I'm just trying to populate lots and lots of little circles. Built all these
circles and not a couple more until there's hard, It's hard to find extra spaces. And then when you're
ready you can start to connect them to the middle. Out. Connect them with curved
lines, are straight lines. Let's try to see
they're connecting. Overlap more or less
depending on how you feel. Now I'm going to show
you how to play with line. If you'd like. Chicken make thick
lines, thin lines, It's going to make
your artwork look very interesting if you try to use
different kinds of lines. So before I add any
details to the inside, I'm just going to outline
the important areas. I don't have to
outline everything. But you'll notice like closer
I get to darker spots. I'll give it a little
outline and I I'll just keep outlining the rest in
like different line weights. So may be thinner in some areas that might be thicker
and other areas. If you're unsure what that looks like and you're
kinda hesitant, you like on an open
the leg it just do a thin line all around and you can add some thick ones later. But this will make other
areas pop a little bit, especially the ones
in the background and the ones behind it. It's already pushed away. So if you outline a little
bit of pop, pop lumbar. So if you want to add
short lines that come out kind of like little hairs. Welcome to texture
for different lines. So when you drawn lines, if you're going to try to
resemble this kind of style, you just want to make
sure you're going gently, you're not pressing
too hard because if you do want to change
it, you can erase it. But most of the lines, if you kinda continued to line, they go towards the
middle or the circle. So it's almost like an orange or otherwise kind of face the
middle or like a pumpkin. So if you want to draw
some big ones that are spaced out like near the
top, you can do that. Anything you want
to look darker. You want to bring the lines a
little bit closer together. Okay, so I'll show you a
couple of easier lines. So say I'm drawing towards that circle on this first
petal that we made. I'm just gonna make a couple
that go towards the middle. And you'll see as
it starts to curve, they're kinda going in a
different direction, right? Like they're going
towards the middle. So you'll see the lines don't
always go in one direction. They go in many directions or
they go towards the middle. I have some going on
in the middle there. I'll make some
short ones are ones that are spaced out
near the top here. They still technically
go towards the middle, right there, just
further away now. So keep that in mind when you're Creating those lines. If you want to create a
slightly darker area, I'm going to do that
for this back pedal, you see where they overlap? I'm just gonna make
a bunch of short lines that are really close together. This is hatching. If you want to make them
crosshatching where they're overlapping more,
you can try that to. For this one, I'm gonna make the lines come out
just like this. I'm gonna make them a
little bit closer together, so it looks a little bit darker. And I'm gonna make more. You can make them short, long. You can decide. I'm gonna
make it a couple of here. I'm going to try something
the other side now. So I'm gonna make some that
are really close together. Maybe it looks a
little bit darker. And I'll add just a couple
of loose leaf near the top. So if you're finding that you're losing some of the details, you might want to
try some thick lines to separate the petals from him losing some
of the details because they're kind of joining
together a little bit. Back pedal on the front petal. I've tried different
lines, make sure they're not all exactly the same. Like what if a robot was making it? They'd
always be the same. Try them in different sizes, space out a little bit. So there's an interesting
line that's on this first petal here
or like a setup lines, it makes almost like a shadow. So to do that, I'm
just gonna make short lines that repeats
towards the bottom, almost like those
drawing stairs. I'm kinda see short lines
that are close together. But I've kinda additive. I'm going to try something
like that in the back here. See what happens. And then near the middle
from the back petals I'm going to make
a lot more lines because I wanted to
look a lot darker. Like make more shadows. So that's kinda how I'm going
to finish up these pedals. Remember that area that I said
was kinda like the top of a rectangle from
there you want to align that gently goes
towards the middle, not a full line, but
one of the corners. Just going to make a short line that's a little bit thicker, that goes towards the middle. So it looks kinda bench. I realized that I
have my flower here, but if lots of above space, some either adjust
a little bit or I can make like some
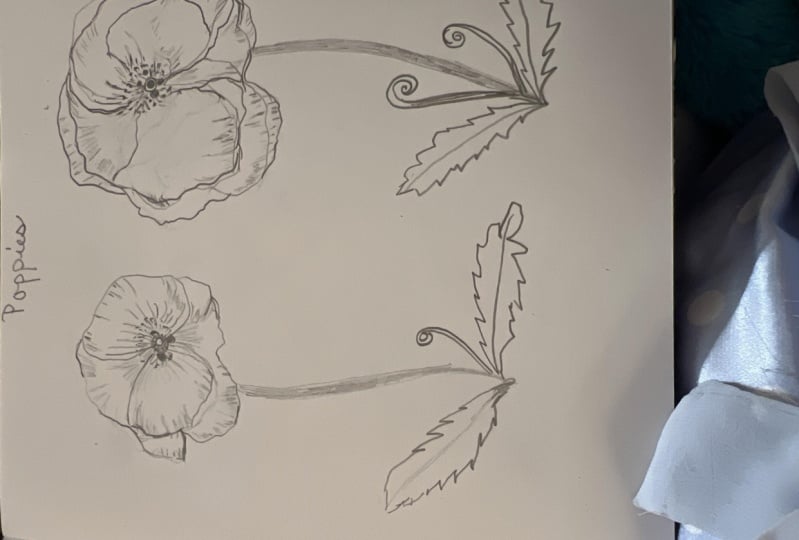
details on top. For the leaf. I'm just going
to change the picture here. There's a couple of
ways you can do leaves. You can draw the little line in the middle and then build
the outside shapes. So it's almost like pokey
triangles on the outside. So I'm going to have
a couple of leaves. I think I'm going to do
one, so I'm just going to draw the line for them first. If that's like the middle line, do another one that maybe
comes down a little bit too. Then maybe another 13. I have three little leaves. You want to have
the little bulbs of the flowers that
haven't opened up yet. You can do that too. But for the plants themselves,
once you have this, I'm just going to
build up a triangle up top, a thin triangle. It's not to be perfect. In trying laptop. If you want to make one of them a
bulb or like the oval shape. And I'm going to leave
one that's like an oval. And then for any of the sides of the leaves are almost
like little triangles. You can build the top
of a triangle here. Top of a triangle here, as it gets closer to the bottom, that can be a little bit
smaller if you want. Almost reminds me of like performance of a
dinosaur battle or not. The horns like the back of, it looks like the back of a
Stegosaurus, those triangles. I'm just building a couple.
And then basically once you build a couple of you can
kinda connect them, right? So connected, you can elect them with little
triangles to if you feel like you don't
have enough space and they don't
connect really well. Just add triangles. And then just because these are, the leaves are still important. So you want to make sure
you outline them or add a little bit of detail you the way you did for the flower. I'm just going to outline
them a little bit. There's still important. You can add some lines
that come out from the middle towards the
triangles if you'd like. Basically one. Just like the flower. I'm just going to
add some short lines to add just slightly
darker areas. If you want to add
lighter areas, you can make lines that
are separated a bit more. Do the bulb or like
the circle parts. The circle part, I'm just going to add a couple of short lines. The edges look a
little bit darker and it looks like some
of them have like almost like the top of an acorn. Were they like open up. So I just added a line. I'm going to keep this
as a pencil sketch. This is my steady
part of my study. And then I'm going to try
some different materials, Experiment with some different materials for my second one. Also, this middle
line has helped. It's done its purpose
if you want to start erasing it or if you have
a line beside it, you can
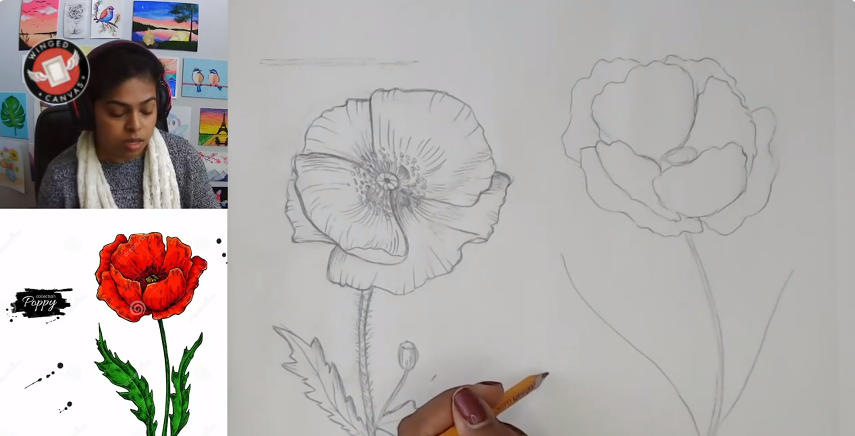
4. Drawing the Second Poppy: We're going to
start the same way. We're just going to find
the circle in the middle. So I'm going to draw them
out a similar height or maybe like a
little bit higher. So somewhere here, go the other side, try
to love the higher. Maybe like here. And
still an oval shape. I'm going to start
the next U-shaped. So the big difference
between this one, this one is the U-shaped, actually looks like a U
that's facing upward. So I'm gonna make a you
that faces upward here. I'm keeping it light to start. I don't know where I'm
going to change things. I'm going to adjust
things a little bit. I think I can make
it a little wider though and make it
like a wide U-shaped. Keep it light. And then just like before, if you want to find
some bends in the top, just bending it a little bit on the sides a little
bit if you'd like. And then you've got a pedal. And remember, you
might want to draw with a different medium
for the next one. So I'm going to still
start this in pencil. I'm going to probably make
this one in coloured. So I'm gonna make the
next petal that I can see that's a little
bit easier to see, the one that's right
across from it. So it's also a U-shape, but instead of the you
touching the circle view goes off the bottom and the
top touches the circle. I'm gonna make another U-shape. And the top, whatever
wavy line, um, here, it's going to
touch that circle. If you feel like it's two
odd, you can squish it more. So it's kinda like the
oval where it's like a squishy oval versus
like a U-shaped pedal. And then the other two
petals are actually like the ones we did first. This one at the back
should be easier where you just find the edges
and then the wavy line, the one at the bottom, it's kinda like the oval. And then you disconnect,
connect one pedal on this side, what I'm gonna do
is I'm just gonna make a gentle and that comes up, it kinda follows the side
of this first petal. Kinda comes up a little bit, comes out, a little
bumpy light comes out. I'm going to stop a little
bit behind this petal here. I'm just gonna make
a straight line. They can overlap a little
bit. If you'd like, social, you write erase it. Diagonal line of
the triangle kind of goes where there's in-between space here. They almost line up. And instead of making a
straight line for this edge, I'm just going to curve
it a little because that's going to help me
with the pedal shape. Basically what you do is if
you want this to Overlap, then you can Overlap. Last one. I'm gonna make it
go under though. And then instead of keeping
a straight line on top, you can make it a bumpy light. So that's pretty much it. I built some of the
ones on the inside, just like this flower. There's a couple of
petals on the outside. So if you want to
build a couple of wavy lines in and
connect them back, you can, I'm going to build
in one of the small petals. So just like this
one on the outside, I'm just gonna make
two short lines. And I'm going to
connect with a big bet. And then little, little
bits, little wavy lines. And do the same thing
again on this side. So you can decide
if how many want, how big you want them to be. Just make sure that a light in case you want to adjust it. And then whenever you're
ready you can find the stem. So it did face this one inward. So I'm also going to
face this one in Word. So it looks like they're
looking at each other. So starting from the
circle, kind of go far. You want to go with that
like a backwards C-shape. If you want to add any text anywhere and you want to start to figure out where that goes. So I did mention I might put
something here at the top. If you need a ruler to draw a
line or something, you can. I'm just going to fit it here. Just as a reminder for myself,
I'm just drawing a line. I'll erase this later. But I want to fit
something there or something in the middle here because I have
lots of space. Or I can fill this with leaves
and light bulbs and stuff. An ad like one leaf shape
that comes up and over. They will draw another one
that comes up and over. And then we're down. Help with my space. So think about what
space you have left, but you've planned for and
then see what you can fill up So I'm just going
down, doesn't I did leave them blank because
I'll put false there. Alright, so I've outlined it, so I'm trying to
decide which one I want to use a different
material with. I might be a little
bit of pen for once and add coloured pencil
somewhere if I'd like. So do you want to
try and layering? I'm going to break out my pen. Whenever you use a
different material that's not erasable, I would test it out
on some scrap paper. So I'm just testing it out on my brainstorming sheet
to make sure it works. It works, which is great. I forgot I didn't do the inside, so I'm just trying moulins,
look on the inside, little circles, little dots to make it different from
the first set of dots. I'm going to color these
ones in this time. So you can see what
they look like. Because yeah, because in
our actual reference photo, if I go back, they're dark. Do you see that? I'm going to make them dark as
well in this one. So the angle I'm looking
at this flower with, I can't see the
ones at the bottom because I puddles covering it. Just remember if you could do have one like that
that yours is covered. I do want to play with
different kinds of lines, so I do have some thick
lines and something lines. I want to try it, but
I'm gonna go in with pen to make sure I can try to
play with that with my pen. I'm just going to
go in with pen. Remember things that you can
erase, just take your time. Take your time. So I'm just going over the edge, all the edges trying some
thick lines and thin lines. If you're not sure,
just outline it first and then you can add
some lines second. Just make sure you're
trying to variety of different lines is showing
values like light, dark areas, slightly lighter,
slightly darker areas. We've built up most of
the shapes together, so that part's already done. And then we kind
of build contrast. So putting two opposite
things together, like really light areas for
really dark areas together. That could be with
colors or could be with black mites or pencil or pen. Basically anything against
a light surface like the paper is going to create
a little bit contrast. I will say near
the middle circle it is a little bit darker. If you want to add
a bit of shadow by crosshatching or hatching, adding some extra
lines together. You can I'm just
going to Overlap, see if I can just get more lines and then I'm going to do
the circles, dark circles. I'm gonna pull a couple of
colors from my poppies. So if anyone does
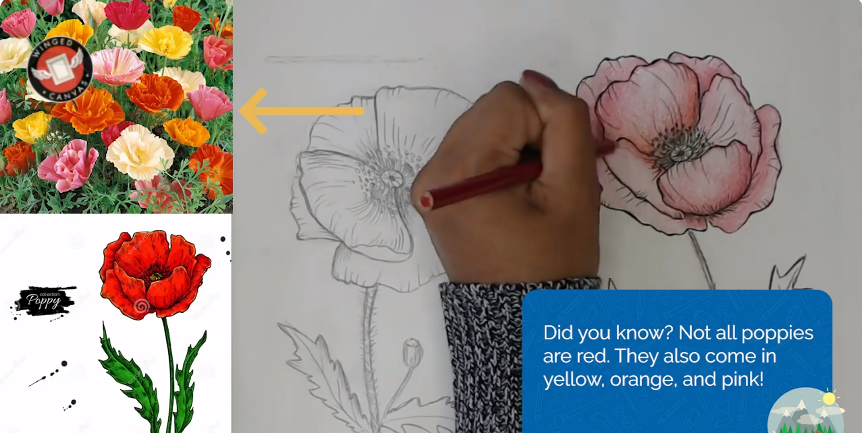
want to work in coloured pencils today in and wanted to try to follow along. I'm going to use red and
like a dark orange. Red. Dark orange, I'm going
use two colors for now. If I want to use a dark
color later, I can, but as I mentioned, I'm
going to outline first. I might just add a couple
lines and just for shadows. But you'll see me start to
outline and then slowly, gently coloured in adding a
little bit of shadow lines, just like I did for
the pencil one. Okay, So just added a couple of extra lines here and there
5. Colouring the Poppy: To make colorful areas, I do have my red. I'm just going to outline,
I think class when I used red, orange, and pink. I'll show you one pedal just
to start and then how to add shadows outlining here. Because this is like old
dry medium over pen. It shouldn't smudge. I'm going to have just
gently colour first. You'll notice I don't
press very hard. I'm just going to go close to the bottom or even
close to the edges. I'm just overlapping. So the more I Overlap, the darker or more vibrant
that value is gonna get. So I'll just do the edge
here so you can see, right, starting to get more vibrant, I'm going to probably
go back and with a pink turning orange, I can even use red. But they'll shut. You'll see how much just
to coloured pencil can do. If you Overlap. I'm just overlapping
and light layers. That's what I would recommend. If and else I'm
just going over it with red and then
I'll add a bit of extra value wherever
I haven't left. And then because this
is my coloured version, I'll probably coloured
leaves and as well. I didn't write my
word Poppy down. So that's something
I will write down. But it's POP PUI. Or if you put poppies like
plural, it's PLP BICS. The flower petals that are
furthest to the outside, I'm just making them
a little darker. So it looks like they're
far away from the late that have more shadows going on. Closer to the middle. I'm going to add, I'm
still going to add layers, add more of the orange and
the, It's more vibrant. Usually when I'm
creating shadows, I won't layer with black. Maybe here in there if
it's like really dark, I'll just use a similar color to whatever color I'm using. Slightly dark red or
purple is kinda similar. Meaning go to blue, but it will create
a lot of contrast, which might be okay because
we wanted contrast today. Learn some of the red. I'm just gonna go in
and layer some of the orangey areas that I've already added
into one of them. The other areas and believes I'm gonna go
and green and a darker. You can take what the steps outlined So many, is it a
different screen to overlap some of
the darker areas, kinda like a different flower. As I mentioned before, I need
to rent the word poppies. I've accidentally smudged using the side of my hand on my paper. So I'm just going to erase some pencil smudging is
I've accidentally done here discussing the
wide side of my eraser, but trying to be gentle in
case I accidentally smudge more than I'm using the
short side or control here. Okay, I think I'm
gonna do my Poppy, the word like a cursive. If you want to add any
labels to your artwork, you can as well as
sometimes studies will have that to show different parts of the Poppy or different
parts of the plant. Whatever we're drawing here. I'm just gonna go on
with my pencil case. I change anything or want
to just gonna go cursive, I'm stringing it gentle P, the P will be separate. Usually cursive,
they're all connected. I'm gonna write the word
poppies because there's more than one Facebook
Poppy, even if you did too, if you'd like poppies. And then for the ion is going
to put those poppies there. I'm gonna erase the
guideline that I made. Alright, there you go. This
is my Poppy from today, are my poppies from today. Some of the biggest things we focused on when we were building our poppies is thinking
about the shapes we built together to make them. Thinking about the spaces we use to compose where
everything went, different kinds of lines, different kinds of values, slightly darker areas,
lighter areas, and contrast. So light areas compared to dark areas are putting things that are very
different together. Like I'm very colorful piece
on a white background. Or even write performance
when it was in its pencil and pen stage versus the background was also a little
bit of contrast. I hope you have been, this
one's a fund one to try to experiment with different
ways to shade into colour. So hopefully you
had a good time. Thanks so much for joining
and we'll see you soon. Bye
 Winged Canvas, Classes for Art Nerds