Transcripts
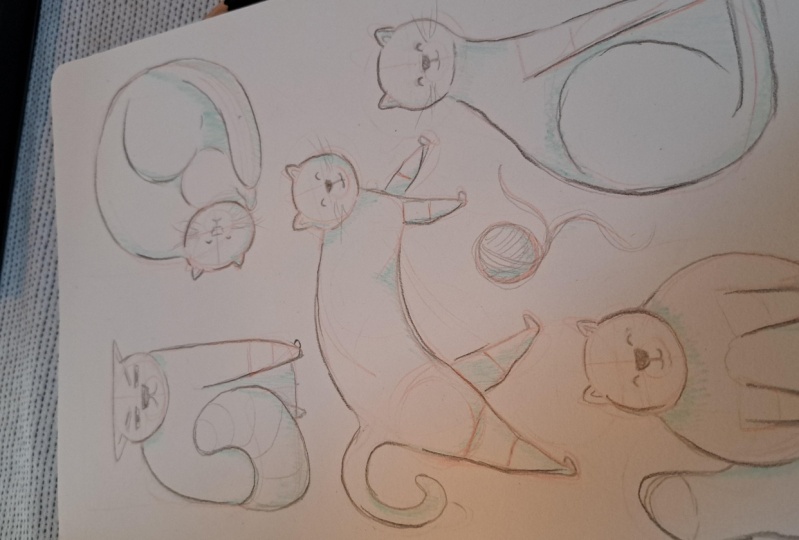
1. Introduction & Brainstorming the Animals: When I get to do
some animal poses, we're gonna get to draw them in different ways so you can look at the shapes
that we're using. We're going to plan
out your space a little bit on your artwork. But before we start,
I'm going to show you some examples and some
other things we'll need. We're going to need two
sheets of paper today. So I'm going to use this as my planning paper or my scrap paper, my
brainstorming paper. And then just the
next sheet I'm going to use as my final piece. So with that, I also have
my pencil sharpener. Make sure you also have an
eraser to go with that. And I'm gonna be using
colored pencils today. Optional everybody, if
you would like to use pen or marker at the very end, you can use those if you want to test them out on your
brainstorming sheet, you can do that as well. Basically what you're
gonna do is you're gonna get to choose
an animal today. You're going to draw them
in different positions. So if you want to make
them more stylized, you can buy more
cartoony, I guess, right? Or if you want to make them
more realistic, you can, but whichever way you go, you want to make sure you're
looking for the shapes. So e.g. would you
say this one is more cartoony or would you say
this one's more realistic? And this one looks a little more realistic the way you
can kinda tell us. There's lots more
shapes in there. You can see that there's lots of different first sections
that are added in. You can go a little bit more
like this if you'd like. You don't have to, you can
start off with the shapes together and add some
fun faces on there. But what I like about
this is you can see different ways that the
animal moves, right? So you might want to have
one that's like sitting. You can have one that's
like walking if you want. There's a couple of shapes
there. What about this one? Do you think this one
is more stylized or do you think this
is more realistic? This one's more
stylized, more cartoony. This one has lots of fun shapes
and stuff as well, right? All the faces tell
you different things. This one looks really happy. This one looks really happy. This one in the middle here, it looks kinda confused. This one looks really angry. But no matter what
you decide to do, you're thinking
about all the shapes that are brought
together, right? So for this one that
just looks like a giant oval and you've
added an extra face odd to, even though they're more
cartoony or stylized. There's like big ones, they're small ones, they're
doing different things. They're standing there sitting. So if you want to go
this way where you have something that's more
stylized remark cartoony, might just want to think about what your positions
are going to be. What kind of positions
would you like? So I have sitting, walking, you can make some that
are more emotion based, so like angry or grumpy. But you want to
come up with five, you might not use all five. I might do about three
to five altogether, depending if I go
realistic or stylized. So thinking about how your
position is going to be, what your animal might be. So, so far we saw
a couple of cats. I'm going to show
a couple of warm with different animals as well. This one I thought
was kinda funny. This one also has a
lot more animals, so just keep in mind, you don't have to do this many. But I liked this one because
this one is also stylized, has lots of fun stuff going on. There are some really tall dog. You can make it really
silly too, if you'd like. If you see there's one
in the middle that has its mouth really wide open. So if you want, you
could think about what kind of animals
you'd like to do, what kind of facial expressions
you'd like to have. Preferably you have
the full body. So just keep that in mind.
This one's kind of fun. This is a little more
realistic as well. But hopefully you can see the shapes so everyone
see what I want. I'm talking about when I
say shapes like the head. You've seen like the back of the body and how they connect. This one has a fox also reminds
me a little bit of a dog, like they have similar shapes
if you want it to do a fox. Usually a fox is a little bit longer or different in color, but sometimes in the wild, they might look really
similar to dogs. Even coyotes look
very similar to dogs. So if you wanted to do
one that's a little more cartoony, you
can do this as well. Keep in mind everybody does. Everyone see all
those sketch lines that are in a different color. So that's kinda what
we're gonna do. Two, I'm going to sketch in
our animal using shapes. You'll kind of outline
them using some lines. And then if you want to
erase the inside, you can. I'm going to keep most of
my inside lines though, so you can see them in cartoons or an animated
movies and stuff. A lot of times when they do
the sketch of the animal, they'll do it in a
different color. So e.g. in this one, the sketch
of the animals done in like red or orange, a different color, right? By doing that, they can kind of outline it and erase
the stuff later. What I will say
though is sometimes pencil crayons or
colored pencils, unless they're like erasable
and they're meant to be erased or not the easiest to erase so much
You're going really lightly. So you can stick to using
pencil if you'd like, if you want to use a
light color instead to block in some of your shapes,
you can do that as well. If you're going light enough, you should be able
to erase it though. And then if you want
to outline later, what I would like you to do before we jump in
and get started is I just want you to think about five ways you might want
to have your animal. What you can do for now
is you want to think about what way that
might be looking, right? So if I had a sitting cat, I'm just drawing it using shapes because I'm not going
to find the whole thing. Then maybe my, my animals,
it's kinda like this, almost like a almost
like a snow person. Usually when animals
are walking, they have a longer
leaning body, right? So they kinda connect. Don't worry too much about
how we'll look for now. We'll draw them in together. If you want to go
more stylized are angry and you want to try
them like this, you can. So if I go for one that's
kinda like this one. It's more of like
a rectangle and then like a circle
and then the ears. Right? So think about what shapes
are faces you'd like to have. I also really liked the one
where it's kinda sleeping. If you see in the top
corner it's a couple. If you want to do a dog, you can also do a dog. One thing you do
have to think about though at the end everybody is, do you see how everyone, or all the sketches
that I showed so far, they use this space really well, even though there's
spaces leftover, they've put them in
different positions. So I'll give you a good example. If this does
everyone see the cat here that's coming down, like that's a really
interesting position. I don't know if that would fit. If I put it in the corner, it would leave a lot
of extra space, right? If you want to have an animal doing something a little
different, you can. But what we'll do is we'll come up with all of our positions, kind of arrange them on a sheet, see how we like it, and then we'll try
it on our good copy. Do also like the stuff
that's kinda reaching up to maybe like one of my
animals would be two circles. So I'm just thinking of the
animal in circles right now. And then if you want
to draw little circles for pause and stuff,
you could do that. But right now I have one
that's sitting, standing, I guess angry or this
one was sleeping. And then I have reaching five. If you're doing a different
animal, that's totally cool. Same idea. A parent is great because the
shapes are a circle, an oval, and a triangle. So if anyone wants
to do a circle, a little triangle, circle, oval. Let me do one for
an owl real quick. So I was a little bit
similar, only big difference, the heads a lot bigger or overly kinda like
U-shaped, right? Oval or circle shaped, U-shaped. And then you might
have the tail, and then you might have
your feet and stuff. Obviously the wings and
stuff for both the parent and the owl or more
triangle based. When they're open. That I still have the oval and oval and then feet or something. Scratch piece of
paper you just want to decide or you
worked in a side to side or up and down. I usually like to
work side to side, just gives me more
whitespace this way. But come up with where your animal positions
are going to be. How are you going to
balance it in your space? Once you've figured out
where everything goes, if they fit well together, then we can switch
over to our good copy. Probably going to stick to doing like a fox or a
cat or something. They'll simplify the
shapes or the face a little bit just so we can
focus on the shapes and stuff. But when we're drawing, we're
going to figure out really are shapes that we're working
with to build our animal. You notice almost all
of these pictures. You can kinda see the
shapes on the inside. And that's just show you
how to build your animal. Basically, these are different
ways you can build a cat, different ways you
can build a dog. Just start with the
shapes first though, because there are a lot
easier to see here. So when you're ready to see how you might want
to have an animal range in your rough copy sheet on just a little scrap sheet of paper like a scrap
rectangle here. I do like the idea
of a sleeping cat. So say I did like sleeping
cat in the corner. Look ahead. I'm just doing shapes, right? Body had body hair, body had sleeping cats. Maybe I have like
sitting cat here. I don't know if I want
to do exactly the same angry cat might have like standing cat's
where it's not moving. Maybe I have like walking cat, like I have reaching cat here. So it fits this weird space a little bit better
because I have a little bit of space here. And then I have a fifth space. So just also kinda weird. Let me see if I can have like a walking cat going this way. Or I can have like
a standing cat or like a jumping cat or like a, like a cat that's flying if
I want to go really silly. But do you see how most
of my space is resolved? I have some weird spaces
that are leftover, but I can move my animals a little bit to fit a
little bit better. I want to try a
different arrangement. You can try a different
sketch for it. Maybe it did like sleeping
cat on the other side. You'll also notice everybody. What I'm going to
try my best to do is have all the heads
face the middle. So if I did a little
star in the middle, does anyone know why I want
all the heads to kinda go close to the middle or
like lean towards the middle. We'll look at the middle. If you have your head kinda
close to the middle or like they're facing in different directions towards the middle. It makes the person
want to stay on the page and look at the stuff. So see if you can find
the shapes for it. If you're not too
sure what to do, you can also follow along
with me if you'd like to do. Don't worry too much
about the details. Okay guys, I know sometimes
the animal drawing, even people join can
be intimidating. What we're really
focusing on right now It's just see if you
can find the shapes, then you can build details
later. It's not a big deal.
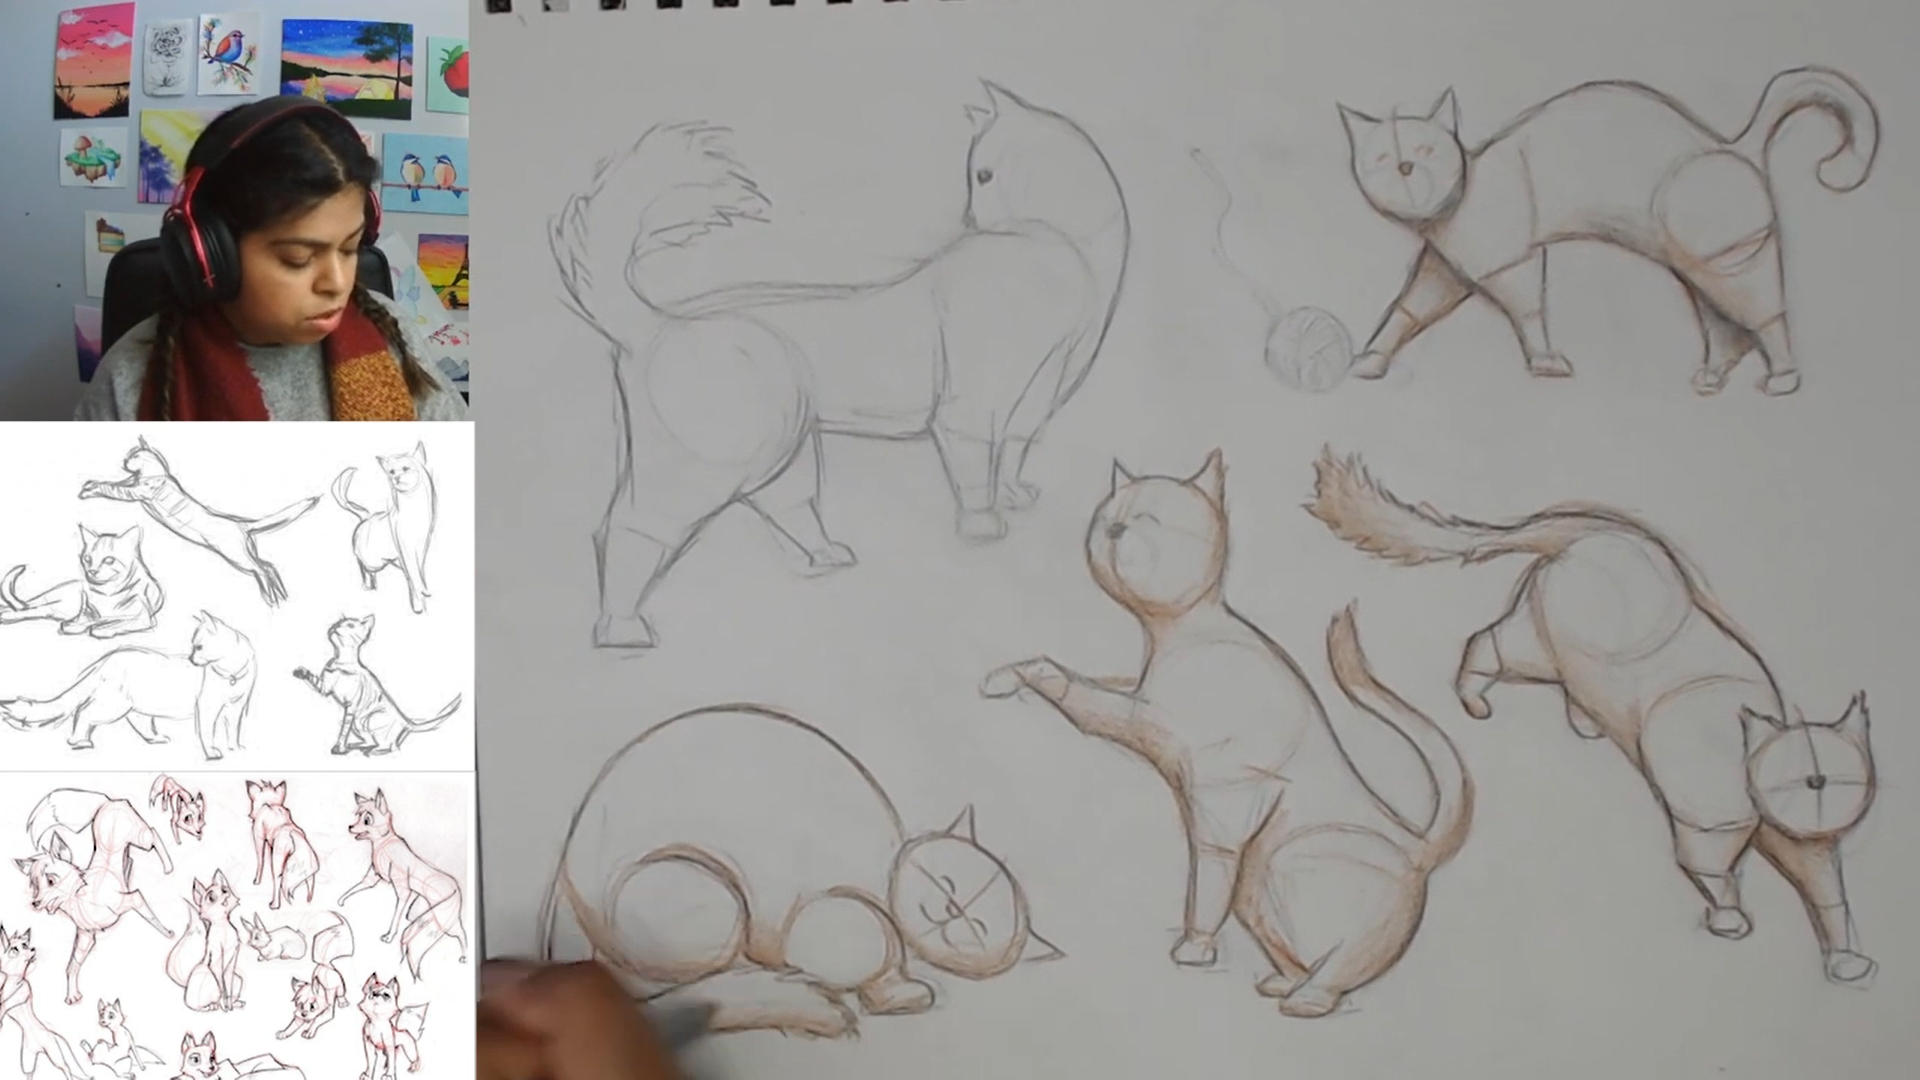
2. Drawing the Animals: This is my good
coffee sheet, right? So the first thing I do
is just take a look at your sheet and we're
breaking it down by shapes. So you might just want to
figure out where your circles, your different parts
of your Anwar. So if I'm going to go like this, I would say cats and dogs are similar or even foxes are
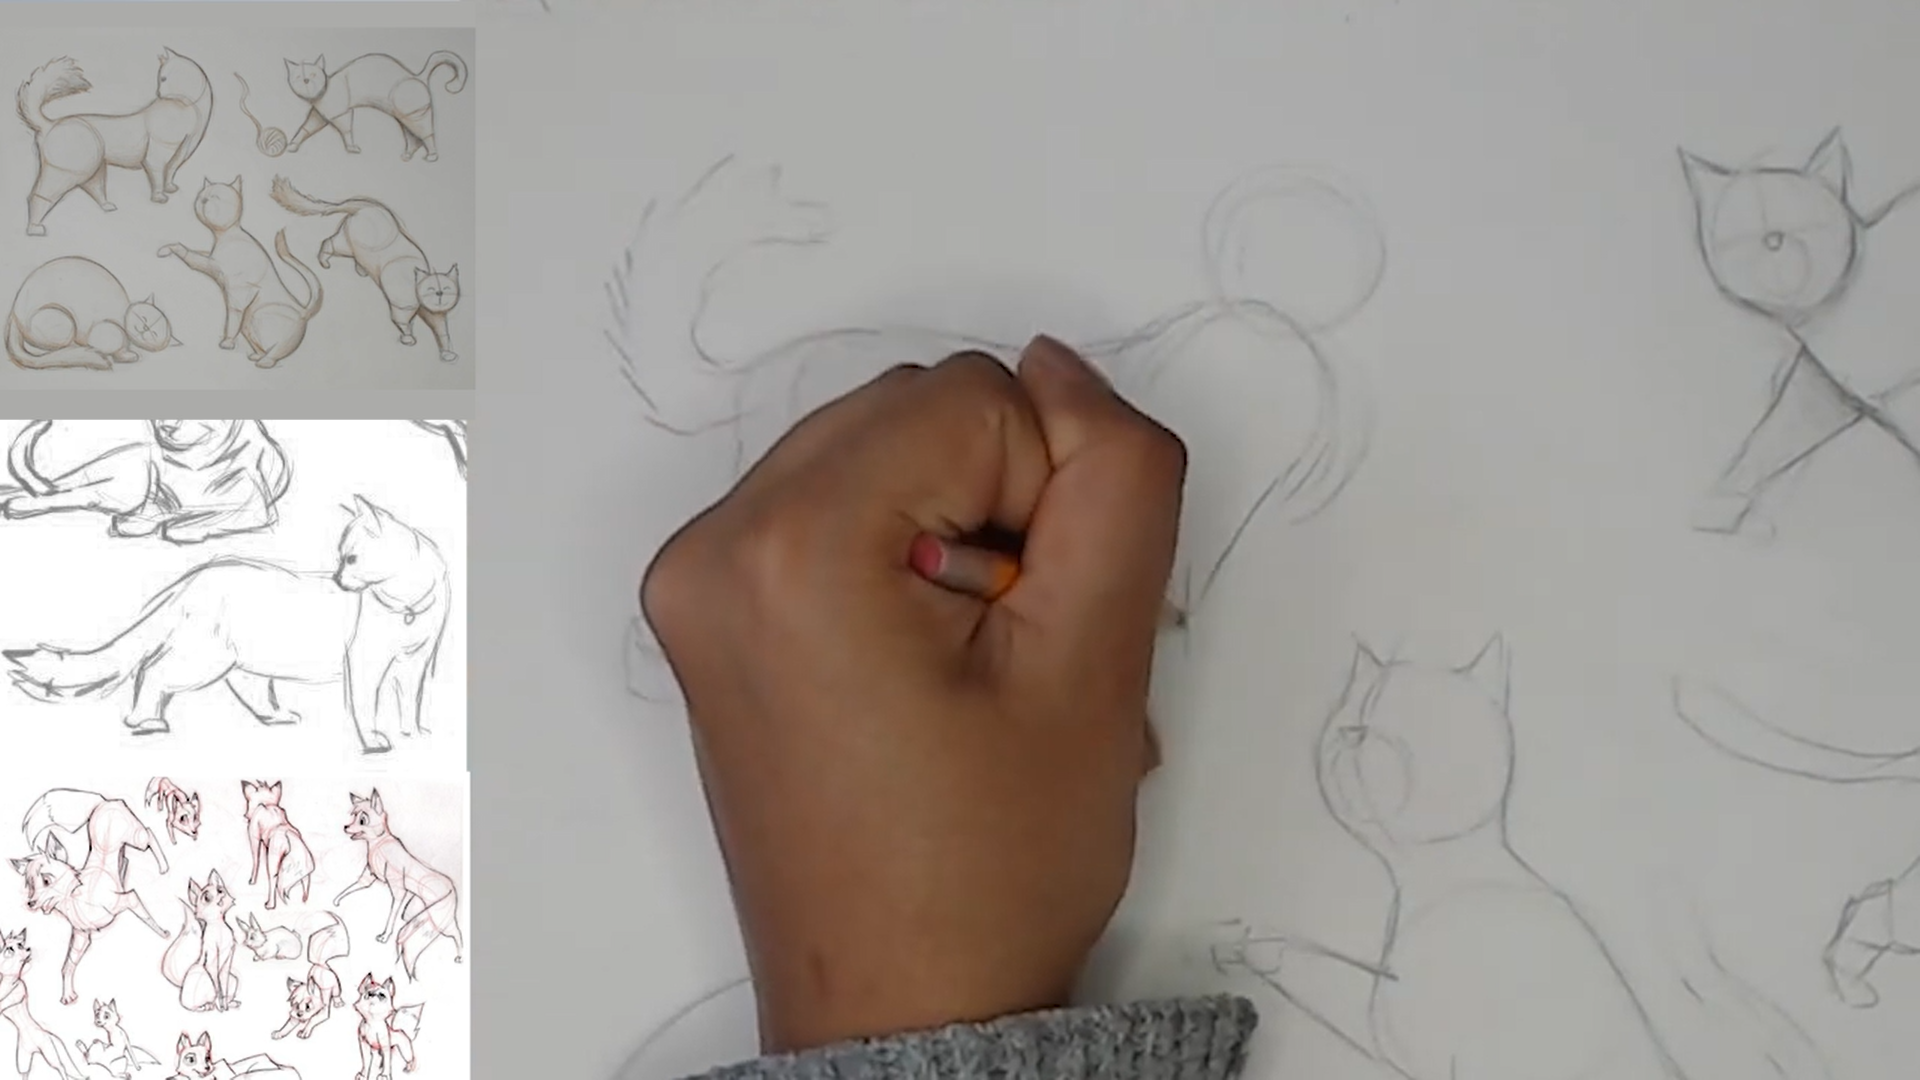
just a little bit bigger, just similar in their shapes. I'm just going to start off with circle shapes for the head, the body, that kind of stuff. I would go lightly as well, just to find them, I will
use my hand as a reference. Does everyone see how I'm using my whole hand just to figure out how much
space I have, right? So if I draw all of my
animals really tiny, it's gonna be hard
for me to figure out how to use that
space really well. So I do want to make sure
that when I'm drawing, I'm not drawing them too small. I'm kinda going in
and making sure that the spaces are used very well. I think on my sketch
that I had written down, I had one that was standing. I have sitting. I have
some that are angry, some that are walking. So I'm gonna see
if I can get those back into my drawing
while I'm going. If anyone does want
to follow this, you can definitely do that, but I'm just finding the shapes. So now I'm doing five. They said one was kind
of going in this corner. I'm just going to block off
the areas a little bit. If you want to do that
and then erase it later, you can just looking at
my brainstorming sheet, I had one that was kinda
standing in this corner. I had one that was
sleeping in the bottom. I think I had one
that was sitting. So I don't want sleeping.
I had one sitting. So this one might cut it into my walking one a little bit. And then I have one
that was reaching, I think in this space
that I have left. So you can go and see a
blocked out my spaces just so I can kind of
figure out where things go. If you want, you can kind of figure out what your space is. Go figure out what your
shapes are going to be. So I'm gonna do one that's
kinda walking first. So I'm just going
to do like a head in front of them that's curious, I'm just gonna go with a cat, just keep it pretty simple. Some students circle head. I'm going to keep the
shapes pretty simple. Just to start, the body
is going to kinda come over and do like the back of the bodies near the
bottom of the tail. But I think that
you'd move my head is kind of close to the edge, but I'm just finding
the shapes so far. Don't worry too much
about the final product. We can connect things later. But with almost
everything that you draw, usually you'll try to draw
with those space shapes first. Even if it's something where you kind of
know how to draw it, usually those shapes help figure out what
you're working with. So say like That's my head. I'll show the picture
that I'm looking at as a reference right now
if I could find it. This one, if you guys see it. If the one when the body
goes up a little bit, socially want to do What might
that you can kind of see the body shaped up and over. Say go like that. So I'm
just finding the shapes. Not too worried yet. Unlike the tail goes somewhere here and then arms and legs, I can bring it back later. But I do realize the bottom of my right underneath
my head I'm missing. So I'm just going to bring
the head up a little bit. Missing like the chest part. E.g. if this is the
head that makes more sense, it's
underneath the head. I have like a little delicate
little U-shaped fact, the chest area and
it comes back. And then for the arms and legs, I'm just gonna do
triangle shapes for now. Draw a little pause and
stuff later to triangles. Triangles and then I can find the other stuff later, right? You want to draw the
ears and I'm sure yours. Hopefully you can see that I'm still going to keep
it pretty light. You can see the head, body, tail, even side
what's going on? Legs, arms. If you want to draw
a little fingers are not fingers to pause. I'm seeing Vogels from that. So that's like one
almost looks like it's standing and staring at
us with just kinda funny. If you want it more
of a living animal, then you can also have the feet doing
different things, e.g. maybe it's going
this way anymore. So then maybe this one's going like this
versus like straight. What I want you to just
focus on everyone's just see if you can get
one animal for now. See you can get one
animal. Figure out what you're gonna
do, your first one. Also everybody,
just keep in mind, you might want to
make sure that you're drawing different
lines as well, right? So you have curved lines
declines than lines, bold lines and stuff. So if you want to take
your animal, e.g. like if this one is the
one that I'm doing, I can take this animal and I can just start to keep the
lines. I want to keep it. I'm just going to go
over them a little bit. I can make it a
little bit older. I'm not pressing
too much harder. Or we can use a different
material or like use colors to keep the
old ones that you have. You can outline
them a little bit. Also want to keep
the shapes that you have to say I'm going like this. Keep that one. So it looks like this cat
is kinda looking at us. So if you want to
start outlining it, but keeping some of the
shapes that you cough, you can do that as well. If you want to add
some more fun details, this is a great part, but you can think about shading and other son has some
shaded areas as well, but you can come back and think about that later if you'd like. For the arms are like the yeah. The arms and legs of
actually for the cat, dog, fox Even it's
almost like a triangle. I did mention that before, but it's kinda like a
trapezoid and a rectangle, like an upside down
trapezoid shape. Rectangle. And then Paul. So how you want to be like half circle
or a rectangle shape. So if you want to
try those, who can. I've got trapezoid
rectangle pod. You can try that for
a dog to remember the back legs, just like humans. You think about
yourself, your arms are like tinier or
smaller than your legs, right? So similar situation. Your arms are not
gonna be as big or like muscular as your legs. Sometimes they are,
sometimes they aren't. Just depends on the way
your body is built. But if I'm doing the
same thing at the back, that back trapezoids usually
a little bit bigger. Select that backdrop. So it's kinda like that, right?
It's a little bit bigger. I'm decide what that looks
like. Try out the shapes. Maybe you have a
smaller angle there. Many have like maybe once disappeared behind the other so we can't see all of it. I think I have to
bring the circle are like the thumb a little bit higher because it overlaps with my tribe. So a little bit. Just figuring out
the proportions. The tail, I might
change up a little bit, but you can see I have
most of my body and now, right, so maybe I want to
change the tail a little bit. So instead of having
a curve over, I'm talking to curve
in a little bit. Fancier. Also because
I'm going light enough, I'm able to erase
some of these things. So just keep flowing lines
light for now and then you can always change them up once you know which lines are keeping. But you don't have to erase all of the insight shapes as well. Keep it like that for now, I might end up doing is like
doing like a trapezoid nose. And then I might fit some
eyes and afterwards, maybe like the mouth has like a little circle where
everything sits. And then I can fit in something after I'm going to
do the next one. To chronicle of the bigger,
a little bit smaller. You can anyone wants to
follow the one that's kinda leaping here or like
sitting and reaching. I think that's the one
I'm going to do next in this extra space that I have. Remember how I mentioned that I might have to make my
sleeping cat a little bit smaller just so I can fit
this space is that I want. But what I'm gonna
do for this sit in cat isn't gonna do head. And then you can see
that the chest and unlike the bottom of the
legs, are also circular. So I'm going to have the
head somewhere here just so it fits right head. I can even move it a
little bit if I want to see if you can start filling
after spaces basically. So go really lightly.
There we are. We're, that is a
little bit better. So I've got a circle
and then the rest of the body is similar
where it's like circle. So the bigger I am running
short on space here. So I'm just going to draw
the sitting body frame here. I think I have to
go higher because it's coming off the page. You'll see that the heads
a little bit closer. I just made it a
little bit smaller. I might have to go bigger
though. It's really tiny. If I want the cat to face
the inside than the face, that curve might be like here. Alright, they stay that way. For this one, it's pretty
much a T across the middle. I'm going to keep this
pretty simple so you don't have to draw these
in. It's up to you. But if you're drawing along
with my head and body here, just like our sketch here, I'm just going to start
to connect dates. So that gives a
little bit thinner. I'm still going lightly until I know I want to keep
these shapes right? So I'm going to go down a tail
that goes somewhere here. And so to fit my sit in
cat and my reaching cat, I'm just going to have my tail come up a
little bit higher. So thinking about how
you're using your spaces, don't worry too much about the details yet.
Just connecting. Everyone see in
connecting so far, the chest area and
then it come down. Like lot of stuff leftover. So if I want my hand to reach kinda like the one we see here. Kinda draw it. Same idea, trapezoid rectangle
or a triangle. Long as there's no
point at the end and kinda see it, right? Rectangle or trapezoid
rectangle and then Paul, and then for the legs, you can do the same thing. You can do, absolute rectangle. This one looks
like it's sitting, so the trapezoid and the circle might overlap a little bit. Rectangle. And then Paul, the other arm, looks
like it's coming up, what it looks like
it's coming down. So if this one is longer, this one looks kinda sharp. So I might make this one a
little bit longer as well. Make sure that just kinda match up and the other leg kind of disappears into the background since we've drawn
extra Paul here. Right now the bottom of the
body looks kind of small, like it looks really tiny. I'm just gonna make
sure that I can fit the bottom area there. And then if you want,
you can fit like yours in a little bit higher. If anything looks too
big or too small. This is where you adjusted e.g. I. Have my cat here.
My body looks okay. My head is a little big, so if I want to go a
little bit smaller, I can. You don't have to change
them too much though. You're just finding that shapes.
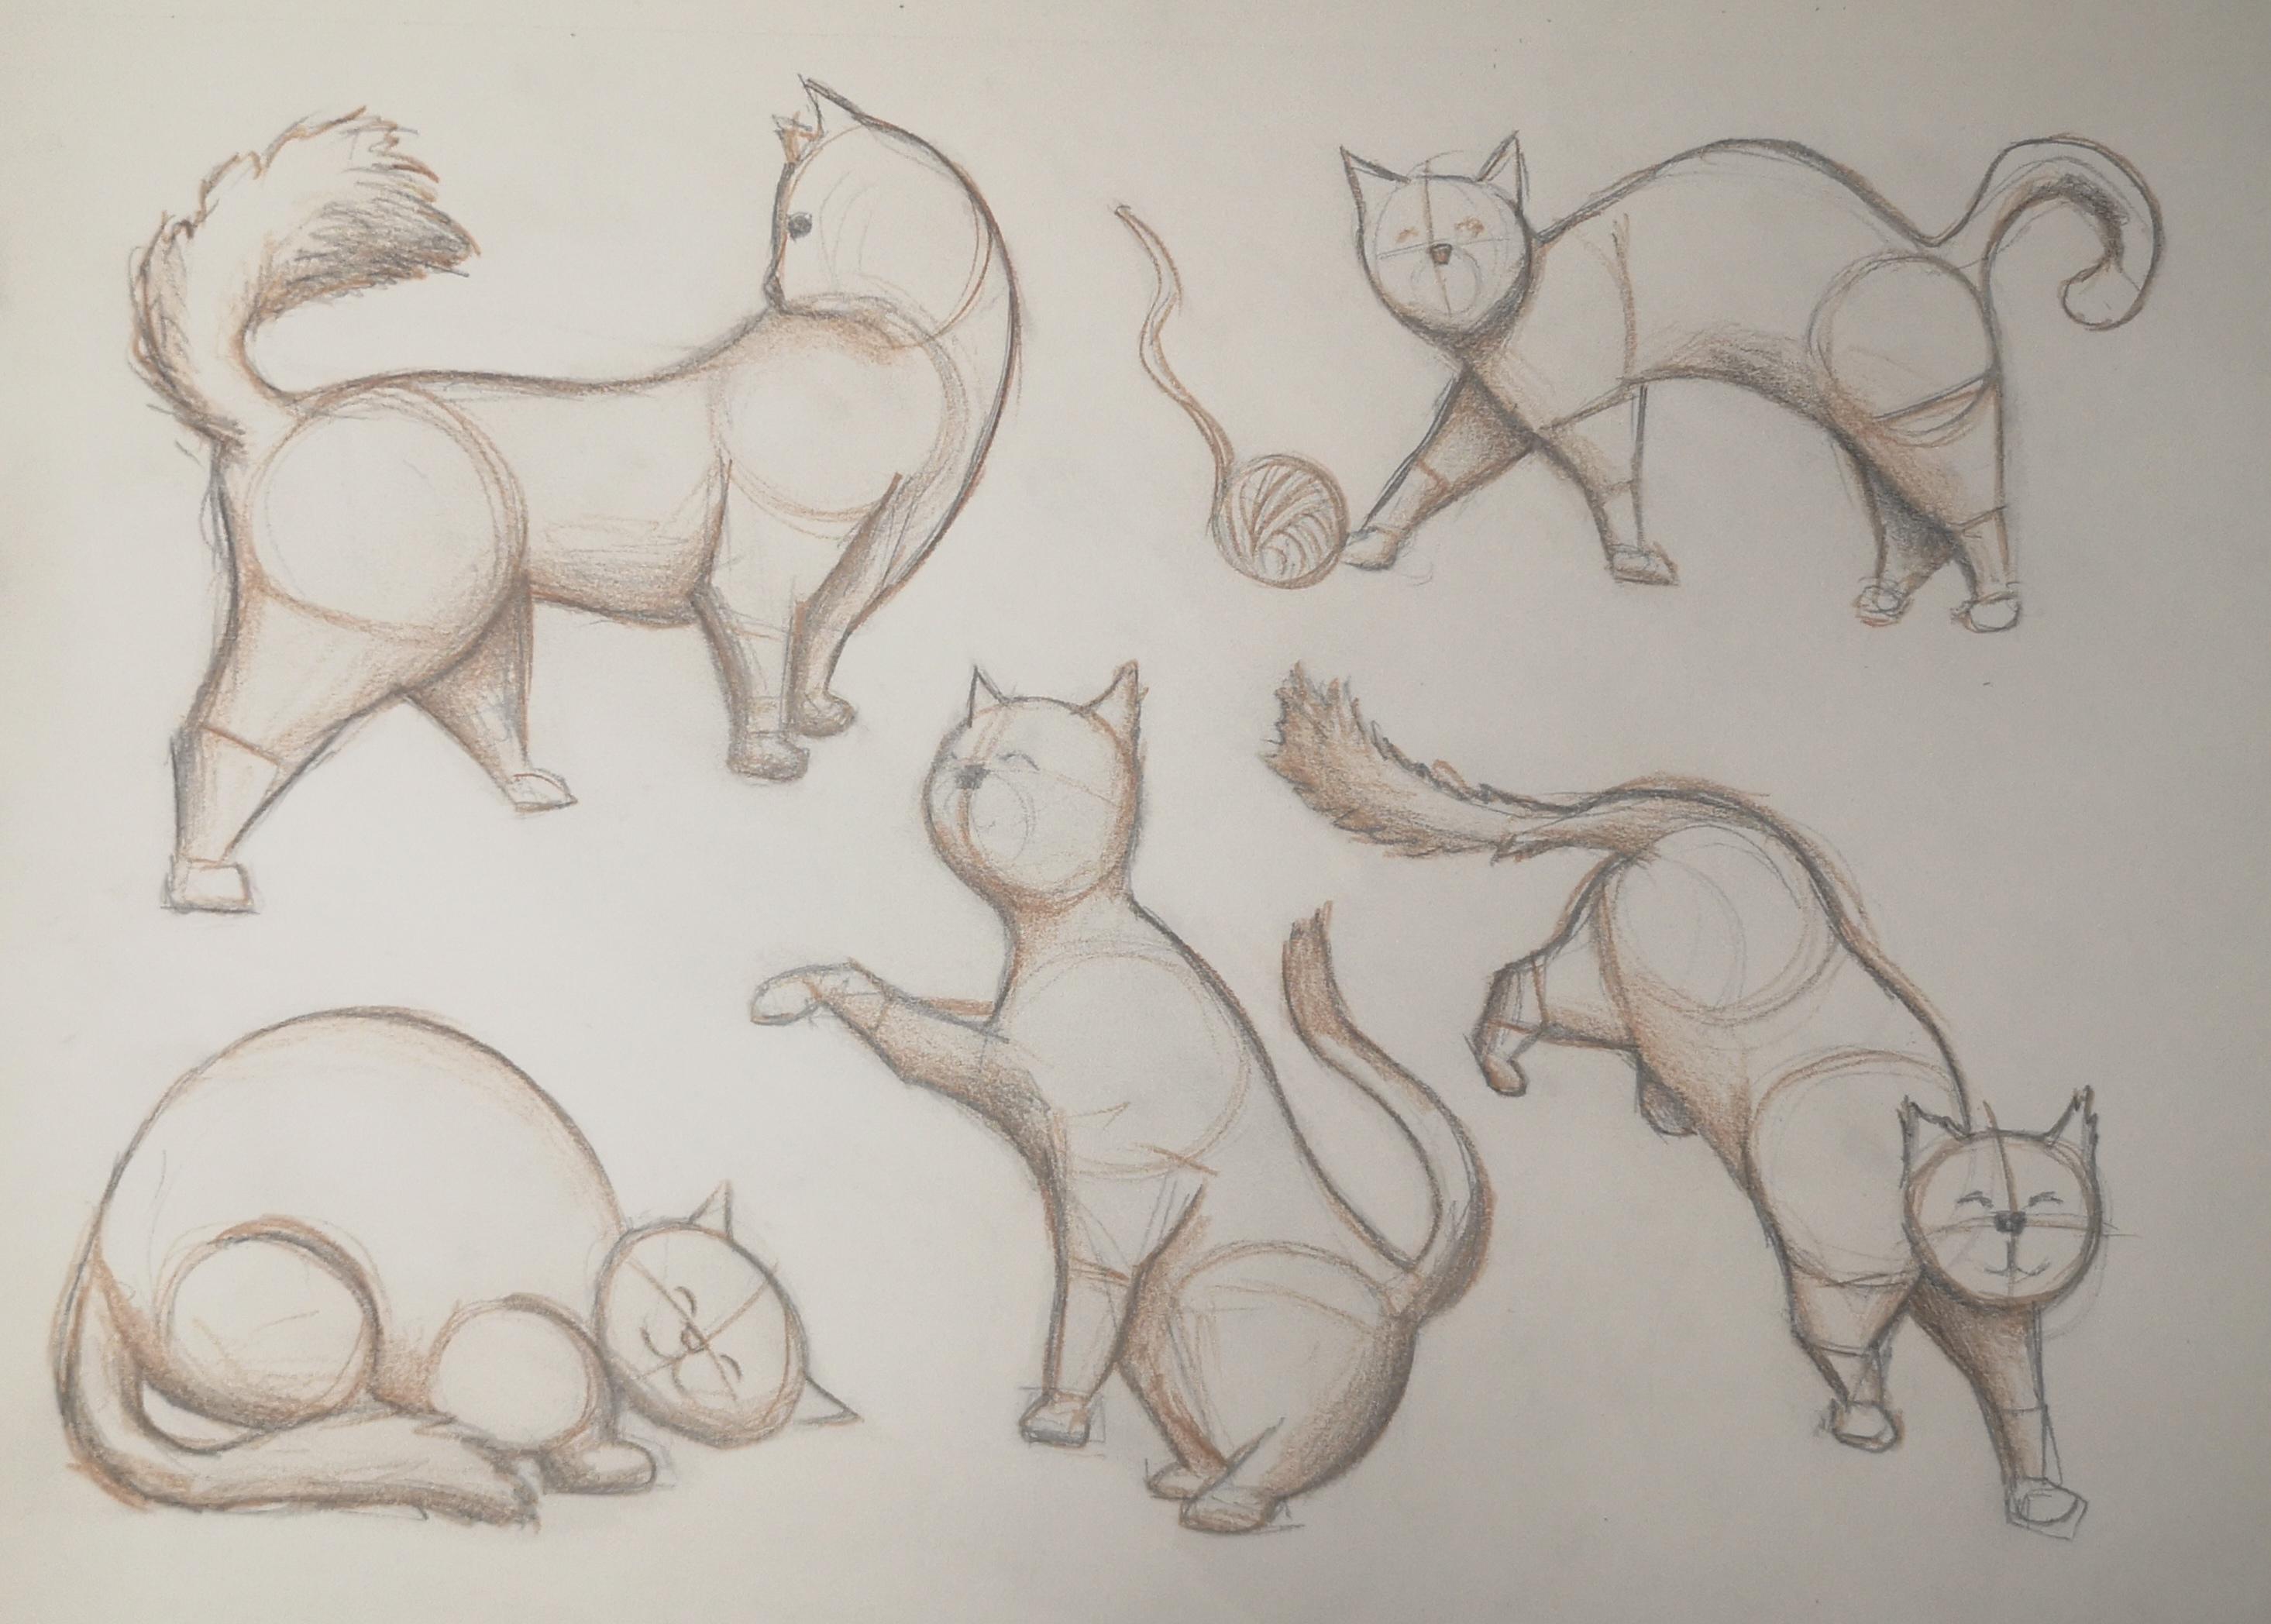
3. Finishing the Animal Drawing: So I have two here. If you feel like these
are a little complex than stick to doing them more
stylized, more cartoony. You can simplify your shapes
a little bit. So e.g. if I did want to do one that was more cartoony and
this one that's like kinda sleeping in the corner that I might just do one here. So i'm, I'm running out of
space a little bit here. So my body is going
to be more of a circle For my head
is coming here. Do you see how I'm
simplifying it? A lot more body, head, the arm, if you're looking
at that picture, is kinda like what we had
here, trapezoid rectangle. But it almost looks like a
circle, trapezoid rectangle. And then the leg is also
kinda like a circle. And then you can add
some stuff in there. So if you want to simplify
them a little bit further, you can add the details
of this head in, like triangle head
or triangle ears. Top of the head and the
bottom of the head. And then you can
fix up the ships. The tail kinda comes
around the body. I also want it to look like the arm is like right
beside the tail. So I might pick the
tail a bit longer, but see if you can
find those shapes. I'm just going to make
that a little bit bigger. I'm just outlining
whatever it is like the big outline wherever
I want to keep. And then instead of being like this one that's kinda
side-to-side, right? The T-shaped where the
nose and stuff won't go. Windows here, the
trapezoid shape. This one is going to help
resolve my space a little bit better because there's
like different circles. So I'm going put one here. So this one is gonna be
kinda low circle shape. And then the body
overlaps a little bit with that one circle. And then the back circle. That fits a little bit better. It's going to hit this
cat a little bit. So I'm gonna make this black
circle a little bit higher, almost like, you know, when
you come down the stairs. But that's kind of what that
actually reminds me of. Also everybody. Do you remember
those extra lines that I built in at the beginning
to divide my space? If you still have those, you can slowly start
to get rid of them. And then you can start to erase and address things
that you want to keep, things you want to get rid of. If you're going light
enough, hopefully they're all erasing. So okay. So if that's on my body, Cameron do trapezoid rectangle or if I want to squish back here a little bit shorter
rectangle and then tall. And then if I walked
in longer one, I'm going to do
longer trapezoid. That's thinner, rectangle. And then Paul, right? So you can kinda see it
a little bit better. Body, the back of the body. Trapezoid rectangle. Or you can do the
rectangle coming down Paul to kind of see it
looks like the last leg. It can't really
see here too well. I just have three in the top
one being in the back here. And then I'll have the tail fill up that extra space that I have. Because that's what I was
trying to figure out. Right. That extra space. I'm drawing one
that's kinda standing like the one on the
far left there. When do head, front of the
body, back of the body. And just to help fill
up my spaces here, this one is going to look
a little bit bigger, even though in real life and
my all be the same size. So bigger, bigger,
I'll have some tails, face, arms, legs there. So I've got the shape Sport basically the back of the body. So I'm going to curve down and
I see a little curve here. Bottom of the body
is kinda like this. I've got the
trapezoid rectangle. So much kind of like a shoe, maybe more like a rectangle
to reach a lot further. It's too close to my body. I'm going to keep the
back of the body. I just I liked how it looked, but I do have quite a bit
of space at the bottom. So I'm just going to lean
this guy a little bit lower and see if I can resolve the back of
the body a little bit. Just a little bit lower,
just allows me to finish up that space
a little bit better. These legs look giants. I'm going to make this
one a little bit smaller.
4. Lining and Shading the Animal: I'm just going to
kind of outline what I'm going to keep everybody. I do still have a little
bit of space here, but it's fine. It's a
tiny amount of space. If I want to put a little
ball of yarn or something that can help resolve
that space a little bit. You want to add any eyes
or something and you can add the noses. For me, at least
the nose is tall, which way my face is facing. So I'm going to take a
quick moment here just to outline some of the
shapes that I do have. Just because they are
pretty light right now, anything you do want to keep, I'd recommend going over
with a quick outline. If you wanted to make
some of your shapes in a different color just so your outline popped a little further. You can do that as well. I'm gonna do that in a moment. I'm just going to outline
first just to see what I can keep and then go over some
of those new shapes and erase anything
I don't want to. So for now I'm just going
to make my way through each animal than go through the shading and
shadows and stuff. So I've got this outline here. Anything I want to keep, I'm not pressing hard but
I am outlining or overlapping slightly
thicker lines. I'm going to keep this
sketch shapes because remember those kinda helped me. Remind me where
everything goes though, go over different
color if I like. Cats and even dogs
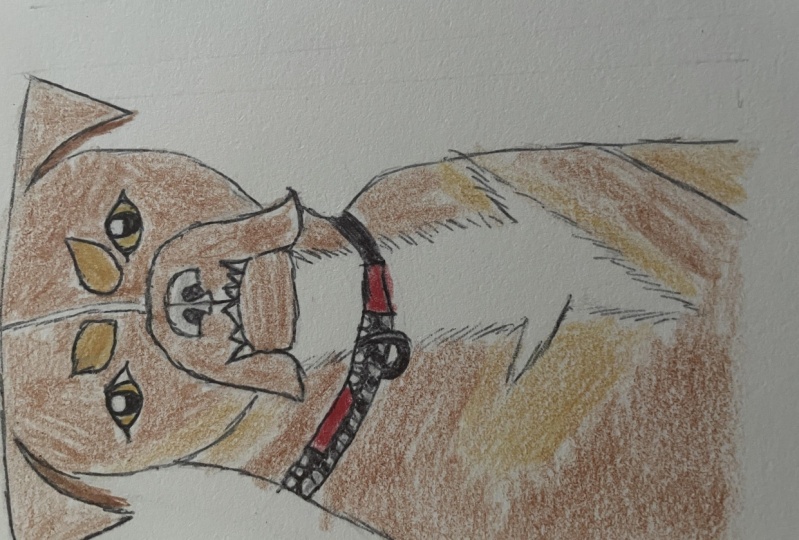
have this extra It's almost like an elbow when they come out from there. Pause that. So if you want to have
like a curved section there that you can see, like appointed section,
you can add that in. Ms. cat has a definitely
a bigger tail than a lot of the other
cats in my picture. It's a lot fluffier. But I think that helps fill
out my space a little bit. Almost reminds me of
like little fox cat. So if you wanted to
have a little bit of a fluffy or tail or tail to get smaller tail on
what you'd like to have. Any extra lines I don't want
to keep you'll also see me erase the sketch lines on the
outside, block my spaces. Okay, so I've got a two
out, one really quick. I'm just going to
outline my sleeping cat. I'm adding some zigzag lines, a little bit of variety
for the lens that I have in the back leg and pulsar
curved a little bit. This one is a little
more stylized because I can't see all of the shapes. There's a little bit of overlap, but I can see some of them. I've got three outlined. I'm just going to
outline the last two. I'll put a shadow,
a little bit of shadow color with that. So try and thick thin lines
if you haven't already. I would say that
these extra lines that I'm adding a
little bit thicker than my original ones because they're more original lines
are a little bit lighter, more sketchy there a little bit lighter because we were
planning out where they go. That's a little bit
easier to erase. That's why I keep them lighter. And then once you know
you're going to keep them, you can outline the way I'm now. And it just helps you
plan things out without having to commit fully
to really dark lines. Eyes and close to the nose. Add them in to almond shapes
are two circle shapes. And then I already
covered most of it in a little bit
of a shine mark, if I want Sean March, just that extra white-space that gives a little bit of
glimmer in the eye. Just the perspective that
we're looking at might not be able to see
both eyes entirely. Last, I'm going
to make this tail just a little bit fluffier,
a little bit larger. So helps fill out that space
a little bit more than I'm balancing my space is
filling out most of them if I can add it
prompts and objects, if you'd like to also
fill that space. I'm in a trap so
it from the nose. Let's make sure when
you're drawing, you're breaking down
those shapes, right? If they look like they're
too big to small, you can adjust them while
they're still late. Okay. So do you have an outline
for most of my areas here? Now what I'm going to do just
that I have those outlines, I'm just going to use my
pencil just to shave some of the areas that are
darker or half shadow. I might use some of the
colors that I have to block in the shapes just
so we don't miss them. I think that'll be
a really fun touch. I did sharpen it a little
bit of brown before. So anywhere that I have my
shapes, my original shapes, I'm just going to
outline them really quick using my brown
and then I can use my pencil and the
brown for some of the shadows and I think that
would be a great touch. This is optional at this point. If you've got your shapes, you
can still see your shapes, but you also have your animal in your pencil or you wanted
to outline it in marker. You can do the outline
marketer if you'd like, but I want to add a little
bit of color to mine. See me using my colored pencil. Look for the shapes,
like I mentioned before. For this one, they use the
colored colored tool for the shapes and then you outline
it using your main color. E.g. I'm just building back
the shapes in this cat. Wherever there are shadows, I'm just going in with the brown and shading gently subside, not pressing too hard. Outline most of those
now that I've got that first cat almost done, I'm just gonna add a
little bit of shadow box. I added shadows here. But just in the one area
it looks a bit strange. The head shadow you can even use my pencil
gets darker shadows. Even if you want to
show different colors in your animal like
a different color, tail tip or the base. You
can try those as well. Took out one. Do this
work my way across. I'm just outlining
the shapes and adding a little bit
of shaded area, change the value for the
shadows just so it shows up. There are some shadows, some light areas
underneath the habit, this one to see me
sharing a little bit. The body here. And
then my shapes. Optional if you
don't want to draw back but shapes the way I am, you can keep them a little
bit later if that's okay to just kind of nice
to see those shapes. And even though there
are some sketch lines outside my shapes, I might keep a little
bit of them that's okay. Destroy anything that I've
accidentally switched. Then definitely
under the tail up some sharp charity tell how much these to pop
out a lot more than my pencil sketch just by
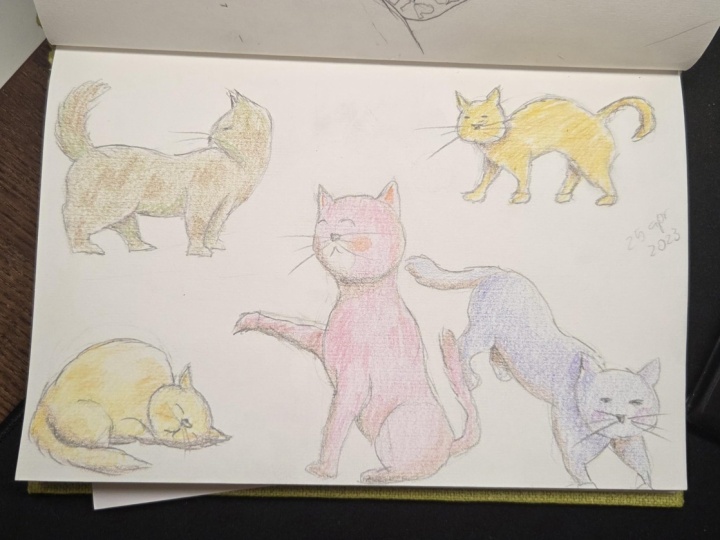
adding a little bit of color. If you'd like to add a
little bit of color, a little bit of shading
to some of yours. You can go ahead with that. You don't even have to add
too many details to the face and just see if you can
find those shapes to start. Then add a little bit
of detail on there, starting my next one. So if you're not too sure how
to start the colored areas, just give a quick outline first, come back to your shapes. I'm starting with my outline, circle there, circle, rectangle Paul. And then I just outline
most of the stuff. So I'm just gonna
go in and shade. So wherever I think
there will be shadows usually
underneath the body or where there's lower
areas have more shadows. The top of the tail,
if different brown, just so there's some variety, almost like the way the fox
has a power of two area. The sun has some pattern. There is little sleeping cat. It's a big oval shape. Kept the face pretty
simple with curved lines, trapezoids and like a
W shape for the mouth. And then any shadows for sure underneath the body
here, some shadows. It's because it's
closer to the ground. Lower parts, shading
side to side gently. Not I'm not adding too much pencil pressure just so the bottom isn't too much, change, too much
in the top isn't shaded orange and a little
bit of shading to the top. And I'm going to go
to my last name. Also go over your prompts
as well if you'd like. I'm probably going to go
over that real quick. I'm just going over
my outline first. Also the nice thing about
coloring with colored pencil. If anyone's curious, it's
colored pencil doesn't smudge. So that's something a
lot of people will use for a quick sketch
because it doesn't smash, but there aren't colored
pencils that are erasable that you
might see people using as their base sketch because they can erase
it and it won't smudge. They might use a pen
or something on top. That is optional as well. I'm going to keep it
as a pencil sketch with my colored pencils for now, just because I've
got most of those details and I've
got some shading and I just got through
my last shaded area. The shading a little bit
along the bottom, shapes. A little bit of
shading to the tail and stuff should overlap. Some of the slightly darker
areas are really dark areas. Outlining the
properties. You can add extra props and things to smaller areas if you
have those leftover, if you want to resolve
some of this basis, or you can add some cat
details or animal details just depending on what
you'd like to do when I've got my prompt, which can be used to shade like this where it has
slightly darker shadows. Anyway, that's a
really dark shadow. I'm just using my pencil, overlapping has some slightly
darker shadows to her. So it looks like it has some
depth, really fun values. That way. That's not the
only cat that's really dark. There's some other
areas that have darker cat details, Jeff, shutting gently for the shaded areas because
we're not adding too many in just a slightly
lower areas of the animal. You don't have to
add too much detail. We're just figuring
out the shapes and how to draw these animals today, we're making steady
so on, right? So you can decide, as long as you can see the shapes
and those final details, you should, should be set. Alright, so as a last
touch for myself, I'm just going to erase anything that I've accidentally
smudged because my left hand and smoked quite a bit about
my pencil sketch. And then when I erase, I'm
just going to gently use my breath or I can rub it again, but it might smudge
a little more. So I'm just trying to blow out any extra things
that I sketched. Something you can
do to avoid some of the smudgy areas
like the ones I'm erasing is you can always put a little piece of
paper underneath your artwork while
you're working, just so it doesn't
smudge as much. But yeah, there we have it. This is my cat. Animal will post this
drawing from today. Today we were focusing
on animal posters, so how to draw an animal in different ways,
different directions. And as you noticed
today, some of the biggest things
that we did focus on, at least at the beginning, even throughout, is a building. Our animals using shapes, also planning out our spaces. So making sure it
was balanced by moving some of those shapes
around or moving some of those poses to
fit certain areas of we looked at the
kinds of lines we used. We use thick lines, thin lines, bold lines, curved lines, all that fun stuff. And we also talked a
little bit about value. Some values are
like the slightly darker areas that we use to show shadows underneath the legs anywhere that was a little
bit lower on the body. We added a little
bit of shadow back and I hope everyone had
a fun time with this. I notice there's a
little bit different, a little more focused on some
of those details and stuff, but it's fun to try them
in different poses. I hope everyone had a fun time. Thank you so much
for joining in and we look forward to seeing
you soon. Bye everyone.
 Winged Canvas, Classes for Art Nerds