Transcripts
1. Drawing Roses: Introduction: Hello and welcome to this
drawing flowers class, where we focus on some roses. We are working from a
photo reference that I took outside on a walk and we will be drawing
roses with whisk graphite. And I take you
through my process of how I like to
draw roses over, say, a three or four day period, where we block in
the big shapes. And then we refine the drawing. And then we add tone and
texture and pattern. And then we finalize
the drawing. I loved drawing this way. It takes a complex subject
and simplifies it, gives, it, gives it a
framework to work within. And then we get to choose how complex or how simple we want to
complete the drawing. At any stage of this process, you can choose to stop and
your drawing will be complete. And yeah, that's
that's pretty much it. So I want to thank you
so much for being here. And I want to encourage you to go out and take
photographs and draw from them and really use the drying process as an opportunity to
explore your creativity. I just want to say
thank you so much.
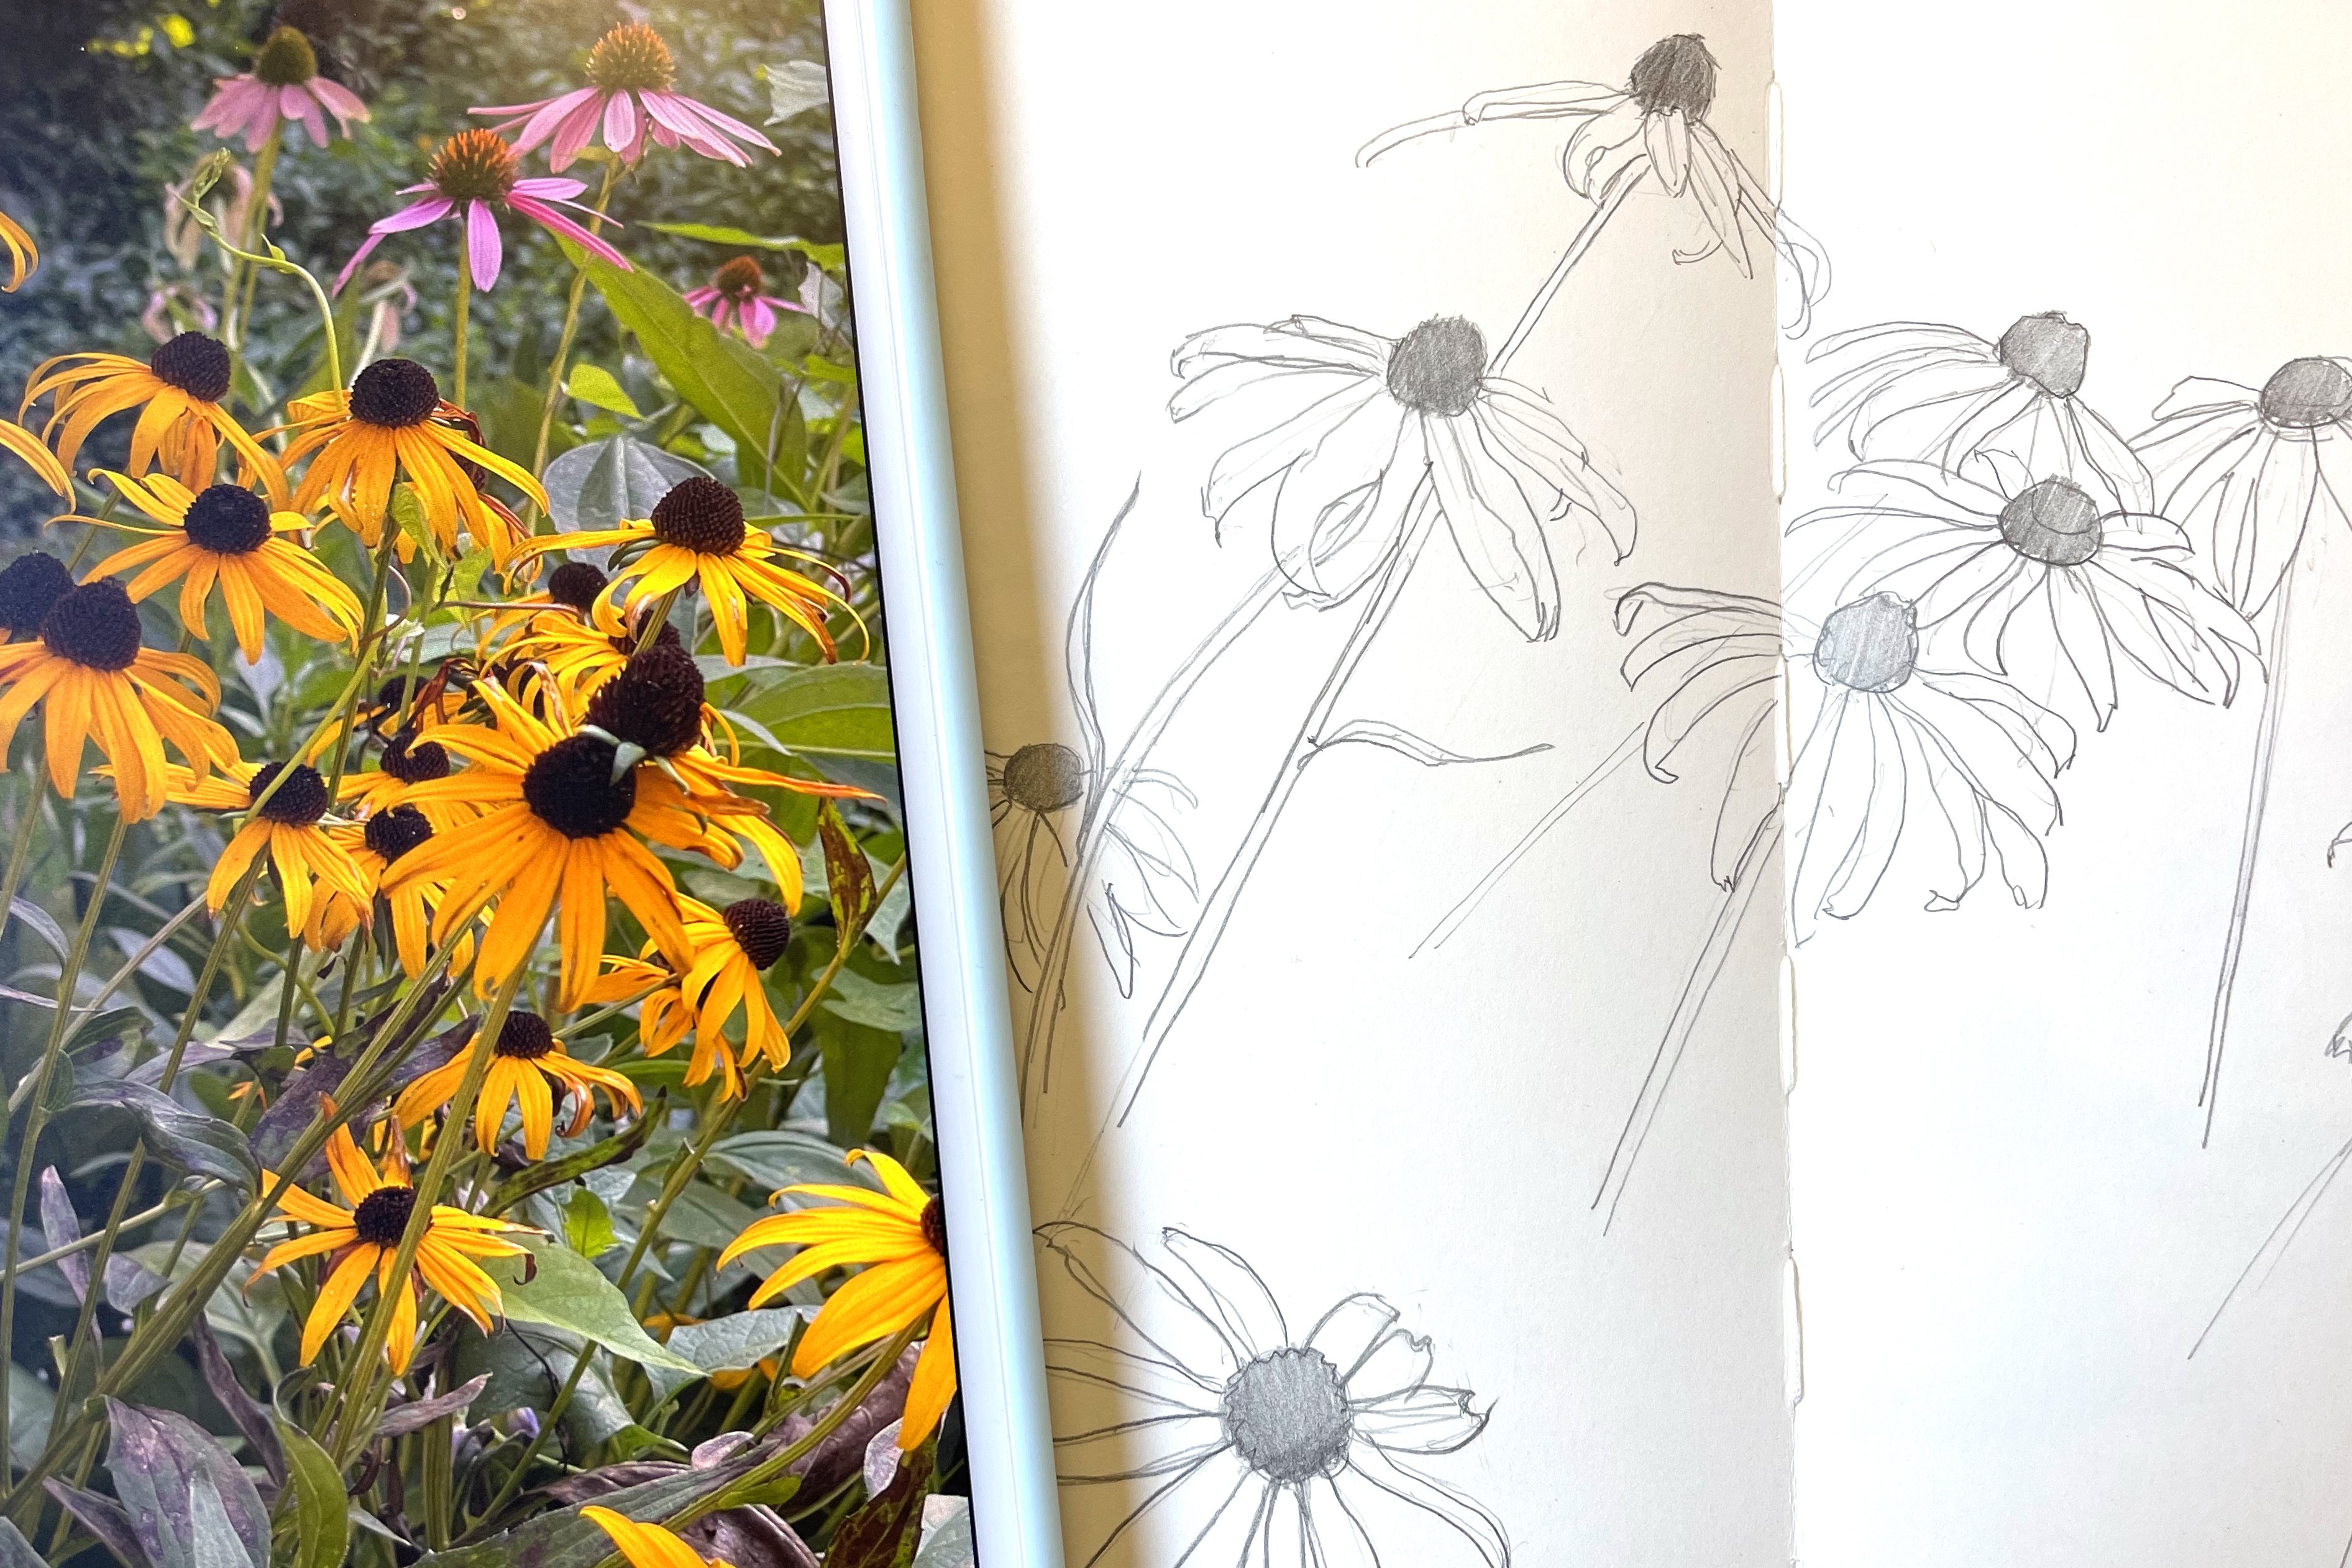
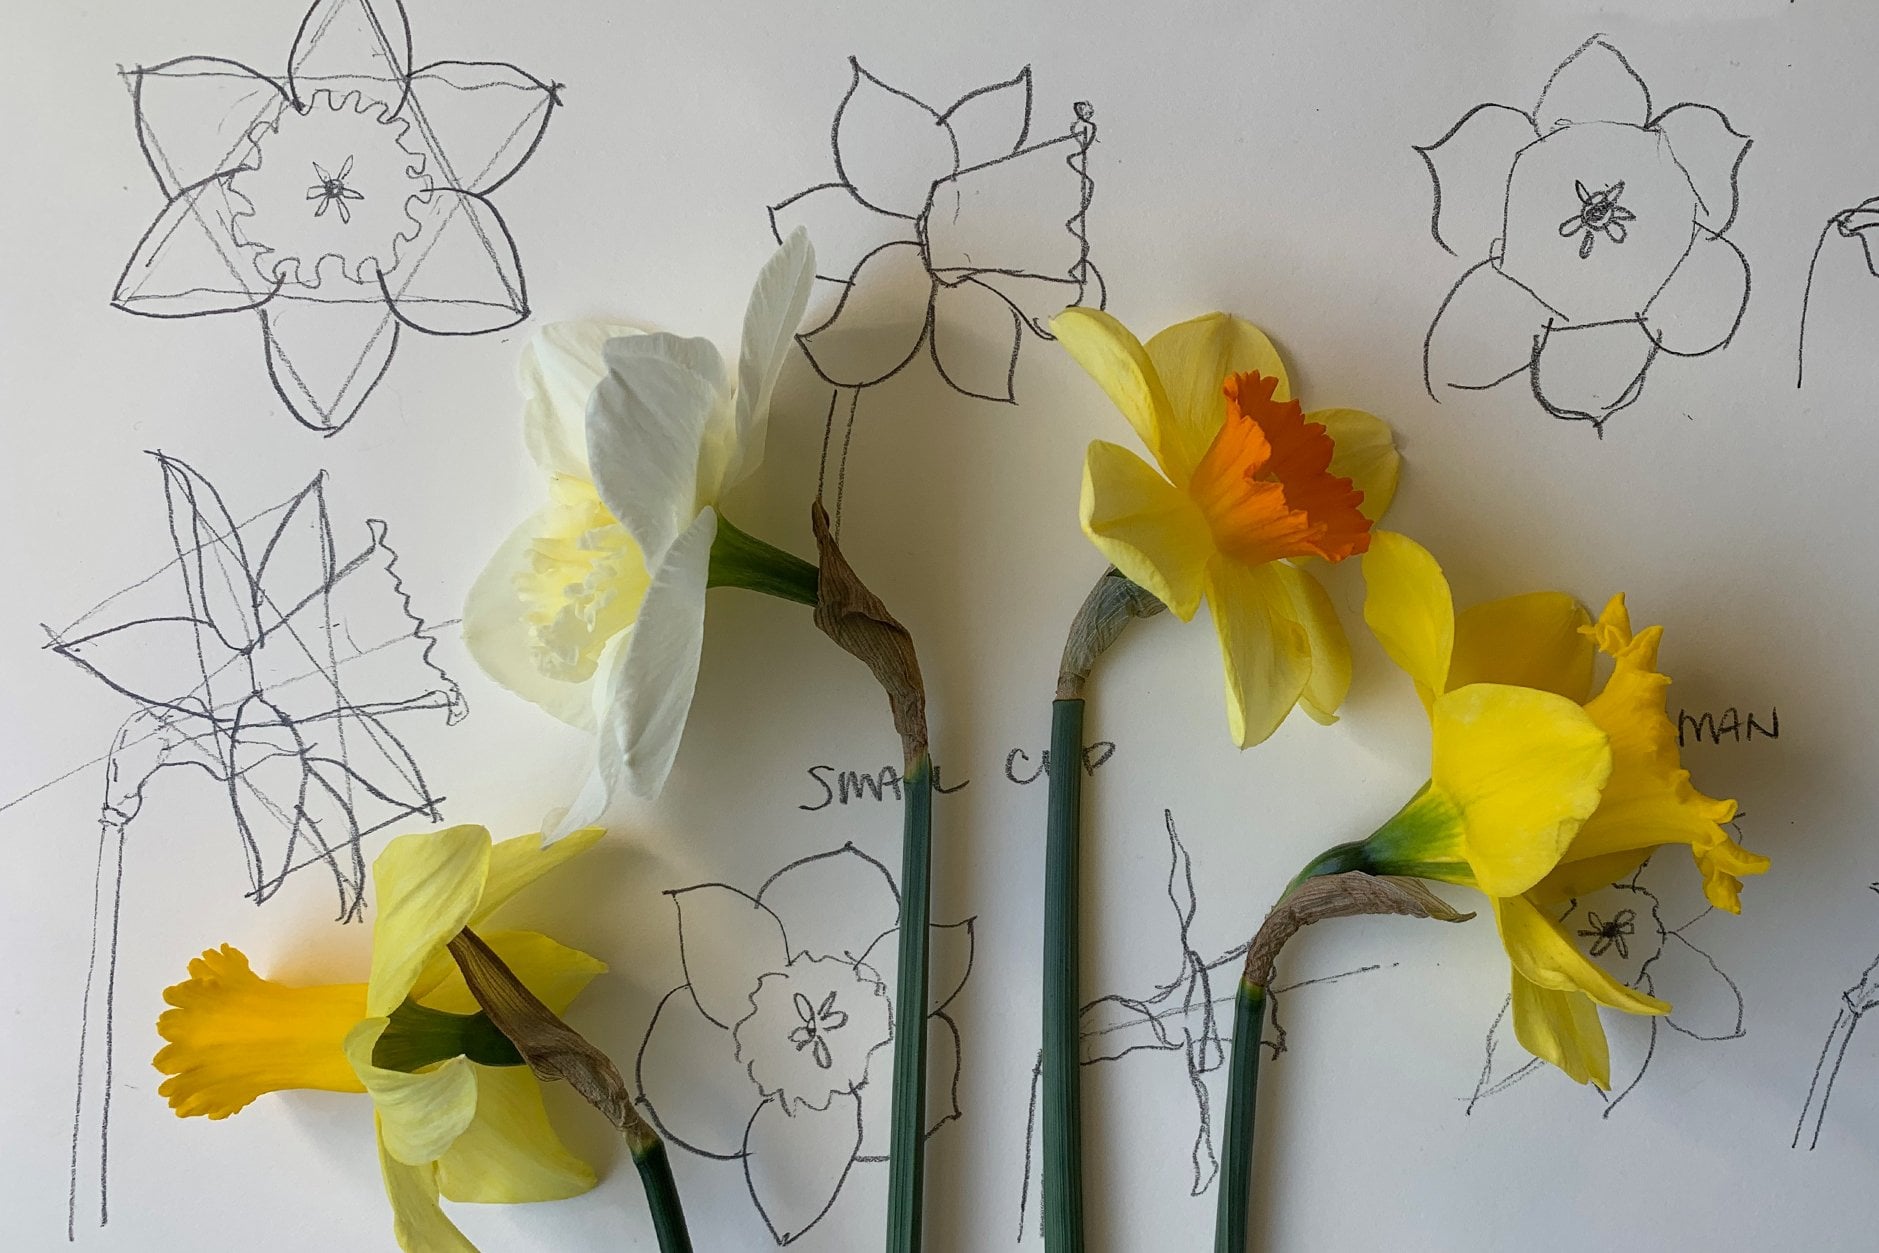
2. Drawing Roses: Materials: Okay, Let's talk about materials that I'm going to use for the sketchbook drawing. So I have a bound Stillman and burn Zelda
series sketchbook. And I'm going to
draw on this page, which is my November, November 5th to
18th sketchbooks. So like I I like to
draw in my sketchbook. This is one that's, that records a lot of my my walks and what
I've been out and found. And I will sometimes incorporate a little bit
of watercolor today. I'm only gonna do pencil and
I'm going to develop my, my drawing to be a B pencil, a little bit more developed
than these daffodils, but that's this draw. This sketch book
is a variation of both pencil and
watercolor sketches. And so stay tuned. I'm sure I will be drawing. I will be pulling out
my watercolors as well for another
class coming up. But the Stillman and burn
set a series sketchbook, but any sheet of paper will do. I am using my 0.3 millimeter
mechanical pencil. That's the lead I'm using. Then I have to
point holders that hold Tooby and for B lead. So I sharpen it with
that lead holder. And then this is the
lead that I'm using. And then I've got three erasers. I've got a kneaded
eraser by generals. Here's an example of this
is actually fabric Estelle. I have a mono Zero eraser
which is square inches square. And then I've got a, another Mono Zero
by Tombow eraser, but this one is a
little tiny point. And then I also, I'm sure one thing I'm also doing this is another
little drawing here. I always like to draw
on an, on an angle. So when I'm drawing,
I have also, I have my iPad and I'm using you can use the
iPhone I Photos app. But I've got it in Procreate and then I've got a
wooden drawing board, which I think I
have a yoga block, just the plain old yoga blocks that I used to prop
up my drawings. And that is my setup for today. This is my setup for today.
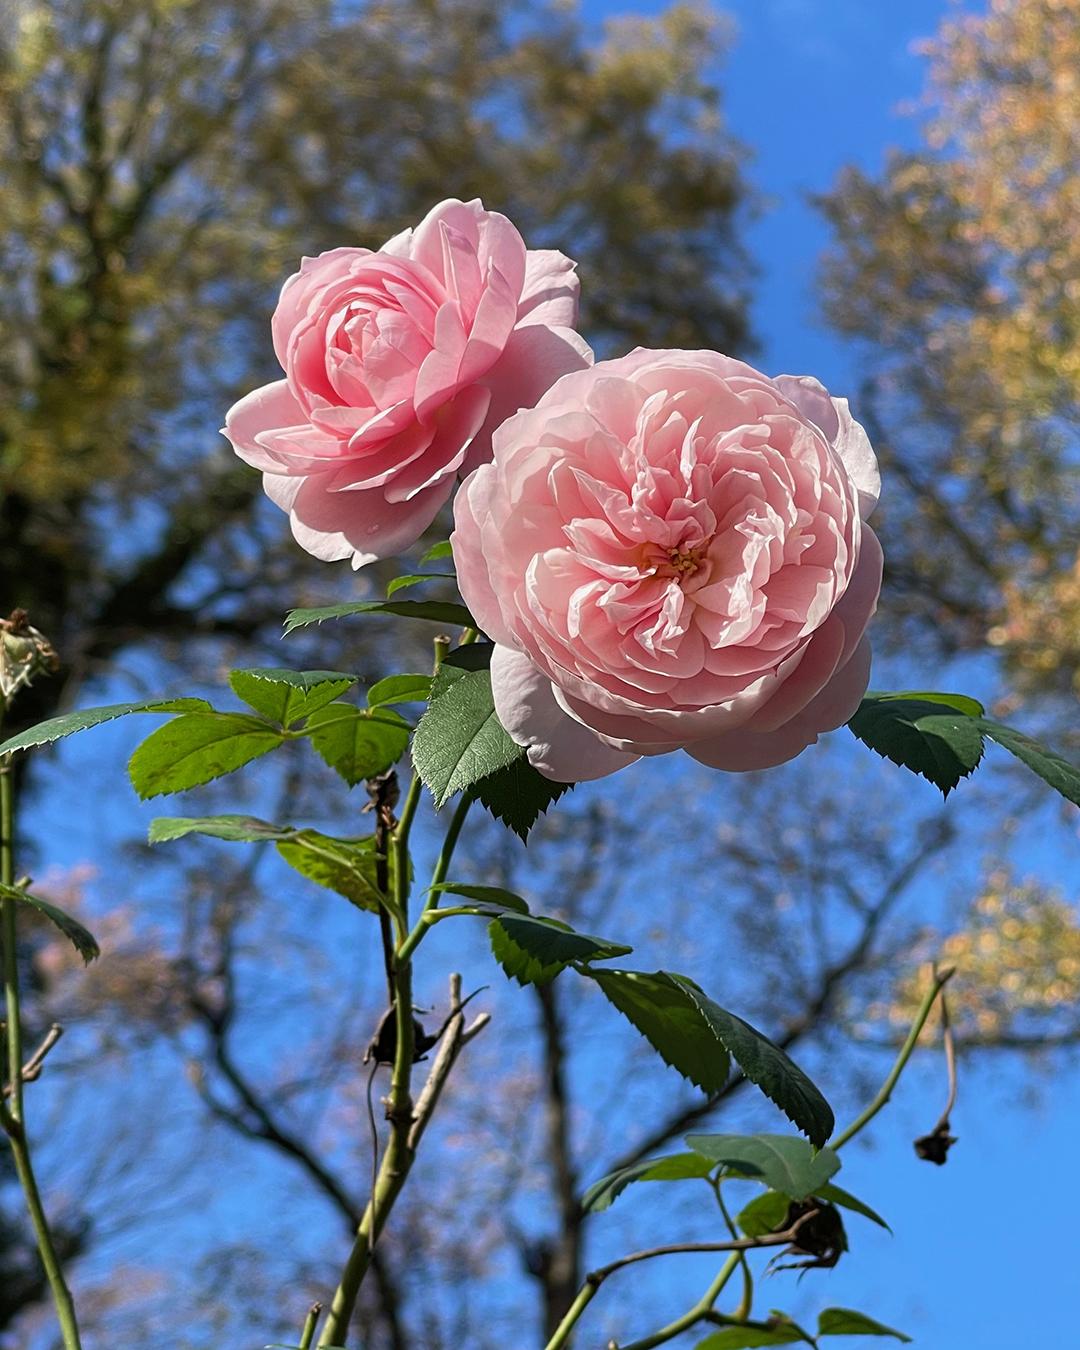
3. Drawing Roses: Photo Analysis: Hello. We are going to draw these
beautiful pink roses that I photographed while
out on a walk. Before we jump in and
dive into the drawing, I want to talk a little bit about analyzing your
photo reference. I like to think
about how to make the flowers very expressive. So this is the
center of this rose. There's a circle. I see. I look for the unifying,
so there's a circle. And then I like to
think about it with an orthogonal of a clock face. So this is midnight 639. So this leaf and
that petal then at the 04:00 to 06:00
P.M. eight to six, there's a point
right there that's halfway between the
1.2, so to speak. And that helps me. And then I think about, well, where is the center? I want to find relationships. So that's right. At the 10:00 is the center
of where that goes off. And then what's my
unifying shape there? I've got a circle there. And then that helps me find
an organize my drawing.
4. Drawing Roses: Block in: Okay, let's get started
with our drawing. I'm going to fill up
this page predominantly. And then since this
is for two weeks, I'm going to work on the
other page next week. I'm going to I went to get
my basic circling now, I'm not I'm working very
lightly with my hands far out. I'm holding my pencil
very far back, so I can have a nice
soft edge and the center of my right there. So that helps me come down a little bit
of stuff going on. Just kind of block
those in but not do it thoroughly and
with lots of detail on. But instead I'm going to just kinda wanna get
those in my circle. A little bit of something
going on there. Then I've got another petal right here that's
coming out, kinda like that. Here we go. And so with that now I can start working on getting in my, the shape of the second rows. And sometimes I look
for the spaces between. I use the negative space to help me measure instead of positive. And it's always amazing
Like when I get to a really triggering
the particular spot, if I slow down and investigate the the negative shapes
that I'm seeing, more often than not, it becomes easy and
then I can just move on and start
continued to work. Okay. Okay. So I'm just kind of
getting the big shapes in. Okay. I think that's good enough spot. Okay, Now I'm going to get
a little, some of them. I'll start looking
at the leaves. This leaf right here
comes out very thinly. Gosh, I love roses
for their elegance. It's like a ballet
dancer almost. Okay, There's a lot
going on in these stems, but I'm not going
to draw everything. What I'm going to focus
on is probably this stem, which is for the
rows that's up here. And then this stem right here, but this one right here that really dark when
it's in the back that come off of the same stem that these
other two roses are on. And then there's a leaf caught. I'm gonna ignore those. I might put this piece
in that dead piece of rose stem rows cane
and come forward. But this leaf I might, that comes off of that little
one, might again simplify. So we'll see how everything fits up or may not be able
to get it fit in. It looks like I may not. So I will leave that to
the last figure out. Oh, and I just
noticed I loved that. I loved the thin leaf so much
that I over-exaggerate it, it, which I'm very
prone to doing. So what I've noticed is like I tried to reel myself
and when I start, when I see myself, Oh, I'm in an exaggerating mode. I really want to
exaggerate that. I think about it, I noticed it. I don't think anything
bad about it. I just know, oh, I
really loved that. And then I then I move on and I'll correct it
if I'll keep it. So sometimes that, that that exaggeration is it makes a painting,
makes a drawing. So sometimes I'll keep it
and sometimes they won't. So we'll see comes down and then it comes over and then there's a leaf
that comes off. I'm just going to
kind of get it in. I'm not going to go all crazy. And there's another leaf
comes off and goes over. Ms. Originated from this
stem right here. We have a leaf that
comes up over here. The stem comes up. A ruse. Leaf comes here. And when sometimes
you can get rid of leaves, by coincidence, I really am drawn to the complexity of the way the
leaves are foreshortened, the way the stems move
around and everything. So instead of
getting rid of them, I'm actually going to really draw them
and celebrate them. But it's up to you, you as the artist get to choose. And that's, you know, that's the wonderful thing about being an artist or being artistic. Exploring something creatively
with your drawings is that even when you're working from a photograph,
don't be fooled. You don't have to draw and
capture the whole thing as is, you get two, you get to be
innovative and really explore. And you know, yeah, okay, So I want, I want this
leaf to fall off the edge. So that makes for a really beautiful negative
space on this page. I love that. Never mind. I think I think that's
my drawing actually, I don't know if I
will go and develop. Oh, I don't know. I'm still deciding. But essentially this
is the, you know, I'm just blocking
in the drawing, figuring out what I wanna do. I knew what I was like. I knew what I was
drawn To with this with this photograph and then I wanted to
capture it in a sketch. But sometimes you
don't know until you actually are in the
midst of the drawing. Do you realize, oh, this
is what I want to express. This is it's just an idea
or a hint, and that's okay. That's okay. So my blogging is pretty
much established. So this is what I liked. This is when I'm
drawing and I'm, no, I'm gonna be, I want to complete
a nice drawing. And I know it's going to, I wanted to develop it
thoughtfully and thoroughly. Oftentimes, I plan on drawing in it over
a number of days. So if I was working in my
setup, my drawing setup. Oftentimes this is where I
would stop and pause for the night because I love
drawing at night today. This is we're going
to stop here for a moment and then
we'll come back to it. And I'll show you how I
like to refine a drawing. And you can see in some places where I have already
begun to refine, but now let's dig into that
rose a little bit more.
5. Drawing Rose: Refining the Line Drawing: Okay, Let's go in
and refine this. These roses. More, lets, you know more than just the blocked
in basic shapes. And I really want to work
on that rows right there, but I think what will behoove the drawing is
to work on this back rows first and then
move, move forward. And one of the things I like to do when I'm
drawing is I like to have a sheet of paper
that my hand rests on. There are oils in our hands and that way we don't
damage our paper. Okay, so I'm gonna
work with negatives. The negative space
between this rose, this rose in the
background rows, the upper rows, and the
way it reacts to the leaf. So what I see is that I'm still using my 0.3 HB
mechanical pencil. And I absolutely loved drawing with mechanical
pencil. I love that. My point stays,
stays consistent. I love that. I can take this pencil
with me anywhere and it will keep a uniform point even if I've traveled
with it in my backpack. So I'm always drawing, I'm always sketching with
a mechanical pencil. And of course you can
use a regular pencil. I, that is a okay. Okay. I'm even going to
draw in the shadow shapes that helps
me find my space. Sometimes, there we go. Because this shadow line, and I want to get that line in. And then there's some wrinkles. And then, Oh, right there. Then we've got a
pedal back here. Okay. So that petal is a little bit bigger than what I had it drawn. I'm always also making
corrections as I go. And guys, there is no harm
in correcting your drawings. That's what erasers, especially when you're
working in pencil. That's what erasers are for. So I'm going to actually
go in there and erase some of my lines that
were a little bit wrong. That's my shadow shape line. There's a shadow shape. There's a shadow
shape right here. But I'm not certain
that it does anything for the composition of my roses. So that means I get to
choose do I want to keep it or do I want
to get rid of it? And I'm choosing to get
rid of it right now. I don't see the value in it. There we go. Comes out. Then there's, That's beautiful. Just beautiful. Okay, we got another
petal right here. Becomes, so I'm just working up the, the
different petals. I'm going to get
rid of these lines. Okay, inside that shadow is a
petal that comes like that. One of the beautiful things
about doing a drawing of a flower like this is oftentimes I use drawing as a precursor to
my, my oil painting. I love having that
opportunity to get very like almost intimate with like the flower subjects that I know I'm
gonna be painting. And even if I'm
not going to paint this drawing or this
photo reference, I it it informs me
enough that I can, the next time I work on a, on a, on a rose painting. I can think of this
drawing experience has has entered into my memory, into my long-term memory. And because guys, I have a belief that like
drawing is learning. And when you take
the time to learn, when you take the time to
draw, you're also learning. You're enabling your
brain to remember. And now I understand this
structure of this rose, the structure of roses in
general, and how they. They, they unfurl
specifically this type arose. And so then that gives, that informs me and gives me an opportunity
to understand more. And then therefore
it also lets me create with more
facility, with more ease. And that's, that's the goal, is to do this, to make to improve your understanding of the
flowers and everything, but also to make your, your, your painting experience
easier and more fun too. I think that is, That's where I, that the
true joy of art is about. It's that the deepening
of your understanding, that the deepening of your
awareness give me something to draw and I m happy as a clam. Now, you might notice
that as a whole I've had to erase some things
and correct some things, but as a whole, my my block in was pretty close. It's a little bit it
grew a little bit. And that's one of the reasons
why you do a block in is that it makes it easier. It just simplifies the
whole, the whole experience. Okay, So that Rose is done. Now it's time to
move to this one. And I wonder if I
end up enlarging. If this row starts
to enlarge to, but we'll see it may not. I may have just undersized
the the one in the back. And now I'm just seeing, so I am working on
thinking about my edges. And let's point out something. I want to point out
something real quick. Okay. So in this drawing, are in this photograph
that I'm going to draw. I also like to look, this one's got so many petals. I'm not going to draw
in every single petal, but I am going to draw
in the big shapes. So there's a big
shape right there. That, and then that
shadow shape right there. That is important
because then it also interacts with what's
going on in the center. And so I like to, when I'm drawing from a photo reference
or even from life, I'm always trying to think about the geometry and see if I can take a complex subject
with a lot of pieces, a lot of details, and see if I can
simplify it more. I often do that by
squinting at it. If you don't want to squint at your photograph, which it works. So squinting at photographs
makes total sense, is just kinda like get your eyes a little
bit out of focus. If you're wearing glasses, you
can raise your glasses up. And what that does is it, Sometimes it helps you
see shapes more and that's at this phase when
you're still refining, but we still want to be seen
shapes, the bigger shapes. So I'm trying to, and I want to echo what I noticed is that my
line right there is in the wrong location
for the second petal. This petal is more
like right here. So this line is like the
third petal in which is cool. Then once I know that
there's a dark curve, which is right where the center of roses. Okay. And then I've got
like a wrinkle. It's not a wrinkle. Well,
I can call it a wrinkle. It's a, its petals that allows me to see and
simplify a little bit. One right here. Let's see. It's about right there on edge. I'm going to get that in. Now when you're working
from photographs guys, if you are having a hard
time seeing your value, you can always switch your photograph to
a black and white, and that will help you
see your value more. I tend to continue to draw in color from the color
reference because I like the, I like the challenge. I like the fact that
it's forcing me to to get and get a little
bit more involved. I think, just a little bit more, um, and I think that helps
me become a better artist, which lets me make
color decisions better when I am painting. And I love to paint. I also love to draw. And that's, um, they, they go hand in hand. And I really try to make sure that I'm always making decisions that enable and make for a
better experience. Hurry go. So nice. Okay. Okay, and I often
will make curves by first going to add
them with a line. Here we go. Right there. So pretty right there. Right there. Alright, there's petal and then there's another
petal right here. Yeah. Okay. I'm almost
finished with the refining, drawing of this, of this flower. Okay, and there's a
whole bunch going on in here and here, but those are details. My big shapes of kind
of already laden. So yeah, I think the refining
drawing is complete.
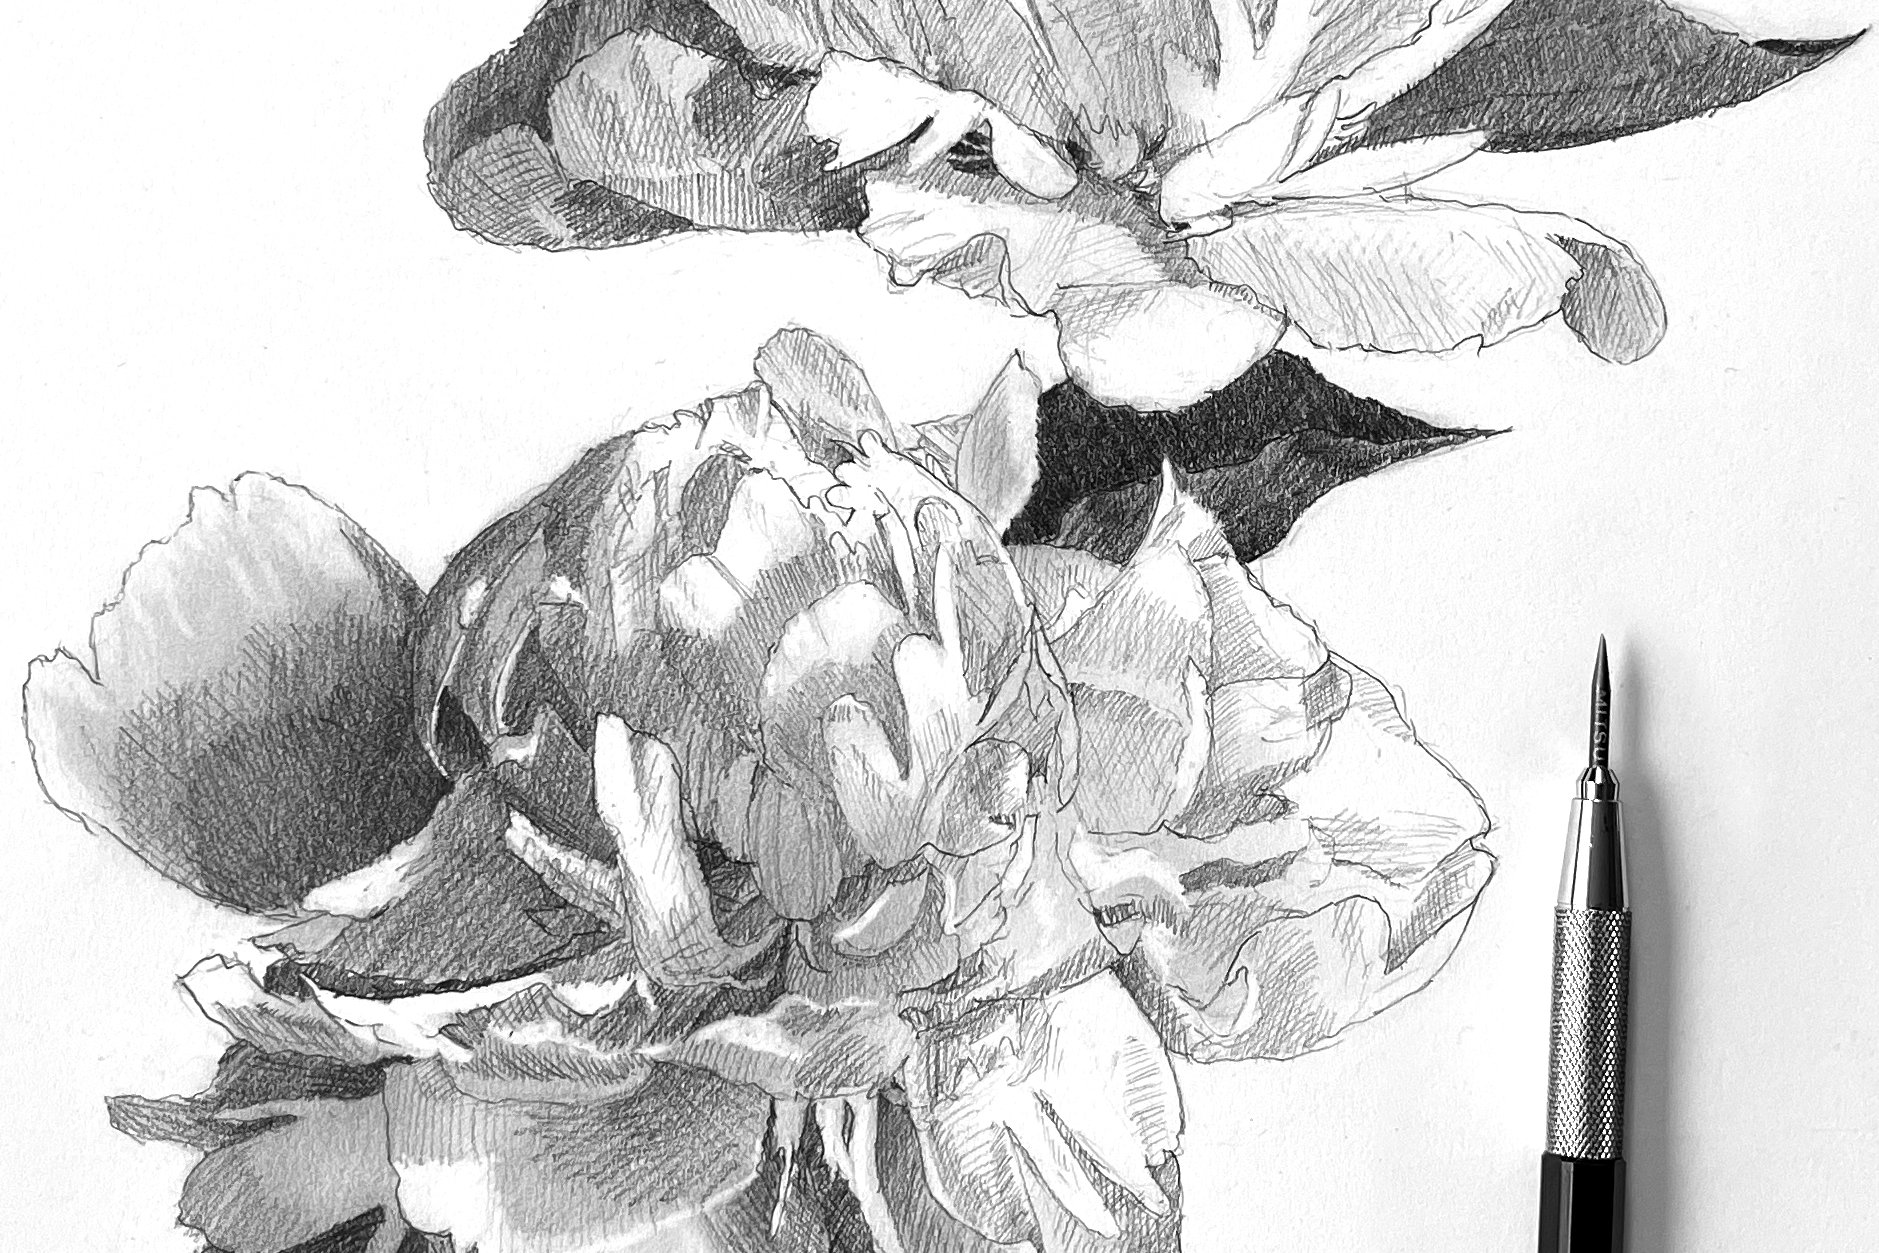
6. Roses: Adding Tone Part 1: Hello. We're gonna be slowly
adding values. The tools that we're
going to use for this are the mechanical pencils,
the 0.3 millimeter. And I probably will
start moving into using my Tooby lead as well. I also will use a
sheet of paper to protect my hand
while I'm drawing. I'm going to work back to front. First, putting in the
basic tonal shapes of light and dark value. And well, and as I find if I see something that needs
to be majorly refined, I will also refine it to, because this is a great
stage to do that. Right now I'm thinking
about like, Okay, my value shape on
this petal right here is just kind of get a small outline, which
just helps me out. A little bit of shadowing
on the underside here. So I'll put that in. Everything
except for right here. Catches light. That's
kitchen might, but everything
else is in shapes. I'm going to add some tone. The backside of this
petal is getting tone. See, I'm drawing all
in one direction. Lightly. I just noticed
that there's a pedal in here that I never saw before until I started thinking
about the tone. A little bit darker. I'm holding it at the end. So that way I'm not
putting too much pressure. And the goal is
one of the reasons why you do not
want to always put down a lot of pressure
is paper is delicate. And it's got a little
bit lighter tone. I'm holding my pencil far back because paper is
sensitive and delicate. And I want my
pressure to go down. I want the pencil to
go down softly enough. I'm not damaging like
putting deep end into grooves into the paper
from my from the pencil. There's some I squint my
eyes and I see, Okay, So it's really dark here. And I have, while I'm working
on an adding this tone, I have two choices
available to me. I can take Kleenex or a papers stump and unify
and smooth everything out. Or I can kinda keep it as is where you can kinda
see a little bit of the linearity of
the, of my marks. And for today, I'm gonna kinda, I don't think I want to
do much like blending, smudging that stump
will provide. So I'm going to
just plan on just leaving the texture in place. I, I like that. Sometimes I want to
blend my peony works, my peony drawing class, I did a lot of blending. But for this, I'm going to keep that texture
because I want that feeling of texture
and to be present, I think this drawing more. Now every drawing has its
own like emotive feeling to it and gives me an opportunity to decide,
like, what do I want it? How do I want to present? And I think I want
to present where all of my pencil strokes read. I have a shadow shape there. I tried to draw a back-and-forth
as parallel as I can. I am zigzagging essentially in back-and-forth that panel. Then there's pedal right here. The petal and then shadow
shape goes like that. This is a back edge, shows it's deeper
in value over here. It's deeper and
value in here too. So I have that opportunity to immediately going back over it. And if you apply just a
little bit more pressure, you just want to be careful
not to apply so much pressure that you're damaging the
surface of the paper. Because if you shouldn't need
to erase for some reason, you will have damaged. Unfortunately,
you-all have damaged your paper and
those grooves will always remain right there. I love that. Ms. Schell. A little bit of shadow, so
I'll put that in there. That's reading. So very well.
8. Drawing Roses 07 Adding Tone Part 3: Comes down into here. We've got some dark values. And I've got light catching
its petal right here. If you notice, I'm like really
abstract in these shapes. I know that there's
a lot going on. I'm trying to simplify an abstract these shapes while still keeping those details in. Because it's a fine
line between totally obliterating those shapes
to a true abstract shape. Or, you know, like
I'm told, you know, like essentially I'm viewing the light and dark
patterning as a, something that can be simplified
into solid flat tones. That what that does
is that it allows for simplification and
clarity of drawing. Which I think the more you can start to
incorporate some of those aspects
to your drawing, I think the more engaging
your drawing will become two. Because it's those
abstract moments of where you might
have like, uh, an interesting
shape that then has an interesting edge quality that allows an invites
the viewer into the art. If everything is
too precise and to, to solved, to developed. I think what happens
is that there is no room for invitation
for the viewer. But leaving areas that are open. And what I mean by open
in that I'm painting, I'm drawing this realistically. I'm drawing this realistically. But at the same time, I am also drawing in such a way that it can become, it has these very
simplified tonal shapes. And that level of abstraction
then allows for us to, to really get creative. And we, I mean, that's the point of art, right? Is to, to create something
that speaks to the viewers, invites the viewer is in
your painting realistically. You want it to look
like the flowers. You want it to look
like those objects. But you also want
to make sure you're inviting the viewer into
your, into your drawing. So I, I always, always, I'm looking for those places in my drawings where I can add, I can use abstract
shapes like this center. I'm going to have
to get in there and put in more dark shapes. Get some dark shapes
in there to get depth. I am having to choke up
with more on my my pencil. When I want softer, softer touch, I with an HB, I hold it at the end. See, this needs to be, that's catching light
or that's in shadow. This one is catching light. But it's got a
shadow shape, right? Cast shadow right there. We have shadow shape. We have a petal right here that's catching
a lot of light. And then immediately behind it, There's cache shadows
and then edges are catching light. Okay. Yeah, me too. I'm looking at that line. I don't want to use my
hand to knockoffs that this petal is pretty dark. So I will be going and as
is that one right there. So in the photo reference, there is a leaf that's
coming off here. And I may or may not include it. I haven't decided yet. Or I can even hint at it. Because this is a sketchbook. It doesn't have to be
a completed drawing. I can just choose
where I want to have where I want to complete. Yeah, maybe that's what
I'll do. I've hinted at it. I crossover my center part of the sketchbook that
looks really nice. I like that detail. Okay. So this is, hey, there's a dark line in here. Instead of hatching, I'm just
reinforcing that dark line, like going back and forth. Then there's a pedal and is curved and catching
light at the tip. But this part is
essentially shade. It's a form, a form shadow that, and what do I mean
by form shadow? It means that the
curvature of the item is, is creating a shadow shape based on the shape
of the object. This is pretty,
it's pretty dark. There's another
petal right here. So let's see. It's dark is over here. So I'm going to say two petals. So I'm going to
say I'm crossing, I'm drawing over my hatch. And there's a little bit
of an edge of that pedal. I will be reinforcing some of
the darker areas over here. Love that. So pretty wife that's really
reading well too, isn't it? That's, that's always
rewarding when it starts to read this flower
petal right here. We have an area that
is catching light. And then we have
an area that's in shadow going back and forth. And then half of this, the edge of the petal that's
rolling up is catching light differently than what's
really deep value. Then this flower. So this, the fried here. I have the choice
of keeping it up, drawing it thoroughly
or keeping it more. Sketching outlined. And they might just keep
it sketchy and outlined. Starting to look really good. So this petal is a little bit, It's, the pedal is curved up. So it would be in shadow if it wasn't for
the flower petals. Translucency. How to cross hatch? Again, there's a little bit
of an area of dark in here, so I'll get that dark and you probably have cut out
11 petal learn the other. But not significantly. And that's one of
the things too, when we're working from a photograph and we're
working from life. The main goal of this art is to, is to get the majority
of what we see in there. You don't want to. We're not. I always think about
it is we're not. Automatons were not
these machines. We are still humans
interpreting an object. And so that means
that there might be times when you dropped something or maybe some of our measurements are
off a little bit. And that's okay. The goal is to, you know, each drawing to do it
a little bit better. So I I I don't ever
beat myself up if I kinda get off if
I get off track of it. I want to encourage
that for you too. That you that you should give yourself grace
if you get a little bit off. And instead, just make sure that you're really
enjoying the process. Okay? So I have had, I think this is
looking really great. So the next step is to
though with a heavier, heavier or lighter
or darker lit. And so.
9. Drawing Roses: Adding Tone Part 4: Let's demonstrate real quick. I'm gonna go over into this, this quarter right here. So what I want to show
you real quick is I've been using an HB
and if I hold it deeply, lightly from a distance, then if I hold it tightly
and put more pressure, that the dark, oops, and I break my lead two, that's the dark as I can get. So I have a lead holder or
an LED pointer sharpen. It gives me a very nice tip. I've got graphite dust, which I wanted to take off,
and then there's my tip. This is a Tooby. And if I hold it in the distance that it's about
the same as an HB. Then if I put again,
I broke my tip. If I put clips, if I put down harder, I get a much darker.
And let's do it. This is a light tone. Then this is a dark tone. And then if I go over it,
I can even get darker. And that's actually
demonstrate this is h be, zoom in. Okay, so that's HB. And then so here's a light tone. Then here's a dark tone. And then if I want
to make it darker, it doesn't get much darker. So those are and
then I have four be available to meet two
for this drawing. I don't think I'll need for B. I think I can stop at the to-be, but I'll demonstrate to
you guys real quick. This is for B, that's light. So again, potentially
depending on your pressure, you can get the effect
of a from an HB to a for B on just by controlling
your pressure. Then that's, you can see that it gives off a
little bit darker. So that's for B to B. Then let's show a
soft, That's soft one. And then a hard one starts off a little bit
darker than the to-be. It gets really if you can
get very dark very fast. So those are my those are my
HB lead that I like using. But I'm going to
switch to a to-be. Actually. Stay zoomed in. So I do the to-be. Brian. I want to get with
my Tooby lead. I went to get my darker
notes, a little darker. That means the center of this. Why do you do dark? Why would you get
darker in value? Will that when you get darker
in value, UE visually, you visually create a little
bit more visual depth and are in the drawing because it helps with adding that
a greater sense of three-dimensional
squint my eyes added. Sometimes also the
tube allows me to add a little bit more
hatch to the drawing. So I've got that HB tone. Then if I want to add some, something a little
bit more interesting, like reinforce a
line a bit more. I can, I can do that by
adding a hatch over that. You can create some really
some wonderful pattern and texture doing that. And I'm sorry, I'm
going to do right now. Squint my eyes. Realize this is not quite
rolling the way I want it to. So I'm going to play with
that just a little bit more. Drawing is really,
really important. And growing your skill set, you, you want to get better
at drawing if you can. Because drawing, if you start getting to where
drawing becomes an easy, easy form of expression, you can pretty quickly also
improve your painting. I find that the more I draw, the easier my painting
experience gets. And so then I'm very, I get, I'm very motivated to always be working on
improving my drawing. Because I also want to be
improving my painting skills. Like I went over a little bit. That's okay. Some of it I'm not going to
some of it I do go over and I loved that
death or stay there. I didn't get it
works for keeping, you know, creating a
little bit more variety. Variety. Looking at that HB or
the to-be immediately, if I put a little
bit of pressure on, I get such a wonderful
dark line and drawing it. I love at play between putting in a tonal mask and then playing this line. To be is just
reinforcing that shape, that shadow shape of the petal. So different,
different pressures provide different effects. Not all edges will
get reinforced because that gives me kind of a fun variety of edge quality. And as I was saying earlier, that the more variety
and kind of that dither, that abstraction that invites
the viewer into your art. More. And the more you
can find places for that, the more your art welcomes. And as I've said tonight, I'm a big believer that your art is about creating
human connection, about finding ways to really kind of like share something
that you think is beautiful. And then another
person comes across it and goes, oh, me too. I find that so beautiful. I'm so glad you've taken the
time to really express that, that sense of wonder and
beauty that you feel from, from this experience. Say, there we go,
It's coming together. I'm going to move on to
the next flower then. What I wanted to do
before I do the rows, I'm going to just take my pencil and work on this one
leaf right here. I want to get that leaf in. There's a stem. I'm just going to
let that trail off. I don't need to do
much more with that.
10. Drawing Roses 08 Finalizing the Drawing: We are in the final, final stages of
completing this drawing. And it only needs a few things
I think to truly complete. And what I wanna do is I
want to go in to this rose and put in a couple of more couple of areas where that needs to be
a little bit darker. So I'm using my point, my Tooby lead holder. And yeah, let's get
started because that's I think there'll
be done real soon. So you just need to
put in a couple of areas that need to be a little bit darker or that
I think it will add greater depths
to this drawing. And then by providing a
little bit more depth, we'll get a little bit more
variety in my value shapes. And that will add
just a little bit more to the paint
to the drawing. So I used a little bit
hard pressure and type broke when am I
Chip? A moment ago. So I'm going to
sharpen my pencil. I've got a graphic dust on it, so always wipe off the graphite dust and then I'm ready to go. I squint my eyes and look at the areas that the value needs. Scope it deeper in value. Squinting again,
okay, so it needs, needs to be some
darker spots here. There we go. Then what I'm also
noticed the, let's see. Then there needs to be a little
bit more variety in here. Not so flat. This needs to go a
little bit darker. So I'm going to go
back and forth, create a little bit
more visual depths. There's a little bit of
catching light there, so here we go. Okay, So I think that's done. I, what, what else do I need
to finalize the strike? So this is the phase where
I'm finalizing my sketch. And I really love how
that is, maybe my work. And create a little bit
more interesting line here. There we go. A little bit of line there. And I'm going to go, Oh, he's a little bit of
a foreshortened leaf that I really like. Let me get that drawn in. Then there's another leaf that's foreshortened only through
half of it last time. Comes up over here and
then it comes there we go. Here we go. Yeah. Okay. So there's my
drawing for this week. Really, like how
it's turned out.
11. Roses 10 Thank you: Thank you for joining me
in this drawing process. I hope you really enjoyed yourself and that
you learned a little bit more about roses and
improved your drawing technique. And can now take these skills and take them to
another drawing experience. I really want to encourage
you guys to spend time every week or whenever you have an
opportunity to sketch. Drawing is such
an important part of the creative process. It is. And it's one of the easiest ways to express
yourself creatively. We can always have
a pencil with us. And if you're like me, I always like having a mechanical pencil with
me and a sketchbook. So that gives me
an opportunity to draw whenever and
wherever I'm at. And and it's just
such a wonderful way to express ourselves and learn a little bit more about
the world that we live in. And to take a quick, I find drawing to be
so very rejuvenating. And I hope, I hope that
this class has helped you also see the wonderful power of drawing and how it
can really bring about a level of
relaxation and peace. And also just another
opportunity to, to express yourself creatively. So thank you so much. If you are curious
more about my work, please visit my website
at Elizabeth floyd.com. And as always, thank you
so much for being here. I really appreciate it.
 Elizabeth Floyd, Artist | Elevating Everyday Moments