Transcripts
1. Watercoloring an Autumn Leaf: Introduction: Hello and welcome to this class on watercolor
and sketching. We are going to be
drawing an autumn leaf and adding it to our sketchbook, and then adding
watercolor to it. In this class, I demonstrate
how I draw a leaf from life. How I always block in the big shapes first and
then I refine into detail. And then I jump right
into adding watercolor. Almost all of my watercolor
sketch book entries are done over a few days. That gives me the freedom to
work in short bits of time. Finding little, little moments
of the day to be creative. And the same goes for this, for this sketch book entry. I did it over two days. And it's a wonderful
way of being creative and also working your artistic expression
into a busy life. And I really hope that
you have fun with this quick sketch book entry. And let's get
started. Thank you.
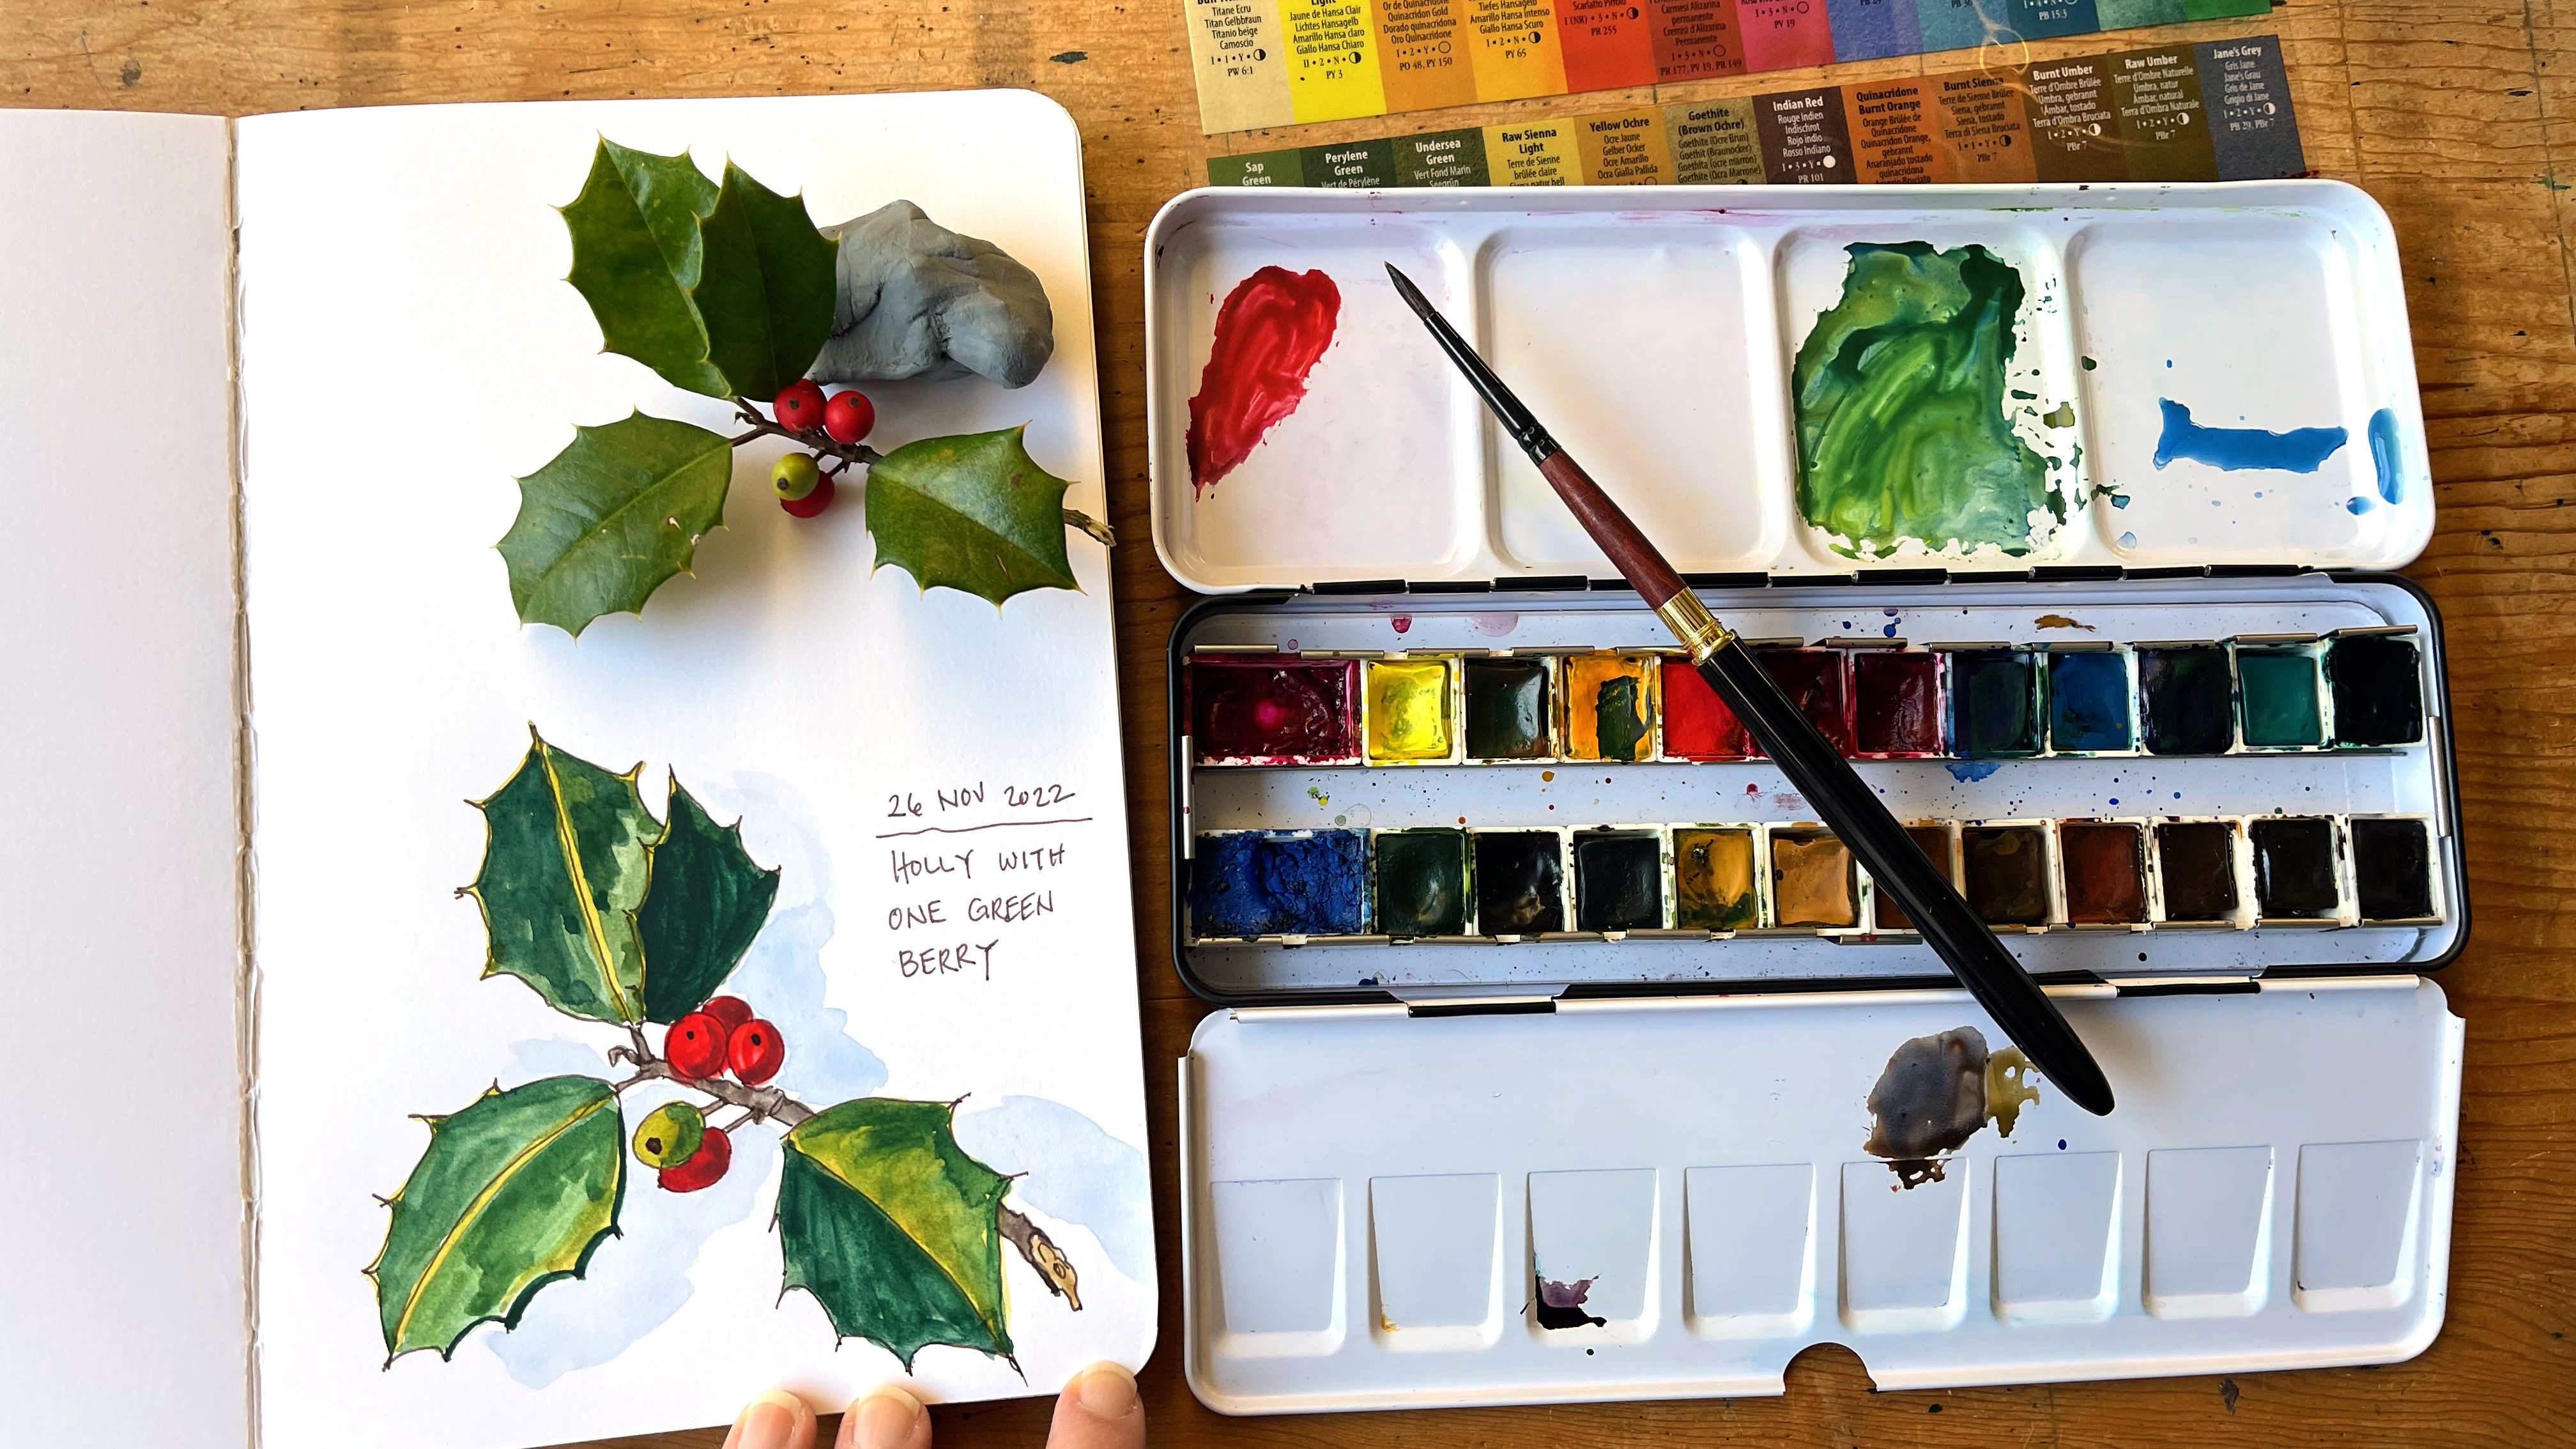
2. Watercoloring an Autumn Leaf: Materials: So I want to show you
the materials I will be using for this lesson. I am using a Stillman
and burn Zelda series. What are mixed media? Watercolors? It's mixed
media bound sketchbook. And I am using this for my
perpetual journal sketchbook. And this is where this
is the watercolor I did. And if you're curious, I have a class on the rows. How to do this rose
drawing entry to this is the sketchbook I'm using by Stillman and
burn zeta series. Then I am using a 0.3 mechanical
pencil for my drawing. I did not use anything. I use those. I have erasers that I
always keep available. A kneaded erasers. I love a kneaded eraser. And I've been using the
fabric Estelle type. And then I'm using
the Daniel Smith. It's a preset that I
got off of amazon.com, and these are the colors in it. The only difference
is that I altered this palette because I
removed the buff titanium. I don't, I don't use that
watercolor. Not crazy about it. And then I added big pan of pigment red 177 and a
pan of cobalt blue. And the brush I'm using for
the demonstration in this, for this journal entry is a size four pointed round and it is a it's a
travel paintbrush. So I love travel paint brushes. I love them because
you close them up. They have a hole at the end
so that the bristles will continue to dry and then
you can put them in. And that's another
reason why I like drawing with
mechanical pencils is I put the lead-in and I
can just grab these items. I have a sketch pouch and I just put those guys
in there and they are ready to go and the
brush will get damaged. The this is a, comes from a set of four. So this is the single
brush I'm using, but it actually has
a set of four that I got from from Amazon. And it's, it works, works fine for what I need. And there we go. Those are the materials that we
are using in this class. Today.
3. Watercoloring an Autumn Leaf: Drawing: Hello. This is my next week's entry
into my perpetual journal. And I picked up this
sugar maple leaf. And I wanted to, I wanted
to include that into this week's session and I'm
going to watercolor it. So I'm using my
mechanical pencil. I have a inexpensive
travel paintbrush that I purchased on amazon.com
and a mechanical pencil. And I'm doing that. I
want to paint this in. I'm going to draw it
pretty much as you see it. I love the colors of it and I love the
little ragged edges. To get started. I want to draw it life-size. So what that tells me is I
actually already shrinking it. So I'm going to start it like this right there. So I think about that
angle right there. I'm going to think of that
angle to that corner. Just looks like it's a little
bit wider than that one and it's at a slight diagonal. So again, I often like to think about my
bigger shapes first. And from my perspective, I have some foreshortening
of this leaf. And I'm going to actually
include that foreshortening. I'm not going to and
it goes to about here, and then it comes out. And then this is the end. So this is the basic shape. And then that diagonal
comes to about here. And then the leaf is, the
tip of the leaf is up there. Then it comes out. Then the stem comes
down and curves over. And has, there we go. It has a little bit of width. There we go. So there's my best man blocking. And I've got a little
bit, I want to kind of put it in my shadow
shape just a little bit, because that is also
something that's very pretty. A little bit of shadow. There we go. It's a soft shadow. There we go. Okay, so there is
my basic drawing. I want to start capturing
some of the details. And then between here and there, there's three little sawtooth. So 123. This one goes up. It's a saw tooth. And then it comes down. And this vein like that. And because of the
leaf is foreshortened, I barely see the vein. So for there, there is a curve, tiny sawtooth curls in. And then right here is
the bigger Sawtooth. Sawtooth there. But there's a bigger saw
tooth about right here. There. This one's got the
sawtooth is about right there. Big sawtooth, their little
saw-tooth, bigger sawtooth. Kind of medium. Little. There we go. Then this one has let's see, it's right under it, right there, right
under this diagonal. And it goes up. And
that's the big tooth. And then the vein does. And we have a bigger saw tooth, a little tiny sawtooth, and then there we go. So that's the, the drawing.
4. Watercoloring an Autumn Leaf: Watercolor Part 1: I've got a travel paintbrush. I really loved these two because I take them
everywhere with me that the tip gets protected. And I've got my I've
got a thing of water. I'm using a Daniel
Smith watercolor kit. And what I'm noticing as I have, I don't really have a
yellow spot on my palette. But I can clean this up, this area up, and I can use
this top part for my yellow. And since there is some green, I think I'll start with, I'll
lay down my green first. And this is a mixture, gosh, this has got a mixture
of all sorts of things, but I bet it's got sap
green right there. This is the Daniel Smith kit, but there was an extra room. I took out the titanium buff because I didn't
like titanium buff. I'm not that crazy about that. Permanent Alizarin crimson. This one is pigment red 177, and this is a big cobalt blue. And the Daniel Smith does
not come with cobalt blue or that pigment,
watercolor pigment. I removed the tape, the buff titanium, and I just
smooshed everything over. I'm going to use start with
a little bit of sap green. I need, it needs a
little bit of yellow, so I'm going to add a little
bit of yellow to that green. There we go. That's better. Where it's really yellow. Yellow notes there. A little bit more pure, sap, green over here. So watercolor dries a little
bit lighter in value. Then then it does for okay, I've got a burnt umber. I'm going to mix, I'm going to mix burnt umber right there and a little
bit of burnt sienna. Those are, that's gonna
be my brown here. Looks like there's
some brown right here. I'll do that. Oh, and
then there's like a big brown splotches
right there. It's darker. I'll
probably have to reinforce that at a later date. Water coloring but brown
spots right there. Okay, So now I want to
play with my yellows. And so I've got, I'm going to wear the yellows
intersect with the green. I'm going to put there. This is my Hansa
Yellow Deep paint. Make sure when I just, I love, when the thing I love
about this sketchbook is that it's designed
to be mixed media. So it will take both, you know, it draws
really nicely. It's got some beautiful actually
glaze over those colors. Takes the it takes pencil, withdraws pencil really well, Inc. does really well. And it also is a really fun surface for
a very smooth watercolor. So this is not it does. If I, if I want. Yeah, it's just a
really nice watercolor. Sketchbooks, multimedia
media sketchbook. Okay, so now I have
this spiral, scarlet. I want to put in some
spots, like right there. I may not get exactly. And that's okay. Just by doing this watercolor,
I'm exposed. I'm, I'm exploring color
and shape and form. And sometimes that's all I
wanna do with my watercolors. I just want to get a
little bit exploratory. So this is my Hansa
Yellow Light. I'm going to this is that Permanent Alizarin crimson
that's got a convenience. Make sure it's got PR 177, but then it's got PV 17, which is quinacridone rose. And then I can put this PR 149. So it's a it's a three pigment convenience
mixture and I'm not crazy I'm not crazy about I like working when I can unpick with paintbrush paints that are
single pigments, mixtures. It just makes, I
think it makes for a better painting experience. But for today or when I'm, when something
easy and this is a really nice, easy setup. I use C, I'm going to have to, I want to make that softer. And there's like a tinge
of red at the edge. I'm going to do that. Tinder red here. Then I'm going to use
the Hansa Yellow. Oh, you know what a, this
is the quinacridone gold, which is also a convenience, makes sure of pigment orange 48, which is I think, I think. And then PY one-fifth. So picking up a yellow, a yellow and orange mixture. That's nice. It's what I needed. A little bit. If the Hansa Yellow Deep. Okay. I'm really liking how
that's turning out. It's very colorful. I need to put in
some more green. Okay. Yep. So I'm going to add a little bit more
green mixture to my my guys right here. Okay, So the stem, I'm going to start
getting that stemming. I'm using the burnt umber. And I see that there's
some green in that stem. And then it shifts.
There's like it. Okay, so it's gonna have
to get some of that. Quinacridone gold
kinda reminds me of, so I'm gonna get that in. Then it shifts screen. Let's get that green in. Its even green right there too. So I'm gonna, I'm gonna
take a little bit of the burnt umber
and quinacridone gold mixture and start
slowly bringing in the vein. There we go. There we go very lightly. Am I putting in that vein? I know it's going to bleed
some and that's fine. The goal is to just get it. They're slightly Let's get that, hence a yellow in again. I'll get some light,
like sunlight down. This is also, I've got an opportunity
that if I wanted to, I could even lay
in some gouache. But for today, we're
just doing watercolor. Okay, so now I'm gonna
stop there and let it dry. It needs to dry. And then we'll work
into it again shortly. And we'll do the shadow shape.
5. Watercoloring an Autumn Leaf: Watercoloring Part 2: As a whole, it's a fine
tuning of my watercolor it. And now I'm going to start again and I want to
get the shadow shape. And so if you'll notice, I am first adding
Clearwater to the paper. And that is so that way
I'll be able to get a little bit of everything. We'll get a little
bit more diffused. And I'll mix my color. And so I've got this blue, which looks like that's
got a little blue in it and a little bit
as civilian in it. But it needs to be a little bit more purple and
also a lot thinner. So it's it's more pigment, less dense than I want it to be. I'm going to firstly
in that color. I'm purposely yeah, it's
it's kinda blurring out. Hopefully it will blur out. I'm going to take
some freshwater and just further make that defused. Now have some blossoms going on. But it will make four. A little bit more diffused. There we go. Just a little bit of air. So now this part that's
closest to the leaf is darker. So I went to mix
a darker mixture. And oftentimes, so like right down here
is my purple mixture. And often what it is is I'll
mix quinacridone, rose, which there's my I'm using the Daniel Smith watercolor
kit minus the titanium, buff or buff titanium
and added pigment red 177 and cobalt
blue to my, my kit. And then ultramarine
blue is right there. So it's a mixture. I'm mixing. And that's to make my purple
for my shadow shapes. And I want it to be a little bit more pigment, really dense on a little
bit more pigment. This is very smooth paper, so I'm purposely allowing for blooms to kind of I have no, In some ways, I'm
purposely painting in such a way that I'm not
in control of my shadow. That's kind of the fun
of watercolor too. Okay, now I want to get
some of those dark dots that I've been alluding me. So I'm gonna start
with some raw amber. And I'm gonna do
ultramarine blue as well. They are gonna go down in
a couple of my areas here. Whenever spot right here. Raw, umber. Raw umber is a cool umber. Burnt number is warm,
and Raul is cool. So I want I want these dots to be a little bit on
the cooler side. So they read to me as
and then see my yellows. Then I want to take some
yellow shade when it, hence a yellow light. And a little bit of the quinacridone gold
with sap green mixture. So I'm going to take
that green and I'm just going to slowly kinda paint over some of the greens to
soften some of that edge. And then I've got it. I'm
gonna put a vein in. Yeah. That's my my journal
entry for this week. In my perpetual
actually, wait a minute. I see that there's one
area that I did not. I'm gonna put a little
bit of a shadow here. And a little bit of
that blue color. Get more pigment, less
dense. My purple. I'm going to take
very, very pale blue. Wash it along. Oops. It's just, I think with art, the more you get
comfortable with the fact that you're
gonna make mistakes, the better ear, the better the experience is because the reality is we
always make mistakes. And instead of just
driving ourselves nuts, We just like, you know, call it, oops, and move on. Okay. My journal entry for this week.
6. Watercoloring an Autumn Leaf: Thank you: Thank you so much
for being here. And I hope you've
had a wonderful time working on this sketch book
entry of an autumn leaf. Thank you so much for being
here and participating in this class on a sketch
book entry of an autumn leaf. I hope that this class will encourage you to experiment and explore with drawing
in watercolors. It is a wonderful medium that really provides a
lot of diversity. And it's very fun to add a little bit of
color to our sketch book, and I really encourage
you to try it out. If you have any questions, always feel free to
reach out to me. I love hearing from you guys. To check out more about my work. Please visit my website
at Elizabeth floyd.com. And I look forward to
drawing with you an entering more sketches
into a sketch book. Thank you.
 Elizabeth Floyd, Artist | Elevating Everyday Moments