Transcripts
1. Peony Drawing Introduction: Hello and welcome. In this peony drawing class, we will learn how to
take a complex subject, the festival maxima peonies, which are these beautiful
white lash peonies. Turn it into a beautiful
graphite drawing, where we go from a
simple geometric block in to refining it through
adding three-dimensional tone, and then finally adding beautiful texture
through hatching. And it is my goal for this class that you
enjoy the process, that you grow in your
understanding how you can take complex subjects
and simplify them. And that it's just a
matter of breaking things down and being
willing to slow down. And take the view, the experience as a
meditative process. And it is my pleasure to teach this class because I
absolutely loved drawing. Drawing informs all of my art. It is through drawing
that I find that I truly learn and understand the beauty of the flowers in the world. And it is my hope that you too will really grow in
your appreciation of drawing and also in the process and how
that process can be a beautiful meditation and
admiring beautiful flowers. I mean, there's so much
beauty in the world. And by drawing, we, it's like by drawing week to love and admire and connect with nature at a
whole nother level. And that is my goal for you, is that at the end
of this class, you have a drawing
that you are proud of, that you have connected with these peony flowers
with a whole nother level. And that it's just been a
wonderful experience for you. So let's dig in.
2. Peony Drawing Materials: Hello. In this lesson, I'm going
to talk about the materials you can use for this
drawing project. It is really just a paper and
graphite drawing project. Which means that you
can use printer paper and even just like
a regular pencil, like this From with an
eraser, just any old pencil. However, I have used some
specific materials and I wanna go over the materials that I did use to create this
beautiful peony drawing. I used Strathmore Bristol paper and I used the smooth surface. And this is an 11 by 14 sheet. So that is what I
used for the paper. And then for graphite, I used a 0.3 mechanical
pencil with this lead. It's an HB hardness of lead and then I have to lead holders. So you can see the point, let me share with you
the point I use to lead holders a to B
and a for B and I use, this is the lead I like to use. And I use a point holder. Holder, which helps me
sharpen and let me, I'll demonstrate real quick. So you make sure your lead is out enough from
the point you put it in to the lead holder
and then you just spin. Then you have a beautiful, very nice, very sharp point. And it makes for
wonderful side effects. So those are the pencils in
the lead holder that I use. I use a kneaded eraser, which I like. I am prone. I like to use the fabric
Estelle kneaded eraser. And then I have to do fancy
other erasers that I use. And this is a Tombow mono 0. And if you notice
it's long and skinny. And this is another
Tombow Mono Zero, but it's a rectangle square. And so through for this drawing, these are the materials
I used paper, these three pencils, and
these three erasers. I go into explaining why I
use each one of them in the, in the drawing demonstrations. And in the next lesson, I'll actually demonstrate
that the uses of these pencils, and that's it. It's very simple. And one, however, I do want to talk about why do I choose these pencils over, say, an artist's drawing kit, or just a regular pencil? Well, first of all, a
regular pencil is only HB lead where an
artist's drawing pins, artist's drawing pencils where
I have HB to be in for b means that that is a harder
lead and so it draws lighter. This is the softest lead
and that I am using. And it draws darker, leaves, a darker
footprint on your paper. And I can use, and for years I did use these prismacolor,
artist's drawing pencils. The thing is they need to be
sharpened so often that I go through them quickly where
I find when I'm traveling. If the tips break because the tips aren't
protected, That's annoying. Where for example,
with a lead holder, when you're not drawing, you just put you just open it up and put it in
and it's closed in, that tip is protected. Same goes for a 0.3 mechanical pencil in that when my lead
is not being used, I tip it in and
it's ready to go. With the mechanical pencil, my lead point always
stays the same width. This, of course it does
get wider as it gets used, but it's so easy to sharpen. And as I said, when you, when you walk around
sometimes with my drawing, with my pencils, the
tip stay protected. Okay. Thank you so much.
3. Lesson 1: Pencil Demonstration: Okay, now I want to demonstrate why I use the different pencils and what do I use them for? So for a mechanical pencil, I have a 0.3 and I leave the, I push the lead out quite a bit. When I want to talk about, is that how I hold my
pencil varies the pressure. So when I hold my
pencil at the very end, I put down very soft. My lines tend to be softer. And as I, that's
my middle level, they get a little bit darker. And then when I choke up
really a lot, they might. So the way I hold my
pencil affects and influences my the pressure. Now, another thing is when
I wanna do at a tone, I always hold my pencil
at the very end. Because if I choked
up on the front, what happens is the angle. It's a lot harder to create a straight line
and back-and-forth. Yes, I can do it. But it's like I'm fighting against the angle
of my of my wrist. So when I hold the pencil back, I have a larger radius. And it just makes it so much easier to create a
back-and-forth to tone. And this is like my HB. And of course when I'm
holding back further back, it does mean that I
am adding it lighter, but my HB is the hardest lead. So therefore it goes on the
lightest onto the paper. Now I want to show you my Tooby. So my to-be is the next
level of dark lead. And so if I hold it back light, I can create some
really wonderful. And I'm essentially showing you the same pressure
that I use there. And so then if I'm halfway, my pressure gets just
a little bit darker. And then when I get tighter up, I have the ability to
really create some time. Now when I'm adding tone, I always want my tip to be
the sharpest when I begin, so I always sharpen and then you will have some
graphite dirt on it. So I always keep a
Kleenex and I wipe it off before I start. And again, I I tend to hold my when I'm adding
tone or adding hatching, I always hold my pencil
way in the back so that way I can get my lines
as parallel as possible. And I'm using the same pressure
that I used for the HB. But as you can see, it goes on darker. And see how, when the
point is really sharp, it gets into the groove of the of the paper and this is me going over
it a second time. Now let's look at the four B, C. I've got a brand new point on it so I don't need to sharpen. So again, soft touch, medium touch, and
then tighter touch. That wonderful. And you
can see between the HB, the Tooby and the Furby. Same pressure,
different, you know, different dark,
level of darkness. And then here is the
four beat adding tone. I will sometimes flip
and rotate my pencil. So that way I can keep my point
a little bit more pointy, especially with the number
four because the graphite goes off on the paper so
quickly that you end up, you end up using up your point very quickly with a for B, okay, So these are my pencil supplies that I'm using for this class.
4. Lesson 2: Analyzing the Photo Reference: I want to talk about how I
think about the big shapes, the abstract shapes, and
how I break them down. These two flowers, they are piano, Festina maxima peonies. And they have quite a
bit going on in them. They're very,
they're very florid. They've lots of petals and
everything that, however, they can still be
simplified and, and put into, into like
the idea of bigger shapes. So this is what I'm gonna do, is I'm going to talk about
how I think about my flower. So oftentimes with the
peony in particular, I often will look at like my, like my central node. And that's, that's the
thing that I look. That is what helps me
measure and where I, where I measure from. So first of all, that's my node right there. And then I think about like
I see a diagonal there. I see another diagonal there. I have this wonderful
triangular shape right here. And then there's a secondary
triangular shape inside. And then you've got the
inside triangle shape. You have this kind of
faceted diamond shape. Then I also like to look
for like my plumb lines. And so there's a plumb line where This edge of that petal, this petal interact
with each other. So that's a very important thing to know about when I'm
measuring and scaling. Here's a wonderful
diagonal right there. And then we end up having like some triangles that create
some diagonals there. There's a little triangle
right here in shape. Then we also have that
kinda of a polygon. But like I guess if
we carried it out, it would be a triangle. That triangle right there meets
up with the edge of that. Okay? And then there is a curve. And then these two are curves, so I tend to just
will create those. And I don't identify them
so much as, as true shapes. And then let's look at
this, the other peony. And so the P, this peony is more open and slight
different angle. And then here again, that's my important node right there. And I use that as
a measuring point. So now that I've got that
wonderful little red there. So from that shape, eye, nose and my other
shapes come off of it. And the way p.stance
knees are that there's a they are designed or
they have a center. And they're usually a ball. And then their petals
fall out from it. And then if you're seeing it
from straight on top view, that's kind of the view
that we would get. The two flowers that
we're looking at. We're looking at it on the side. So we see it more as a, I think of it as a cup, but then has petals that
are fallen out from it. And not only do they
fall out to the side, but they also fall out
foreshortened towards us as well. Then this one's a three
is a three-quarter view. So we see the cup in, or it's a ball and we can
actually think of it. This one Is, this one is, so it's a sphere and this
is our shadow shape. And then we have petals that
come off of it In different. And depending this ball
casts a shadow here. And depending on how things go, you have different shadows. So those are the big shapes and that is what I'm
going to be blocking in for the, the initial drawing. And these are, you know, I think about these
abstract shapes. I think about how,
how they interplay. And when I'm first
doing a drawing, I really like to make sure that I'm thinking about all of that. And like for example,
with this one, we have, those are the
outermost petals right here. But then we have all of this
that's going on as it's fallen out from the center ball. And it's always good for
us to remember that if we, if we first think about
these big geometric shapes, our brain can more easily
and more quickly start to simplify and kind of organize and understand
what's going on. Because we have a lot of there's a lot of information
that's going on with these, with these two flowers that
we're going to draw today.
5. Lesson 3: Big Shape Block-in: I am getting ready to
start my block in. And as I showed you how I'm thinking
about the big shapes, I'm going to start my
block in with drawing in those big shapes with the
0.3 mechanical pencil. And using this lead, I went to orientate my drawing so that the flowers
take up the center. I don't want it to be too close
to one edge or the other. I'm using an 11 by 14
sheet of paper of Bristol, Bristol board paper,
smooth finish. I have my board slightly on an angle so that
way it all works out. Let's get that going. Okay. So I want the flower to
be between here and here. Which means that. So the, the peony is tip of
the leaf goes from here, an edge of pedal to there. And then I go, Okay, So that helps me out. So I'm thinking
about my big shapes. I am placing on my
drawing, on my paper. My node is about right there, so that means, okay. Okay, there we go. Then I've got Here we go. So, you know, when I'm measuring and when I'm starting a new drawing and thinking
about my big shapes, I am constantly thinking about the big shapes and how they
interact with each other. And the nice thing about doing a drawing
and blocking it in with a very light pencil is that first of all,
you first get, you get a very nice
sensitive touch with a lot of the
wiggle of what we, as we have with as
we're retouching. And I don't want my drawing
to be too, too mechanical. I want it to have
a little bit of. And what I noticed too, I just drew my leaf and
a little bit too low, but that's where
I want it to end. So now I know I need to bring it up and bring it to there. So another reason why you
draw very lightly is so that way you don't damage
your paper surface. Because if you draw too hard, you're at risk of
dentine your paper. When you do that, then
when you start to add tone and another
bit right there. Okay, so when you start
to add tone, it will, it will get, it
will be negative. So you'll get a white spot on
it so you don't want that. So that's my shadow there, that's my inner node. I've got a cast shadow there. So sometimes when I'm
measuring something difficult, I'm not using the outside
items to measure, but I'm using items that are the shapes like cast shadows, form shadows to to
help me place things. Okay, I think this is a good
start for the first flower. And now I'm going to
block in the next flower. And one of the things
that I'm gonna do is I'm going to start
working on adjacencies. So I want to, I want to make
sure that I've accounted for the way the flower interact. This is a pedal. And then we have another shape that interacts right there. It might be a little
bit lower hip. So I'm always measuring, like if I make a mistake, which happens all
the time, I adjust. One of the things about art. Art is a, is a constant push and pull
of things coming together, things not coming together and then like adjusting
and adapting. I am still just have it
working at it drawing. And you'll notice that
most of my curves are not curved lines, but instead, I sneak up to all my curves using
straight lines. Which do you think that's
a little bit higher, so the node is just a
little bit higher up. And then the petals. Once I get to a certain stage. Here, I do not have much
graphite on my paper right now. So you'll notice that I'm
just kind of going all over. But the next phase, I'm actually going
to get a sheet of paper that will
protect the paper from my hands because
there are oils in our, in our hands that will affect
the surface of the paper. That's my block and
there's more I can refine. But that is where I want to be on this drawing
at this point, very, very soft using
a mechanical pencil. So that way my lines are very, very small and very delicate
and minimal pressure. And I should point out
that when I'm drawing, especially when I want to
draw lightly in softly, I always hold my
pencil way back. And that allows for me to
have a really soft touch. And doesn't I don't have
I'm not putting down as much pressure just because naturally you do not put
as much pressure down. And then the nice thing
about using 0.3 is that if I use a hard pressure
that the LED will break. So here I'll demonstrate. It also forces me having to 0.3 forces me to keep my
pressure soft, extra soft. So that is my big shape
block in right now.
6. Lesson 4: Line Drawing, First Flower: Because I'm now
starting in the phase where I will be
having a little bit more graphite on my paper. I will use a sheet of paper, just this is just
printer paper as my, as my hand guard. And what I'm gonna
do is I'm going to refine the drawing
and I'm going to actually start with
the larger flower. And part of this
refinement is making my lines a little bit
harder in identifying, fine tuning my
edges just a little bit in some of this
stuff that I want to make sure that I catch with
a little bit more intention because I realized
all fine art is about is an iterative process
and that you go through one phase and then you develop in you enhance
the next phase. And you start to see
things that need to be altered and adapted
and enhanced and refined. And it's just a matter of
just enjoying the process. I really want to encourage
you guys to think about just the joy and the
beauty of the process. Our brain often likes
to tell us that we have to go faster
and all of that. Use this opportunity
as an opportunity to explore your
ability to think and concentrate and admire in Meyer beauty that
is a fundamental we are all humans love is to admire beauty and to get that
time and space for us. So I am not going to draw
every petal that's refinement, but this is refining the block and I just
wanted to make sure that some of my aspects of my
measurements are accurate. And if they're not, what, you know, where do
I need to fix them? And there's little things that I want to emphasize than I do. I'm looking Still
focusing on big shapes. I'm not trying to
get into the details too fast as you can. You can overload your
brain really fast if you get too much into
the details too fast. One of the things I am doing also is I'm going
to start putting in some of my shadow
shapes too. That helps. I find always when I put
in the shadow shapes, some of the cast
and form shadows. I start to understand my, my drawing subject so much more. So that is what the
stage is about, is it's the, it's the, the phase where I am learning. What are all the little details? My, my drawing of my subject. And it just is getting me one
more level of awareness and familiarity before I move on and start rendering the form. Creating this, shifting this drawing from
being in a line drawing to a drawing that has a sense of three-dimensionality
on my on my paper. I do go through, correct. I erase some of the lines
that I've previously had on. Then of course, I know as the process of
drawing continues on, I will have areas
where I'll need to make probably some
pretty big corrections. There's always
that and I'm never like totally set to
how I'm drawing. I do try to aim for
a certain level of accuracy just because
it makes four, it makes for an
easier experience. Now, like I pointed out, it's the deep node right here, and that's like the deepest
part of the flower. So I always, I always
pay attention to that. Here's a mono eraser and
there you can see what it is. It's a very small like
nibs eraser mono 0. And so right now I'm using a
kneaded eraser and my mono. And then this petal starts here, but it goes, it goes
down pretty low. And then it loops and
then we have another. So I'm using straight
lines to make curves. Like I'm always thinking
about the angle. So if I have that angle in relationship to another
angle, another edge. I just noticed that my
drawings off right there. Now I'm going to restart. There's always a lot
going on in a peony. And so one of the
goals as we're drawing peonies is to simplify
the shapes and forms. So that way they work together. You've got your block in. And then I find that
it's always helpful to do this refining
block end because the initial block in is to
look at the big shapes and to get the gesture of the
flower drawing down. If you notice, I'm
still pretty wiggly. And the wiggle is that gesture. I think some of the
most beautiful drawings out there are the ones that have a little bit
of wiggle in them. When I was in
architecture school, we called it the dither. A drawing that has
some dither and it creates a very evocative
and emotive drawing. And the most important
thing we do as artist is create an emotional connection
with other people. Get rid of some of these
construction lines. So construction lines
hold lots of purposes. They help us identify,
like right here. That's a cache shadow
from the center area. I also use construction lines
sometimes when I'm dropping a plumb line or when I'm
filling out an edge. And so that's what this one is. We need to make it
a little bit bigger or just adjust it a little bit. So it needs to be this
flower petal comes out and then there's a little bit tighter,
I guess that's it. There's more going on than
I initially realized. There we go. Then
there's an overlap. Okay. So I've got those two
and those two setup. Now. It's time to work on, it's time to work
on this flower.
7. Lesson 5: Line Drawing, Second Flower: I'm going to check that my plumb lines are
lining up correctly. And what I'm noticing is
that that's the edge. So that means this flower
and leaf might be at the right edge of this petal is not in
the right location. It's actually more
like right there. And the end of this
leaf comes, Oh, it actually comes down a bigger, it's like right there. So that tells me that I have to restructure
the upper flower, so not a ton. All drawings require
that in and out. And I really want to
encourage you guys to give yourself grace
when you started drawing. If you feel that like, oh, I exaggerated that or oh, that needs to be a
little bit bigger or oh, that needs to be lifted up. It's a okay. So but what I'm gonna do is
I'm actually going to do no, I need to work there and adjust, but I am going to first realized that I have a little
bit tighter tangent tos. I'm going to work
centrally and move out. Okay? So when I'm thinking about
my diagonals are my angles, I'd like to think
about this pedal comes here and that
pedal comes down, and then there is some, some stuff going on. But then this pedal
continues over and that looks about right. And then it comes
into the center. And then there's
this cache shadow right here of this
petal on to that petal. And then there's
cast shadow from this flower petal into the center where there's than
the node of this flower is. So I'm going to fit
together and it looks like my angles incorrect,
it's more upright. And then that helps me because there's there's a form there and then this comes off and that
form looks accurate twos. Now I'm going to move over here. And so let's look at it
in relationship now, let's look at the two
everything together. But now as I move over, I do not want my hand rubbing on all that,
all that graphite. So I move my paper
with me and it's okay. It all works out. There's a whole
bunch of like little wiggly things in there. And then there's this petal right here, two angles. So it's slight curve, but i'm, I'm finding that by
two angles instead. Measuring from here to there. So I've got a whole
bunch of lines there. So I've got to get
rid of some stuff. Hey, when there is leftovers
of eraser, I get rid of it. I do not use my hand to
get rid of the eraser. The plumb line is more
closer that there. There's lots of shadow
shapes going on here. So I'm going to actually
put a couple of lines of identifying
these different shapes. And there's like a
bold right there. And then in relationship
to this petal, this triangular petal
has some commonality to, so I want to join
that commonality. Okay, So this is the end of refining blocking until almost the whole drawing
is kinda put together. Now, there's a couple
of things that need to be like probably
refund even more. But for now, it's
an excellent spot. And so the steps
we've taken so far is big shape block in and then
refining the block in. The next step is adding tone. It looks beautiful and I am so excited to
start the next phase.
8. Lesson 6: Adding Tone, Pencil Differences Comparison: And I'm going to continue to use my 0.3 millimeter consult. And the reason why is
because it will give me in the long run to the best and
most consistent even tone. And that point stays super sharp for the whole
duration of the drawing. Where if I was using
a regular pencil, this is a B pencil. And it's a pretty
sharp tip right there. But as it, as I use
it to create tone, it loses some of its refinement. And so then therefore
it doesn't, it doesn't add an
even amount of tone. It doesn't get into the
grooves of my papers. So here let me show
you an example. That's actually
pretty nice, right? But as my pencil gets dollar
and not as pointy the grain, it won't fit into the grain of the paper as much
as I would like it. So see how, see here how the grain
is starting to show it. And that's because my
pencil is getting dollar. I'm gonna go I can
go over it. Upsets. Where if I have a 0.3 pencil, is my tip, stays the same
diameter the whole way. I have. I have a greater precision
of adding an even tone. I'm trying to go parallel, make my lines as
parallel as possible. So this is in real time. So that way you can see
it because when we, for the first layer
of adding tone, we then I use Kleenex to you get a better, more even tone with
the mechanical pencil. Of course, you can continue to use just a regular old
pencil if you want to. Just make sure you're
always sharpening it probably every, you know, every, definitely for
every about that much. So mechanical pencils
just become more easy.
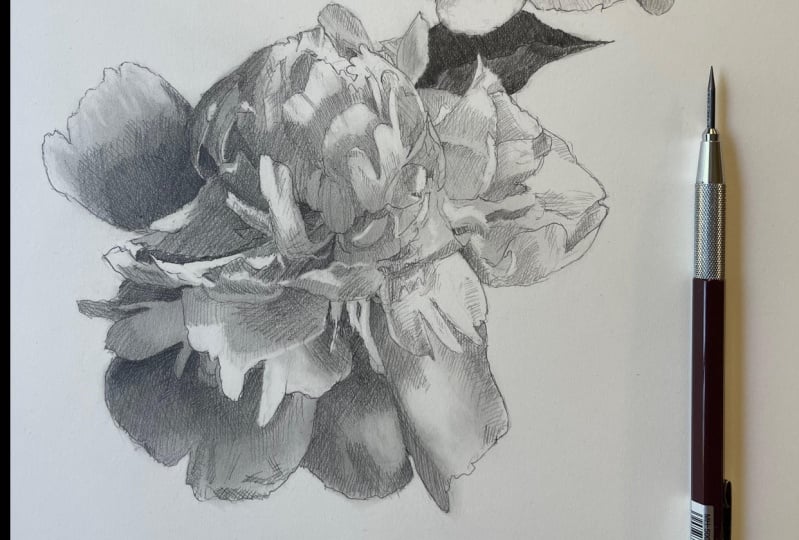
9. Lesson 7: Adding Tone, First Flower: For this lesson, we are going to start adding 3-dimension to this line drawing by
adding tone value shapes. And I'm going to continue to use my 0.3 millimeter consults. I'm going to start here. Okay, So I'm putting
basic tone down, but what I wanted to talk about
is when I squint my eyes. Even though, in comparison, this flower petal is significantly lighter than
what's going on back there. This one, if I compare, I squint my eyes and look at this flower petal
in relationship to what's going on
over, say over here. It's dark, it's overall
like a middle gray. So that tells me that I still need to add a tone
to it similar to this one, I added a slight tone
because even though it is darker than its
adjacent areas, it is still darker than
what's going on on the, say, the light side
of my flowers. So with that in mind, I also need to like this, this portion of
the flower petal. I've gone over it in a
couple of directions. And then I went over it
again this direction as I was carrying
forward, carrying on. So I'm going to essentially
cross hatch because my direction of the tone that I've applied
is this direction. Then to make sure that I can
get into my grooves, i'm, I'm going to create tone, but I'm going to apply my
pencil going cross across. And so that's what I'm gonna do. And I'm going to add, I'm
always gonna be paying attention to see
like yes, adjacent. These might be, this might be darker and this might be
significantly lighter. But then I need to look
at what is the value of this petal in relationship to the whole context of the flower. And if I squint my
eyes and realize it's still falls into my, say, my dark side, my shadow
side of the flower. That means I know I need
to add some tone to it, and that's what I'm
gonna do right now. I have a cast
shadow right there. And this is catching light. And then there's shade here. Then there's like there's some really darkness
going on in here, but there's a couple
of light strands, so I gotta be careful. I want to make sure that I'm capturing what needs
to be captured. And I'm going to refine my edge. Really dark right here. There's a little bit
of a triangle shapes. So I'm going to put
that triangle in. And if you notice, I'm
choking up on my pencil, that gives me, I can put down
a little bit more pressure. Make sure to watch
the lesson where I go over the three
different pencils. Graphite is a use and the different hatching and
how I hold the pencil. So that way you'll
understand why I sometimes choke up on a pencil and
sometimes why I don't. The quick answer is you can apply more pressure when
you choke up on the point. And as you've pushed full back, you have it's lighter. It's a lighter touch. Okay, so I'm going to quickly add some tone on these
elements over here. Really soft, so I'm holding my pencil at the very, very end. So that is adding tone
to the first flower. And now I want to unify my tone so I get a
Kleenex and I start to make sure I get rid of all of the any bit of
hatching or line work. Now, that guy gets a
little bit of dirty, like paper towel,
goes for right there. He's gonna get
erased out because that petal right
there is very light. So, you know, drawing is always a bit of a
push and a pool guys, there's always something
that might need to get a little bit
of tone like right here needs to be some
tone right there. I'm gonna put some tone
there. Here we go. Okay, so that is
the first flower. Oh, I just realized
I didn't add tone, so let me do that real quick. Oh, I actually wanna get, wanted to draw in a bit of
the veins of the, the leaf. The veins will help me
because this is a big, big leaf so I can actually use the veins and to help me segment of when I'm adding tone. There we go.
10. Lesson 8: Adding Tone, Second Flower: Okay, Now it's time to start with adding
tone to this peony. I'm going to start
left to right. And that will be to reduce
any smearing of graphite. I will be using my sheet of
paper to as a hand rest. So that way the oils
from my hands will not be getting on the surface. And eventually I will then unify the tone with the Kleenex. So let's get started. I'm squinting my eyes
and I've already like slightly don't drawn in
with very soft touches. This cast shadow right here. But I have not done so on here. And when I squint my eyes, that shape comes
out pretty strong. So that means that I want to
actually get that in because that will help me speed
up my drawing process. And there's areas here that are catching lights
that are lighter, and then there's areas that
are like a middle value. And also when you
squint your eyes, you can break things down into
your lightest and darkest. Right now, I see like
a, like a lightest, a light like a medium light and then a medium
dark and then dark. So that's for value shifts, for value areas
that I'm going to, I'm going to simplify and put my tones in
that wife initially. Let's get started.
So I'm holding my pencil again, far back, so it's a soft touch, so I'm not grooving my paper. Now this part of the
tone needs to be darker. So I'm gonna go back over it. Then I'm gonna go over
it as a cross hatch or across the direction
than I originally went. And sometimes I'll
even like shifting, switch my paper around
to help with my with the crosshatching because this is a very comfortable
hatch direction for me. So I'll just switch
my paper around. This is this flower petal
right here is catching light, but it's darker in this flower petal is
also catching light. But, but this over here
is darker in value. It's not as dark as
what's going on there. I identified as my
medium dark value versus like a medium light. And the medium lights
tend to be over here. So let's get started. I squint medium dark, even though like compared
to that, it's darker. But compared to
this, it's lighter. There's some variety here. They are lighter
than the dark here, but darker than the light,
the adjacent light. This is my medium dark. See how I patch quilted this big shape with
different hatches. And then I can reinforce and create a little
bit more unity. Here, darker. There are times when I'm
just going to give a whole, the whole area tone, I'm going to create some unity. Cast shadow. I squint my eyes this
whole area here, it's lighter than
what's going on here. It's darker than these adjacent. So I'm going to actually
create just a basic tone. Knowing that I'll have to
refine that in the next and the refining layer. Shadows. See, okay, so I've got to
darken some areas there, and there's a couple of
things over here, not a ton. So what I'm gonna do
is I'm going to allow this to be considered my lights, so I'm not gonna do much
shadow shape there. I do need to create, put in the leaf. Form. A little bit of shade here, a little bit of hatch. They're not a ton. That's very light. It's a little bit of tone. See, this guy still needs tone, so I'm gonna put tone, they're a little bit of shade
here, but a tone. So that is first
application of tone. And I'm pretty pleased with it. So I'm gonna go about right now, I want to unify this. So then right here, there's some halftones,
but I can just look, I can just use my dirty paper
towel to get me some of those very light tones like this flattening pedal
will have to be erased out. There's no getting around that. And then I'll have
to erase around. I can erase either
that way or I can erase with one of my
fancy pencil erasers. I've got two. Well, this is my
favorite eraser, but I've got this
one also that works for erasing up large swaths. And it's got a chisel edge
so I can actually use it. I can actually draw with it. I'm going to continue
unifying the unifying my tone and see how it you can use a stamp for this process to I
just find a Kleenex is I always have a
Kleenex available. I don't always have
my stump available. And one of the reasons why I do this unifying phase is because
it creates a good solid, like, it's like
an underpainting, but it's an under drawing. And it just kind of
immediately kinda creates a sense of very quickly. It creates some nice unity. There we go. So there's both
flowers together. But before I go on
to the next phase, I will spend a little
bit of time erasing out my paper to hold my hand. A few more things I wanna do before I call this
phase is complete. And that is I want
to around the leaf. I like this very much. So that is where
we are right now. The next phase is re-find
the refining layers, and that is what
I'm gonna do next.
11. Lesson 9: Hatching, First Flower: Okay, so now we are on the next stage of drawing
to get it more refined. And what I wanted
to do right off the bat is I want to get
my darkest darks in. So I have, I've
already drawn them in dark with the HB pencil, but now I want to get them in
with regard to my darkest, like some of my darkest darks. And the Furby is a darker lead. Softer. And with that softness comes more graphite comes
off the there, and then the leaf is
also pretty dark. I'm going to actually
get in over here. And with this portion
of the drawing, I use hatch marks to create
my visual interests. Granted, sometimes my
hatch marks are so dense that it's almost like
as if I'm adding tone, but in fact, I am, I am adding little tiny, precise hatch marks to
create visual interest. I'm reinforcing
lines. And again, I want some squiggle. I don't want everything
to be too mechanical. I first go in with
parallel lines. We didn't need to be reinforced. I crosshatch. Parallel lines are
helpful and important. When I squint my eyes,
it's dark is right there. So I want to make
sure I emphasize, I also want to make
sure that the edge of the white area of the
flower really light. I want to make sure that
that is as light as it can, as light as it needs to be. It's very dark here. So my hatch marks are
tighter and I'm crossing. I also use the direction
of my hatching as a means of defining the
different planes in the form. Then like I think there's
just a little bit and won't hurt to put in a little bit of cross
hatching to emphasize that this is darker. So I'm going to I do
not want a constant, same quality of line everywhere. Pretty soon I'm going to
work here with my four B. But then I think the rest
of my patches for this, except for the leaf,
will be in to-be. But I'm going to continue
working just real quick. I'm not going to
be using Kleenex to smear and rub going forward. This is, this is
hatching. Like only. Even with using a for B, I can adapt my pressure, create different
quality of strokes. So like right now I'm working
with a very light touch. I'm also the way my
ain't my wrist is. I don't have as much control. So there's a little bit more like my lines are not as
parallel as they are. When I'm holding a
pencil like this, I've got this beautiful
petal right here. I really love the
feeling of that pedal. And that is gonna be to be not my fault that
I'm working on. So I got to restrain. So that is with a for B, I'm switching to my tube. So it's a push and pull between your lights and darks too. You're constantly refining. There's a, there's a bit of
a core shadow right here. This is a form shadow right
on this petal right here. And then we've got some
reflected light in here and it goes deeper. And then this, this edge
of the petal is catching. So I wanna make sure I
capture all of that. So what that means is actually the core
shadow is a little bit more like right there. That's my core
shadow, but then I have a little bit
of form shadows. So I created a light hatch
that has space between it. And then I'm gonna do the
same light hatch over here. Now look at the
difference. This area did not have the tone put down. And look at how the tone adds automatically when
you hatch on top of it, you get a little bit more a
deepening of visual effect. Like almost I should
probably have tone here. So I'm going to
actually just very closely had a
little bit of tone. You can do that too. At times when you
in the tone phase, you didn't apply
tone in the spot, but then you notice that you
actually need it later on. However you will have to, you want to unify that tone. So that means I
have to go in with my paper towel and I'll
have to rehash everything. But that's okay. That actually makes for a stronger drawing. And I'll always choose
the stronger drawing over avoidance of
doing a certain, a certain aspect of the drawing. So what I wanna do is now I'm going to cross
hatch that form shadow, core, shadow of that pedal. Let's see what's going on. So pretty always, always
guys, reinforce yourself. If you like, something's going, give yourself that quick kudos. I'm always aiming for beauty. So I make sure I point that
out when something's going well and how lovely it is
and how much I admire. It. Looks really nice. Look at that. It's still staying with the to-be right now. I'm going to work on creating some outlines and some
wonderful wiggles. And then I will
hatch the leaf in. I just noticed I laid in a couple of varies,
a bit too dark. So when that happens, you can actually use
your kneaded eraser tool to take it out some. So I'm going to actually soften just a little bit in
my light, light area. I just have this pedal, that petal, this
petal and this leaf. And now I'm gonna go
back to my four b. This is my darkest. I'm going to put in solid. So for the leaf, my goal is
to deepen the value of it. Here we go. Now I'm
crosshatching. Pedal done. And again, my edges, I'm trying to, I want my, my line quality to be varied and I don't mind
a little bit of wiggle, If anything, I like
it because it adds for that natural sensitive. In nature, things
are not machined. So there is a bit of variety. Then this flower petal, There's a little bit
of foreshortening. I've got a, I'm actually
going to cut that out. Here's a tip of a leaf there, but I'm gonna get rid of that. And what I'm gonna
do is identify the foreshortened area and
that there's a little bit of edge quality shift in value. A little bit of cast
shadow right here. I'm going to put
that cast shadow in. Erase parts where
there needs to be, needs to be the
lightest. There we go. And also I'm going to actually take and cut through
some of my hatching. So there is the
first peony drawn, and we'll move on to the
next one, the next lesson.
12. Lesson 10: Hatching, Second Flower Part 1: Now we are going to work
on the second peony, which is a larger
and more complex. And again, I will be using
my Tooby and for B lead, we'll be using hatch
marks to on top of the tone shapes to give this flower some
dynamic field to, I'll just say right now,
I'm very excited about it. I'm going to start with my for me and I'm going to
start in this area, which is my darkest area. My second darkest
areas are down here. And then I have like
a secondary there. And then there's some
pretty interesting stuff going through here. And then everything
that's going on in the light areas will be a combination of erasing out and putting in
light hatch marks. But let's start over here. I need to reinforce
a couple of lines. So I am reinforcing
the drawings. Since when I added tone
and unified everything, I lost some of the structure of the design and like the
anatomy of this flower. So right now I'm
going through and kind of re-establishing
the line drawing. And I'm doing that with this drawing in
particular because there is so much complexity going on with the first peony
wasn't as necessary. But with this one, I feel that I need to
reorganize everything. Again, there's no harm ever
in redrawing something. And in truth, that is what
I have come to think. Art is, art is always a push
and pull of where you draw, maybe smudge down, and then you go back and you
re-establish it. And that's kinda what,
that's where I'm at right now with
this drawing is am re-establishing aspects
of this flower to make sure that everything is working
out the way I want it to. Ultimately, this flower
tip is catching light, so I want to make sure
I get that in there. I've got some they're
catching light. Same goes for here. I'm going to capture
this little, not as kitchen lights. I'm going to do that. There's a node right here,
that's kitchen light. I will erase out of it. And then the edge right here. So the edge of this
flower is catching light. Capture that edge,
draw with that edge. When I squint my eyes, this flower petal is light in relationship to how it looks
like in the background. However, when I squint my eyes to it and
compare it to the other, like lightness to the like. These flower petals or
that flower petal there, it is still significantly dark, so that's why it has tone on it. But there are a couple of
areas that are catching light. I am going to use a kneaded
eraser to brighten. I've shaped it and I'm taking
down some of the tone. And when you compare to the tone that I can
erase with say, this eraser, this is a much
softer touch and night and I, so there is always that you can use your eraser
to draw as well, your drawing in the negative in that you're removing maybe some color or some tone that you've already
applied to it. And you can really make some wonderful soft, subtle touches. And so that's what I'm doing. So going across form, like I just did there
and then going along or parallel to form can create. And when I say form,
I'm talking about the, the, the sense of shape, the mass of the volume that this flower takes up in space
that is, that is formed. So this is slow to
start, but boy, does it create some beautiful
working like this is, you know, it takes time. Boy, do you get some beautiful
visual effects from this? So that is one of
the reasons why I love creating
drawings like this, where I build up the layers
and I have a tonal aspect of putting in like a
solid hatch that then I'd been rubbed down and
turn into a solid tone. And then I add texture
and pattern and variety through the
use of hatching. And what draws me to draw like this is it gives me
an opportunity to really learn how to
interpret objects in three-dimension and
then translate them to onto a two-dimensional
picture plane like a piece of paper. And I was actually thinking
about it this morning when I was thinking about getting started on this drawing is like, why why do a drawing like this? And there's several reasons. One is it's easier to learn how to interpret and understand how to take a complex
subject matter like a peony and turn it into
an artistic expression. I find that drawing
is just so much easier than painting
is using graphite. Because maybe I spent hours and hours with a
pencil in my hand as a kid. I find that working
with graphite is just a natural
extension of who I am. And then it, So therefore it
makes it a little bit easier to look and interpret
and explore. And with that, I want to
fine tune my skill set, I guess, at interpreting
the visual world. And this gives me an
opportunity to do that. And it gives me an
opportunity that's easy. I can start and stop this exercise write-off
without having to clean my brushes or think about like my cat to
climb into it and get, you know, get paint
on them as a whole. Graphites a very
innocuous medium two. And so it just, it really allows for
a lot of versatility. So I'm slowly building up, squint my eyes. That helps me to distinguish different planes. I use a different
direction of of hatching that I think
also helps with. In the initial drawing. I might have missed
or didn't add tone, like right here. In that tone. I'm going to add tone. Now. I want to have these red marks that are very dark and
I get to decide, do I want to include
them into my drawing? Or do I want to ignore
that shift in value and just really focus on the
white flower petals. And I'm thinking
I'm just going to focus on the white
flower petals. Yes. Yes.
13. Lesson 11: Hatching, Second Flower Part 2: Lot going on in there. There's some lighter
tones, mid tones in there, but I'm going to use
my to-be for that one, those and then we're going
to continue catching light. A little bit of tone there, then that this petal
needs to be erased out. Right here. I am so pleased with how
this is turning out. So I got a little bit off
on my drawing around here. The anatomy is just
a wee bit off, but instead of erasing and redrawing, I'm
going to adapt it. And the only people that
will know that I got the anatomy off on this
flower are you and me. But it's still going to
be a beautiful drawing. So I don't mind that
I'm also a little bit, my goal always with these
drawings is to make sure that I'm really celebrating
the beauty of the flowers that I'm drawing. That's a little bit hard
build-up right there. And that's come from
having two patches of Hatch come over and
like by coincidence, land on top of each
other very well. I want to smooth that out, but I don't rub it out. I actually redraw it by
reestablishing my hatch. But instead of going up to it, I could barely to the edge. And the same goes, I want to transition this a
little bit more, so I draw up to it but
not over it there, and that kinda cleans it up. What I'm noticing is this area needs to be just a
little bit darker. So I'm going to oops, I was using harder pressure, which is what I wanted, but I broke broke my tip. This needs to be just
a little bit darker. There's wrinkles. I am pleased with how
everything is going, but now I'm switching over. I'm going to switch
over to my Tooby, which is my medium value, lead to B goes down lighter in value
than the four B does. If I use the same pressure as I was using with the four B, which creates some nice variety using the two different LEDS. So this is done with four B, but it needs to go just
a little bit darker. So I'm going to reinforce
it with just another layer. This needs to be still
a little bit darker. Turn your paper if you need to. So I made the decision, I want this petal
to be stronger, so I'm adding a dark value around it to make that petal seems stronger
than it, than it. So that way, it kinda just
stands out a little bit more, which I have that, I have that ability in
power to do that as a, as an artist, we get to choose how we want
to emphasize things. If we want to, I'm choosing to emphasize my pedal that way. This is a little bit darker, so I'm going to put that
darker in their capture. Some of my lights. Love drawing with,
with these erasers. Are you draw negatively? Here we go. I'm going to add, that's looking so good. Put in the leaf,
I want to work on the connection between
the two flowers. So let's work on that. So first off, very dark. Here. It's a little bit different than what is in the photograph. Reference again, a little bit of I've shifted some
things anatomically. Let it all works out. By establishing
those lighter edges. It helps me make judgment. And now, granted, this
is like almost black, so I'm putting in a back-and-forth hatch for the dark of this, of this leaf. I want to minimize
my need to erase. So I'm actually going to use a crib or I'm going to
use a sheet of paper. So I'm going to draw up to
that edge with my hatch, guarantees that I don't go over where I don't
want to go over, especially with that
edge being so light, That's a little hack. You can use a little
bit more pressure. I draw right up to
what I had previously, where my hatchet
previously ended. I have pretty good control, so I don't always
need that paper edge, but when I do need it, I don't mind getting it out. The lighter part of the green
leaf, but there's still, it's still significantly
darker than any of the white. So with that in mind, even though like this area
right here is catching light, still significantly
darker, squint my eyes. It almost goes away. So doing a cross hatch, that leaf is in. Excellent.
14. Lesson 12: Hatching, Second Flower Part 3: Now I will go back
to using a to-be, some hatching going
on right there. I love this phase
of the drawing. When I am just getting
ready to finish up, I want to work through
and refine some areas, get rid of some of my
construction lines. I'll fund all of those lines. You can use it to soften things. You can draw with
the two withdrawing. There's always some level
of change and I'll train. And so I'm going to be
aware of that as well. This panel comes here and
then it catches light. I went a little bit of dither. I M reorganizing and finding
my space all through here. And what that does
is that helps me choose areas that
need refinement and what needs to be left
alone because we're at this or some of the
shadowing is very subtle. It's darker in value right here. So I'm going to hatch Li, get some different
hatch patterns, stuff going on anatomically. My flower is a little bit
too small in this area. But that's okay. I will still make it work. And only you and I know that it's not exactly
as our photo reference. And so keep that in mind, guys. When you're drawing flowers, I always strive to get to a
certain level of accuracy, but it's not like doing
a portrait of a person. Or if you're an eighth
of an inch off, everybody and their uncle Bill know that you're off
and drawing that knows or that i
but with flowers, most people, they know
what a flower looks like. They may not know exactly how this specific flower looks like, so we can adapt as needed. This one on this panel, I'm choosing to leave
the tone as is. I'm not going to alternate match because the tone is the value of where
it needs to be in. So I'm going to
just let that go. We're going to work a little bit here on the tone of this guy. A little bit darker
down in here. Sometimes the shift is very, very subtle and you don't
want to go overboard. You know, like when we're
dealing with a flower, like a peony flower like this, I always like to
first break down my values into simple,
really simple. So my dark is dark, my medium dark, medium light, and my lightest light. But then as I go through the refining process
and I might have anywhere from 20 to 30
different value gradations. And they're always
kinda dependent also on what's adjacent to them. And that helps with keeping interests and creating
three-dimensional volume. Now this flower right here has reflected light
along the back. So I'm not going to touch that. And it's got, it's catching
light right here on its edge. So I want to erase out. Might be it looks like it's
catching it right here too. And so behind it is
a little bit darker. This is this part is lighter than what's
going on right there. From here to here, it's darker. Then as it goes over here it gets lighter.
So I'm going to Do that. And then this petal, it rolls. There's, there's reflected
light right here. So I'm not gonna do
anything but then there's like a bit of a form shadow because
it's the petals curling. And just by the way, the direction of the light is, it's, the pedal is
its most opaque. I'm going to first put
in one cross hatch, and then I'm going to
cross hatch again. And then I noticed that this
area right here has more, a little bit darker, so I'm
going to put that variety in. I've got some dark there. Let's see, this part of
this petal is really dark, so I'm going to put that in. This is my favorite
part of hatching actually is when
you're dealing with all these little tiny nuances. It's when you can
get most expressive and playful with your hatching. I'm using very light
touches on all of this to let means to be extra clean. And then there's these
little, a little guys. And notice that I have
to be lighter anyway, so I might as well
erase that too. I'm entering the last phase of the drawing where
I have this petal, this petal, and
like to fine tune this petal and then this
drawing will be done. And so I'm going to quickly
look at a couple of things. Might choose to
abbreviate a few areas. Put in a couple of marks. Okay, I have a scenario on
this flower petal right here, where this area has darker in value than
the adjacent areas. So I'm going to, what I'm gonna do
is I'm going to work on putting in a little
bit of my shadow shape. I hatching it in my drawing
or at my photo reference. This edge is catching light, but then there is touching a little bit
of the light there. This edge of this
pedals catching light. This edge is very
bright right here. But there's just a little bit of something going on in here. And then I'm
finalizing right here. We've got a cast shadow. And then we have a
bit of form shifting. I'm going to put some form, some hatches that will
deepen that value, that area just a little bit. Okay, so that is the
end of the drawing.
15. Lesson 13: Finishing the Drawing: I am so pleased with how this
painting has turned out. I would say that it is complete. When I finish a drawing, I always take a few
moments and sit at it and look at it
and like, first of all, decide whether or
not there needs to be anything that needs to unify the piece because I drew these two
flowers independently, I then make a decision. Is there anything that
needs to be adapted and to create some more visual unity
between the two as a whole, I think I did a
really good job of unifying the two pieces. I do see a couple of areas
that I do want to refine, but as a whole, I'm loving
how this piece came together. So the only thing that I'm noticing is there's a
little bit of disunity between the darkest dark of this flower with
the darkest dark of this, of this flower. I want it, and it happens to
be this petal right here. I want to create a little
bit more unity with that, and I will do that shortly. But also, every time I
work on a piece of work, I make a point at the
end of it to identify the three things that I
learned from the experience. This helps me stay away from
being so outcome focused, but instead to focus
on my process. So I'm going to first what
I'm going to darken that. But while I'm darkening, I'm going to talk about
what I learned from this experience
every time I draw, I learned something new and
I value that experience. And so one of the
things that I learned, because I have not drawn a complex peony flower
drawing like this before, is that I learned that it takes longer than I anticipated. That the slowness of me coming at it makes for a
really wonderful experience. So that's one of them. And so I learned that
the next time I come, I learned that the next time
I work on a peony drawing, I will give myself more
time to complete it. So that way I don't feel rushed, but also so that I will enjoy the process
a little bit more. Okay, so that is better. See I'm squinting my eyes. Okay. I also need to
work in that area. And then I had one area, that one spot that I also noticed on this
flower that I need to, I want it to roll more. And it's, it's this
transition right here. Yes, it is light, but there's just a little bit
of variation and rolling. So I'm going to just put just a slight hatch to make it roll just
a little bit better. Yeah, there we go. Okay. So that is the the peony
drawing completed. Again, three things
you learned from it. Plan more time. Make sure I really connect with the process
while I'm drawing it, connecting them with
the process and enjoying every hatch stroke. And just that. I absolutely love how
this piece worked out. So thank you so much for
joining this lesson, and I cannot wait to
see your drawings.
16. Peony Drawing Thank you: I want to thank you so
much for being a part of this class and working on
your own peony drawing. This is mine and I am so I'm so honored to have
worked with you in this class and showing
you my process of how I take a pretty
complex flower peony. And step-by-step, I turn it into something that is to meet evocative and emotional in my appreciation of these
beautiful flowers. And I hope you too have enjoyed and thoroughly learned
a lot from this class. I look forward to
hearing from you and please share your results. Share them with me. I would love to see
them. Thank you so much.
17. REVISED LESSON 01 Big Shape Block in: I am getting ready
to start my block. And as I had showed you the, how I'm thinking
about the big shapes. I'm going to start my block in with drawing in those
big shapes with the 0.3 mechanical pencil
and using this lead. And I went to orientate my drawing so that the
flowers take up the center. I don't want it to be too close
to one edge or the other. I'm using an 11 by 14
sheet of paper of Bristol. Bristol board paper,
smooth finish. And I have my board slightly on an angle so
that way it all works out. Let's get that going. Okay. So I want the flower to
be between here and here. Which means that the peony is tip of the leaf
goes from here, an edge of pedal to there. And then I go, Okay, So that helps me out. Then I know that my panel. Okay. So I'm thinking
about my big shapes. I am placing on my
drawing, on my paper. And I am my node is about right there. So that means, okay. Okay, there we go. Then I've got yes, here we go. So when I'm measuring and when I'm starting to drawing and thinking about
my big shapes, I am constantly thinking about those big shapes and how they interact
with each other. And the nice thing about doing a drawing and
blocking it in with a very light pencil
is that first of all, you first get a, you get a very nice
sensitive touch with a lot of the
wiggle of what we, as we have with as
we're, we're touching. And I don't want my drawing
to be too mechanical. I want it to have a little
bit of what I noticed too. I just drew my leaf and
a little bit too low. But that's where
I want it to end. So now I know I need to bring it up and bring it to there. So another reason why you
draw very lightly is so that way you don't damage your paper surface
because if you draw too hard, you're at risk of
dentine your paper. And when you do that, then when you start to add tone and another bit right there. Okay, so when you start
to add tone, it will, it will get, it
will be negative. So you'll get a white spot on
it so you don't want that. So that's my there, that's my inner node. I've got a cast shadow there. So sometimes when I'm
measuring something difficult, I'm not using the outside
items to measure, but I'm using items that are the shapes like cast shadows, form shadows to to
help me place things. And I also mean, that's too. There we go. Okay, I think this is a good
start for the first flower, and now I'm going to
block in the next flower. One of the things that I'm
gonna do is I'm going to start working on adjacency. So I want to, I want to make
sure that I've accounted for the way the flower
interacts with. Okay, right there. Okay. And then and then we have
part of the flower is, this is a petal. And then we have another shape that interacts right there. It might be a little
bit lower hip. I'm always measuring and
if I make a mistake, which happens all
the time, I adjust. And one of the things about art, art is a constant push and pull of things
coming together, things not coming together and then adjusting and adapting. There we go. Now, I'm pleased with
my measurements. Okay, and then so I am still just have it
working at it drawing. See that comes down. And then there's, and you'll notice that most of
my curves are not, are not curved
lines, but instead, I sneak up to all my curves using using straight
lines and that enables me to have that okey. So that's lower
than this leaf is lower because I have an
an overlap right there. Okay. Okay. I am just trucking along. C. Do you think that's
a little bit higher? So the node is just a
little bit higher up and then the petals. And then I have, once I get to a
certain stage here, I do not have much graphite
on my paper right now. So you'll notice that I'm
just kind of going all over. But the next phase, I'm actually going
to get a sheet of paper that will
protect the paper from my hands because
there are oils in our, in our hands that will affect
the surface of the paper. And I do not want the oils from my hands
to get to get on. So I'm sure they're
okay right there. That's pretty much Let's
block in right now. That is, that's my block and then there's
more I can refine. But that is where I want
to be on this drawing. At this point. It's very, very soft using
a mechanical pencil. So that way my lines are very, very small and very delicate
and minimal pressure. In fact, I should point
out that when I'm drawing, especially when I want to
draw lightly in softly, I always hold my
pencil way back. That allows for me to
have a really soft touch. And I don't have I'm
not putting down as much pressure just because naturally you do not put
as much pressure down. And then the nice thing
about using 0.3 is that if I use a hard pressure
that the LED will break. So here I'll demonstrate. It also forces me having to 0.3 forces me to keep my
pressure soft, extra soft. And yeah, so that is my big
shape block in right now.
18. REVISED LESSON 02 Refining the Line Drawing Part 1: Okay, so now we are entering the phase of
refining the drawing. I will use a sheet of paper, just this is just printer
paper as my hand guard. Part of this refinement
is making my lines a little bit harder
and identifying, fine-tuning my edges just
a little bit in some of the stuff that I want to
make sure that I catch with, with a little bit more
intention because I realized all fine art is about is an iterative process and that you go through one
phase and then you develop and you
enhance the next phase. And you, you know, you start to see
things that need to be altered and adapted
and enhanced and refined. And it's just a matter of
just enjoying the process. I really want to encourage
you guys to think about just the joy and the
beauty of the process. Our brain often likes to tell us that we
have to go faster. And all of that. Use this opportunity
as an opportunity to explore your
ability to think and concentrate and admire in
Meyer beauty that is a fundamental that we are all humans love is
to admire beauty. And drawing is one
of the best ways to get that time
and space for us. So I am not going to
draw every petal. That's the refinement that
this is refining the block. And I just wanted to make
sure that some of my asked some of my measurements
are accurate. And if they're not, what, you know, where do
I need to fix them? And there's little things that I want to emphasize than I do. I'm looking, I'm still
focusing on big shapes. I'm not trying to get into
the details too fast. You can, you can
overload your brain really fast if you get too much into the details too fast. When working. At this phase of
refining the block in, I am going around and looking. I'm breaking down the
big shapes a little bit more with a little
bit more accuracy. I still am allowing
for things to go. But one of the things I
am doing is I'm looking, I'm going to start
putting in some of my, the shadow shapes too. That helps. I find always when I put in
the shadow shapes, some of the cast
and form shadows. I start to understand
my painting, my drawing subject,
so much more. So that is what this
stage is about, is it's the, It's the
phase where I am learning. What is, what are all the
little details of my, of my drawing of my subject. And it just is getting me one
more level of awareness and familiarity before I move on and start rendering the form, the female creating this, shifting this drawing from being a line drawing
to a drawing that has a sense of
three-dimensionality on my, on my paper, on the two-dimensional picture
plane of the paper. I do go through and I correct, I erased some lines that
I have previously had on that shape is more like that. Then of course, I know as the process of
drawing continues on, I will have areas
where I'll need to make some pretty
big corrections. There's always that. And i'm, I'm never like totally
set to how I'm drawing. I just I do try to aim for a certain level of accuracy
just because it makes four, it makes for an overall
easier experience. So I'm, I'm drawing, I'm looking at all
of the shapes. So now, like I pointed out how there's this note
that the deep node, the deep node right here. And that's like the deepest
part of the flower. So I always, I always
pay attention to that. I always pay attention to
the deep part of the flower. It helps me find where I am. And in fact, I should have just noticed I made that too high. This bit is down here. Interesting how sometimes I thought I was making
a correction and then I go back and remeasure
with my eyes the shapes, and then I realize I'm not. Oh, let me point out. So far I've only used
a kneaded eraser, but now I've switched up, I'm switching over to I have, this is a mono Zero eraser. And here's a mono eraser and there you can
see what it is. It's a very small, like nib eraser, Mono Zero. Right now I'm using
a kneaded eraser and my mono eraser in C, so it's right there. So it is a little bit lower than this this petal right here. So that's why there we go. Stuff going on in there, but I don't really have
to worry about that. Then I've got this is
how I knew I had placed at pedal and correctly
because I have this little tiny petal in there. And then this petal starts here, but it goes, it goes
down pretty low. And then it loops and then
we have another there. Okay. I still working a lot with my
three my three millimeter. So I'm using straight
lines to make curves. I'm thinking about my
shapes and the like. I'm always thinking
about the angle. So if I have that angle in relation to become
another angle, another edge that helps
me shadow shapes. And then it goes like
that triangle there. Then I've got a
diagonal right there. And then it comes,
comes from Pair. From that diagonal, There's another diagonal
of some petals and kind of shape and they go to their job actually that
means that's a bit bigger. Then this line right here, There's a diagonal
of a pedal that curves and has two
shapes like that. And then it continues going up. But I just noticed that I'm
my drawings off right there. So I'm going to restart. I got too in the weeds. So it's more like
there. There we go. Then that diagonal. There we go. Sometimes I got to
start all over. Every zone. Okay. Starting over, but not bad. They're kind of coincidence. There we go. There's some stuff
going on in there. Okay, so let's move on to
this more complex area. I'm going to line
that comes down. And then on the other side, if I bring a plumb line down, right there is another
petals that starts. Points are really pretty petal. I want to make sure I'm
capturing it to its best. Comes up, and then
it comes down, it's broken into three pieces. Visually, just a
beautiful petal. And it comes up and then okay, and to make sure that I'm measuring and
seeing things right, I'm going to put in a little
bit of shadow that I see. And that will help me
measure. There we go. There's always a lot
going on in a peony. And so one of the goals as a, as we're drawing peonies is to simplify the shapes and forms. So that way they work together. Okay, there we go. That goes inside here, right? Right, right there. Okay. Might need to be
a little bit bigger. We'll see as I move down here. Then there's a line. Then the line right here. It's right there. So that's one of the reasons
also why we why you do this phase of you've
got your block in and then I find that it's always helpful to do this
refining block. And because the initial block in is to look at the
big shapes and to get the gesture of the
flower drawing down. And I oh, I see. All right. Okay. Right. Comes up more. Shadow shape. Shadow shape. Let me have a long piece
and another long piece. If you notice, I'm
still pretty wiggly. The wiggle is that gesture. I think. Some of the most beautiful
painting drawings out there are the ones that have a little bit
of wiggle in them. When I was in
architecture school, we called it the dither. And I have to agree that I think a drawing that
has some dither in it creates a very evocative
and emotive drawing and has artist, I think the most important
thing we do as artist is create emotional connection between, with other people. We, we find in our visual world. Those elements
that everybody can appreciate and communicate to and needs to be more
like right there. So with that in mind, I'm always looking
for a little bit of dither in my, in my drawing. And Here we go. Oh my God. So good, so amazing. So beautiful. All of that and more. Then there we go. Here we go. A little bit of
variation and crinkle. Those two right there. I am going to get rid of some of these
construction lines. So construction lines
hold lots of purposes. They help us identify. Right here. That's a cast shadow
from the center area. I also use construction lines
sometimes when I'm dropping a plumb line or when I'm
filling out an edge, that's what this one is. C. And we need to make it a little bit bigger or just adjust it a little bit. So it needs to be this
flower petal comes out. Then there's a little bit
tighter, I guess that's it. There's more going on than
I initially realized. There we go. Then there's
an overlap right here. Then we have we have
that right there. And then this one, there's actually another
petal that comes out. It's this theory. There's some shadow shape. Okay, so I've got those
two and those two setup. Now, it's time to
work on this flower.
19. REVISED LESSON 03 Refining the Line Drawing Part 2: It's time to work
on this flower. So I'm going to move up. And I always like at this stage, I'm always using a
piece of paper to, in one of the things
that I'm going to check real quick is I'm going to check that my plumb lines are
lining up correctly. And what I'm noticing is
that that's the edge. So that means this flower. I actually, the leaf
might be at the right. This, the edge of this petal is not in
the right location. It's actually more
like right there. And the end of this leaf comes, Oh, it actually comes down. It's actually a bigger, it's like right there. So that tells me that I have to restructure the upper flower, so not a ton. But i'll, I'll, I'll drawings
require that in and out. And I really want to
encourage you guys to, to give yourself grace
when you started drawing. If you feel that i 0, i exaggerated that or oh, that needs to be a
little bit bigger or oh, that needs to be lifted up. There is absolutely. It's a okay. So but what I'm gonna do is
I'm actually going to I do know I need to work
there and adjust, but I am going to first realized that I
have a little bit tighter tangent also I'm going to get I'm going to work I'm going to
work centrally and move out. Yeah. Then I've got, Okay, so when I'm thinking about my diagonals
are my angles, I'd like to think
about like this pedal comes here and that pedal comes down and then
there is some, some stuff going on. But then this panel
continues over. And that looks about right. And then it comes
into the center. And then there's this
cast shadow right here of this petal
onto that pedal. Then there's cast shadow
from this flower petal into the center rather than
the node of this flower is that together and it looks like my angles
incorrect, it's more upright. So I'm going to capture
that and fix that. Yes, there we go. And then that helps
me because there's actually that there's
a form there. And then this comes off. And that form looks
accurate too. So then there's our petal
right there, Mayor. And then here's the belief. And then have some
stuff going on there. And then this flower
petal comes out down. Then it's got an edge. And then there's some of this
wonderful cream cleanness of the edge of that Howard
pedal. There we go. So that is that part. Now I'm going to move over here and let's look at
it in relationship. Let's look at the two
everything together. But now as I move over, I do not want my hand rubbing on all that, all that graphite. So I move my paper with me and it's okay at
all, and all works out. There's a whole
bunch of like little wiggly things in there. And then there's this
petal right here that comes comes up and over. It's part of that diagonal. And it comes down and
it's about right there. Two angles, so it's
slight curve but i'm, I'm finding that by
two angles instead. Then it goes. Yep, that's right.
Okay, I'm going. There we go. Sorry. I've got a whole
bunch of lines there, so I've got to get
rid of some stuff. Okay. When there is leftovers of
eraser, I get rid of it. I do not use my hand to get
rid of the eraser gunk, I use a Kleenex. Often. The plumb line is more closer that there. So that gives me
more room to create. It's an important triangle. And it rolls up an apex. That triangle, the curve
at apex goes there. There. There's lots of shadow
shapes going on here. So I'm going to put a couple of lines of identifying
these different shapes. And there's like a
fold right there. There's stuff going on. Okay? Then in relationship
to this petal, this triangular petal
has some commonality to, so I want to join
that commonality. And then we've got a
petal that comes out more triangular shape, more dark. Then this guy right here catches light in a very beautiful way. There's a lot going on there. And then we've got this
petal right here is a kind of a continuation
of this shape. Here we go, trying angles and then very pretty. So one of the reasons
why I love painting, flowers and drawing is just nature has so
much variety in it. And I think through drawing,
our drawing nature, you can create such
an appreciation for, for, for, you know, just life in general. So again, that
connection that we want. And there's another, okay. There we go. There's
a shadow shape, their shadow shape there. And then it comes down, comes up over, and then
we've got there we go. So there is, then there's a little tiny triangle
right here of a leaf. I haven't decided if I'm
keeping that or not. Okay. So this is where
this is the end, the completion of the refining. The, the block in. The next step is adding tone. Okay, So this is the
end of refining block in almost the whole drawing
is kinda put together. Now, there's a couple
of things that need to be like probably
refund even more. But for now, it's
an excellent spot. And so the steps
we've taken so far is big shape block in and then
refining the block in. The next step is adding tone. It looks beautiful and I am so excited to
start the next phase.
20. REVISED LESSON 03a Peony Why Use a Mechanical Pencil: And I'm going to continue to use my 0.3 millimeter consult. And the reason why is
because it will give me in the long run to the best and
most consistent even tone. And that point stays super sharp for the whole
duration of the drawing. Where if I was using
a regular pencil, this is a B. And so it's a pretty
sharp tip right there. But as it, as I use
it to create tone, it loses some of its refinement. And so then therefore
it doesn't, it doesn't add an
even amount of tone. It doesn't get into the
grooves of my papers. So here let me show
you an example. That's actually
pretty nice, right? But as my pencil gets dollar
and not as pointy the grain, it won't fit into the grain of the paper as much
as I would like it. So see how, see here how the grain
is starting to show it. And that's because my
pencil is getting dollar. I'm gonna go I can go over it. Where if I have a 0.3 pencil, because my tip stays the
same diameter the whole way. I have. I have a greater precision
of adding an even tone. I'm trying to go parallel, make my lines as
parallel as possible. So this is in real time. So that way you can see
it because when we, for the first layer of
adding tone, we've been, I use Kleenex to you get a better, more even tone with
the mechanical pencil. Of course, you can continue to use just a regular old
pencil if you want to. Just make sure you're
always sharpening it probably every, you know, every, definitely for
every about that much. So mechanical pencils
just become more easy.
21. REVISED LESSON 04 Adding Tone Part 1: For this lesson, we are going to start adding 3-dimension to this line drawing by
adding tone value shapes. And I'm going to continue to use my points three
millimeter consult. And the reason why is
because it will give me, in the long run the best and
most consistent even tone. And the reason why is
because that point stays super sharp for the
whole duration of the drawing. Where if I was using
a regular pencil, this is a B pencil. And it's a pretty
sharp tip right there. But as it, as I use
it to create tone, it loses some of its refinement. And so then therefore
it doesn't, it doesn't add an
even amount of tone. It doesn't get into the
grooves of my papers. So here let me show
you an example. That's actually
pretty nice, right? But as my pencil gets
dollar and not as pointy, the, the grain, it won't fit into the grain of the paper as much
as I would like it. So see here how the grain
is starting to show it. And that's because my
pencil is getting dollar. And I'm gonna go,
I can go over it. Upsets where if I
have a 0.3 pencil, because my tip stays the
same diameter the whole way. I have. I have a greater precision
of adding an even tone. I'm trying to go parallel, make my lines as
parallel as possible. So this is in real time. So that way you can
see because when we, for the first layer
of adding tone, we've been, I use Kleenex two. You get a better, more even tone with the mechanical pencil. Of course, you can continue to use just a regular old
pencil if you want to. Just make sure you're
always sharpening it probably every, you know, every, definitely for
every, about that much. So mechanical pencils
just become more easy. I'm going to start here. Okay, So I'm putting
basic tone down, but what I wanted to talk
about is when I squint my eyes, even though, in comparison, this flower petal is significantly lighter than
what's going on back there. This one, if I compare, I squint my eyes and look at this flower petal
in relationship to what's going on
over, say over here. It's dark, it's overall
like a middle gray. So that tells me that I still need to add a tone
to it similar to this one, I added a slight tone
because even though it is darker than its
adjacent areas, it is still darker than
what's going on on the, say, the light side
of my flowers. So with that in mind, I also need to know this, this portion of
the flower petal. I've gone over it in a
couple of directions. And then I went over it
again this direction as I was carrying
forward, carrying on. And so I'm going to essentially cross hatch
because my direction of my, of the tone that I've
applied is this direction. And then to make
sure that I can get into my grooves, i'm, I'm gonna create tone, but I'm going to apply my
pencil going cross across. And so that's what I'm gonna do. And I'm going to add, I'm
always going to be paying attention to see
like yes, adjacent. These might be this might be darker and this might be
significantly lighter. But then I need to look
at what is the value of this petal in relationship to the whole context of the flower. And if I squint my eyes and realize it's still
falls into my, say, my dark side, my shadow
side of the flower. That means I know I need to add some tone to it and that's
what I'm gonna do right now. I have a cast
shadow right there. And this is catching light. And then there's shade here. Then there's like there's some really darkness
going on in here, but there's a couple
of light strands, so I gotta be careful. I want to make sure that I'm capturing what needs
to be captured. And I'm going to refine
my edge. There we go. And it's dark right there. So I'm going to really dark right here. There's a little bit
of a triangle shapes. I'm going to put that
triangle and if you notice, I'm choking up on my pencil. And it gives me, I can put
a little bit more pressure. Make sure to watch
the lesson where I go over the three
different pencils, graphite, say use, and the different hatching and
how I hold the pencil. So that way you understand
why I sometimes joke up on a pencil and
sometimes why I don't. The quick answer is you can apply more pressure when
you choke up on the point. And as you push pull back, you you have, it's lighter. It's a lighter touch. Okay, so I'm gonna quickly add some tone on these
elements over here. It's a little bit
darker, so I'm going to cross hatch my tone application. So this is soft, really soft. So I'm holding my pencil
at the very, very end. The very, very end
as I'm drawing this. I said, there's a little bit of some cast shadow right here. I'm gonna get some
of that going. Again. Really, really soft tone. See what's going on. Holding onto my pencil
away at the very edge. Soft. So very, very
soft application. You'll notice too that my tip of my 0.3 is pretty far out. So I have to be very careful about not applying to
harder pressure too, because I can break that 0.3 mechanical pencil lead
right off really quickly. A little bit of shadow
here, a cast shadow. It's not as dark as what's
going on over there. Okay. So I'm doing pretty good. I'm pleased. Just want I'm doing nice. Couple of areas that
need to be tone, needs to be refined. So I'm going to do that. We need to get my cast
shadow in the center. The flower. Then there's another dark. So I'm choking backup and
getting that value in there. Right here. Some dark
value right there. Here's the cast shadow of
that pedal onto this petal. This flower petal is short for short and income and towards us and it's catching
night differently. So I want to make sure
I'm capturing that. There's a little bit of tone, minimal, minimal tune
on this flower petals. So I'm going to
add just a smidge. Again, holding my
pencil really far back. Tone ends off, then
there's tone in here, so I'm going to have that. Okay? So that is adding tone
to the first flower. And now I want to unify my tone so I get a
Kleenex and I start to make sure I get rid of all of the any bit of
hatching or line working. Now, that guy gets a
little bit of dirty, like paper towel
for right there. Now, he's gonna get
erased out because that petal right
there is very light. So, you know, drawing is always a bit
of a push and a pull. Guys, there's always something that might need to get
a little bit of tone, like right here should be
some time right there. I'm going to put some tone. Right there. Here we go. Okay, so that is
the first flower. Oh, I just realized
I didn't add tone to the, to the leaf. So let me do that real quick. I actually wanna get, wanted to draw in
that summit a bit of the veins of the leaf. The veins will help me because
this is a big a big leaf. So I can actually
use the veins and to help me segment off when I'm adding
tone. There we go. Okay, there. Okay. So let me unify that.
22. REVISED LESSON 05 Adding Tone Part 2: Okay, Now it's time to start with adding
tone to this peony. And what I'm gonna
do is I'm going to start actually left to right. And that will be to reduce
any smearing of graphite. I will be using my sheet of
paper to as a hand rest. So that way the oils from
my hands will not be getting on the surface. And eventually I will then unify the tone with the Kleenex. So let's get started. And one thing also I
want to encourage is that you always squint your eyes at your
reference Viet photograph or working from life. And with that, what
that does is that allows me to create some, I think about the
simplified shapes again, so I'm squinting my
eyes and I've already like slightly don't drawn in
with very soft touches the, this cast shadow right here. But I have not done so on here. And when I squint my eyes, that that shape comes
out pretty strong. So that means that I want
to actually get that in because that will help me
speed up my drawing process. And there's areas here
that are catching light, that are lighter, and
then there's areas that are like a middle value. And also when you
squint your eyes, you can break things down into
your lightest and darkest. So right now I see like
a like a lightest light, like a medium light and then
a medium dark and then dark. So that's for value shifts, for value areas
that I'm going to, I'm going to simplify and
put my tones in that way. Initially. I also am holding my
pencil again, so far back, so it's a soft touch, so I'm not grooving my paper. This is about as
the longest I ever do with when I'm putting tone. I don't like really
going more than that. I seemed I start
to lose control. Now this part of the
tone needs to be darker. So I'm gonna go back over it. Then I'm going to go over
it as a cross hatch or across the direction
than I originally went. Because I've gone over it a couple of
different directions. And sometimes I'll
even like shift, switch my paper around to help with my with the crosshatching. This is a very comfortable
hatch direction for me. So I'll just switch
my paper around. Now if I squint. This white petal is still
a little like over here. Is that slightest? But there's still
just there is still just a little bit of
gray tone on here. And so what I'm gonna
do is I am going to add a very lighter
and lighter tone. There we go. When
I look at again, if I, you know, like like there and then we've got some
stuff going on here. There's catching light. But my, you know, there's the form of the form
shadow is like right there. This is, this flower petal
right here is catching light, but it's darker in this flower petal is
also catching light, but then that is catching light. But this over here
is darker in value. It's not as dark as
what's going on there, but it's still I would I would identify it as
my medium dark values. So I'm going to versus
like a medium light and the medium lights
tend to be over here. So let's get started. I'm going to make it easier
for my hand to to hatch. Strive to make this as
parallel as possible. Your hatched lines. I often just doodle by creating straight lines are
parallel lines. The more parallel they get. I think it creates some
really wonderful notes. So that's my line. And then that's a little
bit, That's like a medium. Then it starts to
get a little bit darker stuff going on here. Okay, So this flower
petal is catching light. There's a little bit of light
dark shadow shapes here. So I'm going to put this tones in medium dark with a
couple of like dark, darks. And then just some cast shadows. So here we go. Back here. Darker. So that's medium dark, but then we actually
have some dark, dark. So I'm going to put a
little bit more pressure. So I'm a little bit more choked up the pressure
that I'm applying. I'm just, I'm just making
my way through. Here we go. So this is I squint medium dark, even though like compared
to that, it's darker. But compared to
this, it's lighter. There's squint my eyes. There's some variety here. And these petals right here. But they are lighter
than the dark here, but darker than the light,
the adjacent light. So I squint and like make it an assessment and then actually
through here, very dark. And then same goes for here. Crosshatching. Here we go, That's darker. And like we've got some
stuff going on here. It's a little bit lighter
and then it's darker. And these are light
really kitchen lights. I'm just going to This is
like my squint my eyes. It looks like it's my
light, my medium light. So I'm going to first put that tone in because
that will help me measure what I need to do. Again, throughout
this whole drawing, I'm keeping my
hand on the paper, on my this is my medium dark. Let me pull out my lead more. A little bit lighter.
They're not much. So I'm going to actually
still keep the pressure. You see how I patch, quilted this big shape
with different hatches. Then I can reinforce and create
a little bit more unity. Still need a cross hatch there. So I'm gonna do that. Here we go. Okay, so
that's the first bit. And let's get further in. Here. It's darker. So I want to get
that dark shape in. And there are times when I'm
just going to give a whole, the whole area tone, I'm going to create some unity. Same goes for over here. That's really dark right there. So I'm going to put
that in cache shadow. See, I squint my eyes
this whole area here. Lighter than what's
going on here. But it's darker than
these adjacent. So I'm going to actually
create just a basic tone. Knowing that I'll have to, I'll refine that in the next
and the refining layer. There's a little bit of
something going on there. Okay. So when I squint, squint. Okay. There's more
details there, but I'm going to actually
just leave that. I'm going to add a
tone here to create some shape. Through here. Cast shadows. Right here that's lighter. Okay, So I've got to
darken some areas there. And there's a couple
of things over here. Not a ton. So what I'm gonna do
is I'm going to allow this to be considered my lights, so I'm not gonna do much
shadow shape there. I do need to create, put in the leaf form. And it's really dark. A little bit of shade here. Have hatched there. Not a ton. That's very light. Little bit of tone. See this guy still need to tone. So I'm gonna put down
there a little bit here, not much, but it's very dark. And here, a little bit of shade here, about a tone right here. So that is the first
application of tone. And I'm pretty pleased with it. So I'm gonna go about right now. You got to want to unify this. So then right here,
there's some halftones, but I can just look, I can just use my dirty paper
towel to get me some of those very light tones like this flattening pedal
will have to be erased out. There's no getting around that, but that's and then I'll have to erase around like so e.g. I. Can erase either
that way or I can erase with one of my
fancy pencil erasers. I've got two. Well, this is my
favorite eraser, but I've got this
one also that works for erasing up large swaths. And it's got a chisel edge
so I can actually use it. I can actually draw with it. I'm going to continue finding, unifying my tone
and see how you can use a stump for this
process to I just find a Kleenex is I always
have a Kleenex available. I don't always have
my stump available. So even though I use
some specialty items, I also like just having
the easy items around too. And one of the reasons why I do this unifying phase is because
it creates a good solid, like, it's like
an underpainting, but it's an under drawing. And it just kind of
immediately kinda creates a sense of very quickly. It creates some nice
unity. There we go. So there's the both
flowers together. But then like the, there we go. And before I go on
to the next phase, I will spend a little
bit of time erasing out my paper towel from my hand. Okay. Let's look at other spots. Okay. I need to actually unify some
of my hatching right here. Okay? So a few more
things I wanna do before I call this
space complete, and that is I want to
clean up around the leaf. There we go. But overall, I like
this very much. So that is where
we are right now. And I'm going to the next phase. It's probably needs to
be cleaned out. To. The next phase is re-find
the refining layers. And that is what
I'm gonna do next.
23. REVISED LESSON 06 Hatching First Flower Part 1: Okay, so now we are on the next stage of the drawing
to get it more refined. And I'm going to be
using my LED holders. So I have a lead holder that specifically it's
even labeled for B, which is my darkest
soft, the sled. I use these sleds. And then Tooby, which
is my middle value, lead and I use these
floods and here is my, what the lead holder looks like. And when sharpening,
It's got graphite dust. So I clean it off. And then That's my point. Isn't that a beautiful point? I'm going to get started
and I'm going to start with the upper flower when I'm going to start
with my OB today. And what I wanna do
right off the bat is I want to get my
darkest darks in. So I have I've
already drawn them in dark with the HB pencil, but now I want to get them in. With regard to my dark is like
some of my darkest darks. And the four beat
just a darker lead. Softer. And with that softness comes more graphite comes off the but I've already broken
and worn off my tip. With this portion
of the drawing, I use hatch marks to create
my visual interests. Granted, sometimes my
hatch marks are so dense that it's almost like
as if I'm adding tone, but in fact, I am, I am adding little tiny, precise hatch marks to create visual interest and texture. I'm reinforcing
lines. And again, I want some squiggle. I don't want everything
to be too mechanical. I'm going to start here. Soon as I start to
lose some of my point, I do want to go back and we sharpen. Sharpen often. I first go in with
parallel lines. When it needs to be reinforced. I crosshatch. Pressure also affects. Parallel lines are
helpful and important. So that is like one pedal. An area in darker and
I squint my eyes, it's dark, is right there. So I want to make
sure I emphasize, I also want to make sure that the edge of the white area
of the flower really light. I want to make sure that
that is as light as it can, as light as it needs to be. It's kind of dark here, so I'm going to darken
that just a bit. It's very dark here. So my hatch marks are
tighter and I'm crossing. I also use the direction
of my hatching as a means of defining the
different planes in the form. So by by playing with
direction of Hatch, I can also create
a sense of form. And Mike, what's What's going on? Where? So I'm going to actually there's some weaves
like that. Yeah. Then a bit darker right there. So I know I need to go. Then. Like I think
there's just a little bit it won't hurt to put in a little bit of cross hatching
to emphasize that shift. This is darker, so I'm
going to squint my eyes. Yeah, that's falling together. Like I want it to. So now I'm going to switch
like work over here. Like that's my darker
line, darkest line. Then some stuff, kitchen light. I do not want a constant, same quality of line everywhere. So, and pretty soon I'm going to work
here with my four B. But then I think the rest
of my patches for this, except for the leaf,
will be in to be. But I'm going to continue
working just real quick. I'm not going to be
using Kleenex to smear and rub going forward. This is, this is
hatching like only. So even with using a for B, I can adapt my pressure and create different
quality of strokes. So like right now I'm working
with a very light touch. I'm also the way my
ain't my wrist is. I don't get as good of I
don't have as much control. So there's a little
bit more like it's, my lines are not as
parallel as they are. When I'm holding a
pencil like this. I've got this beautiful
petal right here. I really love the
feeling of that pedal. And that is going to be to be not my fault that
I'm working on. So I got to restrain. My pencil tip is starting to lose his point. Okay? So that is with a. For B, I'm switching to my
tube for the time being. Going forward. So going forward, oh, I see. There's a couple of
construction spots that I need to get rid of using a
kneaded eraser, shaping it. There we go. So it's a push and pull between between your lights and darks too. And you're constantly refining. Really need to
work on this area. I'm getting distracted
with that area, but it's this area
that is primaries. There. Some nice shadow shapes. There's a bit of a core
shadow right here. This is a form shadow right
on this petal right here. And then we've got some
reflected light in here. And it goes deeper. And then this, this edge
of the petal is catching. So I want to make sure
I capture all of that. So what that means is actually the core
shadow is a little bit more like right there. That's my core
shadow, but then I have a little bit
of form shadows. So I want to make sure that I created a like a light hatch that
has space between it. And then I'm gonna do the
same light hatch over here. Look at the difference.
This area did not have the tone put down. And look at how the tone adds automatically when
you hatch on top of it, you get a little bit more. A deepening of visual effect. Like almost I should
probably have tone here. So what I'm going
to, I'm not going to draw in my I'm going to actually just very closely add
a little bit of tone. You can do that too. At times when you are
in the tone phase, you didn't apply
tone in the spot, but then you notice that you
actually need it later on. You can do it. However you will have to you
want to unify that tone. So that means I
have to go in with my paper towel and I'll have to rehash
everything. But that's okay. That actually makes for
a stronger drawing. And I'll always choose the
stronger drawing over, Over the avoidance
of doing a certain, a certain aspect of the drawing. So I'm a believer in that. Never hurts. I'm gonna cross
hatch that form shadow, core, shadow of that petal. And then there's like
another petal here. Love hatching parallel to. Here we go.
24. REVISED LESSON 07 Hatching First Flower Part 2: Here we go. Okay. And then there's this
spot right there, and then I've got darker. And then it's got a pedal
that actually catches light. Then it's darker there. So grab that. I know I'll have to
erase some of that. Let's see what's going on. So pretty always, always guys. Reinforce yourself. If, if you like how
something's going, give yourself a nice
quick kudos of like, I'm always aiming for beauty. So I make sure I point that
out when something's going well and how lovely it is
and how much I admire it. I love these details too. Okay. Yes, there we go. That looks really
nice. Look at that. Okay. I'm almost done
with this flower. Still staying with
the to-be right now. I'm going to work on creating some outlines and some
wonderful wiggles. Then I will hatch the leaf in. Loving this cast shadows. Now one thing is,
like I just noticed, I laid in a couple of varies, a bit too dark though,
when that happens, you can actually use
your kneaded eraser tool to take it out some. So I'm going to actually soften just a little bit and my
light that light area. Okay, I also my point
is getting too big, so I need to sharpen it. There we go. We've got a pedal back here. Let's get that petal. Just have this petal, petal, this petal and this leaf. And now I'm gonna
go back to my OB. Now. This is my darkest. I'm going to put in Solid Leaf. My goal is to deepen
the value of it. There was my point. Okay, so I need to
erase because that is white along that edge. Same goes for right
here, right there. Now I'm crosshatching. I'm gonna go back to, to be, to work on this petal and
this connection pedal. And then we'll go to four
B again for the leaf. And then I'll work on this guy. First. Let's get
this pedal done. And again, my edges,
I'm trying to, I want my, my line
quality to be varied. And I don't mind a little
bit of wiggle, If anything, I like it because it adds for that natural sense of nature, things are not machined. So there is a, there's always a bit of variety. Then I've got just very subtle
bits that I want to put in for some interests on this big shape of power
are some darkness there. But then right here, okay, I went to do it this way. Then this flower petal, There's a little bit
of foreshortening. I'm actually going
to cut that out. Here's a tip of a leaf there, but I'm gonna get rid of that. And what I'm gonna do is
identify the foreshortened area, that there's a little bit of
edge quality shift in value. Stuff going on here. There we go. A little bit
of cast shadow right here. I'm going to put that cast
shadow in right there. Hairy cow. And then
I'm going to take an eraser and erase the parts
where there needs to be, needs to be the
lightest. There we go. And also I'm going to actually take and cut through
some of my hatching. Now. There is the first peony, and we'll move on to the
next one, the next lesson.
25. REVISED LESSON 08 Hatching Second Flower Part 1 : Now we are going to
work on the second PMI, which is a larger
and more complex. And again, I will be using
my Tooby and for B leds. And just like with the first
flower, see right here, I will be using hatch
marks to on top of the tone shapes to give this flower some
dynamic field to it. I'm going to start
with my four B, and I'm going to
start in this area, which is my darkest area. And then my second darkest
areas are down here. And then I have like
a secondary there. And then there's some
pretty interesting stuff going through here. And then everything
that's going on in the light areas will be a combination of erasing out and putting in
light hatch marks. Let's start over here. I need to reinforce
a couple of lines. So I am reinforcing
the drawings. Since when I added tone
and unified everything, I lost some of the
structure of the design. And like the anatomy
of this flower. So right now I'm going through and kind of re-establishing
the line drawing. I'm doing that with this
drawing in particular because there is so much
complexity going on, we'd be left with
the first peony. It wasn't as necessary. But with this one, I feel that I need to
reorganize everything. Again. There's no harm.
And then there's no harm ever in redrawing
something in truth. That is what I have
come to think. Art is. It's always a push and pull. Art is always a
push and pull of, of art is always a push and
pull of where you draw, maybe smudge down, and then you go back and
you re-establish it. And that's kinda
what that's where I'm at right now with
this drawing is I'm re-establishing aspects of
this flower to make sure that everything is
working out the way I want it to ultimately. And I'm going to
erase some edges. This flower tip is
catching light, so I want to make sure
I get that in there. That's some they're
catching light. Same goes for here. I'm going to capture this
little knot is catching light. So I'm going to do that. There's a node right here
that's kitchen light, IOL. You race out of it. And then the edge right here. So the edge of this
flower is catching light. And so I'm going to actually reach shape
and inches on my, my edge so I can
capture that edge, draw with that edge. Yeah, there we go. Here we go. When I squint my eyes, this flower petal is light in relationship to how it looks
like in the background. However, when I squint my eyes to it and compare
it to the other, like lightness to
these flower petals or that flower petal there. It is still significantly dark, so that's why it has tone on it. But there are a couple of
areas that are catching light. I am going to use a kneaded
eraser to brighten. I've shaped it. And I'm taking down
some of the tone. And when you compare it to the tone that I can erase
with say, this eraser. This is a much softer
touch that you can use your eraser to draw as well, your drawing in the negative
in that you're removing maybe some color or some tone that you've
already applied to it. You can really make some
wonderful soft, subtle touches. And so that's what I'm doing. And I'm going to move on. So going across form, like I just did there. And then going along or
parallel to form can create. When I say form, I'm
talking about the, the sense of shape, the mass of the volume that this flower
takes up in space. That is, that is form. Working like this is, you know, it takes time. Boy, do you get some beautiful
visual effects from this? So that is one of
the reasons why I love creating
drawings like this, where I build up the layers. And I have, I have the tone, the tonal aspect of putting in like a solid
hatch that then I've been rubbed down and
turn into a solid tone. And then I add texture
and pattern and variety through the
use of hatching. And what, what draws me to, to draw like this is it gives
me an opportunity to really learn how to interpret objects and like three-dimension and then translate them to, you know, onto a
two-dimensional picture plane like a piece of paper. And I was actually thinking
about it this morning when I was thinking about
getting started on this drawing is like, why? Why do a drawing like this? And there are several reasons. One is it's easier to
learn how to interpret and understand how to take a
complex subject matter like a peony and turn it
into an artistic expression. I find that drawing is
just so much easier than painting is using graphite. Because maybe I spent hours and hours with a
pencil in my hand as a kid. I find that working
with graphite is just a natural
extension of who I am. And then it, So therefore, it makes it a little
bit easier to look and interpret and explore. With that. I want to, I want to fine tune my
skill set, I guess, at interpreting
the visual world. And this gives me an
opportunity to do that. And it gives me an
opportunity that's easy. I can start and stop
this exercise write-off. As a whole, graphite is a
very innocuous medium. Two So it just, you know, it really allows for
a lot of versatility. So I'm slowly building up, squint my eyes. That helps me to distinguish different planes. I use a different
direction of hatching. That I think also helps. Sometimes. In the
initial drawing. I might have missed
or didn't add tone, like right here in that tone. So I'm going to add tone. Now. I want to, I have these red marks
that are very dark. And I get to decide, do I want to include
them into my drawing? Or do I want to ignore that
shift in value and just really focus on the
white flower petals. And I'm thinking
I'm just going to focus on the white
flower petals. Lot going on in there. Some lighter tones,
mid tones in there. But I'm going to use
my to-be for that one. And I'm going to
continue sketching light, a little bit of tone. They're actually put in a little town with a dirty
Kleenex and I have leftover. Then this petal needs
to be erased out. Here we go. Right here. I'm starting to move
into the light tones, which I'm gonna be
using my two beats. So before I switch over
and move over here, I'm going to actually get down
here into my darker values with my and stay with my four B for just a
little bit longer. Okay.
26. REVISED LESSON 09 second flower hatching part 2: I am so pleased with how
this is turning out. I'm going to work in
this area right here. And then I'm going to
fine tune what's going on in these areas and then
finish up with that area. That's my plan. We'll see if
it goes exactly like that, but I think it will. Okay. Okay. Here we go. So I got a little bit off on
my drawing around here. The anatomy is just
a wee bit off. Instead of like
erasing and redrawing, I'm going to adapt it. And the only people that
will know that I got the anatomy off on this
flower are you and me? I I don't hold myself to such a precious it's okay.
I don't mind that. I'm also a little bit
my goal always with these drawings is
to make sure that I'm really celebrating the
beauty of the flowers. And I feel I am still
a very good when That's a little bit hard
build-up right there. And that's that's
come from having two patches of Hatch come
over and like by coincidence, land on top of each
other very well. I don't want to smooth that out, but I don't rub it out. I actually redraw it by
reestablishing my hatch. But instead of going up to it, I could barely to the edge. And the same goes. I want to transition this a
little bit more. So I draw up to it but
not over it there, and that kinda cleans it up. What I'm noticing is this area needs to be just a
little bit darker. So I'm going to oops, I was using harder pressure, which is what I wanted. But I broke broke my tip. That's okay. I'm going there. That's really dark there. And that's also a
really dark there. Then it dissipates out. That's really dark right there. So I'm going to
put that. So this needs to be just a
little bit darker. Wrinkles. I am pleased with how everything is going, but now I'm switching over. I'm going to switch
over to my tube, which is my medium value lead. Okay, so there we are. And this amine now,
there's a couple of things that I want to clean up. I'm noticing, So I need to lighten some put some
lighter notes here. So I'm going to use my
kneaded eraser a bit. So lovely. So Tooby goes down lighter in
value than the four B does. With, if I use the same pressure as I was
using with the four B, which creates some nice variety having hat using the
two different LEDS. And then like I notice, this is done with four B, but it needs to go just
a little bit darker. So I'm going to reinforce
it with just another layer. To be squint my eyes. Same goes for over here. This needs to be a
little bit darker. I'm going to put that in his
kitchen light right here. Let's capture that. Here we go. Now. Here we go. Turn your paper if you need to. So I made the decision, I want this petal
to be stronger, so I'm adding a
dark value around it to make that petal seems
stronger than it than it is. So that way, it kinda just
stands out a little bit more, which I have that, I have that ability
and power to do that as a, as an artist, we get to choose how we want to emphasize things
if we want to. And I'm choosing to
emphasize my pedal that way. This is a little bit darker, so I'm going to put
that darker in there. We go. Capture some of my lights. Love drawing with
with these erasers. Are you drawn negatively? Okay. Here we go. That's
looking so good.
27. REVISED LESSON 10 second flower hatching part 3: Brian continues to be developed and I'm really
liking how it's going so far. I am going to start
moving over to this area. And what I'm gonna do is I'm
going to put in the leaf, I want to work on the connection
between the two flowers. So let's work on that. So first off, very
dark from here. And then we kinda
comes like that. Here we go. Like that. It's a little bit different than what
is in the photograph. Reference again, a little bit of I've shifted some things anatomically, let
it all works out. So the one thing I do notice that I wanna get
in right away though, is I want to get
this light tip in. I want to get that edge in. I know I'm going to
have to erase out more, but I'm going to work
on that right now. Needs to be lighter to as does this edge right here and
right edge right there. So we'll get those values in, and then this edge right there. Okay? So by establishing
those lighter edges and helps me make judgment. And now, granted, this
is like almost black, so I'm putting in a back-and-forth hatch for the
dark of this of this leaf. I'm not going to erase on
because I'm not going to erase. I want to make sure that I want to minimize
my need to erase. So I'm actually going to use a crib or I'm going to
use a sheet of paper. And I'm going to draw up two. So I put the, I got to be very careful because the stickiness. There we go. So I'm gonna draw up to that edge with my hatch. You see that guarantees that I don't go over where
I don't want to go over, especially with that
edge being so light. That's a little hack. You can use a little bit
more pressure and not. And then two, to make sure
that these new hatches I don't want to go over because then that will create
a darker line. I draw right up to
what I had previously, where my hatchet
previously ended. I have pretty good control, so I don't always
need that paper edge. But when I do need it, I don't mind getting
it out to try it out. Go. Now let's get the lighter part of
the Greenleaf's, but there's still, it's still significantly darker
than any of the white. So with that in mind, even though like this area
right here is catching light, still lighter, still significantly darker
than any of my script, my eyes, it almost goes away. So crosshatch is a little bit darker right here. So I'm gonna put that curve in. There is a vine, the vein, I mean, so I'm going
to on the leaf, so I'm using that as a natural
place to stop my hatching. I went to hatch here. Okay. That leeches in. Now, I will go back
to using a to-be. A little bit lighter. Some
hatching going on right there. Okay. So I'm going to have lots of
fun shifting over to that.
28. REVISED LESSON 11 second flower hatching part 4: I love this phase
of the drawing when I am just getting
ready to finish up. So I want to work through
and refine some areas here. So I'm going to get rid of
some of my construction lines. I'm going to soften
all of those lines. Kneaded eraser is amazing
because it's a soft eraser. It you can use it
to soften things. You can draw with it too. I think that is where I
need to be with with Brian. There's always some level
of change in all train and so be aware of that as well. There's I1, so soft right there. Then you've got some wiggle. This pedal comes here. Then it catches light. Him, another panel
comes in and over. And then there's another
petal right there, and this is the outermost pedal. I went a little bit of dither. So I want that, sorry. I kinda like having those
two lines right there kind of creates some visual interest. It's catching lines. There we go. Right there. Right there. So
pretty right there. I am reorganizing, Finding
my space all through here. What that does is that helps me choose areas that
need refinement and what needs to be
left alone because this are some of the
shadowing is very subtle. And I want to make sure that
I I am working within there. There's, it's darker
in value right here. So I'm going to hatch slightly
different hatch patterns. Your stuff going on. Anatomically, my
flower is a little bit too small in this area. But that's okay. I will still make it work. And only you and I know that it's not exactly
as our photo reference. And so keep that in mind, guys. When you're drawing flowers. I always strive to get to a
certain level of accuracy. But it's not like doing
a portrait of a person. Or if you're an eighth
of an inch off, everybody and their
uncle will know that you're off in
drawing that knows, or that i with flowers. Most people, you know, they know what a
flower looks like. They may not know exactly how this specific flower looks like, so we can adapt as needed. Catching light. There. This one on this panel, I'm choosing to leave
the tone as is. I'm not going to alter it. Match is the tone is the value
of where it needs to be. And so I'm going to
just let that go. Worked a little bit here
on the tone of this guy. So pretty little bit darker down in here. So I'm going to see. There we go. Sometimes the shift is very, very subtle and you don't
want to go overboard. In my transitions. Like when we're
dealing with a flower, like a peony flower like this. I always like to
first break down my values into simple,
really simple. So like my dark is dark, my medium dark, medium light
and my lightest light. But then as I go through
the refining process, I might have anywhere 20-30
different value gradations. And they're always
kinda dependent also on what's adjacent to them. And that helps with, with, you know, keeping interest and creating
three-dimensional volume. This flower right here has reflected light
along the back. So I'm not going to touch that. And it's got, it's catching
light right here on its edge. So I want to erase out. Might be it looks like it's
catching it right here too. And so behind it is
a little bit darker. So I'm going to this is this part is lighter than
what's going on right there. From here to here, it's darker. But then as it goes over
here it gets lighter. So I'm going to and then
this pedal, it rolls. There's, there's reflected
light right here. So I'm not gonna do anything. But then there's like a bit of a form shadow because
it's the petals crawling. And just by the way, the direction of the light is, it's, the petal is
its most opaque. I'm going to first put
in one cross hatch. And then I'm going to
cross hatch again. Then I noticed that
this area right here has more, a
little bit darker. So I'm going to put that variety in the course. Reflected light. That up. Here we go. You've
got some dark there. Let's see, this part of
this petal is really dark, so I'm going to put
that in darker. Then we have some petal here
that is capturing my darker. So I'm going to then it
starts to go lighter. Cut some stuff going on here. You've got a pedal, comes out, curls
ender on itself. Then we have some light,
little catching light pieces. Then this guy's like that. We've got where it's
catching light here. Kind of shadowy here. This is my favorite
part of hatching actually is when
you're dealing with all these little tiny nuances. When you can get most expressive and playful with your hatching. I'm using very light
touches on all of this too. I don't want to be extra that needs to be extra clean. And then there's these
little guys that are up. There we go, There's
something there. Okay. And notice that this has
to be lighter anyway, so I might as well
erase that too. Okay, so I'm getting there. Okay. Okay. So now the edge is lighter, so I'm going to there and then you've
got a light edge, but then it's dark here. And darker here. Darker.
29. 12 Peony dwg demo Finalizing the Drawing: I am so pleased with how this
painting has turned out. I would say that it is complete. When I finish a drawing, I always take a few
moments and sit at it and look at it
and like, first of all, decide whether or
not there needs to be anything that needs to unify the piece because I drew these two
flowers independently, I then make a decision. Is there anything that
needs to be adapted and to create some more
visual unity between the two. In sitting here
talking about it, I notice that the value shift from here to here in the
central ball of the, of this peony is not
distinguished enough in that it's not telling that the
story that this is my dark side and this is
my light side enough. So I need to actually, I've got a for B and I need to actually deepen some of
my values on this side. So that's what I'm
gonna do real quick as part of the final final. And I'll just tell
you something. And that is that I don't
consider a piece of work finished until it
goes away to a new home. I always have an opportunity to go back and rework
in it if I want to. And there's something to
be said about that having that flexibility and
knowing that I can always go back in or I find
a ton of value in that. Okay, So I'm going to deepen
this just a little bit. Because as I deepen this, this is lighter in value than this portion of the drawing. And then it still is. So I mean, it's even there. Right here. Here we go. She said this area needs
to be deepened in value. This whole area right here. And appear. If I squint my eyes. Look at this again. Let's look at starting to make
it feel deeper and value. And I squint and this
is actually too light. That's part of my problem. Yes, it's catching light, but it wasn't as light and
value as I had given it. Same goes for here. Same goes for over
here. There we go. Fair? Okay. As a whole, I think I did a really good job of
unifying the two pieces. I do see a couple of areas
that I do want to refine, but as a whole, I'm loving how this
piece came together. So the only thing that I'm noticing is there's a
little bit of disunity between the darkest dark of this flower with
the darkest dark of this, of this flower. I want it, and it happens to
be this petal right here. So I want to create a little
bit more unity with that, and I will do that shortly. But also, every time I
work on a piece of work, I make a point at the
end of it to identify the three things that I
learned from the experience. This helps me stay away from
being so outcome focused, but instead to focus
on my process. So I'm going to first, what I'm going to I'm
going to darken that. But while I'm darkening, I'm going to talk about
what I learned from this experience
every time I draw, I learned something new and
I value that experience. And so one of the
things that I learned, because I have not drawn a complex peony flower
drawing like this before, is that I learned that it takes longer than I anticipated. And that the slowness of me coming at it makes for a
really wonderful experience. So that's one of them. And so I learned that
the next time I come, I learned that the next time
I work on a peony drawing, I will give myself more
time to complete it. So that way I don't feel rushed. But also so that I will enjoy the process
a little bit more. See I'm squinting my eyes. Okay. I also need to work in
that area right there. And then I had one areas that one spot that I also noticed on this
flower that I need to, I want it to roll more. And it's, It's this
transition right here. Yes, it is light. But there's just a little
bit of variation enrolling. So I'm going to adjust and put just a slight hatch to make it roll just
a little bit better. Yeah, there we go. Okay. So that is the the peony drawing
completed. Again. Three things you
learned from it. Plan more time. Make sure I really connect with the
process while I'm drawing it. Connecting them with the
process and enjoying every hatch stroke deepens
the pleasure of the drawing. And I absolutely love how
this piece worked out. So thank you so much for
joining this lesson, and I cannot wait to
see your drawings.
 Elizabeth Floyd, Artist | Elevating Everyday Moments