Transcripts
1. Introduction: In the first part
of this series, I've shown you how to
draw a bonsai tree. We've done one with leaves. I've shown you how to set it up, how to shade it using
hatching techniques, how to create something
really pretty. In this class,
we're going to draw a pine tree together,
a bonsai tree. For that, we need to look at some different aspects
of the bonsai tree. Since this is a
continuation of the series, I'm going to use some
of the techniques from the previous parts, but I'm going to expand on them. I'm not going to
explain them again. Those things I've
explained already, but I'm going to add
some more to it. Well, let's get
that Apple pencil. Start drawing and
add another nice, cute, adorable bonsai
tree to our collection.
2. Setting up the Canvas: Welcome to this first lesson. In this first lesson,
I'm just going to quickly walk you
through what we need. And we're going to
set up our canvas. And then in the next lesson, we're going to draw it again. What do you need, of
course, is an iPad with procreate and preferably
an Apple Pencil. Although this one you could fury do with your finger to or different styles
that doesn't have any pressure sensitivity
as the iPad dose. We're going I'm going
to make use of that so that she could do it on your iPhone with procreate and your finger to leveled work. Pretty good too. But it's way easier to
work with their pencil. But that's up to you. Of course. The next thing you
really need is the knowledge of
the previous part. So part one of this
drawing bonsai series. You really need that because I'm not going to expand
on how to draw, how I'm sketching,
how I'm hedging, how I'm bringing in
light and shadow. I'm going to focus on some
other things in this class. So if you have no
clue how to do that, don't know how to draw. I would say go there first
and then come back here. But if you know that, then
what we're gonna do now is set up a canvas so that
we can start drawing. Attached to this
class you'll find some photographs of
these bonsai trees. Now I'm not going to go
redraw them exactly, but we're going to
use them as examples so that we have a little bit of an idea of how bonsai trees up the last time
we did a square, more square one this time, I want to make a taller tree,
completely different tree. And I don't want to make
a tree with leaves, but I want to make a pine tree. Something like this. No, not exactly like this. I'm just going to draw, we
have one with leafs already. Now, we really need
a pine tree too, because many bonsai trees are little cute pine
trees to for that, I'm going to my gallery. Now you can use these
photos as a guide, especially in the project when you're going to do one yourself, you can use it as a guide. Now here's the fonts
I did the last time. And this is really in a square, and I also did the second part is extra one also in a square. But for this one, I want
to make a taller one. I need to set up a new canvas. So what I'm gonna do is
the last time I just edu screen size or made a simple
Canvas should be on there. Somewhere, 3 thousand
by 3 thousand pixels. So I need to create
a new canvas. And for that I'm
hitting on the Plus, I'm seeing a new canvas. I want a portrait size. I want it to be free by four. So the size is three by four, that gives me a nice size. So the simple thing, what
they will do is here already, is there for me would be 3 thousand by 4
thousand pictures. That gives me 83
layers on a 300 DPI. This means I can, if I want
to print my conference, if I want to print my
tree, I can print it. Really nice. Enlarge this way. Now if this is too
large for you and you end up with just
a few layers here. I'm not sure what
lipids you use, although we're going to use 10, 12th at the most 15 layers, I think we all should be okay, but you could go smaller too, but you need to keep
that free by four ratio. So let's say, I'm going
here on this one. I'm making it smaller. I'm going to 2000s. Then I need that
three by four ratio. And then I wouldn't do
to files and then I will do 2100 to make
it myself easier. I'm going to divide
this number by three, that is 700, and I'm
multiplying that by four. This is three and
that is the force. So then this one would
need to be 2800. And then the ratios can, if I divide this by four, I'm gonna get seven times. Three is 2100 to
make it myself easy. And then I've got
a lot more layers. I'm going back to the large one. So free thousands by
four or 5 thousand. But if you need to go smaller, just calculated and create
that the rest of the settings, I'm fine with as long as
you have that 300 DPI. Now I have three by four
Canvas, like the size, if you will turn, if you want to draw more real
estate for drawing, you could turn your
iPad, throw it around, and enlarge it a bit largest as your iPad has
that same ratio, three by four, so
it fits nicely. And now I'm not
going to do that. I'm going to put this back
and I'm sure I'm gonna rotate my thing back to
as it should be. There we go. Alright, good. So we've got a canvas ready. We don't need any
special brushes. The only thing we're gonna
do is the same as last time. I'm going to use
that grayish color. It's still on that
grayish color. So red and a half. And then this one you
want to go to the red. And with this one you don't
want to go all the way black but a bit
grayish like that. A nice gray tone for a brush. I'm going to use
the same HB pencil. You're going to find
that one in sketching is a standard Procreate brush
sketching HB pencil. Alright, we set it all up. So now we can start drawing, not gonna do that
in this lesson. We're gonna do that in
the next lesson and start drawing another lovely
qt bonsai tree. But this time a pine tree.
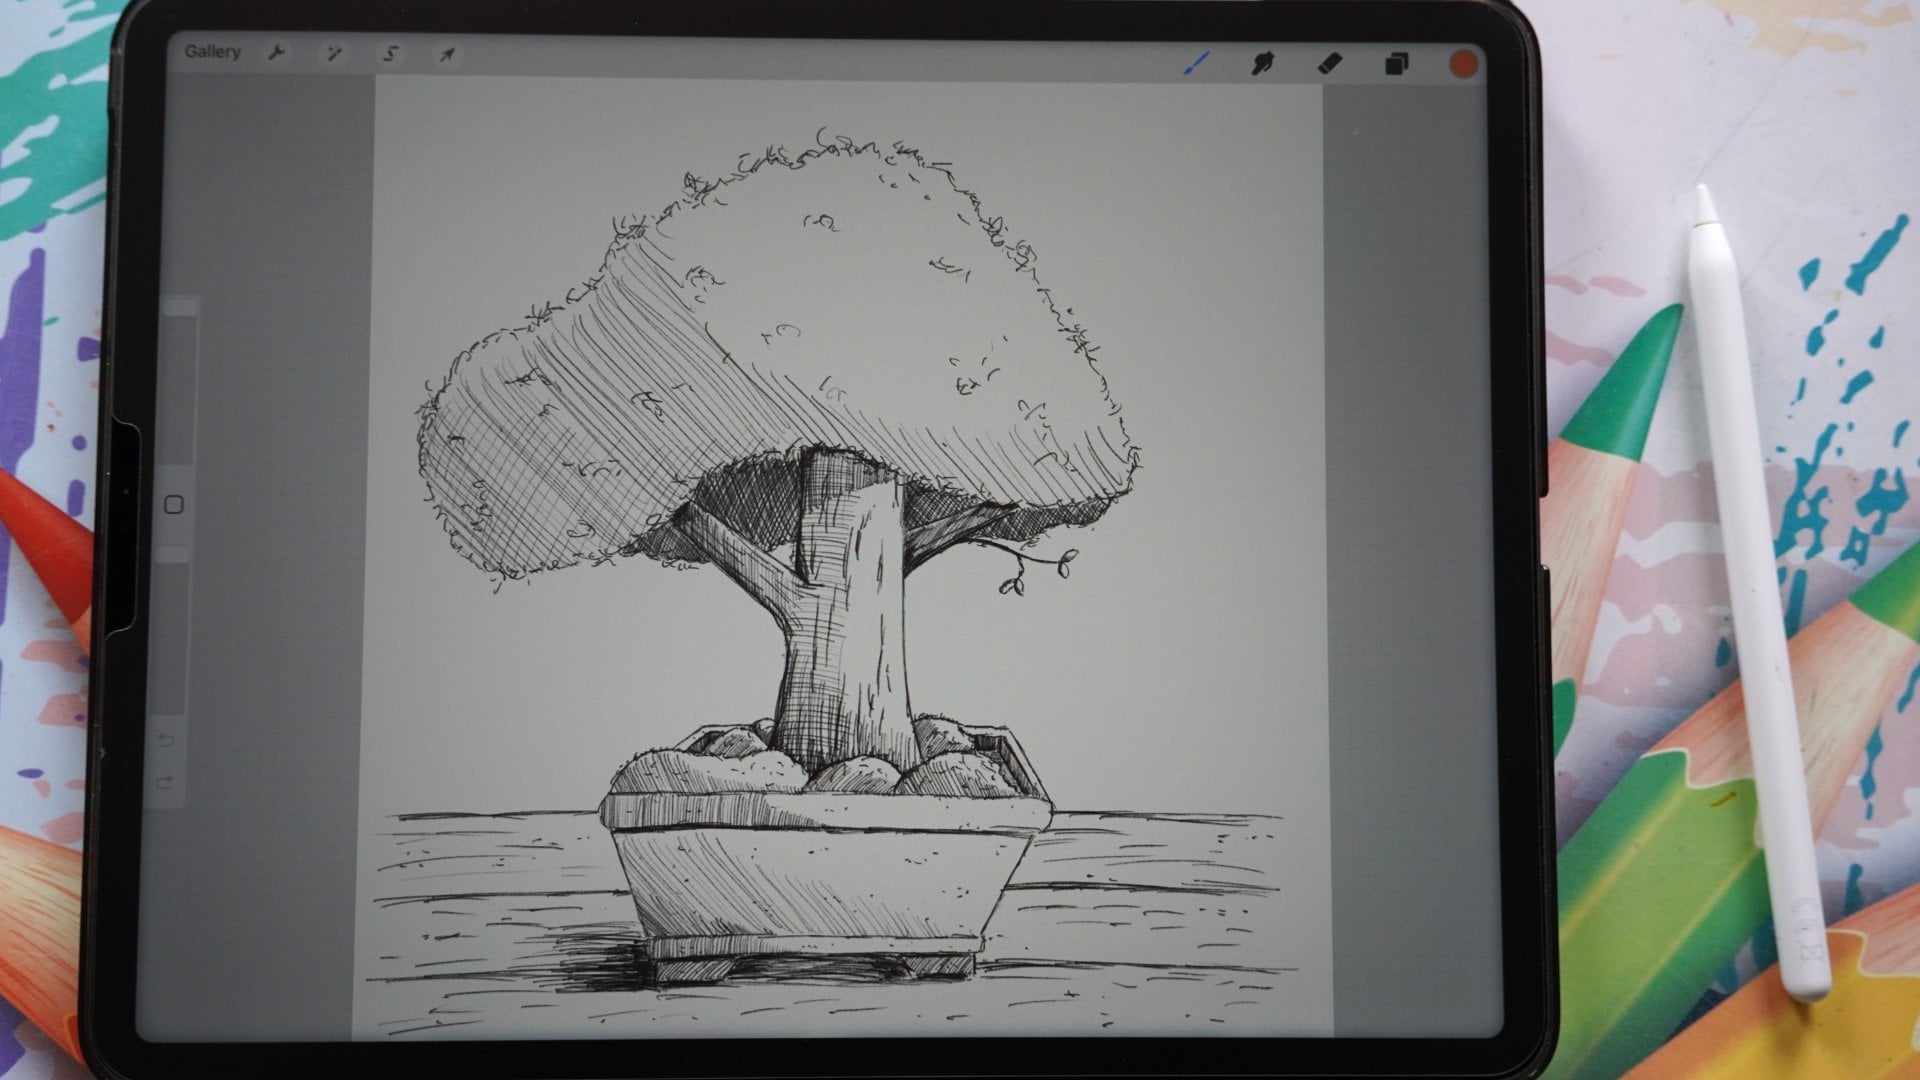
3. Drawing the Pine Tree: Let's start drawing together. In a previous one, we
did one with leaves, with some foliage and
some elements on it. I'm going to walk you
through those elements really quickly again. But this time we're
going to do a pine tree. Now, pine tree does look different than a
tree with leafs. Broadleaf, and planting trees look different because
there's needles, but also the shape is different. We're going to look
at that together. I've got my canvas here, but I'm going back to
those pictures to just quickly run you through
what we did last time. There's some elements
on the tree. We've got of course, the trunk, we've got the branches,
we've got the roots, and we got the foliage. Now, a pine tree has
slightly different shape, but with a bonsai, of course, it can have any shape,
whatever shape. This is totally different shape. This again is a totally
different shape. And I've seen even more
crazy shapes and this because when they grow
them with some wire, some metal wire, they're
gonna lead all the branches, the main parts to where
they want them to go. And actually they
designed the tree and there's white growing
bonsai is an art, just like drawing is. Working in procreate is an art. Growing bronzes isn't R2
because you determine how it will look in the end
unless you let it grow wild. But most of the time that
doesn't go well for Banza. As you can see, I've drawn
some bonds I already here. And here There's all kinds
of different shapes. Now if this one we made more of, indeed more classical tree with leaves but
with a pine tree. If I go back to my canvas, I'm just going to draw what
a pine tree would basically look like is having this shape. And now you probably already recognize this as a pine tree. Instead of when I would
draw it like this more. You would say now that
is not a pine tree, that is a total different tree. And that's what we're
going to make use of. We want to bring in this
shape a little bit, but we're gonna
do a bonsai tree. So we're going to
exaggerate on purpose a few of these elements to
make it look nice and cute. Alright, I'm going
to clear this layer. We'll start with a blank layer. What we're gonna do is we're
going to determine how we want to do this bonsai tree. Now I've got a different
kind of paper. What I want is the foliage. I'm pretty much one debt to go. Take up about half of my paper. I want to go a little bit lower because I'm looking at an angle, so my half, I have to estimate that
is a bit harder to do. What I want to do
with this tree. I want to make a nice shape. I'm going to start
with the trunk again. Let's say the trunk. We're going to do that really, really simple as with
the previous one. That would be my trunk. There you go. Brilliant, isn't it? The canopy? What I would want to
have with my canopy, I want this one to
be pretty much in the middle of where
the trunk middle is. I'm just going to go branch
out really large like that. And I'm going to go
do that here too. That already gives
me that shape. But this gives me a bit
of an exaggerated shape, bit out of proportion because
this is a bonsai tree. What would be nice
to have this bonsai? We haven't done that
with the previous one. The previous one, what
we did if this is our brands we had
this is our trunk. We have some branches
going like that. I don't want to do
that with this one. I want to do this differently. I want a branch that comes
more or less towards me. So what I'm gonna do,
I'm gonna draw in branch under angle
a bit towards me. And that means that
this branch is now separated from the
main tree, the trunk. And I'm going to
make sure that that gets clearly shown to that this is a bit
separated from the rest. The next thing I
want that this point here is higher than this point. So I want to go look
around here, there. I want in the end the
foliage to go like that. And I want to make nice cut-out. And let's say, but I don't
want that to go in the middle. I wanted to go see if
this is my middle. I wanted to go around there and I want it to
be on the other side. I want it to be longer, so I want to shift
this from the middle. And then what I
want to understand, this disappears behind here. I might go a little
bit taller with this and a little bit
smaller with this. Perhaps. There you go. That's that. Now we've got our
main thing set up. Now, what I'm going to
do next is I'm going to determine where I
want my pot to be. And I want this is where I have. It just is pretty good, right? I don't want my
tree to go lower. Let's see if that works for me. I think I can work
with that, right? I'm gonna make this pot slightly different than the previous one, but I'm showing you
that in a minute. Okay. There you go. So we've got the main
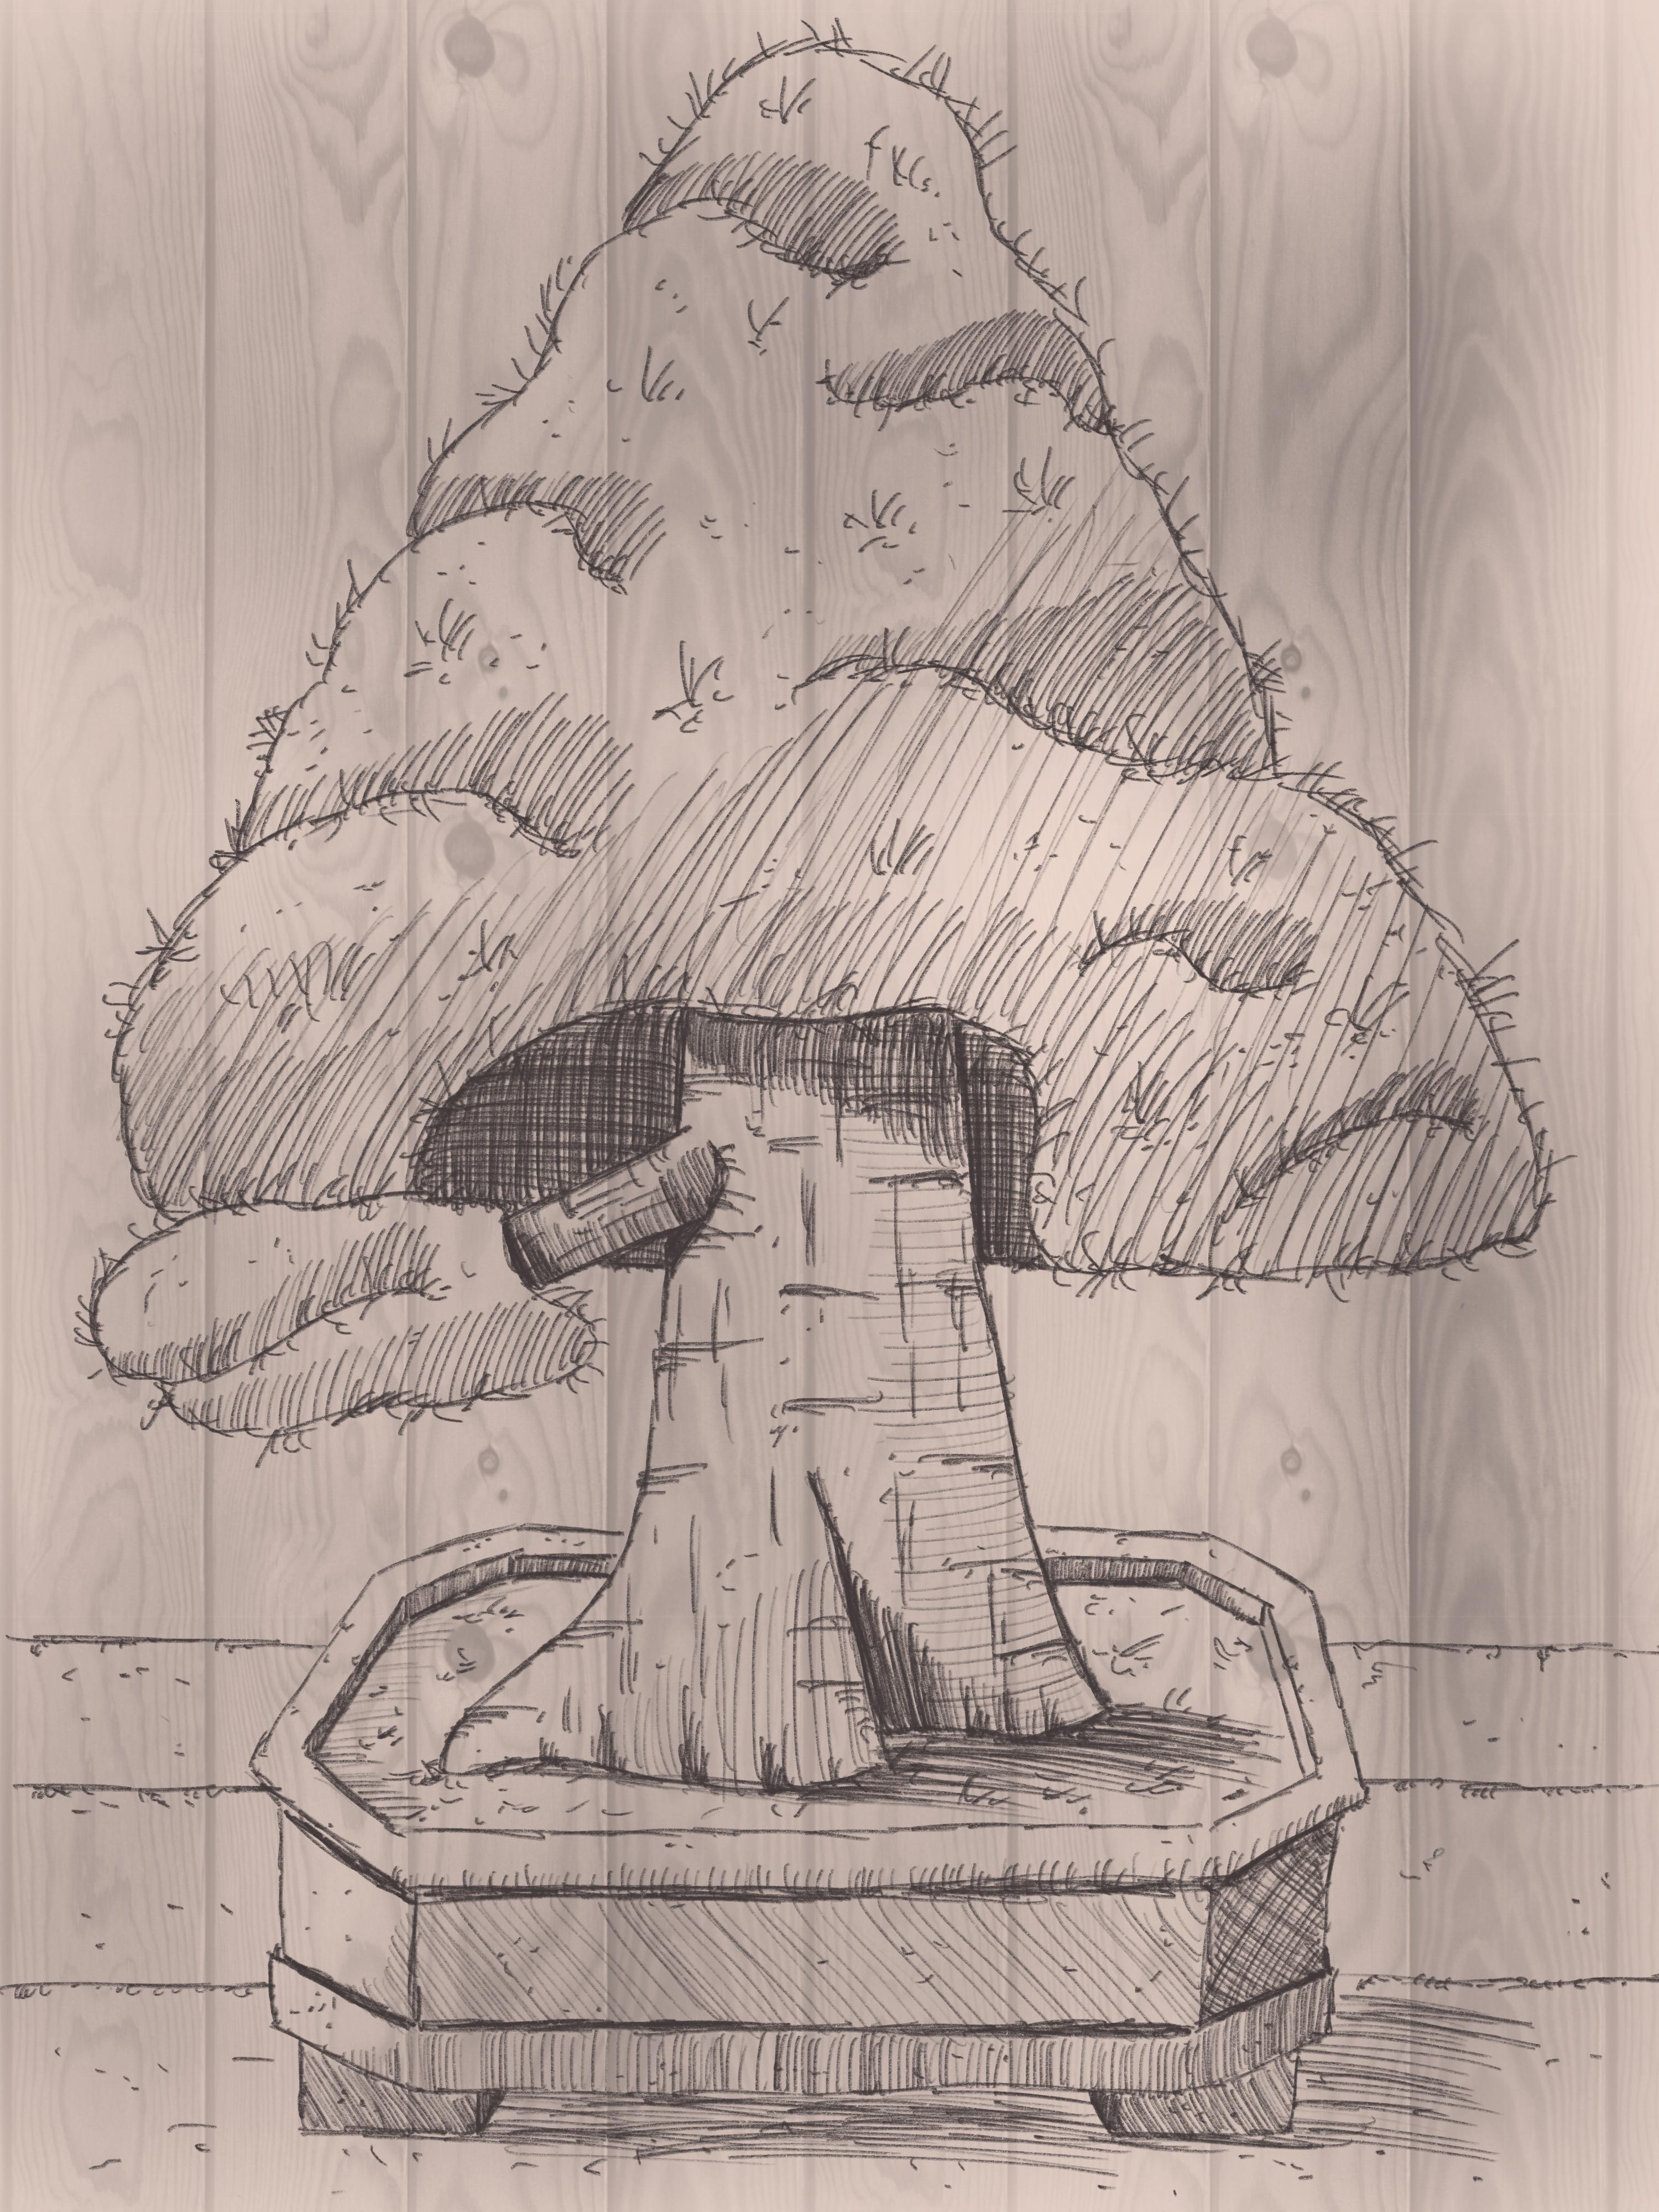
our tree setup already. And as you can see that it looks like a pine
tree a little bit. What I wanna do with the strong, I want to have a nice
thick trunk with this one, because a lot of pine trees are grown that way that
they have a nice solid, strong, thick ones. So I'm gonna do that. And what I'm gonna do is
now I'm going to extend. So we started this
is our middle. I'm going to go like that. Nice thick trunk, the ego. And I'm going to do that. Trunk like that. That's good. I want to give this a
little bit of room here. Then the next one,
I'm going to extend the trunk shifted
slightly from the middle. And I want to make
this nice enlarge. And I want to make sure that the bottom of this root here, I'm not going to draw
in all these roots separately, more or less. What I'm gonna do is
something like this. And you go, I like that,
something like that. Nice thick root. This one, perhaps
extend a little bit. I get that nice shapes here. Now we get something really
interesting already. Now only problem I have here is that I might have started
my tree slightly too large, so I don't have room for my pot. And that's the nice
thing about Procreate. I'm going to erase this. I'm just using my eraser. The airbrushing are hard blend that, just erase everything. Diego. What we're gonna do with this, the top, I'm going to make
slightly less pointy. And I'm going to do this. And then I'm going
to hit that arrow. And I'm going to move
this up a little bit. There you go. So that I create some room
down here for my plant pots. And that is good like that or that it's good
to close enough. I might even go with this
one slightly closer. Gift, the impression that this is quite the tree, the ego. Alright, good. Now the next thing I want
to do with this pot, I want it not to be
like the previous one. What we've done with the
previous one loss like this, easy now I want to do
it slightly different. And that's why I've
got this one shorter. I want to create a
nice octanol pot with eight sites on it. So it goes like this. Then I need to do the
same as the previous one. Make this under an
angle definitely to give that idea of
dimension and shape. And then I need that
corner there too. And then if I have this line, I'm imagining this line
go on the same length, so I need to meet there. And I'm doing the same here, this line I'm imagining to go the same way until
these two meet. And then the rest, I can go straight. You go, That's my pot. Now once around this, I want a rim, a nice edge. So at the front,
it's pretty thick. And go into the bag should
get a little bit smaller. Again, to add to
the sense of depth, if I make everything
the same size, you don't get any
idea of dimension. That's good. I like
that. Alright? And the next thing is,
I'm just going to go down not on the edge. I want it to be a
real nice edge. So I'm going away from the edge a little bit Insights
to create a nice plot. What I'm basically going to do, I'm going to recreate
this part again. And what I'm gonna do
first is I'm going to add this line and I wondered about the same length as this one. And this I gotta
extended a little bit. And to draw a nice
straight line, I'm looking actually at
the edge of my paper. And I'm keeping the
edge of my paper in few and then I know that I
get a nice straight line. You can do the same
at this site too. And there you go. I'm not sure what that they're remove that,
that's better. Alright, the next
thing I'm going to create is a little
bit of an edge. And we're going to let
that go on a little bit. And I'm just gonna go down and perhaps make that slightly
like that here too. And now I'm gonna go
same lines that and I know I've seen this one is under slightly
different angle, but I'll be okay. There you go. Then the only thing
is left this I want some nice legs on this one too. Making them about the same size. That's too short it
around there I would say, and that is from this one, add some dimension
to this one too. There you go. Now it looks like a pot. And the only thing we
now need is that floor. I'm going to add
floor around there. And I think I've got
that one too high. Perhaps. If you want to make
it yourself easy, what you could do is I'm
going to add a new layer. I want to draw a line. We're going to hold my pen. I'm going to add that
layer line like that. Now I know where
my second line is, going back to this one. There you go, and I
will clear this layer. There you go. Now,
good bit boring this. Just a couple of extra
lines here, too. Small, one. Larger one. There you go. Alright, and
there's our pine tree. Now, with this one, what I want is I want to
have a Bec can have P2. But first of all,
I need to draw in, of course, this branch here. Alright? And what I'm gonna do is next, I'm going to say I want
my brunch to come around. Let's say, There you go. I want to make sure that if
I have this one straight, I want to make this one
under an angle to create the sense of that this is coming towards me and it's
getting smaller. Oh, I like that. That's
good. There we go. And then now we can
draw behind here, basically a bit of
a canopy and this will get really dark. Let me draw that in right away. So I have an idea where to go. Now, this I want when
I'm starting to draw and making these angles a bit
nicer than what they are here. Alright, good. That's the way I'm going
to set up my pine tree. I'll see this looks way more pine tree as
the previous one. Now what I want to do
if this pine tree, I want to create some
clusters of pines in it. And I might as
well draw them in. Just like this. Make
it myself easy. You go and perhaps not
a one right there. That do let's do one here too. I think I'm okay with this. This is my basic
setup for the tree. Yes. I'm not gonna do anything in the spotlight with
the previous one. I'm going to keep that straight. The only thing I might do later on is add a
little bit of hint, hint of some perhaps pebble
solar little bit grass, most things like that. I want this one to go like that. There you go. That's my
basic setup for my tree. That concludes this lesson too. We've got the basic
setup for our three now, we definitely have a pine tree, although of course we
got to work on it. Really nice. And that's what we're gonna
do in the next lesson. We're gonna give
it a nice outline. Then we're going to shade it. And then in the end we're
going to add some needles to, to really make this
acute bonsai tree. All right, let's do that
in the next lesson. After you've drawn it,
go to the next lesson, we're going to really make
something nice of this.
4. Outlining the Pine Tree: We've got our basic idea of how a bonsai tree
is gonna look like. Yours might not look perfectly
exactly like this one, but it's not a problem
because it is a bonsai tree. They can have different shapes. You can play a little
bit with the shape. Smaller trunk, even
wider perhaps, yes, some more branches on it. You can do a lot with this. But before we're going to
go into all those things, Let's give this a nice
outline and shaded. Alright, let's do that. Alright, my pine tree, one thing I want to
change on my pine tree, like this, but I don't
like it that much. This the shape here. And what I want to do
is with this shape, I want to change the shape of this and make this a little
bit more straight. I got it now, a lot
under an angle. Apparently on the wrong layer. Alright, I'm drawing on a
merge these two layers. Okay? I've drawn my
design on two layers. I want it on one layer. So what I'm gonna
do, the top layer, I'm going to say press on it. Then I get the menu. I'm going to say Merge Down
and I've got one layer again. Right now I can erase this two. That's better. Alright, I've got this. I want to hide it under
a real strong angle. I think I may want to do it
a little bit more like this. Yes, I like that better. Alright, and I'll
just play with this. And what I want is
probably to extend this part a little bit
to make the branch shorter and make this foliage slightly longer, like debts. Now I like that better, right? That gives me a better sense of the dimension and how
this looks like, right? I might leave this year, I'm leaving this could do this slightly
more under an angle. Alright, now it looks better. Okay, restore that. Now we've got a nice design. The next thing, what I'm going
to do is add a new layer. Press on the previous
layer, the layer one. And I don't want this
to be so strong. So I'm gonna go to 50 per cent where I can clearly
see what I've drawn and now I can draw
my pine tree on it. Alright, let's see
what we're gonna do. Want to draw this
pine tree, of course, I'm going to sketch it in.
I'm going to start here. And what I'm gonna do
is I'm going to sketch this in really roughly. There you go. There's my first part
and the second one. What I'm gonna do with
this part on top, I'm not going to
follow this line. I'm going to follow that line, but I've gone outside
here a little bit. I want to create a
sense of that these are branches,
clusters of branches. So I'm gonna go like that, nice. And I'm gonna do
the same here too. So not start here where
I would continue, but start a little bit there. Even make a little
bit of a dent in it. Follow that line. Day you go to the next one, that's going to look good. I'm gonna do the same
at the other side. I want to start right here. I want to start, might
start on this one. Give it a little nice wave. Now go around events. There you go. And I
might as well continue. Now I'm leaving this. I'm gonna do the next one. We're going to
start right there. And the next one, C. And now you get a
nice interesting shape, giving the idea
of some clusters. And now I'm gonna
do this one here. And I might give it a little
bit of an angle there. Look at that and there's
that nice shape. Let's see. Do I want to? No, I'm, I'm okay with us. The main shape.
Alright, the next thing I'm gonna do is this one. Then I know where the rest goes. So I'm gonna do
this branch here. And I'm going to just draw
it and give it a little bit of a more interesting shape
than what I've done here. Do it like that. Now. Connect that. And
they go a nice shape. And now I know that I
can continue this one. Now. I'm going to follow just
this line here. That's good. Sketching with these
small motions as we've done in the first part. I'm just Adding some interesting
lines and now I'm done. I'm Louis. Yes, I'm there. Alright. Next thing which I'm gonna do is I'm going to do this branch. I'm going to draw
in that top one. And I'm going to
draw the bottom one. And I'm going to
do it like this. I'm not going to connect it. Now. I'm going to let this part more or less almost be
connected with that part. And if I've done it there, I need to extend that line. And there you go. And this thing, I want
to go slightly earlier. There you go. Let's do this one. Nice and straight. And this one is now straight. What I'm gonna do
is I'm going to add a little bit of a
shape to it like that. That is nicer than
just one street thing. Now let's do this one that just goes straight
out like this. We're gonna do this
one a bit down. Now, I'm curving it back. Oh, that's makes it
interesting. Alright. What do we do with this one? This here? Slightly closer to
there you go, right? The tree so that
there is less room between the trunk and
this part of the canopy. And what we're gonna do is
this canopy comes here. I'm going to do it around
there. There you go. Alright. Well that's the shape. Let me add a new
layer for the pot. I'm going to start
at the inside. And I'm just following
what I've drawn here. But doing it a bit more, less rough, which tighter? Not too tight, but a bit nicer. Here. You may notice me turning my pencil
on in a while. I kind of sit and I said
Management is the Apple pencil. You don't need to do that. If I'm drawing with
a real pencil, I'm turning it for
one reason to keep my point nice and sharp and I'm turning and then to
the point of course, wears down at some not at one. If I keep it straight like
this on the same angle, then only one side, of course, wears down, but by turning
it, it doesn't wear down. You can see what I
do a lot and I have that weird habit of doing that
with my Apple Pencil too. So now you know why
I'm doing that. Now I'm looking at this,
I'm going to say, alright. Now I think I'm
going to leave this, this angle is slightly
too much angles if I look at debt side. So I got to correct that. A little bit. Too
much corrected. Make sure it has about the same thickness a car.
That's a bit better. Alright, now we can do
this one n and this line. Um, let's see. There you go. And change that angle
two just a little bit. To Harris. Nice pots. These I'm going to do just
simply straight here too. Alright, That's our pot. Going to add a new layer. I'm going to add my floor to it. There we go. Oh, that is not nice. And straight. There you go. That's better. Alright, that we've got the
outline lets us disappear or layer and that looks nice and clean without any extra lines. The only thing I
don't like is this. And that is on this layer. That is just too
messy. There you go. Or tight. Alright, and that is debt. One thing I wanna do. Now, all of this here in the plot is flat and it
isn't flat of course. So what I'm going do is I want to draw some
straight lines here, not too large when
I do the same here. And I'm gonna give
that hint of that this is actually a real
edge here too. I've done that want
slightly too large. What we can correct that
That's too much correction. That wasn't DID was it? Alright, I've got that. And now this one,
we're going to go straight and let it
disappear there. See, that is fine. For this. We're going to do exactly
the same here. There you go. Now you've got some dimension to this that this is
not some flat part, but a little bit thicker.
Well that's not true. We've got our tree ready, we sketch the
outline of the tree. The next thing what
we're gonna do is we're going to shade this. We're gonna do that
in the next lesson. I'll make a separate lessons that makes it a lot
easier to follow. So we've got an outline. The next lesson we're going
to work on our shading. See you in the next lesson.
5. Adding interest through Shading: Well, we've got our three ready. At least. We have
an outline now. We don't have, we have
the shape of a tree, but we need to create
something nice on that end of light and shadow at some
depth to it, some dimensions. And we're gonna do
that through shaming. We're gonna go with shading, but we're going to use
hatching for that shading. You can do it different ways.
We're going to use hedging. As in the previous tree. We're going to do
exactly the same or not, exactly the same of course, but we're going to use hatching if you don't
know how to hedge, I would say go to the first part where I'm showing
you how to hedge. Once you've got that,
you can just come back here and we're
going to hedge that. Alright, let's do that. So here's my tree. What I'm
gonna do is first of all, I'm going to of course
add a new layer. I'm gonna do that on
top of layer one. I want that undermine outlines. I'm going to catch now. I've got to first
of all, determine where do I want my son to come from and where from which south, this side, this side, from the middle, even
some interesting. I want to play a little bit
with the light on this one. I'm going to say mainly my
light comes from this site, but I'm going to
do a little bit, so that's safe from this side perhaps I want to show you
what we're doing with this. Let's start with the
easy part now is, part of course is in here. This needs shading. Now as with the previous
one, what I've shown you, if you go large, you
can go large like me. Then you have to
shade all like this. The hatching goes like this. Now that's going to take awhile. What I'm gonna do, I'm
gonna clear this layer. What is way easier
to do is to make it smaller so that you do not have to spend so much distance. And I'm going to shade this. Now. What I'm gonna do with
this one, Let's see, I'm going to shade it slightly different than the previous one. I'm going to put my lines
together reasonably clots. So I'm going to
give us this shape. And let's do a slight angle
or let's go straight. Let me think we're going to go straight down for this one. Let's go straight down. And I'm going to
keep them really close to each other
if I go outside. So if I have a line like that, doesn't actually matter
because we can erase, of course everything
go slightly larger. We're going to try and keep them nice and close
to each other. I'm gonna do the same here, straight close to each other. And I'm going to even go on
purpose outside of this one. This I need to do pretty much the same and make sure I keep the distance pretty
much the same. Alright, now I need to
erase a little bit there. Perhaps they're clean it
up just a little bit. Next thing I'm gonna do,
I'm gonna shade again. But as you can see, I'm going to go
exactly 90 degrees, a 180 degrees angle. I'm going to shade it like debt. With this one. I have no problem
going totally outside of this whole thing to make
it myself nice and easy, because with Procreate,
erasing goes great. Now we've a real tree. If you will do a bonsai
tree with a pencil, you will not do this
because you want to erase as little as possible. Make sure a nicely
inside the branches D, Alright, That's the first part, C, and that gets nice. Egn, dark right away. And that's the whole idea to create something nice and dark. What I'm gonna do is
I'm going to even with the straight lines at some more to make it even
a little bit darker. So I'm going with
a second layer. And most likely with
my second layer. It's going to go on the places where my first layer then go. Alright, that's it.
That's the first part. Now it's nice and dark back
there and I want that. The next thing I'm
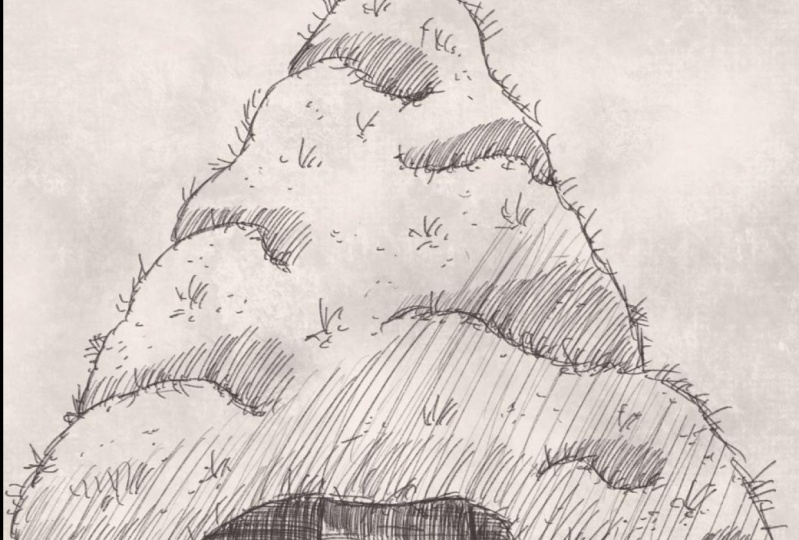
going to shade, do this on a new layer. This whole part, the foliage. What we're gonna do
is on a more or less, regard the light and shadow. So from this side, but not totally, I'm
going to start up here. What I'm gonna do here, all these parts on top,
I'm going to shade. I'll show you how to do that. And we're gonna go start small and then
making them larger. A little bit playful like that. That is nice. I'm gonna
do the same here. Small. And automatically when
I go into that curve, I'm going to do them large. Alright, now we've got this
part here. On the here. What we're gonna
do is, let's see. I'm going to add just
another cluster here. I think I had that on my
original tree to yes, I did see I haven't painted that then I gotta
go back to my tree. That is this layer.
There you go. And I want one here too, but not until the
ends are like that. Now you can go again. Go back to my shading. This one can go See, now they're back and I'm
gonna do the same here. Now we've got those
clusters ready. Alright, what do we can
do with this one here? On back to the tree? I think I'm going to divide
that up here too and make that into something like this and then
do the same here. Go back to the shading. I'm going to shade
that bottom part. And then you go on that to create something
really interesting. And now I gotta have
some shading here. I'm going to go really small
and do that on a new layer. I've got that extra layer. What I'm gonna do
is I'm gonna give this a general
shading and I'm gonna go from here all the
way to around here. So my shape would
be around there. You could draw a line here as we've done with
the previous one. So we need an extra layer which we're going
to remove later on. Let's say I want to follow
deadline a little bit. Going back to the
late you're wearing, want to shade, I'm
going to make it small. And we're gonna go shade this. Now I need some
really tall lines and these are not nice lines. What it can do that
to make it myself easy to turn my canvas and shaded like this. More natural because it's a straight line
instead of an angle. That's, makes it slightly
easier than we need. That Eurasia because
we don't want to have lines outside. Same here. I think we're okay. Fine with here. We're going
to erase that layer eight by sliding this layer
with the extra line. Slided, say delete. There you go. Alright. Let's see. Do I want
to keep it like this? No, definitely not. I want an extra layer under it. This is an a rough shading. I'm going to go down here. That's my eraser.
I don't want that. I'm going to just shade
in some more here. You could do this
on its own layer. I'm gonna go right
there. There you go. I like that a lot better. Let's add few more lines to make this slightly
better, nicer shade. And there we go. Alright,
that's that part. Next part, we're
gonna do the trunk. I'm going to add a new
layer for the trunk. The trunk. What I'm gonna do, I'm gonna
start with this branch. This is quite easy. Here. There's quite some shading. I'm going to do straight, nice angle following
the contour, the cross contours that
this would be the contour. So I'm following that come
to I don't want to go cross contour just with
hatching and crosshatching. So cross contour shading
here it is pretty dark. Light comes from here. So I'm gonna go less and less. But when I get to this part, I'm gonna go actually more and more again to create
some dimension, some shapes on it. Right here. I want some more right here, two under here I
need some SHA-2 now, not going the same angle, but I'm shading it in like that. I'm going to do the same here. I'm seeing and I have
some sloppy shading from the previous one. Let's correct that right away. Alright, going back to the
right layer, the tree itself. Now we need some shade, of course, right here. And I'm going longer and
longer away from the light. You go. I like that. On top. I might just add a little
bit of a line, they're good. I definitely want this darker. Adding another layer. Alright, created this. Nicer than I have. There you go. I like that better.
Alright, that's that. Now down here, we need some shading down here
in this area here. I'm gonna go still straight
when I'm keeping this pretty close and now I'm
going further apart. Like debts to create that
interests shifting shape. Add some more dark here, Diego. Next thing I want
some shadow here. I want to do that
pretty straight. So straight along the edge. I'm going to start out here, I think, oh, my reservoir. And do it like deaths. Alright, I like that. Okay, now I need some
general shading on the tree. If the light comes
from this side, I would need some shading. I'm going to do that. I
just do it like this. Alright? Some general
shading on the tree. There you go. Now we're
getting something really nice. I've got that. Okay. What's next? We have this. We have this. I'm going to keep it like this. I think we're going to add some interesting
lines later on. The next thing I'm going
to shade is around here. I'm going to add a new layer. So I've added a new layer for the shading on the floor,
the ground, on the ground, but on the tree ground here, what I wanna do is
make sure I'm giving the idea that the light
comes a bit from this side. So I don't want to go straight. I want to go a little
bit under an angle, but not too much. I want to keep it
reasonably straight here. Here to some day
you go with there. And I like it that
c, that is nice. On, Add slightly more, some extra lines, longer lines. Diego, and erase
what's in the tree. Don't want that in
the tree, Diego. Alright. Now with light
comes from this side, then that means that this here just doesn't get any light. So when will do on
hedge that with straight lines here to just smooth straight lines
here to the steel straight. Looking at this edge,
going straight. On this side, you're
gonna get the opposite. This is going to be enlight. This is not gonna be in light. So I'm going to
hatch this thing, move on to actually hedge this, but not all the way
to do it like that, because that side is enlight. Now I want to add
a little bit of extra shadow line right
there, and I want to do that. There are two. You go, nice. Alright? Now, technically, if the slide comes
from this side and you would get
a little bit of shade there from this edge. So why not put it in? And it makes it interesting
too, and the rest, perhaps a little bit more there, and a little bit more
there are some there. Alright, Now, this here, the pot itself dram, I'm not going to touch
pretty much for now. So there would be a lot of
light there that will leave that as it would be
a lot of light here. Now this part here definitely
wouldn't get much light. So I'm gonna cross hatch
this in under an angle. Then go the opposite
angle. So long. That's a show that
that is nice and dark. Although I'm not going
to say that is nice. Well, this is definitely better. There. You go home a
bit on the bottom. Alright, that's better. Now, this rim here, this room would have the same. It would be hedged, but I'm not going to head
**** the same direction. We're going to go
straight again, keep them close, the ego. And I'm going to Let's say
I'm going to do adhere to what I'm going to keep these further
apart once in a while, then a little bit closer. Skip a little bit. Play with that a little bit. Not all uniform hashing. And there we go. Alright, definitely need
to erase something there. And what I'm gonna do here,
I want to give it this. Some hatching like that. Now this I'm gonna do
under an angle again. This whole part here. Alright, and this
little bit here, a little bit like that. What makes it interesting
now on the here, this edge will definitely
cost a little bit of shadow. So let me draw that into. All right, Good. I like that, That's good. And I'm going to create an
edge on top of this to that. Well, that's too much. Just a bit thicker
so that you get the idea that we have a
little bit of an edge dash C. It looks interesting. Alright, now we only have
this part, the legs here. This one. I'm just going to go really
close to each other. Same here. Really close
to each other, dark. And for this one,
what I'm gonna do is I need definitely an angle, keep them reasonably close, but not as close as here. And there you go. This one we're gonna do.
Secondly, the same. Close. Not too close. Alright, good. Well
that will be dead. Almost. I'm going to add a new layer. I'm going to work
on the floor here. And what I'm gonna do is
I'm going to do pretty much the same as
what I've done here. Around. I would see around
here I'm going to start keeping it slightly. Under an angle, not straight. They go and under here, even a little bit. Even here. Just a little bit
on the net angle. And shade this part
into going slightly. Outside. There you go. Good. There we go. Well, at least
that we go for this part. Let's see. We have the
shadow everywhere. We've got another branch
without it on this part. Yes, we do not see, I want only wants to
do a little bit on this edge here on the bottom. Add a little bit of
shading on it like this. Yeah, I think that is good. There you go. All right, Good. Now let's get some dimension. Just a little bit. Good. I think I'm done with this. Yes. But at least for an hour still looks like a pine
tree with snow on it. Or you're going to
definitely changed it and do something about that. Alright, that's it
for this lesson. In the last lesson,
we're going to just finish this drawing. Add some extra details
to really give the impression this
is a pine tree. Make sure we get some nice bark to perhaps do a little
bit about the part, and then we're done. Alright, see you in
the next lesson.
6. Adding the Needles, Bark and Extras: You've made it to
the last lesson. We're almost done with this
cute little pine tree, drawing it completely ourselves. We need some details. Now it's nice, but we can make this a lot nicer and that's
what we're gonna do now, want to add some
details to this. First thing I'm gonna
do is on the bottom, create a new layer. I'm fine with that. Alright,
the first thing I need is this impression that this
is actually a pine tree. Well, I think already everybody knows this
is a pine tree, but by the shape, but still we need to
give the hint of it. And what we're gonna
do. Surprisingly, we're going to add some petals to it. And needles just randomly
add some needles, make them straight
under an angle two. Alright, there we go. Crossing them even
like that, up there. Then some like this. Making this turning this
tree into a pine tree. Now I'm not doing it everywhere. Now on the bottom. Now what I'm gonna do
is I'm going to put some, put some down. There you go here to end
on this Part two here. Sum up some down those
middle parts in a minute. Now this one needs
the needles here. Now there you cannot
see the needles. I want them, they're good. I want them even there. On this edge going
inside and outside. Alright, I think I
like my pine trees see now that's already starts
looking more like a pine tree. Let's do that. I'm here to meet up, but some go down to I'm making the ones that
go down slightly shorter. There you go. The pre instead
of effects that they're coming to its meet.
A little bit. There you go. Though. Try and shorter on the day. Alright, let's do
this one too then. Okay. Looking good.
We've done that one. Yes, we do this one. Let's add a couple up. Here. They go. And we need some here. Alright, that's good. But now I'm gonna do something about the empty spaces I want, I'm gonna do is just some
random clusters of needles. And you can play with this up, go down a little bit. Like going down, you get the
idea that they're coming to which you and that's
not all straight. Let's add a couple there. He's in a few here. Right? And now it's
not that empty anymore at just a little bit
of interests to the tree, alright, and now it's
looking like a pine tree. Next thing is, I'm going
to do the bark here, get the idea of bark and get the idea of that
too on the branch. What we're gonna
do on the branch, Let's see, I'm going to add
just a few lines like this. And I want to add a couple of lines like debts. Day you go. We'll do the same on the tree. Turn my paper like this. I'm going to add some
interests like that. Some lines. And then you get that idea and that
is blocked there. There's some things
on it, cuts in it. What do you have for a tree? Even there there you go. Even do a couple. In the middle, really thick, some there to around here, some extra C. And now it's starting to look
like a nice tree. Let's do a couple of hair tumor. Okay. Then let's do some
on the bottom. Strong ones here, two
short ones there. And why not do that too? Perhaps a longer one. There you go. Little bit more there. And now I'm going to turn my paper. I'm going to definitely
add a couple like that to really create that idea of a pine tree. Now that looks a lot
better than improves my pine tree right
away. All right. Now, here, around here, what I've said I want
to do I'm not pro not doing grass or anything but just a hint of
something going on. Just some, even some needles
that have fallen down. Perhaps. We'll let the
fewer decide what that is. My iPad is playing tricks on me, probably because I rest my
hand on it a certain way. The palm rejection, thinking that I'm
erasing something that we go See now that looks nice. At the bottom a little bit
here to, there you go. Alright, and that
clears that up. Do I wanna do it at on the pot? A little bit probably. Like we've done with
the previous one at just some dense on it. Just to make it a bit
more interesting in that. Some there please.
Thank you. I bet. Even on the edge, a little bit. On the edge of the edge. See, that improves
it. Maybe few there. Alright, let's do a
few on the bark too. Another branch goods. And now we're
having a nice tree. Look at that. The only thing
left to do is down here. Let's add just a little
bit of interests. Just some random
scribbles here and they're making it less empty. And so we're going
to do with this, making it less empty. Line here and there you go. So there, alright, good. What I wanna do with
these edges probably, let's add some lines
just like this. Even on this edge here. All on the same side. So on the bottom of
the edge going towards the bottom. Alright, Good. Now we're adding some
interests to it. Okay, I'm not gonna do anything about the background of
this with the previous one. I'm just going to say, let's
look at this. Pretty nice. Let's try one thing. I'm gonna do a new layer
on the tree itself. Let's add just some
little thoughts on these empty spaces here. Not needles by just
little stripes. And since we already
have the idea that this is a pine tree, we could see that as very
small pines perhaps, yes. And that improves it nicely. Might do some more there. Okay. Good. I'm going
to leave it like this. I'm happy with my tree. There's the pine
tree. Let's see me. Just make sure that these lines, the edge of the tree. Perhaps here to our
very obvious strong, nice and branch to that. Yeah, Okay, That
makes it better. Alright, I'm looking one
more time to my drawing. I'm going to say, great. I'm gonna say this is dumped,
this is looking great. This is definitely
a bonsai tree with a nice sturdy trunk with
needles going up here. Nice foliage. Even dumped her up
there, of course. Most part giving the
idea that this is a bit taller than the previous
one, you get that idea. This is a bit more
larger bonsai tree, but it's still a bonsai tree because it is in this nice plot. Now if you want this to
be a small bonsai tree, what you gotta do is you're
going to change this. You gotta create a taller one. So if you want to do
that, Let's do that. We're going to add a new
layer just for demonstration. I'm just going to draw
that, all that in. But if you want this
pine tree to be smaller, what you will do
is you will draw basically a much
larger pot like this. I would keep it at
the same there. See, that is just very
quickly drawn in. And if you do that, this whole tree suddenly
becomes a lot smaller. Now I don't want that,
but you can do that. You can say, Okay, I want
my pot to be larger. You could enlarge it and then
you get different effects. Alright, you could still, I'm a duplicating,
I'm deleting that. You could still do it now. You could correct it
if you wanted to, then you have to find
a pot that is here. I'm going to duplicate it
because I don't want that. I'm just going to
show you that my duplicate, I'm going to hide. I'm going to take that
pot and I'm going to say, alright, I think my
pot is too small. So what you're gonna
do is you're going to hit that little arrow
while you're on that, you're going to say here,
free form, not uniform, then it does everything and
you probably don't want that. You might want to have
it slightly larger. That's for sure. But
you want it wider. So then you say free form and
you take that middle one. And you take that one. I think that is nice. Hit that arrow again. Now you see that you get a
much larger, wider parts. Now you need to
change the rescue. Of course I'm not
gonna do that with this because my shading is now. My shading, my
shading is all wrong. Of course, these
lines is all wrong, but see the effect you
get you right away, get a smaller tree, then compare to
what we have here. Now you get a large tree. Yeah, that's the whole
idea of a bonsai tree. You determine how large, how small it is by
reference point. And then this case,
the reference point of a bonsai tree is,
of course its pot. I got to bring back
my shading again. There you go, because
I like it this way. And that concludes this lesson. We've got a nice pine bonsai
tree in the previous part, withdrawn one with leaves, showed you how to get leaves, how to get that effect
and that impression. And this one is unmistakably
a nice pine tree. Now you could do a
lot more of this. You could experiment with
this, create other shapes, creates more interesting shapes, make it a lot more complicated. But for now, we're
going to stop here. We've got some nice, easy to draw bonsai trees, withdrawn them
completely ourselves by looking a little
bit at photos but letting our imagination
play a huge part two. Alright, that's it.
Next up is a project. I'll explain that
in the next video. Alright, see you in
that last video.
7. The Project and a little extra!: Welcome to the project. Now for the project, I'm gonna do say This
project is a project in two parts, are
actually three parts. The first part is of course, draw this tree and edit to the project section
so that we can all see it. The second thing I will
challenge you is do a secondary, perhaps take a photograph on line or change some
of the shapes. Just play a little bit with
this in the same style, with the same technique
to create another tree. And the third part
of this project, I would say add a little bit of, for students, we're going to paint in a little
bit of a Canvas. Now for that you can use
various brushes in procreate. I'm just going to
show you what to do. One of them, just to add
a sense of a canvas. Alright, let's do that now.
I'm back in my drawing. What I'm gonna do
next, I'm going to add one more layer and it's
going to be on the bottom. So on top of the initial
sketch which we hidden, I do a new layer. Then I'm going to go to my
brushes and I'm going to, there's plenty of blush brushes in Procreate or perhaps
you have like me, several you could use,
but we're going to use one that everyone can use. And in this case, we're
gonna go to textures. I'm going to pick
that grunge brush. It's already selected here. And what I'm gonna do
if that grunge brush, if I would use that,
I'm sure you've done. I've got it on large
unwanted paint that in I get this. Now. T01, that, that's not
a texture, is it? That is a mess. Alright, go. What are we going to
do is we're going to lower the opacity. Let's go over
twenty-five percent. Let's see what we get with that. And we're going to paint in. And what you do if you press this brush heart like this,
it's pressure sensitive. Or if you press it a little bit, It's a huge difference. So what I want, I'm going
to press it slightly. And I want to
create that hint of texture even on my tree. As if there is a
bit of a hint of a paper texture behind
here and that is Brunch, crunch, crunch brush is really nice for I'm
hardly pressing. If that is a problem, then what you could do is
lower the opacity even more until you get a
nice pressure you want, which is comfortable for you. So if you have, you tend to
press a bit firmer than I do, then what you can do is
lower this opacity lot more. Alright, I got that hint
of a bit of texture. See that? It's quite
interesting already. There you go. On a bit more on the floor
and a little bit. There you go. That's all I'm gonna do. That takes away that Y2. Now it's not so snow anymore. I want a little bit more there. Alright. I'm not regarding
any light shadow things. I'm just trying to
keep an even pace. That gives the idea
of a paper texture. As if we're having
a paper texture. Another thing you could do
with this now we're on this. What you could do now
I have painted this. You could do this in a
different color, of course. Let's see if we can do that. I'm going to add another layer. I'm gonna give this
layer a color, trying to create a little bit
of vintage color of that. What I'm gonna do
is I'm going to just create my own
vintage color. Let's see, which would be
a nice vintage car, yes. And the orange that
light brown there. So I'm in the orange
range and I'm going to light brown skin color. I would say, I'm going to
fill this with Dead Sea. I look at that bit
too strong perhaps, but it gives that idea. So what you could do is
either lower the opacity on this one until you
get where you want. Oh, I like that. I don't know 50 per cent
or create that even lower. And how you get a
whole different ideas. See that? I've added just suddenly a paper
texture to my whole drawing. Without even having a
paper texture will house special brushes with the
standard Procreate brushes. Now this is not the
only brush which gets this effect you
could draw on moot. Be really cool. Yeah, there's plenty of
them yet tessellate, it gives more stripy part. Or you could do
some spray paints. You can do a lot with this
yonder textures? Yeah. Okay. Let's give them an hour on it
and let's give that a try. We have to do that. Alright,
I'm going to hide these. And I'm going to go add
another layer on top of it. And I'm gonna go back to my
original color a little bit. The easier part of course, then it takes the color it
remembers, there you go. Nice thing. It just keeps
your colors in history. So I've taken the
gray from my history. Taking that route, um, have no idea what's
going to happen. So what I'm gonna do is lower
the opacity 40 per cent. With this, I'm pretty
sure if I lift my pencil, yes, it's going to
start this again. So I don't want that. Alright, I'm going
to lower the opacity and more 22 per cent. So the trick is not to lift
the pencil onto your donor. Now, this is, if I
painted on wood panel, that is cool, right? I've painted on a wood panel
now, which is pretty cool. Next thing I wanna
do is I want to add another layer under it, and I'll need to get that
boot color in a little bit. Would color. Go to the brown. Not too dark here, like this. Let's give that a try. It go way too dark. We can change that. Change the opacity. Diego, that looks
like able to pan out. I might go with a different
color on this one. Back to the pretty
much that same color. Yeah, that's just nice to
what you can play with this, of course, go for a
really dark color. That's perhaps a
little bit too dark. The previous one was nicer. And there you go.
Working on a wood panel. I think I'm going back to
the previous one, height, this paper texture, bit of a
vintage look. I like that. That's the first part
of the projects. I've drawn my tree. I'm not going to
draw a second tree I did in the previous one, but I've did the third part of showing you what
I mean with that. Just create some kind of
background checks on this gray, get the effect of a paper
texture like I have to. The mood was nice to just a
bit of the idea that you're drawing on something else then
the iPad by creating that. Alright, Good. That's it. That's it for the project. Three parts, really. The tree posted. Then create a secondary,
a different tree. And please, yes, do
post that one too. And then the third one create
a nice texture background, giving the hint of a paper
or working on something else than just a white
canvas in Procreate. Alright, well enjoy, have fun. Thank you for being
with me in this class. And of course, there's
way more classes I have here on Skillshare
for Procreate, but also traditional drawing. So pick whatever you like. Don't forget to follow
me so that you get that notification that when
I release a new class, you can jump right into it. Now I got to end this video. I'm just going to say,
see you next time.
 Benjamin A, Art Teacher, illustrator Art by Benjamin