Transcripts
1. Introduction: Over here, it is summer. In the summer, that
means that part of our garden, a flower, pops up already for decades now, clamped it more
than a decade ago, and it just keeps on
coming every year. And that flower is the cosmos. And I really liked that
flower and I figured fine to do something
with that in Procreate. In this class, I'm going
to show you how to draw this flower
from a real flower. You do that in Procreate
or you can sketch it. And wonderful, I've done that. I want to show you how
to apply a few brushes, which you can use to create beautiful painting of
a watercolor effect, similar effects on it. It's creating beautiful painting in procreate from this flower. And of course, I'm going to
show you how to do this. Take you along with me. I'm going through
this process and just follow me along
and then discover. And how you can effectively
sketch and use some brushes. Right? Good. I would say go to
the next lesson. And in the first lesson, I'm going to show you how to
get there from actually from real flowers into
procreate and from there for and what to get.
2. Creating a Color Palette: For the first step in
drawing our flower, the cosmos, we're actually
not going to draw anything. We're going to set
up, of course, the Canvas we're going to use. But more importantly,
what we're gonna do, we're gonna create a
color palette ourselves. And I'm going to show you
how we're gonna do that. For that, I'm going to
use the actual flower, but you could use the
photograph supplied. Or if you just want to, if you have a cosmos
somewhere around and you want to draw it from that
life flower too. Then I would say take a
picture from the flower to, I'm going to show you
how to do the best. How we can create a nice palette from actually the real flower. What do you need for this
step is blank piece of paper. Use that. Now we're not going to draw
on a blank piece of paper. I'll show you what
we're gonna do. Aside from that blank paper, you're going to need
the actual flower. Now I've got to hear
from my garden. I think 15 years ago, I did plant some of these. And since then, every year
they keep on coming back, but they also change colors. And I've had this nice
deep purple color, always had these ones and
white ones this year. No white ones. Plenty
of disciplines and some of these yeah. Plant them once you are happy
for the rest of your life, I guess they just keep on coming and coming and coming
out of my nice flowers. So the next thing
you're going to need, of course, is your iPads. Alright, let me show
you what to do. So I've put the two
flowers on a white paper. Why am I using a white paper? Simply because I don't want all the background distractions. Now if you can't do whitepaper, you're taking photos outside. Officially, you're
getting some restrictions in that for what if I have half the actual flowers and white paper that
would work best? So I want to get
these colors from it. So what I'm gonna do, I'm gonna use the photo app for that. I'm pressing just the Photoshop. What I'm gonna do
is I'm going to put on the flesh because my studio is not perfectly light at setup
for taking this photograph. Now, I could do that then I
need to change everything, but I'm going to try to
do it with the flesh. So the next thing, what
I'm going to do is here. And I think you just
see it on the photo. I'm going to try to get these
flowers nicely in focus. I'm using the flesh. So let's see what kind of photograph I'm getting
this photograph here. I think I might be able to
work with that photograph. Alright, so let's
give that a try. So I'm putting these
photos, sorry, this photo and put
these flowers aside. The next thing
you're gonna do is you're gonna go to photos. And there we have the photo
of the flower photo I taken. And we're going to
press Edit here. The photo is the
wrong way around. So what I'm going to do
is I want to cut some of this close to photo
was decent photo. I'm heading this little crop and rotate with the arrows with this crop tool and
move that water can do is rotate my photograph. There you go. And I could use this actually, I wanted to trace,
this would work fine. Now, I'm going to crop this
a little bit closer so that I won't get all these
extra distracting colors. I've got all these shadows. And the less distracting
colors you have, the better your palette
or of course work. I don't think I'm okay with
this. I'm going to say dumb. The next thing what
I'm gonna do is I'm gonna go to Procreate. I'm going to create
a new canvas. I want just a simple square, so I'm going to add plus. And for my square I like
this size 3500 by 3500. That gives me 81
layer has plenty. I don't think we're
even going to use ten layers for this. So if you are a number
of drops here below ten, I would say lower this number
to 3 thousand or 2500, but I think an iPad will be getting a decent
amount of layers here. I'm keeping it on 3 thousand just in case I want to print it. Next is the color profile. I'm keeping mind as
RGB because I know the sRGB connects really
nice to my printer. The way I print my
printer goes well, Display P3 has a
larger color range. If your printer works
with that, Go for it, or your printer might
be needing CMYK colors, then pick one of those profiles, whatever your printer does. But most printers
correspondent, right with this, the time-lapse and the
Kansas properties, I'm not even going to touch and I'm going to
just say Create. The next thing we're gonna do. We're gonna press
that, this color here, this circle here.
It's round, this dot. Whatever color there isn't yours is the last color you used. We're going to press pellets. If it's not already on there, we're going to hit that plus, and then you have a
number of options. You could create the pellet yourself from the
camera, from photo, from phi f, we're going
to go from photos, so we're not taking
new photograph. We're going to use two photos. From photos. I'm going to
select that photo there. And it creates a
nice palette for me. Pretty much. Yeah, not something nice,
deep colors close to it, but I don't think the
greens are perfect. But that's the portfolio
is not perfect. If I want a perfect one, I should have lighted it way
better but were corrected. Then the next thing, I'm
going to change the name. I don't want this palette
from whatever image that is, I want to call it, of
course, what are this call? Cosmos. So I've got cosmos, but let's give it
the full Latin name. That will be cosmos BP. Notice, and let me spell that. P I, P I N N a T U S, beep pinata. So not if she would say in
English American, by pinatas. By pinatas, you would
probably pronounce it, but we're gonna give it the letter name
cosmos be pinatas. That's the closest I
can get to the Latin, I think we're going to say done. Alright, so I've got my palette, I've got my cancer setup, and I'm ready to draw. I'm not going to
draw in this lesson. We're going to draw
in the next lesson. So we've set up our canvas. We've got some colors now, although the cause
we need it later on. Alright, well.
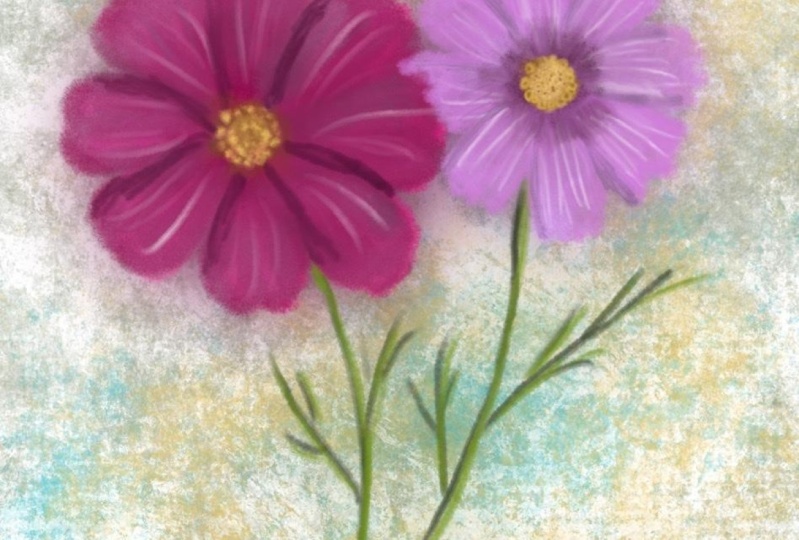
3. Drawing the Flowers: We're going to draw the flower. We're going to draw our
Cosmos DB cosmos be pinatas. We're going to create just
a nice drawing of it. I want to show you
how to do that. Alright, let's do that. So I've got my canvas setup. I've got the flowers here. I put the white
sheets on the red so that you can just see
them a little bit better. And what I'm gonna do with this, I won't put this one on water. I'm not going to use
this one for now. Let's just for the color
because I liked it, deep polish color. Alright, we're going
to draw this one. We're gonna make it as self. Quite easy. I want to draw it
as I hold it here. We're going to
start with drawing it from the top like this. And that is just the
easiest thing to do. Let me see. Yeah, you should be able to
see that in both cameras. Alright, good. This is now, this
is a nice round. And what I normally
do, first of all, I determine where I want my flower to be in and
I'm drawing for that. I'm normally drawing a square. So what I'm gonna
do is I'm going to pick one of these gray colors. I don't really mind which one. Night dark color,
this black and white, you want to pick this one here, blackish color or
even that one there. That one is a nice grayish
color. Let me see that. I liked that. Now we're going to change brushes, of course. Going to the standard Procreate
brushes for this one, not the ones I've chosen here. I'm going to go to the sketching and pick
that too and pencil. And let's see, make sure
this is 100 per cent. I've got this 102%
and let's see how that creates a nice line for me. Alright, I have one
canvas and that is nice. Now what I normally would
do is I would sketch simply a box like
this. There you go. That would be the box
I'm going to work in. And the next thing I will do
is sketch in some details, but we're using procreate. This will be regular sketching. So do we want to go regular
sketching in Procreate? We want to make use of the
features are Let's go, Let's keep on going with the
real, real sketching method. So we're going to do
some real sketching. And then the fun part about this is if you will do this
with a pen and paper, you will actually
get the same result. Feels a little bit
different using the, this pen pencil or of
course this pencil, but the result would
be actually the same. The procedure to get
that would be the same and the result
pretty much two. Alright, good. Let's
continue with that. So I created a, pretty much a square. The next thing is, this is a nice round and probably this is pretty much
in the middle. So what I wanna do is I want to draw a
diagonal like this. And I want to draw a
diagonal like that. And by doing that, I find my middle. Now, nice. The
next thing which I need to do is to
draw in this circle. Now I could draw a circle
perfectly with Procreate, but since we're sketching, Let's continue with that. The next thing, what
I'm gonna do here is defined this one into squares. Into the square,
I'm dividing into four new squares. I've got 1234. By just dividing
a meal now knows for sure that the
middle is right there. The next step, what I'm gonna do is I've divided the cross, share this across hair. They would call
that the middles. And I'm going to
connect this point to that point and to
sketch something. If you wanna go from 1.21, I visualize that I'm
going to arrive there. So I'm going to start here. I'm going to think,
where does my pen go to? I could draw the line like this and that goes a bit wobbly. I'm not doing that. I'm sketching and I'm keeping
my eye on the second, I'm going to do the same here. I want to go from this
point to that point. I'm visualizing that I
arrive at this point. Now, let's do the same here. Good. And let's do the last one here. There you go. The next thing I'm gonna do
is I'm going to say, alright, I've divided this, I've
got this triangle here. Now, I want to find
around the middle, I'm going to put a point there. Does the middle of this one
to this around the middle. The middle I'm
going to use about the middle to make myself easy. Then I'm going to
put some dots here. What I want to do next, we're gonna create an arch here. It's going to create
simply an arch from there. Now you see what happens. And the next one, I'm going
to just do this one here. We go straight down
with it will go through the point and
go straight there. That's it. The next thing I'm
gonna do that here to go from two
sites that you go. And this one, I'm just creating that
circle and now I've got a nice circle around here. And it's technically
how you make a circle, a quick circle. If
you want to do it. Very accurately, you would
need some more points in it, but it works pretty much. This will work fine. The next thing, what I'm gonna
do is I got my circle now, so I'm going to add a new layer. I've got this circle.
I want to stay within this circle and we're going
to look at my petals. So what I'm going to
say from the middle, there's a petal
right in the middle. I'm going to just draw in a line that would be the hotline
of this petal here. The next one is pretty
much straight to, and these are straight
and this one is straight. This is easy. This
is eight petals. So the next petal wouldn't be there than there would be a petal there and you
would get a petal them. Now, if you have a
different flower with six, then you would of course, rearrange this
hotlines differently. And this one goes through the middle to fruit
and middle to, through the middle there and
through the middle there. If I'm now going to hide
my original sketch, this is what I'm
going to work with, but I want to keep
that original sketch. Alright, so I've got this. The next thing I
need to determine there is this hard in it. Let's see. I'm just going to draw that
in now what you could do, you could do the same method as we did to get
that nice circle. But since I got a
circle already, I might as well go with that
so-called a little bit. And there you go.
As you can see, I'm sketching and
while I'm sketching, I'm correcting my
angles a little bit. That will be pretty much
the heart and how I can draw basically
in these petals. Now, I'm not gonna
do that like this. What I'm going to do is
I'm going to this layer. I'm going to set the
opacity to about 50%. I wouldn't do it same
with the other layer. And I'm going to add
a new layer on top. I've got my base sketch, I know where to go. This is the middle.
Now. Now I'm going to take a look at this flower. And what I'm seeing here is an outer circle there
with little circle. So I'm going to divide
this into shapes, the shapes I can work with. So what I'm gonna do, I'm going
to zoom in and we'll say, alright, I don't, I don't
care how many there are, but I know there's
little circles, so I'm going to draw
those in like that. Keep trying and keep them
roughly about the same size. You go. And see I'm managing
pretty well. So those are dose
and in the middle there's Indies as dots. So if I would not painted, so if I'm only sketch it, would put in those dots, Diego. Alright. And there we go. The next thing which I'm seeing is in the
middle, I'm seeing 12. And the rest are basically o ducts and I'm going to put them in some
largest, some smaller. Alright, And if I now how
high dose down those there, see I'm getting
nicely this heart. Apparently. I missed something there. And you could add a few more. Yeah. No, that's that's already a hearts and the Simple as that. The next thing
which I need is of course Mike, guidelines back. I don't wanna do those petals. So what I'm observing and
I'm looking at this flower, I'm seeing that this petal
definitely is the top one. The top of the top,
on top of everything. So what I'm going to
do, seeing that it has this fringed edge here. And what I'm gonna do
first is I'm going to say, alright, this is the
heart of that petal. And it has a nice arch there. So I'm just going to draw
that nice arch in the middle. Pretty much in the middle of this I want to
reach around there. I would say, I'm going
to just add an arch. I'm gonna do the same in
the bottom, the bottom, till it reaches
the outer points. I'm going to leave it like that. Now the next one, this petal is on the hair. So I don't need to sketch it all the way. It's under there. This one is on top again. It's right here till it
reaches the end of the flower. And there you go. Now you've got two
petals already. Now, I'm observing that
this petal is on top again. I'm drawing in that petal again. Not that this would be, this would be the middle, but it's not really in the middle. This one is a shorter one. Wanna go around there? That would be at a
quarter from the site. There you go. Now I can draw this one in. And there we go. Alright, let's me see. This one is which one is on top? Lift them. This one is
on top of this one. So I need to draw in this 1 first and then
comes out there. Now I can draw this one
is on top of that one. So we're going to
get this one here. I might be slightly Let me see. Yeah, that would be
slightly too small. We're going to go slightly
wider with this one. Want to get around, they're here to, there you go. Let's see the next one. This one is on top too. And here's the last one there. You can ask not the last one. This is the last one that
goes just under the rest. There you go. Alright, good. Now I've cut my,
basically my flower. If I hide this, see, I'm getting the shape
of this flower. Or I only have some dots
which I don't want there. Just to show you something
I don't like the adults. Alright, let's continue.
Bring that back. Now we're going to add
in those edges now. I see that they're there. I'm not really too worried about how accurately
I'm doing it. I'm just gonna make sure
I get them in somehow. This one, larger, smaller one. And there you go. Alright, and here's another one. I might just go
lower with that one. That looks nice. Let's see, we're on this
one or that one has a larger one in the
middle and then two there and this is I need
to meet it around there. All right. And these two so you
can just observe this very accurately or roughly, I'm doing it roughly now. This one isn't about free to
want to make it a nice turn. This one has four. Alright, This one
is interesting. Let's see that one has
none in the middle. One there, one there, and then it meets the outer one. There are two
interesting, alright, and this one I'm going
to do roughly again. All right, and then
we have our cosmos. See, now we have that
nice Cosmos flower. Okay, Now we see
these hard lines. Of course we want
to add them in. We have some hard lines there. Want to make use of debt and make sure I'm
on the right layer. Yes, I am. I'm just let me see. I'm seeing them indeed
having one in the middle. All of them. Pretty much, yes. I'm going to draw
them in the middle. Alright, and the next
thing I'm noticing, there's at least two. Some have free for, let's go with 312. This one is bit wider, so let's give that a three. This one make it even uneven. 123. This one needs a
bit better line there. I'm going to do this
112, this 1123. And there's one for, let's do this 1 first. There's one there.
And there we go. And this one I'm gonna
give free again. Alright, good.
Height, everything. And now I've got a
nice cosmos sketch. Alright, good. We'll put this one on water. Alright, I've cut the cosmos
from really from the top, but I'm going to
turn it towards, facing towards me,
pretending that I want to do another step of it so that
I can work with this. This is now huge, but we need to work with it. Alright, the next
step I would do is I would make this smaller because now we've
only got one flower. Now you could, of course, paint is nicely.
Do it like this. Have one flower just
to focus on it, which is pretty nice, but slightly more of it. So what I'm gonna
do is I'm going to duplicate this layer, duplicate because I
want to keep the rest. If I change my mind later on, I can just go back to
that hidden layer, right? With this one, I'm
going to hit the arrow. I'm going to make sure
this is now on uniform. I'm just going to
make it smaller. Put it right there in the site. Alright, now, with this flower, which is definitely needing
water, I'm putting it down. There you go. I'm seeing, of course it
has a bit of a stock, So I want to add a
little bit of a start. Now I don't want to go
straight down. That is. Really boring. I want to
go with a star like this. I'm going to add a
new layer for now. Since I want to go
from the heart and just go with a
stock, right there. You go. There's my stock. Going to thicken
it a little bit. It's not really thick stuff. Alright, The stock
has done pretty easy. The next thing is the leaf. See what I'm seeing is
the leaves are really, really easy to just basically
little branches on a tree. The splitting in the end. And they're having
little branches and the branches that
makes up the leaves. And they're not on the same. So they're not angled like this, but they're angled like this. Now, let's watch you notice
as I'm observing them. And then let me remove this with an eraser and start
that again here. And then I need one there. The next one I'm going to
put in a little curve. Now if I take the
other one with it, you get interesting
shapes and things like that just the way you want. But I think that would be
nice to put one on the curve. Let us split and making
sure that you go. Alright, and that's
done my sketch. Well, that's my first sketch. Now I have a few
choices to make. Whatever I want to
draw in a second one, perhaps slightly
different or whatever. What I want to just make
use of this one is copy it. Let me show you that. Alright, I could make
use of this one, make it myself really easy. Copied the layer with the
flower, duplicate it. Hit the wrench and I'm
sorry, that arrow. I'm going to make it smaller. I'm going to move
it somewhere else. Pretty much. Do it even
slightly behind it. Maybe too small. There you go. Let me see. Yeah, just
a little bit smaller. Put it behind there
with this green arrow. Rotate it so that it won't be straight up
like the other one. But whatever we
could go like that, that would make it nice. You could do that. Now, the next thing is
you take an eraser. I'm using airbrushing, the
medium heartland for erasing. And whatever is overlapped by the first flower needs
to go off course. So that I can clearly
see that first flower, the best, that is the
flower that is on top. And you get this one. Not that makes a very
nice drawing, doesn't it? Then what I would
need is a new layer, add stock to it. Or if the stock, by the
way, on the other layer. Let's remove that
top part I used. Just as my guide. That's better. Now on the new layer, I'm going to add a new stock. I'm gonna go right here
and let it meet down here. I'm gonna go with a glue
with a curve like that. There you go. And get a good stock day ago
and it's still a sketch. Alright, and I'm put a prudent, some of those leaves again. There you go. I might want to have
one down there. Just giving the shape. I would like it to be in here. I'm going to make here one more. We're going to let it
touch the other one. So I need to make
this slightly better. It's a bit of a moment's
getting more of a mess. Ti go, that's better. All right. Wait, that's on there. Yeah, that's good. Okay. Alright. Alright. Now I've got two nice flowers. Now, we could draw the second flower from the side or in some
different angles, but I wanted to keep it
pretty simple in this lesson. I'm going to work with this. If you want to
experiment a little bit, try to draw a flower
from the side, where of course you're
welcome to do that. I'm going to go into
the next lesson what we're gonna do
some more with this, alright, let me show
you what we're gonna do this in the next lesson.
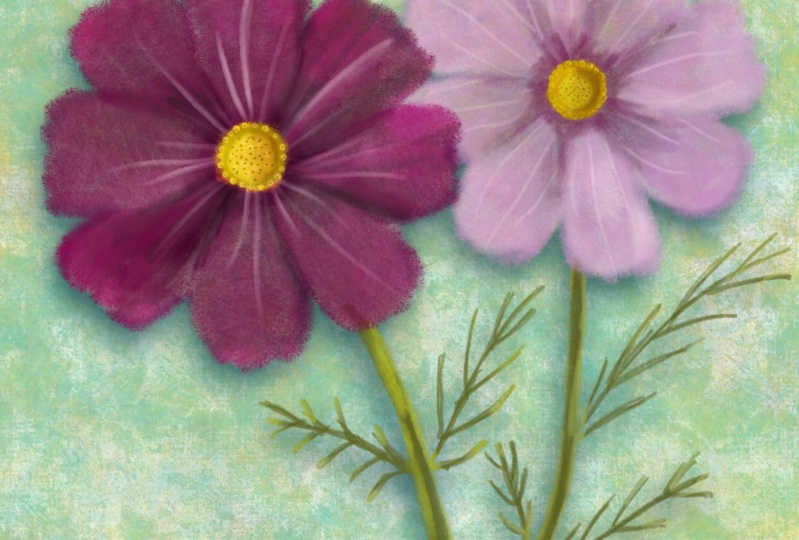
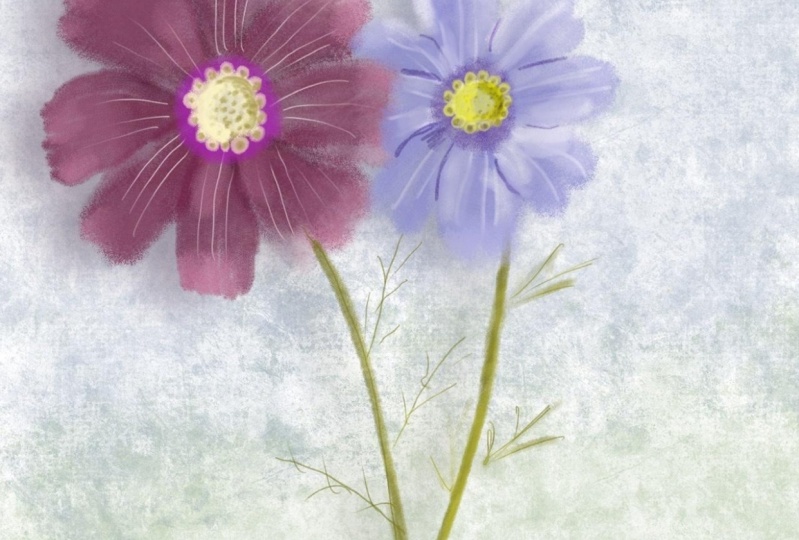
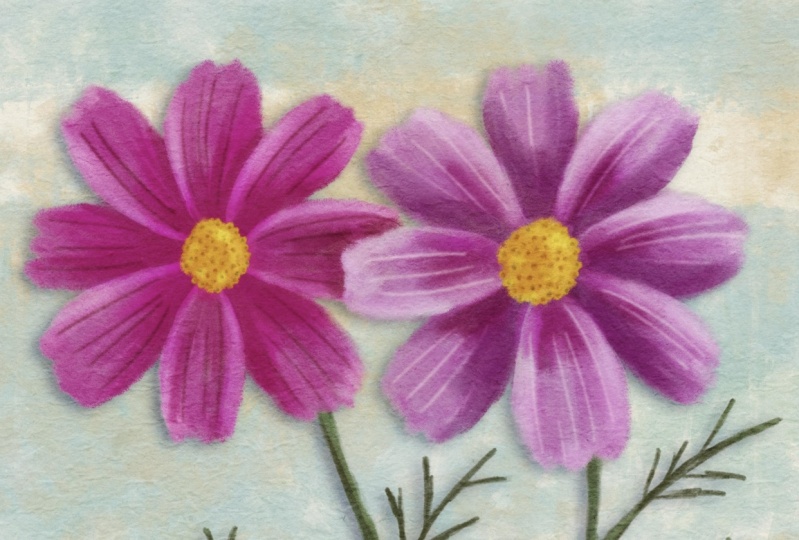
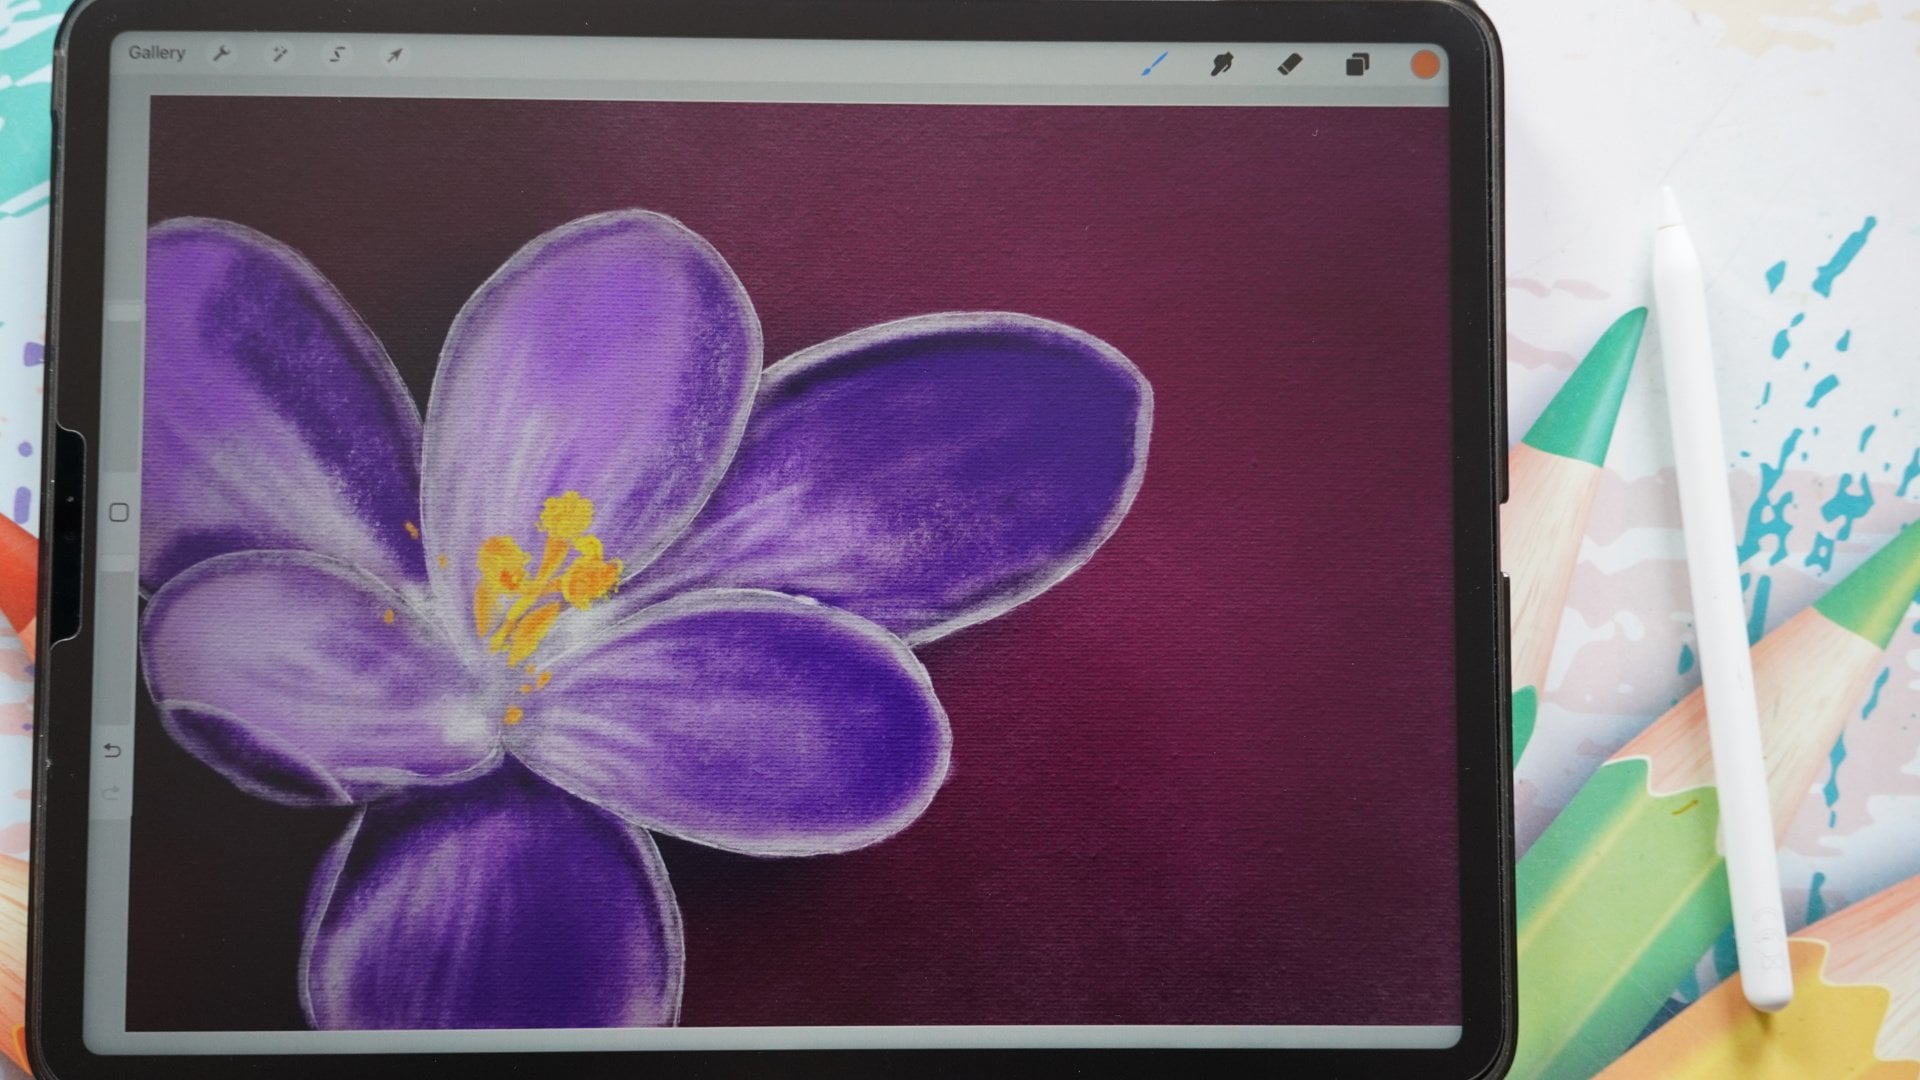
4. Painting the Flowers: Welcome to the next lesson. We're going to paint the
flowers for that I've supplied to Brushes
some samples from a watercolor pack
and working on which shoots at some point be
available at my website. But for now, we're going to
use two brushes from that, which are provided with
this class, of course. And we will use them to paint in these watercolor flowers. We're going to paint some
watercolor flowers with them. Alright, let's do that. I've got the sketch here. The first thing, what I'm
gonna do is this head, these ones I've, I'm now seeing, I'm going to select them all and says I'm not
going to work on them anymore. What I'm gonna do is I'm
going to group them, click on that group
and flatten them. Now they're all in one group. Now the ones I
don't need anymore, I'm going to notice one is
this one but not this one. The rest, I'm just going to
delete delete what I did. I made a copy of it, which I can go back
to if I need to. But for now I only
need to sketch. Of course, one will
do if the sketch, I'm going to lower
the opacity to around 50 per cent.
I'm fine with that. I'm going to add a new layer, but I want to make sure
my layer goes on top. And I want to lock my layers. I'm going to slide my
layer to the right. No, sorry to the left. Say lock. Now I cannot
accidentally paint on it. Okay. I've supplied
some brushes with this. Two brushes doesn't
owe for washing mesh. There's a watercolor wash
and there's a o for mop and the ovum mop allows me to
really paint a nice structure, a nice painting in it. And the other one we're going to use for the
background later on, they call us, we made
it color palette. So I'm going to pick that
lightest purple, pinkish color. And I'm going to just
paint with that. So we've got that brush. I'm going to paint
in this flower. I'll put my brush
about ten per cent. And I'm going to just
start painting like this. And the next one, top of it. I'm not lifting my brush. I'm mixing it in a
little bit more depth. Because once I'm
lifting my brush, it's going to add a
new layer on top of it with a different
stronger color. And I want to make use of that. This one goes under it, so I'm painting
the ones under it. Let's do those first. This one is under
this one again. All right, the next one, Let's see, this one is
on top of both of these. So I'm going to paint
this 1 first in it. Now other way around. Let's see. Now it's
getting tricky. Now this one I need first. Then I'm going to add this one. And the next thing, I'm
going to add this one. On top of that. We're going
to add this one. Cfi. See, I noticed paint
didn't paint it there. I don't want that very lightly, so I'm hardly pressing now. We have color here. Now hide the sketch for
now. And there we go. We've got these nice
colored flowers already. Good. Alright, what
I'm gonna do next is I've got this base color. I like it this way. So what we'll do is I'm going to add a new layer on top of it. I'm going to make
that a clipping mask. Since I'm happy with this, I don't want to destroy this, but I do want to play
a little bit with it. And we're gonna go to
this color I have. And what I'm going to slide
this to a lighter part. I want to give this
some extra color. And what I'm doing
next, I'm picking, so I have this lighter
color now I'm going to the opacity down to
about 50 per cent. And since watercolor
paint is pretty opaque, I'm going to just add a
little bit of a layer like that at the edges. Good. Let's do the edges first. Here to a little bit. Diego, no doubt, not really. But here it's a free edge. And I'm going to determine
where which is which. And we can see that
by the Sketch. So this one is on top, so I'm going to add the
lighter color there. This one is on top here. I'm going to add a lighter
color at the edge. Let's see, this one is on top, adding a lighter color. This one is on top there. And let's see, this form is actually on top
of the other one, and that one doesn't
get a lighter color. And I'm going back to, I'm going to my palettes pick. This was the original color. Pick a slightly darker color. Do the same and say, alright, this one is under it. So I'm gonna give that a bit
of a darker color. This one. Is under it. Around the edge
there was a dark color. Here. They go. And this one is on
this side under it, and this one is actually
here on the Here you go. I think I've got all
the ponder parts. Let's hide the sketch.
And there we go. See you end up with a
nice watercolor painting. Go back to that light color. Cancel on luck. Need to go to that
clipping mask. May want to add a little
bit more light color. There are two here to get
that idea of lighter color, slightly back in here. There are two, good, alright, the next thing, what I'm gonna do is
I'm going to bring in these hard lines, the opposite hotlines.
The flower has. These lines going to bring
those in. My doodles. On the same clipping mask
layer with this same brush, go for a higher opacity, 2%. Let's see if that works. Ring red line. I've got
that light color steel, which I picked from that
adding these lines. And since we're working
on the clipping mask, we can't go outside of
where we've painted. Alright, let's do
this one to here. There's one. There you go. I'm just doing basically
every one of them. And again, fairly
Rafa, I'll get, end up with a nice
quick painting. Alright, That's that, Let's
see. High the sketchy. Now we're starting
to get somewhere. We're missing one thing. That's the really dark
color here at the edge. So let's bring that into. I'm thinking I'm working
on the clipping mask deal. Let's keep working on
that clipping mask, getting a darker
color, this one. Now, let's get that nice
bright color. Go larger. Ten per cent again.
At the bottom. Carefully, bring that in. Good. Alright, that's enough, good. We're gonna go for the heart. I'm going to hide this for now. I want to work on the heart. I'm adding a new layer on
top of the colored flowers. I'm going to get that same brush I have already am
not change that. I'm going to pick that yellow
we picked from the photo. I'm just going to
basically paint this in. Alright, and that
is quite large, so I'm gonna go lower
two or two per cent so that I can do
these parts too. Make these rounds at the edges. I think the rest of this okay. We should be okay. Making sure this is
dark to around there. Adding a little bit of a
darker circle around here. Still that, alright, good. Stick with that. Next thing we're gonna
do here too is again, slightest to a nice light color. And I'm gonna do these on
these edges a little bit. These pots here, right? Good. Middle two. And let's go for 1%. And let's hide the
sketch because we see what we're doing,
right? It's nice. Let's add just some random
dots here and there. Good. That looks good. Now let's go for a darker
yellow, this one here. See if that works. And insights. Yes, that works. We're bringing back that seed. Now this depends of
course, on the status of a flower if you would
see this or not. But this one is pretty
much in another fan stage, in the middle to a
bit more up here too. Let's go for some random
ones within detail in. Alright, good. Now let's bring that other
flower back to. There we go. Now we should have
a nice flower, brought back the flower, this a bit wild, but I think I'm okay with
that. Now the next stage. What color would
be? I would bring in some light shadow parts. I'm going to do that. Her2 going to show you how to do that. We can use the clipping mask, but not gonna do it exactly the same as I would do
it with watercolor. Different method a little
bit because procreate allows for some different
methods and net. Alright, let's do that. I want to need a new clipping
mask above this one. But what I'm gonna
do first is I'm going to hit that
layer on one working, I'm going to say
plus that creates an automatic clipping mask. And I'm going to move
the one below there. And now this becomes the top. I'm going to say this, set
this to multiply and we'll make use of a little bit
of deep digital power. I'm still having the same brush. Go for free percent.
Let's see what happens. I want to pick darker color
that one. And let's see. I want to create
some nice edges, strong shadow edges like this. Yeah, that's good. All right, good. That's all I want here to want to
create a little bit of shadow edges where they
are, they're here. Alright, that's good. That makes it nicer here too. I know this is a bit of shadow. So let's create a
shadow edge there. I know there isn't
shadow edge here too. And I'm just more or less
drawing that in a little bit. And I know we've
got them here too. And around the
site too, I think. Or is that the other
way around us? The other way around
him? This is light. It is here, that edge. Okay. Let's see. This is
definitely on the red. How about this one? Bring back the sketch. Yeah, this one goes under it to now I define
clearly where is which, what belongs to what petal. Alright, see, that looks
better right away. Let's get this brush
till about 17%. And I'll carefully smear
that in a little bit. Like this rise, not this one. Definitely on this
one little bit here. Alright, good. That looks
a lot better, doesn't it? I'm going to add a new
layer on the record. That's okay. Move
this layer down. If this an overlay, get the white color
that is here. And let's see if I
can add callback. Nine per cent, I would say. Let's see, can I add a nice lighter that
share? Yes, I can. I'm on the wrong layer.
That's not working. I'm correct that I'm doing
painter on Dupain's, so see how far I need to go back until it says
undo blend modes. Right, then I'm back. So the top one I was
going to put on overlay. That's the better one. Now I'm on the right layer. I've said that light color. And now I can bring
in some fall as well around the edges. Some even lighter colors. To create that layer effect. A little bit better. Here too. Some nice bright colors in here to brighten that up slightly. And around here. The lighter edge
that is here too. And that is around there too. Okay, and here. Alright, good. Now I like
this a lot better. Let's see. Now I just need to
carefully paint this in a little bit nicer
way that hard-shelled, I'm not pressing hard, is adding a little color. Doing that around day
or two. Alright, good. And now I'm ending up
with this nice thing. Lowering the edge a
little bit now here. See if I can. Oh, that's of course, on a different layer,
it's not going to work. Alright, I'll need a layer
now on top of the heart. And we're going to set that to a clipping mask
and to an overlay. Don't need to think. I'm not
sure if I need dark color, overlay, light color, lowering
the size of the brush. Now, let's say the light comes from this
side a little bit. Then. On these edges here, it would be slightly lighter. And on the other edge
it will be darker. Having about four per cent. That's okay, right? Just adding in a little bit
of light there like that, then I might do that on
these things carefully. Two are a little bit that
I blur everything away. Simulate little bit of
that light going on seat. That looks better. Okay, Now we're going to need some
darker this one too. So I'm adding a layer under it. I'm setting that to multiply. Diego want to pick a
dark yellow color, even a brown color? See if that work.
Yeah, that's good. And around their carefully bring in a little bit of
dark color like that. Alright, good. There's
my small flower. That looks nice. You could do that
around here too. What I think I'm okay with this. The other thing I
don't like is this. What I'm gonna do is I'm
going to find that layer. That is this one. I wanted to just
get a smudge brush. What I'm going to
set my smudge brush to its two the
same. Oh, for mop. Lower the opacity 40 per cent. How large is it?
About ten per cent. And let's blend this
in a little nicer here to run that layer or
blending in the edges. A little bit nicer. That's something you
actually can do with watercolor by taking a brush with pure water and then
start adding some pure water. And that actually blends
in some colors really nice around this edge to see
that the edges are gone. Now that looks a lot
better HER2 of it. That in a little bit
nicer. There we go. All right, good. Let's see. I'm worse than
those stripes on what, Chile. Yeah. Okay. I could do that
too a little bit here. See if that works carefully. Take that blender and my own death and blend
this, these lines in. The little bit less
strong and a bit nicer. All right, good. Just as I
will do with watercolor, add some water to
start blending with. Actually an oval mop. Works really good for that
in real life too. Here too. Just a little bit. All right, and now we're done. Okay. They're a little bit more. And there's my
watercolor flower. Okay, I'm not going to do
anything more on this one. Wow, I've said around
it and it's not nice. And a little bit in here, blend that a little bit better. We have some nice
strokes, not that's it. Alright, I've got this
first flower down now. Now the next thing what
I need is this stock, of course, and then
this flower is done. Alright, let's add the stock. Okay, let's add the stock. Bring back that sketch. We know that stock
now we've done one. There's only dark green colors, darker, darker, and
not nice screen. I'm working with
this dark green. Do my first layer, I'm going to see
under everything. Plus, oh, that's gonna
be a clipping mask. Let's see if I can move that. I can move that away
under everything. There is new layer that ovum up, not too thick or too thin. Um, 6%, I think it is, yeah, that's nice
for this, right? And let's add that stock. Again. Painting these in loosely. Don't go depth thick
and it might not make a guess as thick as it is. Now I've got my dark color
already. Alright, good. I'm gonna go lower
1% for these ones. Now let's do a little now. Let's go for two per cent. Two. That's better. Give them a nice shape a
little bit. Alright, good. Here's one more. Oh, yeah. Alright. Let's hide the
sketch for now again. There you go. That's good. Connect that a little bit. Better. And that too, just a little bit thicker. Alright, and then
you got the stock. Let's go to back to lead. Six per cent. Push that a little bit better. And then erase. Right there. We want to make sure
that goes well, okay, Now this is all dark. Adding a layer above it, setting that again
to a clipping mask. Keep that same color. Go to a nice light part. I'm having it on
the six per cent. Let's see if that works
carefully on the edge. Yeah, that should work. They go on top of these. Leaves a little bit too good to lower this till about three
per cent carefully, you want to bring
it in here too. And there too. A little bit on the top here. Alright, good. That's it. Alright, that's nice. But what I'm going to lose
too much or too little bit, keeping the same smudge brush much that in a
little bit better. There you go. Alright, good. Takeaway. That edge
like that. Here too. And there you go. Alright, now that is good. I'm not gonna do
anything about that. I'm going to leave it like this. Will be the first flower. The flower is totally them. What I'm gonna do next is now I'm gonna do
that second flower. What I'm gonna do exactly
the same as I've done. So I'm not gonna go
through that in detail. I'm just picking different
colors while you manage which colors probably
you figure that out. I want to put, I'm
gonna do that now. And once that is
done by going to the next lesson where
we add the background.
5. Painting the Background: Welcome to the last part. Now there's one brush
we have not used. I've done the both the flowers. Hopefully you've
done both them too. We're going to now add
a background with debt. Second, brush. Let's do that. Alright, for that, I need
a layer under everything, but if I'm going to
add a layer here, It's gonna become
a clipping mask, so I need to move it under
there. That's it. Good. Now, what causal
we're going to use? That's a good question. I want to pick that
color wash mix. I'm gonna go to my palette. Let's see what would we add
that these are a bit boring. This could work. Let's
try this a bit grayish. Might be boring, we might
just need different Colorado. I'm gonna put this
on the max and Min, just paint this
in another route. Actually work. Good. I got a background done. We're done. If we want this
color and then this would actually work
as a nice background. Let's add something above that. You could pick totally
different color, let's say a really nice
contrast color. Bright yellow. We want to pick the
brighter yellow here. And I could work to extending a little bit and you
get this effect. Do I want that? I'm not sure. We're going to keep it at
a new layer on top of it. I might want to have a blue. Slide this to the blue. Nice bright blue or dark blue. Too bright. Let's go for
a bit of a darker blue. Let's see. I'm going to
go over this again now. I'm hardly hitting, sorry
hitting, I'm hardly pressing, adding that blue now in C, now we're getting
somewhere like this. Now we're getting a nice, interesting contrasting
background, not pressing too much of that
is layers actually blend. So that first color, and if you look at
it, that first color still comes through, that
yellow comes through, and now that blue comes
through a little bit of a bluish greenish tint. I like that. Let's give it
a stronger on this side. Yeah, that's good. All right. I like
that. A little bit stronger here too. Just there. Okay. Now that makes an interesting
background, doesn't it? The next thing we're gonna do, we're gonna do a little
bit of a trick with this. I want to add some nice shadows, so I'm don't want
to paint a minute. I just want to use
a bit of a trick for that. I'll show you how. Alright, for debt, I
liked the background. This is nice painted
seat or some, even some little bit of the paper texture now
in it. That's good. Now if you wanna do
a different color, of course do so. But what would be really
nice is some shadow. I'm going back to my gallery and duplicating this sliding to
the left saying Duplicate, make a new layer, go back in. Now, if you have
plenty of layers for this and you have
plenty of layers left, you don't have to do that. But for this, let's do
that because I'm not sure what iPad you have,
in which size you have. So what we're gonna do,
three of these layers, we're actually going to merge a little bit of these layers. Let's see what belongs together is I got to find that out. Which, which one is
which one there? That's the trick now, to make it myself easy,
we're going to hide. So I'll just stuff and
this is the top one. Alright, this is the top one. Let's see if this
is the top one too. Yes, of course. So what we're gonna do is all of the top ones. Like she'd gone to select. I'm going to group. And I should have a
new group with that. That layer is, and I
don't want that in it. Of course, make sure that
I'm taking that layer out. Make sure you don't put the
layer in with the group. There's only supposed
to be that flower. I wanted to stop to an
unknown to sink too, by the way, an error.
That's correct. This would be the stark that
one or the top on this. Yeah, that's it.
With dead layer. And the eraser go to the
layer of the stock on it. I want to, of course, erase that a little bit. That's better.
Alright, I'm not too worried about these two yet. One way to do the next one
is I'm going to select everything that belongs
to the other flower. That should be this. I'm going to group debts. And now I've got
the other flower. Alright, good. Next thing. What I'm gonna do is this one. These are all the stocks I
might make a group of two. Now, this is the
easy part, okay? We've got three groups now. We've got the background,
which is separate. I'm leaving that. I've got the first flower, the flower I've got the from the stocks and I've got
different flower. That's good. Alright, with this first group, I'm just going to say flatten. The second group, we're
going to say flatten. And the third group, I'm going to say flat and
now I've got three flowers. I cannot edit them anymore, even if I wanted
to do like this. Now, the next thing I'm gonna do is I'm going to duplicate. I'm going to group these.
Let's do it as easy. I'm going to group them again. They're in a group. And I'm going to
duplicate the group. Slide to the left. Duplicate twice the flowers now seen how to
become really bright. I don't want that. This group, the bottom group, I'm going to flatten once again, and the top group
I'm going to hide, I'm left with a flattened
image. That's good. Alright, the next
thing which I'm gonna do is I'm going to create this. I want this in a
gray black color. I've made a black problem
or a dark blue color. Alright, for that,
I'm going to go back to the first
brush, the ovum up, putting on large color, dark blue, red, blue like this, not a black, dark
blue like that. And I'm going to put
this on Alpha Lock. And I want to repaint this. Keeping the structure. There you go. Nice. X fingers. I don't wanna switch it. Switched at alpha
lock off. Good. And I'm going to
blur it for that. I'm going to need that
magic wand of caution blur. And I got to know once I'm
starting to slide this blur, see now it's gone, now it's
back. I want to blur it. Do it like this. See that I'm not in a way. About 20%. I think 20% is nice. I'm good with 20%. Now I'm bringing back the
original sketch, Diego. There's a little bit of shadow. But what we're gonna
do if that shadow, I'm of course going to move
it to you really see it. Now I don't see much
of the background yet. So what I'm gonna do
with the background, with that shadow, not the
beggar that shadow selected. I'm going to hit the arrow. I'm going to move it a
little bit right there. And what I might do is
perhaps change the opacity. But for now, let's
leave that, Let's see. Alright, and now we get
this nice painting. See, that is very nice. Let's see if I want to
change the opacity to 0 too. Yes, I do want to go around 40 per cent to make
sure we can see it's 60. Go for 70 per cent, right? You can keep it on a
100 if you want to. Now there's a nice subtle shadow that's gone now it's there. Now, what you could
technically do is erase all of the shadow
passage should not be there. Which I do not want to
do, takes way too long. I'm okay with this, right? Good. I think I'm okay. This
is down a bit brighter. This gets a bit deeper color
depending on what you like. I'm okay with a deeper color and then leave the edges
a bit lighter. Okay, good. We've got a nice subtle
shadow behind it. If you like, strongest shadow, yes, then please
go for the 100%. If you want to erase a
little bit here and there. So let's say I want to
lighten, lightened pod bay. I'm taking that eraser, but I wouldn't take that blender would take which one
would I take this one? Soft brush here. You could around the edges. A bit like this.
You could do that, but you need to be careful
because as you can see here, I went wrong. I already want to stay inside the flower to create a bit of a texture effect by erasing that shadow
a little bit here too. Don't do it everywhere. I'm not pressing really
hard with this brush. I'm just pressing a little bit. I'd want to have
that shadow around. There you go. Now, that creates the medically, some
interesting textures. Alright, the rest I'm okay with. A little bit here, there. Okay. Well, let's hide those top, the top layer here you
get this effect, right? Alright. That's the way you do that. I think that's the way
I'm gonna do my flowers. And if you don't like
the effect of that, then of course,
once you going to do is don't do that at all. Alright, good. I feel I've done this. I
might want to bring back perhaps shadow a
bit more till 90%. Yes, I would erase that. I want to definitely do that. Okay, There's a flowers. All right, Well that
ends this lesson. Okay, then we're only left
with the last bit of projects.
6. The Project: The final stretch, the projects. Now what I of course
would love to see is what you have
created and post that. And then I can enjoy it and everybody else can enjoy it too. What I would challenge
you to do on top of that, It's just take a
different flower and with these simple steps, recreate a flower,
draw it, painted. And then of course post it to. You wanna do some other
things with Procreate. I've got more classes here on Skillshare, which
you can check out. And there's a number of
oil painting, some bonsai, drawing, some special effects through all kinds of classes. Also keep an eye on my website. When I'm done with
these brushes, I'm going to post them there. So you may want to
keep an eye on that once in a while and
see if these brushes, the whole sets are done. I'm going to create
different sets of brushes with all kinds
of nice brushes on it. Alongside with that, some
tutorials to photos brushes. So you may want
to keep an eye on that so that you
don't miss them. Alright, thank you for being
with me in this art class. I really enjoyed creating this. And I hope you enjoyed watching this and creating this too, of course, learning,
discovering something from it. Alright, thanks
for being with me.
 Benjamin A, Art Teacher, illustrator Art by Benjamin