Transcripts
1. Introduction: Have you ever felt that you are great at following tutorials? But when it comes to creating
something from scratch, you're stuck, I've
got you covered. Character design is one of the most essential
skills in illustration, and the design process
itself pushes me from not knowing
what to draw and procrastinating to
a finished artwork. So whenever I hit
a creative block, I start to come up with
random characters, then build worlds around them. And a, I've got a
finished illustration. In this cute monsters
character design workshop, I'm going to show you a super
fun exercise to help you overcome any creative roadblocks and get those ideas flowing. If we haven't met yet, I'm the art mother,
an illustrator, artist, online educator, and a professional art teacher with a master's degree
in art education. I've had the pleasure
of teaching more than 80,000 students worldwide
with my online classes, and my mission is simple. Making complicated art
topics easy for beginners. Now, in this workshop, we are not going to dive into complicated topics like
composition or environment. We are keeping it light and fun. So our goal today is to spark your creativity,
build your confidence, and help you create
your very own fun, super cute masa character
that you'll love. So how we are going to do this. We'll start with a mindmap
to unlock your creativity, explore some fun shapes
and silhouettes. Sketch your character,
and I'll walk you through my own illustration
process in Procreate. But remember, this
is your project. So feel free to let your
own style shine through. And why monsters
because they are a perfect opportunity to let
your imagination run wild. No rules, just fun with shapes
and colors and designs. And trust me, this is
going to be so much fun. All right, grab your iPad, open, procreate, and
let's get started.
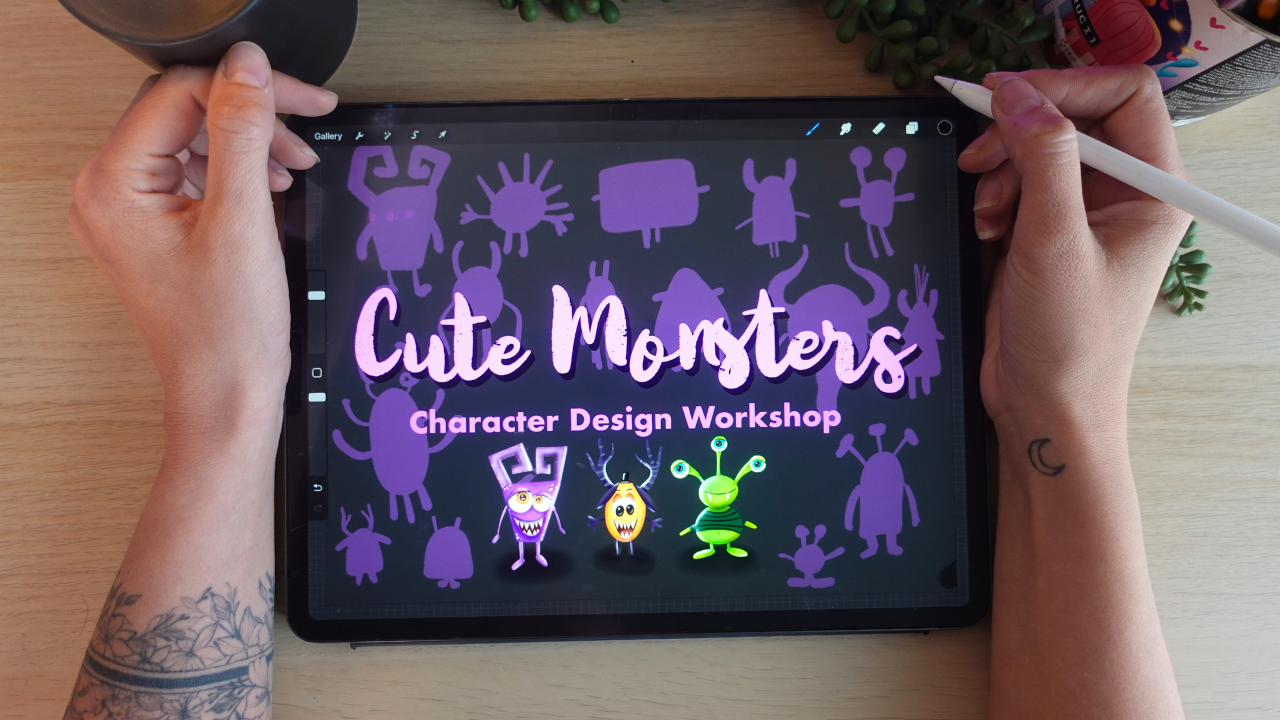
2. The Mind Map: Hello, and welcome to the cute Monsters Character
Design Workshop. I'm so excited
that you are here, and I can't wait to do
this workshop with you. Alright, so let me just start by explaining how we are going
to go through the process. Obviously, our goal is to create a cute monster
illustration, okay? We are not going to place
him into an environment. This is going to be purely
a character design workshop for beginners, okay? So we are going to go really
easily and I will explain everything so that you as a very beginner can
easily follow along. I created several different
stages for the process. The way you can participate
is to just grab your iPad, open a new screen sized canvas and do the exercises that I'm going to show you in
the separate stages. In the first one, we are going to actually
create a mind map, let's just get into it and let's start doing the design process. These steps that we are
going to go through are um most of the times done by me and most of the times
done differently. Okay? So for example,
in this mind map, and I'm just going
to grab a color, and from the brush set, I will choose the
sketching pencil. So at first, I write into the middle what I'm
going to illustrate. So that is going to be the
subject of my process, okay? So it is going to be a monster. I can do this in all
different kinds of ways. So let me just show you the first thing
when I'm more into, you know, the illustration part because illustrations
tell stories. So I need to think about what is actually
happening in the illustration. So in that way, I'm adding an
adjective and verb. An adjective now is
going to be cute, right? Cute monster doing what? It is going to be the
verb. So what is he doing? I don't know, reading. So now I have an action that
my monster is going to do. This is one way to
do this mind map, and I can keep this in mind, and I can just hide it. I will create a new one, and when I'm not even really
sure how to do a monster, and that's more of the character design
part of this process. I can think about
the monster itself. So mostly body parts, okay? What do monsters have? So they have a main body, right? Torso, maybe. Then then they have eyes, and they can have multiple eyes. So they can have one eye or
they can have three eyes. So it can be unusual. This is why I've chosen
the monster as the topic of this workshop because
it can be really, really fun when experimenting
with these things. Then what can a monster have? You know, monsters can have
these tentacles, or horns. They can have legs and also hens and they can have fur. This is basically a
brainstorming activity that I'm brainstorming
anything a monster can have. They can have fur or they
can have what they can have. They can have teeth. And they can have let's
think of one last thing. They can have tail,
for example, okay? So this way, I'm already, like, you know, starting the imagination process
within my head. I don't love to look at
reference photos of monsters. Yeah. For example, you can just write like Monster
Illustration to Pinterest or Google or any
social media platform. It will show you some results, but I don't like to do that because it is good
to look at them. Sometimes I do it in this way. Like, I look at the
inspiration photos and then don't look at that
topic at all for weeks. I go weeks without
checking on them, but keeping in mind
some information about them like color
palettes or proportions. And now, when I do it like this, it starts, you know, to open my mind and think
about different body parts. And you will see the next stage, why is it important to
keep in mind these things? Because we are
going to work with silhouettes and randomly,
like, you know, throw these body parts around to have invent a new creator. Another thing that I love to
do is to look at animals. I hold the belief that there isn't anything more creative than
nature itself. And if you look at some colorful bogs or
I don't know, birds, they can have really, really
beautiful textures and patterns on their fur and on
their, you know, fetters. And it is really fun. So if you really need
some inspiration, I would I would recommend
you to check out animals. They are really
amazing. Alright, so now we have a monster. I will just do a
little foreshadowing what we are going to do, okay? Of course, we haven't ridden, like I will right
head to the body, okay? So it has a head. Let's start with a body shape. It has a head. It has eyes. Let's say he has eyes. He has tentacles. He has horns. He doesn't need to have both. He has legs. He has arms. A fur or whatever. Teeth. Cannot see
that. He has a tail. He doesn't have.
Okay. But, you know, I already created a silhouette of a monster that
I can use later, and I can have as a starting
point just by going through these body parts and throwing whatever
shapes here. Yeah, so this is
what you need to do now if you are
thinking anything, any subject that
you are going to illustrate, go
through this part. This is the best. Alright, so after you have
actually the information that you need to process
in your design process, we are going to create
silhouettes. Yeah.
3. Silhouettes: So let me just show you I've
already done some here, but we are going to go
from scratch together. I will turn off this layer and talk a little bit about
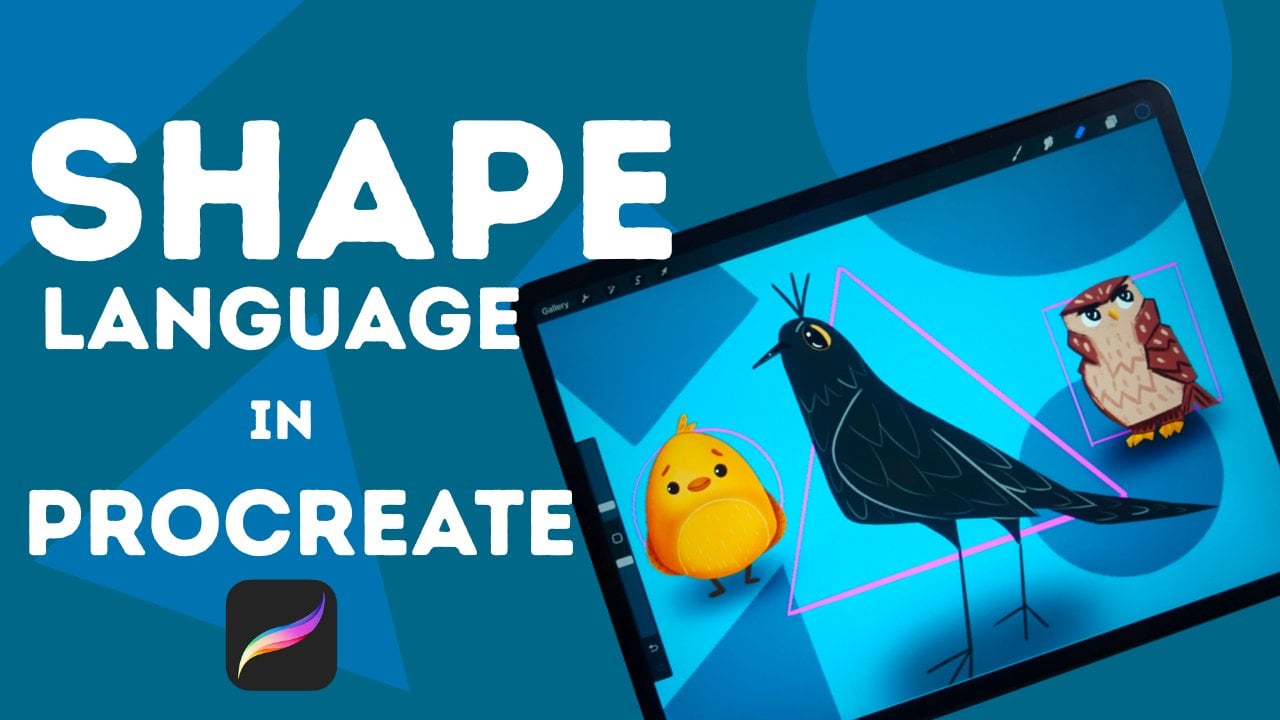
shape language, okay? As we are doing
now cute monsters, we have basically three
basic geomatic shapes, yeah. Let me just draw them here. So we have circle we have
a triangular shapes, and we have rectangular shapes. And in character design, it has a really important
role these shapes because they carry
meaning and they help you to talk without
words through your character. So if you are creating
cute characters, you will use circular shapes and not like perfect circles, you know, but circular shapes, curved lines, et cetera. If you are creating
villains, triangular shapes, you know, they, um, convey the meaning
of kind of danger. Villains usually have triangular
shapes in their design, rectangular shapes convey
strength and stability. And usually these superheroes or dad figures have these
shapes within their design. And now as we are in
cute monsters, okay, cute is kind of
these curved shapes and they are monsters. So they need to have
kind of these edgy, triangular shapes within them because monsters are
dangerous, right? They can be cute, but
they are monsters. So I would say, when we
are designing a monster, let's focus on these two shapes. So when we are going to throw these silhouettes in a second, um, do I don't know, kind of an oval shape, for example, and
lots of oval shapes, et cetera, but you can have triangular
shapes within the design. I think I will use it
mostly for the teeth later, but just keep in mind that you can add edges into these things. All right. So now let's go and spend some time with me
creating silhouettes. Alright. Alright, so
let's get into it. For this, I'm still using
the sketching pencil. I've chosen this purple color. I will create a new layer. So if you are in whatever canvas, you
can create a new one, and you can just, you know, create a new canvas. And I'm just going to, like, go through the whole
page and just randomly throw differently
shaped you know, bodies with keeping in mind the mind map that we
have just created. So, uh It is the body. It is the head. I will add some horns. Maybe four hens and four legs. This can be a bug, but it
can be a monster, as well. Okay, let's do a new one. I will do now just
a full body shape, and I will not really consider like having
a separate head, but simply, you
know, just the body. I will add some
horns of some shape. I'll had two hens and a leg. Cool. Now I will
do I don't know, a triangular but still
oval body shape. And just add some
chunky hints and legs, and, that can be it, basically. Or I can create one that
has a different body shape. That's oval can make two ints, but it can have horns
as well. Like this. Or we can have a body, and he can have eyes like this and maybe also
just hands and licks, or he can even be like a ghost, you know? Just a ghost. Some hints, again,
differently shaped. Horns? Yeah, cool. Then, I don't know. Let's have, again, a
separate head and body. Like this. He can have
tentacles like this. Or he can have I don't know. Horns like a deer, you know. Like this. And
ears, again, maybe. I don't know. Or he can have a
very chubby body and eyes like this as a frog. And he can have, like, hands like this,
maybe legs as well. Or it's kind of like having
aliens, small aliens. Whatever. Two hands, two legs. I don't know, I like the idea of the horns for some reason.
I like these, too. So basically, within
this process, you will see what works for
you and what doesn't will see which body shapes or elements or body parts
are that you like that, like, you know, have
that feeling of excitement or gives you
the feeling of excitement. Oh, my God, this is
such an amazing idea. And that is that
you need to follow. So try not to play
it safe, you know, uh, try to go out of
your comfort zone. Make sure to fill the page
with these little drawings. Randomly so that you have
something, at least, you know. It will look so good
after finished. Okay. And it's kind of
similar to this one. I don't know. You can have this I don't know. I will do some
smaller ones as well. And one last one. What's that here. Okay. I have a page filled, and what I'm going to do is
to select three of them, and I like this
one with the horn. I love this one
with the horn and probably maybe this one. So what I'm going to
do is to select these, put them on a new layer, free finger swipe and I can
duplicate or cut and paste. I go to duplicate so that I
have the original as well. Again, I will select
free finger swipe, I will do duplicate again and this last one I will
again select. Oops. Free finger swipe and duplicate. Now, I will turn off this, and I have these three
different little guys. Now we place them
next to each other. Like this. And make this
last one a bit bigger. They already look super cool. Okay, we arrive to
the next stage. What I'm going to do
is to I will merge this layer hoops and basically
take it to the next stage, which is catches, but you
just keep them in your file, okay? Yeah.
4. Sketches: That o. The sketches.
This is the next stage. What I'm going to do
is to basically create a new layer and kind of lower the opacity
of this these silhouettes. And I will choose black and keep the sketching pencil
but make it smaller. I will basically use these random
silhouettes to build up the designs of
these monsters. And I can choose one from
these three, but basically, I love all of them so much that I will
illustrate all three. You are free to
illustrate only one, but I think they are
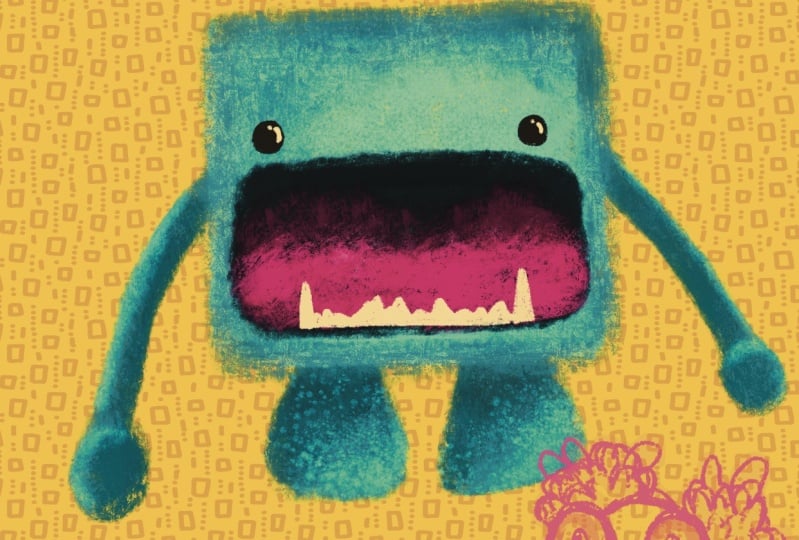
friends or something. Okay. So this body is
kind of this rectangular. But I will try to make these round edges so that
it's not that sharp. We are doing cute monsters. This is the body.
I love to do that, these giant eyes, and one eye is going to be smaller and one
eye is going to be bigger. And Like this. I will add the mouth. And yeah, this is where I'm
going to add the sharp teeth. Cool. And add these horns. This is more of a
stability expressing guy. He is more like this rectangular,
but he's still cute. Can you see these
rounded eyes and stuff? I'll create a very thin hints like this and I will need stable legs that
holds this body. This is going to be one guy.
Let's do the other one. He is it's very rounded
shape body he has. And he has ears. And I love these horns. I need to work on them. As you can see, this is
a very quick design. Usually I take more time
to build up characters and think through with
these quick things you need to do quick decisions, and sometimes it works, sometimes it doesn't
my designs will not be good at the
end, but whatever. I thought that this
character is a bit shy little I don't
know, dear monster. And you will have
giant eyes as well. Usually cook. Cool. Usually
cute things have these. This is so fun. Sorry. So these cute, things like, it can be an animal
or a monster. They have like big eyes, okay? So this giant big cute eyes will make anything cute, okay? So So nice. I missed something
from his head. I think he will have a Hat. Yeah, a little hat. Looks good. Yeah. As you can see,
I'm not following the silhouettes that much. And let's see the third one. Now the question is, if
he will have eyes on these tentacles or he will
have the tentacles only. I think he will
have eyes on them, so let's do it like that. Here is an eye. Oops. Okay. Here we have
the three eyes. Oh. So here's the head. He can have just
this kind of a mouth with some triangular teeth. This belly. And these little hints and legs. Okay. So now I already have three character designs there. Now, we can work on
the line work and to character design it fits to
have props and accessories. So if you wish, you can just add I
don't know clothing. I can imagine this
mouster to have a shirt striped shirt
for some reason. This is what I can imagine. This hat that I added
is also a good thing. So now, think about one
thing that you will add, and I think this monster will
have this weird t shirt. He has ends like this
part, but whatever. In illustration, you can
do things like that. You just have belly button here. And he has a hat, and he will have what will
he have? I don't know. Mm. What did he have? Maybe he will not have anything. Yeah. So feel free to
do whatever you wish, and now we are going to move
on to the illustration part. So I will just take this layer and place it
to the illustration part.
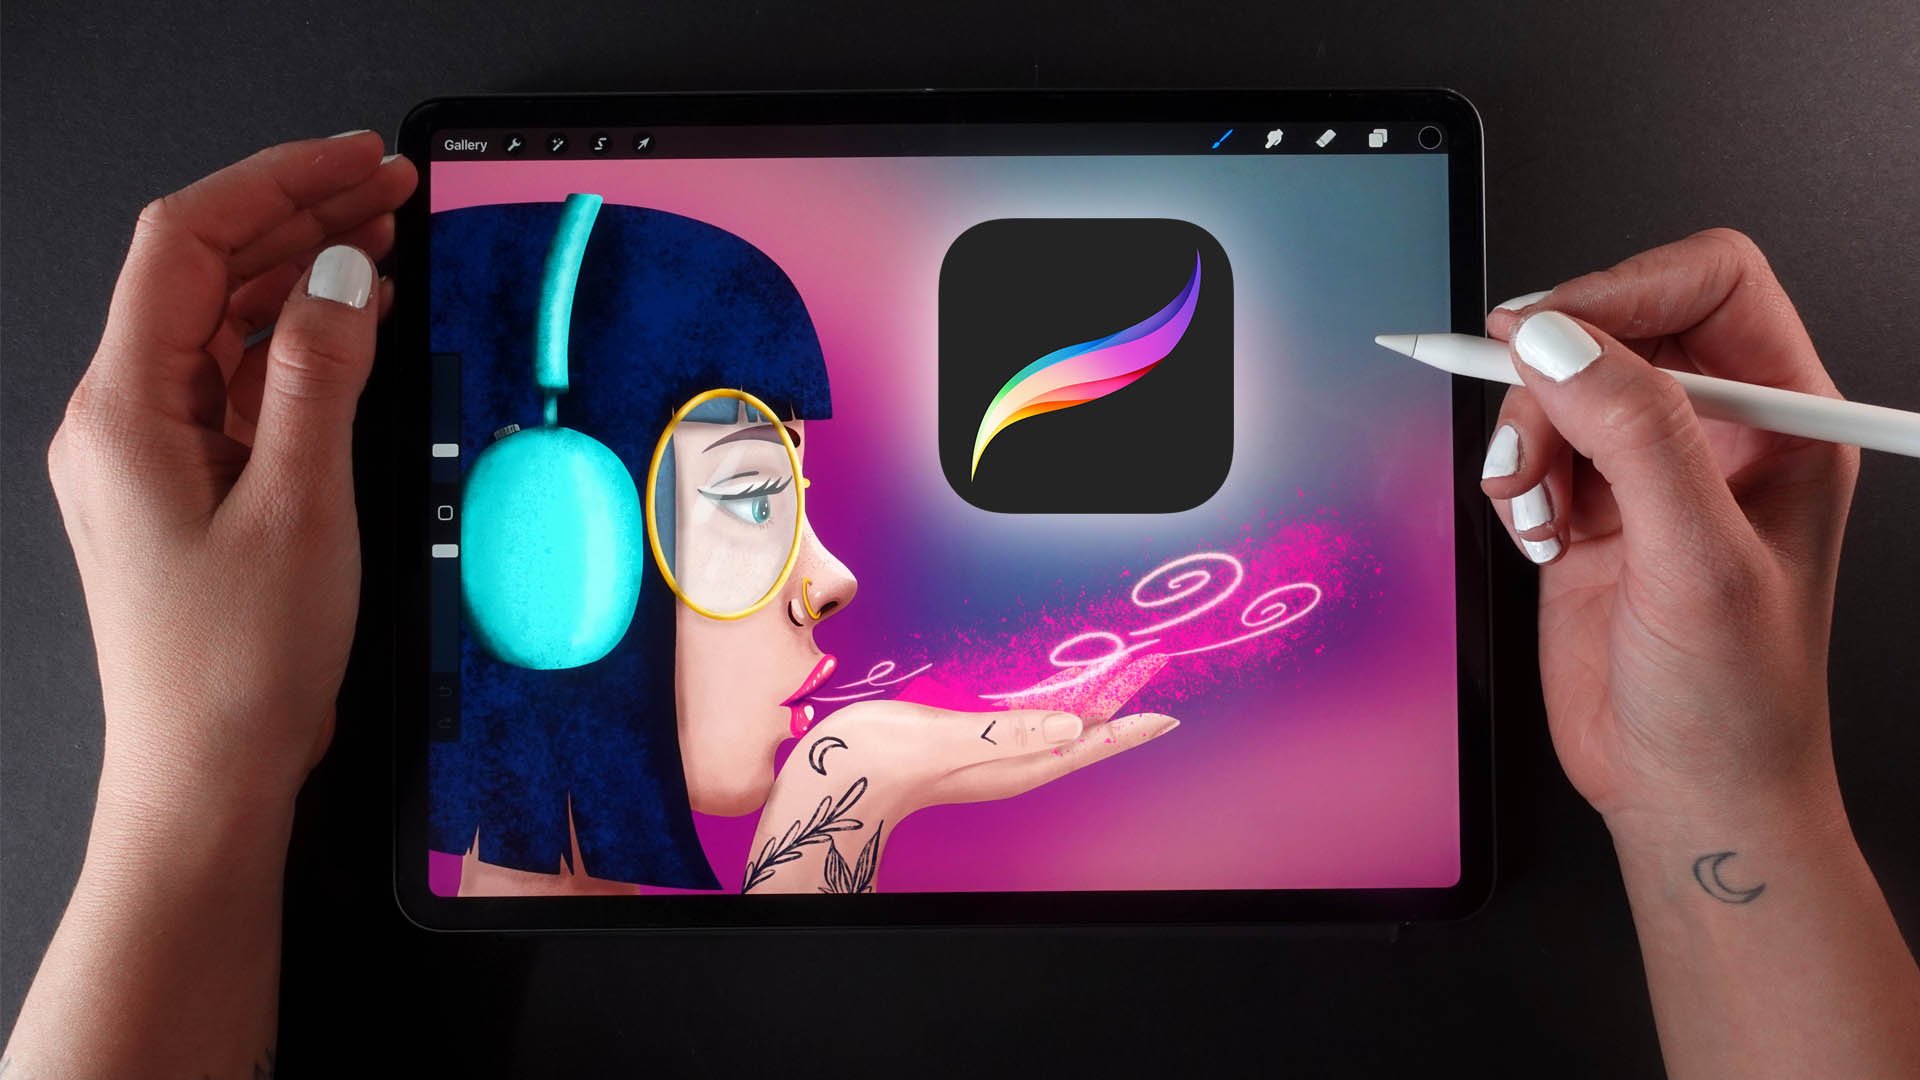
5. Illustration Part 1: Now, I have three sketches, and I have an
illustration process that is kind of the same. The way I do this is that
I fill in the main shapes, I add shading and
then work on details. Now, this takes a lot of time, and I don't think we
have that much time. So basically, I'm going
to illustrate one, and then you can watch
a speed up version of illustration of
the other two, okay? So I have my sketches here
and let's just get started. Okay. So as the theme color of this workshop is this purple, I will just grab this
purple as my color. I will work with the
clean shape or brush. Then I will lower the opacity of the sketch and create a new
layer below the sketch. Basically, what I'm going
to do is to fill in the shape of this monster, the main shape with color. If I need to grab
back from the shape, I will just double dab on
the Apple pencil, to erase. And I often do that
because I love to be dynamic when I'm drawing. I can also use a
quick shape function to make things more even. What I've just done
is that, for example, I just hold down the line
and it will straighten it and you can do that with the eraser as well
when you are erasing, if you need to erase
a straight line, if that makes sense. You can just drop color, but I love to fill it manually because sometimes when
you just drop colors, it misses some pixels, and that can be annoying. I mean, I just
messed up this part. All right. So cool. I will add the legs, as well. No, on a separate layer. Yeah. Let's create a layer
below the main body. And I will choose more toned
down purple for the horns. Yeah, perfect. The way I'm choosing my colors, is kind of intuitive. I don't really, you know, when you are working a lot, or illustrating a lot. You will have your go
to color combinations, and I don't really create color palettes when I'm
doing my personal work. I love to go into
with that as well. But if you're not really sure what colors,
you know, to use, when you are illustrating, you can download pre
stat color palettes from the Internet, and that can help a lot. Yeah. Cool? Not at one. Amazing. I will just
add the pins, as well. You can go into more
detail if you wish. But you don't
necessarily have to. The level of detail you keep
in your illustrations is actually kind of
defining your style, and it can be really fun, to just keep things loose and not go into
too much detail. Now, I'm going to alpha
log both of these layers, and let's just work on
the main body at first. So I will choose the main
color and go darker. Okay, so I will choose a
darker version of this color. If you have a base color and you choose a
darker version of it, it is going to look great
when you are shading it. So I will just choose the
shader. I will make it bigger. Oops. And actually, I am going to shade around the
base shape, as you can see. It will give it volume
or dimension right away. I will get back with the original color a
bit to clean it up. But it also created
some kind of texture. Can you see that? I love it. I love it. So this is one way. If you want to shade a little bit or
have a more color variation, you can choose this darker
version of the color and toggle it a little
bit more towards blue, for example, and you can have different or maybe
you can que even darker. A little bit different
hue for the shading. It is more purplish
or bluish purple, and it can look really nice. You know, I just adds a bit. To the overall color. And if
you go through the whole, it adds a little bit of, you know, interest
or color variation. But I can still go back
and to the middle, just lightn it up. And those little pixels, as this brush is
pretty textured, those little pixels
will stay there. And when I'm zooming
in, can you see that how much color
variation I have? And basically, I just
use three colors. So this is for the main body. And for these shapes, I have this muted purple, I will go just
simply darker now. And again, with the shader, I will shade around the shape. Okay. So the inner corner
is a little bit outside. It is the simplest
shading technique I love to use shading
around the shapes. You basically don't need
to do anything special. If you choose the main
color and go a little bit lighter and keep
the shader small, going to the middle
and light on it, you will even create this
even better free effect. Can you see that? Looks so cool. You can go back with
the dark to the hens. Yeah. So with this
dark muted color, I will just add some
shadows to the body parts. And it is so cool. Now, we can add some textures. So I will go to this brush set, and I will choose
this texturiser. And what I love is to use a
lighter color, basically. Make this brush big and just simply go through the
whole just a bit. The whole layer.
Yeah. Add the texture and it looks super cool. Now, I will create
another layer on top, choose white and clean
shaper and work on the eyes. I will hold down to
create perfect circle. I will just fill
in. Can you see? I just drop the color and
it left out these pixels. As this branch is
a bit textured, I will just erase around
it to have a nicer shape. Okay. I place those ice a
bit to the center, and I will need to add
shadows to that as well. Okay, so I will alpha
lock the layer, choose a kind of gray color, choose the shader again. We'll make it bigger.
Oops. That's a lot. And just shade around
the shape a bit. I will choose a lighter
one lighter gray. Okay. Cool. I will create a new layer
and make it a clipping mask. And with the clean shaper, I will do the eyes and
what color those will be. The complimentary color that
I can think of is orange. Maybe it will work well. I will choose a
nice orange color. Let's try it. What do you say? Does it work? Do you
have orange ice? I think yes. Let's
have orange ice. You can do it monochromatically. If I choose this pink, it will work good as well. This orange, however, will bring out your design, it will make it pop and this lies basically
in color harmonies. There are several ones
and you have tools for that in Procreate. If you go to the color tool
and you go to Harmony, you can select colors
and choose and it will choose a
different color harmony. If I set complimentary, if you click here to this
text below the colors, you will have complimentary
and it actually has blue. But if I say split
complimentary or analogous, triadic. Te tritic. Yeah, this triadic kind of says this orange for
this purple color. But again, you can
go just simply, you know, buy your intuition. Because these art theories
are there to guide you, not to limit you, okay? So you need to take ownership
of your process and, you know, come up with things. I'm choosing colors because
this is why it works. It works because you love it, okay? So That's my. These are my $0.02 for creating your own characters.
Feel like a creator. Literally, you are
creating on a canvas, but it's just your imagination and you can create whatever. Whatever. Okay. Cool. Okay. I will duplicate it because I don't want to
create another circle. I will make it smaller
and place it here, and I will make them on a same layer and make
them a clipping mask. Yeah. And I will flock them
and choose a darker color, darker version of the color. I will push it maybe
into the reddish side. Choose the shader. And what I'm going to do the
exact same thing. So I'm going to shade around the shape and give it volume. That's that. Just like that. Yeah. I will go back with this orange to the middle and I'm
going to go even lighter and I will go a bit more to the yellow part and actually add a yellow circle
into the middle. And that's where
the pupils will be. So I will create another layer and make it a clipping mask. You can go for black or you
can go for a very dark brown. Maybe I will go for
a very dark brown. Almost black. Choose
the clean shaper, and I will add the pupils. So cute. Can raise from it. So cool. Now I will choose basically white and the shader
brush and make it really small and I will add
this light to the eyes. It will bring it
alive. How cool. Okay. Let's move on
to the mouth. Yeah.
6. Illustration Part 2: Let's move on to the mouth and I have created
a new layer for it. I will choose a very dark purple and a clean shaper to
draw the lips, basically. It's going to be the lips? Okay. I will create another
layer below the lips, and I will choose
white and just fill in the shapes of the teeth. It is not a clipping mask. Okay, cool. Fantastic. Io, it looks like, Oh, my God. Alright. I will create a layer below and make sure it
is not a clipping mask. I will choose this very
dark brown and just fill in the mouth like this. And I will go to the
teeth, Alpha lock them, and choose a darker gray and a shader brush, and even darker. Yeah. And I will shade
around them as well. Oops. Like this. Even around the mouth, it should be darker. If I want it to be even darker, I can just go to adjustments, use saturation brightness
and just darken basically. Yeah. So it's not that,
like, you know, harsh. Okay, so what I miss are some
extra shadows and details, and I think we can incorporate this orange into the
body a little bit more. So we have a brushe called
the texture shaper, and I will go into the
body, create a new layer, and make it a clipping mask, and I will basic hoops
and make it smaller. I will basically add some little dots around
the body like this. I don't know. To make it
a bit more interesting. And I will go to the blending
mode and see how it works. Hmm. I this orange justn'
the best idea. I love this lighter Um,
the lighter purple. And basically, I can choose a
darker version of the color and basically the sketching
pencil and just even darker. And just draw some even darker, lines around these
little elements. I like this. Cool. And actually, I miss eyelids. I miss eyelids. Let me see
how will it look like? I'll create another layer. And what if I just add some
eyelids? Will it look better? Hmm. I'm just filling it in. I love a lot. Choose
a darker version of the color. Choose the shady. Just go through it. Yeah, maybe. Just the shape of this lid. Okay. Los. Cool. I think this pupil should be
also in the middle. I'm kind of rearranging stuff. Okay. I need some line
work over the eyes. I will create a new
layer, and I don't know. With a sketching pencil, I will just show a line between
those eyes a little bit. Okay. Looks better. And I need the drop shadow brush
to create some inclusions. So I will choose the
drop shadow brush and black and actually go and create a layer
above everything. And I will add a shadow
below the eyelid. Don't worry, it will look good. I will do a little bit of
shadow around the eyeballs. Like this, maybe between them. Yeah. Below the
mouth on the teeth, below the slip. Okay. And I will just go
and go hablare it. And well, I love it looks cool. I miss some shadows
from the horn, so I will go back to the horn. And I will just
create a new layer, make it a clipping mask, and to the inside part. I will add some more
shadows like this. And again, I will just
caution blurt. Well, huh? And I will create a drop shadow. Yeah, I will create
another layer below it. And Oops, make it big. And layering this
shadow, as you can see, this brushes if you layer it, it will get darker and darker. So I will create a round shape. Let's make it bigger like this, even darker one,
even darker one, and maybe below the legs. And I will just gauchen blur
it and yeah, it is too dark. So I can just lower
its opacity and, I will add another
one just below legs. Just like that. Now
we'll go and blur it. Yeah. I will just
adjust some stuff. Give me some second, a second. I can add some details as well, with a clean shape or sketching pencil and
this light yellow, I will make it a bit lighter. I can just add, like, you know, lines like this outside
the eye so that it's not that boring. Maybe a lighter. Cool. And if you want to add some more
details, even more, for example, to the
mouth, the lips, you can add, where are the lips? Where are they? I will choose the original color and or
we the shade or brush. Just light in the middle of it. Of this mouth. Like this, maybe. And I can maybe add
a little bit more of this drop shadow brush around this little mouth. So
let me just go there. And on a new layer, I will just add darker
version of that color. And, you know, just
a little bit more of a dropshado Here. Let me see. A Shambler Yep. Cool. I will add another
one below this eyes. You can spend a lot of time on, you know, refining details. Didn't really want to do that, but it just grabbed me, now. So gtimblGhon blurring. Cool. I would say that this
little monster is finished. I can play with light
and even more things. But basically, what I wanted
to show you is that from very simple basic
geometric shapes and with adding, you know, techniques and knowing
what you're doing, even though when you
are just figuring out, but trusting the process, we'll give you great results, and I just can't
wait to finish up these two other guys and
have these cute monsters.
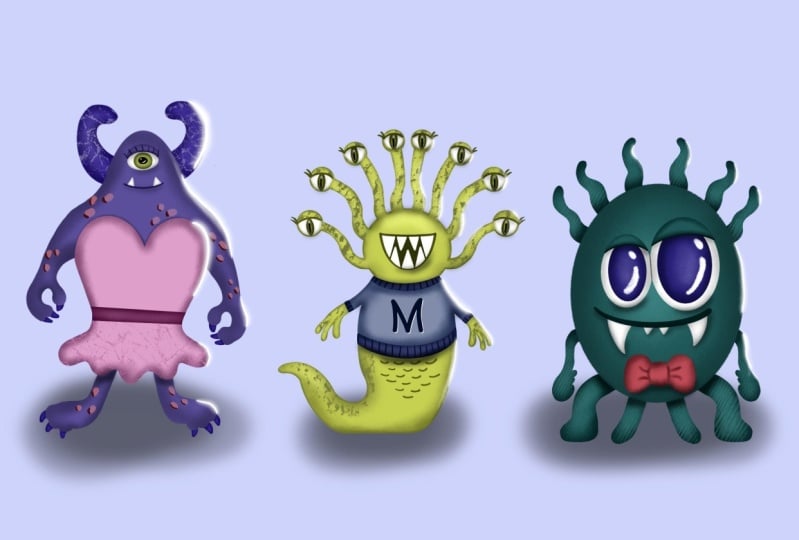
7. Class Recap: Alright, and now here
are they finished. All three little monsters
are fully illustrated, and I love how they turned out. Okay, so as the final word, let's just do a little
recap on what we have done in this class and what you
can do as a next step. So we basically focused
on character design. Okay? So, coming up
with a character. But the first thing
I said was basically that an illustration
tells a story, and if you want to have a story, you need an action, right? And we were talking about
making the character, you know, the cute
monster reading. So the next step might be after you know how your
character looks like, thinking about an environment and placing him into
that environment, doing that action that
you have came up with. This character design
part was really to know how you are
illustrating the character, how his body looks
like, et cetera. And now you can move forward, you know, to place
him into the story. Well coming up with
the character, think about the body parts, what he has if you are like illustrating a real
thing like a frog, just just write down what
you know about frogs. You know, they have a heat, they have a leg, and they can be green or
yellow and stuff like that. And then it will just come
naturally through your hands, you know, with the
creative energy you have. Your creation will just,
you know, come alive. And then you can play
with silhouettes. We created tons of silhouettes you could,
like, choose from. We chose three of them, or you can just choose
one of them as you wish. And then basically during the illustration process
we basically created the sketches from
these silhouettes and came up with some
fun accessories. And then I filled in the shapes, added shadows, played with
light, and things like that. So that's how we progressed, and I hope that you
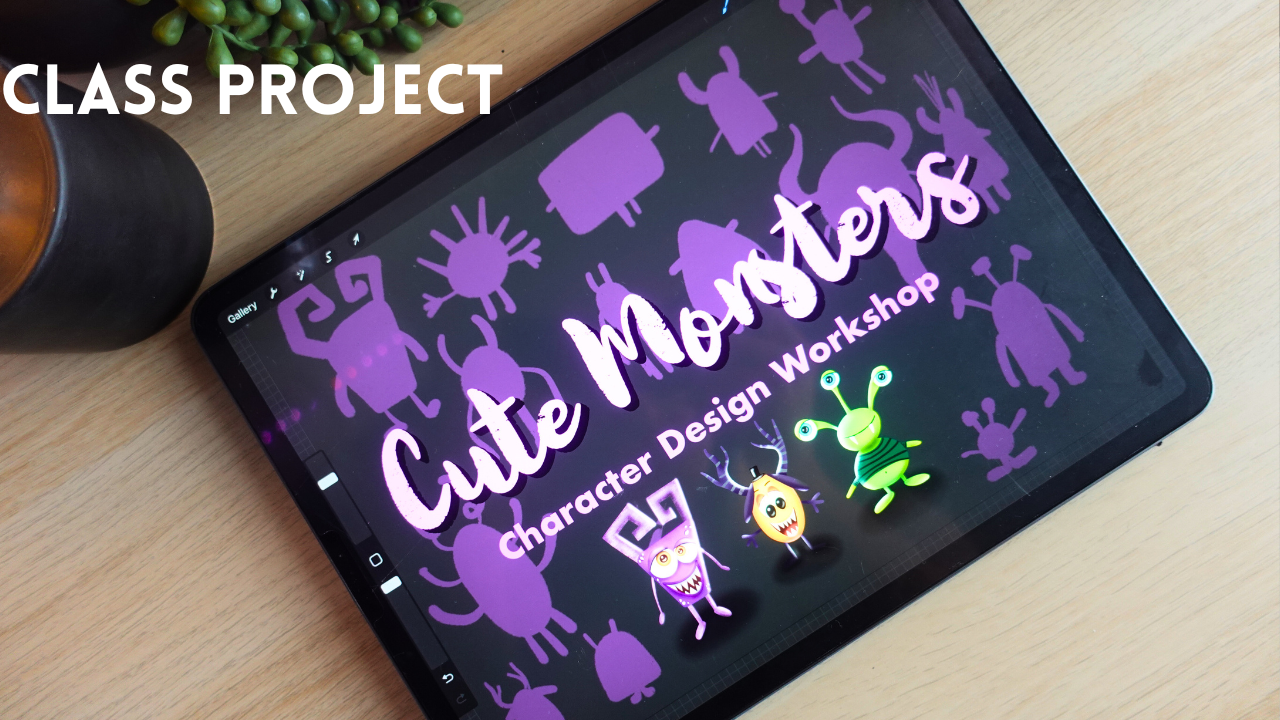
enjoyed the process. And, of course,
don't forget to post your class project to
the project gallery. I can't wait to see
what you create. Alright, see you
in the last video.
8. Final Thoughts: Oh. Let's just take a moment to appreciate what have you just created. Come right. Now you have a cute little
Muster character illustrated, a clear and simple step by step approach to
character design. New skills and confidence to build your very own characters. Character design is
all about practice. So keep going, keep experimenting with
different shapes and ideas. If you want to dive deeper, check out my
Skillshare classes to all different kinds of topics related to digital illustration. Character design, shading
perspective, and more. And let's stay connected. Follow me on social media on Instagram and Facebook
for more tips, inspirations and for you to
stay updated for challenges, new classes, new artbooks and all different
kinds of things. Also, grab the free brush set on my website by signing
up to my newsletter. And most importantly, keep
creating and having fun. It was a pleasure to have you
here, guys. Happy creating.
 The Artmother, Professional Art Teacher and Artist