Transcripts
1. Introduction: Have you ever wondered why some characters
instantly feel cute, silly, powerful,
or even dangerous? This is the magic
of shape language. In this class, I'm going
to teach you how to implement shape language
into your illustrations. Hi, my name is Alexandra,
AKAD art Mother. I'm an artist, illustrator,
and online educator, and my superpower is making complicated art topics
easy for beginners. In this class, I will
guide you through three levels of shape
language application so that you really have
that solid foundation to build on and that really smooth, gradual expansion
of your skills. Level one will be super
simple just changing the base body shape into basic geometric
shapes like a circle, a triangle, and a rectangle. In level two, though, we are going to go further
and we are going to play with composing a
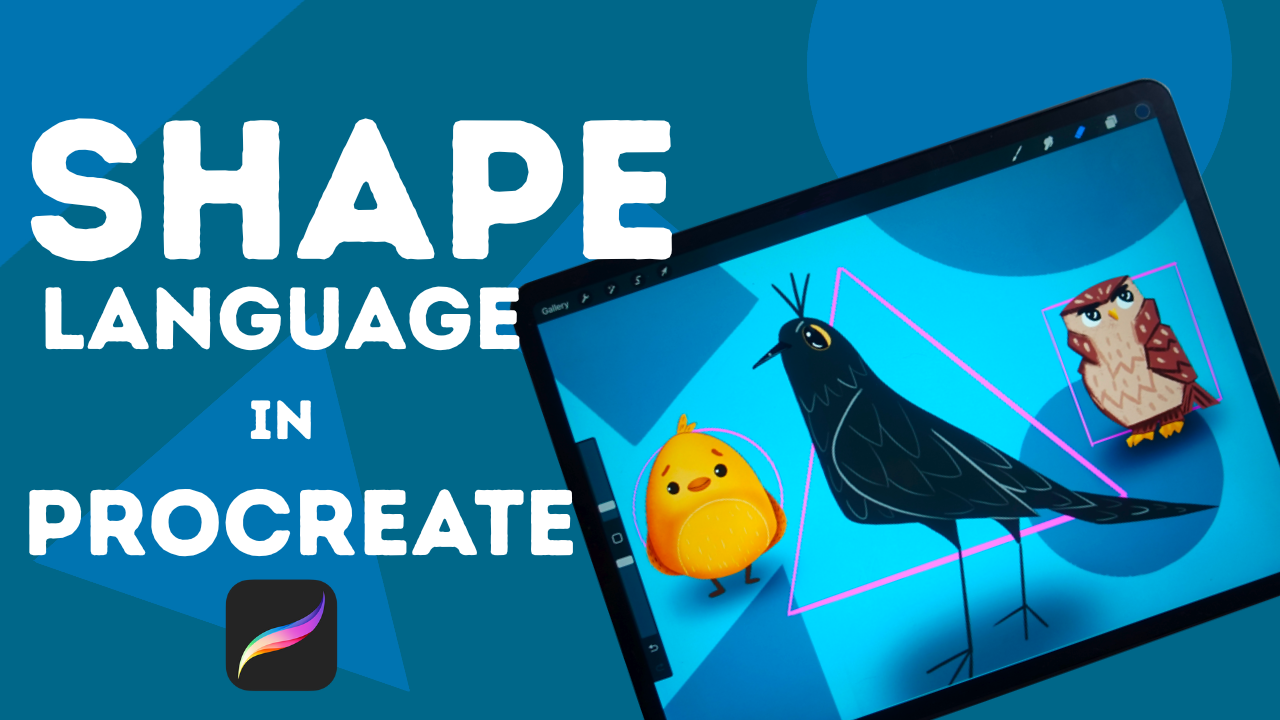
character into these shapes. At level three, we are going
to apply shape language into all the features of the animals that we are
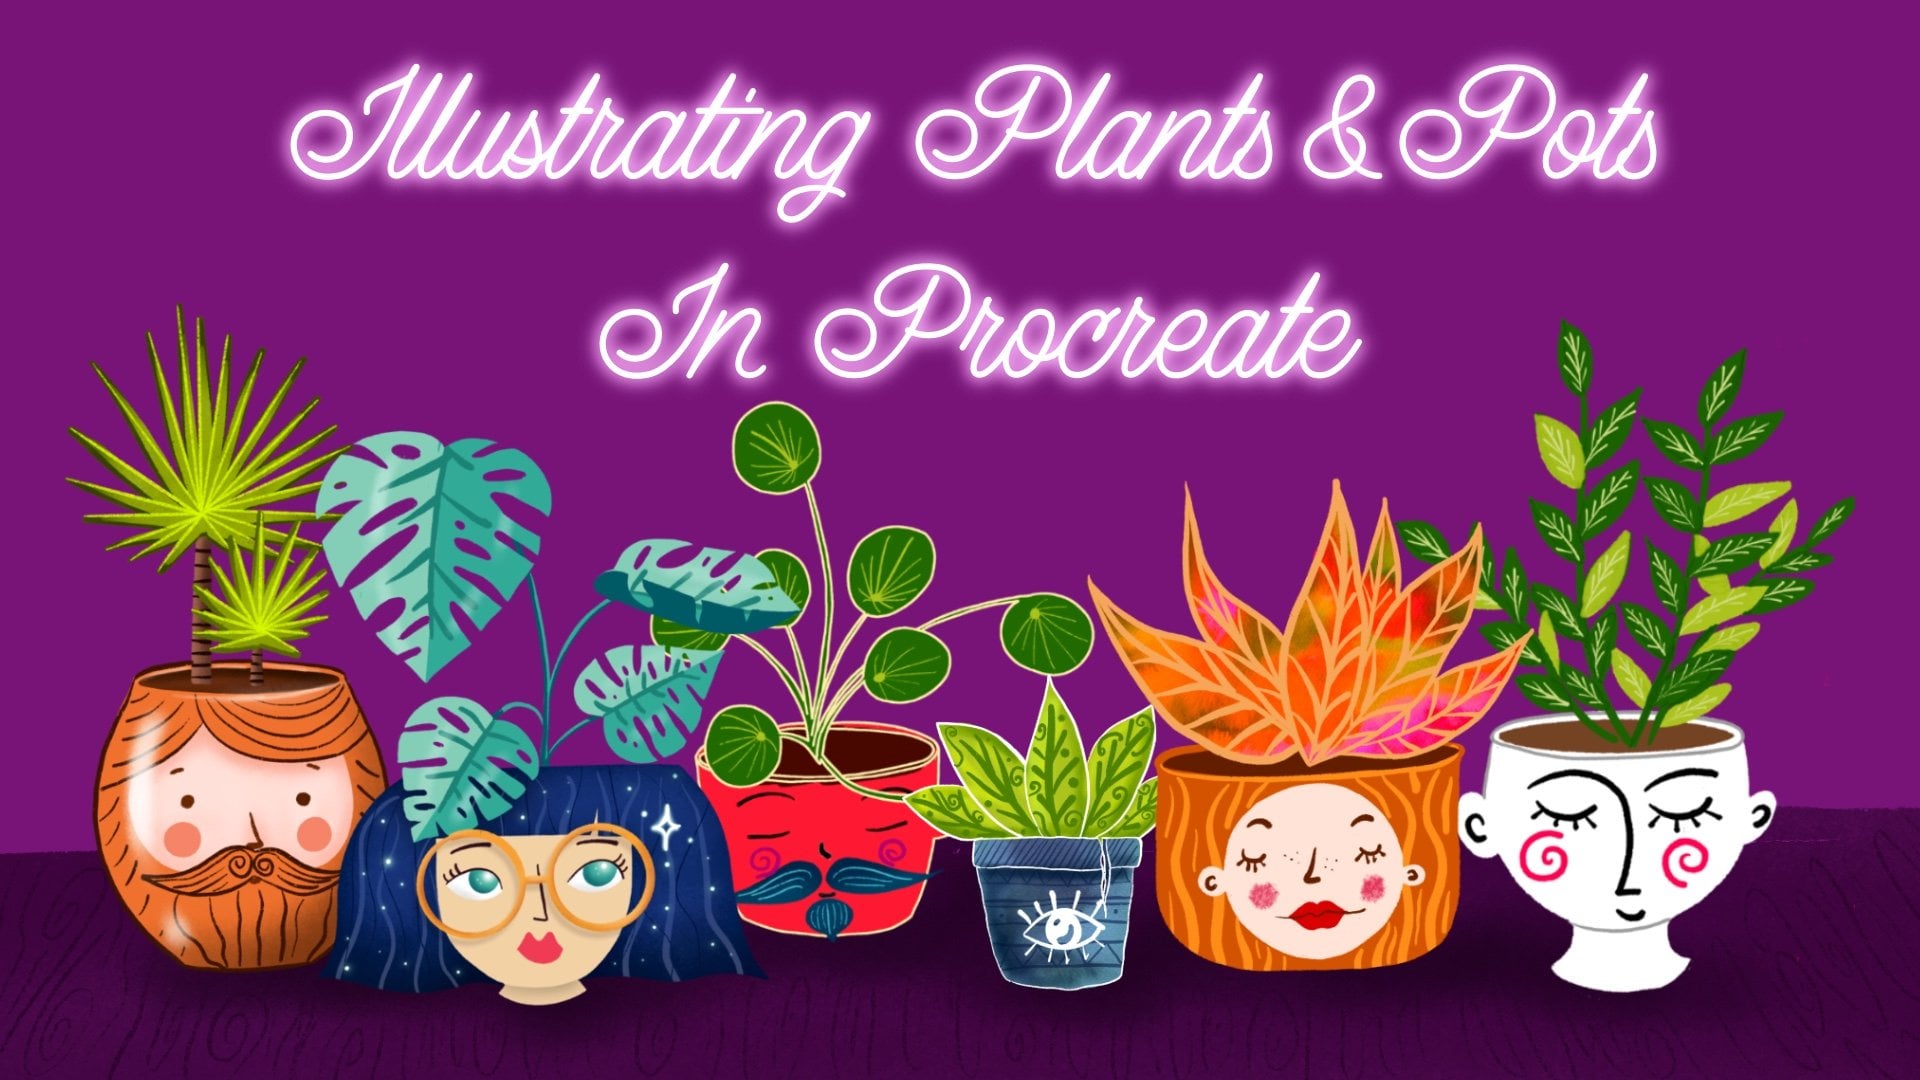
going to illustrate. Yes, the main topic of the illustrations of this
class are going to be animals, and we are not going
to stop there. We are going to outdo
haGiPT's auto generated image at a bingo game. We are going to randomly
choose a level, a shape, and an animal and ask ha Gi
PT to generate an image, and then we are going to use our illustration skills to
create a better illustration. It is a secret if we outdo him, you need to watch a class till the end to know the result. This class is going
to be super fun and entertaining and
you as a beginner, you will feel at
home, I promise. What you will need
for this class is an iPad with Procrit on it. But if you want to use
a different program, you are free to do that, but you will need to adjust
the steps for yourself. By the end of this class,
you will understand how you can apply shape
language into your work and you will end up with ten little illustrations
if you do them all. So if you are ready, grab your iPad and see
you in the first video.
2. About The Class: Welcome to the class. I'm
so happy that you are here. In this video, we are going to talk about the class structure, the class resources,
and the class project. So the class structure
will look like this. So we are going to have
three different levels of shape language application. At every level, we are
going to illustrate three little illustrations
with one topic. So at the first level, we are going to illustrate a whale, at the second one, a dog, and on the third one, birds. You are free to change
the topic if you wish, but you should
follow the guidance. Okay? So how create
these little animals. Now, on different skill levels, if you are a very beginner, please follow step
by step so that you feel comfortable
during the process. In the resources, you
will find everything to be successful to
complete the class. Take this as practice. You don't need to invent things, you don't need to I don't know, um create something
very special, you are here to practice and maybe this is your first time even thinking about
shape language. Allow yourself to
use the support from the class to finish
the class project. If you are a bit more
confident artist already and you have maybe already worked
with shape language, in different classes
or in different ways. You are free to, you know, change the illustrations
that we are working with. So you can, for example, illustrate a different breed
of a dog or not a whale, but a fish or a different
animal, you know, but I would say that maybe
you should go through the class with me
and then try it again on your own so that you have that
confidence and know, you know, what you should do. Of course, you can
customize everything. You can use your colors, you can use your way
of illustration. If you already have
your ways of expressing yourself or ways of working
with digital illustration, you are total free to express
yourself in this class. Okay? If you are very advanced, I'm really happy that you still chose to
be in this class. You are totally free to outdo me and create incredible
illustrations in the process. Maybe this is going to be
a very nice practice for you to the skills and maybe my thought process
can show you something new. Okay, then what I thought
of at the second part of this class is that we are
going to play a little Bingo. We are randomly
choosing a level, a shape and an animal. You are totally free to choose
the topics into that part. You will see how will that work. I'm going to generate an
image based on this with HAG PT and see
what it generates. And then using my skills, I'm going to create
an illustration, and you can totally
follow me along. Again, in the resources, you will have everything to follow me step by step during
the illustration process. It is a great practice, but this is the
place where you can really get creative
and, you know, just try your skills out in real time and come up with a
completely new illustration, and let's fill the project
gallery with all this. And first, let's talk
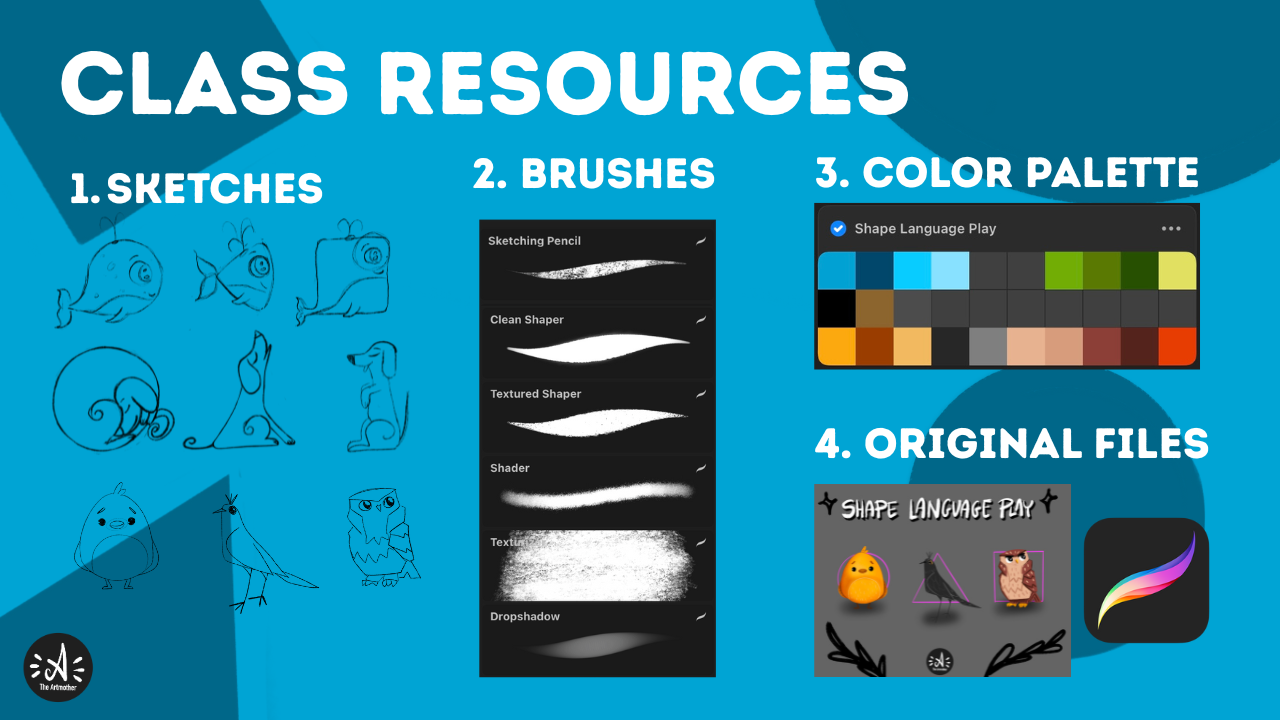
about the resources. So in the resources, you will find everything,
all my sketches, all my procreate files, brushes and color
palettes as well. Okay? So you will have everything and you
are free to use them. And your class project is
to illustrate an animal. Basically, the second part should be the main
class project, but I would be really happy if you would build
your class project up. So after every level,
what you created, just share it there,
and then you will have, nine little illustrations
and then a final project. And I'm so excited how this project
gallery will look like. Alright, I think I
said everything. So let's just get started, grab your iPad and see
you at the first level.
3. Shape Language: Welcome to the first lesson
in which we are going to talk about what shape
language generally is. There are several ways we can communicate or
ideas, for example, with colors and also when we
look at an artwork before we notice details like texture or color or eyes register shapes. Shapes are the foundation
of visual communication. They carry meaning,
emotion, and personality. This is what we call
shape language. Every shape tells a story. For example, circles
and rounded shapes, and it also includes
curved lines. They feel soft, friendly, safe, and think of cartoon
characters with big round eyes and
smooth curves, and they suggest warmth and comfort and cuteness
like babies, they are also very
round and soft. And then triangles have sharp angles and they create
energy, tension or danger. They can feel dynamic or
even aggressive or exciting. Okay? Squares and rectangles
give a sense of stability. They are, every side
they are stable and also they give
structure and they can feel solid and trustworthy. Artists and designers use
shape language intentionally. For example, in
character design, a villain might have angular and sharp
features while a hero has broad stable shapes and the side kick is I don't
know, soft and round. And also in composition, dominance of one type of shape can set the mood scene
full of circles, feels playful, while one dominated by triangles,
feels intense. Also in abstract art, the choice of shapes alone
communicates emotion. Shape language is a
silent storyteller. Once you become aware of it, you will see everywhere in art, design, film, or
even architecture. When you start using
it intentionally, your artwork will gain a new
layer of depth and clarity. Now, I suggest you
are a beginner. We are not going to go into very complicated ways of
using shape language. We are going to go
very smoothly so that you can dip your toes into it. So just start to
experiment with it. Because if I just present it
to you in a complicated way, you might not even
start to use it in your twex or just not
pay attention to it. There are several elements
of art and if you have taken my quick guide to
art fundamentals class, you know that I allow to break down the whole
art to these elements, learning these different
elements little by little. So dipping your toes
into color theory, dipping your toes
into perspective, or into form where the
shading is taking place. And now we are focusing
on the shape part. Also when you are sketching, you use shapes to build up your artworks or when you are doing
observational drawing, it is so good to break down the main subject into basic geometric shapes and use that as a base for your sketch. Now we are going to
rather work with this shape language and relate
it to character design. What we are going to actually
do is we are going to go through three different ways to approach shape language
at a beginner level. The first one is when
there is an animal, we are going to work
with animal characters. There is an animal, and we are going to draw this animal
three times free ways. We are going to
incorporate circles, triangles and rectangles
into this catch. In the first one,
we are going to keep the features of the
illustration the same, but the body shape
is going to change. In the second one,
we are going to keep the little
character the same, but we are going to place it and position it compositionally
into a circle, a triangle, and a rectangle. Lastly, we are going
to create a topic. It will be a bird
that's a spoiler now. And we are going
to design a bird, so the same subject with completely different
shape language, even in features and details. This is going to be
the three level. In the next video,
let's just start with the first level and we
are going to illustrate, sketch out at first whale and change its body shape to these basic geometric shapes. I can't wait to start
seem the next video.
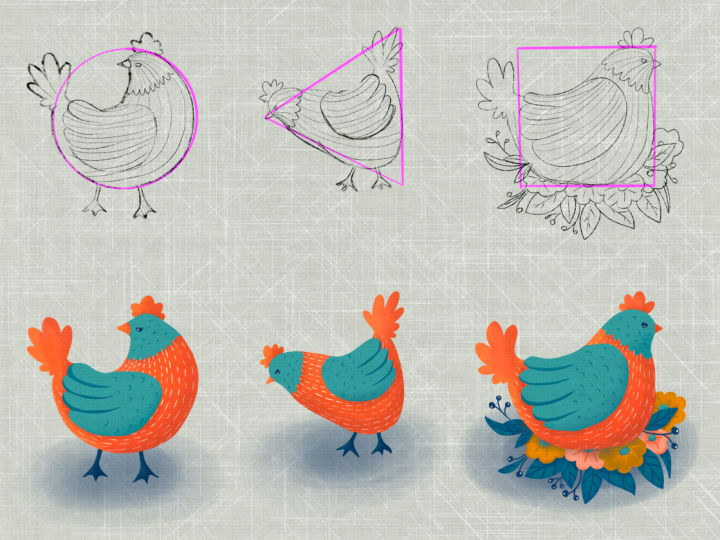
4. Level 1 - Sketch: Okay, so welcome to the first level of
shape language play. So the topic of this lesson
is illustrating a whale. So to warm up, you will get this little worksheet
in the resources. But if you didn't download it, you can just create a
new screen sized canvas. Make the background a little bit gray so that you see it better. I think it's better to work on a not that completely
white background. And create a new layer. Now I will hide these
basic geometric shapes and I will just
grab black color. Now, I already have the updated
Procreate brush studio. The whole app
updated a while ago. So you can just choose
whatever sketching pencil. If you have my brush set, you can just choose
the sketching pencil. You will get the brush set
with the class as well. So you can just use
my sketching pencil or you can just go to the regular six D pencil
at the sketching library. I love the six D pencil, and I'm just going
to use it right now. So before looking at any
inspirational photos, how would you draw a whale? So for me, it is
kind of cheating because I illustrated
whales a lot, but I always start
with a circle. And add a little tail fin. Okay. I add a little
water at the top, I add a little tummy, a big eye, and the
mouth maybe an eyebrow. I already have a little whale. For a warm up, I just want you to draw a whale
from yourself, how would you draw it without
looking at anything, ok? Spend a little time with it. Then you can just spend 10 minutes on looking
at reference photos, then return and turn off this sketch and
let's just get started. Okay. I'm going to guide
you through my process, how I am placing this exact
wale into these triangles. Again, the features
will be the same. I will use these things
that I've drawn here. So basically, this is
going to be my body shape. The circle, then I
will add a little fin, little water, face,
and a little tummy, so it's very easy. I'm on a new layer, and let's start with the circle. So we're going to change
only the body shape. Okay? This will make
sense a little bit later for you why we
are doing it like this. What I'm going to do is to
use lots of short lines to follow this
circular body shape. And I'm going to add a little fin he or tail. Then I will add a little Tammy, another fin here,
an eye like this. We'll add some light here, a little eyebrow, little mouth, and I will add a little water
and some little features. I don't know, these
little circles here. This is my little whale. Now, how would I transform
this one into a triangle, taking in consideration
that these edges are, you know, guiding somehow
the attention of the viewer. What I think would
be the best to go to these triangles and
change its direction. So I want to place This little well,
in this direction. Okay. This is what makes
sense based on the basic, you know, composition of the body because he
has a tail here. Okay? So as you can see, already has a little bit of a triangle here in
its composition. So it would really make sense to just turn around
the triangle. Okay? I'll go back to a
layer of my sketch. And as the basic features are kind of this is
a cute whale, okay? So I don't necessarily need to make everything triangular. It is enough if I
add the body shape. I'm going to again
follow the body shape. I mean the triangle
for the body shape, and I'll curve it down a bit. You don't need to be strictly
following the base shape. You can adjust always. Okay? Remember, you are the creator. You are inventing things. Inventing a triangular whale. Okay. I don't need to add
another fin here or tail here. I can just draw one here. I can add the tummy
Maybe like this. I will add this fin, and I can add the water here, keep the same eyes. Maybe features and a
mouth. Cute, right? And now let's do the
rectangular one. Why not? So again, I'm just
going to follow the basic shape of the rectangle and add a
little fin at the bottom. Okay. I can add this
tummy thing here. I will add the water at the top. I will add an eye here, maybe an eyebrow,
a little mouth. I will add these features again. No, I will turn off.
And can you see that? We just implemented shape
language into a character. And how does it
change the overall, you know, mood of the character? Let's just talk about
it for a second. For some reason, I think that this triangular little guy looks more like a
baby. I don't know. It gives me the feeling that it's very young, little whale. I think this is an adult, and I can imagine that this square little whale is like an elder or
a very smart one. We'll add little glasses
there just quickly. Why not? So can you see how
it changes the mood overall or the communication or the character of
the character itself? Now, feel free to illustrate these little whales on your own or in your own style
or on your own way. If you are a very beginner
and you need guidance, follow me to the next
video where we are going to illustrate these
little guys together. So, see you there.
5. Level 1 - Illustration: All right, so welcome to
the illustration part. I want to say that you are totally free to go into as
much detail as you want. I'm going to keep
it pretty simple. Okay? So the first step
is that I will lower the opacity of the sketch and create a new layer below it. Also, you can use
your colors, okay? Here is a color palette
that I created, and I'm going to just rename it. And you will get this color
palette in the resources. I will choose the base
color and it is going to be a middle blue color. From the brush set,
you can choose the clean shaper or any
solid brush that you like. You can just experiment with
the procreates new brushes. Most important thing is
that it has to be opaque. I'm going to illustrate all three at the same
time, not separately. The first thing is
that I'm going to fill in the base shape of it all. I love to use the eraser to get back from
the shapes that I created because this
catch is not very clean, so it happens that I need to adjust the shape so that they actually look good. I feel in a bigger shape
like this with a color drop, there are usually little
pixels that are left out, so make sure to go
through them all. And then I will get
my little eraser and can adjust the shape. Okay. Now I will turn
all the sketch to see if the base shapes are all right and adjust
them a bit again. I have to add that you
can prevent this kind of extra work if you have a clean
sketch or clean line work. So make sure to have
one if you have time. But it is sometimes,
totally okay to jump to just jump to the
illustration process if you are very excited
about what you're creating. All right, I will turn the sketch back on and
now the shading comes. Alpha lock this layer and choose this darker blue and
choose the shader brush. You can use whatever
shader brush, airbrush, texture
brush for this, and I will just go through it and the
lower part and I will try to add a little bit of smooth gradation so that it is lighter at the top and
darker at the bottom. This brush, if you can see, looks like this and
I love to shade with the edges and it is also
pressure sensitive. If I'm going through
it very lightly, it just creates a
really nice texture. But if I push, it
creates a darker part. I'm just adding now
shading to the bottom, and I will add one here as well to this part of
the little whale. I will go back with the original color to smooth
and degradation a bit, it is not that harsh. Okay. You can go back and forth. If you hold down the color, it will just jump back
to the previous color. You can experiment with that. And I will just go back burn. Alright. Now I will create another layer and
make it a clipping mask. This means that anything I
draw into this layer will be cut into the shape of the base shapes of
these little guys. Okay, so the next step is
to add this little tummy, and I will choose this
light blue for it, and with the clean shaper. I will just draw Oh, yeah, draw this shape
into the middle. I can erase from it as it
is on a different layer. So I will just adjust its shape. I will add the same
to here and to here. Okay, I will add a little
bit to the edge of this little fin or
tail like this. And now I will choose this
darker blue again and the shader brush and shade
the tummy a little bit, just to add a little
bit of texture. And now I will choose the sketching pencil and
this very light blue. And I will just actually create a new layer that
is not a clipping mask. And I will just draw some lines
into the tummy like this. Also to the tails. I will just add some
little lines like this. Oops. Cool. I will add
these little details, as well, and I will just
move to the ice in a second. I will just add these
little details. Okay. I will create another
layer and choose white that I don't have
that color palette. Choose the clean shaper, and I will just add a circle. If I draw a circle hole down, this menu will pop up. I will make it a circle. I will place it here,
fill it with color, go through to get all the pixels and adjust the shape so
it is a perfect circle. Okay. I will adjust it here. Cool. I will duplicate it because I don't want to
draw it again and again. Oops. Yeah. I can make it smaller if it
fits this face better, and I will again duplicate
and place it maybe here. I will pinch these three layers together and Alpha lock it. I will create another layer and again create
a clipping mask. Choose this dark blue. And the clean shaper, and I will just throw
the eyes in like this. I will choose an even darker
blue and the shader brush, and I'll follow these eyes. Now I'm getting to
the flow because I'm overdoing it, but whatever. I will add a little bit of shading to the inner
part of the eyes like this and choose white and make this shader brush very small and I will just
add this light here. So one dot and a
little bit of line, one dot, and a
little bit of line. So cool. I will
create another layer. Choose. Actually, I will
keep this very dark blue. Choose the sketching
pencil and just draw in the brow and the mouth. Okay. Choose this very light
blue and I will actually add this little water here, I will also note
this little hole. You can go into more detail, but I don't want to
overcomplicate it. I will not add this glass. This here. What I'm going to do. Oh, I missed this fin, so I will create another layer, choose this dark blue, and just draw it in. I will not overcomplicate it. I will just draw it in. With the sketching
pencil. Why not? Okay. Okay. I can choose this very
light blue and add some wine stairs. Well. And what I love to do
is to add drop shadow, and I will create another
layer below everything, choose black and the
drop shadow brush. Draw one circle below the
body and another one inside, so it is darker. I will do the same here
and try to keep, you know, the size of the little
character here. Now I will go to Goshenbler
and I will Goshenbler it, I will turn off the sketch, and I have three really
cute little whales here. How fun they look like? If I turn on the little shapes, we can just showcase
that they are fitting with their body shape
these geometric shapes. So now I would love
you to turn off this and you can let
your creativity flow. So if you are taking this
one level at a time, feel free to create a
background or a scene for them. You can create a
whole illustration or just display them like this. And when you're done, go to the project gallery and include your Level
one artwork there. All right. It was so much fun. Let's just move on and
continue to Level two, where we are going to illustrate a dasuntT illustration is
going to base on my real dog, and our goal is going to be
to take that character and make its body composition into these basic
geometric shapes. I'm so excited to see you there. See in the next video. But
6. Level 2 - Sketch: Welcome to the level two of
the shape language play. In this level, we are going
to illustrate a dog character based on my own
little dog a Dachont. But again, you are free
to create whatever breed or basically whatever animal
or character that you wish. The point of this level is
to take this character, keep everything the same, the features the body shape, but place him compositionally into these basic
geometric shapes. So we are going to place
him into a circle, a triangle, and a rectangle. So I think we should again
start with a warm up. I will just turn this off
and create another layer, choose black and go back
to the sketching pencil. I'm going to use the
six B pencil again. So we are going to do the exact same thing
that we did last time. So I'm going to show you
how I'm drawing a dog, a dachund before looking
at any reference photos, just draw one yourself
and then look at reference photos or inspirations and maybe
just your sketch. Or if you are a very beginner, come on and join me
and sketch with me. So I always start with the head. So Dahund has a longer nose, and here is a little
circle for his head. He has an ear. He has a longer back. Let me adjust this. This initial warm up is
good to basically remember what body parts that animal
has that you are drawing. I will make it a little bit
bigger so that you can see it and he has this back
leg, a little tummy. And here are two
little paws and, like, at the back
and a little tail. Okay, not perfect. Mainly anatomically. Maybe I will choose this part and place
it a bit more like here and make the hat
smaller like this. Yeah. Okay. This is my warm up. I immediately feel
that I'm going to use some spirals in the drawing. It just came out of me. I will just turn this
little sketch off, turn back on the basic
geometric shapes, and basically start
with sketching. I'm going to create
another layer, and again, you are totally
free to take this your way. And yeah basically, you can learn from following
my thought process. When I'm starting
with the circle, I know that my little
dog loves to, you know, likes to get into
this little dog bun. I'm going to just again
with short lines, try to follow the
shape of the circle. And I'm going to
place his head here. I will just create a circle here and try to add his little head. As you can see, I'm already trying to add circular shapes, including the and this
catch might be messy, so I will just erase from it. Also, with this ear. He loves to sleep
like this. Okay. And he will have his paw
here and another one here, and I already connected his
body onto this outer circle. Can you see that?
So as he is, like, crawled up like this, I will change this a bit. His nose, bit and implement that back leg
here into this curve. I will connect his back leg here and add his
little paw here, and I need to kind of, I will I don't know. I will adjust it
a bit. I'm sorry. I will erase this part, but I will make his head a bit more into this angle like this. As you can see, there's
a lot of back and forth. But I want him to. Mm. I will have this little back leg here and his little leg here. It is not coming together
as I wanted, but let's see. So he has his leg here. And maybe I will fill this
part in with the tail. So I will add the tail here
like this hoops. Okay. Oh. So he has his tail
here like this. And now I'm going to spend
a little time refining this sketch. You can hear him now. Okay. I think this
is really cute. Maybe I can make this
part a bit bigger. Let me try that. So it is more dominant
of this circle. Let me erase this
part and put it like this so that it doesn't
have that small head and that it feels more or less this little
circular composition. Okay. Cool. I think it looks really cute. Now let's think of a triangle. So I'm just thinking what my
dog does that is triangular, how he's positioned
with his little body. Maybe when he's like,
you know, holing. Maybe I will try to
at his head like this and This is his tail. And as he is sitting
here, his little leg. Like this. And. But he has to have open
mouth like this. Okay. Anatomically not the best. But in illustration, we
can do whatever we want. This is why I love
illustrations. I was like, it is good to have things
anatomically correct, and it can be a lot
of trial and error. But, you know, don't
worry too much. This is practice, okay? Yeah. Yeah. It looks so much better than
with that small head. Okay, this is more believable. Fine. So let's move
on to the rectangle. Um he sometimes sits. On his two legs. This
body just came up to me while I was drawing this that if he doesn't
have the legs down, he's basically sitting
with a straight back up. This is really
funny. But for that, we are not going
to have a square. I'm going to select
this rectangle, and I will make it free form and make it
a rectangle like this. Okay? I will go back to the sketch, and, yeah, I will start
again with the head. A little circle. Like this. Yes, little ear like here. This is, okay, this is his back. And Yes, he he will have this
tail like this. He will have his
leg like this and his tummy and he will have
these little paws like this. This is so funny. Okay,
maybe I will add another leg here and his other paw
like this his tummy. This is not good. I need to erase
this bottom part. Let's Let's edge. These little pause like this. The other one here. And how I will select this sketch and make him a bit,
um, straighter. Looks better. Yeah, maybe I can make the head
again a bit bigger. Yeah. Cute. Okay. So we have three different
body positions for the same character that
basically has the same features, you know, the spiral here, a similar head, eyes
closed, et cetera. So keeping the
features and placing the character into
different body positions, I will make this leg a bit longer because I can
feel an imbalance here. Oh, gosh. Okay. So what you need to
do, let's summarize it. Choose the character,
let it be a dog. That's a help from
me, but basically, you can do it with
whatever character you decide to and try
to place its body and compose its body
into these three different, basic
geometric shapes. So a circle, a triangle,
and a rectangle. And don't forget you can transform these
basic geometric shapes. Then they don't
necessarily have to be perfect triangles or
perfect rectangle or square or perfect circle. It can be an ellipse. It can be a triangle in a
different angle or a rectangle made to taller one or
wider one, whatever. Feel free to change the
basic geometric shapes to a position that serves
you because these are tools to serve you and not
you are serving the tools. If that makes sense, take a little bit
more ownership over your design process and
I love to feel like an inventor when I'm
creating and I create my own rules and at
work or might not work, whatever, we are exploring and experimenting, that's your task. If you are a very beginner, you will also find
these sketches in these worksheets and in
their resources so that you can follow me into the
illustration part and just have little illustrations
for yourself or practice that you can customize. You can create your
versions of these artwiks. So in the next video, we are going to illustrate
these little guys together. And again, you are free to
illustrate it your way. You have artistic freedom. And yeah, so see
in the next video.
7. Level 2 - Illustration: Welcome to the second
illustration part, and I know that I'm
repeating myself, but feel free to do it your way. What I'm going to do again
is to lower the opacity of this sketch and
I'm not going to overcomplicate this
illustration process again. I'm going to create a
new layer, choose black, and go back to my brush set and choose the clean shaper and fill in the base
shapes of the bodies. Again, I'm going to illustrate
all three together. So Sorry. And I know that this might seem crazy that this is a
full black silhouette, but don't worry. Just continue. Okay. You did a good job if the silhouettes
are recognizable, what kind of animal
you have there. It is always a good sign. Now what I'm going to do is
to place the sketch on top, click on the layer
and hit invert. Now I can see my sketch. I'm going to create a new layer and choose this dark gray. Choose my sketching pencil, and I'm going to
redraw the linework. I'm going to also put the
opacity of the layer lower. I'm on a new layer. I'm
with a sketching pencil. Actually I'm going to choose a lighter gray color so it can be seen because
our background is gray here and I'm going to just nicely redraw the linework. Okay. I have all three. Now I can turn off the sketch and actually correct the
linework if you wish. I love, if it is this textured, it adds extra interesting
things there. But, for example, here I missed some part of the
shape also down here, so I can just add
some lines Okay. And I think I have everything. Now what I'm going
to do is to choose this darker brown color and just create another layer
below the linework, and I will add with the pencil, parts of the dog, you know, of this color because
my dog is like, black and this brown, and you don't need
to add too many. You can just add, you know, to the paws and to the
face a little bit. And it is so good if
you keep, you know, this sketchy feeling to it. It it will be so interesting
also to the like parts. So it can be seen that
it is actually a dash. So like this, maybe if you want, you can add something for, you know, the tummy here. It can be seen it is tummy, but I will left that out. I will go back to black, and I will just add
nails like this. Maybe enhance the mouth a bit. Cool. Oh, and he has a dot
also here at the the eyebrow, but I can leave that as well. So we'll just keep it like this. I'll start at the nose. Oops. Yeah. Add a little bit here to the paws. What so here. These are his little socks. Okay. And the last one. Okay. What do you think? We have three little dacons and three different geometrical
compositions and with a very, very simple
illustration technique, and I will add what I love
the most, the drop shadow, choose the drop shadow brush, I will turn off the little geometric shapes and I will just make it a
bit smaller Goshen blurrin. Yep. It looks super cool. Maybe I think I need to
make the background a bit darker so that they
stand out a bit more. Cool. Look how good they
look like. I love it. Amazing. Okay, so
now you have free another drawings
or illustrations with the shape language. And now we are going to
move on to level free, where we are going to create three different illustrations. Only the topic will be the same, and those will be birds, and we are going to implement all three basic dramatic
shapes into their design. Oh, I almost forgot. If you are at this level and you completed your
illustrations, go to the project
gallery and make sure to include it in
your class project. I'm so much looking forward
to see what you create and how your little dogs in
these positions turn out. And now, yeah, see you
in the next video.
8. Level 3 - Sketch: All right, so welcome to the level free of the
shape language play. So at this level, we are going to take our topic, which is a bird and create three different birds and apply the shape language
to them individually. So we are going to start
again with a little warm up, I will turn off these
geometric shapes and create a new layer. I'm at black and I will choose
the six B pencil again. And again, I'm
just going to draw a bird or whatever bird so that I remind myself
of the body parts and how these birds
just come out of me. Bird has a head, has a head, has a
beak, has a neck, has a body, has a
tail, make it smaller, put it into the
middle and has legs. And a wing. Okay? So this is my
quick sketch of a bird. And as you can see, I
automatically use curved lines, but here at the
end are triangles. Okay. So now you are again, free to look at
reference photos, just to look at birds, not just illustrations of birds, but images of birds, and I will turn
back on the shapes, and I will create another layer. Let's start with
the circular one. So a circular bird now appears in my head
as a little chicken. So I can just draw a little
ellipse into the middle. So I don't need to
actually follow 100% this circle,
but I can just, you know, add the
little bottom part and I can do better. Okay. So every edge and every feature is going to be curved in this little chicken. So it will have some features like these curved
things at the top. I will add some
wings to the side. As you can see, this side is not working for me right now, but okay, I will
try upside down. Yep. Okay. And I will add a beak. So in the middle, I will
draw a little ellipse. That is going to be the beak, and I will add two eyes. A little eyebrows, a tummy. I love to add these
tummies and a little leg. Like this. Oh, it
turned out cute. Nice. Okay. To the triangle. What bird? Maybe a crow. It is kind of dangerous. Okay. So this part is going
to be the tail. I will just draw a line
here towards here, and the body shape is going
to follow this triangle here. I will add the head like this. Oh, cool. But this is going to
be the main body, and it will have a wing. Kind of like this. And I will try to keep this
triangular shape at the end. So you don't need to make everything
constantly triangular. You can include curves, but maybe, you know,
ending things. And here is going to
be the tail like this. And the legs. Are kind of like this. Cool. And I will add
a triangular beak and maybe an I and I will add these things
at the top as well. So something like this. At this triangular,
as you can see, there is one triangle. There is another one,
there is another one. Okay. This is kind of an angle, so it is not completely curved, but it has this
little edging in it. The beak is triangular
and this is triangular and
this is very edgy, not curved like this. And the third bird is
going to be an owl. It also has the
characteristic, you know, of being, I don't know, smart and stable and wise. So I will start by adding one. This is going to be a
structure for me now. So this is going to be
rectangle for the head, another rectangle for the body, and another one for the legs. And I'm going to
create another layer, and on top of it, I'm
going to add a sketch. So I will add a head like
this, maybe like this. And like this, and I will
add a little curved belly. I will add a wing here. Mm. So maybe I will
not add curve, but like this and maybe
there will be a tail like this and
ending the body. Like this, there is
one leg, another leg. Let's add some nails. Like this. And at the bottom, I will add a little
triangle to enhance the face like this. And I will add
some I don't know. Mm. Oh This I will add ice like this
and a little big. And I will just Oh, I drone on top of it. Okay, doesn't matter. I can just erase. Cancel. I can just erase this
structure lines from below. And Yeah. So basically, when
you are creating a design, this is too much. Creating a design based
on shape language, it really helps if you try to, you know, use that shape
as the base of the body. And if you need
structure, you know, you cannot imagine
all in one rectangle, you can use several rectangles
to build up its body, just like I did with
the rectangles here. I'm just cleaning up the
sketch really quickly. So let's just ss. I think these little sketches starred out pretty amazingly, and the shape language can
be seen pretty well in it. This is a very cute
round chicken. This is a triangular crow, and this is a rectangular,
nice little owl. After you have your sketches, or if you didn't
manage to create your own you can
just use mine, okay? At the illustration part and
try to make them your own. Okay. I just I'm sorry, I need to I need to add a I need to add a little bit
of this wing here. So it's as if you would
have a coat. I don't know. Okay, so see you
in the next video, where we are going to
illustrate these little birds.
9. Level 3 - Illustration: Okay, so let's illustrate. Now we are not going to
illustrate together, but one by one because
they are very different. And here is the color palette that I'm going to use for this. This is the lower
or the bottom part. So I'm going to
choose the yellow one and the clean shaper, and I will create a
layer below the sketch, and I will also lower the
opacity of the sketch. Now I'm going to just fill in the shape of the little chicken. Okay. I'm going to create
another layer below this little chicken. And I will add the little
side with another color. And I want to choose a
little bit more of orange, so maybe I will add
it here at the end. Okay. Now I'm going to
off log both of them. And with this darker orange
and with the shader brush, I will just shade the chicken
around the tummy as well. And I will choose a
very light yellow, and I will just add
back into the middle. Okay. And also, I will go
back to the sides and add a little
bit at the edges. Now, I will choose
this dark brown and make it even smaller. And at the very edge
where these two things, you know, touch, I will just
add a bit of a shadow here. Really cool. Now I will
create another layer, choose the clean shaper, and just add the legs. But I want them a bit darker
so here's this dark brown. Let's try with that. Like this. Now I will create
another layer on top and with this dark brown, I will just add the beak
with the clean shaper. And I will choose
this dark brown and the six B pencil now to add a bit of line
into the middle. I will choose the clean
shaper and add the browse. I will choose black
and add the ice. I will choose white and
at little dots as light. Now I will choose this very light yellow and
the six B pencil. And I will just add to the tummy some little
effects like this. Yeah, it looks pretty nice. I will add maybe to the
little wings as well. And with this darker brown, I will actually add a bit of a line here some
lines like this as well. Okay, let me turn off
the sketch and Walla. Here is our little chicken. Let's continue to the crown. I will actually select these and group them so
that they are at one group, and I will create another layer. For this, I will
choose this dark gray and the clean shaper and fill
in the shape of the bird. Okay. I will add hoops. I will make it smaller. I'll add these things as well. Yep, and the legs. And I decided that they have
to have a different angle. Like this. And then I actually want
to make it a bit darker, so I will go to
adjustments who saturation brightness and bring the
darkness down a bit. I can again invert the sketch so that I
can see what I'm doing. I will create another layer and actually make
it a clipping mask, choose the slighter gray, choose the sketching pencil. I will make it smaller. I will progress similarly
as I did with the Dachon. No, actually, I will use the clean shaper and
make it very thin. Yeah. And I will add these
lines here like this. And I will add some kind
of triangular as feathers. And also here like this and maybe here as well
and add detail as well. Okay. Actually, the beak
is going to be black, too, so I will just add the
beak like this here and I will make it more
points more pointy. Now you turn off the sketch. And with that light yellow, I will just add to here, and I will need to add the ice. I will create another layer
and choose this yellow. We'll fill in an I. I will create another layer, and it should be This shouldn't be a clipping
mass, we just turn it off. But the layer above should
be a clipping mass. I will choose totally black
and fill in half of the I like this and I will just add again some lines like
this and on top, I will just add a
little m eyebrow. I will re invert the sketch
and turn it off and alla, I have my little crow. And do I need anything? I will maybe add Oops. I will maybe add a bit more
of these little feathers. And yeah, I'm finished. Now let's move on to the owl, and I will again just select these four layers
and group them. Alright, let's move
on to the owl. So I will turn on the sketch, create another layer, and I will choose this
light beach color. Now, this darker one, yes. And the clean shaper and
fill in the main shape. Right. I decided that it is going to be
the lighter color, so I just fill it in. Now I'm going to choose
this dark brown, and I will actually alpha lock this shape and just
fill in these shapes. As it is not on a new layer, if I want to change the shape, I need to go back with
the original color. And now I will choose
this dark brown. I will actually
change my brush to the texture shaper to
add a bit of a texture. I will make it a bit smaller and I will just add
lines like this. I'm missing some pixels here, so I will fill it in. I will alpha lock it again, and I will oops. I will just enhance these lines
at these edges like this, maybe here as well. I'm there as well. And I will like more, like, loosely, add some fettered
things like this. And this and at the bottom, I will just add these things. I will add the line
here and here, and I'm again missing a pixel. So I will just add these
lines here. Alpha look again. And I will do the
same at this part. So I will add the line here line here. Mm. As you can see, the brushwork is also this pretty
rectangular one. Mm. Add some lines here as well. Okay, and I will choose the shader brush and just go
a bit through these parts. There might be shadows. I will make it even
smaller at the bottom. I will add more shadows
also to the belly a bit. Also here. We'll make it big and very lightly just add some texture
into the middle. And when I'm using it
in a very thin way, I can just add these
little shadows like this. I will also choose
this very light one, go bigger and into the middle
of the belly and the body, I will just add back. I will add a little bit
to the sides as well. And and I made a
little mistake here, so I will just go back. We did textured shaper.
That back like this. Okay. I at this line here. And with this lighter vision, maybe even lighter, I will
just add these little fetters. Trying like this, I will
add some lines like this even here. Like this. And on a new layer, I will choose this yellow. I will add the beak. And with this brown, I will just add a little
line here and like this, I will choose white. I will add the ice. I'm on a new layer, yes. I will create another
one and create a clipping mask and
now choose black and, you know, just add the
insides of the eye. And I will choose light and
add this here into the eye, and I will choose this
very dark brown and I will add on a new layer,
some eyebrows. Like this. Okay. And with
this very light beach, I will add some
lines here as well. And yeah, I think, oh, no, I left this out. I will choose this yellow again. I can stay at this layer, and I will just
fill in this part. Like this. And with
this darker yellow, probably, I will alpha lock
this layer and I will just add lines like this loosely. This is again another
approach at illustration. Maybe with a very light yellow, I will just add lines
at the top and Wala, I will turn off the
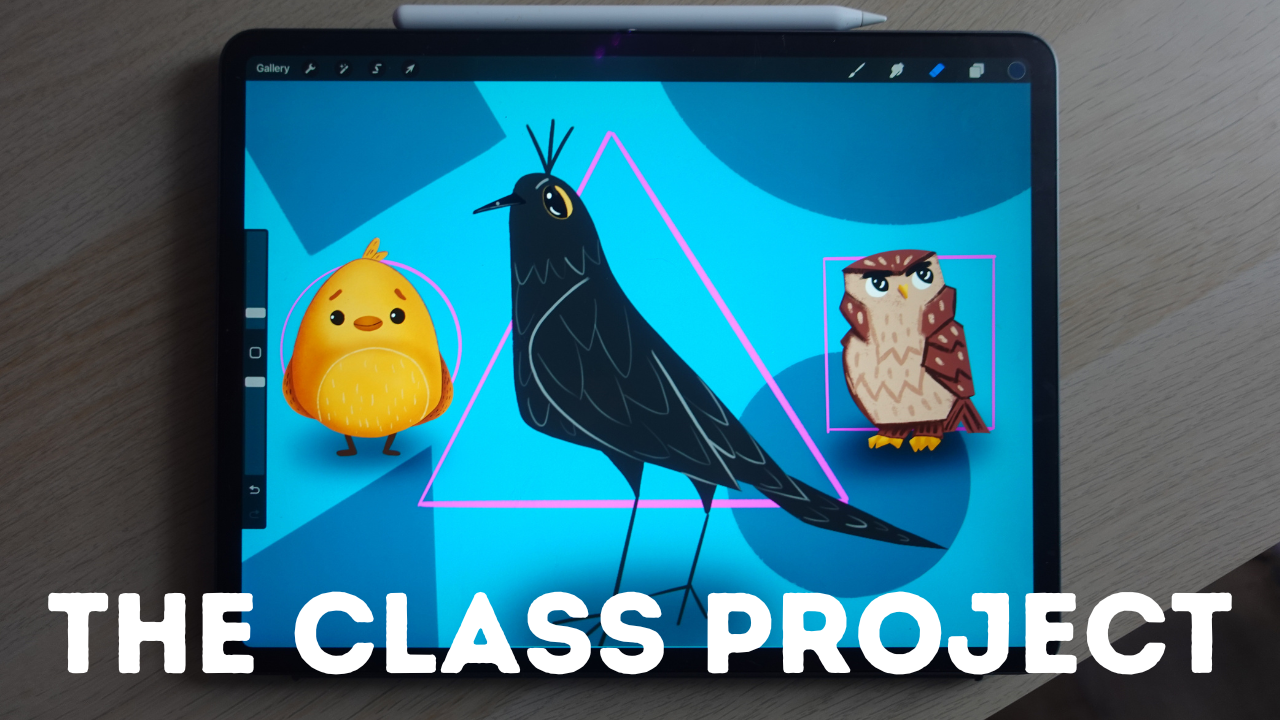
sketches and we have three different birds with three different shape languages. Here is the curry,
little chicken, here is the triangular
crow and here's a rectangular little ol and the final step that
cannot be missed, I will create another layer
on the bottom, choose black, choose the drop shadow brush, and again, oops, I
will make it bigger. I will just create
the drop shadows. Goshenbler and Wala, I will turn off the shapes and here
are the little birdies. All right. I hope that you like this third level because
we are going to move on to the fourth level when you are going to come up with
your own illustration and I thought of a game that will help you to
decide what to illustrate. Keep in mind, again, you have your freedom, so you can just choose, um Level one, shape and
the topic yourself. But in the game in
the next video, we are going to
do this randomly. So before you move
on to the next part, please make sure to upload your artwork into
the project gallery. I can't wait to see how your
illustrations turned out.
10. Shape Language BINGO: Alright, so welcome to the
shape language play Bingo, where we are going to randomly choose what we are going to illustrate as
a final project. So if you have done
all illustrations, you have nine little
illustrations now. So you should have the skills to invent a new animal character or whatever character
you wish to which you can implement
the shape language. And yeah, let's just do a little recap
on what these levels meant. The first level was implementing a shape language only
into the body shape. The second level was compositional shape language
when we took a character and put it into a
basic geometric shape, and the third level
was implementing shape language into
every feature. Now we have three
different shapes, circle, a triangle,
and a rectangle. And now I wanted to
include you into the process of thinking
another topic. So free topics or free animals, I think that I will choose. So let's say the
first will be a fish. The second, I already did cat. I already did a dog, a bird. Well, um, I will ask Chet GPT. Randomly choose three
animals for me. The second will be a wolf. And the third one a lizard. Okay. And let's just
choose randomly. How will we do that? I will
use Ched GPT for that. Two. Okay. Choose a circle. Okay. And choose choose an animal. I'll go with a wolf.
Do you want me guess where this is leading
or keep it a mystery? All right, so it will be a wolf. But that's similar to the dog. Mm. Let's do the
lizard. All right. So what I'm going to do in
the final illustration is to place a lizard into a circle and create an
illustration of that. Okay, let's see where it goes. Guys, can we outdo Cha GPT? I bet we can. See you
in the next part.
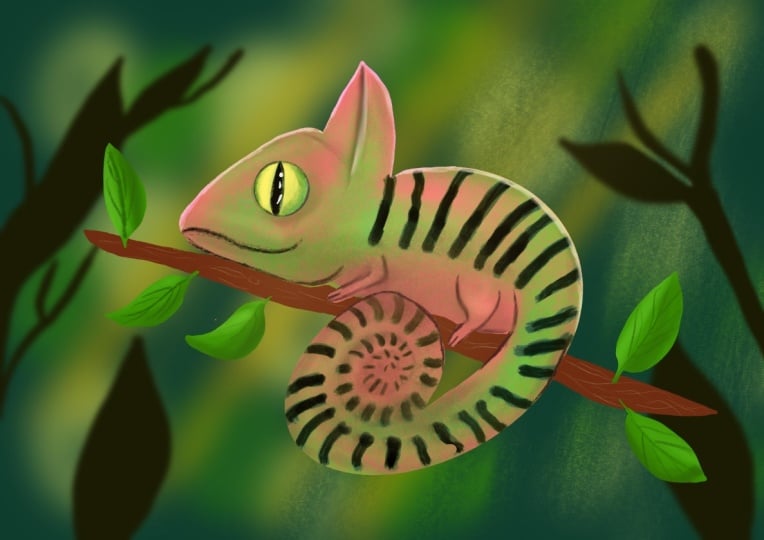
11. Final Project - Sketch: All right, so let's get into it. What I'm going to create
in this final part is a lizard composed into a circle. So its body shape is
going to be in a circle, and I will probably use circular shape language as well because lizards
are cute, right? So my next step is
that I'm going to create a new screen size canvas. I will go back to gallery and
I will hit the plus button, hit the screen size. Again, I will change
the background color to gray so that I can see
better what I'm doing. I will choose black
and the six B pencil. And I will start again
with, I don't know, just putting onto
the paper or screen, how would I draw a lizard? And what kind of lizard? Is it going to be a
gecko or a chameleon? I'm not sure yet. So,
this is going to be just totally raw sketch about what I know about lizards
and how would I draw them. So the first part is
that it has a head. It has a head. I'm not sure
what kind of head it has, and big googly eyes. Mouth. Okay. And a long body. And it has I don't
know how many fingers. I will need to look
at reference photos, but let me create this
little sketch here. Okay. Body and yeah. Another, I'm not even
sure if I have ever drown a lizard before and a tail. So, this is how it came out. It looks horrible. But we
are going to make it better. So now I'm going to spend like 10 minutes with looking
at lizards on Google. So let me just do that.
Okay. Alright. So lizards. When I was a kid, I had this bird a dragon. Um, so it has a head. He has the eyes on the side
and yeah, a long tail. And as if I'm seeing, right, they have four fingers. 02, three, four fingers. Yeah. Yeah, four fingers. All right. Now I'm
going to go back. Turn this off. I
create another layer. I'm going to draw a circle. I will hold it down
and hit circle. That is going to be my
guide for the composition. I will try to put
it into the middle. So I decided that I'm going
to illustrate a chameleon, mainly because it has
some incredible colors. Can you see that? I love how it looks like, and there is a spiral like automatically included
in the animal. So I think I will
use reference photo, and I think I will use this one. So I will go to Procreate and
just drop the image here. I will put it into the side. Okay. So I have a circle
that can guide me. I have reference photo
that can guide me, and I will create a new layer. So I have black. I
have the six B pencil, and I just got into it. So the first thing, I'm
noticing that there is a branch that the
chameleon is on, and I think I should
include it in the sketch. So I will just at first
just draw a branch like this. At what angle? I think I will try
to follow this angle and I will place this
line a little bit below the middle of the circle because this would make it a half right and I will just place
it here so that I have place. Here will be the tail. Like this. Kind of. And as you can see, its back is following circular shape immediately
and looks totally fine. That is fitting basically
this composition. He has his back here, and this sketch is going
to be a bit messy, but we are going to
create a nice linework. Now, what about the head shape? I will try to start here. So it is kind of triangular, if you can see that and starts
kind of let's say here. I will try to stylize it
as much as it is possible. I don't want to
overcomplicate the sketch. Here is the eye, kind of here. And he has this triangle here. So this interferes
with the back, so I will get back from it. So here is the Neck. And his back starts like here. Let me get this angle. Nice. And it doesn't need
to fully fit the circle. Kind of like this. Looks good. And here's the branch. I will add dimension to it.
And I need to play with. So I I don't know. Let's add D. W a hand? Hend? Is it a hand? Um, what does it
look like? Okay? He has actually kind
of like a hand. Can you see that? So I will
try to add something similar. Um, make it a bit thinner. And you like this. This is so cute. And the
leg it looks a bit weird, but Okay, it has
a leg like this. I raise the the tail. And it is kind of
totally a full spiral. I will raise it and
try to do it again. So I I'll try to
make it as big as possible. Kind of like this. Yeah, basically, it is
connected to the leg. Yeah. And I will thicken
the leg, as well. Oh, starts to look good. What do you say? Oh, I love it. Okay. Cool. I think the basic
base is finished. Now, I think that I will
end this branch like this and add some
leaves because why not? Mm, like this. What do you say? I think it looks super cute. So I will turn off
the reference photo, I will turn off the circle. I will adjust Mm hmm. Okay, so I adjust the detail, but it is not
fitting the circle. So what I'm going
to do is to select it and kind of turn it. So it fits better. Cool. I will need to erase
things here like this and adjust
this part better. Let me now turn off the
circle and check it. So I think it turned
out really cool. I will place it a little
bit to the side so that the composition is in the middle and you
will get this sketch. So if you don't want to
create your very own, you can just follow me to
the illustration part. And you know, as always, you are free to
customize this sketch. And if you are not
that confident, you can just choose
your own colors. Okay? That will be enough to
have fun with this process. So see you in the next
video where we are going to illustrate our little lizard.
12. Final Project - Illustration : Alright, so in this lesson, we are going to
illustrate this cute, and I thought that I will just pick up colors from
this reference photo. So I will actually put these colors into
the color palette, and I will just pick up colors. I will choose this
light green and this darker green and
maybe from this part, this very dark green
for shading and of course, this yellowish green. Very light one. I'm going
to work with these colors, but we will see how
we will progress. I will turn up the
reference photo. I will lower the
opacity of the sketch. And I will create another
layer below the sketch. I will go with this green color, and I will choose the clean
shaper and fill in the color of the chameleon. Oh. Okay. So I cannot really
see this color well, so I will go to the background
and make it a bit darker. And I will lower the opacity
of the sketch even more so I can see if these
shapes are looking good. All right, so after we
have the base shape, let's create another layer
and make it a clipping mask. We are going to add some
textures and shading. Now, what I thought
is that we should play a little with the new
brushes that Procreate has. So if you haven't already
updated Procreate, do so or just use any texture
brush that you love to use. If you go to the
classic library, you can click on this button and then choose
back to libraries. Or if we are in a classic
library, we can pinch. This is a gesture control, and you will get into
the brush libraries. So I will choose the
procreate library, and I played around with some
brushes and what I love, go to the basics, brush set and choose the mint brush and
have the darker green, and I will just make it bigger. And go through it all. It is a really nice
texture brush, and it adds such a nice
texture. Can you see that? These are these little dots
and they look so great. I love it. Maybe we can try
shading with it as well. So I will make it
a bit smaller and add a bit of shading
around the edges. Also here at the middle spiral. I will make it smaller
shade around this eye. So it stands out a bit. I was thinking about
adding a little bit of a pattern to the chameleon, and I'm just adding a bit of a shadow to this part as well. I will actually go back
with the original color and soften this shading a bit. Okay. Cool. Then I'm going to choose an
ink brush or at the markers, I really love this
one, the sleepy head. So I will just again create another layer and make
it a clipping mask and choose this dark green and
push it a bit towards blue. And let's see. Oh, it looks super fun. I will make the brush bigger, and it is not actually
pressure sensitive, but you can have fun
creating different shapes. And it also is very interesting what effect it creates when it is overlapping. If that makes sense, can you see that
these burnt edges, I love how it looks like. So I'm going to add these
little shapes here. And where it exceeds, now you can just erase so that it follows
the original shape. I love how it looks like. It is so fun, right? Okay, let's do something
about the shading a bit more. And now I need to go
back to my comfort zone, so I will go back to my own shader brush and
go back to this layer. And with this shader, I will add hoops. Yeah. Add more shading. With the original green, I will add even more
back to the middle. And I will add light
to these inds. And also to the legs. Or the leg because
there is only one here. And I can see I
left out one here, so I will just erase this part. Cool. It looks fine. I will go back to the shading to the shader brush and the layer of the shading and add even
more shadows around the eyes. Okay, cool. Now, let's do something
about the eye. I will create another layer
on top and choose what color? It should be lighter, maybe. So this light green, let's say, and the clean shaper, and I will just draw the eye. I will actually
just draw a circle, hold down, and make it a circle. And we'll make it
this exact size. I should be a circle, yeah. Okay, then we'll fill it in. Get the pops and
adjust to shape. Wow So cool. I will alpha lock this shape, choose this green and
the shader brush and I will go round, maybe a bit less
around the edges, and maybe a little bit
through it so that it is this circle and maybe
with the darker green, I around the edges
just a little bit so it blends in. At this part. So cool. I will create
another layer, choose black, and with the clean shaper, I will just join this thing. Choose white lines
at reflection, and I think we need a
little bit of linework. I will create another layer. Keep this dark green. And with the sketching pencil, and I will lower the
opacity of the sketch, okay, so that I can step better. I will just hoops.
That's too big. I will make it a bit
smaller and just draw in lines that I think we need. Okay. I think it is so fun. Alright. Um, what else? We need this light yellow. I will create another
layer and actually add the little triangular
stuff to the back. Maybe maybe below the linework, so I will create the layer. Below the linework. Let me see. I will just add this thing here. But it's maybe too light, so I will just alpha lock it and choose the shader brush and maybe go through it with this green color
to blend in more. Yep. It's so fun. I will turn off the sketch. And I think we can play with
the colors a little bit. So what I have in mind, I will select everything, even the linework and group it. Now I will duplicate the group and hit flatten and now go to the hue saturation brightness and play a little
bit with the hue. Wow, can you see that? How cool is it? I love this red one and maybe
this pink one too. Cool. It looks great. Let
me try something. I have two colors, and I will choose the
eraser as my shader. I will make it big,
and I will try to erase from this little guy. And color variation. Can you see that how
fun it looks like? Oh, my God. Wow.
This looks so fun. Okay, let me try it again. So I will erase
from his head and maybe his belly and at the tail. Wow. This looks so cool. I love how it turned
out. Oh, my God. I love this color variation. So you can have fun
with colors always. And if you erase more, you will get it back
more from the green, and yea Super cool. Okay. I think I'm going
to add the background. Oh, I forgot the leaves. Oh, this is right. So I will create another
layer, keep the green, I will turn back this catch
and increase the opacity. And with my clean shaper, I will just fill in the leaves. Okay. I will alpha lock them. I will choose the darker green. I will choose my shader brush. I will make it a bit bigger
and go through them. If you're wondering
why am I doing it like this that I'm adding a solid color and then going actually through
it to recolor it. This brush gives texture, and I just love
how it looks like. I will lower the opacity of this sketch and actually
create another layer, choose the sketching pencil. And yeah, at these details. Okay. I need to go back to
the original leaf shapes. And with the shader,
I will lighten, rather the other
parts like this and go back darker with these parts. So from the side as if
the light would come, you know, from there. Looks so cool. Alright, then the last
thing that I'm going to do is to go to the
branch, Alpha lock it, choose this lighter beige color, and this sketching pencil, and I will just add some little wooden texture
drawn like this to the walls. This is how I'm
used to drawing it. Okay, cool. And now
in the next video, I'm going to add a little
bit of background.
13. Final Project - Background: All right, so in this video, let's add a little background. So I will create a new layer, and I will basically drop
blobs of color behind that. I will make this
brush a bit bigger, and I will add blobs of color. Lighter ones to the side, and darker ones to the side. I probably want to fill
in the whole shape. I can choose even darker colors, for example, like this. I will just fill
it and then fill in some other colors as well. I will choose this light green. Like this, maybe here a bit. And now I'm going
to Gaus and blurri so go to adjustments Gassmblur. Alright. So here's a
little background for me. How cool is that
and into the front, so onto the top layer, I will just choose this
dark green and clean shaper and I will actually, I should continue this branch, but if I just draw a
very dark leaf here, it will as if, you know, um, cover it, so I don't need to draw
it. That's the trick. And I will draw a branch
here and some other leaves. Like this. These
don't look good. So you can just experiment. Here is another leaf. And maybe here is another leaf. And here at this part. Like this. No. They're too much pointing
towards the same, so I need to adjust that. And I will make
another one here, and I will guh and blur
that a little bit as well. Like this. And well we have our
little one here. I want to play with a little
bit more. I'm so sorry. I cannot stop. So I'm at black. I will choose drop shadow brush, make it big and draw
a bit of a darkness here and also
probably down here. I will gauch and blur it again. And I will go back
with yellow light. I will choose yellow,
create another layer, and widen this guy a bit, and I will hit, you know, Goenbler again. And it's Oh. How cool is that? I love how it turned out. So what do you
think? Did we outdo Chat GPT? I think we did. Alright, I can't wait to see what you create in this part, and I'm so much looking forward to see your
illustrations. Now, see you in the
next video where we are going to sum
this whole class up. See you there. Oh
14. Final Thoughts: Congratulations. You
finished the class. I'm so happy that you have gone through this
whole process with me, and I can't wait to see
what you have created. And I bet that you are
very proud of yourself, and I'm also really proud of you because going through
all these exercises, I bet it took you some creative energies and
you invested in yourself, and that's very important. Okay? It was a pleasure
to have you here. Thank you for taking this class. Don't forget to stay up to date, so follow me at first
here on Skillshare, and then also on social media
on Instagram and Facebook. If you want a free brush set, make sure to go to
my website and grab the art monors magic
Procreate kit for free. I'm so happy that you were
here and I can't wait to see your artworks and to see you
in my other classes too. I wish you all the best
and happy creating.
 The Artmother, Professional Art Teacher and Artist