Transcripts
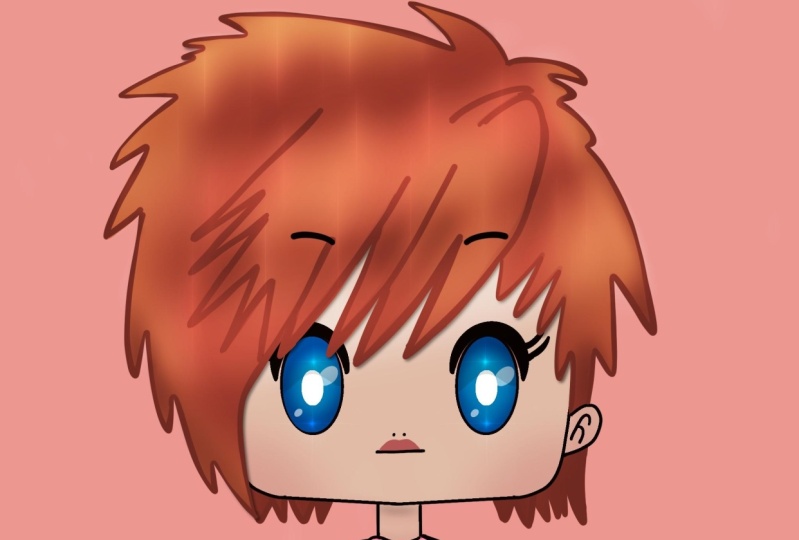
1. Introduction: Hello everyone. My name is senior and I'm an illustrator and graphic designer to D will learn the basics of GB portrait illustration will be starting by figuring out the proportions of the face. And we'll be making this gauge along the way during the class. We'll be working with a clean lines, colors, layers, blending modes, and so on. Upon completion, you'll be able to create your own cheek, the portrait, which you can use in many different ways, starting from creating your own profile pictures and bring their characters to life, to print it out on the stickers and postcards and making the present for your loved ones. This class is for everyone. So don't worry if you have no prior experience. Mostly it is suitable for digital drawing because everything you will see will be happening in the Procreate. But it absolutely doesn't matter that you won't be able to repeat it in the other graphic software or even with a traditional materials. So with that said, if you're ready to launch your software, grab your paper and pen, and let's begin.
2. General Head Scheme: Hi guys. Today we have something interesting and it is going to be the cheap illustration. As I said in the intro, we will start by creating some sketch into, we will learn how to do that. She be illustration from the scratch. And we'll learn a little bit of anatomy. So let's hope in the Procreate, if you're working with other digital softwares, or if you are working with Procreate or traditional materials, it's all. Okay. We will start by learning a little bit of anatomy of the H-E-B. So let's go and let's see what are the parts of the illustration. So first of all, we will need our pencil and we will need to start by creating Alito, maybe not lethal. We will need to create a circle. So let's just go and we will create a circle. I'm using that. I'm using the technical pencil or Procreate pencil. I'm not sure. It's technical pencil, so I will just create a circle. Hold down your Apple pencil at the end of the line, creates a nice shape. If you need to edit the shape, go to the top and heat ellipse or circle or manually adjust what you need. I will be working with a circle. Let's move it. And when you are ready, we will just tap on some blank space and it will be okay for us. So when we have the circle, what we need to do to create the face of the CIMI. Yesterday we are creating just the face. So to get familiar with the cheaper, we're not going to be creating some body parts or like body at all. We will be focusing on the face and the face anatomy and how to make everything cuz so let's get back to the Canvas and we will see what we need to do. Zoo create the phase of the TB. First of all, we will need to take some measurements and we will need to figure out where we need to build the facial features and facial everything here. So let just divide our circle vertically and one more time horizontally. If you need some help and if you're using Procreate, you can go and you can just turn on the drawing guides. The drawing guide is here under Actions and it is under the Canvas. Drawing guide, edit drawing guide. You can work with a 2D grid and something like that. And you can see how close you are to the center and how close you are to do arrogant, like not right butt's nice. So if you are not using it, it's just cancel it. If you're using it, take a leap of faith and he'd done, I will go just with a cancel and I will get rid of the drawing guide because, you know, it's not very necessary for us to be very accurate right now. So let's get back. And we have Alito outline, we have a little map. And what we need to do next is to find the jaw. Let's start with the jaw. So we will go to the bottom of our ellipse and we will need to create one line on the bottom. It's not going to be at the very bottom, but we will cut the parts right here. We will create one more line underneath it. And it's going to be a little bit under the bottom of the ellipse. So like this. Now, I'm not sure if we want to start with like 3 fourth were with the front view. So probably let's go with a front view to create an illustration from the front, we will need to do the following. We have one line already that will help us to create the whole illustration. And this is, this line is going to be the line of where we put the ears and where we put everything. So now when you have the layouts, lets some kind of narrow the face a little bit and make it a little bit not too round. So we will go and we will find the equal distance from both sides. And here we will cut the pieces with this type of line. So let's just go and concepts like this, the same on the other side. If you think that you are not finding the same place on the other side, you can create one more line to assist yourself. And go in from here and cotton the face right here. Try to make everything kinda equal to the things that you did on the other side. And when you did it, Let's just go and we will continue doing a refund. If you are not like a little bit, if you are a little bit confused with all the lies that we have here, you can grab another color for your brush and work with it. So when we have these, we will need to create a bare jaw line. And the jaw line is going to be right at this place. So to create a July, we will need to create one more line. On the bottom. It will be little bits, kinda like this. So it's not the full curve, It's not alike. The part of the ellipse or something like that. It is a little bit curvy and that's what we need. So when you create this line, we will need to combine this line with this one. And we are going to be creating a little cheeks. The chicks are going to have like this shape and we need to connect it with the face by using the sheep. So let's just try it out. You can make it as curvy as you like. It's all up to you. And the curvy you make it that cuter. Your illustration would be probably, Let's check out what we have. Maybe we need to make some adjustments or maybe we need to do something. If not, we can continue and we can start creating the ears and to again continue and start creating everything that we have on the face and everything that we will need to create a nice GB illustration.
3. Face features: So let's start with the ears. This line that I marked right here with the exclamation mark, it is the center of our ears. So it's not the boards and part of the ears, it's not very top part of the ears. It is the center of the ears. And the ears here will be just like that. You can see it. It's just the shape. So we are a little bit go in to the face. It's not on the edge. It is somehow like here in the middle. And also we can work a little bit on the jaw line and we can connect the ear lobe with the July. So it will be a little bit easier. If you can't see what you're doing, you can just grab the eraser and erase the parts that you don't need. So let's repeat the ear on the other side. Just go with this same line and create the same shape here. So again, we are a little bit overlapping. If you want, you can create one more line like this to see where you have the top part of the ear. So let's just repeat it like this. And again, we will choose to create a nicer jaw line and connect the ear. In this way, we will erase the parts that are connecting the body of the head. And we will erase It's to see what's going on here. So when we have something like that, Let's check out, maybe weekend fix anything. So probably I will put the ears a little bit closer to the face and maybe adjust that a little bit. When it's done, Let's continue and let's add the eyes. So the eyes on the cheap illustrations are the centerpiece, the center piece of the phase yet. And we will need to put them. So the line that we used for the center of the ears is the bottom part of the ice. Now let's go and find that top part of the ice. So we will just grab the line and we will create one more line here above. So it is somewhere here between these two lines that we already have. It is somewhere in the middle. This is the eye area where we are going to be creating the ice. So the ice that we are going to be creating, they are conceived of a few parts. So the first part is of course, some kind of an ellipse. The second part of the eye that we need to create is the eyelash. And the eyelash on the illustrations. On the cheap illustrations are looking kinda like that. So we are creating these shapes. And sometimes if you are creating a girl character and you can see a few like eyelashes like that. This part might be bigger. This part might be rounder. So we are somehow experiments in with the shape of the eye ends. Today we probably will be creating some common eyes. So let us get back to our layouts ends. We will try out these ice. So we need to find where we are going to be putting them. And we are going to be putting them right in the center of the face. So let's just go and to this line that is the center, and we will find the center of each part. So here, here, here, and here, this is going to be the center of the eye. Let's start by creating this part. So just creates the ellipse. You can go with the straight shape of analysis. You can go a little bit like an egg shape. It's all up to you what kind of shape you'd like to create. So just o problem, make it a little bit more of an egg shape. It's a bit cuter. And the distinctive feature of the CIMI style. I'm not creating them in the right place. You see that? If I will create them here, it won't look like a chubby and we will need to grab it. I'm sorry, I am little bit confused. We will need to put them down. You see? This line that I told you that we created for the ears is the ice bottom parts. And we will need to repeat it on the other side. So you can copy. You can create it manually. It's up to you. The more rounder you get, the more rounder shape you will create, the cuter your character will be. So keep it in mind when you are ready with the shape. And now we are creating just a sketch. So don't worry, if it's not look in that nice as you expected it to look, It's your first try and I guess it's nice. I guess it's nice. So when we have this, we need to create the eyelashes. And the eyelashes. We'll go just a little bit deeper than the iwi create it into. We need to create it in that way. So you can just shade it interpreted on the other side. So just the same, you can copy it or you can create it manually. Just try to repeat the shape. Okay, we are creating the sketch. It's okay to have not very pleasant thing. Pleasant sketch. So when we have the eyes, we need to add the irises and we need to figure out how the eyes are going to be in general. So the irises can be drawn in different ways. So it might be something like that or it might be just the dots. So up to you what you are preferring, that's what you're going to be drawing. And one more thing about the ice. They almost always have this shadow. So you are somehow making the half of the eyes in a shadow and it's looking nice. So for now, it's okay. Decides what you are creating. If it's a boy, you probably will need to make the eyelashes little bit smaller so the lines are not going to be that thick. And if you're creating a girl, you can add some lashes like that. So not a lot of them, just a few. You can create a view and the sides. To create these distinctive IS, and it's when they have the eyes. Let's create the groups. The Bros are just two curves on the top. And when we have the bros, you can just create any shape you like. They can be like here. Or they might be different shape, just experimental little bit and find that best placement and find what looks better. So when we have that, we can work a little bit on the nose and we can work a little bit on the mouth. So most of the times and the cheap illustrations don't have the notes, but if they have, it is placed right at the bottom line of the eyes. So it is somewhere right here. Let's just put one dot, just a little dot. And we will be working on the mouth. So for the mouth, we can use different shapes. They can be like something like that. Or on the contrary, this one, we can work just with this shape or it's going to be just one dots. Again. It's all up to you. So the mouth, again, the more closer you put it to the nose, into the eyes, the cuter it will be. Let's just try out something like that. Just very simple thing. You can add a little details for the ears. So you can go with the letter S here, or you can create one thing like that and one thing like that. So it's like the H and the same on the other side. So like this and like that, the neck is going to be right here. And this is the illustration. You can decide what you're going to be using this line or this line that we created. So it's up to you. And this is the front view. I will just grab it and I will make it a little bit smaller and put it to the other side so it's not bothering me. Let's make that three-thirds illustration.
4. 3/4 Head Scheme: So the preferred, we will start with the same thing as before. We are creating that little circle, maybe not Leto, talk to you. I will edit the shape is going to be this circle. And we will do the following. We again will need to make some measurements and we again will need to create a little layout for our illustration. So let's firstly find the center one more time. So one vertical, one horizontal line to find the center. Now, we will need to create the cuts. We will need to create the cut on the bottom the same way as we did before. So let's just go to the bottom and we will create one more line. Like that. We'll create another line underneath ends. We will do the following. This line, again is the line for the year. So you can start by creating the ear right here. And you can start by creating the jaw. The jaw line is going to be connected with the ER and it is going to go right there. I will take another color so you can see where it's going. So it's going right here. Now, let's check out these parts. So we will need to create the cheek. The cheek is going to be right here again. And we will need to create one more line like that. And here we will create the cheek. So it's very small. We can create, well, it's not. That's nice as I used to think it would be. Let's just create maybe the nicer Joe line. Maybe the cheek will be smaller. Here let's say that it would look like that. Maybe this cart will be bigger. So when we have these parts and if you already don't like it, don't worry. We will go to our firstly, we will select it and we will use the free form method. And I will just make it a little bit shrink down to make it cuter. So when it's done, Let's continue adding the features. So now the features are going to be shifted a little bit to the sides. So it's not going to be straight-line drawn like we used here. It's going to be a little bit on the site. So firstly, we will create the center line like that. If we are using the 3D thinking, we will need to make not the straight line. We will need to make like a curve. So the curve is done. Maybe I will make it a little bit nicer. That is the curve. When the curve is done, we already know where to put the eyes. So let's firstly add that second year. We know that it is going to be right here. And we will start by creating the ice. We have the bottom line for the eyes. It is right here. And we will need to find where is the top line of the eyes. So let's create one more line like that's maybe. And we will need to find where we are putting our ice. Again, it's the same shape like that, but we need to think a little bit more in a 3D space. Like, I know that it is more like a 2D. But if we think a little bit about the 3D, and if we move our hats, we will notice that our eyes that is more like on the background. It has a different shape and it is getting a little bit smaller. So let's think about it. When we are going to be creating this illustration. We'll start by creating the normal eye. Normal eye is going to be right here. So we will create the shape and S4, the second eye, it will be a little bit tilted like that, not like that, but it's going to be like a little bit tilted in that way. So make sure that you have the right distance right here. We will need to be able, where is it? Will need to be able to put one more I between the eyes to make it look nice. So when you have the area that can be possibly used for creating their third eye. Here you can start creating your eye. So we are tilting it a little bit to the side. And it is going to be a little bit smaller. Not like significantly smaller, but little bit smaller. Try to make them like the same height. And when you have the base for the eyes, Let's create the eyelids. Eyelashes. Again, we are using the same shape as we had here. And remember if you are creating a boy, it is going to be not that Bushi. So let's just start by creating the shape and we'll shade it. And I think that I am creating a girl. So I will use a few lashes to show that it is a girl and the same on the other side. Here you need to create this eye leads ends, eye lashes a little bit again in the perspective. So you will start from here. I will use the different color. So you can see, you will start from here and you will use it like ads, maybe a little bit going beyond the frames like that. And it is, if you lashes right here, when you have this, I will pick the same color as we had here. We can add the irises and we will know it looks a little bit crazy. You can use the arrises like that, just the dots and we will shade the top parts. When it's done, Let's move on to the pros. Again. Just like that nose and the mouth. We have this line that will show right now. This one is our center line for the face. So the nose, if you are creating the nose, you will put red here and the mouth is going to be underneath it. Again, mouth is up to you. Probably I will go just with this part. If you think that these might be not that bringing, cut it a little bit. If it's okay, we can move on to making a nice lines and it's making the hair and everything like that.
5. Clean lines: So what do we want to create that 3 fourth or the front view? It's up to you. I will probably go with the front view and we'll go to the Transform tool. I will make it a little bit bigger. I'm going to be using the uniform. You can create two illustrations if you want. You can create as many illustrations as you want. I will grab the different brush. I will go to the different layer and we are going to be creating more cleaner lines. And we are going to be working on the facial features, we're going to be working on the hair and everything like that. So let's go to the layers and we will do the following. Firstly, we will decrease the opacity. So he'd this n icon. And to use the slider to decrease the opacity, 50, 55, 60 percent will work best. You still need to see what's going on on your Canvas, but you need not to be disturbed by it. So when you did it, Let's do one more thing. We will sludge from right to left and we will lock the layer so we will preserve ourselves from working on a different layer. Let's create one more layer. And here we will grab the different brush. Most of the times that she be illustrations are made with the clean lines and there are not very textured. Or if you are creating them with a textured lines, you are some kind of pursuing the different style. Not the style in general, but different style of drawing the GBs. So they look more like the sketch once. So it's up to you what kind of brush you are going to be using. I will just go and I will choose that technical pen. The technical pen is the perfect brush for the lining for the engine, but we will need to tweak one value, one property. Let's tap on the technical pen or any other brush that you are using. And we will make ourselves some kind of a favor by increasing the streamline for the sketch. It's not necessary to have a greater value for the streamline. Just try out what is comfortable for you. You will need to make a lot of lines that are like that. Let's just go and try out and we always can get back to these properties to the brush studio and to work with a different value for the streamline. So when you're done, just hit Done. And let's get back to the Canvas. I will grab the different color for the brush. It's going to be some kind of brownish one. Well, let's check out the size of the brush. Maybe we will adjust it a little bit. And when you are ready, what we are going to be doing is just repeating the lines that we have, but making them more clean and more nice. So let's just go and create the lines. You can repeat the lines that you have on the sketch, but it's not like you can use any changes that you came up with right now when you are aligning. So don't worry if you have any adjustments or fixing. What I wanted to say is that you don't need to repeat the lines with a 100 percent of similarity. Here. If you are creating the front view, you can just select what you already have and copied on the other side. So let's just do this very easily. Just select the area and you selected the area, three fingers down, copy, three fingers down, paste. Now if we go to the layers, we will see that we have a new layer with inserted image and we need to adjust it and flip it horizontally. So let's go to the Transform tool. And here we will choose flip horizontal. Now, move it to the other site. Now go to the layers one more time. Heat these layer that has the name, inserted, image and settlements, and choose merge down. Now we have everything on one layer. Let's move on. Let's add the mouth, maybe the nose if we want, I will just put one dot and let's at the neck. So I will end the neck and I will add some little bits over close. So I am creating the girl. So I will add some, some nice theme here. Now. When we have all the lines, Let's do the following. We again will go to the layers and we will hide the layer with our sketch. So tap on this little icon and we have our lines. But let's add a little bit of the hair. So it's again up to you what kind of hair you want to create. But the main theme that we are going to be pursuing here is that we need to have, we'll move it a little bit and maybe make it a little bit bigger. Dataset. Yeah. So adjusted on your canvas. And let's add the hair. So the main thing that you will need to pursue here is to use the lines like that. So we are thinking a little bit about the gravity. We are thinking a little bit more about the shape of the hats and we are just needs to create the hair. So what kind of hair you prefer, it's up to you. You can create anything here, so you can go with some point-of-sale, point-of-sale. You can go with a point-of-sale. You can create some banks, you can create some short thing here. All you need to follow is the direction of the hats. I will go with the banks. So we will start here. And we will go along the sheet. Also, if you want to make everything nice and don't mess with these layer that we already have. Or if you want to try different hairstyles and so on, create one more layer and work on the hair on it. Also, Jones creates too harsh lines, so don't go like this. Tried to make them a little bit smoother and go along the sheep. You can start with your hair a little bit above the line that we have for the hat and just work on it from there. When you have the outline that you are going to be using for the hair, you can just again go and decrease the opacity of this layer and create the nicer hair with a clean lines. So I will create one more layer. I'll grab that pen, maybe I will increase a little bit streamlined. Work on the hair. Again, you don't need to repeat all the lines that you have with 100% similarity. Just create a clean and close lights. Now I will go and I will hide the layer that we used for the sketch. And I will clean the lines onto this layer. So again, what we need to do is to create just the clean, not so pointy and not so open lines. So when you make the closed lines, when you're done, what we need to do is to hide the lines that we have for the face that some kind of overlapping the hair. So how can we do it? If you're not willing to create different type of the hair, you can just go and erase these lines. But we can use different option. Let's go to the layers. Let's go to the layer with our lines for the phase. And we will tap on it and we will choose mask. The mask works in this way. We have three options of how we can work with the mask. You can use the white color, it shows the lights. You can use the dark color, the black one, it hides the lights. You can use any shade of gray to create the transparency of the lines. So now we are going to be working with the dark color. It's going to be like a perfect black. We will use any brush you like. I will go with the technical pen. I will decrease the streamline, increase the line value, and I will go over the slides and I will hide everything that is underneath the hair. So you just paint over and you still will have everything that you need. And within that you might use liter, but you won't be disturbed by this lines. So just paint over and here is what we are going to be working with. You can leave the lines for the bros. Because it will look nice, it will look funny. So for the coloring, we can do the following. I will erase the layer that we used for the sketch where I will put it down and we will go and we will create a new layer for the coloring. So for now, that's it. For now, we have the clean lines and in the next part of the class we are going to be creating the coloring, that basic color for our GBs.
6. Basic colors: So let's continue by go into our layers and starting our coloring part. So for the coloring, we will need to create one more layer. And it's actually we're going to be creating one more layer for each part of the face. So for the ice is going to be the different layer for the color of the skin is going to be the different color for the hair ends, this little clothing part, it's going to be the different layer. So let's start by selecting the color for the face. Go to the Layers and create the newly here. So firstly, firstly, if you are some kind of liking what you have right now, and if you are not willing to change anything, you can say, like select both layers that we have right now for the hair and for their heads. And we can merge them together. If you want. You can leave one blink layer with the heads to further experiments, ends to create in different hairstyles or something like that. So let's just do the following. We will go to the layer with our fees, the one that we have now the mascot. And we will duplicate it. So slides from right to left and check replicates. So we have the new layer. And this layer we will just stuck just in case something went wrong. Or if we would like to experiment a little bit further. So with the layer that we used before and with the layer with the hair, we will merge these two layers together. So let's tap on the layer that is above. So it's the layer with the hair. And we will tap on it. And into this drop-down menu, we will select Merge Down. Now we have everything here. If we hide the layer that we created for, like in case. And you can see that we have now everything on one layer. That's we are going to be working with. Now when we have everything on one layer, we need to create one more layer that we're going to be using for starting our coloring. So I'll create a new layer and moving it under the layer with the lines. You can name the layer or you can leave it as it is, but probably I will rename it. So it's happened in it and choosing rename. So let's say that it's going to be the layer with this key. Now, we can work in a few different ways with colorant. And I want to show you how you can easily work with it without like manually color and everything that you need and using different layers and stuff. So let's go to the layer with our lines. We will tap on it and we will set it as reference. When we are setting our layer as a reference, it means that we can work with the outline that we have onto this layer, but using the difference layer to color it so we can separate these two layers. So now if we go to the layer that we created for the skin, and if we choose the different color. So let's just select something very fear, something like that. We can change it anytime later. So when he chose the color LED, just grab it into let's just color drop it. Let's select everything that we need for the color of the skin. And if you don't like it, you can see that right now we are working on a different layer, but we are using the outline off the layer with the lines. So let's check the skin. Maybe we will change the color a little bit. I will make it more fair. So we will go to the adjustments and we will go to hue saturation and brightness. I will choose the option layer aids. We will tweak the color sliders just a little bit to make the color of the skin that we like. You can work with any color you want. I just want to make it like this. So when we have the color for the skin, we are going to be creating a new layer for each element that we have right now. And let's just move on to the eyes. So again, go into the layers, creating the new layer, renaming it. And again here we are using different colors to create the color of our eyes. So I will go with something, maybe blue like that. And if they don't like it, I will go to adjustments and I will adjust it right here. You can go with any color you like, maybe very unnatural. It's just a Chiba illustration. You can work with any colors that you like. So maybe this color will work for me. Now, again, one more time we are creating one more layer, renaming it or leave it as it is and begin another color. I will go with this being, or maybe I will change it to a little bit later and recoloring all the areas that we need to be recolored. Also, I can see that I have little gaps here near the ears, and I will manually recolor them with the color of the hair right here. And also I will add the color of the skin to these ears parts. It just a miscalled places. If you see other miscalled places, just manually recolor them and make everything very neat and very nice. So let's maybe play a bit with the color of the hair. So again, we will go to the Adjustments, Hue, Saturation and Brightness. And we will tweak the colors. So any color, choose any color that you like. I like this one, but maybe I will make it a little bit less saturated. So like that. Let's work on this globe and parts. So again, creating the new layer inch, begin the color maybe green, maybe not. And we'll choose these green. So she's a little bit strawberry like girl. So when we have the basic colors, we will need to work a little beads on the shading and we will need to work a little bit on their general appearance of the elements to achieve these TV style. So it should be a little bit shiny. Each should be a little bit nicer looking. So let's go and start by creating some light shading that will help us to achieve this effect.
7. General shading: Firstly, we will work with the skin. So we can work with the skin, again with the two different ways. We can create the new layer or it can work on the same layer. So probably the first thing that I will do is working on the same layer. So we will tap on this layer and we will choose alpha lock. When we are choosing the Alpha Lock, we are just working with what we have on to this layer. We are not able to draw anything else outside of this part that we have already. So let's just go and grab some soft brush. We'll go with some airbrushing, soft brush or medium brush or something like that. The first thing that we will do is create an ellipse or gradient going from top to the neck. So we will need very smooth brush and we are going to be using the smudge tool as well. So let's go with a medium brush. I will choose another color and it's going to be a little bit darker. So you can go with a little bit more being or a little bit more violet were something like that. And we will just very fairly, we will create the shading like that. So the bottom part will be a little bit more dark and we will just much like that. So it's not seen right now, but it is working. And we can see that we have a little gradient right here. So when I have the gradient, the next step is to go and create one more layer. And now we are going to be working with the clipping mask. The clipping mask is almost the same as alpha lock. We are going to be working just with the areas that we have underneath. But it's not that radical and it means that we always can just get rid of this layer. So let's just create one more layer above the layer with the skin. We will tap on it and we will choose clipping mask. So here again, you can work with this clipping mask the same way as we did with the alpha lock. So you can just create some gradient right here. So it's up to you how you are creating these gradients. And what we are going to be doing next is creating more like, more direct, shallow. So we will grab another brush or we can work with the same brush. And we will set this layer that we just created. As a multiply. Multiply works with the colors underneath and you will see that use some kind of blending them together without that very rough and very strict lines where strict colors. So we can grab any color we want. So for example, I will go little bit with more bluish. And here we will create the shadows that are going from the hair. So just go below them and create the shadows like that. We can also vary this opacity of this layer so we can go a little bit less saturated and less streaks again. And just way, just play with capacity and find what works for you. So I will leave It's about 75 percent or so. And also you can again go to the few saturation and brightness and adjust the color right here. So I think that these bluish one works the best. And here we are going to be working with this color. So when we have these one, we can again work a little bit more on the skin and to show that it is glowing ends to add some blushing and to add something like the bloodshed parts. Yeah. So let's create one more layer. We will again set it as a clipping mask and we will choose the different blending mode. The blending mode I'm going to be using is overly. You can also go with a soft light. They're pretty similar by the soft light is more softer and we will grab some color. I will go with the opposite to the color of the skin is going to be something blue. And again, with a medium brush, I will just add some places. I will decrease the opacity. And I will just find some places that I want to make more blushing. So for example, these between the rows between the eyes, to be honest here, under the eyes and something like that when you discover these places that she wants to be a little bit more protruding, we can grab this much too and we can blend them nicely like that. You can see that they are starting to look a little bit better. In the same way you can use the different colors are for example, something reddish or something like a pinkish and add the blushing like that and don't forget to blend ARAF and smoothly. You can end the blushing to the places that we have right here under the ISOS. Some kind of showing the cheeks. Not too much, but just a little bit when you are some kind of satisfied, we can move on to the next elements, so to the eyes or to the hair. And it's not the final stage that we have with the face. We will make it a little bit more shinier leader when we're going to be working with the hair ends with the general appearance of the hat. So let's move on and let's work a little bit on the ice will create one more layer. It's again going to be the clipping mask, and it's again going to be the Multiply Color Mode. We are going to be adding the shadows because when we are working with that, she be style the half of the eye has the shadow. So let's just work on it and show what we can do. So we can again work with the blending modes. We can use any color for the shadow here. So you can even go with this pinkish one that I have right now and that we used for the blemishes. So we will be, we will be aiding the shallow like that. Go in alone with the shape of the eye. If you overdid it, you can just grab the eraser tool and erase a refund that you don't like. But mostly we will need just 1.5 of this eye of both of these i's to be in the shadow, tried to make them even on both eyes. And when you did it, Let's maybe go to the hue saturation and brightness and checkout whether any other color will work better. I also like how it works with this blue. Maybe I'll make it a little bit more bright, or on the contrary, make it a little bit more dark. It's all up to you. And when you are satisfied with the color, we will need to work a little bit on the irises and we will need to work a little bit on the bottom part of the eyes because in this style they are some kind of shiny on the bottom. So as for the irises, we can go with two different ways. We can, again go with this shadowy option, make them like transparency a little bit, or we can use the white color and add the white color right here. So let's try the white color. Or if you want like it, you can adjust the way you like it. So I will create one more layer. Again, I will send it as a clipping mask. And here probably I will work with the normal blending mode. I will grab the white color and just recolor this part. And if you don't like it, and if you want to try the different option, you can go to the hue saturation brightness and maybe try something else right here. This looks creepy. So I will go with the white color. And also we will need to add, as I said before, a little bit on the Watson part. So we can again create one more layer, use the clipping mask. We can use that orally blending modes and we can just choose, for example, some kind of yellow color. We are taking the brush and just add in some color to the bottom, we can blend it properly. And so you can see that it looks already pretty nice. S4, the, some kind of flashy parts and some sparkles on the eyes. We can work on it a little bit later when we will have everything like done already and when we will create in some beautification. So let's move on for now to the hair. And here again, we will need to create a little bit of the shadow of the smooth shadow n right here to make some gradients. So let's create one more layer, set it as a clipping mask. Choose the multiply blend mode, choose the different color. I will go with this color. It's a blueish. It's opposite to this being that we have. And with the soft brush go in from the bottom, I will add a little gradient. So we are aging the color to the bad parts and we are working with this color. Go in from the, from the bottom to the top. When you have the general gradients, Let's grab the smudge tool and we will blend everything nicely. When everything is blends, we will go and create one more layer. So again, create a new layer, go in tapping on it and choosing the clipping mask. Again, we are choosing the multiply blending mode. I will decrease the capacitor rights away. I will grab the same brush, but I will decrease the size of it. And we are going to be agent vest strict shadows. They're rough shadows the same way as we used to do it to create the shadows on the face. So they are going to be a little bit more, more rough and the same, we will just put everything that we have behind in a shadow to make it believable. Shadows just being which parts are some kind of behind other parts and decide which parts can be in the shadow. So just a little bit of logic here should be used. Pay more attention to the bottom parts because most of the times they are going to be in the shadow. Remember, the places that are overlapping in other places, they will cast a shadow as well. So when you finished the basic shadows, Let's again maybe go to the hue saturation and brightness and see whether any other color will work better. I like it a little bit more bluish, and I will also go to the layers and I will adjust the opacity of the layer. I don't want it to be very sharp shadows. I wanted to be like subtle and nice.
8. Highlights & Beautification: So when it's done, when the shadows are done, we can work a little bit on the shyness and yeah, we will create one more layer. We will set it as a clipping mask. We will grab the girl said the overlay blending mode. I will adjust the opacity to something like 50 percent and we will grab some yellow color, maybe not that lemon yellow, but yellow like that. With the same brush with the medium blending brush, we will go and we will add some color to the places that we want to be a little bit more shiny. Maybe if you chose not the super bright color we can go and adjusted. So I like how it looks with this orange color and that's what I'm going to be working with. So when you put some bits and pieces of this color, Let's just grab that smudge tool and maybe blend modes again. So we have a little bit off light right here. And when we have the lights, we can also adjust the opacity if you like. And if it's okay, we will create one more layer. So this layer, again setting as a clipping mask, choosing the overlay or add or screen. So let's just start with ADD. And here we will set the opacity to something like 14 percent. For now. Maybe we'll change it a little bit later. So now we are going to be agents, some super shiny highlights. And that's why we need the ads blending mode right here. So what we are going to be doing, we will go to some places. So for example, let's start with that top of the head. And with this brush, we will just go and create some kind of the hello here and also the hellos on the hair near the face. Now, I will also add little bits of this effect to the bottom part. And what we need to do right now is to grab the eraser. And we are going to be doing this type of cutting. So just cutting it from the top and two from the bottom and creating these kinds of the highlights. Let's go and play between the ads. Blending mode. We can make it a little bit more shiny, or we can make it less saturated. Adjust the shape if you want. You can make some highlights just like that. Just don't make the highlights on the places where you have the shadows because it's not going to be working like that. So what else we can do? We can play little bit with the lines, and we can play a little bit with the lightening effect right here. So let's play with the lightning. We will create one more layer. Above all the layers. Well, not all the layers, but all the coloring layers. We are not supposed to set it as a clipping mask. We can just go and we will create, will set the overlay blend mode or soft lights. Let's just try with overlay blending mode. I will decrease the opacity and we'll choose some yellowish color. And again, with this soft brush or with a medium blends, I will just play a little bits. You can grab this match tool and smart Utility so you can go to the hue, saturation and brightness and play with the colors right here you can see how it changes the whole atmosphere of this drawing. So I like how it looks when it's bluish. I like how it looks when it's like a little bit more warm. So probably I will leave it as a worm thing. And the last thing that we will do here, probably not the last, it's not going to be the last thing. But the next thing that we will do here is playing a little bit with their lines. So when we are looking at this picture, it looks okay. But if we change the hardness of the lines, if we change the color of the lines, it will be looking better. So let's go to the layer that we have for the lines. Now you can see that it is centered as reference. We don't need it anymore, so we can tap on it and we can select reference one more time, is going to be just. The regular layer. And above this layer we will create one more layer. And again, we will set it as a clipping mask. Now when we set it as a clipping mask, we can work just on the color of the slides. So we can grab any brush wheel-like ends. We can play with the saturation of this lines. So I will go and grab some color that is similar to the shadow. To the shadow color. And I will just smoothly work. I'm here. You can select a different color, you can just highlight some parts. You can choose the yellow color like that sense, we can play a bit with the banks and also we will play with the color of the eyes. So for example, we can just grab the color that we have here and very sadly go and just dow this color. Also, we can play a bit with that different color for the eyelashes, you can make some gradients, you can just make a refund and little bits like that. And it will have the dreamy look. If you don't like how it turned out, you can always go to the layers and just hide this layer and start over again, or just play even more and create some thin nights at more color, just experimental its orbits. When this part is done, if you have some brushes that you can use to add the highlights, some sparkles or something like that. I have this set and maybe I will share a few brushes from it. You can just go and create one more layer above all the layers, set it as ads, and just add some sparkles allover. You can just do it manually if you want. If you don't want anything like that, you can just leave it as it is. But the last thing that we will add is that sparkles on the eyes. So I will go and grab them. Median blend brush again, I will create one more layer and the normal one. And I'm going to be using just white color. And I will add the sparkles like that, maybe a few little ones on the board, some work a little bit more on the shape. Maybe move them, maybe do something more. If you want, you can adjust the opacity again. And that's probably what we have at the end. But if you don't like the result, if it looks a little bit more delta u, we can do the following with our free fingers, will slide down and we will choose Copy O with a free fingers one more time sliding down and choosing paste. If you go to the layers, you will see that we now have the whole layers merged together and they are somehow creating the whole picture on one layer. We can go and we can play a little bit with them. Color balance, for example. So go to the Adjustments, select Color Balance, go to the Lear. Here we'll have the color balance by shadows, mid tones, and highlights. So for example, if we are working with the shadows, you will see that we are adjusting something right here. So you can play with these values right here, play with meat zones adjusted as you like. You can change the color to do anything that she like. Oh, I like this one. And the same with the highlights. I will probably leave it as it was before, and that's the end of the class. I hope you found this class helpful and if you like this, please check out the other classes. Give a follow and leave your review, and thanks for watching.
 Xenia Sorokina, Illustrator & Graphic designer