Transcripts
1. Introduction: Hello everyone, Welcome to my class and Zoom and other while. And in this class, I will show you how you can easily craft a flute and a mockup using old newspapers and some decoration stuff. This class is for all levels and requires no prior knowledge of graphs, our experience of crafts for this class. So anyone who wants to learn how to craft a flute and a MOOC that can join this class. And there will be a class project that you have to submit. Also, if you don't want to miss any updates when I update my new class or publishing neoplasms. Caution. Do not forget to click the follow button on my profile. So let us start with a flute.
2. Let's Start with it's Base: For the base hill, I'm using a newspaper. This is half got newspaper with four layers, 1, 2, 3, and 4. All of these folders, you just need these folders, not the complete newspaper. From the side, from where it is joined. We just have predict that side, hold it and starts rolling it. We just have to roll it to make it into a cylindrical shape. But keep in mind not to roll it very loosely. Keep rolling from one end to the another end. Now at this and just hold it and we just have to secure all that ends up getting this shape are using cellular tape. You can also use offer because if you want here, I'm using a LOT. If you are also using a single tape, you just don't have to use it only at the corners of the cylinder, but in between also, because we don't want our float to be in a shape that is not exact cylindrical. So within this basis where you find that the newspaper is not stick and properly, we just have to pick Othello tape and paste it. Now, our base where the fluid is ready, we'll move on to the next step in the next lesson.
3. Wrapping it Up !!: Now it's time to wrap our base, to turn it into a beautiful flute. Here, I'm using this blue and orange leaves so that I can cover it completely. You can use lays of any color that is totally your choice. Or if we don't have any list, then you can also use a nail driven. And now observe the way I'm wrapping it up. Make sure not to leave any gap between another layer, like 1, second or third layer. We are wrapping them so we don't have to leave any space between them. I'm also pressing the upper layer to the lower layer. You can also do the same to remove the gaps between the layers. This will make our flute look more beautiful. Once you reach the end, you just have to cut the ribbon, all the leaves that you are using to wrap it, simply cut it using the Caesars. After wrapping it up, we just have to secure the ends. Now the base is looking like a flute already. We just have to decorate it, will do that. And next lessons.
4. Let's Decorate..: To decorate the float here, I'm using these meet, these needs, have a big loop over them. And I'm also using this thread so that using this thread, I can pan these loops onto the flute. I folded that 10, four times so that it becomes strong. Simply these beads into the tread and how the tread on to those slowed and simply that a lot. By any chance you don't find any of these kind of beads. You can also use some other kind of beat that totally depends on the material that we're using.
5. Crafting a Feather: For crafting the federal, we need a yellow sheet, a green sheet, and a white sheet. We just need a small portion of the sheets. If you don't have the Smith week sheets, then it's okay here we're just going to use a small portion out of the sheet, favorite small sheets. Then also you can work fine. Firstly, let us start with the green sheet. We just have to cut a small part out of it. Following this into half, and then draw half of the leaf over this side only. Now, using scissors, cut this leaf out. If you feel that the leaves in lard that point and that you need, you can also use these as again to do some trimmings. Now, turn to use the yellow sheet. Just measure a little potion that we need. We need to have a smaller leaves then the green one. Similarly like the greener leaf, we have to make a yellow live veil folder sheet, draw a leaf and cut it out. Let us now use the white sheet with this one shouldn't be smaller than the yellow one. We have took that out, a leaf that is smaller than the yellow leaf. Falling the light sheet, draw a small leaf. Cut this leaf out of the sheet using scissors. Now we have took paste these one over the, another, yellow leaf over the green leaf and right leaf over the yellow leaf. Also, I'm trimming this lower part of this white sheet so that it looks beautiful. Now, paste these together using fabric called on glue. Runs. Each and every leaf is pasted. We have to turn it into a feather. For turning it into a feather, we have to do some cuttings. For cuttings. Hell, I'm using CDO and cutting only the greener part of the complete feather. We just have to make so many cards over and over again on this green leaf to make it look like a feather. Once you are done with the cuttings, you just have to form these curves. A little up, a little down, some upside and some Kurtz downside and some just twisted so that it gives us a natural look of a feather. And the feather is now ready. Window some declarations and use this feather to decorate the flute.
6. More Decorations...: Now to decorate our flute mole, we are going to base this feather that we have crafted. And the last lesson over here. I'm going to use a cellular tape to paste it. You can also use glue that depends on the fabric or the least that we have used. Now, I'm going to use this shim release to wrap it around this flute. Very rapid, very loosely, and not very closely. From this end and paste it using a facilitative. You can also use glue. Sick from the island, also using as a LOT. We are now done with all the declarations for the flute. The float is ready.
7. Crafting a Mukut: For crafting the MOOC. Good, hell, I'm losing a yellow sheet. Here. I'm mocking the measurements of 20 centimeter and three centimeter. We need to cut a strip out of the sheet that measures to empty into three centimeters. Now, use scissors to cut this drip out of the sheen. To use it. We just have to fold the sheets to turn it into a beautiful MOOC. But notice the shape and the size of the mucosa that I'm making. You just have to follow this grafting procedure one-by-one, like firstly the folding one. So I have made this bold hill from one end to the middle part of the sheet, not the another end. We now have to paste it over her hair. I'm using a cellular tape. You can also use fair, we call our blue. Notice that the third tape I've used is not visible. Now, fold this extra strip inside, we'll cut it out later. Now, take the green sheet, got a small part out of it, and we'll work on that now. We have to make small, small forums like this, one over the other. These poles should be very much small, not the big folds. And you can notice how to fold this. It is now looks like a fan. Just hold it from one side and expand from the another one. That is the thing that we need TO decorate our MOOC. I'm going to use this plugin to paste all these fan from vinyl and light from this end. Here I'm applying blue. You can also use for recall, if you want, we just have to press it like this over here and keep it like this so that this all gets pasted from one end. Now a fan is ready, we just have to paste it over the mucosa. Let us now get this extra strip out of this MOOC foot using scissors. We have to paste this craft over here on this MOOC port at this angle. But first let's decorate it. I'm going to use these baffles, these golden sparkles to be sprinkled over the MOOC. Good to sprinkle. I'm using the glue been forced, and we're going to make dots everywhere and then sprinkle the golden sparkle over it. Now here is some more decoration material that I'm going to paste over this movement kill. I have this laws stone that I've pasted at the center. And now I'm going to paste this graph that we have made a fan kind of a structure. We just have to apply some glue over it and then paste it. Now to decorate mole, I have this Jane kind of decoration that I'm going to use to apply some glue. Here I'm using login. I'll just apply some glue and paste this chain over the mucosa so that it looks so beautiful. I'm going to paste the same kind of chain on the other side also. Now, the MOOC, it is also ready. Isn't it looking so cute?
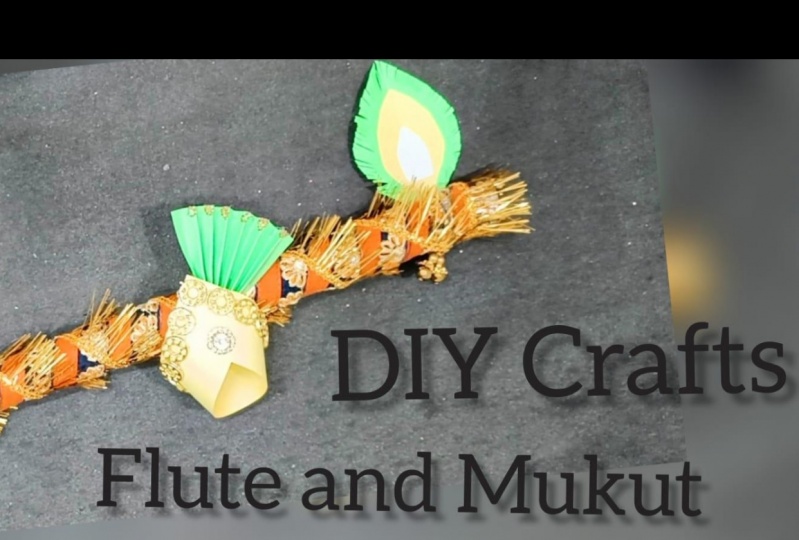
8. Final Look !: Here is the final look of what we have created in this class. This is the fluid that we have made and this is the mook good that we have crafted.
9. Project Work: So guys, as you know how to craft a float and a MOOC, good, using old newspapers and decoration stuff. So it's your time to craft these. Just gathered the decorator material that you have and start making it. Once you make it, click its picture and upload that picture in projects and resources section of this class. I'm really excited to see what you create and what colors you choose. Thank you so much for joining. Bye.
 Suman Aggarwal, Artist and Educator