Transcripts
1. Introduction: Hello everyone and welcome to my class, am Suman otherwise. And in this class I will show you how you can modalities. You are handmade cards. In this class, I will make a simple time cue card, and we'll decorate that card by making Mandela's all over the class. And this class is for our test as well as for non artist. If you want to make a handmade card and want to apply the theme of Mandela's into it. Then this class is for you. In the next video, I will tell you the material that we are going to use in this class and in the following videos, we will go through the procedure. In the end, there is a fun class project for you. So let's get started.
2. Material Required: In this video, I will tell you the material that we are going to use in this whole class. The first thing that we are going to use is a black sheet of silver glitter pen, pencil, compass. So let's start.
3. Preparing the Base: For making discard, I'm here using a black sheet that have already folded in half. The Radman LA, LA Zoo. With it, I'm going to use a compass and a pencil to draw constitutive circles of different radius and then remove for those. So now I'm pointing the campus nib at one coordinate of the card. And then just trying a segment of the circles took ordinary men die law. So it will not be a complete Monday allover Hill. Now I am just trying some so goes so we did not act bored to glow distance. They are just sitting them so close that I am trying or you can use any other media. Do draw these curves if you want, you can use any bleed water saucer Hill. But I'm using a compass that, that helps me to make various reduces 1 easily. So you can choose this. I'm now done with this god NADPH made enough, so goes over her knife to make the Mandela would that God now. So we really make small men dialogue, like just two or three segments of a circuit just to improvise the team of the Mondial over. And these will not be a complete Mandela because we are just making the coordinate main islands. Also. These are very much the gardeners. I'm not highlighting each and every corner that mean highlight is at one coordinate, which we made so many circles the very first time. And now all the other three corners will be comprising of some small Mondelez, as you can see over here. As we have made foldings over. So I have made foldings or now at the third coordinate will also make an adult for rings. There's nothing particularly on it, but just to maintain the uniform medium doing it because I'm not highlighting each and every gardener but uniform EDCs that you have to maintain some, some uniform indoor it, right? So if we're highlighting one coordinate, that coordinate must highlight. So I am not highlighting the other three corners but haven't been deemed a uniformity. So this is the basic bar that we have done till now. Now we will move on to the next step of highlighting these in the next video.
4. Outlining the Circles: So now let's move on to the next step here I'm going to use a similar glitter pen to highlight these because I have two using this color because this is very much invisible on this cut off sheet, you can choose any other color. If you have any type of Jelly Roll pins, then you can use those pins because they are very much visible. But on this sheet looks beautiful. So using this spin glass. All right, now, the third step, we'll move on to the next step and the next video.
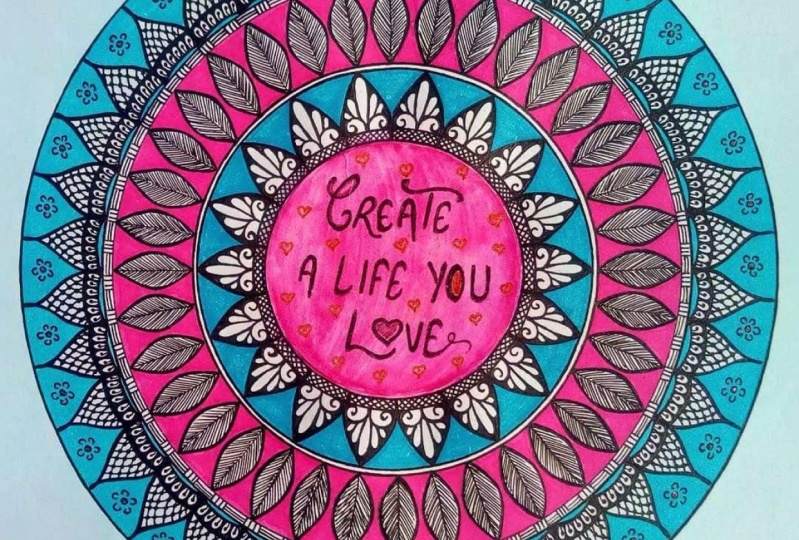
5. Starting Mandala Designing: Now I'm going to start filling these circles with Mandela zines. Firstly, I'm adding a small circle and selling it had so that it looks as a starting point. Now, the frost design is using lines and dots. It's like making some lines and then at each end I'm adding a heavy dot. Now, the second design is a mixture of two in this amusing some curved lines in one direction as well as in the other direction. And in the middle, I'm making a small circle and then making some lines are wet it, and then some heavy dots. In the next design on making triangles at one side and then at alternate side, it's like just making a triangle at the upper soil and then the other triangle at the lowest. Now I'm just filling these triangles in using the same venues and adopt Ben. But I decided to go with a single Ben in this class. So I'm using the same bed. In the next one here, I've already messed up align extras. I'm going to use this line. I'm going to make it better design. I reconverted indoor designs done using design also as a part of my design and going to make more lines like this only to converted into a particular design. Now you're going to observe that this design turned out to be a particular design and is looking so beautiful and no one can say that it was a mistake over day. So yes, I have Komodo it out. Let's move on to the next design. Now, far this when these lines were in the other direction, and now I'm going to make other lines in the other direction. You can observe the direction of lines which will help you visualize the defenses in their direction. Moving on to the next one, I'm going to make a better kind of a design. So these are various petals that I'm going to draw in a consecutive nano. And now I'm willing to fill those spaces that are left between the design. And though a parser.
6. Continuing Mandala Designing: Now, to make it look more, I'm going to add a design that is a skyline ending. Add heavy dot. More. Fulfilling the next circle on the similar lines as we did earlier were much more in the other direction as well as a straight guy. So I'm going to make these lines in the same direction. A design are complete. Okay? And the next circuit I'm going to make a design that is difficult to explain, but that's really kind of a design. So you're going to observe what kind of a design it is. And you can copy this design if you want. And if you want, you can choose any other design if you like, or if you have practiced any other design, you can choose that design that's totally up to you. It's just mine. Globalization of McDonaldization. You can choose your designs. Yeah. Now I'm going to add dots to make it look. Spaces. Who? In the last okay. Now for modifying their design, I'm going to use the spaces that are left between the petals and the upper. So fathers, i'm going to draw a design that is a triangle. Now to maintain the balance between the field and space is ongoing. So close these semi-circles also by luck completely, I'm making another outline or smaller circles that is a semicircle and fitting data, not the compete semicircle. So the big Amanda law is now complete. We'll move on to the next and the next video.
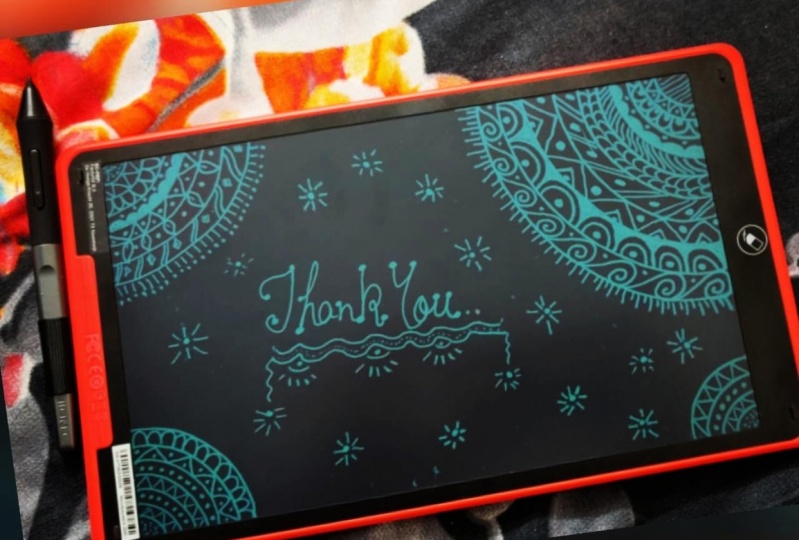
7. Corner Mandalas: We are now done with this bigger Mandela. Let's move on to the Mandela's at the other gardeners. In this, the basic point is to create the centre point that, that indicates the starting point of this Mandela. After this, I'm going to use the same design as earlier, that is making the small lines and then adding a heavy dot at dead end. Next is to create the design using the lines as we did earlier. These are not the straight lines, these are the code lines that is the simple basic design that we did earlier. Also. Now in the last circle, I'm just adding some heavy dots to make them and nulla complete. Let us now move on to the next coordinate to make another Mandela. For this also, I am making the same kind of a starting point as we did in other to Mandela's also the designer. So is the same making small lines and adding the heavy dots at the end of each line. Now I'm losing the triangles to make design and the toad so good. And thus the triangles at alternate side, that is one triangle at the upper side, I'm one AD under Woodside, also unwilling to fill these triangles, often making these triangles. For the next one, I'm going to use the pectoral design as we did earlier. And this we are going to make so many that those inequalities decorative manner. And then we'll spend in space that is left between the apostle and the space between the patterns. Adding some dots in-between the patterns to make it look more beautiful and more shiny. And the last circuit, I'm adding some small dots just to complete the Mandela as we did in the other smaller corner, Mandela. Let us now move on to the last Monday of this speech. For this also, I am making the starting point of the law as we did earlier and all the Mandela's. The next design is also the same, the small lines and the heavy dots at the end of each line. Now I'm getting on red flutter design, the, as we did earlier. And this I am making the floral designs, the Florida battles in our conjugated manner. And then I'll fill those spaces between the backbones and the upper circle. Now, adding dots in-between these battles to make these more glorious for the next cycle and losing the lines to complete the design. In the last one, I'm using semi-circles to complete the design. These semi-circles are just like the triangles as we did earlier hops, so-called actor one circuit and half. So, but at the other side of the circuit, you're going to observe how I'm demonstrating it to make it look more beautiful. And also I'm filling these semicircle is ready to make it more glorious and more shiny. So we are now done with the Mondelez. Now we move on, but full is look at the shiny side of the card. Now. Then move on and create a name tag at the center of the scarp. It's, you're going to write the name of that is 0. And you can also write something as if you want. You can greed applause, an overview.
8. Name Tag : So now I'm going to make a Neil doll in the center of the sky. For this, I'm going to make a rectangle now and add in some manner along with this rectangle, make it more beautiful and seems belong to is already basic Mendel Law. Also decorating the edges of this rectangle. Who you can write the name of the person whom you want to lift it, and this name tag. Also you can add some more design if you want, but are not doing that much. This is our friend side of this guy. Isn't it looking so shiny and so beautiful?
9. Let's Move to Inner Side: So now as you can see, the front of this God is ready. This is looking so beautiful and so shiny, isn't it? So let's now move on and woke in the inside of the card. For this, I have already drawn a square using the syllable glued up and we have to make the same squad at the four corners. This is just to show you that I am using a square wheel. You can draw a rectangle, a so-called, or any other shape of your choice. It's totally up to you. You can modify the designs as per your choice and asked by your God's requirement. But heard I'm using a square and simply filling these squares using the same Ben and the basic nominal technique, that cloud technique. Though Philip and I'm not using any particular technique. You can use any technique if you want and if you want, you can use any other color to fill it. It's totally up to you. You can modify the things as per your choice and head. I'm using the Utopian only to complete the whole card. All right? Okay. And then move on to the next step.
10. Adding Text to the Card: Now, what we have to do next is we'll have to define the space in which we have to add up the x so that if we define that adn gets we'll have good eye tactics or add text. This can help us and make our work easier by defining that ADS so that we can use that as the area easily for adding Mandela's all over it. So we will first redefining it, and then we'll move Frodo and her writing a simple tank you message. You can write whatever you want other than this or maybe this also. And we will just go with the basic things and not much was kind of a message. I'll just go with the basic message that is tan cue. So if you are not very much good with the calligraphic, don't worry, you can use simple writing of yours and not go with much technicalities of Kalita feed that makes your car more personalized. And you can simply decoded alphabets, the basic alphabet. You can just pick and then with the one edge or maybe not taken them on the other edge, that's totally up to you. It's just a simple handwritten Tang Q and not much calligraphy. And even I am not going much into calligraphic right now. So I'm just simply writing it and now own and writing back a little decorator method. That's it. Okay. So again, you can use, you can use. So we are now done with this. Thank you. Move onto the next step in the next video.
11. Corner Decoration: After adding the text, let us now modify the four corners of this con fathers and willing to make a big leaf at each corner of all the firm corner squares that we have already drawn. So whoa, I'm making a big leaves and then filling that leaves with some lines. These are some curvy lines, not the straight lines. And highlighting this leaves by overriding with the same pen again and again. Okay. Now we have to make the same kind of leaves at the four corners of the four several coordinates that we have made. Now, I'm making those small list alongside this bigger leaves to make this look more beautiful. I'm going to draw the sky that often, if at all the four corners. The creation of Four Corners is now done. We'll move on to the next step and then X-ray deal.
12. Highlighting the Inner Card: So the next step is to add the border to this guard and just outlining it using the same pen and making a simple line out of it. You can do the same and you can also try out any other design if you want. You can change the thickness of this line as per your choice. I'm not making it very much take off very much still assess visible kind of a line. And you can see that unjust outlining it twice or thrice. That's more than enough. Okay. We are now done with the first thing to the rest of the tree edges. You can observe the thickness of this is very much highlighted in the cards. So that is what we have done. More because this is very much looking for d like this only. They had to do the same to the edges. So now we're done with this step. We have, as you can see. Now let's move on to the next step. In the next video.
13. Start Inner Mandala: Now what we have to do is you have to add Mandela's all over the card. But first let us define the area that we have to particularly used for highlighting the text that we have added. For this, I am going to use some crazy zingy lines all around it. So I'm going to make these lines making a triangle over it because ad text is already in the triangular context. So I'm adding these lines to make a triangle. Only. Now I'm going to draw a cute little hurt over here. And then I make another cute, smaller hurt over here. And then continued with the droppings of law out of it. Now we are done with this much. Now what we have to do is I'm going to, Mandela dies over this cardinal now. So I will now show you how we're going to proceed. I'm just drawing a circle where that is not a complete called that as, as a girl that is eliminating the triangular part of it and the rest have drawn completely. I'm going to make a lot also called these arrow freehand. So Cosmides, you can draw them using a compass also that's totally up to you, but I'm not using a compass over hill and doing all the things with the free hand now. So I'm willing to make a lot of circles within overview for men Dalit Ising x so that we can add designs later on and made this a complete Mandela. You can use a compass URL, so that's totally up to you and not using UDL because I feel very much meditative and peripatetic while I do Mandela's freehand, That is why I am proceeding freehand. You can just stop creating socket and you can make more so because, so I'm starting with filling these n with designs. And later on I will add more, more so calleds over. So I'm just drawing some simple lines over here. This is the first circle that we're done with it. You can change the design if you want. That's totally up to you. I've already explained so many designs you can use those designs, a wheel. And just adding some dots, some smaller dots in the second circle. That, that is what I have done for designing good because this is a very small gap. So could you can also make these bigger gaps goes, but I have made D's of ADD little gap distance that is on making very minimal designs into it. I'm proceeded with the same lines and then I'll proceed with their dots only. Now see you can also take and have friends from rec. We have drawn earlier C Here we have done, we have discussed a lot of designs overhead, right? So you can take to their friends from Hill and then continue designing in the IMRT backward we are drawing right now. So you can use any of these that Stowe DFA can use any other design notes if you want. That's, that's can be modified. Ok. So we're done with this module. You have to add more SO close if you want like I am doing it. That's totally optional because this is aesthetic, that you can do it if you want, you don't want to add Mozah, cause then you can skip this. That's totally up to you. So I'm adding two more, so close. And now I'm adding designed to these also goes, these are very basic designs that we have done in the very starting of this Monday. These lines and then dot, that is the basic thing that I loved to do. So now this step is also done. We'll move on to the next step in the next video.
14. Highlighting the Text Area: So now I'm not much extending these circles, I'm just stopping her. What I'm gonna do is I'm going to highlight this tics triangle over hill by adding one more line or the line along this line. Okay, so I'm not creating that the friend way, but I'm joining at this word texture, right? So I'm just doing it to highlight it. I'm not disturbing the any other like kind of hold I've drawn Hill or the Mondial over there. I'm not disturbing these designs. I am just highlighting this triangle. Now that takes, is looking very much highlighted, that's done. Now what we have to do is we have to decorate this Mandela, this final look, we have to do it because this is right now looks like it's incomplete. So what I'm doing, I'm adding small, small circles all around it. Who? So now to highlight this, what I'm doing, making small lines over all the circles. Now, on all the circles I made this small lines that will make it look complete, right? The final step to add some dots all over it like all this. At a dot. That is what does Mandela going to look? This is the final look of law that we have to highlight the text part of archives. So this is the final loco phi takes part. We'll move on to the next step, and then next we deal.
15. Mandalatization: Now what we do is we have to make small slide when I'm making a small leaves around it. So this is going to be a way very simple mentality. Now what we have to do, we have to extend these flat lines. Now, adding the dots at the end of each line. So this is the most basic Floyd human dialogue. Now, what we will do is we will decorate this and little, and not much because these astronauts moment dialyze also modify the design if you want. I'm here using a flatter underlie. You can change the design as per your choice. This is my choice to use these basic things to decorate, discard all over because I want to make that bitumen dialer highlight, not these small room and allies highlight. So what I'm going to copy this seem designed all over the cloud. Now I'm going to fill this space is by making the same Mondial I. You can change them and dialogue size if you want to continue the Mandela design if you want, that's totally up to you. Yeah. In the next video.
16. A New Design: So now let's move on to the other side of the sheet. Here. I'm trying the same Mandela design that I did for the DAT side of guide. And I'm not always lingered. I'm making these Mandela's at a lid double-space to maintain the uniformity in the design as well as in the Patton. Now, for this space, I'm planning something as other then this Mandela's. So for this, I have planned to draw different kind of design. So I'm drawing a line. You can use a ruler also if you want to draw the line. But here I'm using a node, Willow Hill and drawing the line freehand, that's totally up to you depending upon your comfort zone, you can manipulate the things always. And now I'm turning this line into sweet little arrow. So I'm just designing an arrow over hill. Now what I'm going to do is I'm going to draw over it. So yes, I'm going to draw a woman dialogue that will be a hast Mandela and autocomplete Mandela. So I'm just drawing consecutive, so close vine over the completing that semicircle. Only. Now what I'm going to do is I'm going to extend each semicircle like a line. So these lines will be not of equal length with one another but with the opposite lines you can observe the measurements. That will help you understand what I just want to illustrate. Like the smaller lines and the bigger lines through these all things will be not exact measured by ds illustration. So the middle lines are of equal nine Then the other second lines are of equal length. So this is a kind of pattern that you have to follow. And now I'm just drawing a so called small circulate, more like heavy dot at the end of each line over Hill. I'm willing to join these tools center lines to make a triangular kind of a shape. So this is now a different kind of s-shaped, right? So I'm just drawing it some triangles over Hill. Now what we'll do is just fill up these circles with the Mandela designs to complete our Mendel. We will do the processing in the next video. Now.
17. Mandalatizing New Design: So now either stat filling these circles with Mandela designs to complete it in the fall. So go lambdas drawing some lines to fill this goo. And from the second, so good, I start making the proper Mandela designers. So this one is kind of a design. You can see who? Now I'm just filling this space that is live Briggs window, so good and the petals. So now in the second circuit, I mean the sequence of half circles that are the semicircle. Semicircle goes this pen in the next layer and moving on with the triangles now, just adding some random dots in a definite back down in the so-called far the outer circle. And let us select the design that we have already made at the output of this guide. You can choose any other desires from these designs, or maybe from the designs that we have made. I'd duck gardeners. I like this kind of a design review really, really much. So I'm going to use the same design in filling this out docile good. So just have a close look good as design falls. See here the halfs timess Oakland at one side and the other end other side. So that is the exact pattern that follow in this circle. So this is the design of fires that is. So now we'll add some lines. All right, so we're gonna make the same kind of lions. So this looks more good. Add some lines, are some finishing lines to this because Amanda allows word that is far radiations. So these kind of lines somewhat represent some kind of positive radiations. So I've, Julie, Julie loved to draw these small lines at the end of every Monday law. So this is the design that we are done with now. So if you feel like you have left some space like overhead, I've learned some trace. So I'm going to draw the same. Mandela will complete the design. And if you want, you can genes that design. But her, I'm continuing with the same design. Now. I'm just adding the designs that I feel that I have left this space because I'm done with these. Okay. So this is the final look of our God. You can always make alterations that is totally up to you. You can add the name whom you want to dedicate discard over here in this named Dan. And I'd ending is if we want in the Guard or move it outside of the God, that is totally up to you. This is define a look, I'll show though finally look in the next video. And so, so no wash that. Who do know how it feels to do complete this card.
18. The Final Look: So now here is the final look of our Mandela dies, God. Is integer looking so beautiful and so shiny, and you'll just one color, one color on black sheep as looping. So, so, so pretty to me.
19. Project Work: So guys, head is your project work. Try Mandela had a handmade card. Click pictures of it. Upload these pictures in your projects section of this class. I'm really excited to see your Mandela atomization of God. And you so much for joining me. Bye-bye.
 Suman Aggarwal, Artist and Educator