Transcripts
1. Introduction: Hi, everyone, and
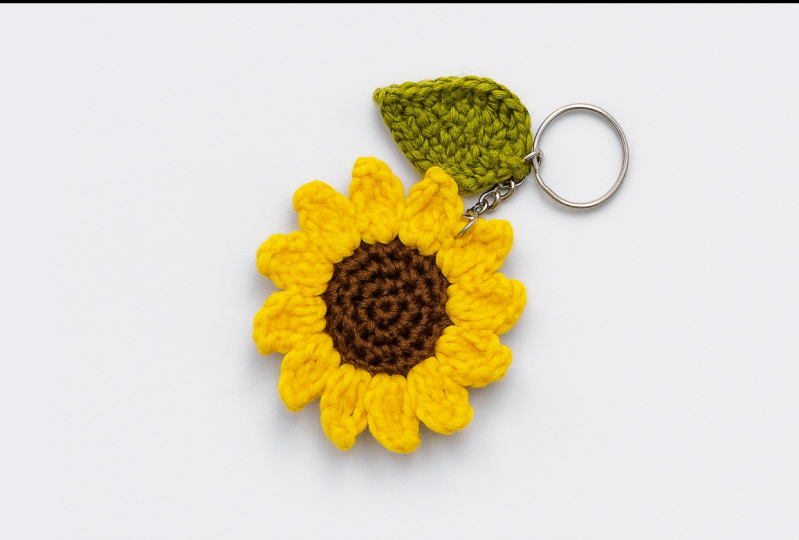
welcome to this class. I'm so glad you are here. In this class, we will be making a beautiful crochet
flower kitchen, a small fun project that
is perfect for beginners, but also enjoyable if you
already know a bit of crochet. Here's what you can
expect from this class. In the first lesson, I
will walk you through all the materials you will
need for this project. In the second lesson, we will make the center
of the flower step by step using basic stitches
and working in the round. In the third lesson, we will create the petals
of the flour and also add some stuffing inside to give the flower
a nice puffy do. In the fourth lesson, we will crochet a leaf to add
an extra touch of detail. Finally, in the fifth lesson, we will assemble
everything together and attach the metal parts to
turn it into a kitchen. By the end, you will have your own handmade crochet
flower kitchen that you can use yourself give to
a friend or even sell if you would like to start a little crochet business. This class is designed
with Wigners in mind, so I will explain each
step slowly and clearly. All you need is some yarn, a crochet hook, and
a few simple tools. So grab your yarn and hook, and let's get started
with lesson one, where we will go over to
materials you will need.
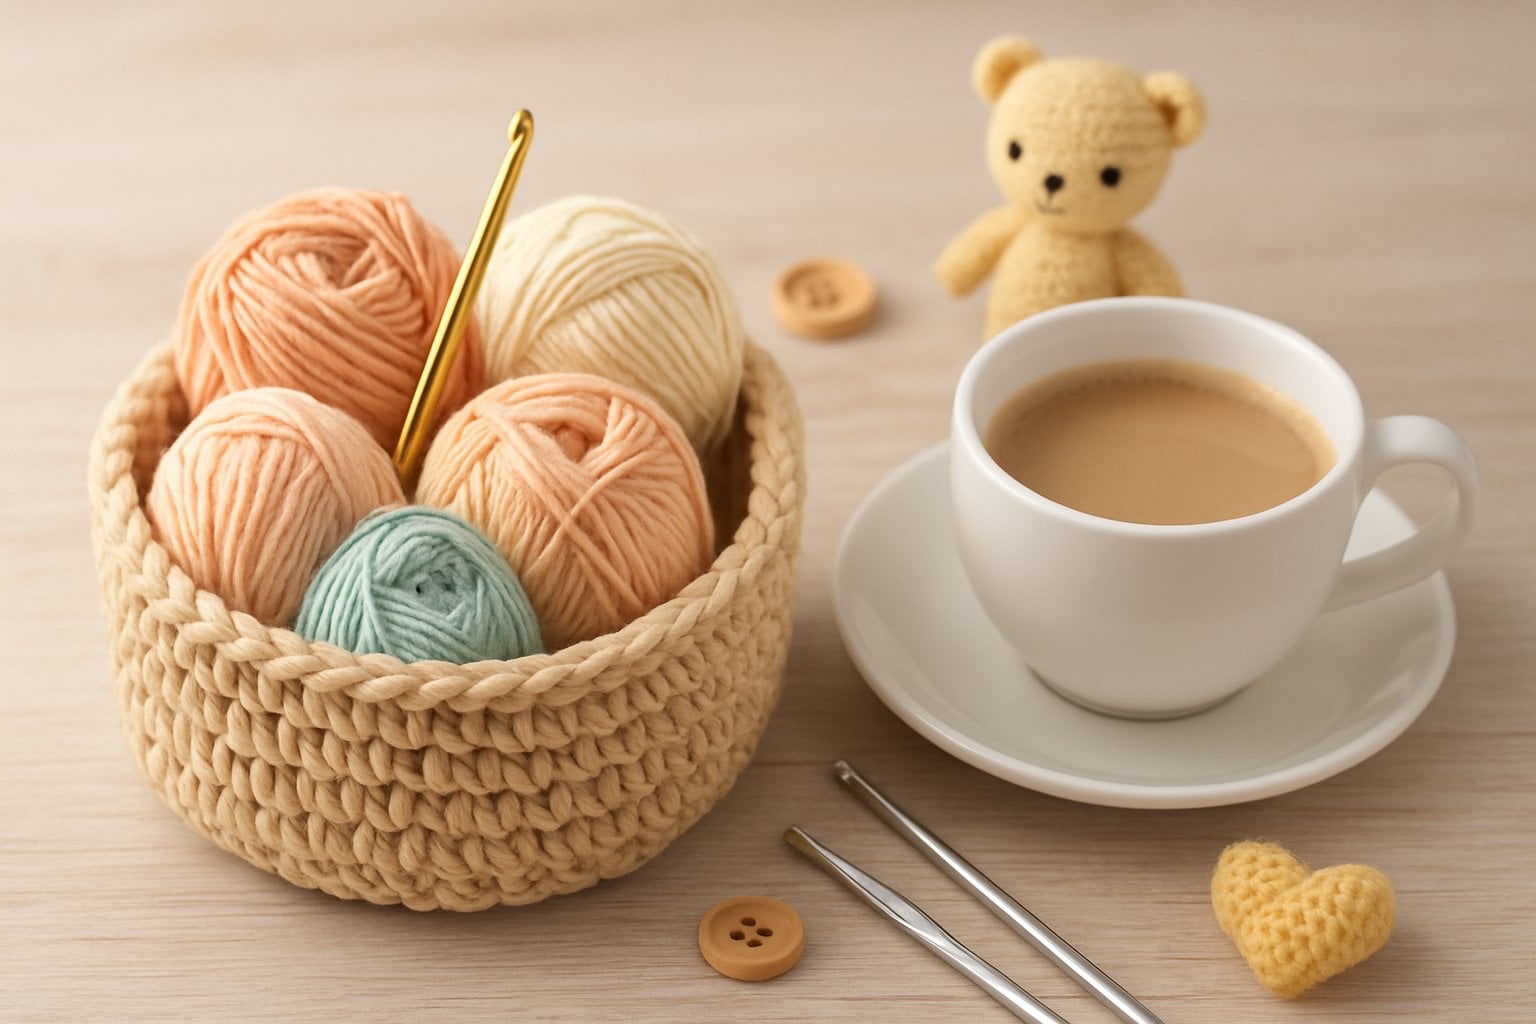
2. Materials Needed for Keychain: This lesson, I will
walk you through all the materials you will need to make this crochet
flower kitchen. We will need three colors
of medium weight yarn, brown for the center
of the flour, yellow for the petals, and green for the leaf. I do not have medium weight
yarn in green color, so I will be using
two strands of this lightweight yarn to
get a similar thickness. I will be using a 1.9 MM
crochet hook for this project. The reason for choosing
such a small hook is that it helps make
the stitches cleaner, tighter and more compact. Since this flower will
be used as a kitchen, we don't want large
gaps between stitches. Otherwise, the stuffing
might show through, and the flour won't
hold its shape well. Apart from this, we will need a casar, some cotton stuffing, just a little to fill
the flower center, a kitchen ring, a jumper ring, and applier to
attach everything. Now that we have
everything ready, let's start by making
the cinqor of our flour.
3. Making Centre of Flower: This lesson, we are going to make the center of the flour. We will start with
the brown yarn. So begin by making a magic ring. In one to secure the ring. Into the ring, make
six single crochet. So that's one, two, three, four, five and six. Now pull the yantil to
close the ring tightly. Now we are going to join it with a slip stitch into the
first single crochet. So insert the hook into
this first single crochet. Yarn over and pull through the stitch and the
loop on the hook. Now to begin the second round, chain one, we are going to make two single crochet into each of these stitches. So make a single crochet
into the following stitch. Now make another single
crochet into the same stitch. Continue to make two
single crochet in each stitch around that
will give us 12 stitches. So here I have
reached to the end, and I'm going to join it with a slip stitch into this
first single crochet. So insert the hook, yarn over and pull through the stitch and the
loop on the hook. Our second round
has been completed. Now, to begin the third round, in one, make a single crochet
into this first stitch. Then make two single crochet
into the following stitch. That's the first single crochet and make another one
into the same stitch. Then make a single crochet
into the next stitch. Again, make two single
crochet into the next stitch. Repeat this pattern around. At the end, we will
have 18 stitches. Now, join with a slip stitch into this first single crochet. Inside the hook, yarn
over and pull through the stitch and loop on the hook for the fourth
round chain one. For this round, we will
follow this pattern. So make one single crochet in each of the
next two stitches. Then two single crochet
into the following stitch. That's one. And two, make a single crochet in each of the
next two stitches. Repeat the same pattern around. At the end, we will
have 24 stitches. H Now join with a slip stitch into
this first stitch. So inside the hook, yarn over and pull through the stitch and the
loop on the hook. Our center of the
floor is ready. Now we are going
to cut this yarn. So take the casar and cut it by leaving a
few centimeter tail. Pull this loop all
the way through. Now repeat the exact same steps with green ion to
make a second circle. So in the end, we will have one brown circle and
one green circle. In the next lesson, we will begin making the
petals of our flour.
4. Making Petals of Flower: This lesson, we
are going to begin the petals of the flour.
So let's do this. Place the brown
and green circles together with their
backs facing each other. Insert your hook through
any stitch of both circles. Make sure to insert the hook under both loops of each stitch. Now take the yellow yarn, place it on the hook and pull
it through these stitches. Gene two. That's one pin two. Make a double crochet
into the same stitch, yarn over, insert the hook
into the same stitch. Yarn over and pull through. Yarn over and pull
through two loops. Yarn over and pull
through two loops. Then make a triple crochet
into that same stitch. Can you and make a slip stitch into these two loops inside the
hook under these loops, yarn over and pull through
all the loops on the hook. Move to the next stage of both circles and make
a treble crochet. So yarn over twice, insert the hook into the very
next stage of both circles. Yarn over and pull through. Yarn over and pull
through two loops. Yarn over and pull
through two loops, yarn over once more and pull through the
remaining two loops. Then make a double crochet
into this same stitch. And finally, make
a slip stitch into the very next statch
of both circles. Insert the hook, yarn over and pull through the stitches and the
loop on the hook. This completes our first petal. Now let's begin
the second petal. Chain two, that's one and two, make a double crochet
into the same stitch. Then make a treble crochet
into this same stitch. So yarn over twice, insert the hook, yarn
over and pull through. Yarn over and pull
through two loops, yarn over and pull
through two loops, yarn over once more, and pull through two loops. Then chain two Make a slip stitch into
these two loops. Inside the hook under
both these loops, yarn over and pull through
all the loops on the hook. Make a treble crochet into the next stitch of both circles. Then make a double crochet
into that same stitch. And finally, a slip stitch into the next stage
of both circles. I have now completed two petals at the ends
between the two circles like this and continue working the petals in the same way
by following this pattern. Once you have completed eight to nine petals, pause to fill the inside of the circles with some
cotton stuffing. This will give the flower
a nice puffy shape. So take a small
amount of cotton and gently insert it between
the two circles like this. Now continue making petals until you have 12
petals in total. Here I have completed 12 petals. Now finish this by
slip stretching into the first chain
of this first petal. So insert the hook, yarn over and pull through the chain and the
loop on the hook. Now we are going
to cut this yarn. So take the casar and cut this. Pull this loop all the
way through to secure it. Now insert the hook into
that same stitch from the back and pull the
yarn end to the back. Now I'm going to
weave this yarn end, so insert the hook into any stitch and pull this
yarn through to weave it. You can also use a yarn
needle for weaving. So I have weaved an completely, and our flour is ready. In the next lesson, we will make a leaf for this.
5. Making a Leaf for Keychain: This lesson, we are going to make a leaf using green yarn. Since I don't have
medium weight yarn, I will be using two strands of lightweight yarn held together. So start with a slip note. Now make a foundation
chain of eight chins. So that's one, two, three, four, five, six, seven, and eight. We have made eight chains. Now we are going to skip
this very first chain and make a single crochet into the second chain from the hook. But we will make single crochet into the back loop of the chain. Insert the hook, yarn
over and pull through, yarn over and pull through
both loops on the hook. Continue making single crochet
across all the chains. Now for the leaf shape, chain one, and turn. Make a half double crochet
into this very first stitch. So yarn over, insert the hook, yarn over and pull through, yarn over and pull
through all three loops. Then make a double crochet
into this same stitch. In the next stitch, we are going to make
a treble crochet. Then make a double crochet
into that same stitch. Next, make a double crochet into each of the
next two stitches. So that is the double
crochet in the first stache. Then make a double crochet
in the following stitch. Then we are going to make a half double crochet
into the next stitch. So that is the half
double crochet and then a single crochet
into the following stitch. In the last stitch, make two single crochet. So that is the first
single crochet and one more into
the same stitch. Now chain one and slip
stitch into these two loops. Insert the hook
under these loops, yarn over and pull through
all the loops on the hook. Now work around the
other side of the chain. Make two single crochets
into this very first stitch. That's one. And you make a single crochet
into the next stitch. In the next stitch, make a half double crochet. Then make double crochet
into the next two stitches. That's a double
crochet in one stitch. Then make a double crochet
in the following stitch. Now make a double crochet
into the next stitch. And a triple crochet
into that same stitch. Then make a double crochet
into the next stitch. And a half double crochet
into that same stitch. Now join it with a
slip stitch into the chain that we did in the
beginning of this round. So insert the hook, yarn over and pull through the chain and the
loop on the hook. So we have completed the leaf. Now let's cut this yarn. I so cut this and pull this
loop all the way through. Now we are going to weave
in these yarn ends. So I have weaved
yarn end completely, and my leaf is ready. In the next lesson, we will assemble our kitchen.
6. Assembling the Keychian: Now that we have completed
our flower and leaf, it's time to put everything together and turn
it into a kitchen. For this step, you will need your finished crochet flower, the crochet leaf,
a kitchen ring, a jumper ring, and a plier to help with
attaching the metal parts. Let's start with the leaf. Take the jumper ring and open it slightly
using your plier. Insert it through one of the stitches at the
top of your leaf. This will give the
leaf a little loop, so we can attach it to
the kitchen ring ladder. Next, let's attach the flour. Start by opening the small ring that is attached to
the kitchen ring. Use your plier, to
gently twist it open, not pull it apart. Once it is open, insert the ring through one
of the stitches on the floor. Choose a stitch close
to the top so that the flour will hang evenly
when the kitchen is used. After inserting it, carefully close the ring back
with the player, making sure it is
tightly secured. Now connect the leaf
to the kitchen ring. Use the jumper ring
we added earlier to easily hook the leaf
onto the kitchen ring. Adjust the positioning, so both pieces hang
nicely together. And that's it. Your crochet
floor kitchen is complete.
7. Outro: Now that you have learned
how to make the flower, the leaf and how to assemble
them into a kitchen, it's time for your
class project. For this project, I
would love for you to make your own
crochet flower kitchen. You can follow along using the same colors I
used in the class, but I really encourage you to experiment with colors
of your choice. For example, go for bright bold colors to
make a cheerful kitchen. Or choose soft pastel shades
for a more delicate look. You can also get creative
with the design. For example, instead
of one flower, make two flowers and
attach them both to the kitchen or add two leaves instead of one
to make it look fuller. Once your kitchen is ready, take a picture of your project and upload it to the
project gallery here. Don't worry about
making it perfect. The goal is to practice your stitches and have
fun with the process. I'm really excited to see the beautiful color combinations and creative variations
you come up with.
 Nida Younas, It's me :)