Transcripts
1. Introduction: Hi, and welcome to this class. If you have ever tried
making crochet swatches, and notice that your edges
look a little uneven. Don't worry you are not alone. This is one of the most
common struggles for bigners. In this class, I will walk
you through why the edges of your crochet swatches may
not look perfect at first, and most importantly,
how to fix them. By the end, you will
know how to create neat and straight edges
with single crochet, half double crochet, and
double crochet stitches. Remember, it is
completely normal for your edges to look messy
when you are starting out. Mine look the same
way when I begin. But with just a few adjustments, your work can look
clean and professional. So here's what we
will do together. First, I will explain the common reasons
behind imperfect edges. Then we will practice neat
edges for single crochet, half double crochet,
and double crochet. I will also share
simple projects for you to practice
everything we cover. Alright, let's jump
in and see why those edges are not even and how to get
them neat every time.
2. Reasons for Uneven Edges: This lesson, we will look at the most common reasons your crochet edges
don't turn out neat. If your swatches look a
bit uneven, don't worry. It usually comes down to a few simple mistakes that
almost every beginner makes. Let's go through
them one by one. One of the biggest reasons for uneven edges is missing
the last ditch of the row. When you turn your work, it can be tricky to see where
that very last stitch is. If you skip it, your
row will slowly get shorter and your edges
will slant inwards. The opposite problem is adding an extra stitch at
the end of the row. This usually happens when
bigners mistake the side of the turning chain for a stitch and work
into it by accident. The result, your rows get wider and the edges flare out
instead of staying straight. Another source of confusion is whether deterning chain
counts as a stitch. The answer depends on the
stitch you are using. For single crochet, the chain one does not
count as a stitch. For half double crochet, it depends on the pattern, but usually a chain
two does not count. For double crochet,
the chain three almost always counts
as your first stitch. If you treat deterning
chain incorrectly, either by skipping
a stitch when you should not or by
adding an extra one, your edges will be uneven. Finally, tension
plays a big role. If your chains are too
loose or too tight, the edges will look uneven. Even if your stitch
count is correct, loose chains create
floppy loops on the edge while tight chains
pull the edge inwards. So to sum up, messy edges
usually happen because of one of the four things
missing the last stage, tiding an extra stage,
misunderstanding, turning chains, or
inconsistent tension. Don't worry if you have
done all of these, every crochet has in
the next lessons, I will show you exactly how to fix these problems
for single crochet, half double crochet,
and double crochet.
3. How to Keep Your Edges Straight with Single Crochet: This lesson, we are going
to focus on single crochet. I will start by showing you exactly how to make a
single crochet stitch, and then I will show you how to keep your edges
neat and straight. By the end, you will
be able to make a simple swatch
with perfect edges. Begin by making a slip node. Now that our slip note is ready, we are going to make
a foundation chain. For this demonstration,
I'm going to chain 13. That's one, two,
three, four, five, six, seven, eight, nine, ten, 11, 12 and 13. So here I have
completed 13 chains. To start rowan, we will skip this very first chain and insert the hook into the
second chain from the hook. Yarn over and pull through. Now we have two loops, yarn over again and pull
through both loops on the hook. That's one single crochet. Then insert the hook
into the next stage, yarn over and pull through. Yarn over and pull through
both loops on the hook. Continue this across the row, one stage in each chin. Here is the last stitch. Let's make a single
crochet into this stitch, insert the hook, yarn
over and pull through. Yarn over and pull through
both loops on the hook. So we have completed
our first row. To keep your edges straight, it is important to
count your stitches. Each stitch has a V
shape at the top. For this watch, we should
always have 12 stitches. Let's count these. One, two, three,
four, five, six, seven, eight, nine,
ten, 11 and 12. If you count 11 or 13, you will know you have
missed or added a stage. You start the second row, chain one, and turn your word. Now here is something
very important. When you start a new row
with single crochet, you make a chain one. This chain does not
count as a stitch. It is just to bring the yarn
up to the right height. That means your very
first stitch of the row will go directly into
this very first stage, not the second one. So insert the hook into
this very first stage. Yarn over and pull through. Yarn over and pull through
both loops on the hook. Then insert the hook
into the next stage. Yarn over and pull through, yarn over and pull through
both loops on the hook. Continue this across the row. The last stitch of diro
can be easy to miss. If you skip it, your
edges will slant inwards. If you add an extra stitch
into the side space, your edges will flare out. To avoid this, look for the little at the top
of the last stitch. Both loops should be there, just like any other
stitch in row. So here is the last stitch. Let's make a single crochet into this stitch. Insert the hook. Yarn over and pull through. Yarn over and pull through
both loops on the hook. Keep your edges straight. It is important to
count your stitches. So let's count these stitches. That's one, two,
three, four, five, six, seven, eight, nine, ten, 11 and 12. So we have 12 stitches. Now let's start the third row. Gene one, and turn your work. Make a single crochet into
this very first stitch. So insert the hook, yarn over and pull through, yarn over and pull
through both loops. Continue to make
a single crochet in each of these stitches. So our third row
has been completed. So that's how to make a single
crochet with neat edges. Remember, in one does
not count as a stitch. Your first stitch goes into
the first stitch of the row, and don't forget that
very last stitch. Keep your stitch
count consistent and your edges will
always look neat. Let me show you a simple trick to keep your edges straight. Here I have already crochet
a row of single crochet. Now, in 110 your work. Make a single crochet into
this very first stage. I then continue making one single crochet
into each stitch across until you
reach the last stage. Here is the important part. When you get to the last stage, insert your hook
into the last stage and into the front loop
of the turning chain. So first, insert the hook
into this last chain. I and then into this front loop of
the turning chain, it might feel a little tight, but just work your hook through. Yarn over and pull through. Yarn over again and pull
through both loops on the hook. That is how you keep
your edges straight. Now chain one and
turn your work. Continue making one
single crochet into each statch until you
reach the last stage. Here I have reached to the end, insert the hook into
this last stitch. And then into this front loop of the turning chains yarn
over and pull through. Yarn over and pull through
both loops on the hook. This trick will help you
to keep edges straight. Continue to practice
in the same way. Here is a swatch I made
using the same trick. You can see how nice and
straight the edges look. In the next lesson, we will move on to half double crochet, where the turning chain works
as a little differently.
4. How to Keep Your Edges Straight with Half-Double Crochet: This lesson, we are going to focus on half double crochet. I will show you how to keep
your edges neat and straight. By the end, you will
be able to make a simple swatch
with perfect edges. So let's get started. Here I have already made a
foundation chain of 15 stages. Now to start the
first row, yarn over, skip the first two chains and insert the hook into the
third chain from the hook. Yarn over and pull through. We have now three
loops on the hook. Yarn over and pull
through all three loops. So that is our half
double crochet. Work one half double crochet
in each chain across. In the end, you will have a total of 13 half
double crochet stitches. So here I have
completed this row by making a half double
crochet in each chin. With half double crochet, designers use different
rules for deterning chin. You will commonly see chin
two at the start of a row. Whether that chain counts as a stitch depends on the pattern. There are two methods of turning chains for half double crochet. Chain two does not
count as a stitch. You do place your first
half double crochet into the very first stitch. Chain two does count
as your first stitch. You skip the first real stage
and start in the second. At the end of row, your last stitch goes into
the top of the turning chain. For straighter,
less gappy edges, I recommend method A. So let's try that. Chain two, that's one and two, and turn your work. Yarn over and insert the hook into this
very first stitch. Yarn over and pull through. We have now three
loops on the hook. Yarn over and pull
through all three loops. Continue to make a half
double crochet in each of these stitches until you
reach to the last stitch. The last stitch is where
edges often go wrong. If you miss it, the
edge pulls inward. If you add an extra into the
side space, the edge flares. Look for the V on the top of the last real stitch and go under both loops like
any other stitch. So here is our last stitch, and let's make a half double
crochet into this stitch. Yarn over inside the hook. Make sure to insert the hook under both
loops of the stitch. Yarn over and pull through. Now we have three loops. Yarn over and pull through
all three loops on the hook. This completes our second draw. To keep age straight,
count your stitches. Each top equals one stitch. So let's count these stitches. One, two, three, four, five, six, seven, eight, nine, ten, 11, 12, and 13. If you count 12 or 14, you have missed or added
a stitch somewhere, usually at the ends. Let's work a few rows together. Janine two and turn the work. Make a half double crochet
into this very first stitch. Then continue to make a half double crochet in
each of these stitches. Let me show you
another trick to keep edges straight in
half double crochet. Here I have already completed a row of half double
crochet stages. Now we are going to move
on to the next row. Instead of chaining to
simply turn your work. Insert the hook into
this very first stage. Yarn over and pull through. We have now two
loops on the hook. Yarn over and pull
through both these loops. Now we are going to insert the hook into this second loop. Here you can see two loops, insert the hook into
this second loops. Okay, yarn over
and pull through. Again, we have two loops yarn over and pull
through both these loops. Then continue to make a half double crochet
in each stitch. So this is another
method to keep your edges of half
double crochet straight. Continue to make a
half double crochet in each stitch across. Let me show you again
how to do that. After making a half double
crochet in last stitch, simply turn your work. Insert the hook into
the very first stitch. Yarn over and pull through. Now we have two loops. Yarn over and pull
through both these loops. Now we are going to insert the hook into this second loop. Insert the hook into this loop. Yarn over and pull through. Again, we have two loops, yarn over and pull
through both loops. Then continue to make a half double crochet
in each stitch. Here is a swatch I made
using the same method. You can see how nice and
straight the edges look. In the next lesson, we will move on to double
crochet stitch.
5. How to Keep Your Edges Straight with Double Crochet: This lesson, we will master double crochet and
most importantly, how to keep straight
and neat edges. So let's get started. Here I have made 18 chains. Start rowan by working a double crochet in the
fourth chain from the hook. So yarn over, we will skip these first three chains and insert the hook
into this fourth chain. Yarn over and pull through. We have now three
loops on the hook, yarn over and pull
through two loops. Yarn over again and pull
through remaining two loops. So that is our first
double crochet. Let's try again. Yarn over, insert the hook into the next stitch,
which is right here. Yarn over and pull through. Yarn over and pull
through two loops, yarn over again and
pull through two loops. Continue to work a
double crochet in the same way in
each chain across. So I have completed this row, and here we have a total
of 15 double crochets. I do not count deterning
chain as a double crochet. Here's where most
double crochet edges go wrong Durning chain. With double crochet, patterns usually say chain three
at the start of a row, and many patterns count that in three as your first stitch. But some designers use
alternatives to get a tidier edge. There are two methods of turning
chain in double crochet. For method A, in two
counts as a stitch. You skip the first
real stage and place your next double crochet
into the second statch. At the end of the row, your last double crochet goes into the top
of the chain three. For the second method, we make two chains at
the start of the row. And that gen two does
not count as a stitch, you place your first
double crochet into the very first stitch. At the end, your last
double crochet goes into the last real stitch
and not the chain. The most preferable method is B. So let's try that. In two, that's one. And two and turn your work. This into will stand in
as our turning chain, but it does not
count as a stitch. Because our into does
not count as a stitch, we will place our very
first double crochet into this first stitch. So yarn over, insert the hook. Yarn over and pull through. Now we have three loops. Yarn over and pull
through two loops, yarn over again and
pull through two loops. Let's make a double crochet
into the following stitch. Yarn over, insert the hook. Yarn over and pull through. Yarn over and pull
through two loops, yarn over once more and pull
through remaining two loops. Now continue making
one double crochet into each stitch across zero. Keep your tension even and remember to count your
stitches as you go. When you reach the end, your last ditch
will always go into the top of the last double
crochet from the row below. This keeps the edge straight, so yarn over, insert the hook. Yarn over and pull through. Yarn over and pull
through two loops, yarn over and pull
through two loops. This completed our second row, and again, we have a total
of 15 double crochets. It is important to count
the stitches after each row to avoid accidentally adding
or skipping any stitch. You can also use
the trick that I have shown you in
half double crochet. After completing double
crochet in last stage, simply turn your work. Insert the hook into
this very first stage. Yarn over and pull through. Now we have two
loops on the hook, yarn over and pull
through these loops. Then insert the hook
into this second loop. Yarn over and pull through. Yarn over and pull
through both loops. Then continue to make a double crochet into
each stitch across. And that's it for our
double crochet edges. With these tricks, you can keep your edges neat,
straight, and even.
6. Project: Now that we have
practiced keeping our edges straight
with single crochet, half double crochet,
and double crochet. Let's put it all together in
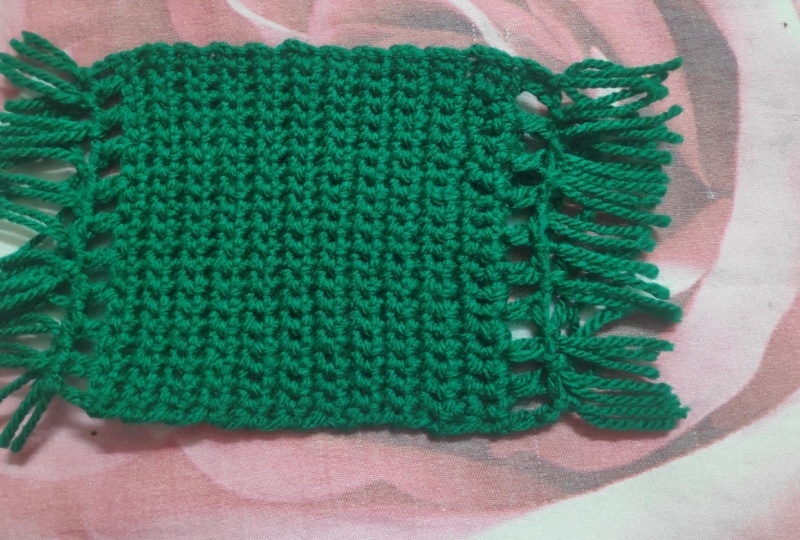
a small practical project, a crochet mug rug. This little piece
is quick to make, great for practicing
edge control, and also looks beautiful
with a bit of fringe. For this project,
I will be using medium weight yarn and
a three M crochet hook. So let's get started. Begin by making a slip note. Once the slip node is ready, make a foundation
chain of 22 stages. You can adjust the number
of chains depending on how white you would
like your mug rug to be. But 22 is a nice standard size. So let's complete these chains. Here I have completed 22 chains. Now we are going to
begin our first row, which will also serve as
the base for fringes. Yarn over, we are going to skip these first three chains and insert the hook into the
fourth chain from the hook. Yarn over and pull through. You should now have
three loops on the hook, yarn over again and pull
through all three loops. Gene one, skip one chain, then make a half double
crochet into the next chain. Yarn over, insert the hook, yarn over and pull through, yarn over again and pull through all three
loops on the hook. In one, skip one chain and make a half double crochet
into the second chain. Continue this pattern until
you reach the end of the row. I have now completed
the first row. These spaces will be used
later to add the fringes. Now let's start our second row. Gene one and turn your work. Make a single crochet into
this very first stitch. Be sure to insert the
hook under both loops. Yarn over and pull through, yarn over again and pull
through both loops on the hook. Make a single crochet into the next stitch,
which is right here. Make a single crochet
into the following stage. Continue working single
crochet across ow. I have completed the second row and now we have a
total of 20 stitches. You can count them from the top. It is important to count
your stitches after each row to avoid accidentally adding or
skipping any stitch. Now let's begin the third row. Chain one and turn your work. Make a single crochet into
this very first stitch. Then continue making
single crochets across. Repeat this process for as
many rows as you would like. So here I have
completed 21 rows. Now let's make another
row for the fringes. Jane two. That's one. A and two, then turn your work. Skip this very first stitch and make a half double crochet
into the second stitch. Yarn over, insert the hook, yarn over and pull through. Yarn over again and pull through all three loops. Gene one. Skip one stitch and half double crochet
into the next stitch. Gene one. Skip one stitch and make a half double crochet
into the next statch. Continue this pattern
all the way across. I have now finished this straw to complete
the piece chain one. Then take the casar
and cut this yarn, leaving a short tail
of a few centimeter. Now pull this slope all the
way through to secure it. Your mug rug is complete. Notice how neat and
straight the edges are. Now let's mire its size. So it is approximately 4 " wide. And now let's
measure its length, and that is 4 " as well. Now we win the yard heels. Once that's done, it's
time to add diferenes. The yarn strands
each about 4 " long. Take those strands together. And fold them in half like this. Now insert your hook into
any of the chain one spaces. Wrap the folded strengths
and pull them through. Insert your fingers into the loop and pull the ends of the strength
through it like this. This is how you can add fringes. Let's do this again. Take two strands,
fold them in half. Insert the hook into the next gen one space and
pull these strengths through. Now with the help of fingers, pull the ends of the
strengths through this loop. So we have added another one. Repeat the same
process for each space until you have added
fringes all along the edge. Once the fringes are added, trim the ends evenly
so they look neat. Repeat the same process
on the other side. And there you have it. Your crochet mug rug is ready.
 Nida Younas, It's me :)