Transcripts
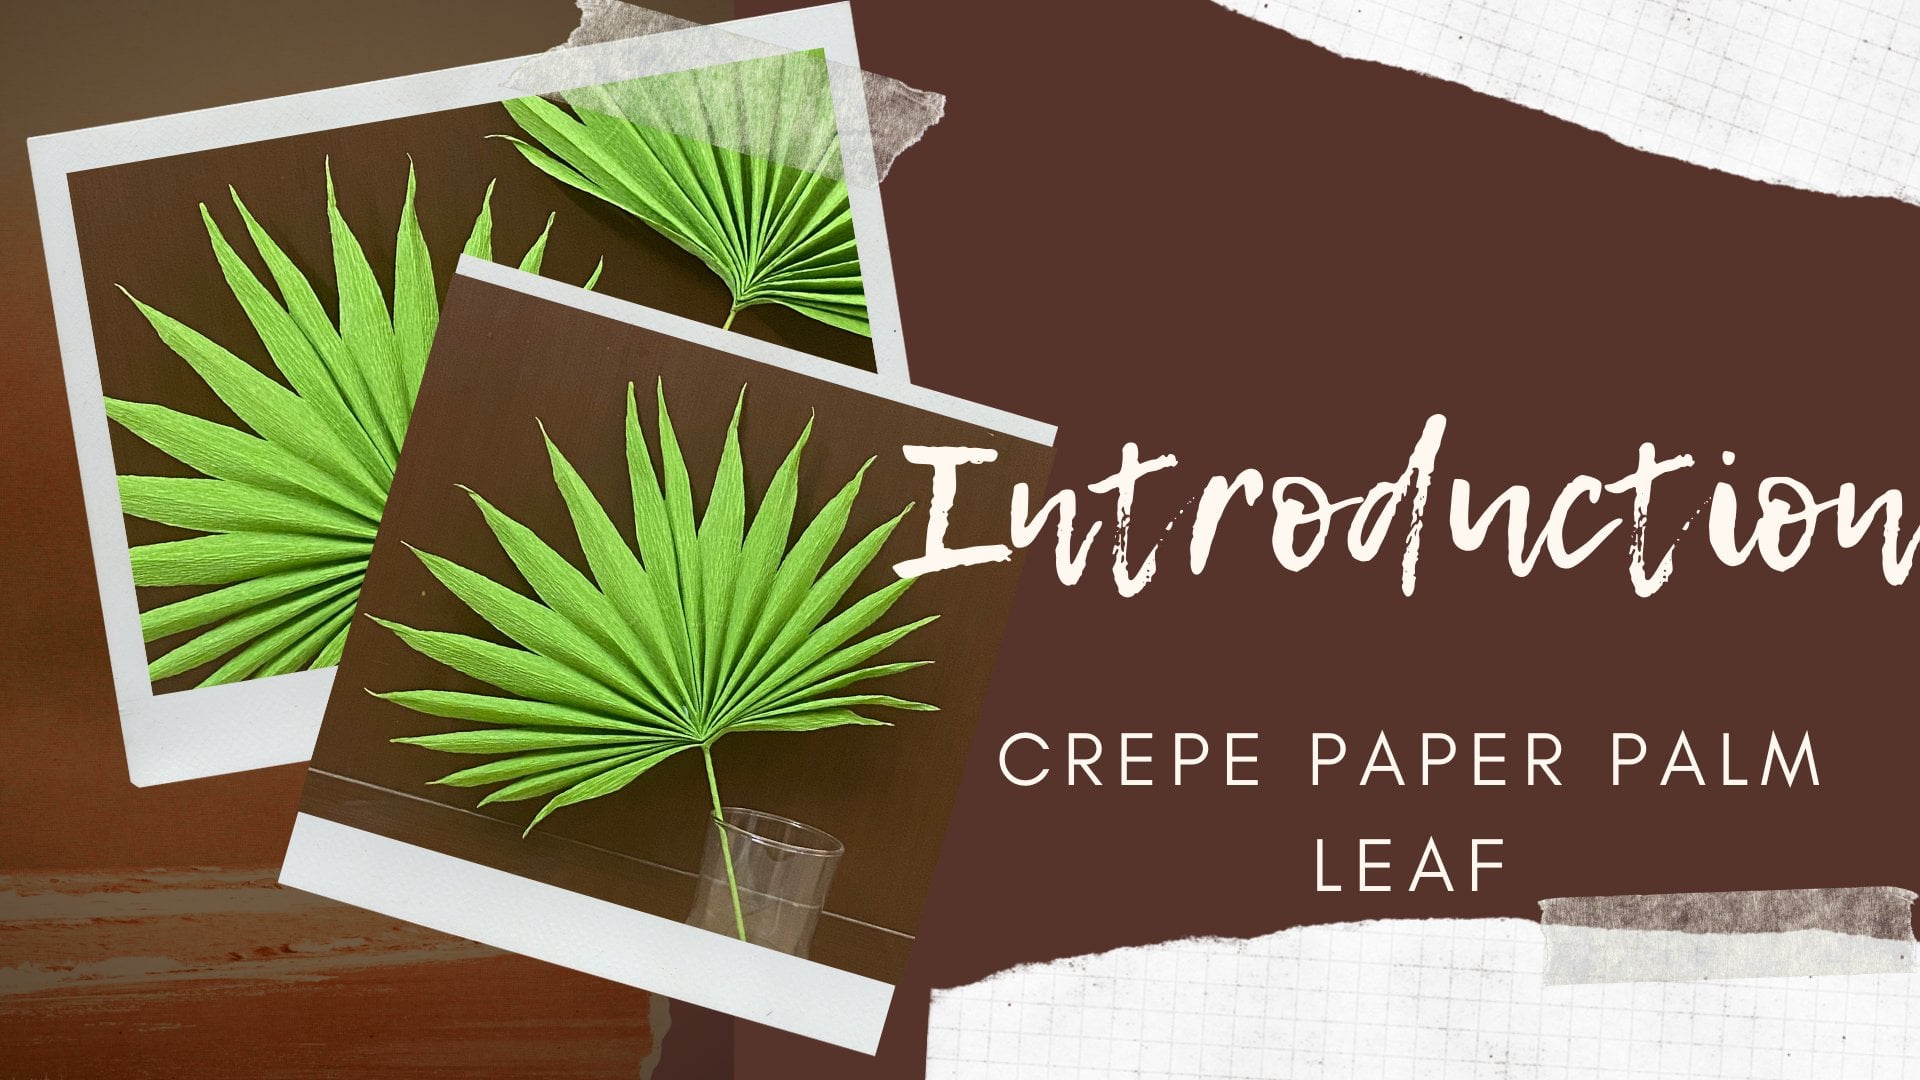
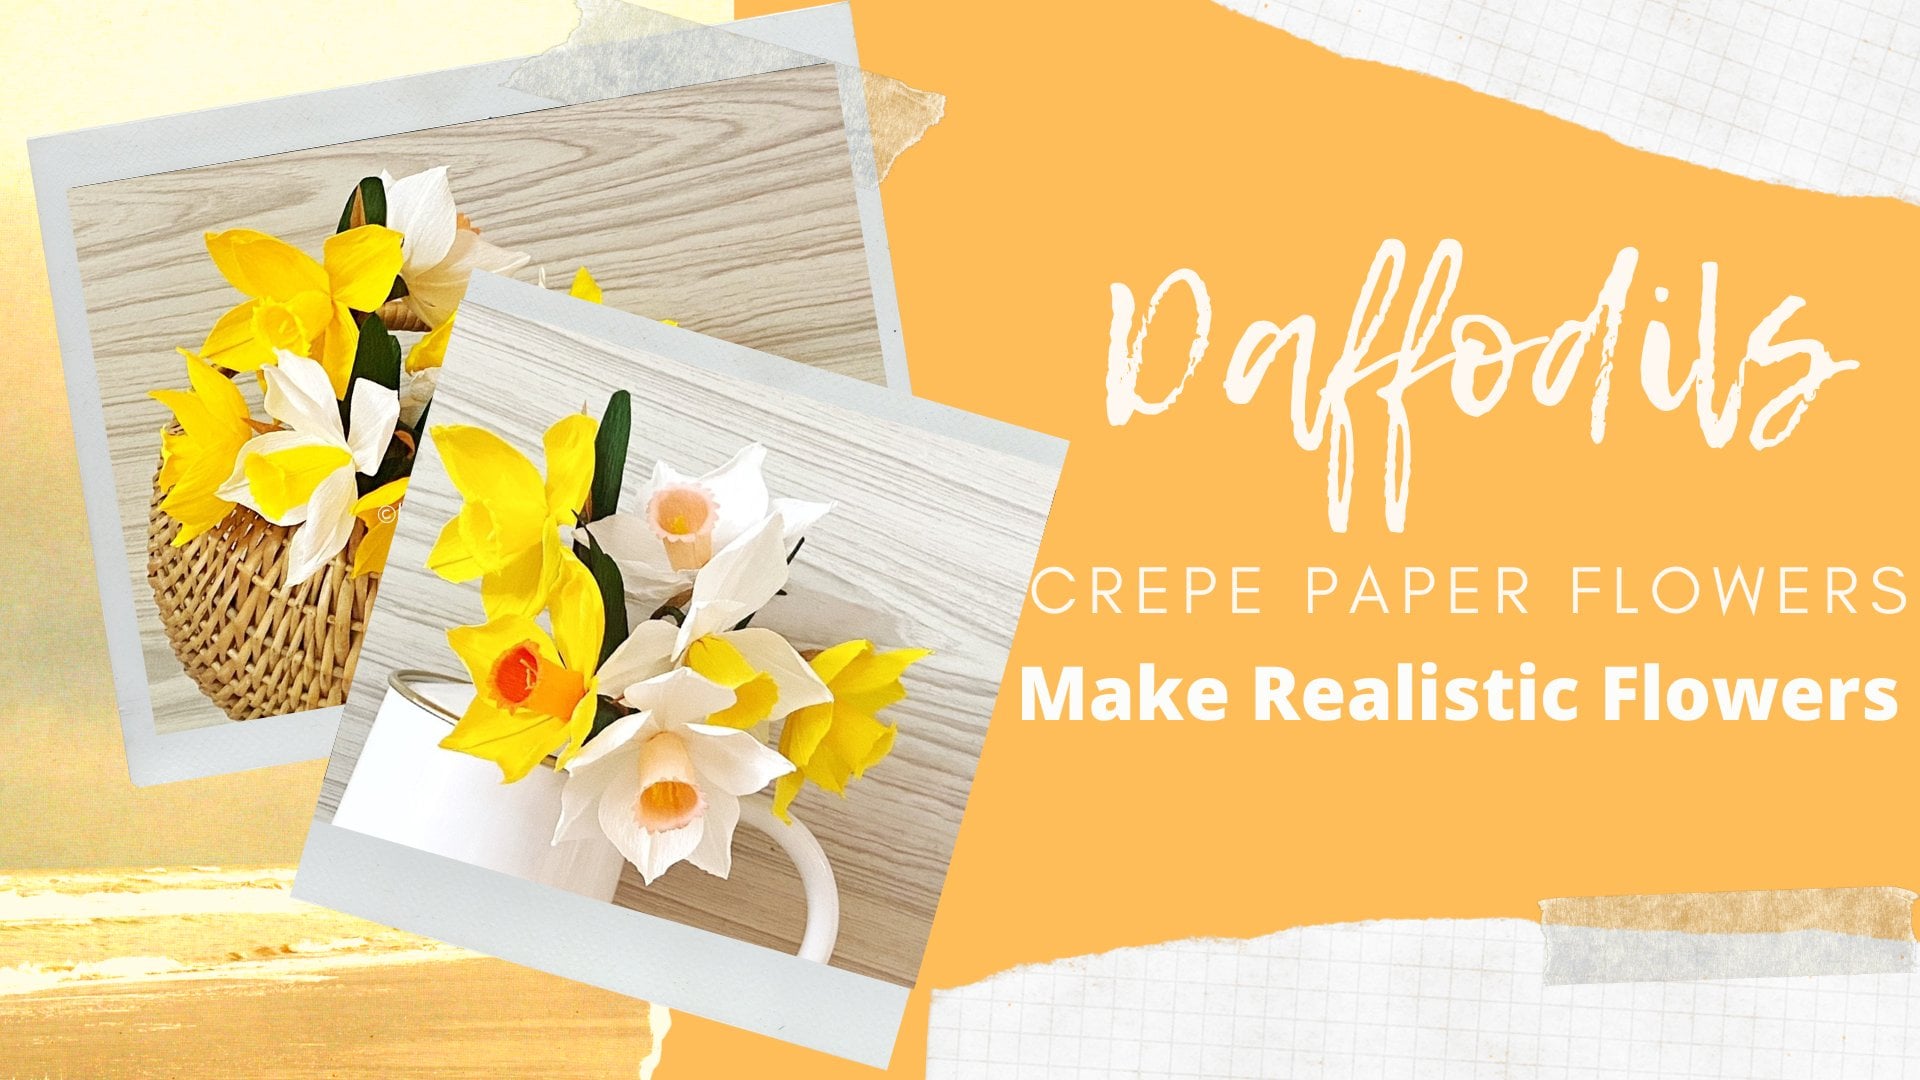
1. Introduction : And not flies in general. And that's where my love for paper floss comes from. I've been making floss in the past 20 years now. Hi everyone. This is make founder are distinct tutor at by the art, but I dig online and offline art and craft classes at Davis Fred forms like to design my mood patterns by referring to the real plants and plants. I like to pay attention even to the minute details of matching colors closely to getting the shape right, getting the phones right. And that is why I like to observe and study my reference variables here. Besides making class, I also loved to do watercolors and babies, other crops, if you would like, and work my role in visit my website which is by the AICPA.com. Or you can also visit my Instagram disease by the same name, by the outlook. In fact, on my online presence is by the need by the afterburner for becoming a full-time artist. I was a college professor and I've always loved teaching. In today's class, we are going to make these realistic snow drops. And I hope you'll enjoy this process with me. So let's strap.
2. Supplies: Let's have a look at all the materials that you will be needing. A pair of sharp scissors, white glue, floral wire, floral Dave, a trend to assemble your flour. And these are the field things that you can use to do the coloring on the flower, which is the green hot. So this is a fine liner which is waterproof. This is a watercolor pencil. This is a normal color pencil, and this is a mock-up. So all of these you can use, I'll show you later how they work on the paper. You will only need white and green as those other two colors that are there and the flash. And I always prefer olive green over any other green because it looks more natural. And this one you will need to shape the floor and wooden skewer. And then B you can use any BDA. Not necessarily, wouldn't. It can be glass or plastic. Does that it has to be a size like this, maybe a six MM or edema. And this is a sponge. This is this basic kitchen sponge. You don't need anything fancy. Finding floral wire rural deep. And then the most important one is the Bentley, which is provided and you can go and check it out and print deca, this printed out on an A4 sheet and don't try to change the dimensions and all because the flower is a bit smaller, so this doesn't cover the whole sheet, so just print it as is. And then after that you have to cut all these shapes. And then we'll move on to the next step.
3. Basics of Crepe Paper: Queer people come in different types of veins on fixed chose thickness and such. So as you can see here, this is our voice and this was a faint green paper. You can see the greens, they are ready This avert and this is quite strict t. Then if you cut a piece and show you the syllabus stretches quite a bit like this. And this one is a very fine-grain like you can hardly see the lines on this one. This one is also very fine-grain and this is a duplicate of this one. Sure. You wonder, yeah, this is an ionic. So this is a duplex paper, so it has to physically do paper which are stuck together, yields together. So here we have beach and here we have things. So these papers are one of my favorite because these are more durable and these are easy to work with. They don't deal very easily. So I love these and this is what I showed you, a clip roles. And then we have beliefs which are the canister ones, as you can see here. So this is just the GSM. Can see my fingers. So these are very thin, but these are very good to make another delegate parts of the flower. A few flaws which are very delicate. And these ones I don't use very often. Now the next part is as I showed you, stretching thought. So posttest choosing your paper like what kind of Florida you went to meet if you're making very big size club. And I recommended to use these roles which have a lot of texture, but these are really good for making huge flask. Then the next one, these are the most common ones that you collect swans. So you have the flex, which have almost the same color on both the sides. This is a white it's white on both the sides. Then I was looking for and against each on the so these are the ones which most let me show you one more thing. As you can see in this. These are the folds which are there in the paper. And that is what makes the gray paper very unique. So whenever we are cutting up that done on anything, any any flaw that you are making, you always cut it like this. All your grades have to be vertically, not horizontally. If you place your petal on the paper like this, you place it like this. And if you've got it, then you will not be able to stretch or shape and Nitty, because they just stretch only in this direction. In this, if you apply. And for sure you understand that. So suppose this will look better. So this, we have GOT the deadlines for the good. I can shape it like this once you can make it better. But if you've got good that the grains are what is on both, make this thing. You can't stretch it. See nothing will happen. So always keep in mind that they had to be straight and or development whenever you are putting anything because it won't stretch these phase 1 stretch the space or you stretch my medication like this. That's one for dividend. Keep in mind. And then you can choose your paper up on a new project you are doing or whatever it is mentioned in whichever project you're trying to make.
4. Cutting: These are all the pieces that you need to go. So whatever it is mentioned here is for one flux. So remember whenever you are making, you just have to multiply it according to the number of flops that you are willing to make. And as I said before, you have to always remember these crepes, all the folds which are there on the paper. They always have to be what the book. Otherwise you will not be able to shape your flow if there are three of these. So I'm just going to call it. But anyway, you all got the multiple layers you have to remember that you learn, but do many of them together otherwise the edges wouldn't be nice. Please. So just like this, just see that you have got a nice heart shape. I'm just going to shade that in a little more deeply, this in a little bit. And this one also we need three. So you can start from Neil, always keeping our clips or false. Then you just wanted to shape it and then you would but just a little slow. This is done. Yeah, I think I have misplaced the yellow lunch. Now on my screen so that I can. But on the green left, I don't like to base my big whistle. I always like to start at the edge. And it says one and this one we need to cut throat so they can move because they are not too many. I can cut them into one, layer them and just get them. Hello. Again. Chair, shameful. And so these are the pieces that you need are running shell. So these are the pieces that we need for one floor. You just keep the template aside for future use.
5. Coloring: Next we need to make this little green hard. This heart-shaped which you can see on the inode veterans. You can also see it in the natural flow. All the three petals which are inside the first layer, they have this. So for this, we can do with all these colors. So this is a watercolor pencil. You can just take some water. And the water. Just make a small part. So you can use this one, make this. And this is a banjo find points. Then I'll want to reflect. So for this you can just gently make this who don't try to draw it because it won't work because of the folds on the grid paper. So we'll just do dot dots like this and the spread a bit. So try to be vitiate or little smaller than what you'd want. This weekend. B was like this. A normal fences with them sometimes these works and things that go. So we have to try and find up. And just like a watercolor pencil, the dividend will adopt it. They said these might not work, make them just like this. You can go and this is a mockup. So you have to use a fine point. Yeah. And same thing that we did that. And then you have google dot dots and little smaller than one-to-one. We'll make this dot, dot, dot, dot, dot like this, P. So this is spreading. They do much, has got to pick up. Let's try one more. This is sped up. Okay, I think this one is spreading too much. So maybe I'm, I'm going to use this one today. Just go ahead with this wonderful offensive. But as you can see, these are all kids. If you have a final one, you can easily do a get them out there also. All of them have worked quite okay. So whatever you have, you can use that they need to do that car design only on these three. So we're going to filter the Odeon flag that just by you can see this. This has to align this and like this VM into the hot, too much water. You can also it that nice point. And that being that a ship. And you can always got these heart-shaped things a bit extra. But those a bit extra. So that if you mess up, yeah, you can use those. And the steward in a different lecture. Can I do or how to look in quite okay. Once you have got all the petals and leaves, whatever you need. And we have gullet also not installed with this shaping of the vessels.
6. Shaping: Not installed with this shaping of the vessels. As you can see that these petals are really small, so sometimes it is difficult to shape them. But the hand, that's why we are going to use this. It's so very simple DIY do that you need to make. So since a scholar has this pointy side, you can just take your B and put it in like this. What we do is we just glue it lies on Google and look it. And then just, just put the beat like this. We can leave it to dry. So I think the extra blue. So this is a basic tool that you will need. When you want to start with these, I'll WBS, sauteing petals, these ones and these other logic. See you just place them on this bunch. And we need to go a V-shape. So you just run your group and you can hold from, you can also use it. Come. So this is all that we need. Just a few times like this. Hold it applies fisher not too much. Just apply pressure and will happen naturally. And the length this a few times. And it will come like this. And this is all that we need. What these also, not too much. Remember the heart that we've made in common DOM site. Tell them this is done. Same thing with this fate. This missing a few times so that it gets a nice curvy shape that's going on the two lambdas. And then you pinch the bulb like this and just trust it a little neck this. And this is also done for the leaves. We don't need much of a shaping. His tool it like this, that your index finger and thumb just quickly it until like this. So all we need is just a slight God lake this whole just run though finger and your thumb once like this, and then it will be done.
7. Assembly: So shaping is also known done. Ceo. Now we'll take the floral wire. And as you can see that the stems are not that long. If you want to display them in a longer vase, you can always keep the stem lot. So for this you need only five to six inches. So I'm just going to cut it. And can use pliers or you can use scissors. We have our small piece of Adi. Just put some glue at that and go over this. Just use some scrap book. We just don't want this green to show. We're just going to cover this. You can all up of all the extra apply some more blue hill like this. And the filaments are way inside actually you can see them. But Serbia making. Now you've got this rectangle and you have to make slips. Gut all the way through Monday like this. You can do as many as you can comfortably got like this. And leisure holding and testing it. And if you form the bulk so that there are no blank. Well the same thing with all of them. Then we'll apply some more. Gloria. Just roll it over this. So that's all that we need. This should be slightly above this white bud each. So the adults will go into layers. So this is the first layer, the one with the heart and these ones are the second live. Now you can use your drift. If you want. You can also apply a little bit blue. So you align it with this yellow. Like this. And do you have the lower part? I'm going to wrap the thread. First. Then the second would you go meal slightly overlapping so that this hot doesn't hide D and align it at the bottom. Continue to use the same thread, the needle a little bit. And lastly, we're going to go with this. For the third petal. We'll just continue wrapping. We'll gently to dy dt. Well, this is how it's going to look. If you want, you can apply a little blue. Yeah. Because this latest Nandan and then stopped with this. So you have to remember, as we did in this one, the hubs to be on the outside. For this one, this curvy side has to leap on the insect. Like this. You have to align the better. This is slightly above layer. And then you just continue to rep. Now if you have to place the three petal so that they are equidistant from each other. So just try it once or it is coming like this. Okay? So for the next one, very slight gap, you have to leave and that they should align. And then you have actually died. And the third one, line up the thought. Just angle. Just score down even further. Once you're done, you can put some glue to secure this tread. That happened a few more times. And finally you can just stop it. And if this once this is done, we'd stopped with wrapping the green tape. To tape already has some blue in it. And we don't need to put any glue. Remember to put it at an angle like this, because if you put it's shaped at one km, that neat start you drive to go or if you want, you can put a little blue here just to be sure that it doesn't slide off. I always do that easily like this. For the first two, we have to go straight. Note I've been at an angle, we'll just have to type it straight and make sure that your thread is hiding under this nicely. And you can do a few known's P. Then you can start to go down on the stem. And now you start doing that at an angle x, stretch and draws, stretch and roll. Just keep it up like this. So once like you reach about roughly doing just from the base, we have those batch, the spade. So here we're going to put some blue. But this idea of discovery part has to face the stem. Like this. Glue. Stick it nicely. And also for a little bit, ape on it. And then you just keep going. Now if you're using longest stems, then also you have to put the leaves at the same place and let the remaining of the stem, the they can down and that can go and hide under the ballpark that your gloved all bought overalls that you're going to use. Like this. For the leaves also, you're going to apply a little viewer feel like. And then again, same Live. Okay, Now for the leaves, the curvy part has to be on the outside. Like this. The first one. And the second one will come here directly opposite to this one. Now this ten bot, we are going to go with that. And again, give it a nice stretch. Then just keep it happy. Once you reach the end. You can just cut it off. A cane. Although you don't glue with still just to secure it nicely. It's what some blue. And got all this extra part. Right to assembly is known done. In the next video, we'll see what I'm final touches. We need to give two omega floor look like the real one.
8. Final Touch-Ups & Bonus Tips: Welcome back. I hope you are enjoying making these flaws. I really love how simple these are and how beautiful they look. So for the final part, we just have to Donna flower down like this. So we just hold it just below this and the neck. And you just fold it down like this. Remember that this favors to be like this. You might need to Darn it a little just like this. And since this flowers are almost closed up like this, you don't need to open too much. Just to lead to if you want them to face away from the leaves and you just don't it. Speed should be like this, nice on this coffee pot. If you want, you can just give it one more bench. And moving extremely lose or anything. Just open them slightly like this. So he owed and then you can feed and see a green half from you. Like this. That said your flower is now done. So unmute authentic and keep in mind is that when you attach these two petals, you can just see that your heart is in the center. So if you want to display them like this, you can see the Hub, although it's not possible to align the heart and all three sides. But at least at one site you can do if that is something that you want in your flower when your display it. So you can just keep that in mind. So that's it. Your floss on all done. One more additional tip is that if you want to make buds like this, we can follow the same thing DO of these older ones, which are hill, same Vivek got it from the template and then we just use the sponge and this one. And just like I showed you before, you just do this a few times to shape it. You just need undergo and only two bells we're going to need. You take the green stem the same vein, and the same way as we covered it before. Only this time you have to use a bigger scrap the book, apply some glue and make sure it's a thin strip like this, folded in half. And then you just do like this. Keep applying some glue. And then you just keep it up being a little bit tickle, tickle. So, so I think this mesh looks good. Lie real lot of belonging on all of these edges like this. And then the Uzbek goods just come up. For mobile. We'll do some more blue hill. And then this has to come a little bit to the top. Make this same if on the other side you put this one, blew them nicely here also. Just twist it and then wind up some new yield. Also. Just fold it gently like this. Then some glue on this. And you fold the other one on it like this. So say embryo bodies ready? Next part will be put in the green tape and then putting this fade the leaves and then the final. And then finally you have to just listed like this, the age.
9. Class Project: Yes, collect these, make as many as you like. So for your class project, I want you to make at least eight to ten of these. And these can be easily displayed and was like this or you can also do this. You can take a block like this. You can use data called.gov container, anything that you want. And then just place a piece of Styrofoam goal or flourished form inside and put it like this. And then you can just insert this one by one. They generally grow in clusters or try to tease them meals each other. In this case, the floss facing outside. The CB1 receptor stimulation. You don't want to do all this. You can simply place them in a loss each other. The loss is not fully be because our floss don't have such a long stem device. This is done. Sure that all your flaws of these things out say it, that they look nice. Too crowded also. This and this, you can use grass if you have it, can displace it. A lawyer or some malls are since I don't have any of those, I'm just going to shred these scraps from clay paper on it. And then I'm just going do a little lift and then got to very thin strips off of these. So basically just like shredding, you can even use just a brown broth. The pre-construction They bought anything like that. He shall also looks very good. Are the final creative. Now very 1001. Make sure that you've got very thin. My next one, this is done so good in them and then crush it like this. And then you just base it on you've bought like this. If you want, you can also do this. Cut some more for more of a cumulus, and select this. Your potted plant is ready. I can't wait to see all your wonderful creations. So don't forget to share them with me. Here. You can do a potted plant like this, or you can try our own variation like putting them in a vase on an, a basket like this. Hepa creating to you all and I'll see you in my next class.
 Dr Megha Cassandra, Art Therapy Coach, Watercolor, Handwriting Expert