Transcripts
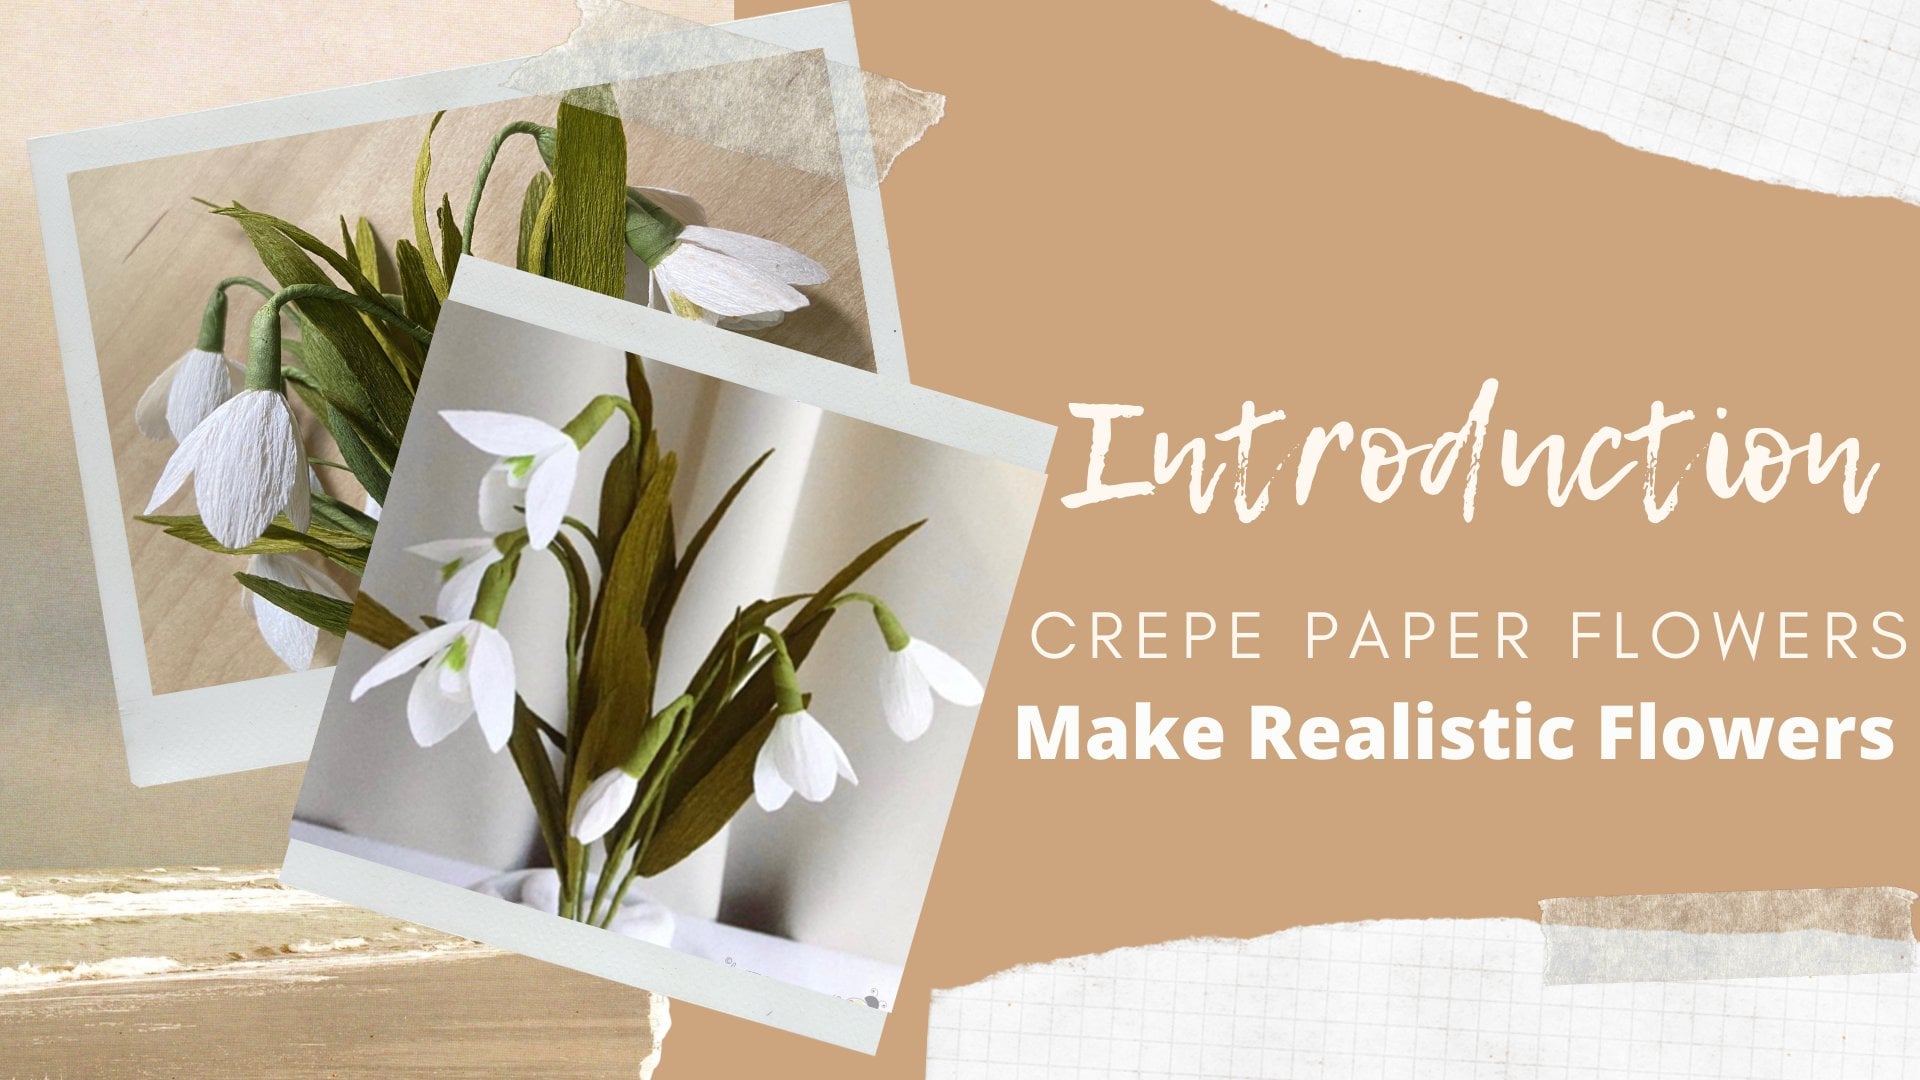
1. Introduction : Hey everyone, welcome to my first Skillshare class. This is Megha I'm an artist crafter and art educator I take online and offline craft workshops at various platforms. Teaching has always been my passion. I was a college professor before I became a full-time artist. I love flowers in general, and that's where my love for paper flowers comes from. Flowers for the past 20 years now, I like to design my patterns by referring to the real flowers and plants. I like to pay attention even to the minute details like matching colors closely to getting the shape right, getting folds right And that is why I like to observe and study my reference closely Besides making flowers , I also loved to do watercolors and various other crafts. If you would like to see more of my work in visit my website, which is byTheArtBug.com Or you can also visit my Instagram, which is by the same name bytheartbug In fact, all my online presence is by the name, byTheArtBug in this class, I will you all the tips and techniques to make realistic flowers . Even if you are a beginner, Snd have never worked with crepe paper I will help you and give you tips so that you can begin your journey. This class is great for hobbyist. nature lovers decorators, In fact for anyone who loves DIY. In the next video, we will talk more in depth about the materials you would need, To make your realistic flowers like this. And we will also cover all the basics of making paper flowers
2. Supplies: Let's have a look at the materials that you will need to make. These paper daffodils And first of all, you need Crepe Paper So these are the colors for the flowers You can use any colors if you like orange, you can add an orange If you Would like to make both the parts the trumpet and as well as the petals, you can simply use one color which is yellow. This is for the leaf. So I prefer olive green because it has more natural looking and it is closer to the natural colour But if you don't have this available, you can use any other light green. And then we need a wooden skewer to shape the flower This is a swing thread You can use white or you can match it with your paper and use that. This is the green floral tape. It is advisable that the it matches with your crepe paper so that the flowers look nice. Next up is the floral Wire So mine is already covered with this green thread If you can find find one which is already covered with green floral tape that is also good. Otherwise, I always prefer to add one more layer with this tape Then for the spathe you need this one, as I've mentioned, the brown So these are 100gsm and these are duplex paper. So which basically means that they are little bit thicker. As you can see, this one is 60 GSM, and this is a little bit thin as compared to this. As you can see you. So this is more delicate. Like in case you don't have this one available, you can go for the normal 100 GSM and use the brown color from that. Next up is the white glue. So I'm using this. You can use any brand that you have available sometimes it leaves a stain and it makes the paper fade So to just to test this if you have never used crepe paper before Then You can try this, take corner of the paper. And just dab a little glue like this. And just leave it for one Day and see how it is. If you notice the paper has faded or there is discolouration you need to change the brand. So it's all about trial and error. Sometimes.
3. Basics of Crepe Paper: So Crepe paper comes in different types of grains, textures, thickness and such. So as you can see here, this is a roll and this is a thick grain paper You can see the grains they very visible and this is quite stretchy Let me cut a piece and show you Stretches quite a bit like this This one is very fine grain like you can hardly see the grains and this is a duplex paper. And this one, let me show you one more. Yes, this is the one So this is a duplex paper. So it has basically two papers which are glued together. So here we have peach and here we have pink. So these papers are one of my favorites because these are more durable. These are easy to work with, they don't tear very easily So I love these, and this is the thick roll And then we have the these, which are the thinnest ones these are very thin So these are just 50 GSM, can see my fingers. So these are very thin, but these are very good to make the delicate parts of the flower or the flowers which are very delicate But these ones I don't use very often Now the next part is that I showed you stretching part. So first is choosing your paper. like what kind of flowers you are making if you are making very big size flowers then you can use these rolls which have rough texture but these are really good for making huge flowers Then the next one, these are the most common ones , the duplex ones We have duplex which have almost same color on both sides And this is white on both sides and the one I showed you before So these are the ones which are like the most. Let me show you one more thing. As you can see in this. These are the folds which are there in the paper. And that is what makes the crepe paper very unique. So whenever we are cutting a pattern any flower that you are making you always cut it like this, all your grains have to be vertical not horizontal If you place petal on the paper like this you please it like this. and cut it like this you won't be able to stretch it because it just stretches in one direction. in this if you try it wont work let me show you how if I cut it like this I can shape like this but if I cut it like this you can't stretch it so always keep in mind to cut vertically you can choose your paper according to the project you are doing or whatever is mentioned in the project you are trying to make.
4. Using the Template & Cutting the Parts: the most important thing is the template which I have available And you can download it and print it out. And then you have to do is cut all these individual pieces. And then once we have these you cut them on colored paper. You'll also need a pair of scissors. You can use. The smaller ones are the bigger ones, whichever you prefer as per your comfort level. Printing, this is very simple. I have a PDF so you can just print it out. Just check that print on A4 size all those margins and everything is set up. Even if the size is a little bit smaller or bigger. it doesn't matter actually, you just have to print it out on an A4 sheet. Once you have this ready to go ahead and cut out all these shapes. So this is the trumpet and I said how many pieces to cut So just refer to that, this I am not cutting right now I will cut directly on the crepe paper. As you can see, these are not very uniform because I always hand draw these. So you'll always find them a little bit. natural and not very symmetrical And this is the filament this also I am not going to cut right now And the last step is the leaf don't worry too much about the shape It doesn't have to be very symmetrical let's check it one more time so here are the pieces that you need I am going to start with the spathe so I have cut little piece of the brown paper
just place it like this And remember the instructions that I gave you before. All these lines. You see this, They have to be vertical. if you cut horizontally then you will not be able to shape your flowers so always keep this in mind. Some, just put it on this side like this and you just cut it up. So this thin ones are really very delicate. So you have to be very careful when working with these. so here it is let me adjust this a little bit we need only one of this now the trumpet I am going to do a peach and a yellow one Again, you have to remember the direction of the fold of your crepe paper. So now we have to cut this part so I don't like to make the scallops very uniform and very symmetrical that's not how the natural flower has it. So let's start cutting this. If you want, you can follow this pattern or you can just go ahead and start cutting and it doesn't have to be regular. just follow this basic shape a bit smaller and bigger. Because that's how the natural flower is. If you're not happy with it, you can do a little bit more cutting on it it appears to be a little bit flat from here so I am giving it a little more cut for the petals I'm going to use yellow, I am removing this fold remember if you are cutting multiple petals together don't cut too many of them. Otherwise the edges will not be nice Slide, just go ahead and cut one of it at first. remove this part Try not to cut on the fold as it is hard to get rid of the permanent folds it wont be a problem if you are using a roll if you wish to cut multiple just measure this again Always remember that these lines, have to be vertical I will just go ahead and cut these I am cutting three at a time it's better to stick to that So we have four we need two more And I think we can get one more from here you can keep a box handy and collect all these mini pieces. Sometimes I like to use these for small flowers I don't like to throw them away Okay, so I think it has some folds let me take afresh for last one Let's quickly do this. alright so here we have 6 petals remove all this the scraps from before we can use it to cut this Just cut a rectangular piece from this Now what you have to do basically is, these are the cut marks so you have to cut in in thin strips like this, but not all the way basically we have to make 8 to 10 cuts you can just work with whatever you are comfortable with, Not too many also. So this is basically a reference for you. I'm just going to cut off this and the last one is our leaf so I am going to use the olive green. place the leaf here. Since I'm using the duplex paper you don't need any wire or anything to shape it up further just gonna round it off a bit This is the leaf. So now we have all the parts ready. And we can keep this template for future use. here we have everything ready to make our first flower
5. Shaping the Petals & Leaf: Now next up is shaping the part of the flower. So we'll start with the filament. take it up in your hand, and then just pinch and roll like this We have to be very careful when you do this. Be careful not to tear it off. So just like this, secure it like this from here. And then hold it between your index finger and the thumb like this in gently, like this. So we will do that with all of these. Do each one separately. This is how we shape the filament. Next up is our Spathe And so for this, you hold it gently like this. Use your thumb and be careful. See, it's very delicate since I told you this is a 50 to 60 GSM paper It might just tear off, so not to worry, we can cut more, in the center. We just go like this. So a few times, 3-4 times then you take the top pinch and twist gently we don't want to do it too much, the open it slightly only the topmost part has to be twisted like this you can also place it in your palm and rub your finger at the center. Like this. Okay. So that's all for this one. Next up, this trumpet for this you need the skewer if you don't have a skewer you can use pencil or anything that is thin like this So first we're going to stretch it. these are the vertical lines you hold it on the top part because we want to stretch only this not this only the top part hold with your finger and thumb and just gently stretch it. And then you just take the skewer and roll it to only the to part. Like this. If you feel you need to stretch more and just pull it up a little bit. take the white glue apply a very thin line and keep in mind which side you want inside and which side you want outside? Just according to that, you have to glue it. I want the darker one to be on the outside And especially when you are rolling this up then also you have to remember with side to go in and which side will be out Just to close this up. like this wipe off any extra glue press it gently So once this is done and dry, you can just roll this again use your thumb And this pull it out like this. Just like this. Now next up is shaping these petals. So first of all, what you do is just hold them in your hand like this. And this central point that you see you have to fold it here make sure your fold is coming here and then with you thumb you just press it to reinforce it And this part you hold your index finger and your thumb and do this gently So this is secure your fold. You hold it like this, bot your thumbs here Your fingers below like this, and then just gently stretch it. The same thing we did with the other side. gently stretch it Now, if you have never worked with crepe paper, this might take a while to get the hang of it. just keep trying. Make your first flower has a trial one next up you take the skewer and you roll both sides place you skewer like this and you turn it over slightly only this much Same with this side, place your skewer like this and And you just fold it So this is how your petal is going to look. we will do the same thing with all of these fold at this tip Then you reinforce the fold. hold gently and stretch hold gently and stretch sometimes the paper tends to tear off that is totally fine You can cut more of it. last part is to roll So you'll put your skewer like this on the edge, turn it between your thumb your finger like this. And then you just remove it, place the skewer, roll and remove same way we will do this all six are same fold, reinforce, reinforce one more time, stretch and shape one side stretch and shape the other side Do this gently even if you don't have long nails you can still do this Stretch, hold and stretch. And then stretch. roll and roll again two more to go. same steps fold, reinforce, roll Pull and stretch. just like this other side just like this
last one don't worry that all the folds have to be in the center There's nothing like that. Just have to make it like this That's all. reinforce Stretch, stretch. Okay, so that's it. Not everything is done for the leaf we don't need much of the shaping. hold from here and run your finger and thumb like this from straight it has become a bit curvy like this All the parts are now shaped So let's move on to the assembly next.
6. Assembling the Flower: Okay, So with that, we come to the last part of our flower, which is putting all of these together to make your flower. So what I like to do is if you have thick wire
00:00:11.010 --> 00:00:13.470
then you can just cut it in half and use it. But if you don't have very thick wire I'd like to fold it in half like this. press nicely from here Then we are going to start with putting the filament first. put some glue here then use one of the scrap papers put some glue, cover this part and just roll it up like this. If you need to put more than, just put a little bit more, So it's really very important that your glue doesn't make your paper fade away. do check it first take your fillament and wrap it around like this Once this is done, then we put the trumpet, put a little bit glue like this on bottom part And then you just take your trumpet. and put it through like this And then you just make one, folds here just a few folds here at the bottom. Try not to touch this upper part because we don't want it to stick. So just work with the bottom and then you just take your sewing thread and tie it tightly like this Okay, now may need to shape this trumpet, so just push the filaments to side like this. And we need to broaden this. be careful with the filaments if you are having trouble shaping like this you can, again use your skewer. gently press it to shape it Even that bad of a brush like this, or use a paint brush or pencil Even a pen like this. Just be careful with the filaments. and then you're done. If you feel that the filaments are coming out of the trumpet too much Just take your scissors and carefully cut them up like this and now they are all inside So that looks good. Let me pick up the thread. Since we made six petals. So they will go in and set of 3-3 So just to show you how we are going to put the petals, as you can see in this flower Let's see, we have 1, 2, and 3. This is the first layer. And then in-between these we have the second layer of three more So let's look at this part first this is all we are going to put the first three petals now as you can see, the folds are here So just remember that while attaching these If you want, you can glue them I just like to wrap the thread, just continue with it. So here's the first petal. First you align it here. You have to remember that it doesn't way to up or way below the trumpet So just align it here with the trumpet like this This folds will go up, not like this. This will come up on the inside of the flower and just hold it like this carefully. If you want, you can always use glue if you are not comfortable and then you just wrap it up few times tighten it a little bit Okay, So once this is done, you start with the second petal So since we have to put the petals like this, 1-2-3 for the second one again, you have to keep in mind all of those things, the folds, this will come towards the center and just place, just slightly overlap it like this. And we are going to continue with this thread. just a tip you can see this is the center place it like this, slightly overlapping. and check the folds on the inside So that's why I don't like to use glue, because if you're using thread you can always unwrap it, remove the petals and start over wrap a few times and then tighten it a bit then the final gap, slightly overlapping and just gently tighten the thread now the second layer So what we have to do, 1, 2, 3, and then 1, 2, 3. So we'll just start with this here Again the folds on inside towards the center. Like this. Just wrap up like this All right, Then these two. the petal will come her, double check the folds are on the inside And then you just wrap it up And then the last one. So these are the two. here third one will come align it at the bottom. and then just tie it. the flower is now done just glue it nicely secure your flower then you can apply some more glue apply on the thread also and then finally you can just cut the thread now these two parts are left next up is the green tape, the floral tape this floral tape already had some glue while you put it you keep stretching it to release the glue as you can see it change color So initially then you will make your flower, it might feel a little bit sticky on the stem. And this especially happens when your tape is very new you can put some glue here so it secures tape nicely So we start like this. Make sure you're covering your thread. Like this. once one round is done And you have to hold it from you. And then keep going, now the tape has to be slant so that wraps up neatly while rolling keep stretching So you can see the color changing a little bit. So when it is at an angle, it wraps up very nicely and neatly. once you have rolled a bit about an inch or so from the base of the flower. we're going to attach this brown part, the spathe. So we'll just put some glue here. take this brown part curve will be on the inside not on the outside. You just put it here like this. don't bother it too much. And then you can just continue with the rest of this stem. Pull and stretch and an angle and then keep rolling. keep wrapping it up. if your tape is sticky enough, you can just wrap it and leave it like that. If not , then you can just put some more glue here to finish this stem. you can just cut off. So that's your flower is now done. And the last is the leaf. put some glue at bottom about two inches. And then we just place it like this on the leaf, see in the center, just stick it. let it cover the stem from below remember curvy part should be on the outside leave your flower to dry completely. the last step is shaping our flower. It is a little bit dry. You just hold your flower from here
00:13:34.550 --> 00:13:37.175
Start with outer layer open the petals like this hold it like this Shape it upwards give it a little curve now the second layer open it up almost 180 degrees. shape the trumpet a bit if you want. one extra tip if you want your trumpet to be bigger just go ahead increase the length of this a bit now the last part Hold it like this. and just . just bend your flower like this. This will go up. Just bend your flower So that is the final part. and now your flower is ready
7. Class Project : As I said before, you can try various combinations, like peach and white, yellow and white. And this is orange and yellow. And I have one yellow on yellow also, so you can mix and match or make one bunch also. So for your class project, I want you to create at least one or two flowers. You can use any color combinations that you like. two flowers can be placed in a bud vase and decorated of make a bunch of five to 12 flowers or more, you can combine different colors Or you can just pick one single color and make them same Same combination of maybe orange and yellow or white and yellow and make all the flowers like that. So that is it. I hope that you really enjoyed watching this class and I'm looking forward to all your wonderful creations and a few ideas you can do with, as I told you before, you can make a few flowers to put in a thin vase was or you can make a whole bunch and decorate in a basket. Or you can just, leave the leaf and wrap them on the twig wreath or a wire wreath of any kind and just make Easter wreath or spring wreath. So that means you can use this.
8. Final Thoughts : If you enjoyed this class and if you would like to make more flowers with me, follow me and stay updated about my upcoming classes. Thank you all, and I'm really looking forward to all the wonderful creations that you all are going to make happy crafting.
 Dr Megha Cassandra, Art Therapy Coach, Watercolor, Handwriting Expert