Transcripts
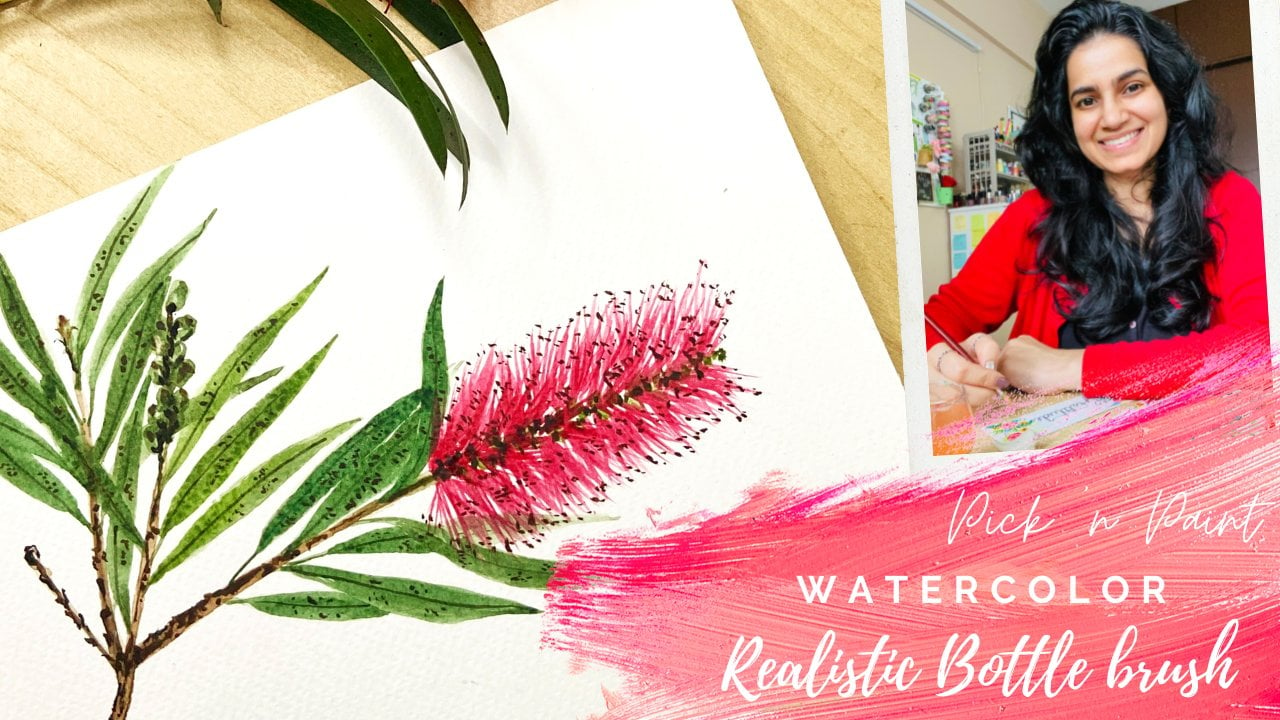
1. Introduction: Hi everyone, This is Megan
and I'm a watercolor artists. These and Bangalore, India. Here are a few of my
watercolor works. I'm totally in love
with this medium, and it is one of my favorite. Nature is my biggest
inspiration, as you can see in the spin things that I
love painting it a lot. If you liked my work and if
you want to see more of it, you can visit my website, which is by the BCG.com and
find out more about me. Or you can also
follow me and find me on social media
with the same name, which is by the art bug. Watercolor is not just a
building medium for me, but it is something that I
do when I'm stressed out, when I'm anxious and
it helps me a lot. In today's class
we are going and painting three
simple house plants, which are fairly common. So you might have one
of those at home. So just stick them
out for inspiration. Or you can refer
to my main thing. And you've been
these step-by-step, we are going to
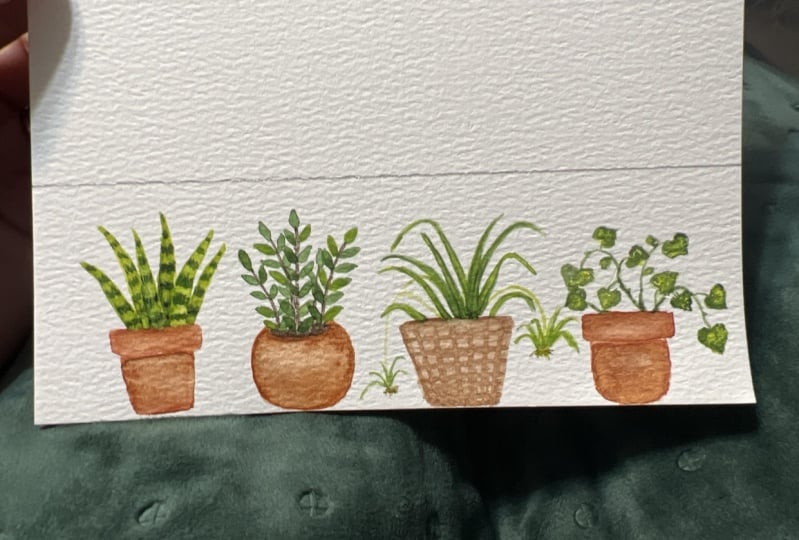
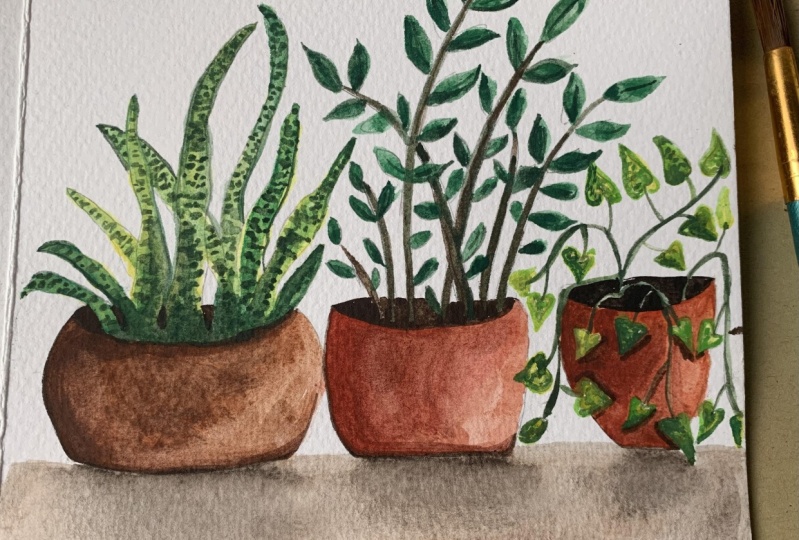
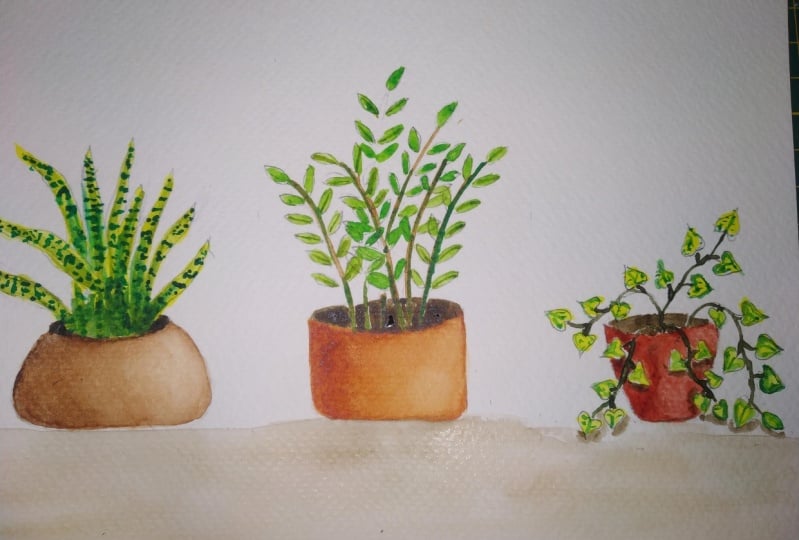
do a snake plant, a ZZ plant, and a portals. These paintings will
not be hyper-realistic. This will be more for
fun and loose typing, dense, but they still look, give a look of the real plants. So I hope you will
enjoy this with me. And in the next lesson, we'll go ahead and see what we materials we will be
needing for today's class.
2. Materials: All right, so let's have
a look at our materials. So here I'm using my round
brush number 8 from Princeton. And then I have delve into
and you don't want to, but I also have my discharge ready valid jagged so that I know
what colors I'm using, how they look on the paper. So it's always a good idea
to have this ready with you. And then I have this 100
percent gardening paper from Fabriano, which I will be using today. And this is what we
are going to bend. And I have two jars affordable, some tissue you're in. You will also need a pencil and an eraser
if you're drawing. But if you're not very
comfortable with drawing, you can just go ahead
and kick off the sketch which I have provided and
you can just trace it, or you can take your fame and drawing it whatever you prefer. So in the next
lesson, vehicle ahead and draw the illustration.
3. Drawing: So I will just go ahead
and start drawing this. It doesn't have to be exactly
same when you are drawing. You can also go
ahead and change and design a little bit like if you prefer
this kind of board, you can make all three the same. Or if you have any
other design in mind, you can use that. So forth. I'm just lightly drawing
board till and then look little bit go from the neck and just two lines here and then
we just leave this. And then you just
see if you need to think a little bit changes to get the symmetry or anything. And you can just stack, make sure that you are
going lightly or else. And then you can also go ahead and like an integer result. So that's it. It doesn't have to be very perfect and symmetrical. And then you just go
ahead and draw this need. So what you'll do is
you'll start look like this long lines and make
it a little bit crazy. And then just complete the leaf. The nice point. Okay, So one here,
then one gram. Follow the same
steps for the sheep. When can the street
and this one here. So whenever you are going to
make sure that it is very, very symmetrical
and normal since we have covered under
full bulbs now it's time to fill it in for
maybe one can be your food. These are mostly
street mode video. Go beyond anything. So we just did that in mind. But along with that, you don't have to
make triangles or spikes or 20 dollar anything. You have to maintain the shape
and bring in a little bit, a little bit here to come here. And so that's again just to get the same thing can be
straight like this. The Emory one small one here. This summer. The space and deeds of work. So that's it Then when you
can meet here on this site, just like the IEEE try one. And then you just do this. So this is it for the drawing, but rest, all we will
do while we paint. Now let's move on to the
second one, which is ZZ. So that one has a
board like this. So this is really simple. And then the Gulf or the neck. And this part of even
just likely he suffered the ZZ plant in the stands will start
like this with a little broad at the bottom and then
the tendon as they go up. So one hertz, as we did before, you first divide it
and then you fill it. Had been drawn in the center. Then one yield. This is good. We are beyond your
ability named John, how many leaves you wrong? If you have a blonde at home, then you can just
refer to it and then see how long you want your illustration to be.
The single goal here. If you're overlapping
each other on the street because it leaves
are very straight like this. But I think these are enough. And then from the leaves, they are in the set of goof, does typically leaves sheep. Like this in a V-shape in sets of group amine or pretty big. And mostly the same size they
are on throughout the stem. So this all can you have broken it into end and just
complete the whole thing? If you want to see
if the leaves are closer or farther away, you can always refer to flood damage and the Internet
of the real gland. And then you can
just observe that and then accordingly
you can do it. So if this stem is in the front, then you make the
leaves fully for this one and for the
one we just behind, behind this, for that you can make the leaves so that
they are hiding behind. So that's the only thing
you have to keep in mind. And just show you, do you hill? So for this one which is behind, like this, stem
has to be over it. Just draw what do we can see? So like this, you have the
product and the scenery. We just complete all of
these and then we'll move on to our last one
which is the hotels. So this is done. I am. And then we can just
like in this later because it's a little bit doc. And then with the cardboard, it's just a normal shaped. And this amendment, The
Seagull again for the bone. And this is a poll tool. So just the stems are coming
out from every been hanging like this because it has like
a clipboard and a few hill. I think this is it. And then for the leaves,
they are heart-shaped. So first a mini stem
will come out and then, okay, So this heart
shapes you have to do. And appealed again beside is
you can just do like this. And then I'll do a bond is
coming in front and just it is that skin off. My case. Little bit here and there. The same thing
looking formula and then the same but
also you can need only then can feed dance with me. So the same thing,
you have to follow hill on the door if you
wanted to come first. And the free ones that you
want to do and then they do, you can do on the half ones, which you just want
to show sideways. Like this. Yeah, so that's
it with a growing body, you can just complete this one. And then like lines on this. And you have to live than this. Just like this. Make sure you are using a good reasons so that you'll be learning is nice and deep. Back on the mirror
at quite a bit. So that only that the Lambdas do that did just to guide
you and not being deemed anything with this. Yeah. So just finished the cleanup
and complete the drawing. And in the next
lesson we will go ahead and start our painting.
4. Painting the Pots: Okay, so let's start
with our painting now. So first of all, we are going to do is go into do these bots. And as you can see, these are all invading
natural galore. So you can either do same color, RV them a little bit. So what I'm digging
in my thinking in mind is that NACADA style. So I'm just using those shades. So from here on my gallows, I'm just going and
digging this bond on birth and on this side. And then mix it up
with a little cadmium. Cadmium you to get
that lovely rid off reddish, orangeish brown. So like this. We start, is start from the corners and the border
and just reflect on dry from one side like this. And it's sealing that light
is coming from the side. So just wash your brush and then just predict
and be fast with this. Otherwise your being pages dry and you will get hard lines. And we don't want that. Just take this. And then you just mix it
nicely in the center here. And that's it. And
then an underline. You can use more of
brown and orange. Again, the same technique
we are going to use. This starting from
the darker side. Wash the brush, split the scholar under the consent
has to be this effect. And this is a bit of what
these things actually give it a more of the Lakota look
McGautha box look like this. But if you don't like it, then you can just go ahead
and apply one more layer. From this one, we will
just leave like this. And for this one, we just
blend this color again. More pigment. Just apply that. And just make sure your
brush is nice and dry. And then you just
spread this onto this site for this one. And then the last one, it has more of
leaves here so you have to be careful
or if you want, you can also do this in the end. I think I'm just going
ahead and rename this. So for this, I already
have this color here, so let's put a little
bit of red to this one. So this is a little brighter. And then again, be careful
where you're leaves are. Make sure you avoid them. The stanza of gears, Adult going to begin on this same technique. For less the skin. A little tricky. Like the bus, is still a sequence and you
can still do green on this. Unlike watercolor
is John's feeding. So we have to be
careful a purpose. If you leave whatever species we have pretty plus ten minutes. And just finish this up. I think that's it for
now later we can do more on that when we
do the final touches. So after this first
one has dried, so we just go ahead and in the next lesson we will
start with our first plant.
5. Painting Snake Plant: Rachel, you're starting
with our snake blonde. And then what I'm doing
is taking lemon yellow. And again, as I said before, if you are confused
about the plants, you can always take all
those original images of the real plants on the
Internet and then follow that. These dips, mainly I'm just going
ahead and applying this. So go This, just start with
the tip of the brush and then rash or the
shape of the leaf and just quickly fill these kids and then just guessing where you're going to heal. Okay. So now it has already
started trying a little bit. So next is sap green. I'm running out of it because that's one of
my favorite greens. Take it on the fifth
and make sure that it's more towards need
to dialogue soap. And then again, same thing. Start Meeting a
little yellow border. Dogs. Just like this. We can also use the BGN glean all the
median you for this, if we like that Gallo, making this end, I have
ended up in this one. I'm just going to use nine step. So seeing this, choose
to live, leave, leaving the little
yellow border on your own beliefs and your deeds, the warm front you
can just add in Greek art and shadows solution. Now this is enough later we will see more details on this. Again, it is a little
bit dry, not too bad, or not completely dry also, the kind of know what
you can call them. So this is what we need. So for the last
part of the lease, known, you can add a little bit, again, more of sap green do it because we just want us apt to become
a little bit darker, but we don't want it
to become brackish. One. This is the Gullah
that we are looking for. And then we will just go
ahead and start on for them. Then the deans or designs, which you can see underneath. Again, to get a better
understanding of this, you can always do
forbidden liquor. And just like this, start
from above, keep your hand. We didn't lose. And what I'm doing basically is
just a gender difference. The brush to create this kind
of design on the leaves. It just kind of lines like this. But broken, broken lines. This. You're going to be Thanks. And again on what
they are symmetrical, you won't have to lose
change lanes I needed. Yes, it's basically
the same pattern that you have to the beat. And the only thing
is, and this part, you can just put the link for the stock photo, few beliefs. We can add this dark group. And then it's just a dip and
continue with your design. Let's keep in mind this leaf is in the front to this moment, have the design on the
tree, on the data, the dome near the edge of the fork in front this land to the end here. Just like this. Yeah. So same thing.
You have to continue, andrew, all the
rest of the leaves. Just like this. This also you can always have
a look and see this plant, this plant because
they come in a variety of in another ID and also the
color is quite different. So you can just look at that and see which color scheme
you liked the most. And you can just go
ahead and follow that. And these are not
hyper realistic, so you don't have
to do it every day. Delaunay not writing it, hasn't got the look which we
knew we were looking for. The I think we just saw appeal. And this is mostly
done this for drying. And then let's move on
to our second block, which is the z, the blood
in the next lesson.
6. Painting Zz Plant: A key, so forth, ZZ, those stems are usually
a little brown at the bottom and then as the core of it blends in income screen. So if you are more
comfortable with only green, then you can do
that on the ways. I like to add a little brown. And so I'm just using
my burnt umber Europe. So I can start with that. And then just leave it off. You will be leaving them
very bright, wrong, my slope is exhibiting a
bit stone when people hear. That. Means infinitely good bit no more glucose in a marketing
guy up and you fast. Second, then just wash the
brush quickly and again, we're going to do it yourself. And then we just take
it for the buck. For the fourth order number, do you use the tip of your
brush so that your informants? And nine, we don't want that with a
click, just like this. So just to politically got killed. Once this is done, we will just go ahead and do the leaves. So for the leaves,
again, as I said, we are not doing something which is very high
Berg realistic. So again, this they have a little bit of the agenda of them in green,
all the really good. So I'm mixing my sap that video again because
I don't like using the scholar on its
pure form and also the follow-up which matches
more with the yellow. This is the scholar. The same column
I'm going to use. So for the first part you
can just like the Gullah. We dip your brush lately in the water and then you have a light left like Gullah left. So working again with just go ahead and do a
few leaves with that, which are on the top. So that would be
the lighter ones. So maybe four or five from
the dock, the whole set. You just naturally
they will have physiological effect
of not doing anything, just cooking flat
color on these. I'm adding more water. In Liberia. That is just for the radiation. And then we can actually do
these almost like the dipole. Again, because the rash
has been made on Sunday, will come light on there. Boom. For this last one. Since it's behind
becoming like that. Then again, the same gallery. If you wanted to get out a
little bit of black and brown. If it's more than
just financial. And they're still
Denise missing that. Now we read ego
among.this.gov on a group. The new families
transcends the group. Slim shoulder joint,
you can the sheep. About glimpse, which is seen
to be pending within mint. Human speech. I
have combat those. You can be first. These light-dark, close to each other on the back. So that's it. So now we have a nice variation of
light and dark in these. And if you want to do the veins, you can do that on so
M on a Mac and b's. So you just take this, now go Some each other. Because maize and
pointed and then just go ahead and under
these conditions. So i not adding to all of them. Again because they wanted a dog, you can add a little bit
black and fairly less water because meeting the goal, this is detailing
and wanted this much very loosely, two
or three words, can you turn on the
fan and just tending. Came up some collinear. So just clean it up. Just to unlimited. And so I think that's it
because as I mentioned before, to guide me, I'm on to the NRI. Anything you just hide,
burden and mystic. So that's it for
our second count. And then in the next lesson we'll go ahead and
you can be doubled.
7. Painting Pothos: Okay, so far are buddhist
seek this chart. So the first step is
our lemon yellow. So I'm taking that. And then just go ahead and
give a touch like this. Not you don't have to
fill the whole leaf, but at least the warden, but of all the leaves. So that's the fun with this kind of mixed use
and realistic dipole. Again, be quick and fast. You can finish the
painting files and I don't have to
be Jewish D delineate your painting looks
very nice and pleasing and has a
realistic Dutch. Quickly, all of
them are non done. We would just go ahead
and declare sap green. Nope. Again, you can always refer to the real plan
to see how the colors are, how much variation is there. And according to that, you
can apply your colors. So what I'm doing is now
it's time to blend is clean. So I'm just applying
on the dip first, then on the bottom and then just leaving a little big deal. If you look this up language
and in-between like this. So kind of just outline
it and then just drop and everybody being
here and nice tip. In this highlight, this. The ones on the side,
you can be more green. It shows that you're going to
do much green and the lies lived on completely clean and just use the
yellow that you have, the book in your first layer. So quickly by the yellow
is still a little bit the Denver vet school ahead and apply this kind of
just outlining with the brush hi lesion. And if you prefer to
bind any other that ID. And then you can look the big
picture of that dependency, how the governance are. And you can go ahead
and do that. Same day. We just finish all of beliefs. So one still is
our normal, again, unique and did the
same sap green. And just to make it
a little darker, I'm just adding a hint of
this burnt umber to it. As you can see, the
colors red and dry. And I'm taking it on. And then you just
go ahead and read all these stems with these, we are not overdoing it, so just make sure that
you do them in one go and many bidders extended doesn't do this so that you
can do the hands-on. So she said this and say to do the assignments, just click on Finish when you want to buy them
so that you won't miss anything tonight for this one. We can continue teacher. So you could see this tip means that you have missed
anything to school by eight. And then I use this one, feel tense to CAD and executing. On this night species. Yes. It's a little
bit of clean up. So that's it. I
think that is also no non-legal want to overdo anything because these
are not hyper realistic. And then in the last part, we just go ahead, which is
how the plants that are spot. So we just go ahead
and in the next lesson we'll finish these drops off.
8. Finishing the Pots: So for all these three, what we need is very
dark brown or black. So I'm just mixing and all
the colors which are here. Adding a little bit
of black to make it deeper into the facility. It also, so it's
basically do sulla mom or the shadows promote this crease. Geometrically. Used to seeing him for this, For this one you can see most of the H and then control it in beach that you see
like the stems carefully. So let's see all
mentally this and then you just quit
and finish up page here for this in
this light depth. As long as I'm alive or anything you look. And the last one,
so for simplicity, the ground plane so
that you know that you have three sentences. So yes, I can see it looks good. No. I came to normal and
go over to anything. So that's it. The gap is not done and this
part is also done. And in the next lesson, what we do is just
have a second look at the plants and see if they
require any leader general, if you have missed
something, maybe add a little bit of shadows here and there and just
be done with the plants.
9. Touch-Ups: So let's start with
this deep blonde. And nobody do is get the same green and black. So we have a dark color. So why do we do this? And a killer just bleed
a little bit of shadow. Summing these little behind and just get a little bit of color variation and homophobic, don't know, man, the
edge of the port. So this has been aligned. And the vaccine is the shape. We can fill in here
with a new energy. And the Neil, you just have a look at all
the names which I learned. A veiling made you can see welcoming and then
just blend it in. Yes, I think that's enough
for the detailing on these. As far as this is concerned, I think it does come to CU minor want to
add anything there. And for these, we can use the same dog run
that we did our milk. And this insight, sorry. And then the DAG again
just to drop in the liver. Shadows like this on the part. With the screens are touching. So all I'm doing is
using the same brown. Rare they are touching the bark. Is doing another colony. And try this 1001, 17 3D animator done in black here. Just not sit. Let's go on this lens one unknown. So I think that's it, the detailing of our glands. And now you just move
on and finish it off, that this be sparked and then not being
able to be complete.
10. Painting the Base: Okay, so for the BC
already put a line here. What I'm doing is just
putting some clean water. Now you can choose any
color that you like. It can be gray or brown, not any of the day dawns. What I'm going to do
is just I have a lot of Galois Hill leftover. So I'll just move ahead
and just drop this. The first year, which
is really light. Can also leave a little bit of whitespace that are not so good. And just, and then more Gullah. Think this even darker. So I'm just adding a little bit. So this mixture, and then
you can just drop that. And for B, so the Gulf
alongside thoughts. As you win, then you get this game to be in you. The needle won't be anything. Sequence some dark blue and
just pumping through this. Yeah. So that's it. The speeding of our
lungs is known done. And in the next chapter, I just let you know about
your class project.
11. Class Project: All right, So for
your class project, you have to make
the same painting. Again, you can change
the colors a little bit, but it would be nice
if you keep this are the dunes because
they look nicer. And for your back,
for the black dots, you can change the colors. We're just keep the dorms for C. And these are the glands
which we have dried, snake blonde, the
ZZ and bottles. So you can just try these and just being this along with me. And then upload your project. And I would love to
see your creations if you would like to change
the plans a little, you can do that also, but I suggest that
at least being two of these same ones
and the third one, you can either do
the same or you can do any one of your choice and then just upload
your project. And I would love to
see your version. And in the next lesson, I just have some final
thoughts for you.
12. Final Thoughts: Hey everyone. So this
is the end of the class and I hope you enjoyed
painting with me. And if you really
like this clause, do liver, watch it after
watching and drying it, dude, leave a review for me
and if you want me to feed any other house glands, then do leave that
with the review also and submit
your class project. I'm looking forward
to it and if you like my work and if you want
to see more of it, you can visit my website, which is by the odd bug.com, or you can even find me anywhere on the social
media or by the same name, which is by the bug, can see my moral typing
things by my role, and follow me on other
social platforms. I hope you enjoyed
this class and I will see you again in my
next Skillshare class. Still land nearby
and happy painting.
 Dr Megha Cassandra, Art Therapy Coach, Watercolor, Handwriting Expert