Transcripts
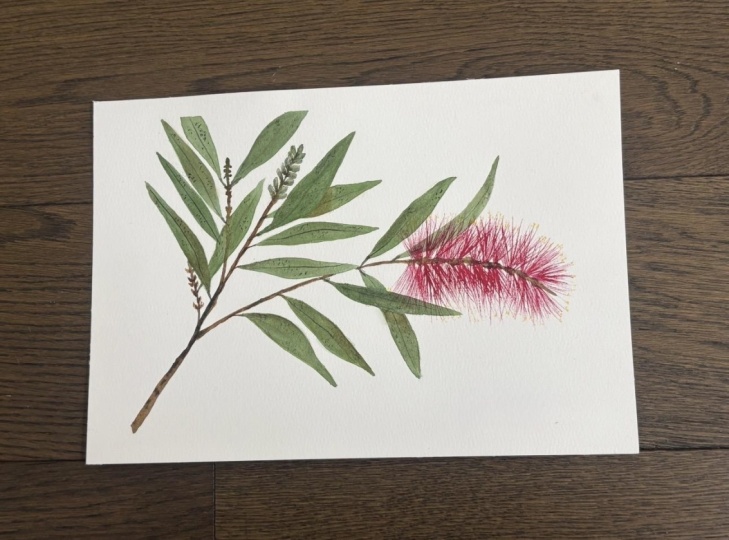
1. Introduction: Hi everyone, This is Megan and I'm a watercolor artist based in Bangalore, India and might be retained to paint with watercolors are realistic leaves and realistic flowers. And in today's class we are going and painting this beautiful bottle brush floss. And I'm going to tell you what are the materials that we will need and what are we doing.
2. Materials: Okay, So here are the materials. So I'm gonna go and use to round brushes, number 4 and number 6. This one is from Rosemary and this is a silver brush, silver silk. And then two jars of water. And my oven. So and Newton watercolor set. And this paper, which is from Fabriano, a 100 percent cottons. So we are going to need two sheets on top practice and one for the final painting. And then finally, the reference which is here. So I picked this up from the garden and I will always tell you that please be mindful when you are picking the flaws in either you pick them up from the wild and be careful with that. Or if a VR doing flower like this, then you can just pick it up from your garden if you have it or if you're borrowing it from somewhere, bees due date, their permissions. So here it's it. And then I could show you this is what we are going to paint today and these are the practice ones. So when we just go ahead and and yeah, a tissue and we just go ahead and start with our session. And the next lesson.
3. Practice: Case on obviously start with the practice and I have a few stems here. So this one you can see is full of bugs, and this one is half-open. And here you can see this one is completely gone. The bars have just gone from this one. And this is a fresh one. And this is the one which we are going to paint today. And I have one more hilar that verbs and leaves. And then this is the old one. So I'm just going to take a few of these out from this. So he added this and a few leaves. The comedian just take off from this for practice. Sorry about that and hit. Okay, so we just arrange these hills. And then listen, we need, but think from Yale. And this is the flag that would be the repainting nato. So I don't know, I don't want to spoil it, so I just leave it, it. And now we're going to go ahead and back as these elements. So if you look at the leaves like this here, on behalf of these if level brownish, blackish spots on them. And here are all the individual parts of the flower to flower. And then this so enlightens our annual been said, I have this Gallo, which is dear. So this one is already there, which I will show you here. So scrim signal x2, which is here, the two matches or fake leave at the flower, which we are going to be. Select this I will show you. And this is a good reason to always have your swatch guard ready so that you can pick the right colors. And if you don't have it, you can make sit like if your color is more towards red, then you can analytically black to it or a allele. How blue to make it neutral, or maybe a little bit of brown to it, so that you will have to check that whether you have the right color or not. Since I already have it, I'm just going to go and use this one. And for the leaves, again, we've referred to the god with the swatch guard. This sap green is the one which is closer to eight, as you can see here. But what I feel is I think I will mix these two and maybe add a little more black to get the scholar which we have here on the leaf. So we'll start with the leaf. Now. Here I already have some sap green and emerald green as well. So I'm just gonna go and mix it all together and then add some more green to it. So both of the greens, I'm adding and a little black. So as you can see, we are getting closer to the scholar of sap green. So if you are not very good at mixing colors, then I suggest that you mix your color in one go so that you don't have to do it again and again. For practicing the leaves, we have to make sure that our brush is full of paint, our pigment. And I'm just going to start with this, with this here. So far the shape, what I see is that both the brush and then you press it down, and then you lift it up quickly. Make this. So that is how you're going to get this shape. If you want, you can also use a slightly thicker brush like this is six. So you can also use eight. Then again, move along and start with the 1009, then press the brush on the VAC if you have less water. And this is what will happen. So could sway, we need to practice. And then you just lift and a little bit. You can also do Anki like this. A little bit touching you can do on so we can just vary the colonial Natalie. Again, you start with the fifth. You press the brush. And then you lift it up and just come back and fill it up. This tips are quite farm and Mary point D. So I just leave it like that. So few more maybe we can try it. Again. Dip and base it on the B. And then lift it up quickly. Then just go over it once MOOC. Once it's dry, we'll do the more the dinner. And you can see from here it's long. But this part is not that long. It's abroad from Yana and then I'll immediately it becomes a lovely narrow and that becomes, so that's what we have to move. So remember not to drag your brush too much and make sure there's enough fought back and pigment in your brush. And last time he stopped and then rest. And then leave. If there's extra model, you can just soak it up in your tissue. And like this. Okay, so this is now done and then we'll just move on. These. We don't need to do physically move these. And then the main thing is these flowers. And so I'm gonna use my Clemson you. So how do we make this individual ones? So we just put some paint like this, and then we make sure that there's not too much paint. And then you just adjust your risk TO. And then if we just pull out from this leg, this is the key randomly. Okay, no color. And then you just add that here. And then again, need a beat. More water. So you could kind of draw like your rest your hand and then just take it out. You can get more color. You don't have to use the galoshes. The main thing is to keep your hands table and just go like this, quick actions like this. And you won't have to, you can't overdo it. And you can go over it again and again. So be careful with that. You just practice this quite a bit small. And then since clone this and just go randomly like this, take some more paint on the brush, not too much water. Let's not do less also, otherwise, it will be dry that way it means is and a little random like Don't move on straight, straight like this, are few like this, like this. So like this, it has to be the end of this. You can see in the yeast, they are all not the same size also. And then some of them are going here and there. So just follow what do we use C. And if you don't have this flaw or we label our available, and I'll just put a picture of this for you to use as a reference. And of course, the bending will also be there for you to use as reference. Okay, So this is done. Now we describe this, which is the buds and leaves we have already done. So I'm just going to go try this 11, bad. Maybe resort like this. So from bulk do dom like it's coming later. And usually these flaws will be hanging like this because they're heavy. So usually refine them hanging like this upside down. Then a little of this bond undertaking and that I'm putting on the top. And then just start with the greens. So the first will be a very light green. And just follow this shape which you see here. Like this. I'm just doing it. So right now I have more water and less pigment. And since they are all over this stem, so a few will come here up. I'm going making those first. Then. And come here and the center came here. And they are quite random. It's not that they have been already fixed kind of a pattern. But we can't be making all of them on the site. So that's why I'm doing this. The key and then we add a few more. Just falling this guy knee, slightly longer shape they have. So these are the bads key and then we'll take some brown and just put the DR. And there are few places like this. And then again, the darker green that we made before for the leaves. So that I'm taking and putting here on the bottom part of the Bund. So it will just go ahead and lead on its own and not do much is selected like this. And once it's striving to a few more details, and let us just come back to our leaf. And what I'm doing is I'm just adding a little bit darker color to the same green that we knew before. And you just go ahead and meet the events from it to YouTube, it to go, Can I have to change the brush size? I use this one null. Yeah, like this, we need very fine ends. As you can see how they are hardly visible. Make sure that the leaf is nice and dry. Before you do that, it's complete this one x2. And then you just go ahead and do this sparks that I had shown you before as you can see EEO case. So there are a few spots here. So this leg in, you're just going and digging more black. You just see this one was not properly dry. So the colorant spreader level with helmets, that suitcase, which just keep in mind that you're going to do the wins on a very wet, on wet leaf and you can try first. So this is just a YouTube galore. And then we'll just work as you can see here in this spot, here and there, not too much and not too less, also. Make this. Okay, and then we have this to complete. As you can see, these brown bots. So we are just going and making those. So again, I'm going to use bond and learned a little black so that it becomes darker and there is very less water on the brush. Regards to this is verifying the dealing and we don't want it to spread. So just go and touch the character. Just press slightly like this. So these are the stigmas and they are very small and grandmom, so on like this, you just have to patch your brush and you don't have to be exact value. Yeah, they are. Red line is coming like hill. You can also put a few to show that here also, it's there. It has to be a mix of brown and black, not totally brown auto PBL. So you can see now it looks like this. Quite similar. Okay. And the last part is again a little black with and if your water on your brush and then we just TO really clean to assure chancre bugs. Just touching the TRND. So just like this. And then the whitespace that he had left before, we just take a clean brush with water. We will just spread this allergy. If you want very little white gaps, you can still leave my paintings leaving just knew spread the color which was there. And again, it will be slightly light but it won't look like. And one more layer of this green if it's needed. So we think that's about it for the bugs. And next week, we want to update it. And if you want, you can just keep practicing these elements so that venule finally painting. You are well-versed with all we're going to do this because, you know this fine bots and getting your store this like this. In this one though, color that I had worked for the Wien has just spread out dens pilot. So just to be careful and just to be sure, I recommend that you practice it a lot. And in the next lesson, we are just going ahead and starting our painting.
4. Painting the Stem: He saw no one CEO practice and all is done. You can just scroll ahead and end with a painting and then always keep your practice sheet with you so that you can refer to it. And we just start with this brush. And I'll just bring our red reference also. Sleep, we adjust it a little bit more. Okay, so here we have our reference, which is the smaller brush. Okay, so now we'll start with bending. And this was the reference which I have kept you. So we just try and make this and Levy of bert, which I had so that one baby below here. We can skip this one and instead of that, we just go ahead and do this. So I'm just putting it here. Okay? So now I'm going and using my number 6 brush. And you can see just follow whenever you are painting like this, you have to follow up colors that you see. So here I see shades of brown. So we'll just look in your ballot and model colors to your head so you have the ammonia. I'm going ahead and using that start from this corner if you want, you can also draw it. Nobody usually when I do these kinds of, these kinds of flowers, I usually don't draw that. So what do we will be doing basically is a walking in layers. So don't worry too much about it. Like this. What I am seeing and your schooling being led. Then one of it is going up. It just ended heel. And then again this one, which I put in between for the buds. So make this a pin length for that part for now. And then we will start to layer it and just keep adding to it. So this part will be hippo for a while. He'll do leaves and the system means stem. Then again, I'll put one more layer that the legal problem along a little bit darker. And what you see here is a little grayish. So to get that, you can add a little black. And as we go ahead, we will keep on doing more detailing to this. You see more black here. Funky in underfund Lord Braam. Because seemingly finish leader, whatever font is seen. Then again, if you want some people, they could be the speed, especially when they are doing a background and since we are not doing any bank moment and so on to keep it loose. And I and so like good, bad deed might be, but as it being some others don't like that. So you can do whatever you prefer and what do you find easy. And just to add that one brush, its scientific name is Gallus daemon. So since childhood we have been using the Lord Potter brush. So I'm not very familiar, so I just looked it up for you all. It's mostly found in Australia and in India. We have seen it a lot. If you have it available. Like now it's blooming urine and the other trees are like full of these flaws. And again, do excuse my pronunciation for sometimes I just see flowers, sometimes I say floss because it just can't get confused between the two that lead to and should I be using because I'm just, you end up using port on them. And now you can see these little, little black dots on it. So I'm just adding those Hill is to get the look and feel of it. The rest of the detailing and all you're doing them like this. I'm taking more of a dark brown with less black in it. And then just going ahead and doing the stem. Now I think it's enough.
5. Painting the Leaves: Okay, and then I think next, we can start with the green part first. But since we need a lot of color, I'm just going ahead and mixing it so that they don't have, don't mix a Kenyan again. And entities there will be a lot of lading and noise. So we have to do a second layer. So this is the first one. And then just go ahead and magic as closely as bad as possible. So here it is. And just to be really refer to this and that witness mostly use. So I just see a very tiny part here which is a think about, which is just coming up. So we'll just do that with a little green and then add a little prominences like this. So this is what I see here on the top. This is the part. And then just move on with the leaves. Don't have to be exactly the keys. And somebody just some who like the same day that we followed before. She just go ahead and do that. Just refer to the director. All the outgoing so that you end up making something which doesn't look natural. Touch this up again. And don't worry too much about that because this is our first layer. Like this. Slightly overlapping them. This link and go straight. More, More villain and in just one small spots, a tad lean on f divide 2 because the brush might be a little too dry. Like this. And these collaborations that you see are good because we don't want it to look flat, so I don't bother too much about that. And this was the bark bark. So a few leaves on this also. Just let them go like this, overlapping a little bit. And then we just come to the bugs and AQIM IV, just a follow that gave the chief end. Then in the center. Then on this side. And again got that whitespace. Then go in the side view. And Cain is key like this. I think we just new to our GYN. Then we just go ahead and do more getting on that. And the last part is this one. So we just do the leaves what this might look at donning all songs during the ones on the case. Well, I think for now that much fuel use. And then we just go ahead and do our flower or no. Okay, So remember the one that we practice before, the thing. So that's what we're going to do.
6. Painting the Flowers: Okay, so as you see them coming from all the directions, if I show you here, these are the bugs and they are coming from all the directions. So that is what we have to go. And as you can see in this painting also, we just go ahead and use some team water and our crimson. And start from your end. Before that, we need to add some greens, which is coherent and just like we did for the buds, the same way. But this time we are not making the month. We're just dropping the green color and the same pattern very randomly on the center as well. And then on the sides. So just follow the same pattern. Key that this, all right. And then we just come back to this and then dropping. And then just stretching out from that. Make sure you have nice color on your brush. Because you can see that it's a very bright, nice crimson there. So a few we will do along with the greens so that the colors blend. And the rest will do when green is a little bit, try it. When kids come out and nice because this is not very ten, Excellent of brawn. So firstly, what do you have to do is just continue doing this on the sides, dropping the color and then just pulling these our patients distribution. And then these single ones, they are not very broad as we saw here. So when you are taking a dog bone to go to many are going on make it broad shape. It has to be Kinsey versus this condition. And from the sites you see that it looks like a cylinder, so that's what we have been made. Then you are also some taking it out, make sure that it matches. Then go random and both the directions. You're not then, then you know, as long as your hand is steady and the lines are coming nice and thin, you will have to worry too much about it. Now as we come to the top, It's just leave it here. No gaps. Discontinue with a baton on. Keep doing this. Now you can see it coming into shape and a v, we just go ahead and keep on adding to it. Now I'm going a little faster because we already have lots of lots of it orderly done. And like it's very, you know, a tick. So that's what I'm going to do. And no, I think the green color has almost dried. So we'll just go ahead and do the same things here. Is you just imagine that the system, but from which the flowers just coming out. And then you just seem the, you do it randomly, one on this side and one on this side. And some of you are few in the center like this. So basically what we have to lose gaffer. And then you just see when ever you need to add a little more. And we have to give a little bit careful because it should not look very scanty also. And at the same time we should not Phillip damage that this brush kind of effect is gone. Okay. So for me, I think for now it is looking good. And you just go ahead and then we just finished these leaves. Now.
7. Finishing Touches: Some father leaves me just add one more layer. This damage is add a little bit more sap green. Now whenever you are adding lambdas, be careful that it doesn't interrupt. Welcome to blackish and doesn't come to dock. So now we are getting the color of the leaf. So with our strokes previously, we already have the shape there. Now let me just do fill them up. You've been just on could we do issue but every bit, the one we just behind this, we will just leave it like that. Because we don't want despite the flower and that cannot be collected data. Okay, So we will do the same thing on all the leaves. And in the next lesson we just go ahead and do a little bit of lighting on the buds, sorry, on this, but on the game is done and you just go ahead and use this same essentially darker green. And then just touch on the tips of these little brown lonesome. And then as we did before, we just go ahead and take a clean brush and then pull our green color, white, this white spots mostly little bit you can do an R group. And then the darker green will go below to show the shadow. Mix with black, which we have used to clear the leaves. Too much. I'm here and there you can just go on. Oh, go ahead and just put that. I think that looks okay to me. So basically our main focuses the flowers, so I can just leave it as-is on each need to do much of detail and also on this. And now as our leaves are starting to dry, then we can just our data darker green, the same green mixture of a little more black. Okay, interest in the beans. Just use my finer brush and the mofo. Sign this. I'm just very lightly doing it, man, I'm an AC again. Skin this up a little and make sure that your being is in sheep, the leaf. And, and then once that is done, no dots that we saw before. So these from brown dots as well, the detailing. And then just here and there in showing on how much water just dotting it like this. And you feel confused, just have a look at the loops that you have and just copy that. Okay, So the system, and then we just go head and to pick the same thing on these leaves and that we are more Baghdadi Delhi 30 dealing on the set of the leaves is also done. The bark, bark also looks quite good. You can just add a little more black wherever its margin damage. And some others. You're not comfortable with using bland. But I think I can't do without lag and I use it like most of the time. And this little bud thing that we did here. That also looks good. And a little bit more. You need to make this look a little rough instead of just a straight line. So that's what I'm adding understand. And few more black dots on this, especially on this side and on the group. We did it before only. Just this part. I'm making it darker. Like with watercolors. It's like if you overdo it, you were just going to spoil it. So we have to be very careful. How much you want to walk on it. This is since this is already done. Just take this and mix it with a living green. Didn't heal. So that's it. So I think the leaves, arms. There's been this stem, everything is done. The last finishing the kids, which we have to add, is this on the flowers or you just go ahead and do that and then I'd been it will be complete. But this'll be on the last block, which is the fly. And those are the dots which are going to reach v. I'm going to group the slightly dark brown, these dots that you break those DO. These are what we do is we just touch the brush, but we don't want make dots. It has to be slightly, make this a mini kind of spread out like this. More brown, less black. And just randomly just absorbed this because this is a VD view. So you have to assume bandwidth in the front, like hill, because of color just looks mixed. So what you can follow is, first you do on the site, the rest your arm, your risk to L so that it's easy. Keep adding big membrane, you run out of it. And they have, they can be different sizes. They don't all have to be the same size and not to pick. Let's kill school. I had an AND gate on the site, own dime and just doing it quickly so that we can go ahead and use dread, so key and then we've just gone, he'll on and you're familiar of urea in the same dove each week, a gum from the green bark and listening don't have. So you can see. The Gypsy are also, even though it's grounded to school ahead and photon that. And I'm going to call Weather Center also at few parts. Again, always unmute, move a little back and look at your painting if it's looking okay, you don't have to know just as trifled for perfection and keep on working on it. If we think it looks good, then you just stop. So for now, I am to stop in here because we have to add on a few more details. So I'm just taking the darker green and then put them in between and a few places just to show the depth. So make sure that it's not very black, it's darker green. And leave the little green also which we did before, because we just don't want it to be hidden by this all do Iago. So this darker bar to just add in the denier and data are flawed is not as broad as this one, which is okay because if you see this one is not very broad. And aerate soil like this. I think it's mostly done. And maybe unlucky more strands. If Fremont, again, add a few. Let's see how that goes. And as I said, I've read a lot over the edge at all. As of now, I think it looks quite good. Just a little.gov. And fuel the lemma into sounding. Because if we do go much, then this offline thing that we did, the full that they just call obey this law. That is enough. I think there's two or four batches of the browns in this new ones here. Okay, So let's come back to this, which we would plot you are trying to paint. I think this, it looks quite okay to me, so I'm just not going when you're liable anything more on it? Look at the stem. You have a closer look. So we have answered all their details on the leaves, the leaves, and the flowers. So I think it looks quite good. So that's about it. The painting is now done and I will be a batching this for you, do refer as a reference so that it becomes easier for you to paint if you don't have access to the actual real, a real life flow. And in the next lesson where you just see I am dog more about your class project.
8. Class Project: Okay, so for your class project, I just want you to recreate this. I will be adding this as a reference picture for you that you can print out or just open it on your computer and try and pin this. Like this. You can follow the instructions so that it is easier and always remember to practice before hand. The more you practice, the easier it will be for you to do. And remember all the tips that I have mentioned before. And I'm hoping to see your project soon. And if you like my Voc and if you want to see more of it, you can visit me. I find me anywhere on the social media by the name, by the bug, on all social media channels and on my website which has the same name by the odd bump. So I hope you've enjoyed this painting session and I'm looking forward to your submissions. Thank you and happy painting. Take care. Bye bye.
 Dr Megha Cassandra, Art Therapy Coach, Watercolor, Handwriting Expert