Transcripts
1. Introduction: Hey everyone, This is major. I'm a watercolor artist
based in Bangalore, India and the founder
of the art book. I simply fell in love with
watercolors when I started it. And my favorite thing to
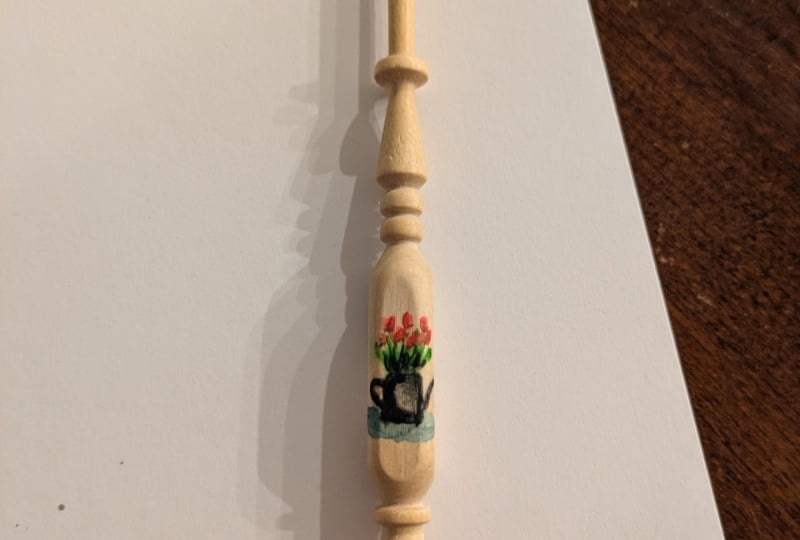
paint in watercolor flowers. In this class, we
are going to paint this beautiful miniature
tulip illustration. And I will show you step-by-step
how to go about it, how to draw it. What are the things
that you should remember by painting miniatures? And we will also discuss all the materials that you will be needing for this class. If you'd like Weinberg,
you can check more watercolor classes
which I have uploaded. And also you can
visit my website, which is by the art
bug.com to know more about me and to get lots of freedom sources which
I have put up there. Since it is springtime. Let's go ahead and paint some beautiful miniature
tulips in this class.
2. Tips to Remember: Okay, so before we
start our class, there are a few things
that you have to remember when you are
painting with miniatures. So here is the paper or the
sketchbooks that I have here. So this is a mini sketch book. So this is three centimeters
by three centimeters. They come in different sizes
and you can always check out your local stores or online
for this, for watercolor, I have this one with
white paper and always remember that you
have to use thick paper, 300 GSM or more,
and 100% cotton. So they come in different
sizes that you can see with this one here is super tiny, so this is around
1.5 centimeters. Like this. It's up to your preference and your comfort level like
which one you want to use. And then I have here
is the magnifier. So you can see it
has one main glass, then there's one
bull's eye as well. So you can easily use this if you have trouble
painting like that. However, for this size, this is not that much
needed or required. But if you feel comfortable
painting this way, like especially for checking
out the details and all. You can always go ahead and use this as kind of magnifier is easily available on online
stores, Amazon, etc. And then it comes
with a light also. So you can just put about 3M
then use the light options. If you want even more
clarity with depth. This is here and then mini balance like this are
easily available again online. So this is also a good tool to have if you are a manager level. If you don't find this
kind of sketchbooks, you can always go ahead and cut your paper into any desired
size that you prefer. You can start with
slightly bigger and then gradually move
to smaller ones. And do this and have
a smaller mini paper, but always use a 100% cotton and 300 GSM or more for watercolors. Then when we come
to the brushes, here are the brushes. These are all numbers
0 or lesser than that. This is what I prefer, although separate brushes
are also available, which are miniature brushes
or detailing brushes. So they are available
separately. So in the whole set you will
have only tiny brushes. If you prefer that, you can use that as well. Then in that you can get different types of
brushes like round and flat and maybe a gap
dung or a dagger. Different types of brushes
like that you can easily get. But as far as I'm concerned, I prefer using these
normal brushes which are 0 or less than that. And always make sure
that your brush has a very nice point because for many HR that is very,
very important. So that's about the brushes. And this is all optional. These are micro miniatures. So here it is. This is a micro mini. This is 11 up from
miniatures. You can see here. This is super tiny. Here it is. You can compare
it with my Neil and see how tiny this is for painting
these kind of miniatures. This comes in really,
really handy. But don't move on to this until you have practice on this and
become familiar with this. So this is a miniature one. This is just a normal
brush which has to, which I have cut
into smaller ones. So it's a number 0. More
miniature books are here. You can also cut the paper very, very tiny like this to create
mini paintings like this. You can see here, since
when the water clean water, some many palettes, these are
all miniature collections, just in regular
miniature short pieces that you can find online. I have these here. I have many brushes. Then mini containers
to fill water, and some many da, by ballots like this. These are all optional if you
want to have everything in one limited box and you really love painting
with many edges. Then you can go
ahead and use this. Then another important
thing to keep in mind is your hands are always please your hand
like this formally. If you want, you can
always tape the paper. If you are painting
in a sketchbook, hold it nicely and family don't put it
in the air like this, always like this table. Then go ahead and do
your painting like this. Heal and move the top
part of your hand to add all the details like
this mini, mini stuff here. That's very handy and then
the tip of the brush. So you can practice
some strokes, please your hand like this. And then you can just practice
doing these fine lines. Dots like this, zigzag. So this way you will
know how much water you need if you have too much water than the lines or detailing with not come nice. So this will give you an idea. So it's like a warm-up
exercise, our practice. Crisscross batons. Always your paper and
your hand have to be stable so that your
miniatures turn up nice. Like this, just using
the tip of the brush. We've been also practice. Make this shorter hill very simple. Like this. Then you can add leaves on this. You can pick up a big paper and fill it up with this leaf. So it will give you a very
nice warm of practice before you started with the class and start
painting miniatures. Unless your hand is nice
and stable in study, you won't be able
to pay it nicely. So make sure there's no
shivering or shaking like this. Practice nicely before you
just hop onto the glass. That's really, really important. That's about it, the materials
and everything else that you will be needing in Barton tips and I
have shared with you, these are the few tips. So do keep this in
mind and remember, by taking this case. Along with this, it is always a good idea to start
with something simple and illustration which does not have too many elements. Or just start with one simple
stem and one simple flower. And then just take
it gradually as you that this more and
learn while painting. Also, if you have never
painted lineages before, don't just right away
start with this size. You can always start with our 33 inch by three inch
of orange by four-inch. Whatever you feel
comfortable with. Miniature painting can be
a lot of fun because you can just fit everything
in the palm of your hand, all the materials that you
need and take them away any way you are going to fit
everything in the pocket. It can be really fun. If you are a beginner, always start with something
very simple, like just one stem of
a flower, one leaf, or a very tiny illustration so that you would want
to get overwhelmed or intimidated by it and start slow and then gradually
keep moving up. You have to always
remember that practice is the key until and unless
you keep on practicing, your skills will not improve. So don't give up even if
your first, second, third, fourth painting does
not turn out very good, you have to still keep at it and keep on painting
and practicing. And the best part about
many edges is that if you are painting
something similar in both, then it will just take a few
minutes for you to do it so you don't have an excuse
that you don't find time. Just back this
practice and practice. Always use the right tools so that you are not frustrated. Emmanuel, colors are not
working and your brush is not working on paper and
your paper is not good. So always big good qualities and the right
materials and tools. And another important thing
is to enjoy the process. Just have fun and just keep
at it and keep doing it. Whenever you are painting
with many edges, make sure that you
have a lot of light. Natural light is the best, so always sit near a window. Otherwise it will
put too much stress on your eyes because painting with many edges can be really stressful sometimes. Or use a magnifier for better clarity and less
stress on your ice. So I guess that's about it. Just have fun and
keep on practicing.
3. Materials: Let's find out what
materials you will be needing for this miniature
watercolor illustration. So first one is this
mini sketch book. This is a three centimeter by three centimeters
sketch book. If you want to use a
little bigger you can use. But for this miniature, I would recommend this size. And if you don't have
this available with you, you can also take a 100%
cotton watercolor paper and cut it into three
centimeter by three centimeter. For this illustration. Here are my watercolors, Winsor and Newton watercolor set that I will be using today. And for the brushes I'm using normal number 0 or
lesser brushes for this, I don't use usually this manager brushes
are the detailing versus which come for
making my many edges. But if you've referred those, you can go ahead and use them. This is basically what we need, watercolors and tiny
sketchbook makes sure that your paper
is a 100% cotton. And then we have our water jars, two jars of water, some tissue, pencil and eraser. That's it. So let's go ahead
and start with our class.
4. Sketching: Let's start with sketching out. What again are water jar? So what I'm doing is lightly
sketching with a pencil. So you can make any
shape you want. We are not detailing this. It's just a rough sketch drawn with a very
freehand style. Just a basic body of the cannon
and a little handle here. Also a tiny little spout
on the other side. That's about it. We are just, we have just done a very simple, basic and freehand
sketching for this end. For the flowers we
don't need to sketch, we just go ahead and
paint directly on them. Let's watch the next part
on painting the leaves.
5. Painting the Leaves: Let's go ahead and start
painting the leaves. Fall leaves, I'm going
to use sap green. You can use any other
green if you prefer that. I'm just loading up my
brush with some green. Then by pressing the
brush, I will start. Then gently lift up the brush, leaving a nice and fine point. So we have to create
deeper in the leaves, start broad and on the
top they will be narrow. So that told the truly
believes are just like this. However many you want, you can go ahead and paint if you want to vary the
color a little bit. I just add a few
on a little bit of yellow for the sap green to
make it a little lighter. And maybe do a few leaves with that to bring variation
in the painting. Seem. Start broad and then finish the leaf with
a nice and fine point. Just to repeat and made pain 67 leaves or however many
you prefer or you like. And just make sure that
the vase is full and nice. And also their space
to add flowers. For a slightly darker
shade of green, you can add little bit of
cobalt blue or ultramarine blue to the sap green to
make it a little bit darker. We are done with the leaves
now in the next spot, we go ahead and start
painting the water again.
6. Painting the Can: The leaves are not done
that start the scan. Now for that I'm just full supplying some clean
water onto the base. The body of this on all of it. Then you can use
any color you want. But for this one, since we are going to put a nice vintage kind of old look. So I'm using a grayish color. What I have done is just to mix a little bit of blue into black, and then I have made this color. If you have any grades
available with you, you can just simply use them or you can mix
your own grade as well. So on the clean wash off paint, water, I'm just applying
a little bit of paint. Also. I'm just waiting it a
little bit like on the top, I have put less
pigment on the bottom. On the side, I'm putting
little bit more. Similarly on the handy, we will put a little
bit even darker just to show that it has a little
bit of shadow on it. Then the spouses, these
parts are very, very thin, so you have to make sure
that you are resting your hand nicely and
firmly on the table. And using only the
tip of the brush, your brush should not
be loaded too much with water otherwise,
lol gets spread. So just make sure about that. Here we are not doing that much detailing since it's very small, so just a dark pigment I have
applied onto the handle. And seemed that
this part as well, whatever shading and color
variation we have to do, we will do it on the
body of the Ken. So this is the bottom part. I'm applying more color here, make it a little bit darker. Then we will just
spread this color. The remaining part
makes sure that you blend it nicely so it doesn't
look like a hard line. Also a little bit
cleaner from here. You can always grab
a tissue and soak up whatever extra you
have while it's wet, it's really easy to do this. Just lift up the extra column. Then you can just
continue with your gray. On this side near
the spout also, I will put a little
bit darker color. Again, we are not
going to do any more detailing here because
it's very thin. Taking some more color. This top part. Since the leaves are there
only one side, you have to do. Then just put that color in. Wherever you have space, just fill it in
the darkest color. Then finally, the remaining
site, the last one. That's most of it, just a little more color
in the corner and then blending it all
nicely in the cans. First leading is
pretty much done. We'll paint the flowers
in the next spot.
7. Painting the Base: Okay, So the candidates done, Let's do a little bit of these, do it so that the painting
has a nicer look. I'm again using the same gray
that we use for the can. You can mix in a
little more blue or more glad to change
the sheet a little. First, I'm doing a
very light version, slightly overlapping so that it appears as if the
candidate is sitting on a surface like median all shelf or
something like that, I'm also adding a
little bit of blue. So just spread it
evenly on the base. Take a little bit
more darker or more, more of the gray color. And just highlight this part. Just to make just to show
as if it has more shadow. Then you can just go
ahead and blend it in so that there
are no hard lines. This is the first layer will
add more details to this. Meanwhile, in the next part
in start with the flowers.
8. Painting the Tulips: Let's start with
our two loops. Now. I'm using this nice abrupt pink, which it doesn't
convert this set, but it's from Winsor
and Newton, opera rose. I'm doing first, I have taken
less pigment on the brush and I'm doing these
mini oval shapes. This is more like a
half of one flower. In the same way I'm going
to paint a few more that light shade the half part of the tulip,
like mini ovals. Whenever you are painting these, remember to rest your hand
from the on the table so that you get nice
and clear shapes. You can do however
many shapes you want. And then one status done, we'll start with the other half. This will be darker pigment
and the same breed. Bill finished the oval, making one more confetti. You can also leave a little
bit of white gap in-between. Half is dark and half is light. Just using the tip of the brush, resting your hand nicely. You can finish the other
half of the tulips. You are confused
about the shape. You can always refer
to the photograph of a real tulip on the
Internet just to get the hang of how the shape is so that
you are painting, painting it, you're nicely, It's just basically
like an oval shape. That's what you have
to follow here. I'm leaving a little
white gap and the light color just
leave it like that. Then you can also
put a little bit of ten line if you can, if you're a fuel or
give it the brush, you can just put one
more in line with the darker pigment on the
lighter side of the flower. As a final touch up
for the flowers, I'm mixing a little hint of
black in the same color. And then we will be highlighting
the base of the flowers. This a little and maybe
a little bit of line in the center where the two
colors we're getting mixed. It can just highlight
that as well. Remember not to
overdo this black otherwise it would
just spoil the pinks in the flower is because
they are really tiny and there's not
more than not much. Being pigment in this, with this black is just
for the highlights. And if you're satisfied with your flowers in the
first round, off, light pink and dark pink or whichever color
you have chosen, then just you can
avoid this dark color. That's about the flowers. They are mostly done now, in the next part of this class, we will go ahead and add
stems to the flowers.
9. Painting the Stems: Let's go ahead and finish
this stems for this, you can just use
sap green as is, or you can add a little bit of blue or black to make
it a little darker. And as the stems
of the tulips are a little bit thick so you have to press the brush already. There's your hand firmly on the table and press
the brush a little. And then just simply make broad, thick lines for the stems. Making the green a
little bit darker here. So that the stems
look a little bit different from the leaves
that we did before. Just rest your hand
firmly, press the brush. We just we don't want to use just the tip because we
don't want 91 kick lines. Just like this. You can finish the stems for all
of the flowers. If you want some to be
hidden behind the leaf, then just make or just paint
only that part as if it's behind the leaf. Just like this. That's about it for the stems, you don't have to
do anything else. And in the next
part of this class, we just go ahead and finish
the watering can and add whatever
finishing touches are left for this illustration.
10. Finishing Touches: Okay, So the illustration, many floral illustration
is mostly done. We'll add a few
more highlights to the watering can and add a
little bit of rusty effect, vintage effect to it. Firstly, I'm using
the darker gray and covering this part, which is the hollow part. Since the flowers are inside, it's gonna be mostly dark. Just highlighting it
a little wherever I find space in between
the stem and the leaves. Just filling this up. A little bit of more dark
pigment towards the sides. A little highlight on
the spout and the handy. And then finally on the base. As you can see once I
put this dark color, how it has just popped
out from the background. Because as watercolor
dries, it becomes lighter. So sometimes it is
really important to add these highlights
towards the end. Then a little bit of more
color, more dark green. The neck part, and
at the bottom. Then just blending it all in. We don't want to cover this lighter part
which we lived before. It is giving it a very nice glow as if light
is falling from this side, so we don't want to ruin that. And then a little
bit more darker towards behind the
GAN and in front. Just to create more shadow. And then just blending
it all nicely. Very subtle. More towards the left side as the assume that the light
is coming from the right. Then you can just let
it dry for a while and see if you need
to add anything else. Now the last job
which is the rust. So what I'm doing is wherever I want to put the rest effect, I'm just so cooling in applying a little clean
water onto just that part. And for the rest you
can mix a little red and a little brown. If you have a very
judicious brown, you can use that. So I'm mixing a little
red in the burnt sienna. Then the surface that is VET. I'll just use another
brush to do that. The same number and
this light part. And just though obese
was all the GAN, and then just put in drops
of this reddish-brown. Since the surface
is already wet, it will just spread and
blend a little bit with it, giving it a very nice and beautiful old vintage
and trustee look. A little bit in
the corners where the handles and the
spotter attached. Little water there and
dropping some more. This rusty brown little bit of touch-up here and
there as we don't want to do too much. So be careful with it. Even when you are
spreading the water. Makes sure that it's
not too much otherwise, all the bees that you
did on the GAN will just get all mixed up since
it's a very small surface. A little bit more towards the bottom part where you would generally
see more dressed. So that's about it.
I think it's done. We don't want to overdo it. Let us move on to the next part and talk about your
class project.
11. Class Project: Here we are all done with our miniature do
lip illustration. I hope you enjoyed
painting it with me. And for your class project, I want you to recreate
the same thing. If you have a mini sketch book, then you can use it. Otherwise, you can
always go ahead and cut the paper in this size, which is three centimeter by three centimeter and paint
your illustration on it. You can change the color
of the tulip if you like. You can change the green. You can change the
shade of gray. They just play around with it, but keep the techniques and the tips that I have shared
in mind while you paint. And I'm looking forward to see your creation if
you like my work, you can find me by name, by the art bug on
any social media. If you try this class, do share with me and
leave a review and I will see you in my next class.
Thank you and bye-bye.
 Dr Megha Cassandra, Art Therapy Coach, Watercolor, Handwriting Expert