Transcripts
1. Introduction: Hello folks, Katrina here and welcome back
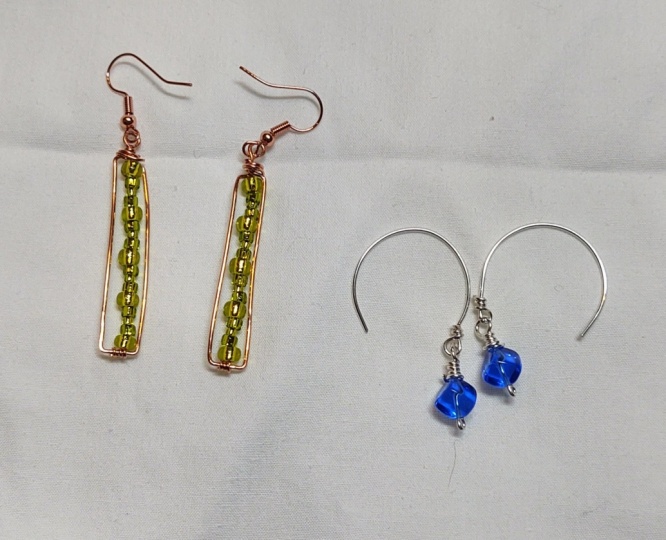
to another class. I've got two different earrings
for you to make today. And first-off is the
rectangle dangle earrings. These earrings are really fun to make because all
you have to do is change the color of the wire or the color of
the bead or both. And you can have a
whole variety of earrings that are the same style but look totally different, which is really
fun, and you might just need one in every color. Our second set of areas is a fun twist on the
classic coupe shape. These are called the
C hoop earrings, which we will be completing
with a fun beaded charm, which I will be showing
you how to rap and make. And it's really fun
because you can change the bead and get a
totally different look. There is a difference between the rose gold earrings and the silver ones
that I show here. So you want to make sure
you watch all the way through the video to
catch that little tip. And now let's jump on
into the class and make earrings that are
like a wildflower, beautiful, unique and timeless.
2. Rectangle Dangles: Starting off, we're
going to make these rectangle dangle earrings. To begin, we have
a 22 gauge wire along with a heavier
20 gauge wire. We will also be using
a file and a ruler. I'm using beet chips
for the beads. And then we also have
our earring Myers. For our tools, we're going
to need the wire cutters, the nylon jaw pyres, flat nose pliers, and
the needle nose pliers. We are going to begin with a nylon job hires and
smooth out the wire. Then we're going to grab
the needle nose pliers to create a loop at
the end of our wire. We're going to bend
that wire into a loop about a quarter
of an inch down from the tip of our pliers to create a small to
medium-sized loop. Then we want that loop to be straight over the top of
our long enough the wire. So we're going to
turn it so that it is vertical to the long
end of the wire. Switching to the
flat nose pliers, we're going to begin creating
the frame of earring. So placing the wire in the very tip of the
flatness players, we're going to create a right
angle just under the loop. And then we're going to place the wire again at
the very tip of the pliers right next to that first bend and
create a second band, bringing that long end of
the wire straight down. Next we're going to
grab the ruler and we're going to measure how
long we want the frame. And I like to make
them 1.5 inches long. So holding it on the ruler
at that measurement, we're going to hold the wire
tightly in our fingers. And then using our flat
nose pliers brake going to create another right
angle in the wire, bending it down again. Now that we have made
what is our third bend? We are going to take the
ruler again and measure three-eighths of
an inch to create the base of our frame
for the rectangle. Holding it tightly
at that measurement, we're going to again
bend the wire straight down to create the other
side of our frame. Now that we have the
frame almost completed, we're going to finish it off by bringing that long
end of the wire down so that it lines up with
the first bend in the wire. Alright, now we're
switching to the nylon jaw pliers so that we can
fully secure the frame. And we want to make sure
that the top of the frame is the same width as the
bottom of the frame, which is three-eighths
of an inch. And I honestly didn't use
the ruler at all for this. I just, I added up. So if you prefer, you can use the ruler and
hold the wires tightly in the nylon jaw players at
that three-eighths inch mark. And then take the
long end of the wire, wrapping it completely around. And then using the wire cutters, we'll cut it off before coming back with the flat
nose pliers to make sure that it is securely tightened against the frame. So we're just going to give
it a little squeezed to make sure that it
is tight and flat. With the frame made, we can now attach the 22 gauge wire so
we can add our beads. We want to make sure
that our wire is smooth. So we're going to use
the nylon jaw pliers to do that real quick. And then determining where
the front of the frame is. We're going to place
the 22 gauge wire through from the front to
the back of the frame. And then we're
going to leave out half an inch and center it on the frame at the
base there and grab that half-inch all the
way up and around. You went to wrap that
first time around pretty tightly so that
it holds its place. As you continue to
wrap the wire around. Once you come to the end of the wire where you can't
use your fingers anymore. You can go ahead and grab
the flat nose pliers to finish tightening and
flattening down that wire. Pinching both this side and then the spiral as
well to tighten it up. Now that we have
attached to the 20th to gauge wire onto our frame, we can add the beads. I really like using
these beet chips for this design because
I think it gives it a really fun kind
of beau ** look. But you can use round
beads are square beats. I think a square stack of beads would probably
look really cool. So the beads that
you choose is really up to you and what
style you prefer. I was at the end of my sport of 22 gauge wire when
I made these areas. So I didn't measure how much
wire you would actually need for these areas when
adding the stack of beads. But you'll probably need at
least three inches enough to fill up the frame
which is 1.5 inches long, and then enough to wrap
around underneath the loop. Now that we have filled
up the frame with beads, we are going to secure it onto the frame by wrapping that
wire around the loop. I like to wrap the
22 gauge wire in the opposite direction of
which I've secured the frame. And then we're going
to wrap it up towards the loop and then back
down towards the bottom, wrapping it over itself, and then wrapping
it a few more times so that the base is wider. Then we want to
bring that long end of the wire towards the
back of the earring, where we will cut it off
with our wire cutters. Next we're gonna take the
flat nose pliers and secure that end of the wire up
underneath this spiral. I like to create a
bend because it helps hide the wire inside
of the spiral. Alright, and now all
we have to do to finish the earring is
attached the IRR YR. So we wanna make
sure that you twist that loop open to the side. And also makes sure
that the front of the earring is facing the
front of the ear hook. And then close the loop and you have finished
the earring. Repeat all of these steps
for the second, Aaron. Thanks so much for watching. I'll see you in the next video.
3. "C"Hoop Earrings: This is a variation of the classic hoop called
a seat hoop earrings. As you can see it
is because it's left open and I'm going to be adding a fun wrapped bit to
the front of the hearing. The tools that we
will be needing include a ring mandrel
and a size ten, which is three-quarters
of an inch wide. We have a file to smooth
down the ends of our wire, as well as a ruler to measure
out the length of our wire. The wire we are
going to be using is a copper wire in 20 gauge, and this is in a rose
gold plated color. Then we have two beats
of a medium-size. And these are just a
pretty blue crystal that I found in my stash. And our tools. I forgot to lay these out, but we also will
be using a pair of flatness players along
with the nylon jaw pliers. And then we will also be needing our wire cutters and a pair
of needle nose pliers. To begin making
RC hoop earrings, we are going to measure
out three inches of wire and cut it to length. So first off, of course, we're going to take the
nylon job players and straighten out the
wire to make sure it is all smooth with no kinks. Now we can measure our
wire on the ruler. But first, as you can see, we've got a bit of a
curve in our y here, so we want to
straighten that out so that our measurement
is more precise. We're going to hold
it at three inches, pinching it tightly with
our fingers and then cutting it with
the wire cutters. Now we will smooth down
both ends with the file. Next up we will be
wrapping the bead, attaching it onto the wire. You can place it on a head
pin and wrap it that way. Or as I will be doing
and showing you here, I'm going to be making
my own head pin, which is super simple to do. First I'm going
to place the bead onto the wire and then
slide it on down, passed out of the way
where I'm going to create a small bend in
the very tip of the wire. And I'm making this
at the very tip of my needle nose pliers to make a bend that is as
small as possible. Twisting the wire to
create a U-shape, which I will then pinch closed. Now that we have created
the head on our pin, we can bring the bead
backup so that we can create a loop at the
top of the head pin. And now we can create the
loop on the head pin. And to do that, we're going to place the pliers on the wire, making sure that the bead is pressed all the way
against the head pin. And then holding the
wire about an eighth to a quarter of an inch
down into our players. We're going to bend that wire over to create a right angle. Once we have made the
bend in the wire, we can now begin creating the loop by holding
the pliers on the wire and wrapping
the long end of the wire all the way
around the pliers. Then readjusting the
grip of my pliers. I'm going to take
that long end of the wire and wrap it
around filling up the space between the
bead and the loop where our players were when
we created that right angle. We will wrap that long end with the wire down around
towards the bead. And once we come to the b, we will wrap the wire around
one or two more times so that the base of that wire
wrap is wider than the top. Once we have finished
wrapping the wire, we're going to take
the wire cutters and cut off the excess wire. Then picking up our needle
nose pliers, again, we will pinch down at that
end of the wire so that it is tight all around against
itself on top of the beat. Then also we want
to take the file and file down that
end that we cut off so that it's
smooth and won't catch on anything
and unwrap the wire. Now we have our bead
made into a charm and we can take our wire and
create the hoop itself. Placing the wire on the ruler, we're going to measure
22 and a quarter inches. And then we're going to hold
the wire at that point, marking two and a
quarter inches. And we will use the
needle nose pliers and create a right
angle in the wire. Once we have created the
right angle in the wire, we're going to put it back
into the needle nose pliers. And a quarter-inch from a tip. We're going to wrap
that shortened down around the long
end of the wire. Once we have that
shortened down, we're going to wrap it around
the long end of the wire. But before we do that, we want to add our
charm onto the wire so that it is wrapped onto the earring itself
and cannot come off. Now that we have added
are obeyed to the loop, we're going to place our
pliers into that loop at the tip and hold him flat against that
short end of the wire. We're going to wrap that
short end of the wire up, the long end of the wire
away from the bead. Wrapping it as far as I
can go with my fingers. I'm then going to take the needle nose pliers and
tighten that spiral together. Then I'm going to be using the flat nose pliers to finish tightening
the short end of the wire against
the long end and tell it is flat against
that long end of the wire. If you feel like it
would work better, you could also use
the nylon job players at this point instead of
the flat nose pliers. Alright, before we
bend that long end of the wire into the hoop shape, I want to show you
that there are two different ways to wrap it. The first way to wrap it
is to just continue in the same direction that
you wrapped the loop as I did with this
rose gold pair. You can see that when looking
straight onto the earring, you can't see it in a loop from which the beat is hanging. The other option is
to wrap the hoop of the wire to the
side of the loop. So as you can see when you look straight on to this airing, you can see the loop from
which the beat is hanging. Once you've decided which
way you want your hoop to be in relation to the loop where
the beat is hanging from. You. Simply place it onto the ring mandrill
and then gently bend the wire around the ring mandrel tightly to give it
its circular shape. Once you have bent that wire
into the circular shape, repeat all these steps
for your secondary, and you have completed
your very own set of C hoop earrings. Thanks for watching, please let me know in the reviews if you liked this video and I'll
see you in the next class.
4. Thank You!: Katrina here to say
thank you again, and I hope you will
leave a review so that I can know how to improve these videos in what
else you guys might be wanting to see and
learn how to make. Also, I'd love to
see you over on my Instagram page
under the same name, Katie Rose creates and tag me in your pictures of
the creations that you have made
watching my classes. Thank you so much again, for watching my classes. Please share what
you've created. I'd love to see it, and I'll see you
in the next class.
 Katrina Anderson, DIY wire jewelry and craft tutorials