Transcripts
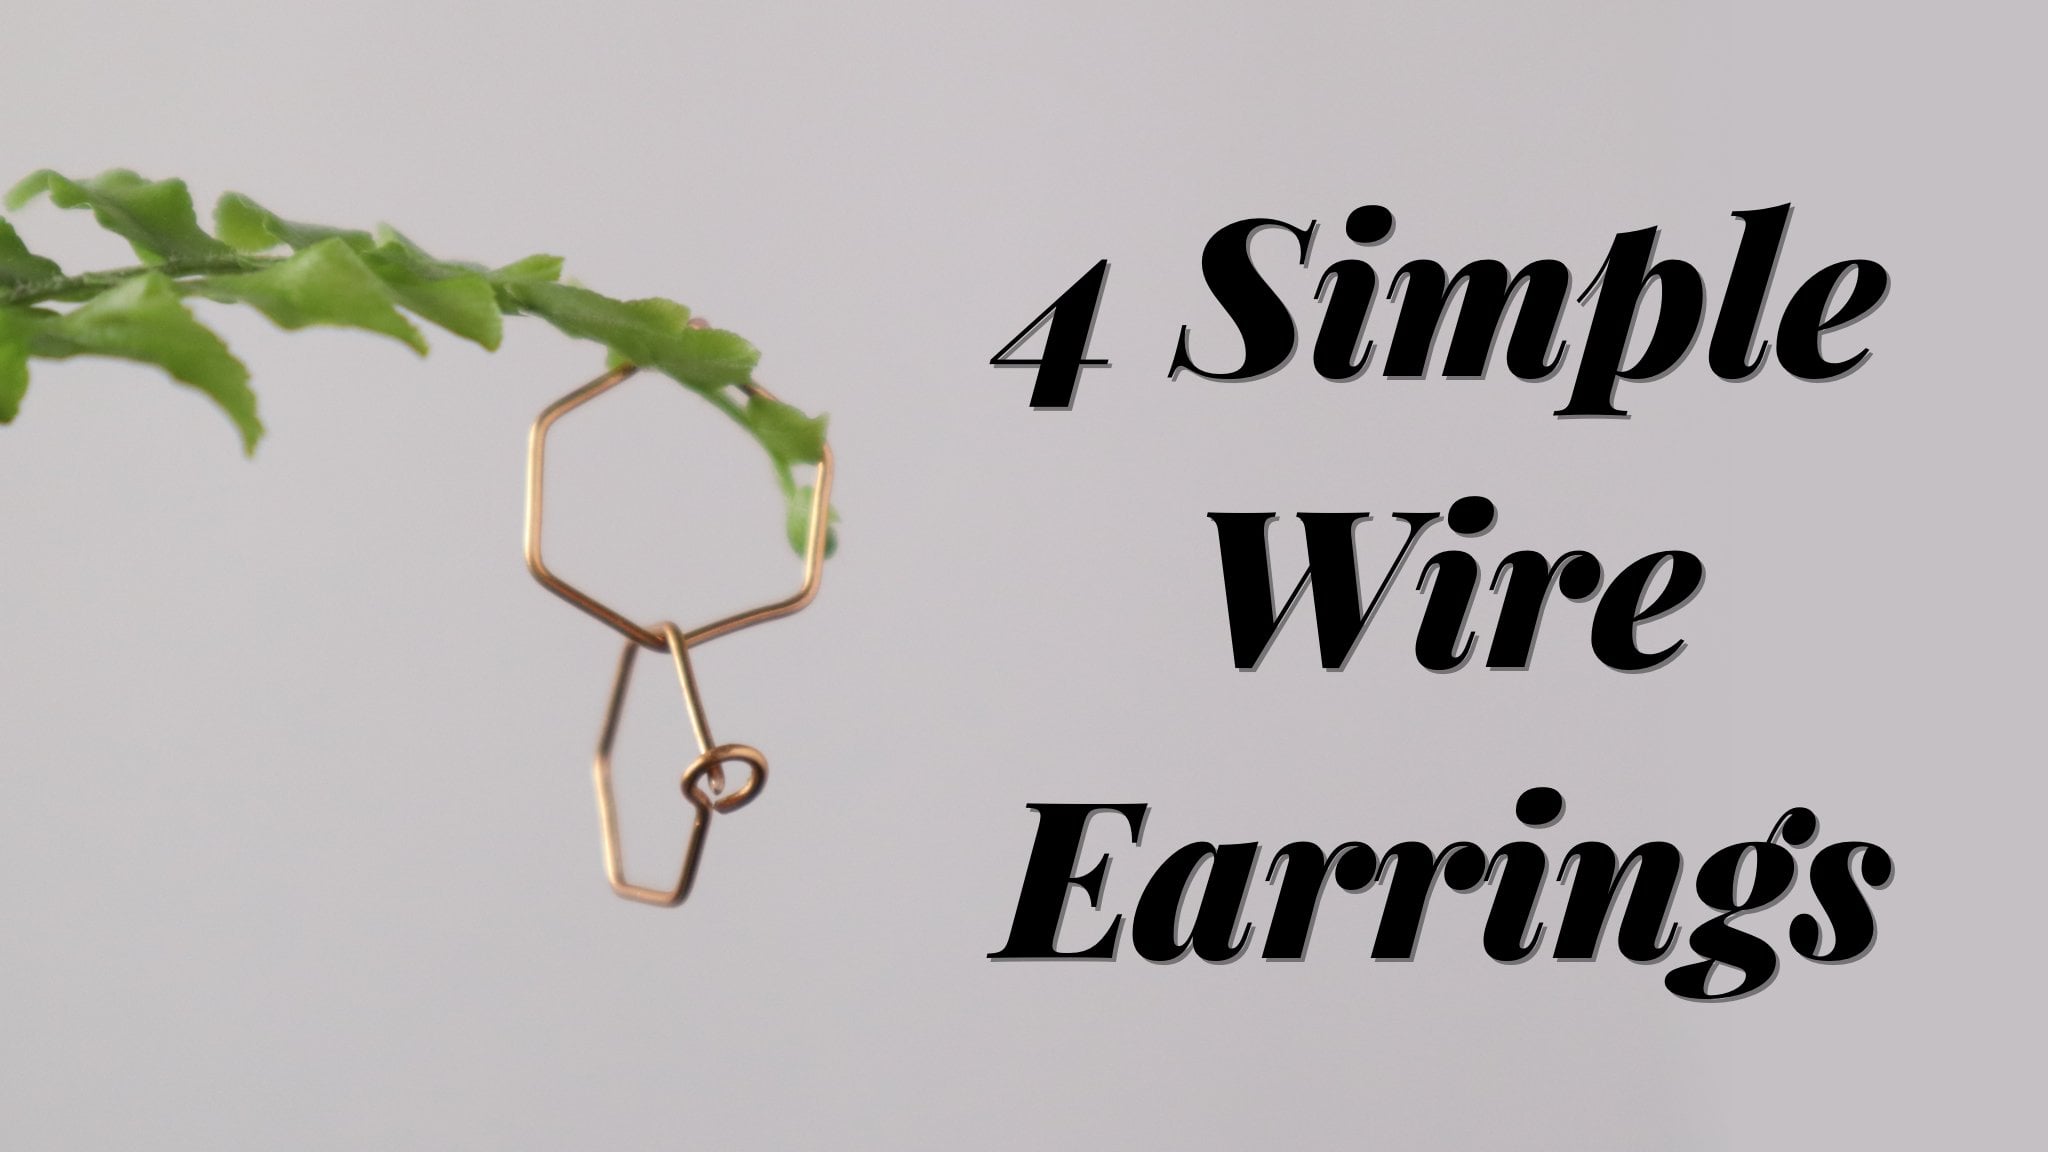
1. Intro: Hello folks, Katrina here and welcome back
to another class. In these videos,
we will be making three different
sets of earrings, starting off with a threat or style and then a
wire wrapped stud, and lastly, a
teardrop shaped post. I will of course be showing
you the tools and materials you need in each video for
that particular earring. And definitely feel
free to pause and go back and re-watch the
videos if you need to. I always try to
keep these videos super simple and easy to follow. So please leave a
review and let me know how it went for you
and what you think. And then I'd love to have you go check out my other classes where you can find even more
wired jewelry tutorials. Now let's get into
the videos and start making jewelry that
is like a wildflower, beautiful, unique, and timeless.
2. Threader Earrings: We're going to start off
with the threat or earrings. First off, our tools, we have a pencil and a file
for all three earrings. I chose this 20 gauge
jewelry wire in silver, but you can choose
whichever color you prefer. We will be using
the wire cutters, the wire straight runners, and the flat nose pliers. You can use just
about any style. But I chose these gemstone
chips for the bees. To begin making the earrings. We're going to pull out
a length of the wire and smooth it down with
the wire Straight nerd. Next we're going to add
the bead onto the wire. If you are using a shaped beads such as a circle or a square, you really don't need to worry about which
way you put it on. Gemstone beads have an irregular
shape most of the time. I'm turning this one around so that it hangs the
way I want it to when I finished the earring
with the bead on the wire, I'm going to create
a small band at the very end of the wire, placing it in the
tip of the pliers so that it creates as small
of a bend as possible. Bringing the wire
all the way around. And then we're going to
pinch it closed with suppliers so that that wire is flat and pressed against itself. Once we have finished
creating this bend, the bead will now
stay on the earring. Next, we're going
to use the pencil to create the shape
of the earring. The length that you
make the front of the earring is
totally up to you. I made mine about
three-quarters to an inch long, and then I mark that spot with my thumb and then wrapped
it around the pencil. This is just a regular
size pencil which maybe has a diameter
of a quarter inch, which is just the right
size for hearing. Now we're going to
create the back of the throat or on this
set of earrings here, I made the back to be about level with the
front of the earring. But on this pair
that I'm making now, I think it will look best
if I make it longer. And so I'm going to
mark that spot with my fingers and then cut it
off with the wire cutters. Now that we have cut
the wire to the length, we want it, we're going to use the file and smooth
down the end. One final step to give these
earrings are really nice, finished look is to bend
the back of the earring, just pressing it on my thumb to give that backside
a slight curve. Ends, pinching the ends together to give
it a subtle bend. We're going to repeat all of these steps to create
this second earring. Now that we're to the step
of shaping the earring, we're going to place
the first earring that we made back on the pencil to help act as a guide to where we need to
cut the secondary. Make sure you are holding that first airing tightly against the pencil so that
there is no gap between the wire and the pencil. And then hold the wires flush. Place your thumb
on both earrings, and wrap the wire
around the pencil until it matches the same
angle as the first airing, making sure that both fronts of the earrings stay aligned. Once we have wrapped
the wire all the way around and it matches
the first airing. We're then going to hold it
next to that earring and mark it with our thumb so
that we can cut it off to the same length
as the first airing. Then we went to
file the n smooth. Here you can see that it has
a slight bow in the wire. So now we're going to take
the flat nose pliers. And at this point, we will straighten both
earrings to make sure that everything is parallel
to each other and flat. After we make sure that
everything else is straight, we're going to go back
to the backside of the earring and curved
that long end to give it a nice curve
towards the front of the hearing and then bending both earrings so that they have the same angle and
they are matching. There you go. You have now made a pair of
beaded threat or earrings. Now let's head on
to the next video.
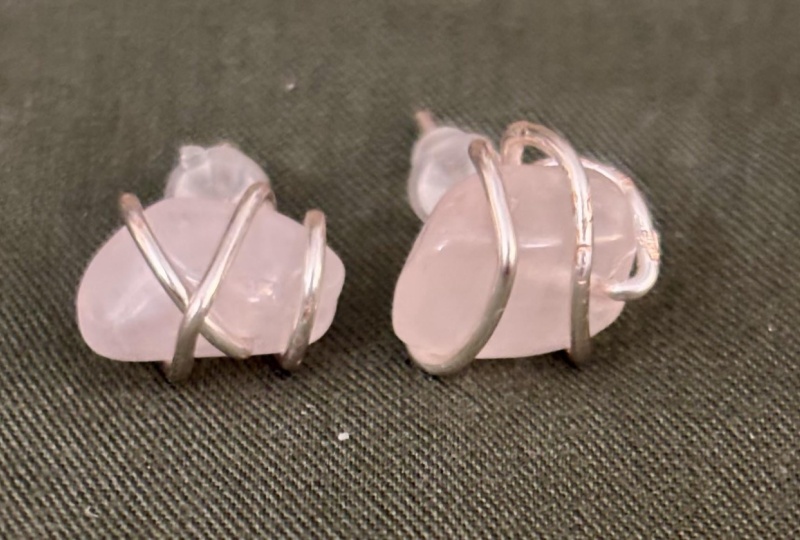
3. Wire Wrapped Beaded Studs: Next up we have the
wire wrapped stats. I will be using the
same Jim Stone chip beats that I used on the
first pair of earrings. Depending on if you choose gemstone beads like
this or around big, it will change how you wrap the wire a little bit
later in the video, we will be using the same wire, 20 gauge in silver, a file. And we will be using
the wire cutters, wire straightness, and
the flat nose pliers. As usual, we will
be starting off by smoothing out the wire with
the wire straight answers. Next we are going
to file the end as this is going to become
the post of our earring. With the smooth, we
will add our bead. We're going to slide
the bead on down the wire so that
it's out of the way. So we can create the
post of the earring. The length of a post
hearing is usually about three-eighths,
2.5 inch long. So I'm going to place
it in the pliers at that length and bend it over, creating a 90-degree turn. Side note, if you are not
using a gemstone beads, you will not need to create this 90 degree turn
in their wire. So take that into account
when creating the post of your earring with my gemstone be pressed up against
that right angle. I'm going to begin
wrapping the long end of the wire up and
around that beat, crisscrossing it in
different directions, around and around and not trying to make it
exactly perfect. How many times you wrap the
wire around is up to you. But I did approximately
three times. Once you have decided
that you are done, wrapping the beat
will bring that long and around and then cut it in a place where we
can tuck the end of it next to another
one of the wires. Once we have cut off
the excess wire, we are now going to tuck that
and down against the stone. And we're going to
use our flat nose pliers and first pull the wire out to create a small bend at the
end of the wire. And then we will tuck it back in against one of the wires that is already
wrapped on the stone. Using our fingers and the
pliers want to make sure that end of the wire is tucked as tightly as possible
against the bead. Last day, I'm going
to bend the post of the earring straight
out the back of the B. You will only be doing
this if you're using the gemstone type of
bead and not around one. And here we have
the finished pair of the wire wrapped
beat its debts. And now I'll see you
in the next video.
4. Beaded Teardrop Earrings: Lastly, we will be creating
this teardrop post earring. We're going to be using
the gemstone beads, and these are a little
bit smaller in size. We have a file besides the 20 gauge wire
that we have been using. We also need a smaller
wire in 22 gauge. Will use the wire cutters, the wire straight
news nose pliers, and the flat nose pliers using
the 20 gauge where we're going to create the frame of the earrings using the
wire straight nurse. We're going to
smooth out the wire. Next step we're going
to create the post of the earring using our
flat nose pliers. We're going to place
it into the pliers about three-eighths,
2.5 inch long. And we're going to bend
it over 90 degrees. Now we will use the
needle nose pliers to create the teardrop shape. We're going to place the
wire at the very base of the needle nose pliers about a quarter of an
inch down from the post. We're going to place the wire in the pliers at the base
and bend it over, wrapping it around all the way
to the top of the earring. The size you make your
teardrop shape will be determined by what
size your BTS. If you need a larger teardrop than the size of your
needle nose pliers, you could wrap it
around a pencil or some other small
round object. Placing the wire at the base
of my needle nose pliers, I'm going to bend
the teardrop shape. So it has a little
more of a round shape, rounded bottom instead of
a long teardrop shape. This adjustment will
depend on the size of your bead and how you like the shape of your
teardrop to look. Now I'm just going to
check real quick to make sure the bead fits
in the teardrop. Now that we have
made the tear drop the size and shape that we want, I'm going to wrap
the long end of the wire around the
front of the post. I'm going to use the
flat nose pliers to hold the teardrop so that it
doesn't lose its shape. While I wrap the long end of the wire down and
around the post, you went to make sure
that the wire does not go over the top of the post
as you wrap it around, but more to the
side and underneath so that it lines up with
the teardrop shape where we can bring it to the
front and then use our wire cutters to cut it off flush against the
teardrop shape. With the wire cut,
I'm going to use the flat nose pliers to tighten down that end and
make sure that it is tight against the post
and the teardrop shape. Gently squeezing it against
the post as well as against itself to make sure that it will not slide or move around. Now we will use the file to
smooth the end of the post. Now that we have created
the teardrop shape, we're going to take
the 22 gauge wire and begin attaching it onto the teardrop so we
can add our bead. First. We're going to smooth out the wire with the
wire strangers. Then we're going to slide
the bead onto the wire. To begin wrapping the
wire onto our teardrop. We're going to
place it up through the center of the teardrop
from the bottom to the top, I have about an inch of
wire sticking off the end, which I will then curve around. And using the flat nose pliers, I will bend it up
through the middle of the teardrop to begin
wrapping it in, securing it onto
the teardrop shape. Having brought up the end of the wire through
the teardrop shape, I'm going to pull both ends
of the wire as tightly as possible to secure it
onto the teardrop shape. Keeping the wire on this
side of the teardrop, continuing to wrap it
around about three times. Keep tightening the
spiral every time you wrap the wire
around the teardrop. Now that I've come to
the end of the wire, I'm going to bring the long end towards the center of
the teardrop shape. And using my thumb, I'm going to press
in the center of the teardrop to create a
slight bend in the wire. This will help keep the bead centered in the middle
of the teardrop. Now I'm going to cut
off that short end where we first begin
wrapping the wire around. With the flatness players, I will now tighten the
end of the wire against the teardrop shape and
alongside the spiral. Now we can slide the beat up into the center of the teardrop. Now we're going to cut the long end of the wire
with our wire cutters, leaving an inch of space, which we will then wrap
around the teardrop to secure the bead
on to the teardrop. I'm going to wrap this end of the wire the same
as the first one, which will be towards the
bottom of the teardrop shape. Using the flat nose pliers, I will bend the wire and tuck it down through the teardrop shape, pulling it out the
other side and tightening it as
much as possible. And then continue
wrapping it around until I am to the
end of the wire. Keep in mind as you are wrapping the wire that you
want to tighten this spiral every time you bring the wire around,
squeezing it together. When the second
spiral up matches the width of the first spiral, who will bring it around to
the back of the earring, where we will then cut it
off with the wire cutters. With that extra wire cut off, I'm going to take
the flat nose pliers and tighten down that spiral, as well as the other one, making sure that everything
is tightened secure, flattened against the teardrop so that it will not slide up and down within a teardrop shape and then no sharp edges
are sticking out. And then repeat all of these
steps for the second earing. There you have the floating
bead teardrop post earrings. Thanks for watching and I
hope you enjoyed this class.
 Katrina Anderson, DIY wire jewelry and craft tutorials