Transcripts
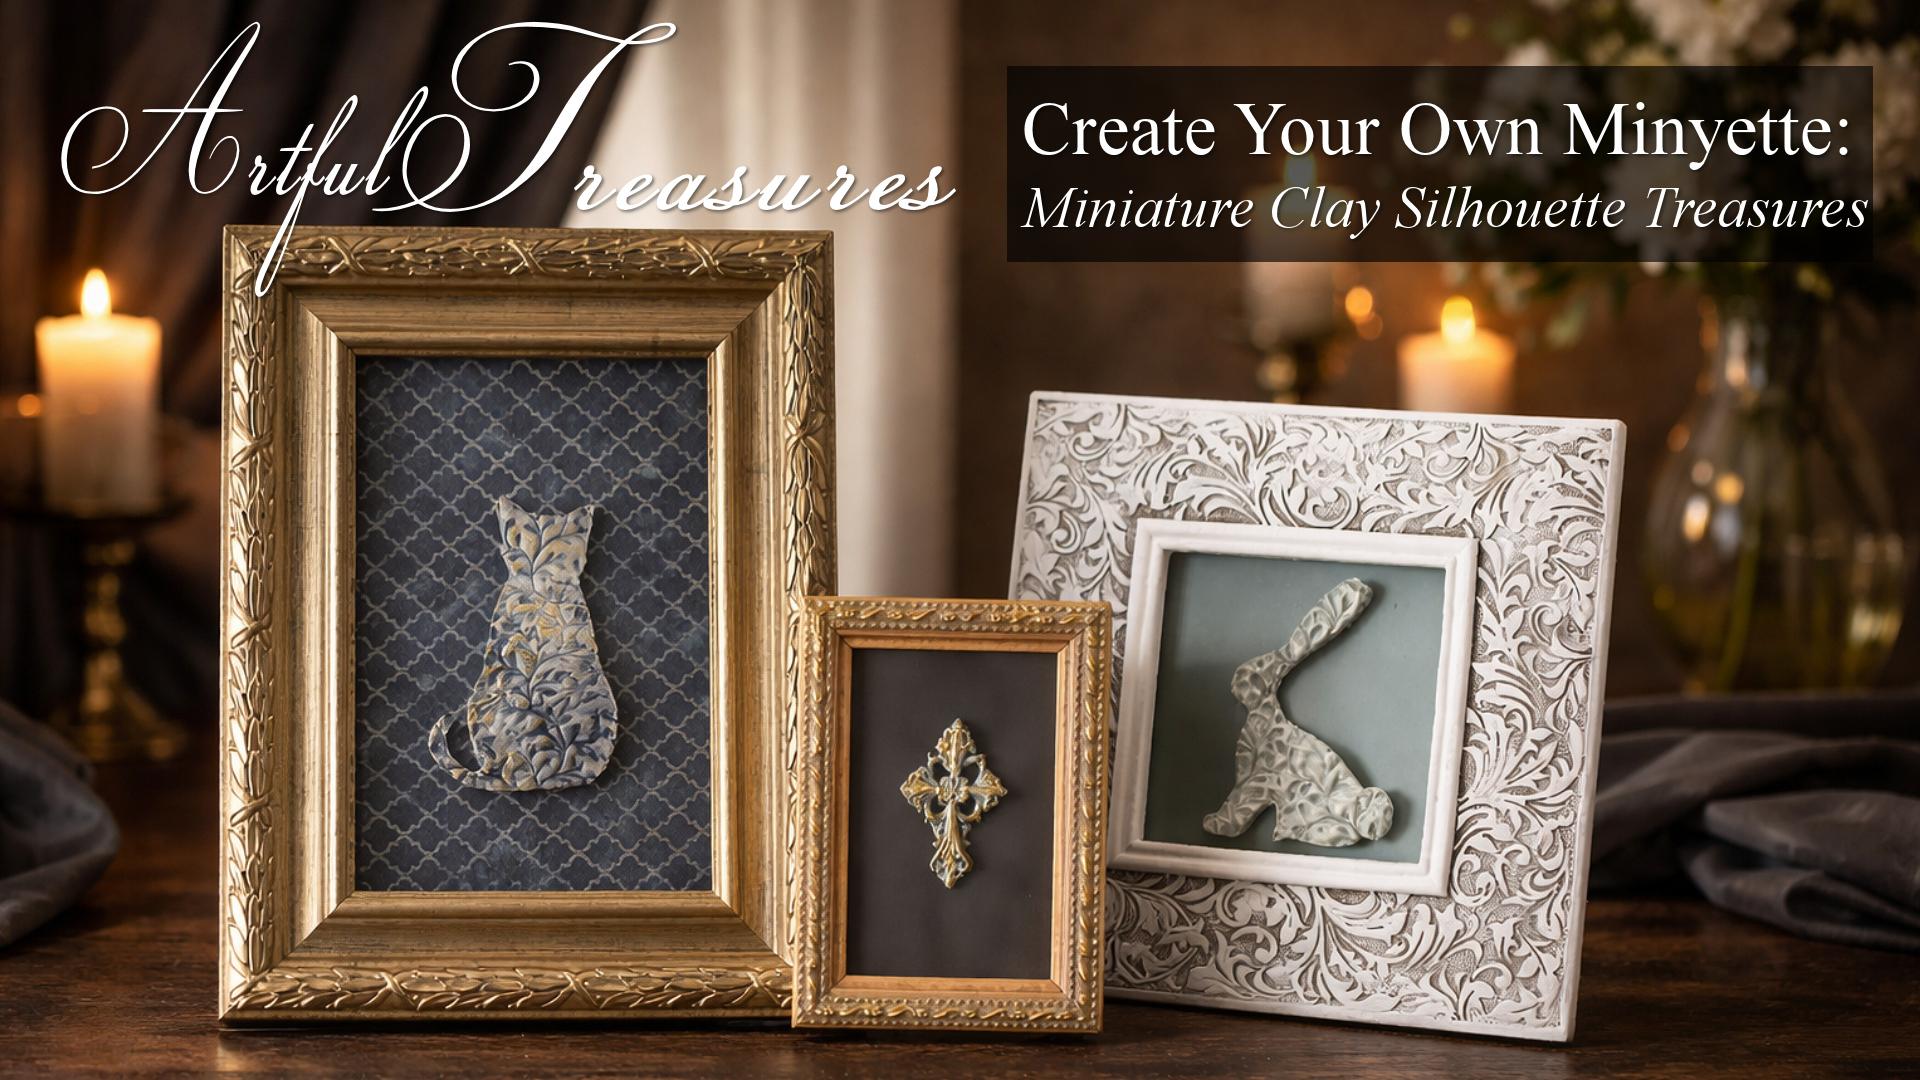
1. WELCOME: Welcome to this class on
creating your own Minette, a charming clay
miniature silhouette. It's very easy to do, and I'm glad you're here with me to enjoy it and
learn the process. You can choose whatever
you want to for your gnet. But in this class, I
will show you how I do mine from start to finish, from picking the
frame to choosing the paper to deciding on
the silhouette and how to get the silhouette to
choosing paint colors and to final embellishing
with some gold. I hope you will
join us in class to create your own mintt,
as you can tell, there's a lot of possibilities here and you can have
a lot of fun with this and create some charming
miniature clay silhouettes for your own space or for gifts. I look forward to
seeing you in class.
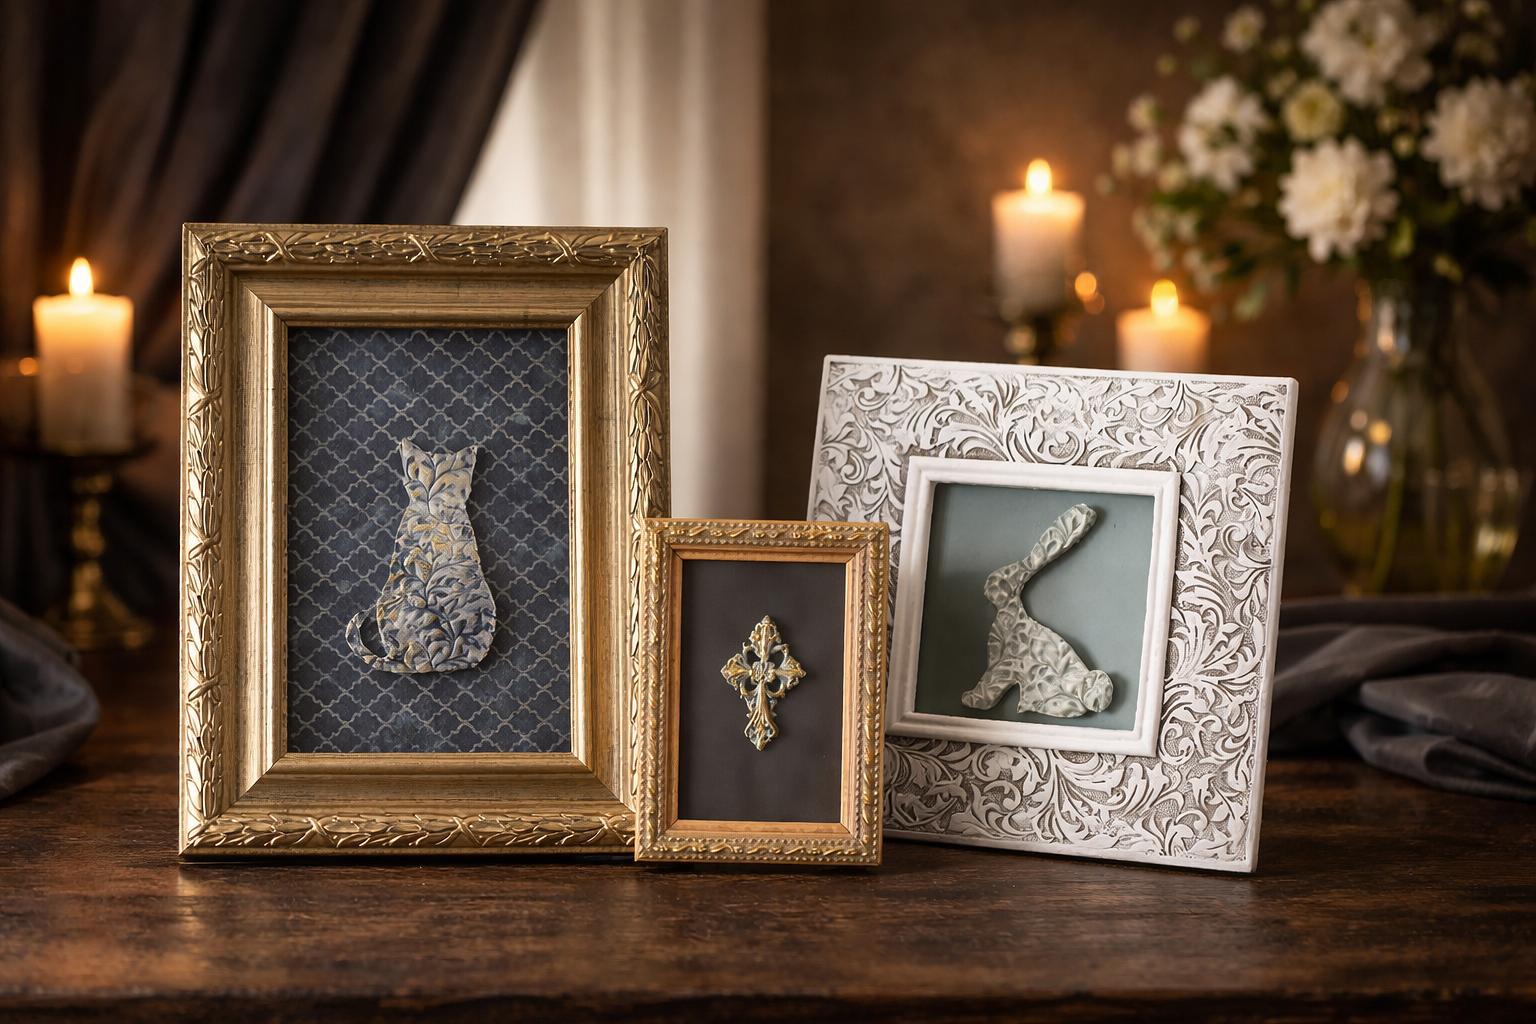
2. CLASS PROJECT: All right, let's talk
about your class project. Your class project is to
pick a frame that you may have a small frame, medium frame, a
little bit larger. Try not to go too big. And to make your own mignette. And you do that with the techniques that
I teach you in this class of forming the clay into a silhouette,
embossing the clay. In this case, I used a stamp, but you can use any
tools that you would like to make a pattern on your clay and then painting and washing
the clay with a glaze, and then adding a
little gold shimmer, if you would like or silver
or whatever your favorite is. You pick a frame with
the backing you choose, and you'll pick your
paint colors to go with that just as we do in class. So your project is to
design your own migtte and then please upload
your class projects so we can see what
you've come up with. Pick a subject that is charming to you, a
subject you would like, and pick your own colors
that you would like based on whatever backing paper you
choose to use in the frame. And I look forward to seeing
what you guys come up with. Whether it be a small, a medium, or a
little bit bigger, it's totally up to you.
Let's get started.
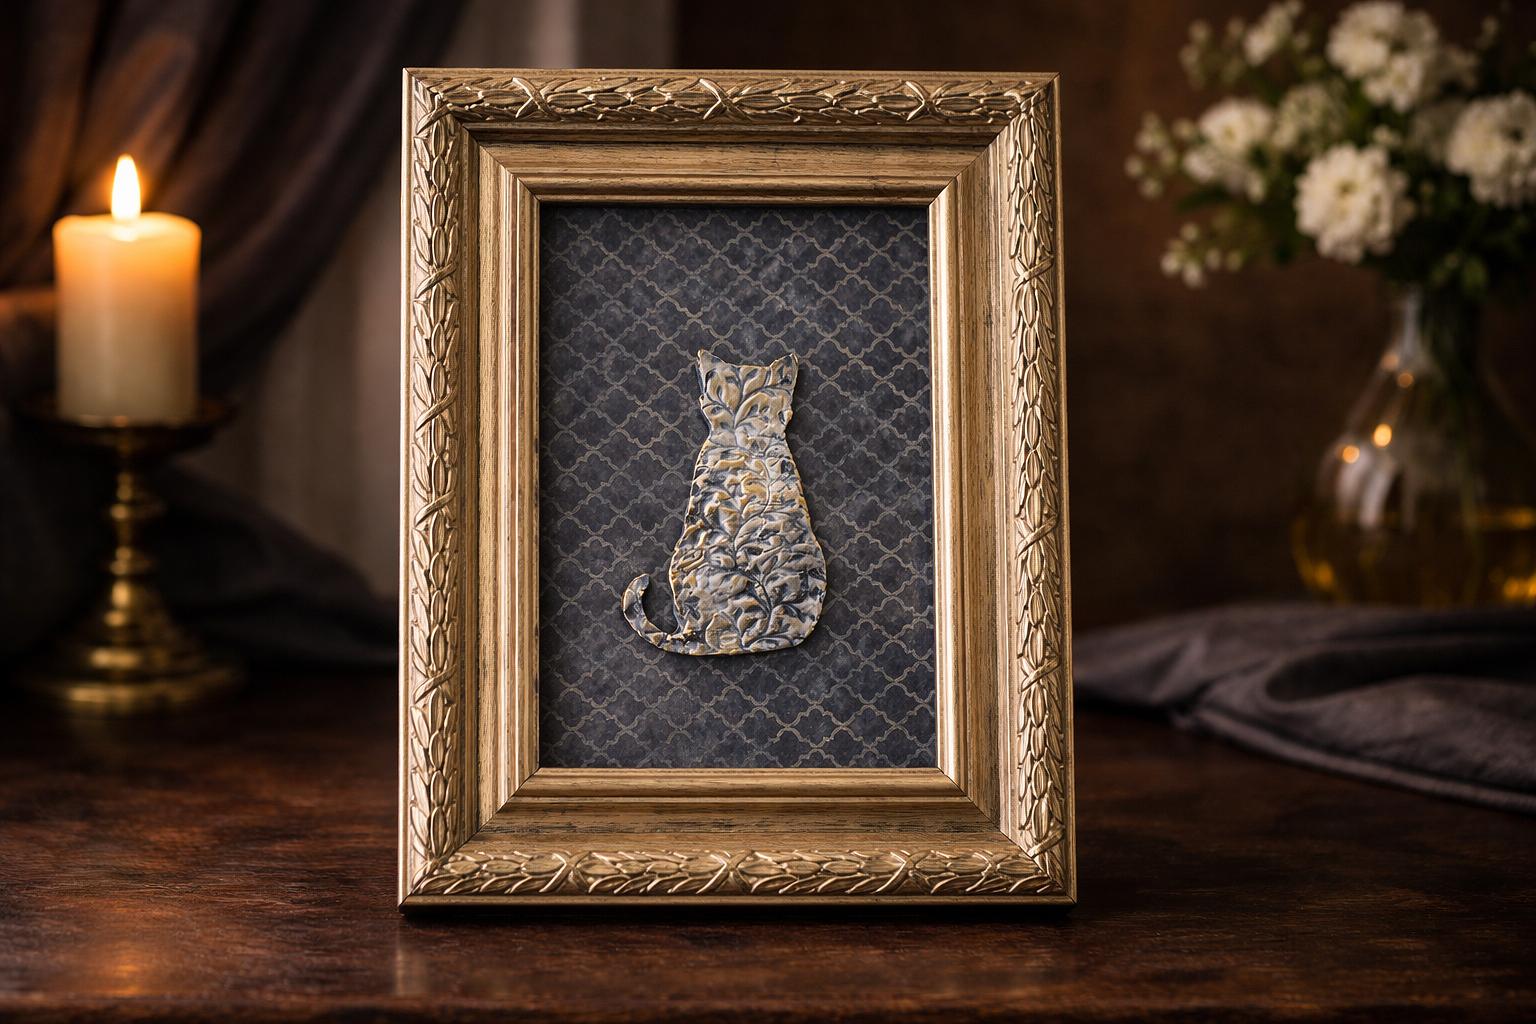
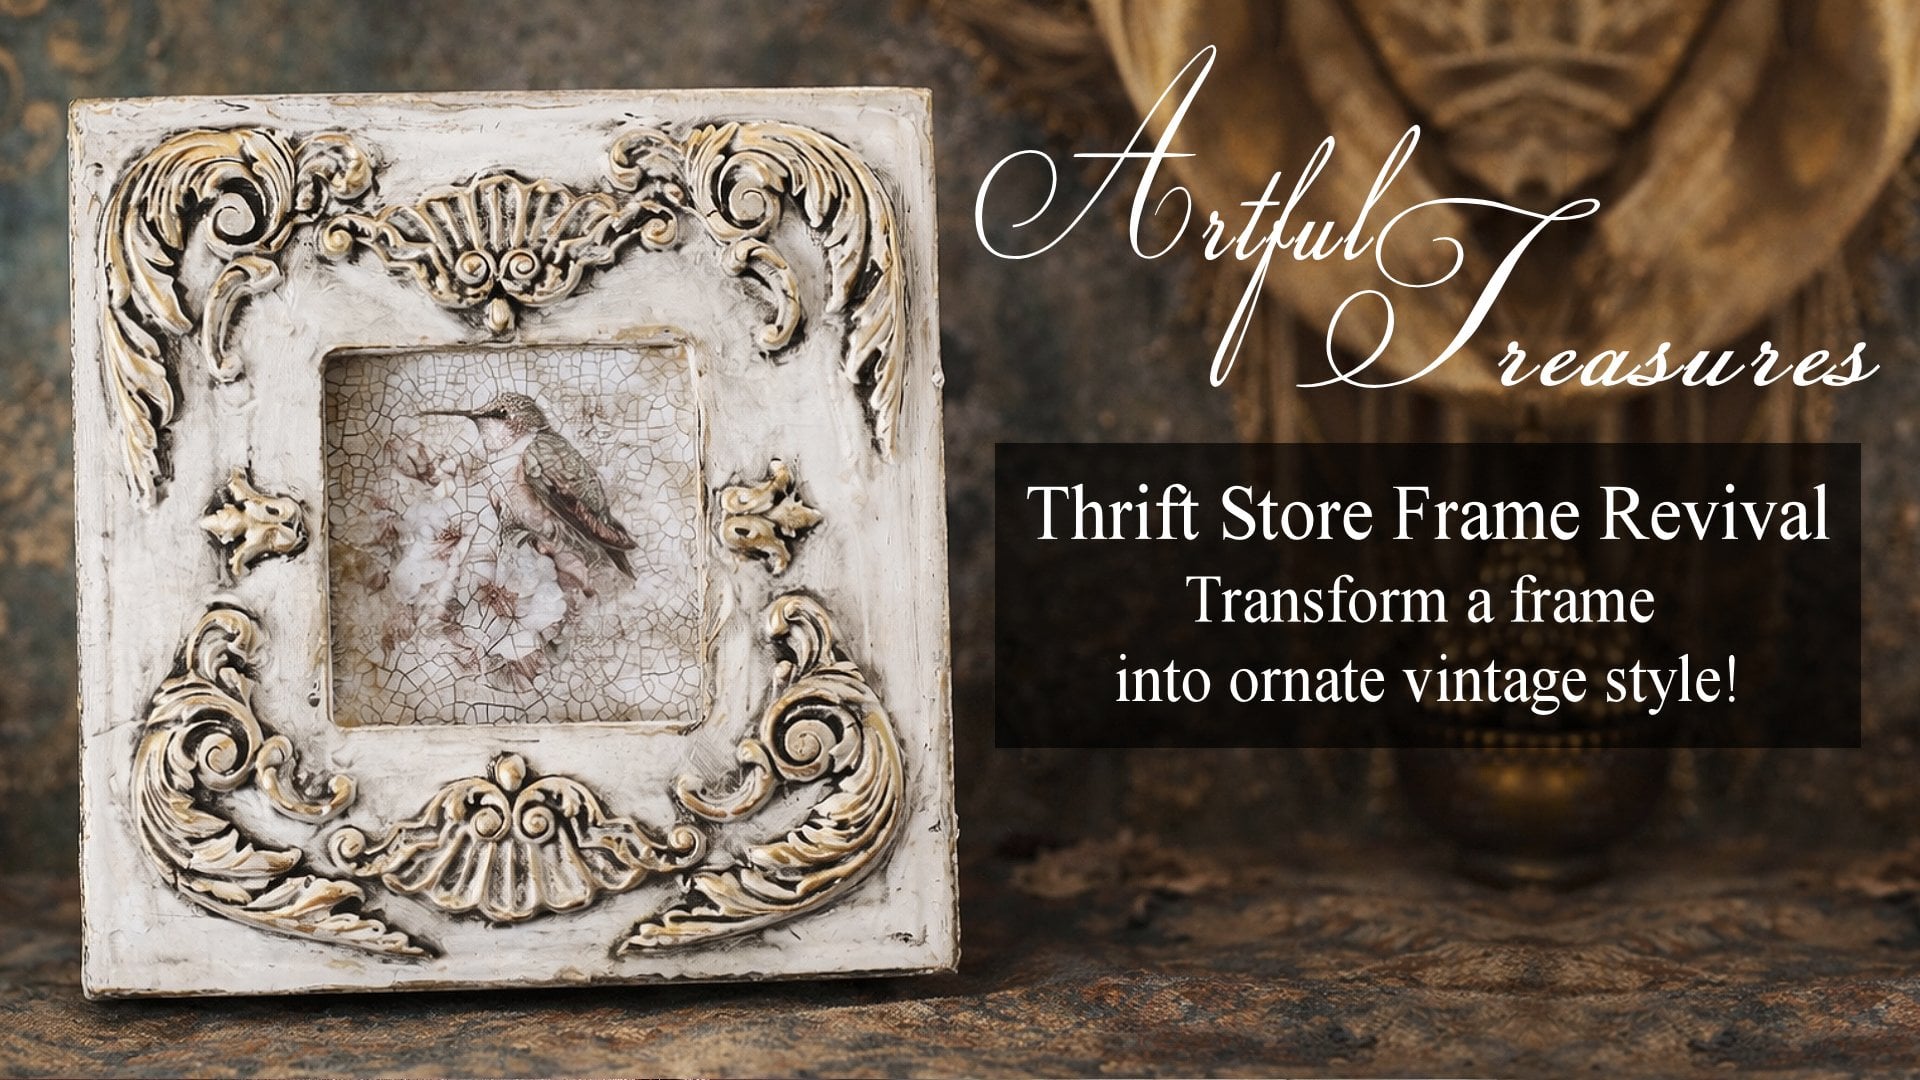
3. SUPPLIES: Okay, let's talk
about what it's gonna take to make one of my
little mignettes like these. They are so sweet.
They are so cute. And they're really
not that difficult. So I'm going to show you
my technique to make this product that I created. And I'm going to start with a kitty cat for
my next project. And so I thought I would take
you along with me and we'd talk about what kind
of things are needed. Now, be sure to download the supply list that
I provide you with on the project page because
I'll list out everything that I used in this
particular class. I'm not sure on
paint colors yet, but we're going to
talk about what kind of paint here that I use. So to get started with
a project like this, I usually start with the frame. And I had this frame, this is a new frame that I've had for a while
that I haven't used yet. It's a four by six, but I wanted to talk
about other frames. This is a frame that I picked
up at the Goodwill store, and it had no glass. It had a backing on it, but it had so many
stickers on it that you couldn't get the stickers off the backing, and I
just don't like that. So with a frame like this
with no glass or backing, I would probably use a canvas
board or a gesso board or something like that
to mount in it and then do my mintte
on top of that. But I'm not going to
do this frame today. I'm going to do this frame. I just you can use
any frame you want. These are real
popular ones for me. I really like the fact
that they're flat, they're wood. They're
easily paintable. I can add additional
clay embellishments if I want or jewelry or
anything to dress them up. These are available
at Michael's. And this one here, I believe this one
came from TJ Max, and I like it. It's uh it's a
very pretty frame, and I was thinking of an
elegant ornate design. So I usually start with
picking the frame. And then, of course,
I want to pick a subject to go in the
frame as my migntte, which is a silhouette
that is either created from clay
molds like these, like the little cross one
I showed you a minute ago here was created
using this mold here. And that made the little cross. So you can use molds
if you have them, but you don't need a mold. If you don't want one, my little thing fell
off this glass here. I need to put this
back on. There we go. In this case, I'm going
to roll out the clay here and emboss it with
one of my rubber stamps. Now, I don't have a huge
rubber stamp collection. I've never been a big
rubber stamp person. I have a few of them, though. Um, these are not mounted here, but this design is
the one I used on the two examples I
just showed you, and it makes a real
pretty design. This one is more of a fun whimsical design
with the circles. I'm not sure that's
what I really want as a pattern on my cat for
this elegant ornate frame. So I'm not sure about that one. This is like some kind of
spider web looking thing, which could make some
interesting pattern. This one is like some stones, which could make
interesting pattern. But then there's this
one, which is the script. And that's very elegant. And this one here I've
already used is very elegant. But I'm thinking
about maybe trying the script for this one. It's just very unique. And I think it might
look pretty with this. I it doesn't really matter. It's whatever you have. Now, if you have a mold, you can obviously use a mold. You don't need a stamp. If you're not using a mold
and you roll out your clay, then a stamp would embellish
it relatively quickly. You can also use tools like
this to embellish yourself. If you don't have
stamps, either, you can draw little lines, dots, things like that to
make your own pattern. It's very versatile project. And the silhouette here
is just one I created, and I printed on card stock on my printer and cut it out,
so I'd have the shape. And when I picked up this frame, I started looking through
my cutout silhouettes I have because I've
done a whole bunch of different subjects I
really like like birds and butterflies and animals. Those are my thing.
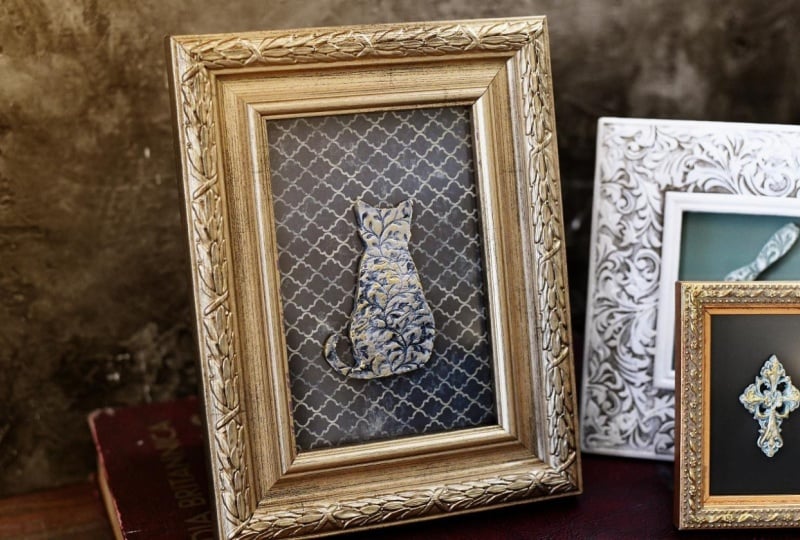
And I thought the cat would look
nice centered here. The clay minette would look beautiful, centered
in this frame. So the other thing I like to do, though, is choose a paper
for the background. And sticking with the
elegant ornate look, I have these
scrapbook papers here that I have a whole bunch
of these I've never used. Now, I design backgrounds and paint my own backgrounds
and things like that, so I could certainly
use one of those, but I thought this
would be a good use for some scrapbook papers because they're already
relatively small, not too much cutting involved
to fit in the frame. And these let me show you this. Hm. This one here, this backing
in here behind this is just a paint sample that I
picked up some paint samples and the different
colors that you get free in Walmart or Lowe's
or somewhere like that. Paint samples often fit
this is a paint sample too on a smaller paint
sample card from Lowe's. But I just picked a color that went with what I'd already
painted in this case, but I do like to decide on the background
before I get started. It's not a big deal because the whole point of
these is that while the clay mignette is affixed
to the top of the glass, the paper is installed
behind the glass, so they can always
be changed out. So if you like this
and then you decide, I want a different
look if you change that background to pink or uh, gold or, you know, even
something like this behind it. You know, as long
as it would go with the color well enough, you can easily change out the backgrounds on these behind the glass and
create a whole new look. And so that's what
I've done with those, and that's going to be I don't know if this is
gonna work with these things. I'm gonna have to
take these off. I don't think they're
supposed to be on there. Hang on. Let's get those
out of the way. There. So, you know, I can pick a background now
to look good with this one and then decide what colors to do my cat
after I get it done. And, you know, I can also, if I wanted to insert some others that go
with it behind that, and then they can just be
swapped out as needed. But it's a great way
to keep the art fresh. You know, change out
the background but not have to mess with the clay, which the clay is too thick to be mounted
behind the glass, so I'm gonna put these
aside over here. It's too thick to be
mounted behind glass, and so I mount it on the glass. And it just it creates a nice
little migntte like I call.
4. FORM THE SHAPE: So the first step would
be to form my kitty cat, and to move my frame
out of the way and I have some clay here. This is the This is
my Ds air dry clay. White. It looks kind of
grayish, but it's white. It dries white when it gets dry. This is my favorite kind
that I've used so far. I haven't tried
too many of them, but this one's accessible
for me because I can get it at Michael's or Hobby Lobby
or somewhere like that. And it's just very
easy to work with. I just have gotten to really
love the air dry clay. So I'm going to put the stamp
aside and the cap aside, and I'm going to get some
of this clay out here, and I'm just going to condition
it some with my hands, get it warmed up a little, and roll it in my hands
a little like this. Of course, it has a little
bit of cracking in it, but that just creates
a neat look to me, and you can fix that later
with a brush with some water, by the way, which I'll
show you if that happens, but I like to condition it a little bit to try to
get a little softer. And this is probably
too much for this cat. But I'm gonna roll it down anyway to show you
what I'm doing. I'm gonna smash it
down a little bit. And I'm gonna use one of these clear acrylic
clay rollers. I may need to stand
up to do this. And there's no set thickness. These have to be, but
the thicker it is, the longer it takes to cure. I start at the middle
and kind of roll it toward me and then
roll it the other way. The nice thing about this glass, which I also got at Michael's, is it handles the
clay really well. It's easy for cleanup. I'm just going to
keep rolling very slow to roll it out to about the thickness
I might want it. And that's pretty good. I
don't want it to be too thin. Yeah, that looks pretty good. I don't want it to be too thin. So now I'm going to make sure
I got room to do my cat. I'm gonna take
this script stamp. I'm also going to make
sure that's gonna cover. I'm just gonna press it down to try to emboss
it and then pick it up. I got some of it on
there, but not a lot. Well, I didn't do a very good. This one didn't do a very
good job on the clay. But there's no rule
that says you cannot introduce another
stamp on there. It'll just create an
interesting pattern. That's all we're looking for
is an interesting pattern, so that when it comes
time to paint it, it'll have a unique pattern. Now, that's kind of that's real busy, but it's interesting. And I don't know how much I'm
gonna need of it on there. That's probably good
enough. So we got a little script mixed
in there with it. So you know, who knows? There's no set way to do it. And I'm gonna position
the cat on there, and I'm gonna kind of try to hold him down
where he won't move. And I'm taking my
little exacto knife. I'm just gonna cut around
the edges of the silhouette. Now, of course, a mold, if you have shapes, a
mold is a little easier, but molds are expensive. And I don't have every shape available in
a mold that's out there. So I mean, you could
accomplish this multiple ways. Let's go around that ear. I'm just getting it
kind of outlined. I moved him a little bit. Outlined just enough. I know it's hard for you to see, but it's hard for
me to see, too. That's why I'm down so close. I mean, you get the gist. Get down to his tail. Now, the tail is gonna be a little bit more delicate area. I'm trying to be
careful here around the tail area and not move it. Too bad. Oh, another thing that
works really well. And I didn't mention this, but with the bunny that
I showed you earlier, that shape was got was acquired
using a cookie cutter. So that is another option. But I also didn't have
a cat cookie cutter. So this is my other
way of doing it. So there's this little body. I'm gonna move the
silhouette out of the way. I save them, and
I'm going to take my palette knife and
try to get this clay. I might have to
take my knife and push push it away
from where I cut. So I don't pull cause I'm not sure if I got
all the way around. I think I did on the
sides pretty good, but I just want to
be very careful. I'm not sure if I
got all of that cut. But just use whatever tool you need to break away
where you cut. There we go. Alright. And all
this extra clay here with the Now, see, I
messed that one up, but all this extra clay
with the pattern on it can be put back in the package as long
as it hasn't dried too much. I need to cut them on this
edge a little bit better. There we go. And get under it
with a palette knife gently lift it up and put that
clay back in the package. And I like to keep
my clay rolled up, tight and in a sealed baggie. This really helps
it from drying out. You don't want to
leave it setting out. You want it out as
limited amount of time as possible and try to push the
air out of the baggy too. Fold it up like
that, put it away. And I'm always a firm believer
in having a wet wipe of some or wet bag out because you want to get
that clay off your tools. And you can also get
it off of this glass, but this is kind
of sticky on here, so I'm not sure how well I'm going to do
on that right now. So now the goal is to get your
subject off of the glass. And this is where the palette
knife comes in handy. I may need to use
this bigger one. And try to scoot it
underneath without distorting your subject and press it down flat to get all the way under
it and watch that tail. You know, if you
have something like a tail on your subject, that is a breaking point. There, I picked up a
little clay off of there. I didn't really mean to, but something like a tail
is a breaking point. So just get where you
can get all the way underneath everything
and lift it up in your hand and clean off your surface right away so that stuff doesn't
dry on there. I have that little
ball of clay left. I could give him a little head or neck adorman if I
wanted to use that. There might be some
little pieces on here. But at this point, there are some little rough edges which
can always be sanded later, but I don't want to
be too rough with it. So one of my favorite
tools to use are these. These are color shapers. They also make these for clay. The ones made for
clay color shaper. That's a size six, and this is a size two for
little bitty areas. But a color shaper is a softer. It has a little bit more give to it than some
of the clay ones. And I just like to
go along those edges and smooth things
out a little bit, where the cut was kind of rough. Just to smooth it out a little. You can also use your finger and get a little but try not
to press on your pattern. Try to keep your pattern intact. The bottom looks pretty good. And I really don't want to
mess with that tail too much, but I do have a little area inside the tail here that is a little bit rough looking. So I'm going to try to get that. Just take your time.
These are very small. But take your time and
go slow and don't try to rush the process and just be careful of anything like the tail area or something
very small like that. If it does break, you can always glue it
into place when you attach your mignette
to the glass. But now I've got a
pretty clean look, and I'm going to clean
this off some more, get this side cleaned off. Now this has to set
and cure for 24 hours. And I'm going to keep it
on the glass here to cure, but I can tell you from
the ones I've done before, when you're letting it
cure on glass like this, when you go to flip it to
pick it up and flip it over. It may feel hard, but it won't be cured all
the way through. So what I like to do is let this side cure so it'll get
white and it'll get harder. So once this side
is cure enough, you know, maybe this evening
before bed or whatever, I may because this is going
to cure until tomorrow, I may come in here and flip it over to let the other
side get cured. So it's cured all
the way through. But I like to leave
it set on flat glass. And this way, if you want to put any more marks or
lines in your gnette, this is the way to do it now. Because once it dries, you won't be able to add
any more marks to it. I have a little
spot at the end of the bottom of this tail
that I'm not liking. It's a little rough. So I'm going to show you a
little trick for that. Spray a little water, get a little brush, dip it in the water, and just gently dampen that oops gently dampen that area a little bit with the brush
and keep brushing it. And it will smooth
that down better. You can also do it with
your finger like so. You just don't want to lose. Now, that did a real
nice job there. You just don't want to
lose the pattern too much. And I did kind of squish it a
little bit on that pattern. But if you're careful, you can always
touch it again with some of your pattern to create some little
lines in there. Now, these are so small. This pattern is a leaf pattern, so it's not real specific, and of course, it was over
the text that I tried. You know, some stamps work well and other stamps not as well. There's a little spot just right here that's a
little bit rough. So I'm going to smooth
that a little bit. But if you wanted to
add another line in, you could take your tool
like your color shaper, maybe even put some little
stripy looking lines in there. If you were creating
a striped cat, I don't know, just
creates interest. I'm gonna dip my
finger in that water a little bit more and
go along this edge, and then use that rag to
wipe up that excess water. Just kind of smooth
out those edges. The edges are already starting
to harden and get white. I try to make sure by gently pushing down this
completely flat. On the glass. So when it comes
time to mount it, it will mount flush
to the glass. So now, that was the first step, and that's all we have to do
right now until this cures. So this will cure until
sometime tomorrow, and I will pick up the video at that point and we'll go from there to finishing out
this cute little project, which is really super duper easy and doesn't
take long at all. So we'll be back
tomorrow after curing.
5. PAINT THE SHAPE: All right. I have
decided it's dry. It cured very nicely. It has a little bit
of a curve to it. I might have to put the glue a little thicker here
when I attach it, but it turned out very nice. The edges because I use the color shaper are
nice and smooth. I don't think I need to
send anything on there. Then I decided with this frame, I would use this paper, which I've cut to the
correct size to fit. I was picking going through my blue paint colors and
really with this paper, this blue here, the darker blue, this is going to be the glaze
that gets in the crevices. So the darker blue
is what I needed. This one was too bright, and a lot of my blues
are too bright, and I don't know if you can see that see the difference
in there or not. But I just did it on a little
test makeup sponge there. I don't wear makeup. I
use makeup to do my art. I mean, I use makeup
sponges to do my art. So anyway, I just did
it on there to see. So I'm going to paint
the main color, I believe, in this French
linen chalk paint. Because it goes with the
little emblems in here. Some of them are more
brighter like gold and others are softer
like grayish beige. That's what this looks like. I thought that would be
a good base color to do. Then the glaze, like I said, the dark blue, that is fusion. I don't know if
you can see that. It's fusion mineral
paint, midnight blue, and it's in this jar
because their jars are very difficult to try to open after
you've used some of them, I like to put them in
the big mason jars. And because I can get
these open much easier. So I just label them. But I don't need this clay or
cutting board here anymore, so I'm going to move
out of the way. And I don't want to get paint on this on and
move it out of the way, which just leaves the
little kitty cat. And I have a towel here and a rag over
here if I make a mess, but it's really, uh, not a big deal to paint this. Let me see if I can zoom in a little bit closer so
you can see what I'm doing. Because it doesn't
take much paint, and I don't paint the I don't paint the back because
there's no need. That's gonna be attached
to the glass with glue, so I only have to paint
the sides and the front. And I'm just gonna shake up this bottle a little bit of this French
linen chalk paint. Now, the fusion paint that I'm going to
use for the glaze, that is an acrylic. So I've got a mix here
of chalk and acrylic. And I'm just going to
work out of the lid. And I'm going to take
small this small brush here. It's a filbert. I'm just going that's
probably a little big, but that's what I've got handy. I want to work that in and
it's going to be hard to see the difference because it's very close to the base
color of the clay. But I'm going to work it into
those crevices really well. I really should do
the sides first. It's a little darker
than the clay color. And just paint this
up real quickly. Do most of the sides anyway. Just to get the base coat on, get up in that tail area, go ahead and paint the tail. And I'm handling it very gently. And of course, I got my
fingers all over it, so I'm going to have to set it down here in a
minute to get it all. I mean, it won't hurt to hold it a little
bit on the side. I just want to make
sure to get it in all those little
crevices really well. So everything's the same color and get the tip of the tail. Go over any areas I
might have missed. But then just let it
sit there to dry. And I do see a spot
I've already missed, so I dipped my brush in
water so it's a little wet. Maybe I can get down in there without messing anything up. Like I said, it's real hard
to tell with this color, since it is very close to
the base color of the clay. That's good, right there. I think I've got it all now. Now. This has to dry. See, use very little
paint for these, which is why it's more if you're gonna make these and you're
gonna try to do several, try to do the stages
all at one time, like make your clay elements. You know, roll out your
clay, stamp your clay, make your clay elements, let them all cure, then paint the base color
on all of them, then paint the glazes. I try to use a base color
that is contrasting to whatever background
paper I'm going to use or very close
to it as color, like maybe just a shade darker. But in this case, I felt that color would go
really well with that. And this has to dry. It will not take long at all because it is chalk paint
which dries very quickly. And as soon as this is dry, I will mix up a little
bit of this with quite a bit of water to
make it more liquidy, and that will be
then brushed into the crevices of the kitty cat. And that's when you will
see the pattern revealed. So I'll be back in just a couple of minutes after this dries to
do that next step.
6. GLAZE THE SHAPE: Okay, I do believe
we're mostly dry. It got in there very nicely, and you can see the color
difference a little bit here. That's the color I put on. This is the color of the clay, so it's a little darker, but it'll look nice
with the paper. So now what I'm going to do is create the wash or the glaze, as I call it, it
acts as a glaze. I'm just going to get a little of this fusion
paint off of here. You really don't need much at all for this and
close this back up. But you really don't need much because we're going
to add water to it. I'm gonna dip my brush in the water here and
get some water in there and loosen that paint up. I'm actually going
to add quite a bit more water with my spritzer. You want it really,
really watery for this and just stir it up. And what I like to do is just take the brush and
kind of wipe it on the sides and see if it's thin enough where you can still see some of
the white through there from the palette. I'm using that's pretty thin. And I have here a couple of the wet wipes to wipe back after I get this
down in the crevices. Stir it up a little more. Yeah, you see that white
there shining through? That means it's nice and
thin, which is what I want. So then you want to
rub it in there. Really, really good. And it doesn't matter if
you go over the edges. Just work it down in there. Really good. You can actually
do the edges, as well. I'm just going on the
sides a little bit. And this fusion
paint dries really, really fast as well. So you don't want to wait too long before you try
to wipe this back. It'll get down in
those crevices and it'll lighten at the top. But it also is nice to lighten
it up yourself a little. I get a little more
in that tail area. See how the pattern is
forming in the cat? So let me sit this over
here and take one of these and just gently
brush over the top. Brush it back and letting it settle in
the crevices, though. Just get it off the top. You might need to
rearrange the wipe. If you don't have a wipe, you
can use a wet paper towel. Get a clean area on there
and do it as many times as you feel you want to for
it to look good to you. And I'm gonna grab this
little piece of paper. And I'm gonna hold it up
there and see how that looks. Could be a little whiter. And if you get it too dark, you can always go
back with that paint that you used or another paint. That might be a little
lighter if you want to brush on something
else in certain areas. Whoops. I try not to handle it too much
during this stage. Let's just hold the
whole thing over here. Oh, I think that's gonna
look really pretty, but I do think I want
to touch him up, add some gold to him, as well. I see a few little fires here that don't have a
lot of the blue. So I'm actually going to
dab a little bit more in these areas probably
because this was closer to me and either the impression is not very deep right there, or I brushed a little harder
when I was wiping it back. And it'll just settle in there. And I'm gonna try to
do it even lighter. It's probably because
the impression could be a little deeper. So remember that when you're
doing your clay impression. Try to get the impression
as deep as you can. I'm gonna try to dab
a little bit more. I might need to use
a real tiny brush to get in there
in some of these. A few little spots, though. I'll soak in there nicely. As long as I don't touch
it too much to it. You could also use, like, a
little tip with some water. I'm just trying to get
around those areas. But it did get a
little darker, so. Now, that's just got
too dry a minute. And it won't take long. I am going to work on do a little bit more
on the side here 'cause it's kind of choppy
looking right there. Let me check. The other side, if I can get it turned around. I don't really want to touch it. I may just have to
look from the side. But it just gives the impression of the silhouette
of the kitty cat. Just enough. I took too
much of that one away. Just enough so you know, whoops, what it is. These are small and delicate. Now, you could definitely
take a heat gun at this point or a hair dryer on
low and go over it just a little bit if you wanted it to dry a little faster,
which I can do that. I'm gonna soak up the rest
of this paint that's in here and try to clean this
palette out a little bit more. It is acrylic, so it does
come off pretty easy. I like to clean up as I go, so I don't have stuff stuck
where it's not supposed to be later. That's a little better. I still have to wash it,
but let's grab a heat gun. See if I can get my heat
gun to come over this way. Might have scoot
this way a little. Down. You don't want to do it too much
or get it too hot. Now, let me stick it over here and grab another paper towel. Just for appearance's sake. Now, the gold I like to add to highlight
these up a little bit is this Americana
decor by Deco art, bright metallic paint, and
this one is vintage brass. You just shake that
up a little bit. And when I put this on, if
I'm doing a bigger piece, I will dry brush it. Oh, my goodness, I
can't get the jar open. There we go. I
will dry brush it. But with a small
piece like this, I just do it with my finger and wipe my finger
off with a wipe. So I'm just going to dab a
little bit on my finger, pounce it off on the
paper towel because I don't want it to be super thick, and I'm just going to gently glaze and I'll dip back in that. You see that metallic
shine it's giving it? That'll go nicely
with the frame. And I'm not pushing
down in those crevices. I'm just basically glazing a little bit of
this over the top, just to give it some richness. And it really helps that pattern be revealed a little bit more. You could even do the
edges a little bit. Just trying to touch the
raised areas with it. I want to go down
the edge a little. And let me get over here
and get this edge a little. There's a little spot there on the ear that I didn't really get much paint on. Whoops. And it's hard to get in that
tail area in between there. That way, if somebody
looks at the edge of it, they still see a little
bit of the gold. I think I need a little more right here, a
little bit stronger. But just basically touching
the raised areas and the edges just to give it
a little bit of shine. That little bit of
richness. I love the gold. I like to add it into a
whole bunch of things. So now he is painted. He does have to dry
for a few minutes before I can attach him. If you want to, you
can seal these. These paints are a matte finish. Both the chalk paint and
the fusion mineral paint, it has maybe a tad bit of
sheen hood, but not much. But if you wanted this
to be super shiny, you could use a gloss
acrylic medium over top. Or if you were doing several at a time and you really wanted
them to have a shine, you can use crylon triple
thick, which is a spray, and you would have to do it
outside because it's very, very strong or in a
well ventilated area. I don't need that shine. To me, the gold adds just the right amount of
glimmer and shine that I want. I don't particularly like
really glossy things. And I like my clay to
be more stone like on these minettes or all of
my clay really that I do. So I'm just going to not
put any coating on top. I could spray a matte finish, but I'm not worried about it because this is not something that people are
going to be handling. It's going to be mounted on
the glass inside the frame. Therefore, it won't be handled like a vase
wood or a you know, something else made with clay
that you might have around your house or a frame
or something like that. It's going to be set
inside the frame, even though it's
outside the glass. But it's not so many
people are going to be putting their fingers
on all the time, and it will stay very nicely, even without any finishing
materials at all. So it's up to you if
you want to do that. I choose not to on these. So I'm going to put
the fan on this guy. Let this gold get good and
dry before I attach him. When I come back,
we're going to do the final step of putting
everything together in the frame and attaching him on the glass with E 6,000 glue. That's the glue I use. And I'll talk about
that in a minute.
7. PUT MINYETTE TOGETHER: Alright, we are ready to put the migntte all the
way together now. So I'm gonna open this frame. And it has several pieces
of backing paper in here, which are necessary to keep this particular frame from
being loose inside the frame. So I am going to keep
all those in there, and I'm going to insert
my paper that I've chosen and then insert these down in there
and close it up. And I make sure if you're
going to hang it on the wall, make sure that you're mounting
it the right direction. Make sure if you
have a easel back, you're mounting
it the right way. So this is the bottom, this
is the top. So there that is. And I kind of get an idea of where I
would like to put it, my little minett
kitty cat minette. And I like it right there. I just kind of eyeball it. So I'm going to put a little
of this E 6,000 on here. Now, this is what I use
because of the strength of it. You can use hot glue or another glue such
as tight bond glue. I prefer the E 6,000
when I really want something to be firmly
attached and not come off. Some of the other
glues could sometimes potentially get brittle and
break off in the future, and I don't experience
that with E 6,000, but it is kind of smelly. And I try not to
put it too close to the edges because I don't
want it seeping out. But I can always grab a wet rag, and I just get enough
of it on there. And I do try to kind of get a little bit
dabbed on that tail. And I'll lay that down
and close this right back up 'cause it
keeps coming out if I don't got a wet rag here in
case I get anything on there. So let's reposition here. Let's see. I'm just eyeballing
it. You can move it. And I drop it down, and then
very gently press evenly. Don't press hard where it
scoots around 'cause it will. See, it's scooted just a
little. And there we go. Im zoom out a little so you can see at a distance.
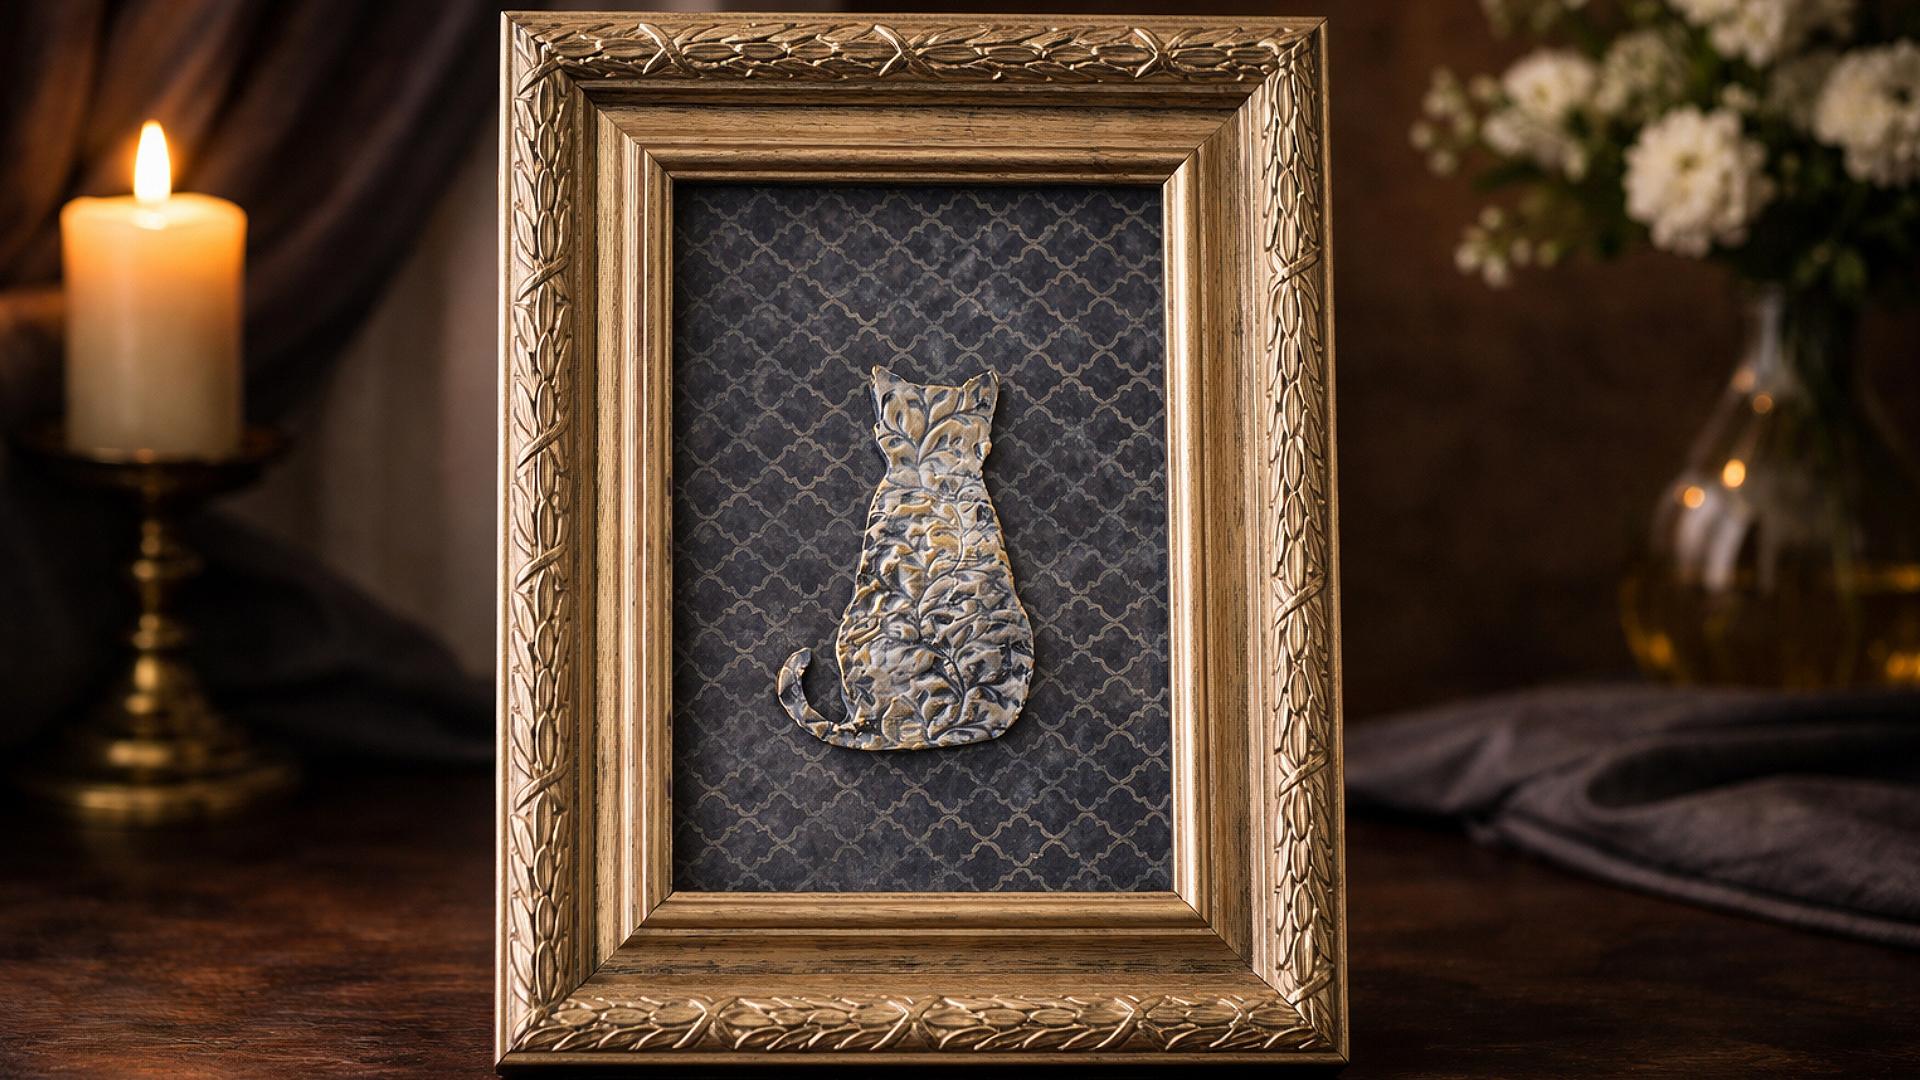
Oh, that's so pretty. But these make charming
little gifts for people. If you have a favorite subject, they make great little additions
to decorate your space. I tend to only do small ones. This is a four by six. I might go as big as a five by seven. You could do larger
ones if you want. But this right here is pretty much this and
these little bitty ones. And even little
square ones like this are the size that I like. So there we have created
a gnet and it's very
8. THANK YOU: And I hope you guys enjoy doing this and I can't wait
to see what you create. Be sure to upload
your class project, showing me what you've created. And so other people
can see, too. And I hope you have enjoyed this class. Thank
you for watching.
 Jai Johnson, Painting My Favorite Subjects