Transcripts
1. Welcome: Hi, everyone, and welcome to the next class in my
Artful Treasure series. This class is Thrift
store frame revival, where I show you how to
transform a simple frame, something like this or
something like this into an ornate vintage
style frame like this. Using a few unique
materials such as flexible modeling paste and air dry clay with molds to
create ornate embellishments, I will take this frame, which was similar
to something like this, flat wood frame, and I turn it into this and
I show you every step that I do and go over all the
materials I'm using and why. This can be done with
a thrift store frame or a frame you already have, something like this or
something like this, like I have here in my studio. It can be done with wood frames, plastic frames or metal frames using some of these
unique materials, and you can create a piece of art if you
wish to go in your frame or you could just frame
a normal picture or an old print or something like that
with your ornate frame. So I hope you will stop in, take a look at the class and
enjoy the process of making a beautiful frame
out of something plain and creating something
new and ornate and elegant. I look forward to
seeing you in class.
2. Class Project: Let's talk about
your class project. Your class project is to either take a frame you
already have like an old wood frame or
a frame you may have purchased at the craft store or the thrift store,
something plain. You obviously want
something plain. You can use the techniques
that I teach you in this class to create
your own ornate frame. I use flexible
modeling paste and air dry clay embellishments
that are formed with molds. You could do one or
the other, or both, as I have done with this
beautiful frame in this class. I also use paint, both chalk and acrylics and some glaze and some gold paint. These things all combined together can make something
beautiful and ornate. Your project is to
find something plain, a frame that's plain and use
some of the things you have, whether it be this
kind of clay or another kind of clay
or whether it be brass embellishments to attach or modeling paste to create
texture on the frame, as I show you in class. But just pick
whatever feels good to you and what look
you want to create. So I look forward to seeing what you come up with
with your materials, and be sure to download the PDF supply list
that I give you of everything that
I use to create this frame from a
thrift store frame. I look forward to seeing
your class projects. Be sure to upload them so we can all see what you do.
Thank you for joining.
3. Prepare Frame Surface: Let's talk a little bit
about what I'm going to do for this project. For this project,
I have a frame, which was this is the back of it that I purchased
at the thrift store, and it's a nice heavy
duty chunky wood frame, which I really like. But it's kind of boring. And I have this
little piece of art I made here on a four inch by four inch canvas that will
fit nicely in this frame. I just hold it up
there so you can see, but the frame needs
to be more glamorous. So I am going to upcycle this
frame and make it prettier. And I'm going to use
my air dry clay and some molds to create some ornate embellishments
and then some paint, like some chalk paints and some acrylic paints to create a more ornate
version of this. I have some cornstarch
here in this little jar, which I'll use in a few
minutes with the clay, and I have some water over
here and some rags and wipes. Always wipes. Great for wiping your hands
when you get junk on them and clay on them
and things like that. So the first part of
what I'm going to do is create the base for
everything to go on. And the frame is really nice. And if this was flat, it would be great, but it
has some grooves in there, and I really want a
more solid surface for the clay elements that I'm
going to put on to adhere to. So if you have a
solid frame you're working with a solid, you know, nice smooth wood frame, you won't need to do this step that I'm getting ready to do. But I want to try to
put something over here to flatten this out and fill these
grooves a little bit. So I have some flexible
modeling paste, and it is wonderful for using on canvas and wood and
all kinds of stuff. And so I'm going to use it with my palette knife to get some on here and kind of
create a smooth layer. In order, though, to get this to adhere well,
just to make sure. You can use any kind of glue, mod podge, tight bond. It doesn't really need
to be that heavy. It will adhere, but
I have a mix here. This is what I call
my secret sauce, and I use on my bottles. When I do glass bottles, it also will work well on here. It's got half mod podge
and half white gesso. So I am going to paint some of that on here
just to give it a good surface for the
modeling paste to adhere to. Sin as I can get the jar
open, I'm going to do that. And I'm going to
stir it up a little. I don't know if it
needs stirring, but I keep boxes of popsicle
sticks here in the studio. I have a great, big,
huge box of them, and I use them all the
time to stir things up, move things around. Support things. I use them for all
kinds of things. They're a great little
tool to have around, especially if you're
doing something like this and you don't
have to clean it. So I just stirred
that up a little bit, and I'm going to take my
big just a big flat brush. And I'm not worried about doing the sides because everything's going to be repainted anyway. My main goal is to get this groove area straightened
out a little bit. So I'm going to
take some of this, and this has a good mixture of the mod pod and the just already in there,
all stirred up. And this is the
same secret sauce I use on my glass to prep it to give it a good surface for decoupage to adhere to
and paint to adhere to, and to get the base layer white, where I have more of a
clean slate and I don't really have to see whatever imperfections and
colors might be there, and it's great for a
decoupage background. I'm going to go ahead and paint over that area right around
where the image will go, too, just to get a head
start with the white, even though I'm probably not gonna put the
modeling paste there. Some may end up there.
The modeling paste is great for adding texture. It's just fantastic. I go ahead and get in
this little area here. So now I can wash that brush
off and stick that aside. I have a nice little
coat on there, and while that's
getting a little tacky, which doesn't take long at all, I can go ahead and start putting the modeling
paste on there. So I'm gonna get I'm going
to try this palette knife. I've got a bigger one, but
I'm gonna try this one. But it's really, really thick. I'm just gonna see here
if this is gonna work. And of course, I
painted on there, so it's hard for me to grab
ahold of that middle section. It's like spreading cake icing, but it'll help create
a smoother area. I can tell I'm going to
need quite a bit more. It'll help create
a smoother area for all of the clay
embellishments to go on. I probably need to use
a bigger palette knife. I'm trying to keep
it from going over the edges because
um let me back up. The clay elements will be attached with my
tight bond glue. And if you like I said, if you already have
a smooth frame without something
you're trained to fill, if you just want to add
texture, this is great. But you can go
ahead and just skip this step and go straight
to your air dry clay. Like I said, I'm putting
quite a bit on here because I want a
nice smooth surface, and I don't mind if it does have a little bit of texture in it. I want it to be textured
and have some interest. It adds to the overall sculpted
look of the whole piece. I'm gonna turn this
around so I can work from the top because I find it a little easier to
show it to you on camera. Down here closer to me, I get too close out of range
so you can't see as good. But you see, it's filling
those grooves very nicely. And this stuff is wonderful
for creating good texture. My bottles getting low here. Like I said, it's
like cake icing. I actually love working with it. I have done several
canvas pieces with this, modeling paste, and you can mix stuff with it like sand is one of my things. I have mixed with
it before because I created some textural
pieces with sand. And you can mix a lot of
different things with it. But it dries white, and that's okay because
I'm going to paint this. So it doesn't bother me
that it dries white. Get a little more up here. And then after I've
got enough on here, I'm going to go over it. And I'm gonna put
some more here. I'm gonna go all the way around
and really smooth it out. And I need some right there. Look at that nice textural look. I mean, if you didn't
even want to do clay, if you just wanted to do this to a frame and not do clay,
you could do either way. If you just wanted to dress up a frame with
some good texture, now I'm gonna start smoothing
it a little bit more. But the whole point of the upscale I'm wanting
to do the upscale. The upcycling I'm
wanting to do is to create something
sculptural and ornate. That's what I'm
after. And of course, you'll get the
picture when I get done of what I'm talking about, but just spread it
like cake icing. If it goes off the edge, just take your palette knife, pick it back up,
clean up those edges. So you can't see those
grooves anymore. And if some of this texture
shows through between the clay embellishments,
that will be fine. Now I've got some on me. This is why I say,
I have wipes or wet paper towels handy because
the stuff's kind of messy. I don't know if I really
need much more on this side, maybe just a little
bit right in here. But I love the feel of it. And then work on this
side. Like this. Now, I've got some right
up to the edge here, here, and almost there. I just need a little bit more there to match up with that. Whoops. That's not enough. I don't know if that's enough either, but we're gonna try. I think it'll be interesting
to have this texture around that center part because the picture will be
mounted behind this. So it won't come all
the way up here. Now I'm going to start going
along the edges and removing excess But if you want to add texture to
whatever it is you're doing, this stuff is fantastic. It does have to dry overnight. Well, I dry it overnight, 'cause the clay's got to
dry overnight anyway. Let's see. Did I get
that I got that side. I'm sorry if I'm going
out of the frame here. Just checking all
the sides to make sure I don't have any
hanging off the edge. Alright. You can use your fingers to get in
there, too, make sure. If you wanted to put your fingerprints on
there, you could. So this is ready now for clay, but I don't have my clay ready. And that's the next step is to start molding
my clay pieces. So I'm gonna put
the modeling paste away. Because I'm
done with that. And I've got a mold here
that I have picked out. This is an IOD mold, iron orchid designs, and it's
called dainty flourishes. And these molds are wonderful. I really love them, but it has these nice corner elements
here that I really like. So I thought about adding
a corner element here, here, here, and here. And then it has this
nice little element here in the center
that I also really like so I will need to
mold this one twice, this one twice, you
know, to match up. And this twice if I
wanted to put it top and bottom here in the
center, which I might do. And there are these other
little two little corner molds here that might be interesting or it
might be overdoing it. To start with, I'm going
to work with the clay and mold this one and this one
twice and this one twice. So we'll do that in
the next segment. In the meantime, I'm
going to put this aside out of my way so I have
room to work with the clay, and this can start drying. And it won't matter if I attach a clay to this
while this is wet, it will all dry well overnight. And then I'll be able to paint it after that to
create the look I want. So we're just going
to set this aside out of the way to be
able to do the clay. And in the next segment, we'll do some pretty clay molds.
4. Mold Clay Embellishments: The first thing I'm going
to do with the clay, and I recommend this with any of the molds is dust them
with a little cornstarch. So I just have a
little fan brush here, and I just put it in
there very gently. Try to get in all
the little crevices. And I'll tap off the
excess into the trash can, so it won't be too much. So that's that one corner
element. Let's do this one. When it comes to molds, there's a lot of
molds out there. Some of them are good. This is really good, this
particular brand. Some of them are okay. And some of them are really
difficult to work with. But this one is really good. I recommend this brand highly. They are on the expensive
side for a mold, but you can use them
over and over again. They hold up really well. I wash mine after every project just to keep them nice so they
don't get all gunked up. And I usually just dust them once with the cornstarch unless I see that I
might need some more, but I usually don't with these. So let me put that aside. I'm going to tap this
off in the trash can. Just to get some of
that excess off, and I still have my wet wipe
there to clean up anything. And I'm working with my favorite air-dry clay
so far is this brand. A Ds it's white. It's kind of a grayish white. But I keep it folded up
in its package and in a ziplock bag to keep it from drying out
because if it's out too long, it will start getting dried out, and then you won't be able
to work with it as easy. I just condition a little
bit with my hands and I will start putting little
pieces into the mold, little balls of it, and working it in there
and pressing it down. And you can roll it to kind of fit the area you're working in. And I try not to have
it be too chunky. If it pops back out, I just put it back in there. But I don't want it to be
too thick in the mold. I want it to have a
slight indention in it. So it's not like
just too thick and bulky and smooth it out. I still have my water over here. I'm actually going to spray a little water in
my palate here. Because if you find that it's getting a little dry and you need
to smooth something out, put a little water on your
finger and rub it on there, which I'll do here in
a minute anyway when I get done getting
all this in here. And try to get every spot. Even if you go over the
edge because when you smooth it out, it'll come off. The way these edges are on
these molds is amazing. They have a nice little
lip on the edge. That helps you to feel where the elements are and where the
clay needs to go. But try to get it pretty full. You don't want it
not full enough, but you don't want
it coming up in a hump, really, either. And I just like to
do little balls of it at a time and work it all in there in smaller pieces because it's
a lot less to clean up, which this is a bigger mold, and I'm able to do that
easier with a bigger mold. The little fine molds, there's just no way you're going to have a
ton of excess with those until you trim it all off. See, I need a little
bit more in there. And every time I pull some out, I condition it just a
little bit to warm it up, get it a little flexible, to be able to go in there, good. And I'm going to
have to make, four of these corners and
one of the middle. And rather than make you No, two of the middle,
two of this one. Since I'll be doing the same
process when I do those, I will probably just do this first group and then I'll get them
out of the mold, and then I'll stop the video, and I'll do the next ones off camera because it literally is the same process to
make several of them. Let's see a little spot right here that's got a little
bit of a crack in it, so I'm going to
add some more clay there to make sure
I have enough. So that's one corner. And I'm going to
try to condition this one and roll it
a little bit more so I can get done with this
one a little faster, which if you can roll it to about the size
you're gonna need, it's a little bit more helpful to get it done a little quicker. If it'll stay in there. You
can't get it too conditioned, then it won't stay in right. I start sticking
to your fingers, which the wipe can
help with that, too. But see, I've gotten a lot
more in that mold a lot faster than I did the other one. So I need to fill in a
little bit right here. Make sure I have
enough in there. And I've got this
one little curve right here I've missed. So fill that in pretty good and bring some
of that over in here. You'll get a feel for it when you work with
it and the molds. These molds are wonderful
for adding elements to other objects that
you already have. Smooth that out a little bit, get that excess off of
there, put it back in there. And if one finger starts
getting real sticky, you can switch to another one. I'm going to divide
this one up a little. It's gonna get too thick. That's enough in there. That's actually a
little too much, so I'm gonna have to get
some of that back off. Now, you can use
a palette knife. I also like to use
this letter opener. It's not quite as sharp
as a palette knife, but it helps me stay skim across the top and get
some of that excess off. And I can actually use
that in this mold. Well, I will since I
get it off my finger. Remember, whatever tool you
use wipe that clay off of it, because it will
dry on your tool. Let me get some more clay
for the center mold. And I've got a glass palette
off camera over here to my left that I will lift these
up after I get them out. I'll set them over there out of the way while I
do the next group of them. And then I'll decide after
I add these to the frame, whether I want to
add anything else. And this is one thing I
really like about clay. When you're adding embellishments
to something else, and it's like, say, a metal jewelry finding, like a metal filigree or
stamping or something like that, kind of you're stuck
with that size. Unless you can easily cut metal, you're stuck with that size. Where clay, you don't have to be stuck with what it
produces in a mold. You can trim it to fit What you are working on exactly. And you can mold it some more once it's attached if you wish. You can put some texture
in it if you needed to or do something else to
it if you wanted to. Whereas with the firmer elements like metal and wood pieces
and things like that, you can't really
make them to fit, and it's hard and I've done this because I did jewelry
design for many years, and I added some of those
elements to frames. And it was like trying to fit a puzzle together
all the time, and things that I thought
would work were too big, just by a hair and they
didn't look right. And the clay is just
so much easier. Okay, now I'm going to
get a little bit of water that I put in that
palette on my finger, dab some of that
off on the wipe, and maybe a little more. And I'm just going to
start smoothing this out a little on all of them.
Not too much water. It just helps smooth things
out a little and pick up any little interesting elements in there that may
be inside the mold. Helps clean up the excess, too, off the edges,
if you've got any. And then I do need to use my
trusty letter opener here. See, there's a
little elements in here that need to be
picked up a little. Maybe. Maybe they
don't. Let's see. I might actually need.
I don't think that element needs to be showing
like it is on these. I'm going to put a
little bit more right there on both of those. I think I took away a
little too much there. There is some in between that I do need to get
away from the edges. Like, right here, there's
a whole little bit right here that needs to come out of there.
So I'll put that back. Alright. Now I'm going to try to use this to
get any excess off. And I may need to use
the palette knife on this just to get
a little sharper. Since I've really
mushed it down. The goal is to get as clean
of a mold as possible. Maybe that's maybe I don't
need to take any of that off. I do need to make sure it's away from those edges, though, and all the little edges are showing and make sure it's
pushed down in there, good. This one I may need
to take some off. It's easier when I'm
doing this to start more towards the
middle than a corner. Try to go this way.
There's a little bit of excess there that
needs to come off. This one, I'm going to
start in the middle. And I try not to dig down. I try to lay it flat as
I go across the top. If I have a lot of excess clay, the letter opener
works really well. But I just have a little thin amount here
that needs to be trimmed up. There we go. I'm going to
take a little bit of water again and just smooth over
it just a little bit. It's very meditative to
sit here and do this. You're probably about
to go to sleep. But don't go to
sleep yet, 'cause I'm getting ready
to pop these out. At least I hope I am. Let's
move the clay out of the way. Get my hands wiped off a little, get that palette knife wiped off before
that clay dries on. Now, to get these
out of these molds, you can work them like this. If you have trouble and
you find its sticking, one thing I have
excess right there. I just see. I believe. Yep, I do. Let's
get that out, see. When you start working with
it, you can tell that. But if you have trouble
getting them out of the molds, you can put this
in the freezer for about 15 to 20
minutes and they'll pop right out in one piece. I usually don't have to use
that technique with these. I just kind of loosen
it from here first. If I see that it'll come
out, I'll get it out. But I don't want to break certain elements, but
the nice thing is, if you do, you can
always put them back in the order
they're supposed to go when you're attaching. I just like to loosen it from the top all around the
edges the best I can. And then I like to turn
it upside down like this. And I push down and start rolling away from this one
edge as carefully as I can. Don't hurry this process. Do it kind of slow. Just
kind of gradually inch it. While pushing down on this side, you're pulling up on this side when you're
releasing these. Okay, there's one. And just to make sure I don't
stretch it out. I'm gonna lift it with
the palette knife and put it over
here on the glass. Now, this one came out
nicely, the center one. It does have this little
delicate area right here, and it's got a little spot of clay right there. I need
to get off of there. So I have to be careful about that to make sure
I don't break it. But if I do, I know where
it goes back in place. And then let's turn
this side around. Push down firmly on this, gradually ease up while
watching what you're doing. And ease back. As you
come back this way, it should drop off. Drop out. I'm trying to get this one picked up
without breaking it. So there's another corner piece. So I'm laying these down on
the glass off to my side. So that I don't mess them up. So now I'm going to do
the same process again. I should not have
to re dust these. But if I see that it's
sticking too much, I may re dust them.
They feel pretty good. But like I said, I'm gonna
stop the video at this point, do the same thing again
to get my duplicate ones. So I have enough to
cover all corners, and then we'll see if we want to do these other
elements at all.
5. Attach Clay Embellishments: Okay, I have all
of the molds done. So this mold here, I'm thinking about positioning
like this so then I'll position the others the same way around each
of the corners. I flip the mold upside down
and using type bond glue. I just squirt Well, sometimes it's too that tip
is too thin to squirt out of, so we're going to do
something different. I'm going to get this out with Well, a palette knife. As soon as I'm finish
rinsing it, I'll I'm going to get that. Well, I don't even know if I can
get it out that way. I may have to just do something
different. Let's see. Let's see if I can do this. Squirt it up here, get
some on the knife, and then smooth it across
the back of the mold. Scrape that off, wipe that off. I like to take my
finger and work it in here because you can get
rid of all the excess. Have a wipe handy when
you're doing this, though. I go right to the edges, right up along the
edges, like so. If you can get the excess off, scoop that back
over to the bottle. So it's not quite so much
because this is still sticky. So it's going to
stick some there. I'm having to flip this over now and I'm going
to decide thinking about something like that and then tap it
down very gently. And there is some
excess coming out, but I'll get that with a
little brush if it's too much. And I like to keep my
fingers rinsed off. Good 'cause it's
got the glue on it. Grab a few more paper towels. Like I said, this is
not a clean process. So we have one down.
So where's that little here's a little
brush I was going to see if I could use to get
some of that excess off. I wet the brush
and dab it off and then just get these
excess areas. And of course, that
dug into the texture. And I didn't really
want to do that, so I'm going to use that same brush and
just guide it back in there that textures
still drying. Probably I need to be a little more careful
with the glue. That was the only spot I saw. That was too much. There's
a little in there, but it's all gonna
be painted anyway. Alright, let's try to get
the one on the bottom. This time, I'm gonna try
something a little different. I'm just gonna get a little
bit on there like this. And I don't want too much, so maybe this will keep
me from getting too much and then just
move it all around. Make sure you get all
the little edges. I wash my hand off
real quick, dry it. So that one is going that way. And this one, I think I'm going
to put it going this way. Like so. Writs my hands off again. Very important. Pat that down. I have a lot less excess with this
one than I had with that one. Okay, now let's get another one. D one this way and then one
that way to match the top. I probably should have done this a little different
layout. Maybe not. And that's what makes every
piece unique is the artist not knowing how she wants to lay things out and just kind of
making decisions on the fly. At least I call that unique. Get all that little
bit on there. So where is I gonna
put this one? Here. Like that. You have a little bit
of time to scoot it around to make it
like you want it. I'm just trying to
decide what looks good to me based on these molds, these clay moulds
I've already done. I do have a little
excess glue there, but I believe that's
within the clay. So it's a little easier
to get that out. See. And I did get
some on there, but I don't know if
I can get that off of there without
messing things up. Well, a little bit. I got some of it off. Alright. Move this around up a little bit more
where I wanted it. Okay, I got one more of these. Which I guess I'm
going to put here. Just easier to squirt it out of the bottle when
the lid is off. The fine point is great for
your little small small ones. This glue is amazing. Once this all dries, this stuff's not going anywhere. I know I have some Uh oh,
and I broke that one. So see that happens sometimes. So I'll position this spot. And I'll position this
one right back there. Scoot this a little. Now, get my hands washed off. You can let your clay dry if you wanted to before
you attach it to the frame, you could let it dry flat. Get that excess glue off. And obviously, it would be a hard mold
and easier to attach them. But if you want to be
able to maneuver it, and I'm just taking
this little wet brush here and kind of working
with that clay there to soften that a little so
I can get that crack fixed. You can use the
brush to do that. Get the excess glue. Put a little that glue right
there where that crack was. It's not gonna matter
this stuff's not going to go anywhere. Okay. Now I have to decide
on these other pieces. They're a little bigger
than I anticipated. I'm thinking I might be able
to fit one right there, but I'm not going to be able to fit it
like I wanted to there. So, do I want to use these? Do I want to use just the bottom one and save part of the other
one for another project? I think I can get
this one in here. Even if that sticks
up a little bit, It should be okay.
I can actually still move this a little. Not much. I'm afraid it's
gonna stick up too much. If I set it down, yeah, that's gonna stick up too much. So here's what I'm gonna do. This is why I like clay. If something doesn't
fit, you can alter it. I am cutting off.
That little top piece and just going to use
this piece there. See, if this was a metal piece, you would not be
able to do that. Well, you might if you
can cut the metal. That's why I like the clay. It's so forgiving when it
comes to something like that. Now, of course, can measure
out your whole project exactly and have everything
laid out the way you want, but I like to work a little bit more intuitively than that. I want to just try
to position that right there for the bottom. Now, do I want to do the
same thing on the top? Am I going to be able to get something like
that in there? I know I'm gonna cut off that
little element to match. But nothing goes to
waste my project. I'll save it for
another project. And I'm just kind of smoothing out that little area
where I cut that. And we're gonna see I could
put it up a little higher. That would be
interesting. It wouldn't go I wouldn't look
right that way. This way, it's too tight. Up here it's kind
of interesting. If it was up above, might
be a little too much. Um, maybe Maybe I should just add one
of these in here. The small ones. And save the other one for another project. What do we think? That
would almost fit there. It definitely would
fit up there, but it's too far of a gap. And this is unable
to be scooted. Well, I can scoot
it a little bit. 'cause that texture
underneath is still movable. So let's just scoot everything and see if I can
work it in there. It'll be awful tight. I'd have to scoot. Uh oh. I'd have to scoot
a little bit more. And I'm not sure. Well,
maybe I can accomplish that. Of course, it's
making some marks in the textured material. That's a whole lot better. It won't be that big of a
deal if that sticks down. I still think it
needs to go further. Just to give it a little
more breathing room. See how much time
you have to work with this texture stuff, though? Let's see, I can
smooth that back out with my hands a little bit. And I can even use
palette knife, maybe. Not that direction. I
have to go this way. I'm afraid I'm going to
mess it up too much. I don't know. I'm kind of
liking that unique texture, and that's going to be a lot of that's going to be
covered up anyway. Okay. In fact, if I get a
little water on my fingers, I could probably Yep, do just like the clay
and smooth it out. As long as you work with
it before it's dry. I'll do that. It is water based, so a little more water. There we go. I'm You do one area and you
mess up another area. That's okay. Let's just
maneuver it all around. So if you do something
in one area, you want to do it in
another area, too. So if there's a
certain mark that shows up there that doesn't
show up somewhere else, it's a little
thicker right there. So that's why it
was giving me fits. And I could still scoot this a little down here just to
give this enough rim. Alright, I think I'm
done messing with that before I mess something up, so I'm gonna get enough glue on this to attach this piece. Go all the way the edges. So the bead needs to
be in the center. Wash my hand off.
Alright, let's flip it. Sort of match what's
happening down below. I need to scoot that one a
little more. There we go. It's on now. It's in there. That clay is a little
rough right there. Right here. So I'm gonna
take the wet brush. And this isn't really
a stiff brush. It's a really soft brush. I'm just smoothing that out
just a little bit. There. You can even use the brush
to make texture in the clay. Alright, I got a bunch of
elements on there now. I get it clean paper towel. Now, I have two little
elements left over here. I have this one and
another one just like it. So do I want those maybe coming out from
the side? I think so. I think that would look pretty. But I just need a
tiny bit of glue, so I'm going to put
the top back on. So I can just get a
little tiny bit on there. It's really hard to squeeze it out of that little tiny area. And this is why I keep
the bottle laid down too, so it doesn't have to roll
all the way back down. Alright, let's put this
one somewhere right in there. Let get the other one. So none of these molds
are going to waste. None of these clay elements. They're all being used.
Every single bit. And let's put this
one distraction, trying to line it
up very closely. I'm looking straight down
here at this trying to see. And of course, I touched
that clay a little bit. Not clay, modeling paste. So I got a lot of
elements on there now. And now is the time to decide
if I want more something. What would the something be? This bottling paste
is still pretty wet. Let me lay that bottle
down over there. It's still pretty wet. Get rid of all these paper
towels and get something new. So do I want to add some other kind of texture into that where it's
a little bit sticky. It's not too sticky over here, but a stiff stencil
type brush would definitely add some
speckled interest if I wanted to do that. 'Cause I have a few areas
where it's messed up, which I can add some more water. On my finger and
smooth that out. I think I will add a
little bit more water on my finger and smooth
that down a little. Of course, I get
up around there, it messes that up. There. I will just
leave it like that. But this has to dry totally, and I will check to
make sure all my edges are down good around
the edges of the clay. This one is not. That one down the bottom wouldn't either. This one is not. There's a gap. So I just press that down to
make sure these edges are down well enough where
nothing's gonna come off later. Even all these little
bitty ones here. So that's the top, and this
is the bottom at this point. And now this has
to totally cure. That's gonna take at
least 24 hours to do. Do not try to paint
or glaze or stain or do anything with your clay
until it's been 24 hours. And you'll see how nice this
look once it's painted. Right now, it may look crazy. And it is kind of different. But that's what I want.
I want different. I'm trying to think if there's any additional clay element
I wanted to add into here, now would be the time to
do it while everything is still wet and has to cure. And in looking at the mold, I had originally considered
these little corner pieces. I think that's
two. I don't know. I don't like those. I think
this particular mold, the molds are bigger than I would want to use
on this particular frame. I do have a spot right there. I need to smooth that
down. There we go. So I don't think any of
these are going to work. And I think that the art. Once it's in there,
and this is all done, I think that will look
really, really nice. And I don't think I want to
add any more texture to this. It's got some interesting
little textural marks, plus the mistake areas where
I have a little texture. So that will all pick up when
I paint it and I glaze it. And that will become
more evident then. So really, all I need
to do at this point is leave this alone until tomorrow and then see what I've got then if
it's cured enough, if it's not cured enough,
if it's too thick, which most of the time it
does cure in 24 hours. But if I want to make
sure it's really, really cured, I
might wait 48 hours. I know it's a test in
patients because I want to continue on right
now just like you do. But I'm telling you,
it'll be worth it. Right now, I'm thinking this is going to be one elegant
frame when it's done, totally different looking than
when I first picked it up. And I do see a little
spot right there. I could potentially
smooth out a little. So just a little water helps
that happen before it cures. Once it's cured, it's not
gonna make any difference. Especially with the clay, it becomes really
really hard like stone. That's why I like it because
I like stone elements. I like wood, and I like stone. Those are my two favorite
elements. And I like jewelry. So, you know, there is
a potential here to possibly maybe if I scoot these, in fact,
I'm gonna do that. I'm gonna scoot these
out just a little bit. Just a little. Because I have some
beautiful rhinestone chain that might work around
this edge after everything else is done to really give it a
little more glamour and offset that offset that
edge just a little bit, so I had to have room there
to put it around that edge. So I scooted these back
just a little bit. It's not a very wide chain. It's a thin chain. So we'll
decide that later, though. So now we're going
to let this cure. And I'm going to
clean everything up. And like I said,
when it comes to your plate, wrap it up tight, put it in a baggie
and try to squeeze all the air out of the baggie and it will keep
really well if you do that. I try to well it up, too, before I seal it and just squeeze all the air
out and then get it sealed. And then roll it up again. Roll it up as much as
you can and then store it somewhere dark and cool. No don't set it in the sun. That won't be very good. So this will sit here and cure
and we will be back after that's done and
see where to go to further upcycle this frame into something really
nice and glamorous.
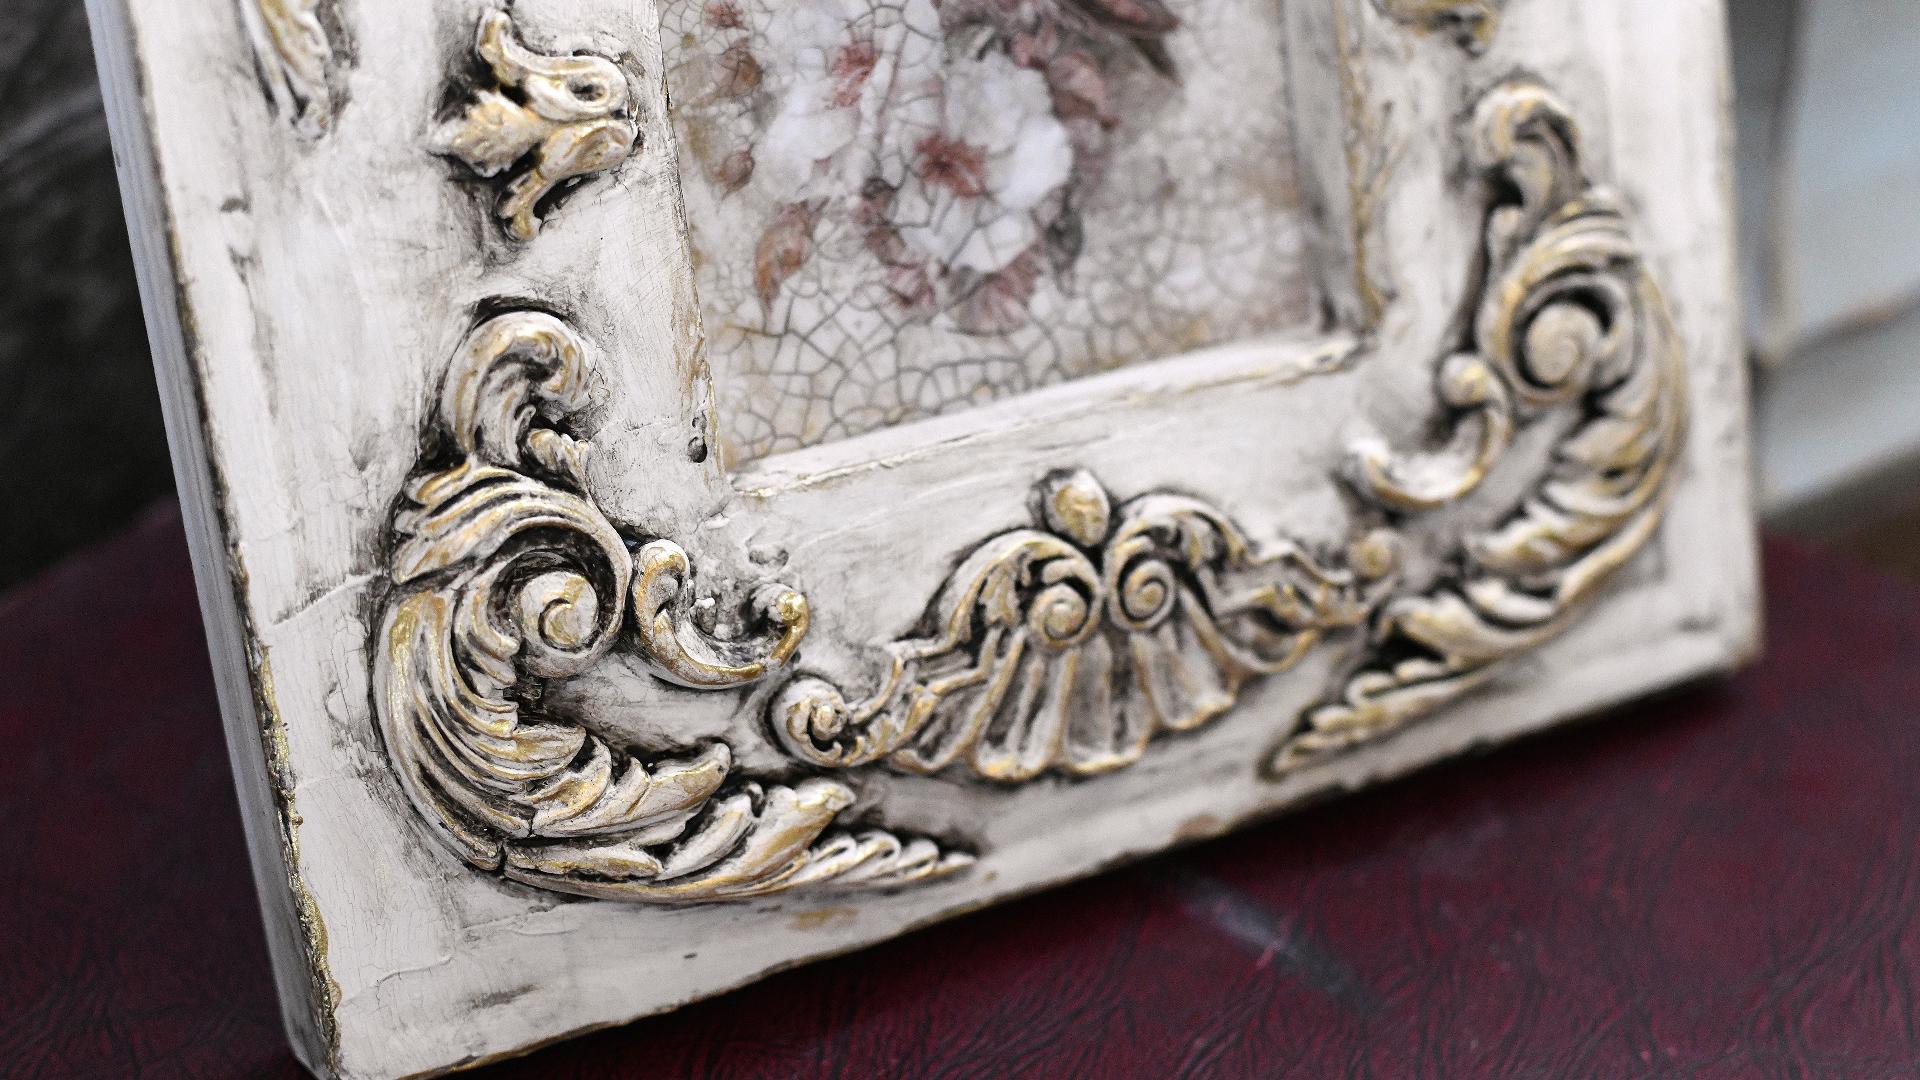
6. Paint Frame & Clay: Alright, everything has dried up and cured just beautifully, nice and hard and heavy. And that's just what I like
about the air-dry clay. It's really substantial. It feels like stone. And it's going to be
a beautiful match for the art I'm
going to put in it. But I'm trying to
pick my colors now. And that's where I
run into problems. Because I have a hard time deciding on one
particular color. I thought about doing
a dark color frame in the dark olive green and then highlighting
everything with gold, which would look
really nice with this and make this
really stand out. On the other hand,
I might want to tie in with the
white in the design, and I've got a cottage
white chalk paint here that does a
great job of that. And then I could glaze in
the crevices of everything. The dark brown, which I would get with an antiquing glaze, or I thought about trying to
glaze with the olive green, and I would mix some of
the olive green with a glazing medium to
turn it into a glaze, to be able to get
it in the crevices and then wipe back off. I don't know which direction
I want to go. For sure. I might try this and see how it's gonna
look on one of these. If I don't like it, I
can get it off of there while it's still wet and
then move to the brown, which will blend with the brown colors that
are in the design. But the olive green will help
pull out this green from the hummingbird and kind
of tie in with that. So I'm just not sure which
direction I want to go. This is just something
I'll have to try. This is Windsor and
Newton olive green. And that's what I
like to do, though. I like to try different things. This is how you learn
what you like the best. And I've always used the
brown antiquing glaze. And it does do a nice job. It's without fail.
Works great every time. But I have not tried
a color glaze. And so I'm wondering about whether I should try
that, and I think I will. And we'll see what happens. And if it doesn't work, then
we'll all know, won't we? So I'm going to
put my art aside. And I'm going to
get the chalk paint going here, shake it up. Really good. And let's see, I need my paint over
here on my right. And I can just dip the
brush right in there. But that's a nice
white. It's very similar to what this
already looks like. Now, if you remember, this was the the texture
finish that we did. And it was kind of
sticky in the beginning, but it's done well. It's cured up well. It's not. Everything's cured. So
that stuff is wonderful. That is our flexible
modeling paste. Now, it's flexible because
you can use it on a canvas, and a canvas has a little
bit of give to it, and it won't crack if it's on a canvas because it's flexible. It's got that flexibility in it. But when you put it
on a hard surface like this, this is not flexible. It's just going to stay
the way you've put it on. So you can use any
brush you want to. I wouldn't use a sponge on this. I've got to get in these
little crevices of the design. And I will probably use the stencil brush to
do that and then use the other brush to go
the regular flat brush to go over everything
really good. But let's just start
with the stencil brush, and I can just pick
some off the lid here and just kind of
scrub it in there. See how that's gonna
look. I actually probably need to pour
some of this out. I can dip it in here, though. Pick up a little
more if I need to. And I've got my handy wipe
here if I start making a mess. I can clean something up. I'm just going to
get in these ridges of everything first
and in these corners the clay has a grayish
grayish white. It dries whiter. It's
grayish when it starts, but it still has
a little kind of grayish tone because like I
said, it looks like stone. And I just like to get in all these little
nooks and crannies. And the stencil brush works
really good for doing that. Let me turn this around a little so we can see along this edge. And you can use
the stencil brush to do the rest of it, too, which I will, but then
I'll probably go over everything again
with another coat. But the main thing
now is just getting all the little
nooks and crannies. That lid is just gonna
keep popping up, so I'm just gonna
grab ahold of it. And work on getting all of
this covered, really good. And the wonderful thing
about chalk paint is it dries to a matte
finish, which I like. And it also dries
very, very quickly, so I won't have to
wait too long for drying to be able to glaze it. I just wipe any excess
off on this other part, 'cause it's all gonna have
to be covered anyway. And this other part has texture
from the modeling paste, so and I like to dig into
all those little crevices. And, of course, it's
wobbling all over the desk. I'll try to hold it down, but It's just it's got those little things
on the back that you that hold the
little mini canvas in there on this frame. I didn't take those off, so
that's why it's wobbling. Otherwise, it would
be completely flat. So sorry if that sounds
a little aggravating. Alright, I got that side
pretty well done there. This one, I don't Oh, yeah. This is a pretty pretty white. This cottage white by Folk Art, which I got at Michael's. I think you can get it
at Have Lobby, too. It's a pretty standard color. But I've been hooked on these Victorian image
designs that I've made. And they all have that later
background. It's a white. There's some cream
in there, too, and I do have a mix
over here where I've mixed this color of chalk
paint with titan buff acrylic. And let me see if I can get
some more of this on the lid. And it made it a little
bit more creamy, but I thought on this one, I would just do
the straight white and let's see where we are. And I can always because
these paints can be layered on top of each
other and work together, then I can always
change my mind. Artistic license is something
we all need to have. There's no set way
to do any project. I always say use what you
have and use what you want. Because your vision,
your art you're putting in a frame
might be different. I'm just showing you how to do mind with the vision
I have for this piece. But obviously, you might you're gonna have
different pieces of art, different type of frame,
different clay moulds. So your vision may be completely different than
mine, and that's okay. There is no set way to do it. The goal is just to create this into something very ornate. Alright, let me see if I
can get this area here. I didn't get this
one yet. Or did I? I think I might have. Well,
I'm gonna get it again, just in case I might have
missed a spot or two. No, I didn't get all
of it if I did get it. I think I got half of
it. I got to get these. These stencil brushes are great for just
scrubbing in there. And obviously, if it
was a bigger frame, which I do have two
other big frames ready to go that
I'm gonna work on, they're too big to do on camera. But I have bigger stencil
brushes that I will use for those to really dig
into those areas. And I also like
this cottage white. Well, number one, it's got It kind of gives a vintage
feel to everything. But, number two, it's
a good base coat, even if you decide to
completely change colors. I just gives everything a
good base to start from. Good base of one color
cause like I said, the clay has some grayish
tones in it, even when dry. And it's nice to have one color underneath us in
case any of it shows through, it'll be all one base
color showing through. I'm really just digging
in those areas. And I think I have them all now. So now I'm gonna
get the flat brush. I'm actually not gonna use
that really big flat brush. I've got a smaller one over here that I'm gonna use just so I can be a little
bit more careful with it. And I can dip this
right in here. Right in there, and if I need
to scrape some off, I can. But I want this
whole thing to be coated well with this color. All of the modeling paste
and all of the clay. Let me start up here
in this corner. Get this top part. I put it on kind of thick
in some spots. And after I let this top dry where I can handle
it a little better, I will do the sides the same
way with the same color. And possibly the back. I don't always do the
back 'cause the back's already pretty close
to this color. What I'm really
curious about, though, is the green, whether I'll be able to use
that as a glaze or not. And I will get down here inside this edge while I've got
this in position to do so. And I'll get some
of the sides, too. Yeah, I'll do the
sides for sure. But I'll wait till this top part dries so I can handle it, and then I'll do the sides. Okay. Trying to get in there in that inner ledge. This is a very simple process. It's just a matter of what to do when and making sure the
different layers are dry, which I know is frustrating. Nobody wants to wait. Everybody wants something
within moments. But, you know, sometimes
good things take a while. I brush some more
on top of there. I see a spot here
at the top that needs a little bit
more right there. I think. Other than
these inside ledges, I think that about does it. Now this just has to dry and it won't take
that long to dry. I'll put the fan on this
and let this layer dry. And then we'll mix up we'll
try to mix up some glaze, and I'll try it on a small
area, like maybe right here. And if it doesn't
work, I'll be able to wipe it back
off real quick and switch over to the brown antiquing glaze if
I don't like it. It just depends on how green
it's gonna make things. I don't want the green to be so overwhelming. Here's the thing. Let's say I get the green on. And then I decide
after it dries, that it needs to be
toned down a little bit. You can always go back in
over top with dry brushing, some stencil brush of the white right back over top to
brighten it back up. It's a back and forth, a back
and forth with the colors. So now I'm going to put the
fan on this and let this dry. And then I'll get the
sides as soon as it's dry. Once I get the sides, I'll
be ready to do the glaze. See, the sides are still kind
of they need to be done, but I really don't
want to handle it until the top part is
dry to do those sides.
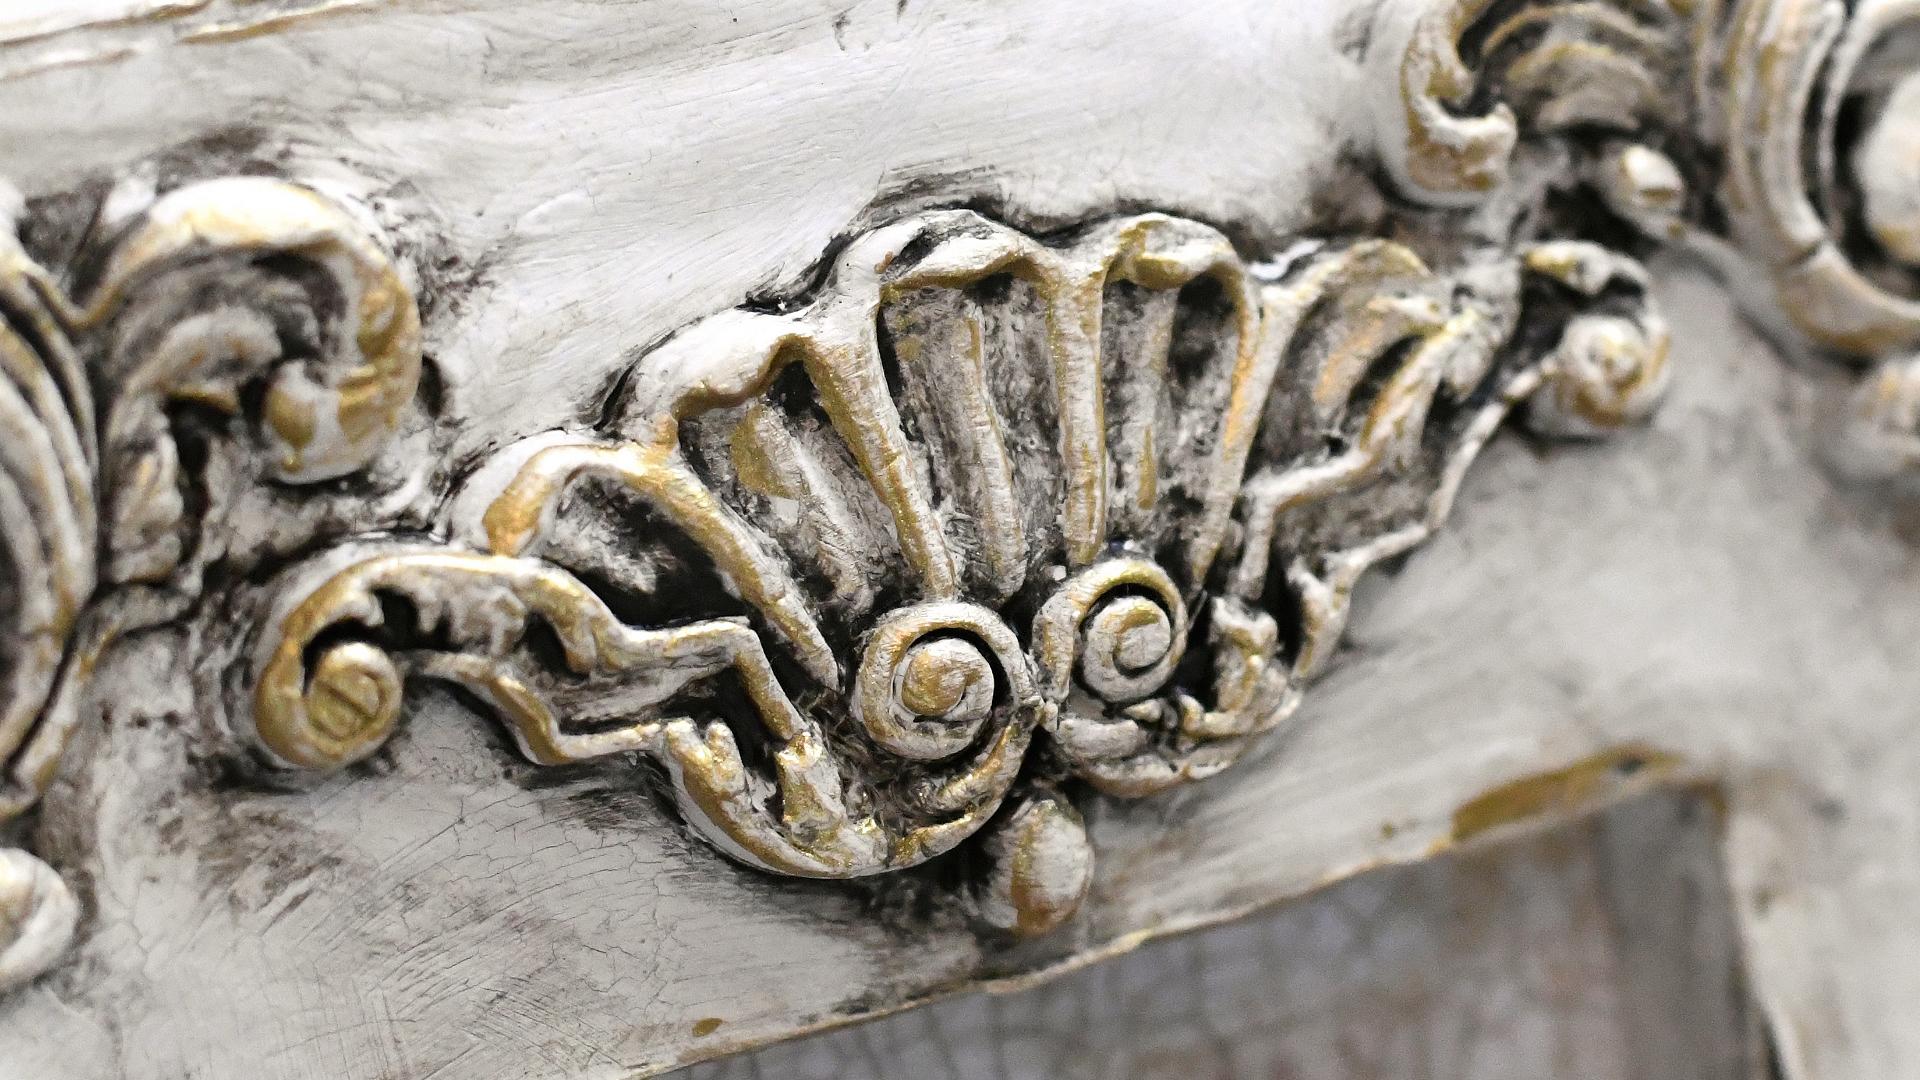
7. Glaze The Frame: Alright. Everything is dry that I put on there,
the chalk paint. I did quickly go over the sides, so that as soon as this
got dry enough to handle. I'm not worried about covering every bit a little distress. I don't think I'm gonna
do the back because it's not that much different
from the front. So what I think I'll do now? Let's try to mix up
some of this glaze. Now, this glazing medium is meant to be used
with acrylics. I wouldn't use it
with chalk paint. And this is why I like acrylics. You have a little bit
more options on things. And I'm just going
to I'm going to do just a little bit at first, just to see if it's
even gonna work, because I don't want to This
is my only tube of this, so I don't want to
waste it if it's not. So I've got a little dab there, and I'm just going to put a maybe about that
much glazing medium, squirt it out of the bottle. This helps make it a little more fluid and we'll turn
it more into a glaze. I'm using my favorite
popsicle stick. And this is tube
paint that I have. If you have fluid acrylics, it'll be quite a bit thinner. And I am going to just
for good measure, loosen it up a little more
with a little bit of water. Just to thin it a little more. And that color will go fairly
good with that hummingbird. As long as I wipe
most of it by cough, I'm gonna drive
another wipe because my first one has gotten.
It's not quite as damp. This one's fresh
out of the package, so I'm just going to take I'm gonna do a
small area here first. I'm going to do this
little tail right here. I'm gonna take the
stencil brush, dip it in there, and pounce
it off a little bit, so it's not super thick. And I'm gonna brush
some of it on there in that little
area right there. And then while it's wet, I'm going to take that wipe and wipe some of that back off. It may be a little
bit too yellow green. Maybe. Let's see. Yeah, I'm not real
thrilled with that green. It's more of a yellow
green at this point. So I don't know that that's
something I will want to use. I know it's hard
for you to see and everything looks different
on video on shades, but that is much more
of a yellow green. I thought it would
match, but in the tube, it looked a little better. I could add some raw umber
to that and glaze with that, or I could just use the spar
glaze that's meant for that. Let me try to wipe some more
of that back off, if I can. I hate to have to waste that, but I'm going to This is how we find out what
works is trial and error, and that color is just
not gonna do it for me. So we're just gonna
get rid of that. And call that an experiment
that did not work. Only because of color. I think it does get in
the crevices and it does glaze nicely if you want
a color glaze like that, but for this particular one, I don't think that
glaze is gonna work. Not for me. Once again, artistic executive
decision. Clean this out. I like to clean everything up pretty quickly right
after I use it. Because I don't like to have to fight with things that
are dried up later. So I'm gonna get another
white, fresh one. And we're gonna try the
Valspar antiquing glaze. And if you can use oops, sorry, I shook the camera. You can use any antiquing
glaze that you would like. Let me put that out of the way. But if you did want to
glaze with acrylics, that's how you would do it
with a little bit of that. It does work. It's just too
yellowish for the bird. Alright, so this I shake it up enough so I get a
good portion on the lid. And I'm going to use this
larger stenciil brush so I can cover more ground
a little more quickly. And you just get it on the brush and push it
in all the crevices. And I'm not going to glaze
the whole thing just around the ornamental areas. And I'm only going to
do some small areas that are together at once. Because it dries and you have a little
bit of working time with this particular glaze.
And most of them you do. Most of the antiquing
glazes and waxes, you have a little
bit of working time. But I don't want to
do the whole thing and come back and
have this be dried. So I'm just gonna start on
this bottom portion and work on this corner
here and really get it into those crevices
lay that lay that there, take that fresh wipe. And I'm gonna wipe back over it, and I'm going to try to
get around the edges. And I don't mind if
it gets on the white. It's going to make
everything look aged. So I don't mind rubbing it around and letting some of that texture of the
modeling paste. See it's picking that up. I don't mind that.
That's what I want. I want it in there, but
it doesn't need to be as dark in there as it is
in the crevices of this. And you may have to find
some little tool to help, not that tool to
find my other tool. Um, here it is. Something like this
without a sharp edge. To help push it in those
areas where it's really thick and kind of pick up some of that
glaze off of there. It just helps push the rag in those little tight areas
where your fingers can't get. And you can be pretty rough
with it at this point. This stuff is pretty stout. But look at that. Look at that. I want to get in
that little area right here it's a
little strong there. And just keep wiping it until such time and you
can move it around the other areas to let your additional texture from the modeling paste pick it up. And you're probably going
to need several wipes. You could also use
a wet paper towel. And I like to if it's taken
off too much for you, if you want it extremely dark, you might want to use
a dry paper towel to wipe some of the glaze off. And you'll need several of
the wipes or paper towels, whatever you decide to use. And I'm just getting in
these little small areas that are hard for me to reach. Look how different
that looks now. It really shows the dimension. I'm still seeing a little
bit of green right here, so I may go a little
darker right there in that one spot and then not
wipe off quite as much. And just let that sit there
and dry right there. There. That helped. So that
looks pretty cool. Let's see how that's gonna
look with the image. Yeah, by the time I
add some gold to this, this is really
going to go nicely with the image I've
chosen, I think. So let me get a few
more of these wipes out just to make sure I
have enough ready to go, 'cause they get really
dirty really quick. Alright. Let's move around
this way to this one. And if you see that
the texture here in the modeling paste is
not darkened enough, you can always add some more
in there into those areas. And just really
scrub it in there. A lot of people use I noticed that do these kind of projects do dark antiquing wax. And that is also a possibility. I have not used that. I don't have any of that. I'm
trying to use what I have. I have several jars
of this vw spar. Now, I put quite a bit on there, but it's a real light coating. I just used what I
had on the brush. And now I'm gonna go back
and wipe some of it off. But the texture of the
modeling paste will pick up. See how it's picking up the dark in that texture. That
is just so cool. I love, love, love using
the modeling paste to texture a surface like
this, a solid surface. Of course, it already
had a ribbed design, but I didn't care for that
design. It looked too modern. And I'm looking for
something a little more ornate for my design
for the look I'm after. I try to get in
those little areas that my finger can't get in. And then wipe off the
tops fairly good. Even go back over these
a little. There we go. Got a little spot right
here I can't get into, so I use my little tool. I like to use the tool
with the round tips or a color shaper tool. Trying to see if I have
one out here. Here. Like these with the rubber tips to get in those little spots. Not something sharp, like
a little knife because a knife might cut
into your surface. See, I could still wipe back off a lot off this white area, too. If it looks too grungy, I like some grunge. Still have some of that
green showing right there. I need to put some more
back on that area. I keep wiping it all and
maybe not wipe as much there. Let that area be a
little bit darker. So we have part of it done
and part of it not done, and see the difference,
how it really makes those sculptural
elements pop. I'm going to turn it this way now and work on it
this direction. Let's see. I did not do this Well, I'll get
to that in a minute. Let me do this side. This side is easier for me because
I'm right handed. I want to spread more
of that down that way. And then start working
it into this element. But this clay is just wonderful. And because my
work is being sold in an antique market
that also has fine art, I like to keep with the antique
look, and I just like it. A lot of my designs
have vintage look. I'm a vintage I'm a lover
of all things vintage. So I want to keep that feel and these Victorian designs I've
made, like the Hummingbird. And then I've done
a carousel horse, and I've done just a horse, and then I've done
what else have I done? Several other designs,
different animals and birds in my Victorian
collection. And those were all
designed for having a vintage look because
I just love vintage. So I'm taking this
fairly dirty rag and just getting some
of this off of here and moving some of that glaze around into the textured areas. Now I'm gonna switch
to a clean one. Get some more of that off there. And this stuff is the molds
I'm using for my clay, a lot of them are designed
to be used on furniture, but I love big chunky
ornate vintage frames. And you just can't find
them much anymore. And there's gonna be a
lot of gold applied to this a little bit after all this dries to
really dress this up. It's not gonna be
all gold, though, because the all gold, to me, I don't know. It's just I love it. I get over here a
little bit more. I do love it, but for this
particular series of images, I think the white with the
gold works really well. The gold just gives it. See, that's the gold there, so it'll look really nice
when we get to that stage. And I am thinking
about attaching a strand of rhinstones
around here, if I can make it work
just around the edge. But I want a very ornate,
old looking frame. Okay, that looks pretty good. Let me turn this some more. And so that's the
look I'm going for. Now, obviously,
if you don't want something very ornate like this, you could add just
a little bit of textural modeling paste or maybe one clay adornment
just to dress it up. And you can paint the
whole thing gold. I've done that before, too, but for these images, I go by what image I'm
using or going to frame. Now, if I'm just doing a frame and I have
no image for it, I may go for all gold, but I usually will put a
base coat underneath it. To darken the crevices and then go with
the gold over top. That's for a whole
different day, use this frame I
do have art for. And I really wanted to work
with a little art piece. So I'm really striving for that. And I just love this putting this stuff on and
then taking it off. It is so messy, but, you know, sometimes it
feels good to be messy. It's like going back to the days of being a kid and getting your fingers dirty
and being able to make a mess and have somebody
say oh, that looks amazing. Even though when you were a kid, it probably didn't
look that amazing. Alright, this one's
getting pretty yucky. Let me see if I can get
in some of these areas here where it's a little
dark with my little tool. There's a few
little spots I just can't get with my finger. And if you're working
with a part of the wipe or the g
that's pretty dirty, you can just move to a
cleaner area here like this. Let it soak up some
of that excess. But this little tool
helps me get in those corners, those
smaller areas. And you could wide
this up a little bit and really dig it
around in there. I'm trying to work
quickly because I want to be able to go back
over it with a clean wipe just to make sure I've got
it looking the way I want. So I want to get it before
it dries completely. Got one little spot
left right there. So let me put let me wipe
off what I got on my table. And let me put
some in this area. You can bring some
more back up that way. Let me just set that on there so I don't get the whole
table all dirty. Okay. Let's see here. This is still pretty clean. Let's see. This is the top. So I like to hold it away from me a little bit kind of
at an angle here so I can really see where I might want to wipe
some more back off. I try to use my finger to
get in those tight areas, but sometimes I have to
resort to the little tool. I'm doing pretty good here. That looks really, really nice. It's definitely
looking very ornate. So let's just set the image
will be behind all this, but I just want to
set it there to see what that's gonna look like. Now, the image
already has the gold, same gold that I'm going to use. That is gonna go
on these elements here to really make it pop. So I got to let the
glaze dry before I go after it with
the gold. I like to. Now, what I did not
do, wait a minute. I need to do the sides to match. They're too bright,
see? So let's do that. Now, that won't
take as much work because there's not any
texture on the sides. But I do want to get a little
of that brown glaze on there and then just move
it around like that. So now it actually
looks like it goes. See? The difference
between that and this, this has had glaze
and this doesn't. There's a little
bit there. I'm not putting very much
on these sides. Just enough to give it some of that color and then wipe
some of it back off. There we go. Let's do this side. Sometimes it's hard to
remember the sides. There's a little texture on that side that went
over the edge. But yeah, sometimes I
forget to do the sides, and then I have to go
back and do them later. And I just switched to a
cleaner area on the rag to get some more
of that brown off. Alright. One more. Side. And this one has some
texture on this side. Of course, the frame was
kind of distressed already. It's got some little
marks there, see? Now, I got more off of those two sides than
I do these two sides. So let me get another white. I go over it with a
little cleaner one because that one was
getting kind of dirty. So now we have a more cohesive look
around all four sides. So there's the top.
There's the sides. Now that just has to dry really good before I go onto these
elements with the gold. And I'm going to
clean this brush out really good because I'm
probably going to use this same brush to apply
dust the gold across these. So we're going to clean this
brush, change my water out. Close the glaze up so
I don't get my hands, arms, or anything else in it. And this won't take but
just a few minutes to dry. Because except for in the areas where it's
in the crevices, so I am gonna put a
fan on it to see if I can speed that along
before I continue on. And you know what
I just realized? I didn't really do
the inside edge. So, now that I've done all this, if you do the same thing, you stick your brush in the water without
thinking you did the outside edges,
but not the inside. I'm just going to dab with my finger a little bit there
on those inside edges. So it's very uneven. See? That wipe that head out, I'm gonna take that and just gently wipe some of that
off that inside edges. So they match everything
else. Alright, that's good. Now I will put the fan on
it and wash up everything, and then I'll be
ready for the gold and see how that
ends up looking. So
8. Add Gold Accent Paint: Okay, it's mostly dry. The crevices aren't
completely dry, but I think I can
get away with this. So what I'm using for the
gold is one of my favorites. Deco art metallics. It's a bright metallic paint. And this particular one
is called vintage brass. I have a brighter gold, but I really like this one. I just got it not long ago, and I'm kind of
obsessed with it. So I shake it up real good. Struggle to get the lid open. Oh, my goodness. There we go. I get a workout doing that. And I lay it here, and I
just pick it up off the lid, and I like to take
a dry paper towel here to pounce off some of it at first until I realize how
much of it I want on there. And, of course, get
out another wipe. And I will put
some of it on here where the texture
is in these areas cause I think it'd
be kind of cool or, you know, some may
get there when I'm wiping it off the other. Well, no, I'm not
gonna wipe it off. Sorry. But I might
put some there. I've washed my big stencil brush and I'm rubbing it
on a dry towel. To get most of the water out of there because I don't want this to be thinned. It's already kind of
on the thin side. So I'm just going to
dip some of that in there and then pounce
some of it on here. I'm going to just try this
little one right here. And I'm just gently dusting it. Across the raised edges. And that may be a little much. I'm going to do this
one the same way. Since I already have it
done on the one side, I want the sides
to kind of match. And you can kind of tap
it there around it. Let's try some around this
edge of the Of course, I may put the rhinstones here, so may not even need
to do the edges. Oops. If you get too much
on there, get that wipe. Wipe it back off. You could do the
same thing here, can wipe some of that back off. I didn't intend on doing that, but if it gets a little too strong, that's
what I like to do. Just wipe some back off. It'll actually leave
a little glisten to the piece overall. I'm thinking instead
of the brush, I may need to use
my fingers on this. Let me try that and just
tap my finger off on there. I just have a little
bit because I can feel more where the edges are with my finger
than I can the brush. The brush I sometimes
press too hard. And I found in my last one
of my last projects I did, I found I really liked doing this with my
fingers because it does pick up the I feel the
raised edges a little better, and that's where I want it
is on the raised edges. I don't want it in the cracks. And of course, I can only get a little bit on my
finger at a time. I just kind of move around to where I see
that it might need it. So you see the difference
between this and this? It's really dressing it up. Yeah, I do like using my
finger better, I think. I want to add a
little bit more to that on some of
those raged edges. Then we'll move over
here to this one. So this is one of those times where I feel the brush
was a little too much. There is a gold wax out there. I can't remember what it's called that you can use
your finger to put it on. People do or gloved finger. If you don't want you
get your fingers in it. And oh, that's pretty but I can always wipe it off really
quickly with the wet wipe. I don't have the wax comes
in a tube, and it's. They have different
colors. They have gold, they have bronze,
copper, et cetera. I don't remember the brand. So if you have some of
that, you could use that. I have to be very careful what
I use that it doesn't have any strong smells,
solvent smells. E 6,000 blue is about the only thing I will use
that has a strong smell, and I use it very quickly and I leave the room
as soon as I do it because I react very
strongly to smells. And so I just try to not use things that have
solvents in them. And I don't know
about that wax in the tube if it does or not, the gold ones and so
I haven't tried any, and I haven't really researched it because I have
plenty of this. This I got at Michael's,
this particular gold. I can't remember if Hobby Lobby or I don't know
about other stores. But I find it to be very good. And it lasts I mean,
it's going to hold up. It's not going to
change over time. It's just going to look richer. And, of course, I'm
doing decor items that aren't going to be
handled a whole lot. This isn't like something you're going to be handling every day. These type of things. This is, I just love upcycling, old frames that aren't very exciting and really making them look ornate with the clay. I have fallen in love with this. As much as I enjoy my
art, I enjoy this. I got a little too much there. Had a little bit too much on my finger, but I can wipe it. Like I said, it's fairly thin, so I can wipe some
of that back off. On the other hand,
it may look okay, just to have that area have a little bit more.
So let me do this one. And see, I'm using very little
of this. Just very little. And so this jar
will last forever. In fact, my bright
gold colour jar, I've probably had for ten
years or at least eight years. And if you get if
you realize later, you got too much on and
it's dried too much gold, too much glaze brown, and you want to add some of your white chalk paint back on or whatever color
paint you're using, or even bring in another color. That's also a possibility. I do have a sage
green chalk paint, which might be kind of
interesting to bring in. Now I'm just going to take
my finger and go right on the rim here of the edges. There is some good texture
there by the edges. So I like to pick
up some of that. Alright, let's see
what this looks like. Let's see if I me at the top. This is the top right here. Oh, that looks very
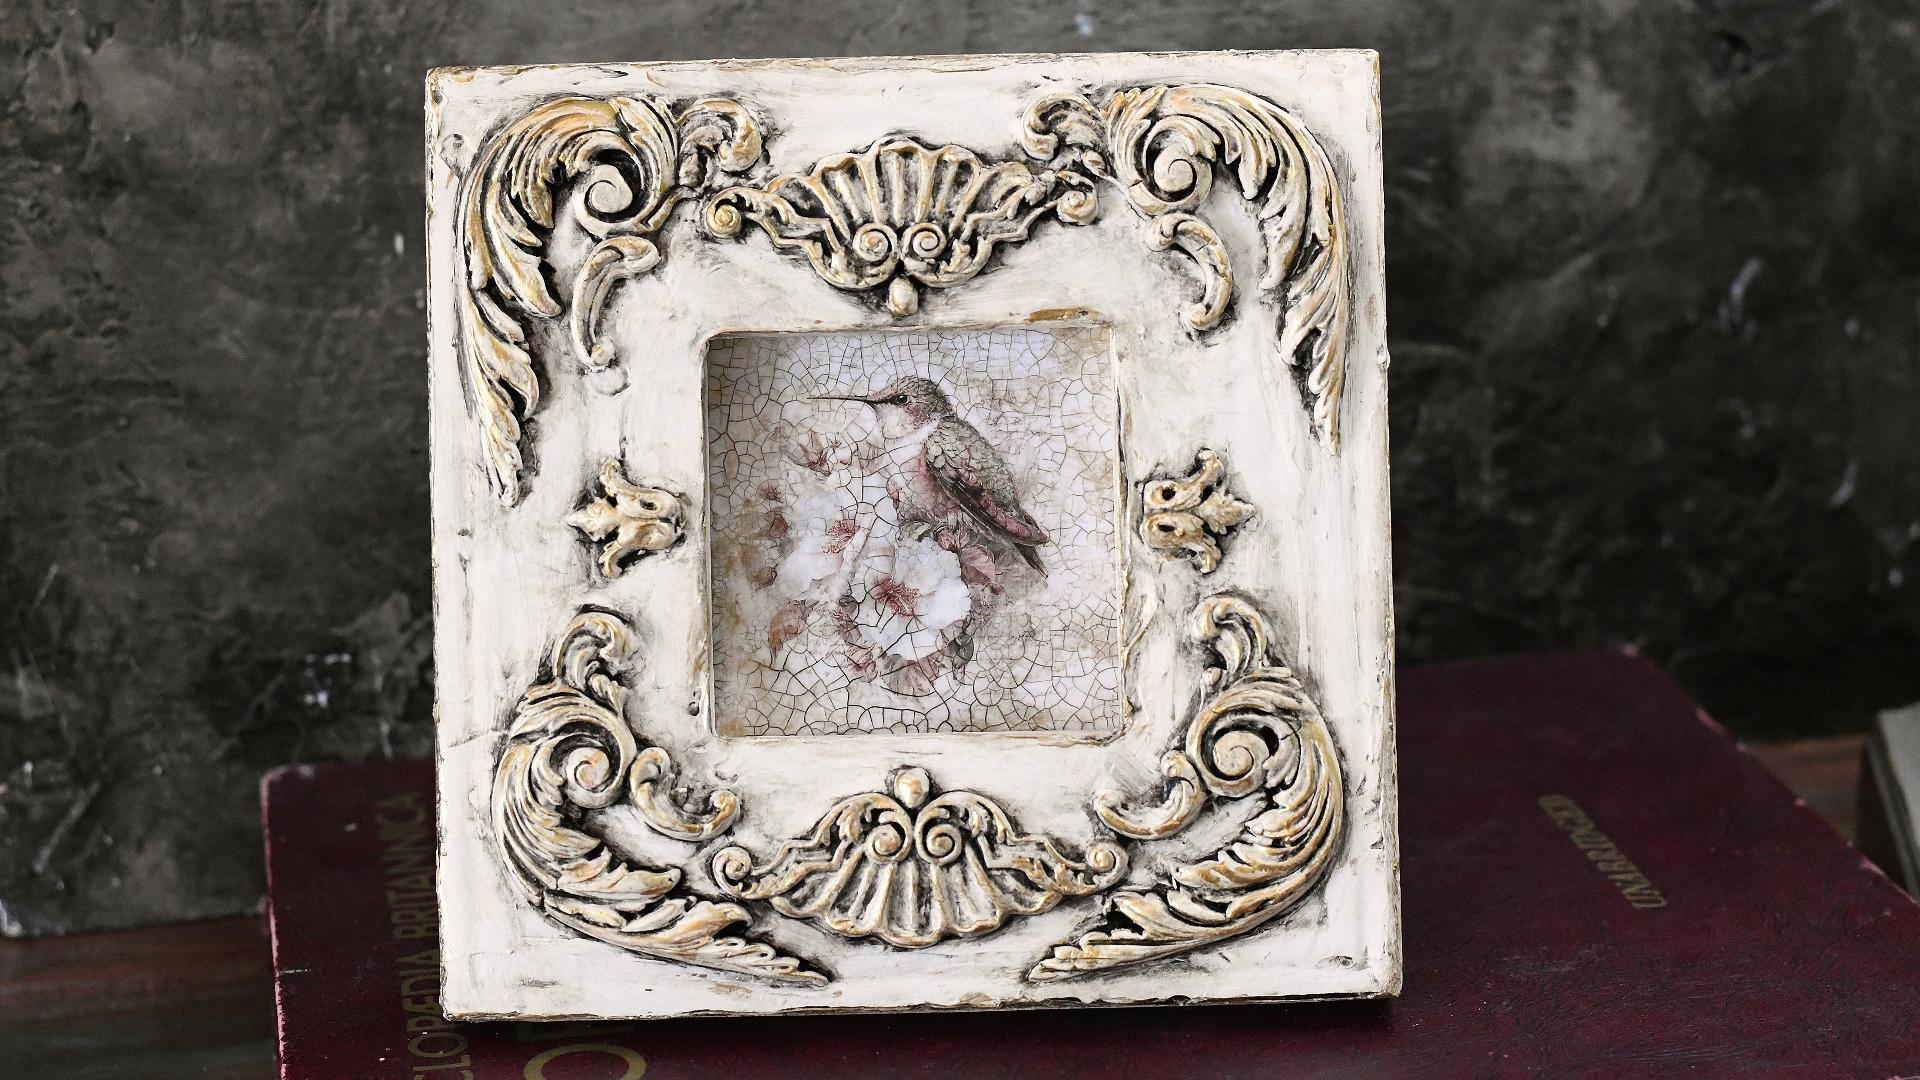
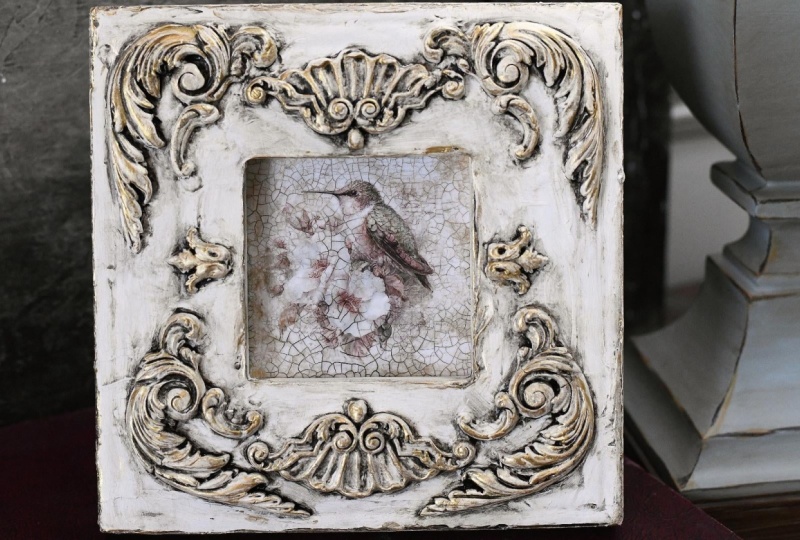
elegant and ornate now. Totally different look than what I picked up at the store. Yep, I really, really like this. Now, let me put the picture
that I'm gonna frame. I'm just gonna lay
it underneath it. It has the gold already in it
'cause I already did that. I just want to see. Let me stand up so I can
see what you're seeing. Oh, yes, I think that's
gonna look just beautiful. I'm almost wondering if
I don't need a little green on this frame to
really tie in with it, maybe on these outer edges. I'm gonna put this
brush in the water. Now, the olive green
obviously was too yellow. I think I have enough gold. Yeah, I think I don't want
to overdo it on the gold. I want to use the
gold as a accent. But I am thinking, let
me grab this green. It is the same brand
of chalk paint. And I'm not used this color,
but look at that green. That's a little softer than the olive and
it may not match. I'm just going to
open the bottle. Well, I think I'm going
to open the bottle. I'm just going to take
a look at it with my eyeballs. See what I think. I have to get this paper. I haven't used this one, so I have to get this
paper lid off of here. Another on the spur of the
moment artists decision. Okay, that needs a
little mixing up. I think that's gonna have to
be shook up a little more. See that marbling in there? I think that color needs to
be shook up quite a bit more. So I'm gonna tighten
that lid real good. Shake it really, really good. This is a new bottle, so it's
not like it's an old paint. I just want to see that
may be a little too light. It's hard to find the
perfect color green. I'm afraid that's too light. I don't think that's
going to match at all. So we're going to scratch
that idea and put that aside. I have some other
green acrylics, but I think I would have to mix something up to match the bird. And I'm not sure if
I want to do that, it's really hard to
tone a green unless I can try a couple of colors and decide if
that's what I want to do. Let me just go ahead and
pop this bird in here. This is fairly dry. I'm going to slide this
little canvas up in there. And close it. It's hard to get it
pushed in there good. I'll have to wait till
the front's dry where I can push this corner in.
I could do it with this. You know, they say a
frame is a certain size. And they lie, to be honest. Though it'll say that this
frame is four by four. Well, this canvas
is four by four, and it's a little bit snug. So that means the opening is a little less than four by four. But I did get it in
there pretty good, so that is what I have. And I may play with a little green to see if I can
get I don't know. I kind of like it the way it is. I like now that I'm looking
at it in the frame, I like the fact
that the green on the bird kind of
makes your eye go to the bird without any
other green on here. And this accentuates
the picture. And so I think I'm going
to call this one done. I will title and sign the back. And I did not put any gold
on the edges, though. And I think I might
want to do that. Hold on. See? Got to think of these
things before I finish. Of course, you can always let
it sit and come back to it, but you know how I did
around the edges here. I think I'm going to do around the edges here with
a little bit of it. Just little hints of
it. Not too much. And I did get a little too much, I feel right there, so I'm
wipe some of that back. Very, very delicately, gliding my finger along that
edge and letting that edge grab the paint. I can't wait to
photograph this and put this in a nice cover photo because the video does not
show the true beauty of it, but my photo photos of it will a lot better
than this will. In person is the best
way to look at it, but I know that's
impossible online. They now I have gold
around the edges, too. Got a little too much on
this edge right here. There. There we go. Now, let's see. Yeah, so it's got that gold
touch everywhere. It doesn't down the sides, but I don't have any
trim on the sides. And the reason why actually, I forgot something on the back. Hang on. I knew
something was different. Let me clean this up. Clean
my hands up real good. I forgot. We have an easel back for this. So I'm gonna reopen
this little hook. And I'm going to try
to get that in there, and you know what? I'm not sure. It's gonna Oh, it is gonna go. Maybe. Yep. Oh knew something was missing. But I'll probably
take that back off and sign it inside there. But now, and I know
you can't see this, you can see it
from the top view, but it's got the easel back. So this particular frame is
meant to sit on a table. That is why I did not add any clay adornments
to the edges. If it was meant to
hang on the wall, I probably would have
to further dress it up. But because it has the easel
back and it's meant to sit, if there was any clay
adornments on this bottom, they would be hitting the table, and it would not sit right. So now it is ready. I'm just going to let this gold finish drying and
quit handling it, and then I'm going
to sign the back. And after I sign the back, I'm gonna make some
pretty photos of it, so you can see the
true beauty of this the video is just
not showing it all. So that is how you
upcycle a frame into something a little bit more ornate from what it looked
like to begin with. That's how I do it. And I
hope you've learned something that might spur you into doing a creative
project like this, as well.
9. Thank You!: And I want to thank you so much for
taking this class on creating this ornate frame from a plain thrift store frame. I hope that you have found it enjoyable and
that you've learned a few things that'll help you in your own upcycling of frames. If you have, please be
sure to leave me a review. I would love to hear your
thoughts on my class, and please be sure
to follow me for other fun classes and projects in the
future. Thanks again.
 Jai Johnson, Painting My Favorite Subjects