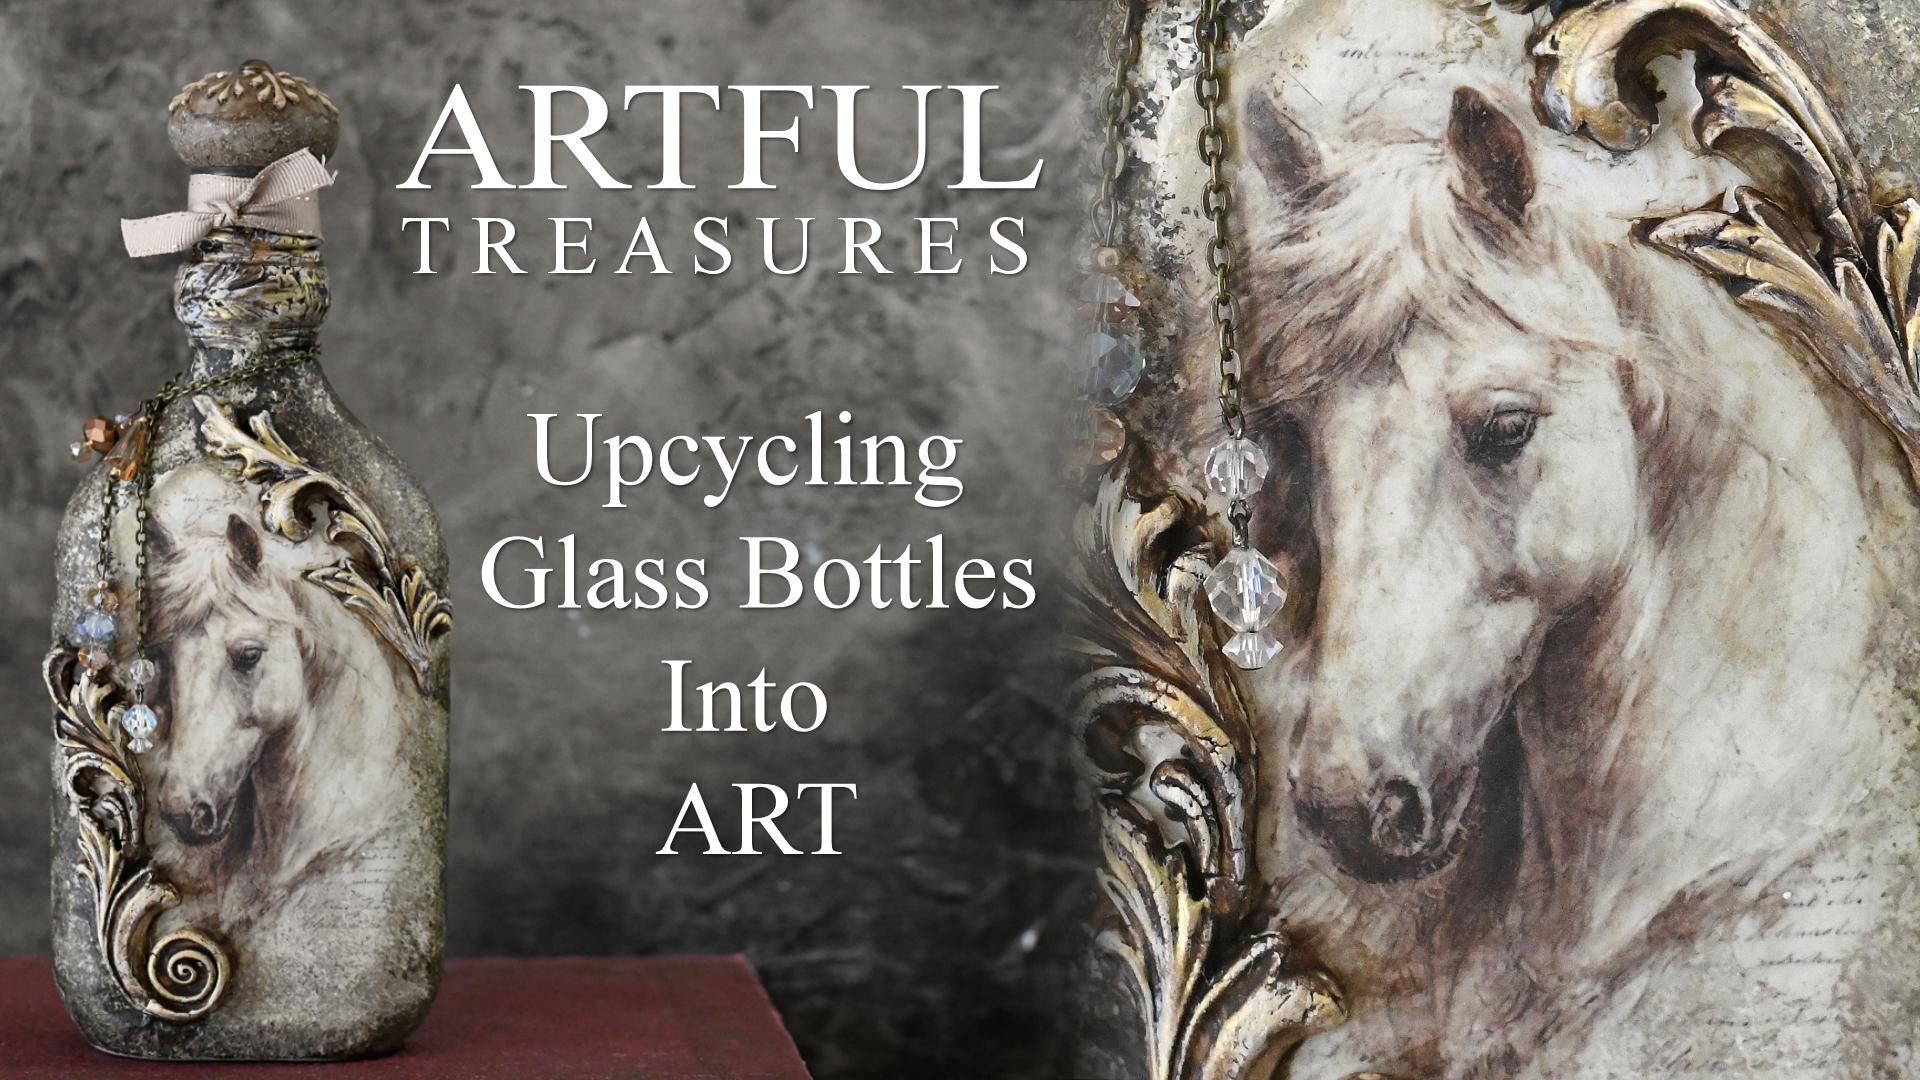
Transcripts
1. WELCOME: Hi, and welcome.
I'm Jay Johnson, and I'm so excited to
share this class with you. Today we're going to
take something ordinary, a glass bottle and
transform it into what I like to call
an artful treasure. These bottles are
usually overlooked or discarded after a single use, and we're giving
them a new life. We're combining
decoupage and sculpted clay details, paint, ribbon, and jewelry elements to create
something one of a kind, a truly collectible piece that's full of texture,
personality, and presents. What's wonderful
about this process is it's not just
about decoration. It's about seeing potential
in something ordinary, designing with intention and creating a small
sculptural artwork that can live on a shelf, a table, or even become
a cherished gift. Every bottles, different shapes, surfaces, curves, which means every piece
you create will be unique. That's the magic of
these artful treasures. You're not just crafting, you're creating something that's personal, artistic
and collectible. In this class, I'll walk you through my step by step process, including my mistakes
and how I fix them. By the end, you'll have a
finished piece that's elegant, ornate, and entirely your
own. Let's get started.
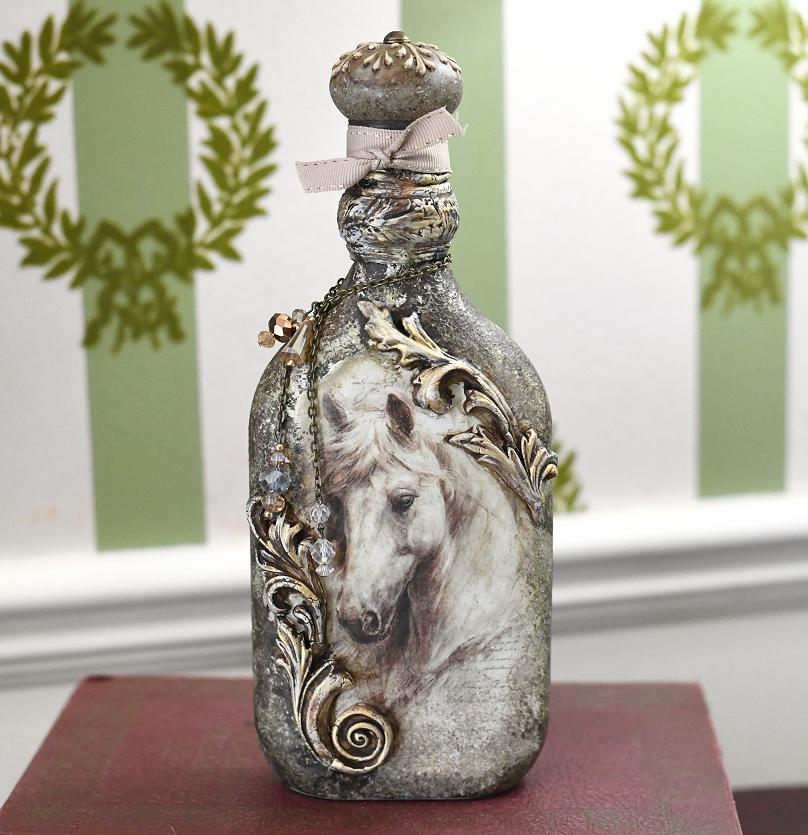
2. CLASS PROJECT: All right. Now that
we've talked a little bit about what artful
treasures are, let's talk about your
project for this class. You'll be creating your
very own artful treasure, a glass bottle transformed into a sculptural,
collectible artwork. We'll combine decapage
sculpted clay details, paint, a decorative topper, ribbon, and some jewelry or
vintage embellishments to make something
uniquely yours. I want this project to be
inspiring but flexible. Use a bottle you have on hand, or even another type of glass object you may
have like a vase, choose art, textures and
colors that speak to you. You can make it ornate, subtle, whimsical, or elegant. The goal is for it to feel personal and
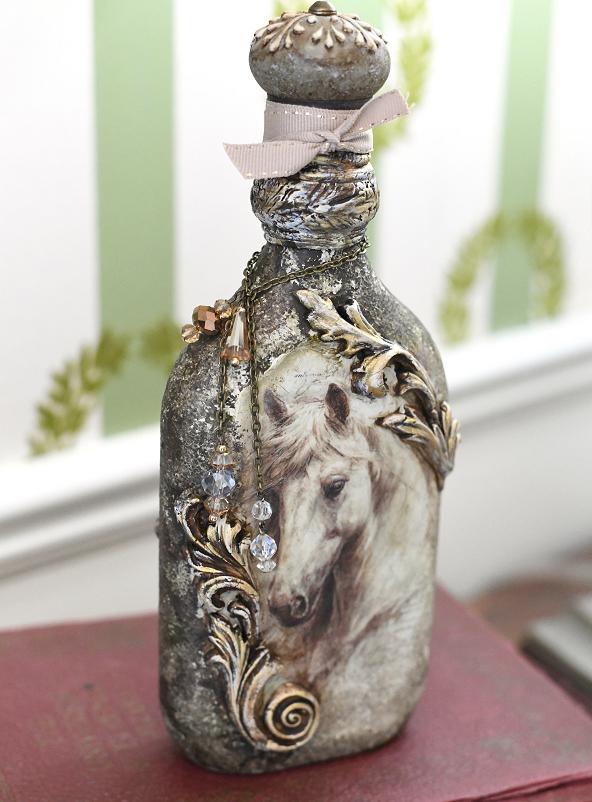
collectible for you. On my bottle, I decoupage a
small art design on one side. Added the sculpted clay
details around it, and then another sculpted
clay detail on the back. And I'll finish with a beautiful vintage knob and embellishments. But you might decide to add clay details across the
whole bottle or focus more on deca page and paint and skip the sculptural aspect. It's up to you. Every
bottle is different, and that's what
makes it special. As you create, think about
balance and placement, front and back views, how embellishments interact
with your chosen art, texture, height, and curves. By the end of this class, you'll have a finished
artful treasure, a small sculptural artwork
that's uniquely yours and ready to display gift or even start a
collection yourself. So gather your bottle,
think about your design, and get ready to
transform something ordinary into something
extraordinary.
3. SUPPLIES: Okay, let's talk about supplies that you will need
to make an artful treasure, like what I'm going to
make in this class. The very first thing
you will need is a glass bottle because I'm making an art bottle
in this class. This is one of the artful
treasures I make is I take old bottles and turn them
into artistic treasures. Some people call them
altered art bottles. But I just call them treasures because they're very
ornate when they're done, they're they're the ones I do are not always specifically
centered around art. They might be just
sculptural or home decor. They're all just treasures. But where do you find bottles? This particular bottle, which I'm going to
do for this class, it's a very simple bottle. It was found at the
Goodwill store. This one my husband
found on Ebay and it's a pretty bottle and I do have a booth at
my local antique mall, so I might just sell
this bottle as is at the booth because I know
there are people that collect these and it does
have the labels on it. If you decide to use a bottle
with labels like this, you'll have to get
all those labels off. So I'm not going to
use this bottle, but I just wanted
to show it to you. It's, you know, if
you have old bottles laying around or you
know somebody that does, you might want to
grab them from them. Here's another bottle,
great big bottle that I got at the
Goodwill store, and what I look for in the bottles do when I'm
going to put art on them, which I am in this class, I'm going to do art on one side and sculpture
on the other side. Sometimes I make a
bottle just art, sometimes I make a
bottle just sculptural, and in some cases, I like to do both. So
I'm going to do both. One side will be the art, the other side will
be sculptural. So I look for a flat surface
that the art can go on. Like even this bottle, it's taller, it's
bigger, it's longer. It has flat surface
on all four sides. I could technically, if
I wanted to easily put some art on all four sides
of this great big bottle. But I'm not going
to use that bottle either because it
would take too long. And my classes already go way longer than most people like. So this is the bottle I'm going to use that I picked up
at the Goodwill store. And before I get into supplies, I want to tell you that
the very first thing you need to do you've had
your fingers all over this bottle is get some
alcohol and a paper towel. And I like to use Viva, paper towels or shop towels. They're thicker and softer than a lot of paper
towels out there. And I just put a little
alcohol on here and try not to spill it and then wipe down
the bottle really good. And, of course, if there
was a label on here, which there is
not, in this case, if there was a label on here, I would probably soak it, get the label off,
use some gugon or something like that
to get the label off. But I just like to clean
it off a little bit. And that's my alcohol top. I was gonna put
that on the bottle. I'm going to put that aside and put the bottle aside
for right now. And the paper towels. While I talk about the
rest of these supplies. The very first thing I do before deciding what I'm going to do with a
bottle is decide whether I'm going
to use art on it. And in this case, I am. And this is an image
that I created, and I have sized it three
ways on this paper. I have measured the bottle. I'm trying not to
touch the surface to see which one of these sizes
would go best on the front? That one there will
fit just fine. This one's a little big, but it could fit as well. So one of those I will
use of this image. So when I go to picking
out a top for my bottle, and my paint colors. I like to if I'm
going to put art, I choose the paint first. I mean, I choose the art first and then
choose the paints. If I'm going to do a
sculptural bottle, I'll pick whichever
mold I want to use to sculpt something
from my air dry clay, and I will just pick what elements I want to
mold to put on the bottle, and then I'll pick the
paint colors I want to use. But when it involves art, I like to pick the art
and then pick a topper. Now, here's some things I
like to use for toppers. These are vintage door knobs
that I picked up recently. Aren't they pretty? They're old. They can be a great topper. They're a little big for
this bottle, though. I'm gonna have to keep handling
the bottle to show you. I mean, they will fit, but they kind of
overpower that bottle. So that would be for
a bigger bottle. I have these cabinet
knobs from Hobby Lobby. There's a nice, sweet crystal cabinet knob that would
work very well as a topper. So that's a possibility
with that design. And here I have
this cabinet knob, which happens to have the
colors that are in my design. So this is a really
good possibility. I need to take my price
tags off, but see, that will fit nicely on top
of that bottle, as well. And then I have a darker one. If I was going to use dark pink colors, I
might go with this one. But I'm planning on going
with the later pink colors. And really for this
design with the horse, I really think this
one works perfect. It actually matches perfect. So that's the cabinet
knob I'm going to use. You can use a wide variety
of things for toppers. You can use finials, you can use door knobs, cabinet knobs, anything that will fit on your top and not
overpower your bottle. If you want the topper to overpower your bottle and
that to be the main focus, then obviously you might go with a really large finial
or something like that. It's totally up to you. What I'm showing you
is what I use and what I'm using for this
design I'm working on. You obviously will
pick your own art, pick your own designs, pick your own accessories
for your bottle. So that's the knob
I'm going to use. Let me put the bottle
aside and the knobs. Okay. And let's
talk about the art. I just printed this on
regular copy paper. And like I said, I resized it a couple of different sizes. I may do this bottle with one and I have some
smaller bottles. I may do another one of
these on a smaller bottle. I print this out and I have crylon matte finish
spray. I take it outside. I weigh it down on the corners,
and I spray it with this. I spray it once, wait a few minutes, and
then spray it again. Because this is printed
on ink printer, that helps to seal the
ink. So that it won't run. Now, I have done many projects like this where I have
not sealed the paper, and it's been fine because I use mod pod as my the matte
finish one to apply, and it dries very fast, and I don't overwork
it with the brush. So it's up to you if you
want to seal it or not, but this is just printed
on regular copy paper. I have printed before
on tissue paper, but on these bottles, you
can do it either way. So that is the art, and that's how I prepare that. Now, let's talk about the
rest of the supplies. For my molds, I have
a variety of molds. Grab a cup here. I have molds. Like this. This one was
purchased at Michael's. This is a trim mold. This one works really good. It is a silicone mold, so it is very flexible.
These work very well. I ordered these off of Walmart. These are much cheaper, but they're very, very
loose and flimsy. They're more difficult
to work with. So I'm not going to
use these today, but I will say when I do use these type of molds
like this that are very, very flimsy and I have difficulty with the
fine details in them, I will after I put
the clay in the mold, I will put them in
the freezer for about 20 minutes and then get them out and they'll come
out just perfectly then. But they are a little more
difficult to work with. It's kind of one of those things you get
what you pay for. This is one of the IOD molds. IOD is ron orchid designs. They make these great molds. They're expensive. You can get them on sale sometimes
if you're lucky, but they're expensive, but
they're worth every penny. Worth every penny. I think this one was $26 or $28 for this
one when I bought it. They have a little
rim around the edge, which is specific
to this company. It makes it very easy to mold the clay and to
get your clay out. And as far as the like this one here from Michael's is a little
firmer than this one. So I find it sometimes
a little more difficult to get it out of this because it's
a little too firm. This is just right, and these are super,
super flexible. Sometimes super flexible
just isn't as good. But, you know, if
you have molds, you don't even have
to have molds. You could flatten out
your clay using a roller, apply a stamp to it to create a pattern and then maybe cut it out with a cookie cutter
shape or something. If you wanted to apply an element on there and
you did not have a mold. But I highly recommend the
molds and you'll see why, by the time we get done, they really make a
great difference in making the most ornate
pieces that I like 'cause I'm going for ornate and lots of elements involved that make it
just super, super pretty. And so I like this mold, and I have a little jar here
with cornstarch in it and a little fan brush
that I will apply cornstarch into the mold
when it's time to do that. So that's another
supply that helps your clay come out of your mold a little
better as if you apply some cornstarch
in it first. The clay I use is the DOS brand. It's just the plain white, but they have it in
a lot of colors. It doesn't really matter
because I'm gonna paint it. But I just I like the white. It looks kind of gray when
it's wet in the package, but then when it
dries, it dries white. So that's the brand of clay I like to use
for air dry clay. And we put these aside. Let's talk about
these other supplies. For decoupage decoupaging
art on the bottle, Mod Podge for gluing the clay elements after they're
molded onto the bottle, tight bond, quick and thick, multi surface glue,
available most anywhere. So is mod podge. And I
use the matte finish. For paints, I do use
acrylics sometimes. I have a whole range of them
because I do paintings. And I'm a professional artist, I've been painting for years. And so I do have tons of
acrylics that I like, but I also like chalk paints. And I've used these two just
recently in another piece, and they go with my horse. And I may pull in to add a little bit of darkness
this, but I may not. This was hobby lobby, and this one is cottage white, and this one is French linen. They're both really
pretty. I'm creating a sort of a theme right now with several done in the same colors to create a certain look
for my local booth. For gold paint,
this deco art brand is one of my favorites. They have various
metallic colors. This one happens to be
called vintage brass. And that's the one
I've been using lately. So I like that one. To glaze, I have this valve spar antiquing
glaze that I had. I'm trying to use up
supplies I have here. This is something
I've had for a while. This is a new bottle that
was just opened recently. It's just a brown
antiquing glaze that you put on and
you wipe back off. A lot of people use a wax. That is also if you have a wax, a brown wax, that
would work as well. Or any other brand
of antiquing glaze. You don't have to
use the same brands. I'm using the folk art chalk
and the Deco art gold. You use whatever you
have that suits you. Obviously some water. I like a spray bottle
in case I need it, scissors to cut out my art, a variety of brushes. These, I like these
little pounce brushes for working with the chalk
paint, and these bigger, softer brushes for other things I might do and some
little smaller brushes, and another one that
really works to get this one I use for the glaze to get that glaze
down in the design. So all of that, if you have a
palette knife to get the clay in the mold
properly and get off the excess
outside of your mold, palette knife is useful. Any knife will work a
regular butter knife. This happens to be
an old letter opener that belonged to my husband. And so it works perfect. I like this a little
better than using my palette knife because
I tend to go too hard when scraping the clay off and sometimes I
dig into the design, and this is a little thicker, so it keeps me from digging
into the design too much. So anything that you can
use to do that with, let's see what else.
Obviously, rags, wipes. If you have any wipes, like baby wipes or whatever, these are equate
fragrance free Walmart wipes I use to clean things up. I have to have things
that don't have a lot of smell because I'm very
sensitive to smells. Then for sealing, after
finishing everything, the matte finish is really good. If you do want a glossy finish, this one is a real good one. Triple thick,
crystal clear glaze. It will put a shine on stuff. I don't particularly like
my bottles to be shiny. I like my elements I add to my bottles like my
jewels at the end. And you don't see my ribbon or my jewels out here
yet for this project. But I do use some
ribbon to finish it off and some jewelry chain and some vintage jewels and beads
and things like that. That is just an extra thing that you can do to make
your project even prettier. And I don't pick those
until after I have finished the main bottle
and have the topper on. That's when I pick those
because colors may shift during the work
and what you know, I may end up going darker with the pink color or
something like that. And if I do that, I don't
want to have picked beads and jewels that might not
go with the final product. So I always pick my little
accents at the end. So they're not out
here right now. But I'm telling you, if you have beads and rhinestones
and old buttons and old brooches or new ones,
you don't have to have old. I just happen to have a lot
of vintage parts and pieces, and I have some new beads
and new things as well. And so I like to integrate those into my final design
as final touches, just to elevate it over the top, because I like my designs
to be over the top. So it's a pretty simple process is just kind of time consuming. So that pretty much
covers the supplies that I can think of to do
what I'm going to do. And in the next video, we'll actually start
preparing our bottle. And I'll show you my
secret way that I like to prepare a bottle before I
do anything else to it.
4. PREPARE THE BOTTLE & ART: Okay, let's talk about the
very first thing to do. The very first thing I do to
my bottle is take mod podge, the matte finish, my
little stomper brush, which I put in the Mj page. I usually just stick it
on a paper plate here. And get it really coated good. And then I pick up my bottle
and start dabbing this on. Now, macho, mod podge, I'm gonna need more
than that is a glue. It's a white glue, and it
looks like you're painting your bottle white with this
stuff. But you're not. You are preparing the bottle for other paint
and other things. I'm going to try
to lay this down. And you see that little
fun texture it's making? I actually like that.
But that texture helps everything grip well. I will soften out some. And I go all the way around one side down to
the bottom edge. Tapping any areas
that I need to, and I like to set a
paper towel here. I'll fix any of it at the end. It's really hard to do
this at this angle. But this works really
well to prepare that glass surface because paint does not like
to stick to glass. There are numerous things
you can do to make it stick, and numerous other
products you can use. But I'm all about no
smell, non toxic. And I already have these paints, and these are the paints that
I want to use for my art, and I've stuck it to the
bottom of the bottle there, so Oh losing my mod podge there. All right. Get the sides well. I'm trying to not tap it too
much on that paper towel. I have a glass palette over
here that I will set this on. The glass palette, the stuff
will be able to be scraped off later if any
gets on the palette. Like from that bottom edge. I just try to make sure
it's totally covered. Kind of look at it at an angle. Let's see. Other than the top rim, that is pretty well
covered to start with. There's a little section right here that needs a little more. I will get around the rim some, but this will help This will help when attaching
other things to it, including paint,
everything will stick nicely and I know you can't see. Right now, I'm trying
to keep it straight up, so I don't take any of this off. I'm just making sure
every spot is covered. See? Now, this will be set aside over here onto
my glass palate. And this I will dunk
in my water to go ahead and wash that
glue off of there. Really, really good.
Scrub it down in there. Now, remember I said those wipes I learned along
the years with these paints, if you wipe off around the rim, where you got it all
goopy with a wipe, it will help your bottle
open better the next time, which I do have trouble opening this one because
I didn't do that. But see that took
very little effort. It won't take that long to dry, but you need to wait
until it's totally dry before going on
to the next step. So the next step would be
deciding which size of the arch to use and
in looking at it, I really think I think the smaller horse smaller ones might get a little they
look fine on this bottle, but they might get
a little loss. And with this one,
I have more edging. I can get rid of that and
blend that in with paint. So I think I'm going to
go with the bigger one. So I'm gonna go ahead
and cut this out. And I'm going to just
cut close to the line. And I'm going to
put these others aside and just trim this up. But I'm not gonna
leave this straight. There we go. My you you don't
have to do bottles. Let's say you don't
have a bottle. Let's say, like, for instance, in my
dining room in there, there's an old clear
glass vase that had some flowers in it at one
time. It's just sitting there. I haven't done anything
with it in years. And if I wanted to decorate something up and turn it into an artful treasure, I could actually use that vase if I didn't have any bottles. You don't have to do bottles. This process more on anything. And I'm specifically working with a lot of glass
things right now because in the
picture I showed you, there is a lot of glass out there that is
basically just tossed away. And I believe in upcycling, I don't like to just
throw good things away that can be a base
for something else. So I haven't thrown
my base away, and it's there in case
I want to use it, and I probably will at some point when I
run out of models. Alright. So I have torn I
mean, cut this guy out. And now, what I'm going to do because I do not like to
mount this with a hard edge. It will not do well. But what I love to
do is get a brush, just a small brush. I don't need one really big. Dip it in this water over
here. Get it a little wet. And I like to go around the edges like
this with the water. I don't need a lot. I was going to let that soak a
little bit on that side. And I'm kind of going around
in a in a sort of a circle pulling off those corners with this water and down
the very edge. Now, what this does is it softens that edge
so you can tear it. And notice how when it gets wet, it's changing that
color a little bit. But now that that is wet, my goal is to go along
where I wet it and tear it. And I like to tear towards me. My need to soak
in a little more, or I could have gone a little stronger with the
water there, I think. I need some more water there. Come in a little bit closer. But the torn edges, if you do a torn edge, it will blend in better when
you go to paint around it. So, I like to go ahead
and get this part done, and I like to tear towards me rather than away because that just reveals
that nice torn edge. Now there it's a little dry. I didn't get enough
water on there, so you can hear it
kind of crunching. That's okay. You can tear
it when it's dry, too. It just feathers out a
little better when it's wet. And it tears so much
easier when it's wet. I don't like that
little bit right there. Probably just need
to wet that so I can tear that a little
bit better in a minute. Let me get this. See how much
easier when it soaks in. It just comes right off. I'm trying to stick with
where I put the water, and it just pulls right apart. And the uneven edges,
though, will make it. Now there's a little dry. I need some more water there. Pull that off. And this little spot
right there I don't like. And didn't I put some
down here? I did. It's better if you let it soak in a little bit
longer than that. And you can actually
pull it away like this to get that
feathered edge going. This was the spot. I added
more water right here, and I'm just gonna pull
that all the way around. So now we've got
a nice torn edge. It's still too big for
my bottle, though. But that's okay,
because we can wrap around the edges a
little bit. Let's see. Yeah, it's way too big. I need to come in
a little bit more. I don't want it to
be quite that big. You can go around
the edges some. I'm just going to pull
even more of this off. It's better to take too little off and have to take some more off than it is to take too much off because
once you've taken it off, you can't put it back on. So once I took that off
and kind of reviewed it, I see it needs to have a
little more come off of there. So let's go along do this again. And I'm kind of tearing and
pulling at the same time. I tear it towards
me, but then I'll start pulling if I feel it's going to release
easy enough like that. That's just peeling
right away now. See? Look how nice
that's coming off of there. Just pull it away. Yeah, that's a little better. Let's see if we're closer
to the size. Much closer. And like I said, I
don't mind if it wraps around the edges a little bit or even the bottom
down here, a little bit. I could take that off
later if I want to. Actually, that is a little
deep section right there. I don't think I want that
going across the bottom, so we're just going to wet
that a little bit more right there and work on
tearing and pulling. That might be better
now. Let's see. Still too deep down there. Okay. I'm gonna take
off that little corner, and I'm gonna come
across right here. Alright. There we go. Now it's tearing good. Yeah, I like to
pull it if I can. It really does feather
it out nicely, which thins those edges
a little bit. Now. I think that'll be still got a little deepness
down there on the bottom, but I kind of like that,
so I'm gonna leave it. So now that is prepared
and ready to go. So we will wait for the
bottle to fully dry. And then we will apply
this to the bottle. And then after that, we
will mold some clean. So we just have a little
drying time now hang in there.
5. APPLY THE ART: Okay. Our bottle is dry. Now, you'll see
some little bubbles in here and you can feel them. If those bug you, you could
sand them down a little bit. They don't bug me. I like my glass objects to
have some texture. My goal is not to make
them appear like glass. It's to make them into a
different kind of treasure. And so I don't mind them, but you can sand them down a little bit
if you would like. But it's dry, and it's only
been about 30, 45 minutes. I will add, do not dry your
mod podge with a heat gun. If you dry it with
a heat gun and then you apply paint
later, it will crack. If you want cracks, that's
one way to get them. But I don't want it to crack. I want everything to
stick really nicely. So I've got this old
blue paint rag out here, nice and soft to
lay my bottle on. Let me make sure that we're
in camera. There we go. We're in camera. And obviously, we're gonna use the
mod podge again. And we're gonna put the
image on the bottle. I'm trying to figure out
where I want it to go. Now, here is a little tree. Because this is going to
wrap around a little bit, there's an edge right there. I'm trying to make it there where it'll end right
here at the bottom. Um because there's
a curve to this, when you go to mount
this art on here, getting it to stay down around that curve or getting it to do properly is
going to be difficult. So a little trick, take
your scissors and put some slits like this
in various areas, I just kind of go all the way around I try not to
cut into the subject. Just do little slits, so it will curve fit
better around the curve. I'm not worried
about cutting into these little imaginary words. I don't want to cut the subject too much, but it won't hurt it. Where's that other cut?
Okay, right there. So now I've cut
little slits in it. So when it comes
time to mount this, it will go down and one section may end up covering
a little bit of another, but it'll help it
lay down better. So the first step is to put
the mod pod on the bottom. And then put this down and then put the
mod podge over top. I like to use this
big brush for this. It does give me the ability to cover a lot of real
estate really quick. So once I put it on here and lay this down
where I want it to go, I will then put some
in the middle and push out like this, and I'll keep doing that
until it stays down. If I need to take some
more of this off, I will. But I'm just trying
to make sure there's a little bit of area right here. I want to make sure the horse is going to fit where
I want him to fit. I want him centered, kind of. It's hard to center them. Exactly. I want this bottom torn edge to
be about right there. So that's about where I need him to be, but I can move it. And what I like to do to be
able to move it a little easier is spray the back a
little bit with some water. But first, I want to put
some mod podge on there. So let's get that done first. I've got my little plate here. I've got some actually
left on the plate. If it's still wet, I can go ahead and use that. I don't like to waste anything. And just really coat
it really good. And I'm going to have to get a little more out of the bottle. I do like to go a little
higher and, of course, over those edges because it is going to wrap
around those edges. So I want it to have enough there where
it can stick good. Like so. Like that. Let me set that down. Now, I'm gonna spray the
back of the image with a little water just to make
it move a little better. And of course, it
wants to curl up. And I'm going to
try to line it up. I may have to pick this up
a little to look at it. But that actually
line up pretty good. And yeah, it sliding
a little bit. You can move it a little bit better once you've
sprayed it with water. I'm just going to tap
all this down the best I could as it's dry, like so, and then I will
go over the top of it. And remember that wipe I
said? It's good to have. It's good to wipe this
stuff off your fingers. Alright, now I'm going to get
a good amount on the brush, and I'm going to put some in the middle and start
pushing outward. I don't want it to drag, so I want to make sure
there's a good amount on the brush before I do that. You don't want to dry
brush, it'll drag. And I got a little piece
sticking up right there. So I'm pressing really hard, and some of this will move. You can see I've
got a little piece here that's kind of moved. So I pull that back down with my fingernail and go the
other way on moving it. Try to get it where it's
not going to pull up, but I want to make
sure it's pretty flat and very well covered. Now this will dry clear. Oops. I'm going to get some off the bottom edge so it
won't stick to my palette. Now, see, that will dry nice and clear and we'll
seal that image in. We've got a few wrinkles there. You can push them out
with your finger. It's coated, so it
should be okay. Not any dry spots on there. So it's coated really well, as you can tell from
the shininess of it. And this is white, but
it will dry clear. And I'm going to
set this over here. And I'm gonna rinse off
the brush immediately. I scrub it. I have a grate in
my water bucket, and I scrub it on that grate
to get that any glue in between those bristles loosened up 'cause I use this
brush for painting, too. But if you clean your
brushes right away, if you clean them
off right away, they won't get stiff
and disgusting. So that's enough
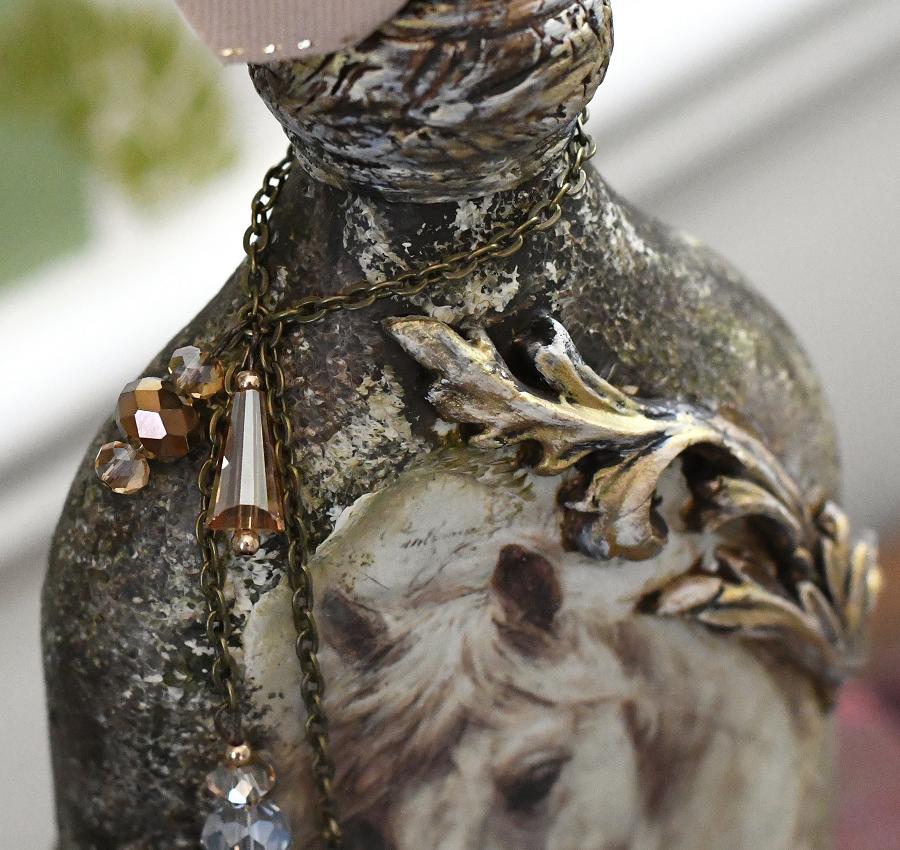
of that right now. And I want to mention
something else. Let me get the bottle
back over here. You see this rim
here at the top? Now, when the cabinet knob
is placed on the top, it will sit right there
where my fingers are, but you see that little ridge, that will be covered up
with some ribbon later on. This section here though, I do like to do a wrap around clay piece for
that top section there. I'm going to pull back
out one of my molds here. I have a few trim
molds from IOD, and I try to make sure that
if I pick one of these, it's going to fit nicely. Obviously, this one's too big. But I'll pull the
bottle back over and actually look at
what size might go. I actually like this one here. In the middle,
it's not too wide, but it does have this
nice little border edge. Let's see here. These are too wide. This one here may work, and I can actually come down under this lip with
some of this possibly. Or I may trim some of that off. I may mold just this middle
section and not out here. But that's the one
because it's leaves. It's flowing and it's
leaves and I don't want anything really
super ornate. I may use that one. Then the other one is that I had picked out is
this one for the back. I need to decide what kind of element I want on the
back and I also need to decide if I want any elements
around these corners. And these corner elements
right here work very well. This one here, these
are a little bit too much for this bottle because
it's a medium sized bottle. It's not a small bottle, it's not a huge bottle. But these may be a
little too much. And, of course, you
don't have to use your mold the entire
way it is shown. You can cut it and
use a part of it. And if I was to mold this
really long one here, I could cut it in the middle
and I could use a part here, and then this part
here at the top. But I also have to keep in mind what I'm going to do
at the top up here. And so if I do that
and I use these, it may be a little much. Actually, any mold around the image might be a little
much with using one here. I don't know. It may work. It may work to do that
long one and split it up. Maybe. And let's see. My biggest thing that takes
up time is decision making. I do like this ornamental
piece right here for the back of the bottle to
create a sculptural effect. I'm just not sure if
this is going to be too wide on this one. It probably won't I mean, I can mold it and if
I don't use that, I can ball it back up and
put it back in the package. So I'm thinking this trim for around the top,
at least part of it. This long one here divided in two with a
part being on the bottom, right corner of the
horse and a top curving across the
top left corner. And then this one for the the sculptural
effect on the back. I don't want to do too much sculptural effect on this bottle
because of the art. I don't want to
overwhelm the art. I want to complement the art. Now, when I do a bottle
that's all sculpture, I will use the sculptural
elements quite a bit. I have some cross molds that I use to do what I
call prayer bottles. And so I'll put a cross on them and use a
bunch of other elements. But for this one, I do think this would work nicely in
the center on the back. This one divided maybe
around the horse, and this one as the trim possibly around the top
edge of the bottle. So that's the plan
on the molding. And we will do that
in the next step. We will do that.
6. MOLD & APPLY CLAY: Alright, we're ready to make some clay mold in these molds. Now, I am gonna
get another Oops. I'm gonna get another wipe out here to be able to wipe my
hands and wipe other stuff. I keep my clay in a plastic bag. I fold it close, tape it up, keep it from drying out. Then the very first thing
I'm going to do is put some cornstarch in the molds
that I've decided to use. So I just dip the fan brush in, tap it off, and just
start dusting the mold. Like so. It'll help it release
better if you do this. I'm not used any other
kinds of powder. Just the cornstarch
is what I use. I don't know if other people
use other things or not, but the goal is just
to get it to release better out of the mold
when you're done. And you'll see how
wonderful these molds are. And I held off on buying these because of the
cost buying this brand. But now I know after
getting a few of them, now I know it's like everything else, you
get what you pay for. If it's expensive, it's
probably pretty good quality. That's not saying others
aren't, but they do. You know, I'm trying to
work with what's easiest. Where I don't have to
fight with it as much. So let's get a little clay out. Can you see that? Let me see. Yeah, you can see that. And this clay is really fun. And I used to use polymer clay in the old days when I was
doing polymer clay work, jewelry design work,
which I did for years, and believe it or not, the polymer clay made me sick and I couldn't
figure out why. It wasn't until years later
when I got diagnosed with Alpha gal that I discovered that the polymer clay brand I was using had animal
ingredients in it, which if you know
anything about Alpha gal, it's from a tick bite and you cannot have anything with animal ingredients in your life. So that's why it
was making me sick. I knew it was non toxic, so I thought I was safe, but I wasn't safe because of
my own Alpha Gal syndrome. Okay, I've kind of
conditioned this and rolled this
into a little ball. And what I like to do is
take little pieces of it and then push it into the mold and kind of
work it down in there. And if your hand
gets too sticky, you can dip it in the water. Dip your fingers in the
water a little bit. And I just keep pushing
it in that mold, and these rims on this
particular brand, they really make it a lot easier to get things in there where they're
supposed to go. They also help you clean
it up good afterwards. So you can have your detail like it's supposed to be
because that edge that raised edge they have on
these molds really makes a difference on finding out where you should
be in your mold. It looks like I need a
little bit more right there. Normally, I'd have this right up underneath me 'cause my
eyesight is not the best. And I just put those extra
little bits on there. And I like to work in the
smaller pieces rather than one big large chunk because then I can kind of not have
to do as much trimming later. If it extends way out over here, it ends up in the other mold and I like to stay as
close to the edges as I can and work it in there. You have a few minutes of
time here to work with this. Pretty good amount of
time because this clay, the DOS clay DOS, it won't cure until overnight. So what I'm doing now
is the final step, other than attaching
these to the bottle is the final step I will do today. Because once I've attached
this to the bottle, it has to cure overnight. 24 hours, they say, is best. I try to scoop the
extra out and get it level in the mold. But it does take the 24
hours or at least overnight. It doesn't have to
be 24 hours exactly. I go move this one out
of the way for right now so I can turn this a little bit and make sure that I'm where I'm
supposed to be here. See how when I push down there, it forms right there
in that middle. That middle section is
not part of the mold, but those edges help me see
what is part of the mold. And sometimes I can
pull that excess off. I just try to get it as
flat as possible and to make sure each little
detail area is covered. Um I'm gonna move my bottle
out of the way a little bit. Where is my letter opener? This is what I like to use. I don't like to
start when I try to scrape off to get
the excess off. I don't like to
start at the tip. I like to start somewhere
in the middle from each direction and
just pull towards me. See how that trim that up real nice and then
I'll have that extra piece, and then I'll turn it this
way and do the same thing. But the letter opener does not dig as much as my
palette knife does. And I'll just make sure, again, and smooth it a little bit
more before I pop this out. And I like to do one at a time. Now, if you have trouble
with the mold, like I said, you can take it as it is in the mold and put it in the freezer for
about 20 minutes. Don't leave it longer than that. You don't want it
to freeze freeze. But when you get it out,
it'll pop right out, and then it starts thawing and you have time
to work with it. So now to get it out, I probably should
have dusted some of the extra cornstarch out, but I didn't it over and just
start. I lay it down flat. And try to pull from the
end and peel it back. And I push down here
while I'm pulling, and you'll get the hang of this as you figure out the
molds and work with them, and I got to figure out where
I'm at on the mold here. There we go, because
it extends this way. But I push here and pull from the outside area.
That did pretty good. Got a few little pieces left, but I'll get rid of those. I do take my molds
and wash them. Afterwards, now have this nice long mold here and I'm just gonna set this off to the side and let that
sit there a minute. While I do this other
one here, this one. I'm gonna use that same clay. I just pulled off on excess, but I do wash these
out right away. And the reason I do
that is because I don't want the clay
drying in there and causing a problem
and being there for the next impression
of the next one I do. So soon as I'm done
here with this process, I will take these
and wash them out. So once again, smaller amounts to push in
there to start with. This one here will be the one
that will go on the back. Now I can use a bigger
amount in the middle on this because I have more real
estate there to work with. Push it down all
the way in there. And if it starts sticking to your fingers and
pulling back up, you can dampen your
fingers a little bit, or you can put some
cornstarch on them. This air dry clay, though, is pretty
easy to work with. Get another little piece
here for this section. I don't know how much I'll need. That's probably
enough right there. Yeah. Make sure that's
pushed down real good. And you can if you have
your little exacto knife, you can do any trimming you
might need to do later. I'm gonna pull from
this side first. Get that excess
off. On this side. See, the letter opener
is great for this. I hadn't used it for
opening letters in years. But it was in here in my studio. And I thought, Well,
that may work, but it skims right
across those edges. You get the extra
little bits out. If you can, you can also use
another one to pick some up and then smooth it out
a little with your finger. Make sure it is inside all the edges before
you pull the mold. And then, same thing, put
it down and peel back. And this go as slow
as you need to go. If you try to go too
fast, it may break. Look at there.
That'll be beautiful. And if any of this
does break off, when you go to attach
it to the bottle, it will be easily, you know, placed with
your glue back together. Alright, let's try to do this strip to go around
that top of the bottle. I probably should
have got that extra. Cornstarch out. Let's see here. Now, the neat thing
about their trims is they're meant to go to
connect to one another. So if you're doing a longer
trim somewhere and you need to connect two
pieces together, you see the way this
is? That's really neat. I haven't had to
utilize that yet, but I do have a couple of
frames I'm working on next. So with frames, I may end up needing that to
do a border around a frame. Uh, and see I pulled it out. Pulled too hard. It
stuck to my finger. I'm fingers are covered
with the clay too much and not moist enough
to stick into them. I probably ought to
wipe some of that off. And dry. Okay. Now, let's try. And you could do a long snake like piece with this
and roll it in here, which might be a good idea to get this done
a little faster. Like this and push it in It's still trying to stick
to my fingers, some. You can tell when it pulls
back up, it's doing that. Oops, your hands get kind of dry with that
cornstarch on there. On the trims, it may be a little bit more beneficial to try to get a little
extra in there. Just to make sure
you've got it in there, good. It's trying to pull up. You can use a wipe
and kind of dampen it a little bit and help
you smooth it down. Just want to make sure
everything is filled in. I got a lot of excess on this one. That's
gonna have to come off. Yeah, 'cause I got
too much right here. But I want to make sure it's in that impression really good. Alright, let me try
to get some of this off 'cause I got way too much. Well, I dug too much off. So let's put some back in. Now, these wipes that I'm
using do not have alcohol, and they are scent free.
Alright, let's see. I also use them to
clean my letter opener. And I may have to do a
little trimming on this one. The faster you go
when doing this part, whether it be with a
pallet knife or with this, the better it will work. These longer ones are a
little bit more tricky. And I probably won't
need all this anyway, so I don't know why I'm
fooling with it so much. Alright, let's flip it and try to see how
easy that came out. Left a little bit
in the mold there. Alright. Set that over here. It got kind of a nice
little pattern now. Pulling my bottle back over. This is not dry yet. But I do want to start
attaching some things here. I do know I'm not going
to need all that trim. So we're going to just
kind of wrap around here and see what I
am going to need. And I'm just going to cut it here and put this back in there
with the rest of my clay. So it'll stay damp, smooth
this out a little bit. I'm actually going to
connect end to end here, so I'm gonna cut off
that little piece. And hopefully, I'll have enough
to go all the way around. Oh, yeah, I got way
more than enough, so I still need to cut
off a little bit more. So I'm gonna make a
mark right there. If I can see where that was, I think it was right in here. I normally work on my
glass palette for this. This just has some little
leaf indentions or something. I am going to glue
this on right now. This is where the
type bond comes in. This stuff does an amazing job of adhering things very quickly. I go all the way
around the edges. And do kind of a zig zag a few little marks in the
middle and lay this down. And what I'm going
to do is spread this out because I don't want the glue really
seeping out too much. I can't get ahold of it
here to make it hold still. I pull it off the edges there. But that's what the wipes for. If it seeps out, you can
wipe some of it back. So I want the seam
to be on the back. So I'm just going
to pick this up, and I'm going to go around
here and connect it. I still need to cut
off a little bit more. I want to tap one side in place just gently
with my fingers. Yeah, I'm going to need to
cut off some more of that. You can cut it when it is on
the bottle very carefully. But you do not want to put this piece of clay because
it has glue on it, you don't want to put it back in there with the
rest of your clay. That one is trash. I try not
to throw it on the floor. Where your cat may get it. Alright, now, you see, I've
got this all wonky here, so I need to scoot this and scoot it together
the best I can. And if you have one
of these tools, this is a smaller one here. These are color shapers. Oops. I'm sticking my fingers
to the front of the bottle, but they're also
great with clay. And they make these
fore clay specifically. I'm just going to try to squeeze this together as close as I can. And I'm going to take a
little water on my finger, dab it off on the
towel and just kind of wet that area a little bit. It helps to smooth
that seam together. And when you do that, you'll
lose some of the details. And that's where these
little color shapers come in handy because you can kind of add some little lines
and details back in there kind of crossing
over where the seam is. And you can smooth any of those details out
with your finger. Or your fingernail. Now I'm going to tap the top edge around very
lightly and the bottom edge, and I'm gonna carefully turn
it and look at my front, and I know it's hard
for you to see. I'm trying not to
touch the front, but I'm tapping this
bottom section in there tight where that glue will
catch around that bottom rim. And it will help it stay
adhered better with no gaps. And if you need to
readjust something, you can use a clay
or a color shaper. These are called color shapers. They have them at Blick. I use them with my pastels to blend. And I also use them with this. Then I have a little
glue at this top edge, but I'm not too
worried about that because that's going to
be covered with a ribbon. But now we have a nice little chunky top around that bottle. Okay. And wipe off your tools where you have that glue
on it and clay. Because if you don't, that
stuff, especially the glue, will stick there, which is another reason these wipes
are really handy to have. And then get the excess
clay off your work table. Like so. Now we're ready to glue. Oh, let's do the
back the back piece. And I cannot lay that
down yet to dry. Um, I'm trying to see
if I have a way to kind of h I'm
afraid to lay that. We might just have to come
back in another segment here. Let me let this dry
a little bit more. Just about, you know, 15, 20 minutes more on that
front where I decoupage that design so that I can maybe handle it
a little bit better. So we're gonna
pause this and come back with another segment
on the rest of the clay.
7. APPLY CLAY PART 2: Alright, we've dried
for a few minutes. I decided to do the front first. I'm gonna lay this because the front still see,
now this won't touch. I'm waiting on
this to fully dry. But while I'm doing that,
I can go ahead and glue these front pieces on because the mod podge is glue,
and this is glue. So that one long one here
that I did the long mold, which I'm not sure if you
can see that on camera. You can kind of see
it. I'm going to just cut it in half using my knife. Because if you let the
clay dry too long, it'll start to not
be maneuverable. Okay, I got this and I got this. So I'm thinking this
down here like this. And this one may be like that. What do you think? Oh, maybe you've been scoot
it up a little. What do you think? Um, this one may have to go off the
edge a little bit. Why not? Alright, let
me do this one first. And once again, put the
glue on the back of the clay and then rub it all
around with your fingers. If you don't want to get
your fingers in the glue, you can always wear gloves, but I hate wearing gloves. So fingers in glue, it is. Just like this. The nice thing is
this tight bond stuff dries really, really quick. It is wonderful. Okay. Let me wipe my handle as soon as I
find what I did with that. G another one of those out. Okay. Flip this back over. Let's see where I want this. I do want it coming up
over the top, like that. I think that's really cool. This one is supposed to curve more this way and tap that one down
right around the edge. Now, when it comes
time to paint these, some of this paint's
gonna get on this image, but it's protected
with the mod podge. So I'm not worried about
that. It will blend in. I will blend it in,
and I will have a white pandy to wipe off any paint I need to
take right back off. And it will wipe right off
because this is now protected. So this one I want
to glue right there. So let's get the
glue on that one. You can just do little dots
with this if you like, so you don't overdo
it on the glue. The nice thing is
with the mod pod still being a little bit damp, that will help it
stick better as well, but it won't go anywhere
with this tight bond. I've done several
pieces already. Oh, I also wanted to mention
another glass choice, if you would like to
decorate glass like this, I mentioned vases, but another thing I did
not mention was jars. Jars are wonderful, as well. I want to make this one kind of curve off the edge a
little and just tap it down and I'm going to kind of lift up my lift up my bottle to see
what we're looking like. Oh, that's gonna be pretty. So while this is still wet, I'm going to make some little adjustments here to this little part where
I cut it to kind of squeeze that and
make it a little thinner and tap everything down all around the edges to make sure everything
is connected well. This one I see a
gap right there, so we're going to push down
on that gap, a little bit. I'm not pushing very hard. I like the little cracks that appear because I'm trying to create an aged look.
I really like that. But if you don't like
that, you can get a little water on your finger or even a little water on a brush, I'd use a smaller brush
than this and you can smooth that out a
little bit if you want to. In fact, let me do
that just to show you. Just make sure it doesn't
have too much water, dab some of the excess water
off and just go like this. See how it just makes those
cracks sort of disappear. If you've got any extra clay on there, you can get that off. But the brush actually helps to smooth it out if you need to. That's looking pretty good.
Tap that down a little more. Blow on it. This part right
here is wanting to pop up. But I just spend a couple
minutes doing this to make sure it's fully secured. It doesn't really
matter if you have a little slight gap because
when you paint this, that paint's probably
gonna get in there. Here's a little
crack right there. Let's see if we can adjust this. Just soften that a little bit. Smooth that out. And
even right here. And if you have any excess
glue around the edges, you can use your brush
to kind of pick that up. We're we're doing
pretty good here. And once you've I mean, this hasn't been very long
and it's not going anywhere. If I stand this up, it's not
gonna slide down the bottle. So now we're gonna
do the back piece. And try not to touch
that, but I just did. There's a little
crack in there, too. I can use the brush to
smooth some of that out. There's just a slight leaf
pattern in there at the top. It's just enough to
add some interest. Tap this down a little more. I do have a little
excess glue up there, but that's not gonna matter. And I have I just noticed
there's one little crack there that I don't particularly like because it's
right on that edge. And when you add a
little water to it, it makes it into a slip where
it gets kind of liquidy, and it'll have to re dry. It doesn't do that
once it's hardened, but only when it's still wet. Excuse me. So Just kind of
smooth some of those out. I still make sure we're I keep touching
this top one here, and I just dug my
finger in there. And this is where a color shaper can come in handy
because if you wanted to put some little
lines in there, some little marks, I'm just tapping that a little to give it some interest where
I smushed it. Like this is a leaf. It should have a
little line right here and there a little bit
more of an indention there. These are wonderful for
moving your clay and adding little marks
like that if you make a mistake and
smoosh it too much. And you can also use the
brush with the water where your seam is on the back here. To really help lend that in. You might not be
able to see this, but I can see the seam is
softening and disappearing. And if you made
too deep a lines, you can smooth them out. It's amazing what
you can do with these little tools and
clay. I absolutely love it. Alright, now we're going to
put this one on the back, and this is going to be a
little more difficult because our front one is still working
on staying attached good. And I can't really you
can hold it like this, which is probably what I'll
do to get it on their string. Alright, here's the
mold for the back. And do I want it this way? No. I want it with
that little piece at the top. I'm
gonna flip it over. Get the glue on there. All around the edges. Like so. So in the middle on this one because there's a lot more real estate
to cover on this one, but I'm definitely going to work on this little piece here. That's the little ornament at the top and the
little connector. Then I'm just going to
put my finger on there. I'm going to have to wipe
my hands off anyway, rub that glue all around. Really good. And off all the little corners
and edges like that. Wipe your hands. And Uh oh. Try to pick it up
without dropping it. And I am gonna grip
this over here, but I'm not pushing on it. I want to lay this down and decide Oops, where
I want it to go. I want to slide it up some
trying to make sure it is centered before I
start pushing down. I think it needs to
come over a little bit. You don't have much time
before this starts settling. So there we go. Turn this just a little there. Now I'm going to start
tapping it down. And I do have a lot of excess
glue here on this one. I'm trying to make sure
not to touch these. They're already
starting to harden. S. Trying to make sure not to touch those
front ones too much. I do have a couple of
spots on this that would like to touch up
to smooth out a little. And I have that glue. I would like to get that
excess glue off of there. Basically just smooth
it out and maybe even take this little wipe and wipe off that excess
right up to it. And then pat it down. Make sure there's
no gaps showing. That's gonna be the
back of our bottle. I'm just gonna set it down now because if I keep holding it, my hand will warm up that clay and will
leave an impression. So this is gonna be our front. This is going to be the back. And We're gonna work on our paint after this fully
cures tomorrow morning. So this has to fully cure now. Set it aside and don't touch it, and now work on cleaning
up all your stuff. Like I said, it's
best to clean up all your tools immediately. And I'm not gonna make you sit
here and watch me do that, but I am gonna take
my brushes right away and go ahead and wash
them, and my molds. Don't forget to
clean your moles. So they won't have
dried clay in them. We will be back in the morning with a dry bottle to work with.
8. REVIEW COLORS & CHANGES: Okay, we have something
else we need to discuss. Before we get into things tomorrow with painting
the rest of this bottle. Now, I don't know if you can
tell from looking at this, but can you see the
difference in tone? Do you see there's a lot
of darkening and there's a lot more greenish
tone that has occurred with the image? This is a risk when
using ink up prints. They the ink did not smear. And even though
they were sprayed, um, it's something about using the mod podge
over certain colors. I will darken and change
the hue slightly, which is why I don't
really like to pick out paint colors ahead
of time too much. The lesson here is always be willing to
change your paint colors. Because this is what I was
originally going to use this cottage white and
this French linen. Neither one of those will
blend well with this. This is a parchment
color background. And it has printed a
lot later on the print, but as you can see, it has
darkened considerably. Now, if you don't want to
take that risk, with images, you can use specific decoupage
images that are printed on specific papers for the process of doing this rather than
using your own prints. Or if you have a laser printer, I don't think the
hues change as much. I only have an ink yet, so I'm working with what
I've got. This is my design. I didn't want to place
a special order for it, so I just print them out here. It's still a pretty image. It does look more antique, which is the goal I'm going for with my booth and the
things I'm offering. So I do like it, but I just wanted to bring up, it's not going to match the colors I'd
originally picked out. Now, when I darken those colors with the
glaze, it would help. But I'd like to get a closer color match on the image with the
paint I put on the bottle, and I've been kind of like, there's the white. I
tested it on there. Because of the change, I'm going to have to dip into my acrylics to match my paint. This is a little bit
of artistic license, I guess, you would
say, comes in handy. I've mixed a few acrylics. You can see here on
this paper towel. That shade there is a
lot closer to that. I still say that has a
little bit more green in it, but it'll be fine as
far as a match by the time I'm done because this will darken with the glaze. And that will change
the hue of this. But to start off with, this is a color that I think
would work best and here it is wet on this little paper
plate palette I've made. I'm not going to paint
it now because the bottle's not ready
for paint yet. The clay's not
ready. The bottle's ready, but the clays not. If you paint the clay
before it is cured, it might not cure properly. So it's very important
to let the clay dry overnight and
let it cure good. I can tell you a
little tip if you put your your fingers on the clay and it feels
cold, really cold. It's not cured yet.
When it is cured, you'll put it on
there and it'll feel more room temperature,
if that makes sense. The three colors of acrylic, I'm going to blend to make this particular
color is titan buff, a tiny touch of olive green, and a tiny touch of raw umber. So don't be afraid to mix colors and don't be afraid to
even mix your chalk paint, if that's the kind of paint
you're using to get to a specific hue that you would like to better
match your image. Because I am
switching to acrylic, chalk paint sticks to anything. Now, you can see, this is a little chalk paint I put on
the back here just to see. And I was able to wipe some of it off before
it dried, but once it dried, I took a wet paper
towel and went over it and it would not
come off at that point. So it sticks to anything. But acrylic paints
a different animal. So since I'm going to
be using acrylics to create this specific
color here that I need, and that's what I'm gonna be painting the bottle
and the elements with, I need a better base
than the mod podge. So I will use Oh, let me find it. I will use this. Clear gesso. The reason I will use clear gesso
is it has a nice, first of all, it dries clear. It doesn't dry
white. It goes It's white when it comes
out of the bottle. Let's just put a little
drop. See, it's white. So it's white when it goes
on, but it dries clear. And it has a little
more gritty texture than regular white gesso, which helps the acrylic
paints stick really well. And that's something you want to make sure
of that the paint will stick really well and not be easily scratched
off or wiped off. Obviously, any kind of painted glass unless it's done with a specific
glass paint, you could scratch it
with a sharp object and it would show a scratch. But um you know, I try to prevent
that the best I can. And most of these bottles being decorative and meant
for display only, it's not a big concern because people aren't going to
be handling them a lot. They're going to be displayed, and they're not going to
be used as an actual item. So I will clear coat this. I won't worry about the clay. I don't want to get
it on the clay. I'll get right up
close to it with a brush and some of
this clear gesso, and I will let that
dry overnight as well. Then tomorrow we'll
be ready to mix up this color and apply
that to the bottle and then maybe apply some other
chalk paint on top of that as an accent or dry
brush or I don't know. I don't it's a process
of decision making that you just kind of make it as you go based on the bottle, based on your
design, your colors, how they're turning
out once they've been coated and once they're dry. So that's the next step I'm going to take because I'm going to swap to the acrylics. I would I wanted to
bring up white gesso, just regular white gesso. I did not white gesso
under this because this is a clear bottle and it didn't need the
white gesso under it. If I was using a colored
bottle and I was going to put this image
on a colored bottle, that color would affect how
the image looks tone wise. So then I would have put down white gesso underneath
before I placed the image. But because it's a clear bottle, I didn't have to do that. And now I'm just going
to put the clear gesso on to prepare for adding
the acrylic paint tomorrow. And we'll mix up the
acrylic paint then rather than now because I
don't want to mix it now. I won't I can make
a jar up of it. I make jars of my paint. That is mixed up or just if
I want to put them in a jar. I make jars of
them to keep them. These little jelly jars we'll
keep acrylic paint forever. You might have to refresh it with a little
squirt of water or two every so often if
it gets a little thick, but I have tons of jars of custom color
paints that I've created. But I don't know that
this is going to be something I need a whole
lot of that color for. I won't need a whole
lot for this bottle, and I don't know
if I'm going to do a whole multitude of them. So I just want to
mix up a little bit, and I don't want it to dry up. I don't want to take
up a whole jar. So we'll do that tomorrow. And right now, I'm
just going to coat this bottle with a clear gesso to prepare for tomorrow's paint. So I just wanted to go over that why I am making
these changes. We learn as we go on what
works and what doesn't work. So these colors I picked
out of the chalk paint are by theirself anyway
are not going to work. With this image. They're gonna they might be
integrated with it later. And I don't know. I'll
make that decision then. It's a decide as you
go kind of thing. So I'll be back tomorrow with
the bottle ready to paint.
9. DISCUSSION ON PAPER TYPES: Let's have a little
discussion on the paper and how the prints turned out before
we get started painting. I decided to test the
other two horse images, and I took them outside, sprayed them on the back, and sprayed them on the front again with the
crylon matt spray. And then I wet this
one around the edge, and I could see it was turning
it a little bit greenish, not quite as green
as the bottle, but just a shade. And then I decided to not
wet the edges and just tear and go ahead and put the mod pod on on a piece
of glass testing this one. As you can see, it is very
similar to that in color. It did turn that
greenish tinge again. Now, when I've done
my own prints, like this, I've usually
used darker prints. Lately, I've been experimenting with the lighter prints and the color change did not
happen with the darker prints. It's only happening with
the lighter prints, it must have something to do
with the lighter colors of ink and spraying with the
crylon multiple times, it's a little lighter,
but it still did it. So the only solution if you're going to do your own
prints with ink chat is to work with that and change
up paint colors and make changes as you go based on how the actual
image comes out, or would be to order some
paper from somewhere else. Now, I order my decoupage
paper from Zazzle, and I wanted to show you
this is the tissue paper, and this is the 18
pound tissue paper. And it's very nice to work with. Goes on very well. And then they also have, this is a huge sheet, so excuse the bigness of it, but this is the wrapping paper. See, as you can tell it's
got the marks on the back. Now, here's the catch with asm. You can upload your
own images and print them and have them
shipped to you. The catch is on
the tissue paper, you can order as small
as a ten by 14 sheet, but you have to get
three sheets at a time. Their price per sheet, and the design has to be
the same on every sheet. When you order the
wrapping paper, you have to order
this large size, which is like 20 by 30. That's the smallest they have or 19 by 29 as they say
it. I just round it up. So the nice thing about
the wrapping paper, though, you still have
to order three sheets. However, you can order three different designs
on those three sheets. So if you wanted to
lay out your image, in your editing program, set up your image
to be this size. And then if you
wanted smaller images on your wrapping paper, you paste them on the image
and save it all as one image. And you could do multiple
sizes like I've done here. I don't know if you can see it. But I did one really big because I was going to put
this guy on a table. And then I did two
smaller ones here that I could use on other projects of a different zebra
that I painted. And I just set up my whole big paper like
this in the image size, and then I set up another paper and I
set up another paper. And when I ordered the three
sheets of wrapping paper, they all have different images in different sizes on there. So it just depends
you're going if you think you're going to do
multiples of the same design, the tissue paper, might
be the way to go. You can also do that, you know, set up a ten by 14 or a bigger sheet and lay out
your images on that sheet, how you want them, the
size you want them. But all three sheets are
going to be the same. So when I ordered
this butterfly sheet, I got three of the
same sheet because I plan on doing multiples
with the butterfly. But the zebra, on
the wrapping paper, I don't plan on doing
that many multiples. So the other two sheets of wrapping paper I got with this have different
designs on them. The wrapping paper
is a little thicker, but it works very well. If you order either of these and you put Md
pad on top of these, they will not turn in color. These are professional prints. They're not ink yet,
and they will not turn. Me, being the impatient
person that I am, I like to do things on the fly. So if I create an image I like, I want to
do it right then. So here I am with this horse art that is turned
a little bit too green. This one is not quite as green. I could have sprayed it
maybe multiple more times. And maybe that's the answer. Spray it multiple
times on the front, multiple times on
the back, let it dry for a day or two and
then work with it. But me being impatient,
I don't like to do that. So as you will learn in all
my classes, I am not perfect. And sometimes things don't go as planned and I have to
make changes on the fly. And that's part of
what I'm you know what I teach you in my classes is that not everything works
out the way it's planned, and, you know, I show you
how I deal with that. And I hope that's okay. People seem to like that. But now, I don't know if the sun is causing too much
of a glare there. You can definitely
see the difference in the color tones here. Now, it's fun to use this because I am
after a vintage look. A lot of vintage papers have that greenish tinge to
them because that's just part of the
vintage colors and things that were used.
So I'm fine with this. I do know from my artistic experience that if I want this to appear later, then if I use dark
colors around it, it will make this pop and appear brighter and it
will stand out more. So I'm rethinking my colors
that we discussed yesterday, and I'm also
rethinking the knob. See, I was gonna use
this knob on top. And this knob, when you put it up against that image,
it's very bright. And remember, the other one I pulled out that I
said was too dark. Well, guess what?
It's not too dark now because my image
darkened up. Like so. And so if I go darker
on here to tie in with this knob and try to
work my paints to match this, then that will make this pop and everything will blend together
a little more. So once again, I'm making
an artistic choice based on how the
paper has turned out once I have
decoupaged it on here. So that's what
we're going to do. We're going to try
to get these colors, and I can do that by a base
coat with the brown first, a little bit of the olive green. And then notice
this lighter color, that titan buff I have here, that will tie in with
that very nicely. So I will work on these with that color and maybe some of that color in here as well. It's all dried up very
well. It's cured. When I put my hand on it, it's more room temperature. Definitely cured, ready to go. So that's what
we're going to do. We're going to try
to tie in with this and make the bottle a little bit darker than I had
originally intended. But that's what you got to do when things don't go as planned. So I hope that helps
you maybe make some decisions on
paper and printing, whether if you have
ink jet printer, if you have a laser printer,
it may be different. I don't have a laser
printer, so I don't know, but I do know laser
prints are better as far as not changing colors
with the Md pod. So you'll just have to work with what you have and make decisions based
on what you have. And the papers from Zazo I like them because you don't
have to order a whole lot, and they're very, very, very good quality,
very good quality, definitely worth the wait. So if you plan a little bit and order some papers like that, you won't have any problem. But if you want to do things
on the fly like I'm doing, you see you might have to make adjustments, which is
what we're gonna do. Alright. Let's get
started painting.
10. PAINT THE BOTTLE: Okay, I'm ready to get
started with some painting, and I'm going to try to
make my paint color to match the knob the best I can. Now, the knob does.
I don't know if you can see this. Let me. These little flecks right here, the sun's shining on it, so you may not be able
to see real good, but they're like a light blue. I do not want to
integrate that color into the overall bottle design because there's really
no blue in here. What I may do later when it
comes time to add the beads, I may pick out a couple
of beads that may have that light blue tint to them
just to tie in with that. But right now my
goal is to get to this greenish brown color with the top or buff color
for the elements. Now, because I'm
going to go dark, I may not need to use
my glaze because I use the glaze when these are
lighter to enhance the details. Since I'm going to go dark, the darkness will
be on the bottom of the sculpture
already in the cracks, and I will probably
dry pounce or dry brush the lighter
color paints, the green and the
titan buff on top of the brown and
then maybe even add some of this metallic to it if I want to gold
it up a little more. So right now, I'm going to start with painting those
sculptural elements, so I'm going to put I'm going to move the paint knob over here just where I
can see it off screen. I'm going to put a little bit of the raw umber on my palette, maybe a little more because I'm going to use quite
a bit of that. And these are thicker acrylics. So I'm going to give a couple
little squirts of water there just to loosen
them up a little bit. I got a couple of pouncers
here to do the bottle with, but for the sculptural elements, I like to use a stiff
brush, small brush. This one I've used for
years. It's very worn. It's an angle brush, but I like to use that to
get down in the details. And I have a wet
wipe here, handep. So if you don't have that, maybe wet a paper towel because if any of that gets which it
will get on the design, I may want to wipe that away. So I'm just going
to get the brush going and I don't need it to be super coated
with paint, but get enough. I'm going to start
up here at the top, and let's just go
ahead and paint this. And I'll paint right
over that glass too there at the top. Get this get it down in
all the little crevices. With it being a stiffer
brush, it's able to do that. It gets in those
crevices really nicely. Now, this little part here, the glass part at the top, that is where I will probably tie some
ribbon of some sort. I just think a little ribbon
there to hide those ridges of where the bottle
top would have been would be a good thing. I get down in all those
crevices, scrub it in there. And I might have to add
more than one coat, maybe. I don't know. This is kind
of a do it as you go. But see how that brown
really ties in with that. Now I'm going to
work on this one. I'm gonna work on
these two front ones first before I move to the back because I need my hand on the back right there to hold it. And I'm going to try to
be a little bit more careful here so I don't
make too much of a mess. The sun's trying
to get in my eyes, and this is getting in my way, so let's move this a little bit. So I can scoot over here. And I tried to get the edges. It's gonna be on
the glass, anyway, so I'm just trying not to make a mess of
it on the actual image. A little bit on
there won't hurt. I don't want to have to
do too much cleanup. And if you do have
to do cleanup, you need to do it pretty quickly because acrylics dry very fast. But a little bit being
in there won't hurt. As long as I don't get
it all over the image, and of course, it's gonna
be on the glass anyway, so I'm not worried
about that part. I got a little too much on
that portion right there. So I'll need to wipe that off. Try to make sure to get
in all the crevices. So no bright white of
the clay is showing. You see that nice
little mess there? Like I said, it being on
the glass is not a problem, but around the image, try to even if you brush some
of it back off the clay, it's still going to
have the brown tones now that you've put it on there. It basically acts as a glaze. And you may not need I mean, you may not be able to get
in, like, super close. In these little tiny areas. You could even brush
some of it back off if you want, like that. It gives it a nice look aged, and you can brush
some over the edge here of the image to actually bring the
tone into the image, but not as strong as
it was initially. See, it acts as a nice
glaze there on that. That actually looks pretty good to wipe some
of that back off. I don't want to wipe too
much of it off, though. Alright, so that one
got that one done. Now let's move to this one. I just love the
sculptural elements and the decoupage together. But I also like doing just sculptural bottles with
elements and no decoupage. But I had these horses
I made and printed, and I wanted to see how
they were going to do, which we learned through
my experimentation here with ink jet printing that things don't
always go as planned, so you have to be willing
to make adjustments. I got a big blob of
paint on the image. But that dark brown ties in
real nice with the horse. Making sure I don't see any
of the white from the clay. Okay. I'll see if
I can get this. See? When you blend it out, it just becomes part of the
image. And that's okay. If there's too much on there, you can wipe it away
like that spot. If you need to get in crack, just kind of wad
that up and go in there and dry brush or dry
wipe it on the edges here. Now I'm gonna take a
little back off the top, just like I did the other one, gives it a real
nice antique look. I may not even
need to add any of the green paint in there.
At least not on those. And remember the clear gesso, it has a little bit of
arity gritty feel to it. But that's what's making the
paint cling very nicely. Now, see how by going
dark around this image, it has made this image
pop a little bit more. So that's pretty cool. Let me grab another white. That one's gotten kind of yucky. Now, I need to do the back. I need to figure
out where to place my hands so I can
do the back one. And something happened here. This apparently slid. See that? So apparently I should have had that laying
flat a little bit. So we have a little difference there that we really
shouldn't have. So that's gonna be interesting. I didn't realize
that had done that. But like everything else, things don't always
go as planned, and you have to be
willing to alter what you're doing and come up with solutions rather
than just, you know, a lot of people would
have said when they saw the way the image
darkened like it did, they might have said, Well, I messed up my project, and they might have
scratched the project. But that's not necessary. Just use your creative brain
and come up with solutions. Because there's
always a solution. And even with this
little incident here, there'll be some
kind of solution. I may hide it with paint. I might highlight it. I don't know. We'll just have to see. But that is a little
accidental thing that happened probably
because I had the bottle sitting straight up and the glue wasn't cured enough for me
to stand it straight up. That tight bond cures
pretty quickly, but I might have had a little
bit too much on there. Now, I'm not going
to worry about wiping it off the bottle because it needs to
be on the glass, but I am going to wipe
some of this back. Like so. Just like
I did on the front. You can blend out
some of this other. It doesn't matter because
the whole glass bottle is going to be
painted this color. Yeah, we have that
little spot right there. But that's there's
a good possibility of a fix there that I'm
already thinking of. Um, it doesn't look wonky
when you hold it back. Doesn't It's a little
bit tilted this way. I think this moved
more than this moved. I think it moved off to that
direction a little bit. And I could just pry that off of there, maybe.
I don't know. It's on there pretty
good. But Alright, I'm done with the
brush for right now, so I'm gonna put
that in my water. And I'm going to bring in
some other colors here. I'm going to bring in the green. Put a little bit
of that on there. This is Windsor and
Newton olive green, great natural color. And some of this tighten buff because now we're going to start pouncing and I'm going to add a little water
to both of those, and a little more to the brown because this is a thicker paint. And we're going to
start pouncing, but I'm going to pounce between different colors without
washing the little sponges. So we're going to
start with the big one and then make sure where to put my hand on the bottle. We try to keep it. This way. Well, I'm gonna end up I'm gonna
end up with it on me. I can hold it like this. Maybe. Let me get some brown or technically
technically raw umber and just gonna start
working that in, like, so It's hard to
pounce on the paper plate. I should have done this
on the glass palette, but I may need to get the smaller
pouncer going. Let me do the big one first. All around here. There's gonna be a couple
coats of paint here, so let me get the
small one now to get in that little center area. I'm just gonna have to go
right over it to get in there, and then I'll wipe it back
off or adjust it later. Let's see here. Well, I got a little too much
on that pouncer. Yeah, I am gonna
have to wipe some of that back off. Okay. Let me get a little bit of
that wiped back off there. So I can see the elements
a little better. Oh, I need to fix
this spot right here. And down here along this
ridge at the bottom. I like that and maybe wipe a little
more of this back off. There we go. I really like
the antique look it's giving to the sculptural
pieces just by doing this. Alright, I'm gonna dip in the
olive green a little bit. And we're just gonna see.
You know what I did not do? I did not wipe it
back off of this at the top. I probably should have. It may be a little too late. It may be dried on
there pretty good now. Well, some of it's
wiping back off, but not much of it. So we may have to hit that
with some paint up there. Yeah, it's not much coming up. Gives it a cool look, though. Alright, let me get some
of this olive green and try to work some
of that in here. I'm sorry the bottle is shaking. The video's not shaking.
It's the bottle. And I'm not cleaning the little
pouncer I may need to get my brush back out and pick up a little of this umber and tuck it in there in these areas. And I can pounce that, too. If I have enough on there, it'll go in there and fill those little spots in.
A little bit anyway. I'm gonna need more
paint on here. I can tell that. Uh oh. I accidentally picked up some of the titan buff. You see it? See how that's changing. But I can go back over it
with some of the umber, if I didn't like it, which I wasn't sure if I
liked it or not. I kind of liking this dark look. Hmm. Let me try to pick up a little bit here and
pounce it off on the plate. I'm gonna try to come up here and integrate a
little bit of this. And I accidentally
pounced up there, it gives it a really neat look. It's a better look
when you've pounced a few times up there where it's real bright. Oh, that's cool. I think that's gonna tie in. Really good with that. Okay, I'm liking that, but I
can tell right now I'm gonna need some more green on here. And some more raw umber. But I probably need
a lot more raw umber a I still got the whole
rest of the bottle to do. I'm gonna put a bigger
portion of that out. Raw umber is one of my
favorite colors 'cause I do a lot of natural elements. I think I need another wipe too. I go through these things. We buy these things
in bulk for me. I got a little of that
tighten buff up there, and I think it's
a little strong, so I wipe that back off. Alright, how are we doing here? And I also have to
make sure when I handle the other
side of the bottle, well, actually, I
wasn't handling it. I was doing it in here. The other side should be getting dry pretty
soon. Let's see. Oh, yeah. I could actually
put my hands on that now. I keep getting my hands
on the back side. Let me lay it in
my hand like this. There we go. Yeah, that color's
gonna work really well. So let me get some more of that tighten buff on this
little pouncer. Not too much. I pounce
a lot of it back off. And I'll go back over it with the green
and the brown, too. The mix of colors
is what gives it that real interesting Oops kind of stone look
and the texture. So let's pout some of
this green in there. Now we're getting a
little bit too green, and this is where the raw umber will come back in and rescue us. I just want all of
the colors in there. Gives it a real cool mossy look. Now I got too much up there. Alright. Let's get the
raw umber on here. And darken it backup? Oh, yeah. I really like
the way this is looking. So you just keep adding one color and then
the other color and then the other color till you get the perfect mix that
you like for your project. Oh, that's looking
nice right there. That's looking really good. Oops. I need another
place to lay that. Go a little bit of
that off of there. And how did I get so
much paint on this wipe? I want to go back over.
This just a little bit, tone it back down.
Now let's compare. Does that not look pretty
much similar? It does to me. Alright. I'm gonna let
this part of the bottle dry because I'm gonna have to flip this and
do the other side. I could start working on
the edges if I hold into the top here like this. So let's try that. See if that'll work. I got some sun glare coming in
here that's driving me nuts. So I'm gonna see
if I can fix that. Hang on just a second. Well, I still got some, but it's not as bad. I'm just trying to
get a board up there. Yeah, doesn't want to stay.
It's a little better. You can see the sun hitting
the top of this bottle. I don't know. That may be
too dark for you to see. Wanna take it back
off. Well, let's see. Well, it's about the same. Well, it may be a little bright. Alright. I if I scoot over just a little
bit. There we go. Alright, so we're gonna
go with the brown first around this down this edge. Let me go right up over
the edge of the image. Now we'll get a little
bit of green on there. Put some of that green in there. Like this. I need to go over the image a little bit.
You want to hurt it. That's what the
wipe's for, though. You need to take
some of it back off. Now let's get a little bit
of this tightened buff. Trying to pounce a lot
of it off my Alright, I'm going to have
to go back over it with the brown anyway, so I'm just going to
gently tap some of this in like so go right over onto
the image a little bit, cause I want it to look
like it's a part of it. I don't want it to look like
it's just a frame around it. There we go. And of course,
that's super bright. So this is when we go
back with the brown. Back up here on top and tone that brightness
down just a little bit. But I may leave some of that brightness right here where I've blended with the image
because that works. Um, there we go. That's pretty good for
that edge. Right there. Let me see if I can
work on the other edge. With the brown and this
little top section. See if I can get in there. I think the sun is trying
to reach me over here. I have a mix of all colors
on here at this point. Pouncing it gives it
some good texture which blends in with
the other texture. That's already on the bottle. All right, let's pick
up a little green. Put some of that in there. Actually bring some of the
green over here. Oops. That might have been a
little too much right there. Trying to get don't
forget the bottom edge. Now let's get some of
the tighten buff going. And even right there
in that center area. That's a little a little bright, except for the part
right by the image that could use a little
bit more brightness. There we go. I don't
want to do too much. I probably have done too much. So I'm gonna use this
wipe right here, trying to get to
where I can use it and kind of back off some of this right
here around this edge. There we go. Got some
on the horse's hair. There. Oh, that's nice. Now I'm gonna get a
little bit more of the brown to tone
down some of this. And I'm just pouncing
very gently here with this brown because I don't want to undo everything I just did. A little bit more of the
brown on the bottom here. Okay. Maybe right there. Ooh, that's looking nice. Let me see if I
can show you this. I got a little little
bit right here. Wipe that back off. Oh, that's looking nice. And I really like
this right here. It's done a little where I wipe that back off
from around the image, I did a little highlight right
there that I really like. Um, down here on the bottom, lighten up a little
bit, right there. Actually bring that up
over into the image there. There we go that's adding some nice little
bits of texture there. Oh, yeah. I'm liking this. I might got a little
too much dark there. Now, I put too much on there, you got to wipe some
of it back off. There. Look how pretty that is. Now, let's look at the
sides and the back. It looks like a really
cool, dark, mossy green. The only area I see I don't particularly care
for is right here. I think I might
need a little more green and lighter right there. And then tone it down with the brown just
a little. There we go. That's better. It's
not such a harsh. Woops did not need
that mark there. Not such a harsh
line right there. That side looks good.
Back looks good. So now it's time to let this dry for a little bit before
I come and start touching back up on the sculpture
parts because I do want to brighten those up with some of that
tightened buff. And then I might even add some gold in here to
give it a little shine. But this is what it
looks like right now. And the bottom I had just briefly painted
with chalk paint. When this bottle parts dry, I will probably put some tighten buff across
that bottom just to make it smooth on the bottom because that's where my signature
will go with my gold ink pen. So I'm gonna let this sit
here and dry a little bit. And then I will I'm gonna wash my pouncers
out, my brush out, and I will come back
and we will touch up the sculpture
areas and compare, see how it dried up
compared to our topper. So I'll be back in a bit.
11. ADD PAINT ACCENTS & TOP: Alright, let's see
where we are here. The bottle is pretty well dry, had a fan on it
for a few minutes. It's a little sticky still. So I'm going to be cautious. But look how well these
colors blend with that knob. Never thought I would be using this knob with this
until this happened. So what I want to do now
is let me pull my sleeves up and get another white because I'm probably
gonna screw something up. But what I want to do now is do a little dusting of the titan buff on the
sculptural elements, a very light dusting. So these kind of brushes here are some of my favorite
brushes to do that with. They're really, really stiff. I don't even know what
kind of brushes they are. Plaid is the brand. They're a stenciling brush.
That's what they are. But they're really,
really stiff, and they do very good for dusting on a
little bit of color. So I'm going to pull out some
of this tighten buff and just coat the end of the
bristles of this brush, just the end, and then I'm
going to smash most of it back out to get a really, really just light
amount on that brush. And I'm going to start with this one here
and I'm just going to lightly just very gently. I call it dusting. Dust across the top. Just very lightly. I'm not pressing hard at all. There's hardly any
paint on there. I'm just letting
the top edges of the design pick up the color and maybe a little
bit on the sides there. Just very, very oops. Now, see, I got some on
the bottle right there. And I can take the other
stencil brush or the wipe. I don't want to get the
original paint off there. I'm just kind of blending that out a little where
I made that mistake. See, it's just given
it a little dusting. We get a little
bit more on there. It gives it this
nice antique look. Now let's do this one over here. I'm not adding any more to the, I got a little much there. It's okay. If you do it
sideways and drag it, the top edges will pick
it up of the design. Like that. If you get a little too much on, you can always come back
with a darker color. But that looks really nice
to frame out the horse. Now, very carefully, I'm going
to not handle those two. I'm going to swap over
here and do this back one. I'm gonna get just a little
bit more on the brush. Pounce most of it
out and just drag it sideways rather than do this. That works better. Just over the raised
edges of the design. And I still don't know what I'm going to do with that
middle part right there. May not do anything
with it. I don't know. You know what I
might do, or I just did that little dot right there. I may get a little bit of the raw umber on this other little
brush and pounce that back on top of there and blend that in with
the background more. So it's not even really
visible that much. Now that I've got
some on this brush, if there's an area where I need to bring back a little darkness, Well, might have done
too much on that. There we go. Okay,
I really like that. Oops. So I'm gonna put
this little one aside. Now I want to do the part around the top. I
want to dust that. So I'm gonna get a little more of the
tighten buff on there. Pounce, pounce, pounce,
a lot of it back out. So it's a really,
really dry brush. And turning it on his
side very gently. I know it's kind of hard to see, but I have to also
see what I'm doing. Okay. And I'm trying
not to touch anything. I'm also going to add some
gold in the same manner. Adding a little lighter
colors there at the top. Just kind of dusting
it like that. Trying to see if there's
anywhere else I want to add some of this
before I add some gold. The gold is really gonna make it come to life when I do that. See by painting that center
spot where it slid a little bit and painting that darker to blend in
with the background, it kind of disappears
to the eye. And, you know, if you've ever
examined vintage pieces, vintage pieces a
lot of times have imperfections because a
lot of them were handmade. And to me, that
adds to the charm. And it shows this is not a factory produced
piece of work. And it just adds to
the uniqueness of it. Now, I'm going to get
this tightened up off of here and dry the brush
off really good on a rag. And I'm gonna go ahead and rinse this one off while I'm at it in case I need it. But I dry them off
really, really good. So I think that's all
of these colors I need at this moment, so I'm gonna put that aside. Now let's do a little metallic. If I can get it
open. There we go. And with this, I usually just dip it into
what's on the lid. And I also want it to be very, very dry on the dry brush. So I will pounce it off here on this paper towel
and kind of scrub it off. I got to be careful what I touch here 'cause I don't want
to touch what I just did. So if I hold it like this, I'm gonna try the
bigger brush first. Just get a little gold on there. Pounce it off. Let's
try on top. Oh, yeah. I think I need a
little more on there, though, I might not need
to pounce off as much. But once again,
sideways, dragging it. See, 'cause I put that on dry
brush, the lighter color. It Oh, yeah. I like that. It's already dry, so it's
not really blending with it. But I just like to use the side and just very, very gently. I'm gonna have to turn it at
an odd angle here and let the edges of the sculptural
design pick this gold up. See? Alright, let's do the The element here. Oh, might have got a little too much
gold, but that's okay. Nothing wrong with extra gold. I can take that wipe and
wipe some of that back. It's just enough gold where it adds that
little bit of richness. Pounce that off a little more. I'm gonna try to very
carefully do this one. Very, very gently. It works really well with
these sculptural ones. This is turning into
quite the elegant bottle. Now I'm going to
continue to hold it here and do this back. And I'm going to stay away from that little spot in the middle. And just dusting
across those edges. So there's a little
of the cream or the buff color showing
hints of it through there, but there's also
now gold in there. So now all of this has to dry. And when it dries, it will be time to add the
rest of the embellishments, which will be ribbon
around the top here. First, I will mount the knob. In fact, I need to
do that right now. Let's go ahead and
mount the knob. Let's just take care of that. Now, I am not going to use
the tight bond glue for this. It needs a really, really
strong bond for this. And I don't like to use E
6,000 because it's toxic, but my gosh, it
is the best thing to use in cases like this. So I'm going to set
my knob there to see kind of position it. So just inside this edge here. I need a good helping
of the glue there, and I could even put a little
bit on here if I want to. But because the whole bottle
has to finish drying, at this point, this would be a good time to attach the knob. And then when I come back
to do the embellishments, that's when we'll pick
out ribbon and pick out beads and add a little bit more glamour to this bottle with the
ribbon and the beads. And I do need to
paint the bottom, though, in that tightened buff. And I can't do Oops. I've already got
glue coming out. I can't do the bottom. When I've got that
top sitting on there, it's got to dry
for a little bit. So let me take care of that first before I
get to that stage. And for that, I'm just going to take looking for
the right brush. I don't want one
that's real scrubby. This is a nice soft brush here. So without handling the
areas I just painted, see how I've painted that white. I want that to be
tight and buff. I want to get a good
helping of that. And go over this because this will be where
I sign it on the bottom. And I signed with
a gold ink pen. Well, it's not I don't
know what it is. It's a paint pen
a gold paint pen. Want to make sure
I can't see any of that from the sides. No, I don't see it.
I don't see it. I will set this over here
on my glass palette. Let's just pull that over. Because if it gets paint on here on this glass
palette, it'll come off. So if it gets a
little bit of paint stuck there, it'll come off. Gonna set it there
very carefully. And now I'm gonna
glue the knob on. And I can't really lay it
sideways to show you because I need to position it in
the straight up position. But when you do a knob like
this, you'll figure it out. I want to put a nice, generous helping of the glue around the middle of this and maybe even some
just a couple. It doesn't matter if some
falls in the bottle. This is going to be
permanently attached, and I'll go ahead
and set it on there. Like that. Close this glue up before too much just
seeps out on its own. Now, glue is seeping
out around the edge, and I'm going to try to eyeball this to where I got it
straight and push down. And it'll set fairly quickly. But there is glue that has
seeped out around the edge on the area where the rings are where the top of
the bottle would be, but we're gonna have
a ribbon there. So I'm not worried about that. And if the glue is still
a little wet and the ribbon sticks to it,
that'll be fine. I'm just going to turn
it around and look from all sides very carefully. Make sure that the top is
on there. Pretty straight. And I will probably put a
fan on this to let this dry a little bit more
and let that set up, and then I'll come back and
we will pick out ribbon and beads and all that fun stuff that's going to
make it glamour up.
12. ADD JEWEL EMBELLISHMENTS: Okay, our top is mostly dry. I can turn it on its side. It's it's not moving. Well, it moves a little bit. So I'm still gonna
have to be careful. It won't fall off, though,
if I turn it that way. Um, but E 6,000 is a little bit flexible
until it fully cures. But I wanted to go ahead
and get the rest of this put together here with my accessories because
this is the fun part. Now, I'm trying to
decide on a ribbon, and I have used
this ribbon before. This is a vintage piece of fabric ribbon that
I really like, but it's a little
bright for this bottle. And then I found this ribbon, which is a beige color
with a little bit of gold. And I thought some of
that wrapped around this top might be kind of nice. And I'd like to it may
stick to the glue. Not really. But what
I like to do is wrap a couple rounds of that around and
tie a little knot. So I don't know how
much of this I'm going to need to be
able to do that. Let's see here. Let me just do it like this. And let's see if I can get
a little knot tied somehow. I just need a little
bit of a barrier there to cover that top part. Alright, let me
trim this off here. And I'm just gonna
I'm not gonna try a bow because I don't
do bows very well, but I am just gonna tie
a little knot there. And that's too much hanging
off, in my opinion. So I'm gonna clip it off really, really close in like, so I got a couple extra pieces. I save everything.
And I'm going to try to twist this a little
so you can see the gold. There. Just a sweet little knot. It covers up that area
where the rings are and gives it a little bit
of softness to the bottle. And it blends in nicely
because it's got the little gold flex in
that particular ribbon. I want to mention
before I did this, I did take it outside
and spray it once around with the map finish spray I showed in the supply video. You're not supposed to
handle it for a while, but it feels good enough
for me to handle. So next thing I want to do
is add some jewels to it. And I have several
several jewels here, these are from Hobby Lobby. I like to use vintage jewels, and I did I don't have a lot because I used
to be a jewelry designer, and I designed with vintage
jewels and parts and pieces, and I don't have a
lot of those left. I have a few things left, and I found this little dangle here with the aurora bola beads. It's already got a little hook. It's ready to hook on a chain. And I have this brass chain. It's just a necklace
chain, and obviously, I won't need the full necklace. So I think I will
wrap the chain around the neck and take the clasp off. There's a little jump
ring there and use that jump ring to
hook two dangles together and then put the vintage beads on one and then some of these
other beads on another one. And I have some brass headpins also bought from Hobby Lobby. To be able to fix up some beads. And remember, I said the top has a little bit of blue in it, and I found these blue beads
that are really pretty. But I also have these, which are even prettier,
in my opinion. So this one, I don't
think I'm going to use. Now, these might be a
possibility. Let's see. Some of those are
kind of interesting. And there's a little there's actually a little
grouping here already, and that's kind of got
a little bluish look. And that might look pretty. That little section here with three beads might look pretty as a dangle next to this one. So I may use that instead of these just for
something different. These I like as well. I used them on my last
prayer bottle I made. And there's that looks like
a very similar bead to that. That almost looks purple. I can't tell if that's
purple or blue. But when I hold it up there, it kind of blends
with that light blue. So I'm thinking this
little section right here. With the two gold beads, it either end and these beads
in the middle as a dangle. That's what I'm thinking
rather than this. Rather than those. I
don't need a whole lot. This is a smaller bottle, so I don't really
want to overdo it. I do want to clip these out
while I have them in my face. While I have the spot marks, I'm gonna use wire cutters
and just lay them out here. Those two, this one, and these two kind of in a row. Ah? I can hold on
to that little one. Then I can put the rest
of these back in there. There's a Okay. So the chain, we need to
figure out how much chain. I'm going to go ahead and now, you would obviously if
you're gonna attach jewelry, you would need some
jewelry tools. So I'm going to unattach the
jump ring that's on here. And let's see if I
can get it undone, which you usually
need two pliers or pliers on one end and
your finger on the other. Alright, there's that jump ring, which can be quit, which can be used to hook
the two pieces together. Now, obviously, I don't
need all of this chain. And my thinking was join them at the top
of the jump ring, have one shorter dangle and
one a little bit longer. So I may cut this chain right there. Okay. Now, I'll put it around here. And I know you won't be
able to see this very well. I'm just lining it up
to where I could have one longer angle and one
shorter angle like that. And I'm going to grab that
jumper I took off of the class with my pliers and try
to get it in there. I probably need my other glasses
on so I can see what I'm doing. Doesn't want to go. Let's put some other glasses on. Alright. Just trying to line it up where I
want the dangles. Now, if I can get this
jump ring in here. Apparently, the
pliers are magnetic. There. I got it in one side. And I may need to actually have it a
little bit lower than that. There we go. There. Now I've got it hooked
through both of them. While I have hold
of that jump ring, I will grab my other pliers. And I don't know if
you can see this, but I twist them back together without breaking
anything preferably. So they're lined up like that
and hooked with the ring. And there's my dangle. See that? One longer
one, one shorter one. So this is the
vintage beads here. They're going to be a
little shorter than these are once I put
a headpin on those. So I'm gonna hang
the shorter ones here and the longer
ones on the other side. You get out a headpin for those. Hopefully that headpin will
go through this chain. Yes, it will. Okay. I'm going to go ahead. This
one already has since it's a vintage part off of a
previous jewelry design, it already has a little
hook on the end. So I'm just gonna try to
squeeze that closed down there. There we go. Oh, in
that pretty See? It'll dangle right
there by the horse. Now let's put this
longer one together. If I can pick up the headpin. So I'm gonna put
one little bead on. The little beads help brace
the other beads in place. One of these beads. The middle bead, which has the bluish color,
slightly bluish. This next bead, there
and the last gold bead. And so this will make
a dangle off of there. So here's how I do that. I take my round jewelry pliers and I push the beads down
as far as they'll go. I do it at the very tip, so my loops not super huge. And I will bend,
holding it very tight, bend the headpin this way. See that? Then I will shift, just take my pliers and
turn and grab right here, and I will pull it right
back over the tip toward me like that down
toward the beads. And now we have a little
loop starting to happen. Now I will clip this with the wire cutters right
there. See the little loop. So now I'm ready to hook
that in to the chain. I check the angle. Yeah, I like that. I'll take the round pliers and curve it a little bit
more closed with them. And then the flat pliers, squeeze it completely closed
till it touches like that. It's not super fancy. And now we have a nice
little bit of bling there. Now I'm thinking, I want
something here at the top, a little cluster of something, where I put that first jumpring. Just add a little bit more. So let me pull back out
these other beads and see what I've got that
might work and a headpin. I don't know if I want to attach two separate things
or several things. Let's do. Let's try just
I might do two. Why not? And I can hook both up here,
one, and then the other. I do like this bead right here. It's got an aurora
boless tint to it, which makes it change
colors and a copper, sort of a copper
brown. I like that. There are some little flat
beds that look like spinners, which might be interesting. And let's see what
we got over here. We've got a couple
of those colors. We have this great big one here, which is really too big and
it's too bright for this. Yeah, this one, which
is very interesting, it's like a triangular
bead. I kind of like that. I might do that one. And I might need a bead at the top of that and a
bead at the bottom of that. We also have this nice
sparkly bead there, which could be kind of I don't want to be too chunky, though. Let me pull out two of these
little gold ones again. And let's see. What else I got? Don't I use one of those?
Might be kind of neat. See, decision making is the
hardest part of things here. Let's see. I might not need
a bead to end on this. No, that'll stay on
there just fine. So let's put let's try one of these spinner beads.
And then the other one. Finding the holes is in these beads sometimes
is challenging. See, they they make a
neat little they spin. That's kind of interesting.
This one may be too big on top. Yeah, it's too big
on top of those. Maybe underneath them. I don't know that may
look fine just as it is, without the spinners
with one of these. Like I said, I don't want
it to be too chunky. Let's not use the spinners. Let's just do those
out of the way. Let's do this one, and
then let's put one of these tiny gold beads here
and do this long one. This triangular
one. I really like the angles on that bead. So then we'll have
that and this. And I don't know if
that's too much. I'm going to hook
this one on first. So once again, I'm
going to make my loop. I'm going to push this
down as tight as I can. Get down to the very tip because if you're
too far this way, you're going to
make a huge loop, and I don't want my
loop being that huge. I just want to bend that
away from me like that. Turn the pliers
to the top of it, and bend it all the way back
around toward the beads. Like I said, it's been a
while since I've done this. We're going to cut this. I save those little pieces if they
don't fly across the room. And I'm gonna hook it right to the jumpering and use these flat pliers
to close that loop. Making sure it's all the way
close. Oh, that's pretty. See? That angle beat?
Oh, I love that. Now, I think I'm going to attach this one to
the same jump ring, but kind of behind that one. So it'll kind of
cluster there with it. So once again, grab it, bend away, turn the pliers up, bend toward, and all the way back around
toward those beads. And as you do this, if
you're attaching beads, you'll get better at it if
you've never done it before. Clip that off, save it. I need to I've
kind of bent that, so I need to straighten that up. I'm gonna hook that on that same ring and close
it with the flat pliers. So now we have a little cluster there of that.
Isn't that pretty? I almost think there needs
here I am adding more beads. I almost think there needs to be another colored bead somewhere
in here, but maybe not. Maybe not, or maybe I
could I don't know. Maybe that's good enough. Like I said, I don't
want to overdo it. I really do like the
colors of these, though. I don't know how
well you can see those 'cause they're
flopping around. But they hang nicely when
I hold it up straight. They hang nicely
next to the horse. So I think I'm gonna
stop right there except for signing my name on the
bottom, which is ready. So let me dig out my famous
gold pen I love to sign with. And shake it up. Once again, this is this
deco brand, deco color. I'm assuming it's the
same brand from deco art. The logo looks the same. The metallics I use. I'm gonna shake this up
and I'm going to just test it on a piece of paper first
to make sure it's writing. And I'm going to flip
this horizontally. Sign my name and write the year. Blow on it. That's
not going to touch, now see my beads have now
swiveled to the back. They also look good on the back. So the back is a
sculptural side now, and the front is the art side. Like that. Isn't that just beautiful? I'm really happy with
the way this turned out. I hope you guys like it, too, and have fun creating
your own bottle art. And I am calling this project done other than curing
the rest of the way.
13. FINAL THOUGHTS: Congratulations. You've completed the
artful Treasure class. I hope you've enjoyed learning the process as much as I
enjoy creating these pieces. Remember, each bottle
you make is unique. Each curve, each texture, each embellishment
tells a little story. And that's what makes
these pieces so special. They're not just decorative. There are small
sculptural artworks that hold personality
and presents. I encourage you to experiment, try different bottles,
different vases, or other objects that
are glass or otherwise, mix different decoupage art, sculpted details, ribbons
and jewelry pieces. You might even start a full collection of
artful treasures, each one telling
its own story or even an entire series
around a theme. If you like, upload
your photo of your piece that you make so others in class can
see your creation. Sharing your work is part of the fun and helps
inspire others. Thank you so much
for joining me. I can't wait to see
what you create, and I hope this
inspires you to look at ordinary objects in a new
way to see potential, transform them, and create
something beautiful.
 Jai Johnson, Painting My Favorite Subjects