Transcripts
1. Intro: Hi, I'm good this, in this course I
will show you how to create a winter
scene in Blender. If you have some kind
of a scene and blender, but you would like to
transform into a winter scene. Feel free to work with bad. And if you don't have
anything, don't worry. I will provide you with this
scene from our last project. And we will work
on that together. At first, we will create
the snowing animation. Later on, we will add
the snow to be seen. And finally, we will
loop animation. So let's keep this intro short and let's jump into
the first-class.
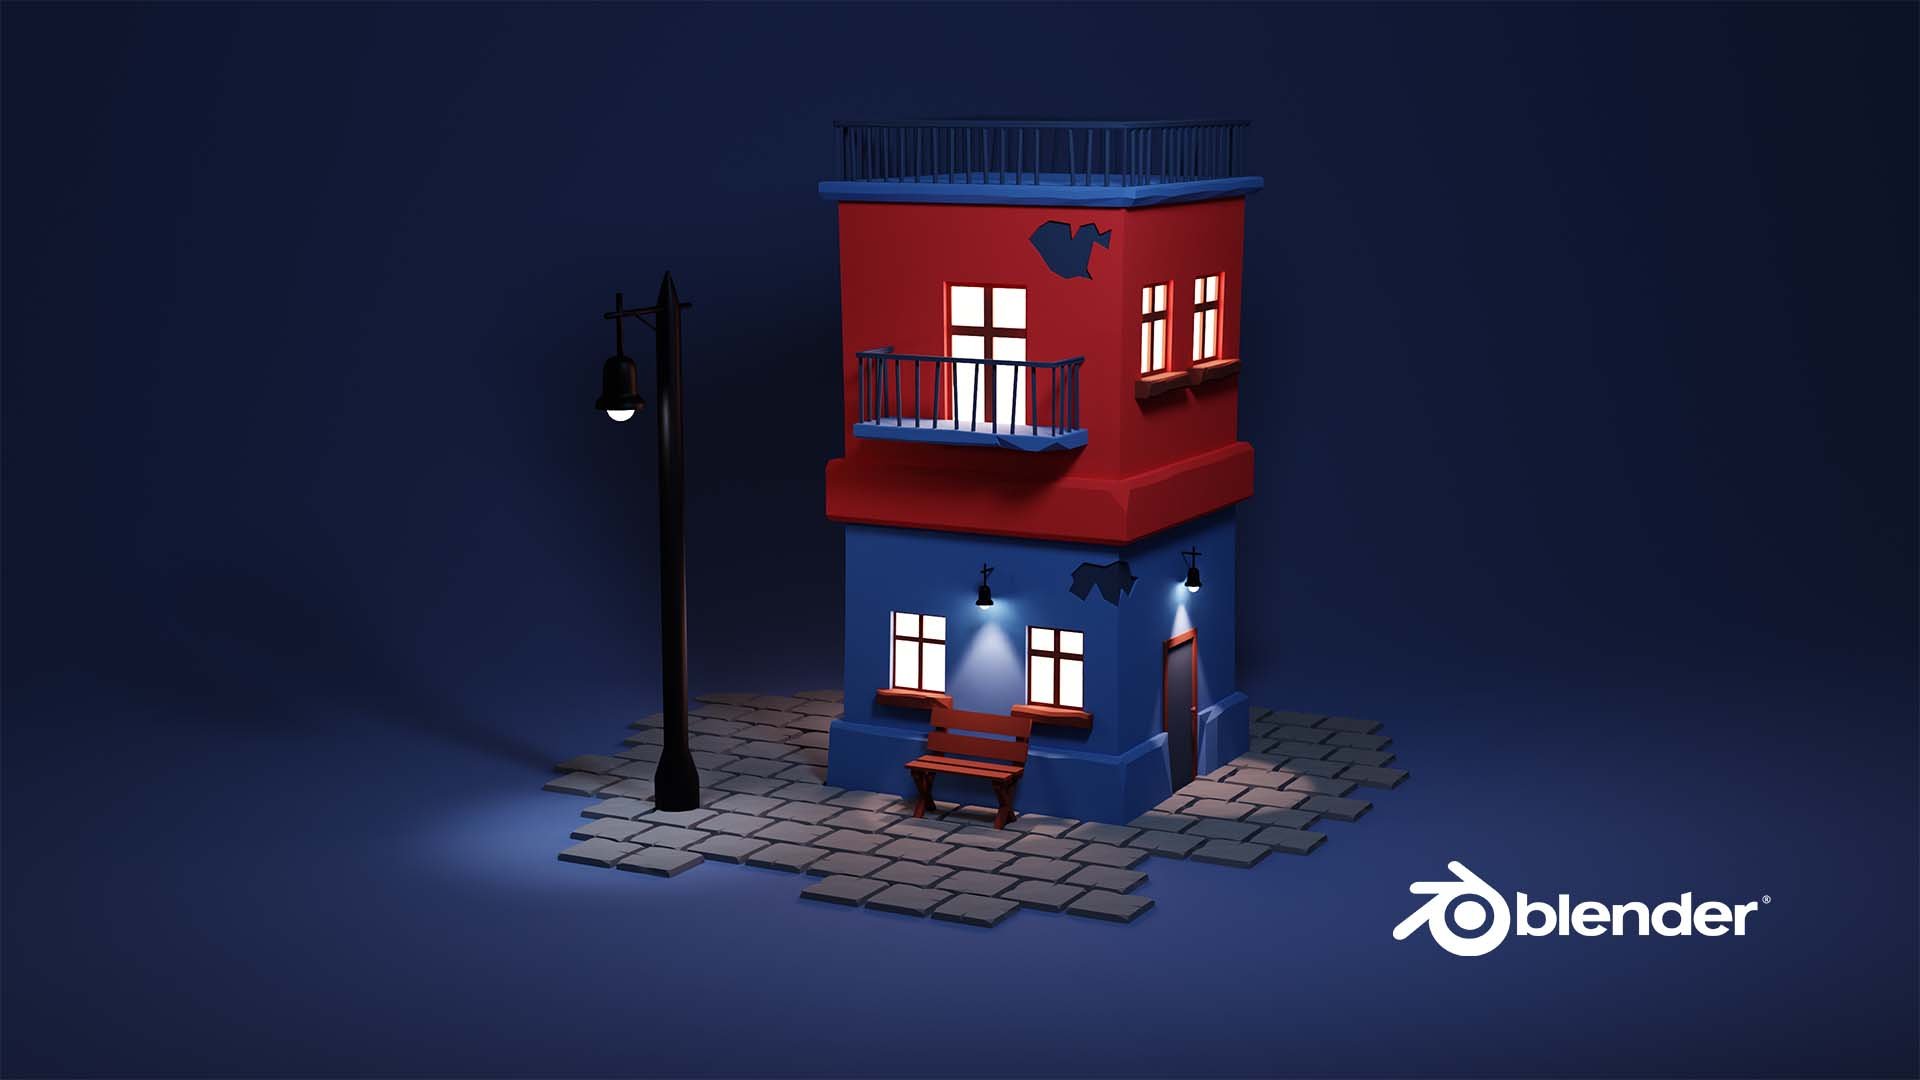
2. Preparing the Working File: So this is where we
left off last time. And before starting working
on this wintery scene, I would like to change
visits render engine to EV. And I will go into
the render mode. I assume that you have a basic
knowledge of the blender. Maybe you are finished the last course vis
a vis course where, where we made his house or you have some
knowledge of Blender. So I will go a little bit
faster in this course compared to the last chorus I made when we created this house. So if it's a little
bit too fast for you, you can jump into
Maya beginner course, where you will know the
basic software blender. Or you can jump into the course where we
created with house. And after finishing I
ever overdosed course, you should have a good
knowledge of Blender and you should be able to
follow this chorus easily.
3. Creating Particle System: Let's begin by creating
snowing effect particles which will be falling in
which looks like a snow. So to do that, we need to create a new object. Let me enable the
screencast keys so you will be able to
see what I'm doing. So if I press Shift a, you can see what I'm doing. So Shift a and I
will add a plane. I will kill that plane. Just something like that. And I will move it
above the camera view. So I'll break G and Z. And whoops, G and Z. I will move it to
somewhere here. With number 0, I can go
into a camera view and I see that I don't see this
plane into a camera. That's exactly what I need. I will press member
at seven to go into a top view and I'll rotate
this Blaine a little bit. I would like this rectangular to fit a camera view better. I don't want to see this angle. So if I press R, I can rotate it and I will write it to something like that. Just basically, I would like
to see this rectangular. In this way. I will get back to
the camera view by pressing the number 0. I think that works fine. It would be a good idea
to apply the scale. So if I press Control a, I get this menu, which properties
that I can apply. So I will apply the
scale because I scaled this Blaine into the
edit mode, into object mode. So I play with scale
and MySQL is one. So that's perfect. And if I go to the
particle settings, I'll disable this by pressing N. So I will go to particles
and I will breath. And as you can see, well already have a particles. Which is easy, right? So this doesn't look
like a snow at all. And you probably see one thing, both particles, if it looks
like they are jumping. So what's happening? Particles have bear appearing
based on the normals. And if we go to the
physic settings, no, not physics, to velocity settings in
one meter per second. And it goes based on monomials. And if we enable
face orientation, you can see that our
normals goes to the, how does it, our
face is oriented up. So our particles goes up. And then because the
physics affecting them, they are gone ven
via going down. It might sound tricky if you heard the biz
for the first time. But it's not bad, hard. And it's not about important because our particles
going down anyway. But I would like to
make it properly, and I would like them
to go down instantly. So there are two ways
how we could do that. We can rotate the
plane 180 degrees and then this Blaine
normals will go down. Or we can just change this
setting and to have m minus one meter per second
and the particles will go down anyway. So they are not jumping
up and men falling now. It doesn't look like a snow at. All, right, so let's
adjust some settings. Let's go to the, for
example, physics. What I would like to do, I would like to slow
down this falling. It looks like more or
like I don't know, maybe like a rain
instead of visit misnomers so we can
adjust the dam setting. It will slow down their falling because snow is
falling quite slowly actually. So something like
that would work fine. Varies on ever
settings of brownian. And really know Brownian. Yeah, probably brownian. And if we will enable that, most particles wiggling and
this looks more like a snow. So that's exactly what we need. Maybe it's a little bit
too much of Brownian. I'll reduce it to
something like I know h. And that's good. Another thing, both bubbles
don't look like us know at all those are halo actually in, if we will, render them, they wouldn't even
appear in the render. For example, if I press F2, it will take a second
and it renders. And we don't see any particles. What we can do, actually, what we need to do, we need to go to
the Render tab and change as Renner as
object or collection. But we don't have our
snowflake objects. What we can create
it very easily. So I will press Shift a, and I will choose the
circle as my snowflake. Both snowflakes will
be very small and the old ginger
vertices to something like eight because we didn't
need 30 do Burgesses. I will keep the radius
and one meter for now. We will change that
a little bit later. And now I will move is
on the side by g and x. So I will go into the
edit mode by pressing Tab and I will press F to fill. So now we have filled circle which is from eight vertices. It doesn't look like a circle
anymore, but that's pain. I will add some kind
of a simple materials. So I will go to
the Material tab, I will press plus, and I will choose
the white color. And why isn't white? It does because this BOD do
not have too much lighten. All the lights go here. If I will go to the
day light view. Now it has blight, so
that's just what we need. We will change the
color of this a little bit later when we
will add the snow, but for now it will
work just like that. Maybe we can go
into the Edit mode, go to a face select mode, select this phase
breast, each extrude. It, extruded a little bit to
have some kind of a weight. And I will press sheets move, I will do that into object mode. And that's basically it. That's gonna be my snowflake. So let's get back to the, to this particle settings. And I will go to a particle settings and
in the render section, I will choose the I don't know what
to choose because this plane is a little
bit hard to find, so I will name it
as Snow snowflake, and now it will be easier
for me to find it. So I'll add it here. And now if I choose the object, I can choose the
object, this snowflake. You can see I have a
lot of objects here, but here is the snowflake in, or if it's hard for
you to find it, you can just go to this, take this and select
the object circle. And it is circle, but it should be snugly. I think I renamed
the wrong circle. Meds, our snow flake. And what's that? That's our particle system. Okay, I'll rename it
this particle system. Now. It's, it's in the
way as it should be. Great. So we have, let's play that animation again. Don't go into it. Render mode. As you can see, our
snowflakes are falling, but they look terrible. What I would like to do, I would like to adjust the rotation and I will
enable the rotation, will randomize it to
something legs to your 0.5. And if we play it again, boom, we have randomized
the rotation and every snowflake
looks a little bit different, which is cool. That's basically what we need. I see some issues. First of all, vis shadow. I hate it because
at the day light, it blocks our sunlight. That's our particle system. And another thing, BOS
snowflakes also cast the shadow. I don't know about you, but when I look through a
window when it's snowing, I don't really see the shadows. When when it's snowing. Theoretically, it should, snow should guess VSAT a shadow. But they are so small
and the various, so many light bounces bad. Usually we don't see the shadow. So I would like to remove
those shadows from the, from the particle
system and snowflakes. We can easily do that. For example, if I press on my particle system and I
will go into shaded mode, I will create a simple material. I want even change anything, but now I have some settings for the shadow mode
and I will press none. And that instantly removed the shadow from our
scene basically. Yeah. And I will do the
same with Snowflake. I don't need to select
bosons snowflakes. I will select my
appearance snowflake. And we already have a
material and the shadow mode, I will press them and both snowflakes one cast
the shadow anymore. So that's grades. I will go into the
camera view again at 0. And let's see how it looks. It looks quite good, right? It is knowing some snowflakes
up falling back good. I think we don't have
enough snowflakes in. Our snowflakes are way too big. Both looks like I'll
know coins falling from the from this guy. So what we can do, we can see Gilman
down first maybe. So I'll select the particle
system or I can do it here, or I can just press on here. And I will go to a
particle settings. We have viz skills somewhere. Yeah, on the render. So we can reduce the
scale of our particles. And we can increase
the scale random, randomness a little bit. And let's see how it looks now, it still doesn't look very good. Where is my scale? A trainer and scale? I still would like
to remove this. Maybe zeros, 0, 0, 2, something like that. That looks a little bit better. Okay? And I need way more snow. Way more. It's not enough, especially when both snowflakes are so small. So let's go to a
particle settings and crank this number to
something like 10000. It doesn't change anything because we need
to simulate this. So if I go to the
start and start playing, now, it's better. Okay. It's knowing, I think it's
a little bit too fast. Still. Don't think. So. We don't have
this snow feeling. So let's crank that damp a little bit more
to some than 0.2. And see how it looks now. Now it looks better, right? But we have an issue. Something happened and
the snow disappeared. Just basically from
the bottom part. It happened because adverse
settings, by default, the lifetime of this
snow is only 50 frames. Not the lifetime, honest, No, but basically the lifetime
of our simulation. So Elgin went to the 200s. Now with snow is falling and it is it is falling here
and even beyond. So that's good. That's what we need. I will go to the render view. And that looks quite good. Okay, that's, that's awesome. We will change with no
material materials. And a little bit later, that looks a little bit
different in the when I'm playing and when I finished because at
the Render Settings, we have Render Settings here. We have view board denoising. I will, I will disable this. We have a better view
and it won't be very different when we blink their
animation And when we stop. So it looks like that. And maybe we can create the
snow for four-bit scene. And then we will have a better idea how the
scene looks in general, because now snow
looks quite good. I think that's fine. Maybe it can be a little bit
slower, but that's fine.
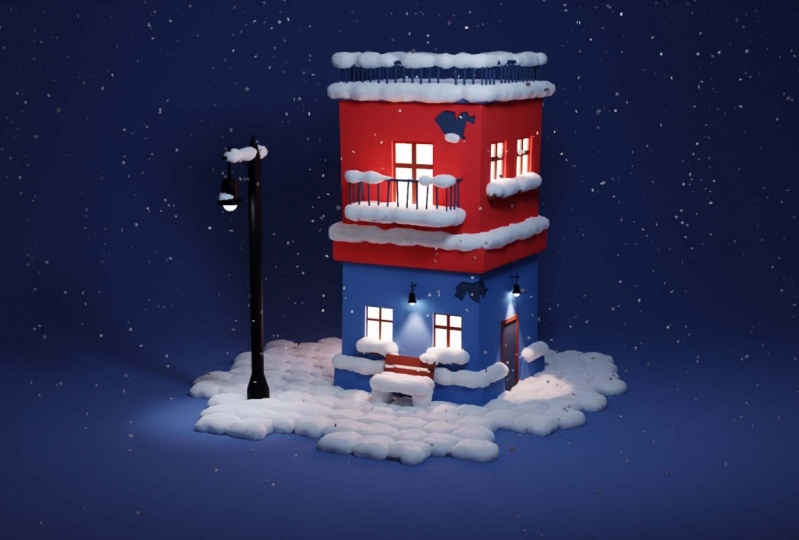
4. Add Snow: Now I would like to
add this node to our scene because it doesn't
look like window at all. And we can do that in many ways. But I found one very, very easy and cool way. Blender has a Ghoul add on it called Like no or
something like that. We can go to the preferences, to the add-ons and
search for this. No, real snow, that's
the name of the atom. We can just enable
it by clicking this and this atom is live. You can see that we can find it in view
3D properties panel. So it is going to be here. We can open this by pressing
this or as you know, or we can press N and
it will openness. And real snow add on is here. And as you can see,
it's very simple. Simple, and easy to use. It, yes, only free settings, the coverage bit height of
snow and the selected faces. So that's basically
really straightforward. Coverage is basically the
coverage of this scene. For example. It will add with snow on
the faces bad you selected, and on the faces Bad
have normals facing up. So for example, if I
will select the bench, it will add the
snow on both parts, but not on both
parts because both are facing to the side. And in reality, the
snow won't appear on, on, on, on the sides. So we can just quickly
add the snow in. You will see how it looks. Yeah, so it added
with no here, here. Some, I don't know the
algorithm on this. It added on top, but it doesn't add
it on myocytes. So I will press control
Z and disable that. We have a lot of objects. And this snow, I'll end with
snowing in on the bench. This, if I will
select with snow, you can see that it's
quite a lot of extra mesh. And we add this no, on all of the scene. It will slow down our
project quite a lot. I think we need to be a
little bit selective on, on what we would like to add the snow a little bit
more about VO setting. Let's add the snow here. A 100 percent coverage
looks like this. That's a big object. It will take awhile
to add vis snow, but so that's why
I am not going to add the snow on on this big, big face on, on the ground. Basically, I will add
just no material. And as you can see, it takes awhile to do
with snow on this. So as you can see, that's our 30s centimeters of a hide Visine of the
snow and the full coverage, a 100 percent coverage. It looks like that. It just covers everything
with the snow. And that's really cool. I will get back my quantile z and I will remove the
coverage to some delay, 50 percent will snow again, and you will see how it looks. It takes a while to add it. So I will fast-forward
this part. So you see that at 50 percent it added with snow and left
some parts without the snow. That looks like that. The height settings, It's
also really straightforward. Now we added the 30 centimeters
of snow and we'll remove snow and we'll add a 100
percent of coverage. And I will add something
low point when 1.5 meters of snow. So let's add it to
the same plane, and let's just add it. And you will see how it doesn't lead me to add more
than one meter, a 100. That's good to know. So now we have most
known jazz basically. More items in my scene. Just drowning in the snow. So, yeah, that's the
basic idea of 0 settings. And for example, I
will get back to 013 and for example,
selected faces. It works like mad if I press this and I will
get to a select mode. That's not the best example. And we'll get, I'll
create a new blame. I'll move it to somewhere here. Scale up. I'll go to this mode, and we'll go to the Edit mode. Select this and edit mode. And I will subdivide it. Just to me like Matt
will select circle, go to a select circle mode, and I will select, for example, this part. And this part. I need to press Shift
to keep the selection. Yeah. I don't know how I forget this. And if I will, and if I go to the object mode
without deselecting this, I can press elected phases, add snow, and it
will add the snow. Most part was that isolate. So that's the basic workflow. With this add-on. I will delete this
scene that we created. I'll get back to
the render mode. And now you have the basic knowledge on
how this atom works. You can adjust it to your skin or you can
adjust division, but we are working on so let's
add vis snow to our scene. What I'm going to do, I O nlogn to select all, and I will add this node
to all the parts beds. I want him snow, but I don't want to
select all the parts, for example, I don't
want to select miss. So I'll go and I will deselect
the selection option. And that's sounds
very strangely, but yeah, I will deselect
the selection option. If you don't have this, you can go to the filter and you see that you can enable some, some tools, basically toggles. Toggles, that's the world. So if you see it like that, you can go here and select this. And you see this
option where you can deselect selection, toggle. You get very idea. So I will deselect, listen. For example, if I press a, it selects everything
in between except this. So I would like to deselect this and probably my snowflake. I don't want to end with
snow on that camera is okay. It does not going to add
with snow on the lamps. So if I press a, it selects all. And I think that's good. I just deselected
both couple objects. And I will add basically be
default settings to my scene. So coverage at a 100 percent and the height that's
fairly centimeters, and we will see how it looks. So let's add this NO, won't run by them at snow. It might take a
while to add with snow or maybe not. I know. That's very weird. It added a lot of snow balls, but nothing appeared
on my scene, only on the bench. That's very, very strange. I'll delete everything,
select objects, the leads. I will delete this. So I had some problems
with adding the snow and I couldn't figure out what's wrong pots for some time. I only had with snow on
the bench for some reason. And the reason why it
happened because I'm stupid. I skipped gets this
selected face option and I forgot to deselect it. I even started to google about the bugs of this atom
and an impound anybody. Reason it's death. Mi. So before if you want to add some snow to the
your wall scene, you need to deselect
select basis unless you want to add
snow onset and faces, which is another story. So let's select all
and press Add snow. It will take awhile. It takes me something
like 20 thirty-seconds for my machine to my
computer to add with snow. Because it has quite a lot
of geometry in my scene for simply assumes it adds no
way easier and faster. But here it takes. We will see how it takes. I'm not going to
cut that part out. I know it's a little bit boring, but I know it takes
them a hormone. How much time? I think it is counted first, vertices, seconds already
or something like that. I don't really know. But it should add the snow. So I really don't know ONE on
what a bend with timing of those calculations
on breast processor on ramps of your computer
are just had to either know. The rendering time mostly
depends on your GPU. And most calculations.
I'm not really sure. I need to Google it. Yeah, so it added with snow. Let's see how it looks. I'll deselect everything
and that looks really good. I think I really like
how this add-on works. And in camera view,
it looks good. That looks really good. A couple of things. Before we move on, you can adjust with snow. At least you can remove
us know a little bit. We go to, if we select this, if we go to the edit mode
by pressing Tab, we, you can see that we have is
geometry, box-like mode. We have this geometry. And in my case, for example, I really don't like this bump here
on the window. So you can select it like that. Or you can hover your
mouse on top and press L. It will select the mesh which is separated
from the other image, but it's in the
same mesh category. Island, just do you know if
you have this separate mesh? You can press L. It will select, it will add up. So if you want to
select 12 or you can, you see what, how
it's gone and press Delete and on faces
and it will delete. So I'll delete with two. I fought about removing
voce, extra geometry, this extra geometry from
from behind the building, which we don't see, but I think we can
keep it this way. If it slows down your machine by a lot, you can remove it. Feel free to do that. But I will leave it as it does. And I think I will keep all
the geometry like bats. That's really cool. Okay, so I will save
my file and yeah, let's jump to an adolescent.
5. Reusing Snow Materials: So yeah, I mentioned you
that island want to add this snow to do his
grounds. Ground Plane. Basically, I can enable selection again to
this ground plane and bad because it would slow down my rendering times
and basically viewport. So I was planning to add
with no material for this ground because I wanted to add the snow
for all the scene, then that's not that hard to do because this real
snow add on gives us the material and
really nice material. For example, if you
would go to the shading, you can see when I select
this and we have this snow 70 6 material and it
looks kind of complex. It's not bath complex, but it's not just
basic principle. Be SDF. I'm not gonna explain the
shaders in this course. I'm planning to do
another course, but we basically get this material for free and we can use it on our
image geometry, for example, on our snowflakes. We can change my material
to Rails, know what Uriel, and that would be
better I think when just basic wide
principle be BRDF. And we can change that
to our ground material. So let's do that first. So we can go to this
materials down, we can add a material and we can choose any of
this no materials. I'll choose the snows 0 to one. And nothing happens because it uses the background
material first. But if I will remove this
background material, it will add the snow material. I don't wanna do that. I will get back because
I would like to get back to his background
material a little bit later. I need to assign
this no material. So I will tap into
the edit mode, select all, and I will
assign this material. This way. I will keep
my background material and I will have
this snow material. And as you can see, this looks very different
from this material, right? It's grungy, it's huge, and it doesn't look like a
snow even from far away. That happened because,
because we forgot to apply the skill to our
ground when we created it. If we go to the item, you can see that my scale
of the ground is 9. It should be one. And then we want to have the
problems like Mad Max, Why? I'm accent all the time battery, you need to apply the scale. We can do this easily
by Shift a and scale. And you see now our scale
is one because before hour, before our snow material was also scaled
by also 10 times. And now it looks
way, way better. It looks the same like
misnomer that we added here. But by making discourse, I figure out that my background looks
better when it is bluish. So I will get back to this one. Well, I'll get back to this one. And I think it looks better than men, bad snowy background. But we can add this snow material to our snowflakes because
now it's not very good. It's not perfect. So we can select this. I will go into the shading. Tab, will select this and
non-white icon selected because because I deselect
the selection tool. So where is our snowflake? Here it is. And now I can select it. And I can change this Jew, any of this no materials. Let's select list
and you can see my snowflake looks like that. Now my snowflakes also have the same material
as the snow in Messina. So that's really good. The one problem is bad. Let's simulate this. Once again. We want problem. At least it should be that it
casts a shadow on my scene. But as a C, It didn't know why. But still, I will change
the mode to none.
6. Loop Animation: It looks like we
created everything we need for this scene. So now what we need to do, we need to loop this animation because I want
to have a looped animation. So let's go to our
particle system. We can select it here, or we can enable selection
and selected here. And annelids go to the
particles settings. To loop animation,
we need to have the same scene and reframe
0 and add frame 200. If most frames will be the same. We can save it. Our animation is looped. But clearly now they have
very different frame. 0 is completely empty and the frame to a 100 is
full of snowflakes. So what we need to do, we need to create an alpha
particle system to move it backwards and to move existing political system
to move it forward. And for example, I can duplicate this particle system
by pressing this. And here you can see
duplicate particle system. And voila, I have a nanoparticle system which have the same settings
as the first one. You can see this number
two and it shows bad both particles
settings I used into political systems
in Busan this, so we can press this. And now we have separate particles settings
for every particle system. Why we need bed, okay, I'll delete this one and
make another duplicate. So now we have political sets, things in both of those. And for example,
if I want to move this to frame minus 100, because I will need
to move one of my particle systems
backwards and another one's for
another one forward. This one also moves backwards. So we don't need that. We need the separate
particle systems. So we'll brevis. And now most
political systems has their own settings which are exactly the
same at the moment. And for example, for this one, I would like to start at the
frame minus one and 100 and, and at the frame 100. And this one. Why it's so slow. I would like to start at the
frame 100 and reframe 300. You probably see what I did. The first particle
system started in here and ends here at frame 0. It will have the frame
100th of a particle system. And this, the second
particle system. It starts here and ends adhere. And at this point it
will have a frame 100, which is exactly the same as the first particle
system frame 100 here. And it should look, that's the idea behind. So that's great. But I made a test and it didn't look for me and I didn't
understand what's wrong. But it seems bad. Week rate of both
particles systems. And we added Brownian,
this forest, which moves the
snowflakes and make them more natural and make them
more similar to a snow. So I would like to
remove that to be sure that both will
be exactly the same. And we'll remove the second
particle system again. I will make the settings that I want and then we will
move to duplicating that. So I will make Brownian 0. And let's see how it looks. With snow is falling
but it's not moving as we weren't
even to to move, right? It's, it's, it's, it's
not very interesting. Luckily, the blender has more than one way to
create something. So instead of Brownian, we can add the force, so Shift a and you
can see force fields. And we need to add turbulence. Turbulence is here
so we can press. G, z and move it
somewhere around here. So that's great. Let's see how it looks. We need more power
for turbulence. So let's go to the terminal
and settings and just increase with trend to maybe 20. Let's see how it looks on 20. Now it's moving and that's exactly what they need. Awesome. At the end of the animation, I don't want to see the
particle system one. For example, if my
particle system one will be still visible
at the frame 200, it doesn't look
like it has looped because my frame 200 one be
the same as the frame 0. Now, my particle system
is still visible as the frame 200
because I don't have a second packet particle system. If I go to verb
particle settings, I have only one which
starts at minus 100. So we have couple options. What we can do to fix that. We can move the plane which
emits particles way down and to reduce the distance between the plane
and the ground. And hopefully that
would fix this problem because snowflakes would have the shorter distance
to move to the ground, but it has their own problems. If I move it down, it will block the
light and I don't have much space before it gets
into the camera view. So unalike this option, another option is to increase
the speed of a snowflakes. Again, if I will increase
this beautiful snowflakes, it won't look like a snowflake. It will look more like a rain. I even would like to reduce the speed even more
snowflakes actually. So that's not a good option. Another option
which we will use, we can increase the
length of animation. For example, instead
of having 200 frames, we can increase to 300 frames. In VAD should fix the problem. In 300 frames. Our snowflakes should fall down and the global over ground. So let's try this and let's go from Doc sheet to the timeline. And here we have a settings
of the end of the timely. So let's set then do 300, and now we will have
enemies feed 300 frames. Let's play it and let's
see when it ends. So we still have
some snowflakes. And at frame, this frame, we still have some. But at the end, I'll deselect both
and it's empty. It's very good. So now we fixed all the
problems which didn't allow us do loop this animation. Let's duplicate this
particle system now. I think we are ready and
we can even not weekend. We need to change the frame, start to a minus 150, and it will end at 150. Now we have a longer
animation and the lifetime of a particle system
will be 300 frames. Also, if you tired of moving this to the beginning
and really simulating, there is an option, too big van animation. If we present bake,
it will simulate. And for example, a can move
to any keyframe I want. And I can see how this
animation looks like. Again, I see a problem
because at frame 300, our animation is still
life, and that's not good. I will unbaked, delete for bake. And I will need to increase
the speed of the snowflakes verus no other way around. We can increase the animation to 400 frames or even longer, but let's increase the
speed a little bit. So to increase the speed, we will reduce the dam
option to maybe 214. Is that going to be enough? I will make VAT again. It's easier for me when men
starting with simulation. No, it's not enough. Why is bad? It's very strange. We still have some
snowflakes flying round. Okay. Delete Rubik,
decrease even more. And let's bake again. Now. It's okay. Let's see how this
beat looks like. It's a little bit fast, but it's reasonably okay. If you want to slow
down most snowflakes, you will need to increase
the length of animation, but I will keep
that at 300 frames. It's working as we want. Let's duplicate this. I have an alpha particle system. Remember, we need to
separate settings. So I press this and let's
start with frame at 150. Let's end the frame, add 450. And lifetime will be 300. Okay, lads bake this one too. And let's see how our
animation looks like. This. It shouldn't be like that, okay, it doesn't work. Delete the big lead
to bake again. Maybe it's some bug. Now it's working. Yeah. There was some kind of public
ledger, something like bad. So let's test this. Let's go to frame 0. I will snippet, and I
will go to a frame 300. Most should be the same. Okay, can I have 300? And here, whereas
my snippet tool, and let's see if
that looks the same. It looks like this
is exactly the same. And we successfully
looped our animation. So that's really it.
7. Fix Bugs & Render: So basically we
finished, our scene. Looks good. I know
we have some bugs. For example, this shadow, it should emit, be, fair. This Blaine casts a shadow when when the sun goes
from, from that side. So we can easily remove that. If you remember, in Evie, we go to the
Material tabs and on the material bad is active and change the shadow
mode from them, from opaque to man
and wet fix it. With this plane. We did that. We removed the shadow earlier. But if you didn't, you can change it here. That works perfectly in EV, but in cycles, this
method isn't working. So let's go to the cycles
or disabled denoise. So in cycles, we still have shadow from this plane
and from this land. So that's not good in shadows. We can remove it a
little bit differently. We can go to the
width property tab and go to the shading. No, No cheating. Visibility and re visibility. And we can disable shadow. It is easy, but it is
a little bit hidden. We can do the same
with this plane. Let's disable the shadow. And if you will
render animation in, in cycles, matt will work now. And rendering settings are the same like in the last project. So if you want to learn more, I wanted to keep this
video short so you can check in to is an immediate
buildings in lender. Here is very enduring
settings in EV, and here is very links,
settings and cycles. So you can jump into the
previous course and land on all, all of these things. So I will render this
and I will show you the results in EV n cycles.
8. Thank you!: Congratulations for each
in-band of the scores. I hope you liked the scores and if you created
something interesting, some kind of window
animation on winter scene, feel free to share that on the student's projects
here on Skillshare. If you shared your still or
animation on social media, feel free to tag me as bill. Gee, I really like to see
my students work online. Once again, congratulations, and see you in the next course.
 Gytis A., Motion designer