Transcripts
1. Intro: Hi, I'm good. I'm glad to see you
in this course. So you choose to learn blender
and bad disagree choice. Blender is a super
powerful 3D application and it is growing like crazy. More and more people
are using it. And it is an excellent time for you to jump on this train. You can create so much
by using Blender. I know it can be intimidating if you open
it for the first time, but my goal in this course is to get you more confident
using Blender. I made the scores for
complete beginners who never use Blender. And I will show all the
basics of the blender that you need to know to
start to work with it. In this course, we will create a simple scene from
start to finish. So you will see all the process on how to create
something in lender. After this course, you will have a basic knowledge of Blender
and you will be able to take more advanced
blender courses or create something by herself. So let's begin.
2. Download the Blender: So if you don't have blender, you need to go to Blender.org
and press Download button. And you can download the
newest version of a blender. And if you feel experimental, you can scroll down
and press this button. And here you see the
alpha and beta versions. At moment we don't have
any Beta versions bad. We have free, free Alpha. So when you launch a blender, you should see something like that for a
different version. So it might be a little
bit different image, but basically nothing changed
for a couple years now. And I don't expect that the basic functions to
change in the future. And of course, if something
will change, I will update. So if you press anywhere outside of this big,
it will disappear. And we can have free default
objects at the start.
3. Navigation: That's the famous default cube. The lighting and camera. Here, I enabled the
screencast keys so you could see
what I am clicking. So that should help to
follow up this video. So first of all, let's
move into the scene and you can orbit around with
the middle mouse button. You see this one. If you press it
and you can orbit around your objects
and around your scene. If you press here, you can orbit the same like
with the middle mouse button. But I would highly recommend
to have a mouse because it will make all the process
way, way, way easier. If you would like to move
your view to the side, you can press shift and
middle mouse button that will move everything. Basically two way. One, if you want to zoom out, That's the wheel up
and down on my mouse. Or if you don't have mouse, you can use both. This one. This one will move that and
4. Manipulating the Object: Basically the same is
with moving the objects. If we will select
the default cube, we can move it by using this move button and we
can move it on the axis, for example, now I'm
moving on the y-axis, that's the green axis, or on the x-axis. If I press here in the middle, I can move it freely. Press Control Z to get back
to the default position. But I have just saying almost no one moves objects like that because it's just low. We have shortcuts in Blender
and to move objects is G. It's basically a shortcut
for grabs some things. So if I press G, I can move objects freely. If I press, for example, why? I am locked on the y-axis, and if I press X, I am locked on the x-axis. The same is with busy. So I can move it like that
very fast with the shortcuts. And that's the shortcut G. And the same rules apply
to rotating and scaling. For example, here we have
those buttons for rotation. And when you hover your
mouse on this button, it helps you with
your shortcuts. Actually, it shows you
that the shortcut for rotation is r. And
here is the scale. For scale, of course it's s. So for example, if I press V, so I have those gizmos. And the same is for the scale. But as I mentioned before, we usually use shortcuts. Meds are for rotation. And if I press R twice, I can rotate it freely. If I press R Once,
and for example, if I press X, I can lock it on the axis. And the same is with scaling. So if I press S and Y, I can scale it on, on the axis that I want. So now let's talk
about the modes. And usually we are
working in two modes. In this video, we will
have mode at the end, but now let's talk about the
object mode and edit mode. You can see that
if I click this, I have more modes, for example, but explain Sculpt Mode and texture
paint, wet paint. We are not going to use this
in this beginner level, so we will talk about
those two for now. So in the object
node we are moving. Usually we are adding objects. We are moving objects,
rotating, scaling, and in the edit mode, we are adjusting the
shape of the object. You can see that we have a
different menu when you are, when we are in the edit mode
compared to the object mode. And our cube looks a
little bit different. One more node before we
are moving into edit mode, the shortcut for
switching between object mode and edit mode is
the Tab on your keyboard. So if I press Tab, it will switches between
those modes very fast. I know that's a lot
of information, but we also need to talk
about both selection modes. And in 3D we basically have vertices that's
both corners, both dots. So in this mode we can select those vertices and
we can adjust them. For example, if we press G, I can move it and I will
have a weird shape. I will get back by Control Z. And if I select this, I can jump into the edge select mode
and I can select edges. For example, if I move this, I will move all the edge. I can scale it. I can do a lot of things. Again. I'll get back to
the default cube. And the third one is the face select mode basis are basically both spaces
between the edges. Again, I can select my face and I can adjust it like they want.
5. Creating the Scene: Now, when we have
all of those basics, we can get back to
the object mode. So I'll press Tab and I would
like to delete the cube, which either need anymore. We will add another shape so we can press Delete
or we can press X. If we press X, it will give
me this option Delete. Now, I would like to add another shape so
we can press Add and Add mesh and we
have different options, different shapes to add. And again, I would
like to show you the shortcut to add something. We usually use Shift a, and that's the best
way to add reshapes. We need the planes,
so I just click on this and we have the
Blaine. I will scale it up. I will make it a
little bit bigger. So I'll press S and
I will expand it. We have bigger blame and we can jump into the edit
mode by pressing Tab. And I would like to jump
into edge select mode. I would like to
extrude one wall, basically for the background. So I'll press numbered one
to go into the front view. So I want to make sure
that I'm looking forward. I'll select this edge
at the back end. I would like to extrude it. To do that, again, we can press this button, but we never used that. We can press E. And now I can extrude
another face. I would like to lock it on
the z-axis so I'll press Z. And now I can extrude it up without any
movement to the sides. So that's gonna be my floor and that's
gonna be the background. In this video, we will
create a scene very similar to the scene
from one of my videos. I think that's called tinder
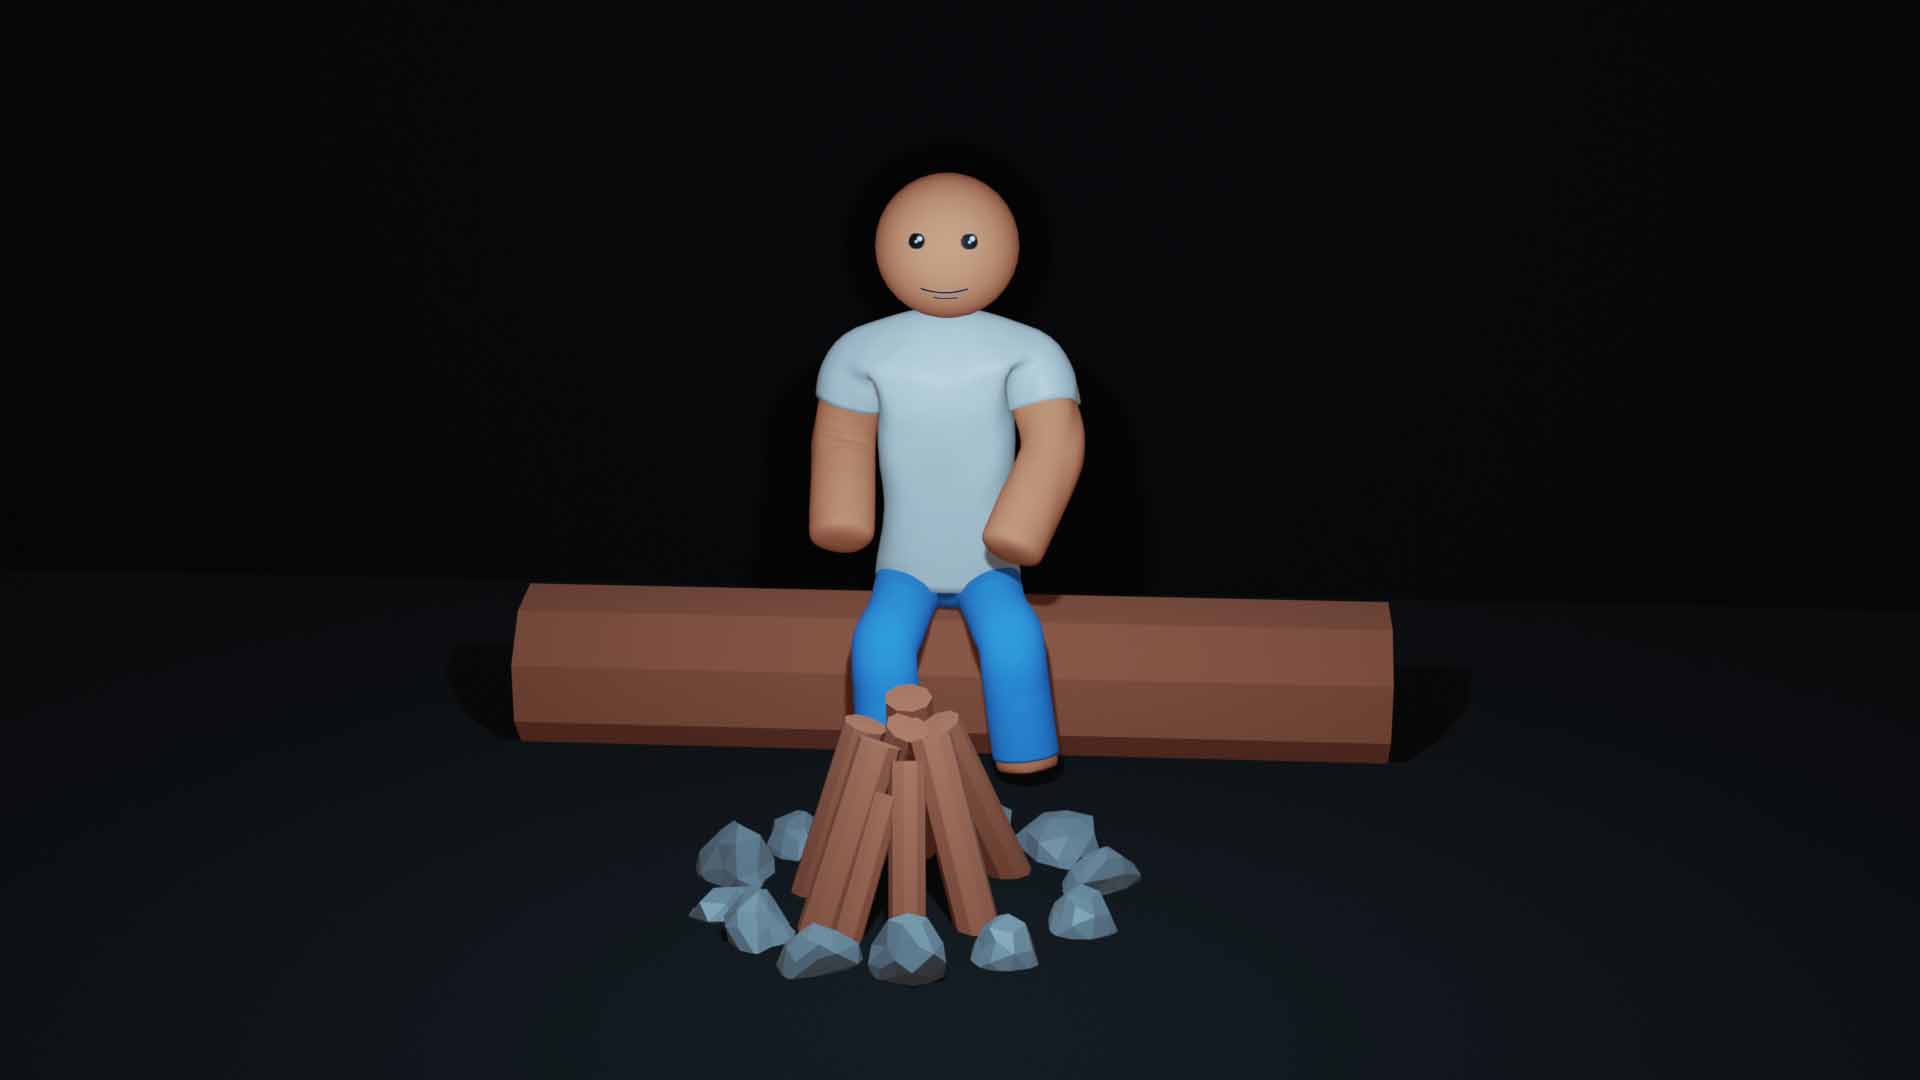
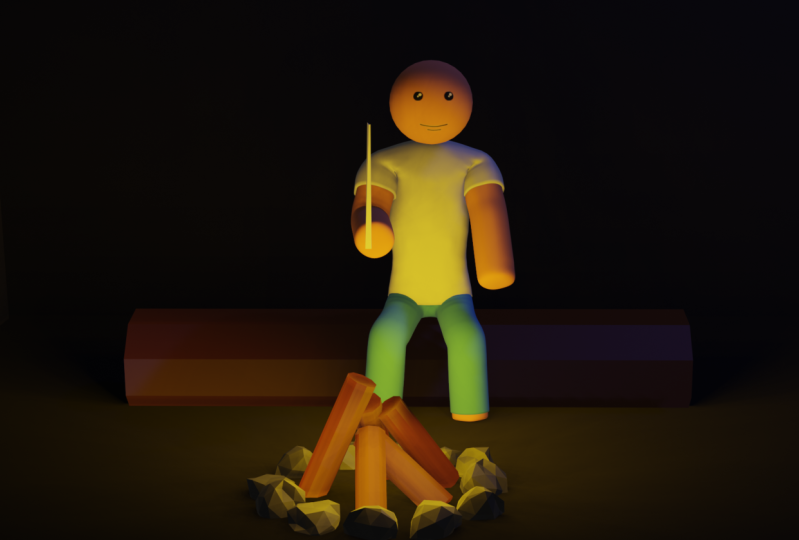
is completely useless. I created a very simple scene in the forest with the campfire. I think we can recreate that
in this beginner lesson. First of all, we need to log on which our character will sit. Again. Let's get back to
the object mode and press Shift a and
search for the cylinder. Cylinder is the closest
shape to the logo thing. So we have a cylinder
which is quite smooth. I would like to make it more
cornered, more low poly. So if I do not click
anywhere I have is menu. And if you clicked anywhere
else, for example, like fats met menu disappears and it is not appearing again. If you did that, you
need to delete this and add another cylinder. Now I have this menu
which I can expand, and I would like to reduce
number of vertices. You can see we
have two vertices, which is too much. I would like to make
it more low poly. For example, if I
make three vertices, a V-shape, and if I
make four vertices, I have this almost a cube, but I will make something
like nine, maybe eight. Let's make it a nine. And now I can click away. And I have a shape. This log that we created
is placed vertically. I need to make it horizontal, so I need to rotate it 90
degrees on the y-axis. So I'll press R and I will
lock it on the y-axis. Now, it rotates
completely 1990 degrees. On the y-axis. It looks like this. It's too thick and too short. I will scale on the x-axis. I'll press S x, and I will expand,
Something like that. Now, I would like
to make it thinner. Again. I will scale it by pressing S, and now I will lock the x-axis. I don't want to scale
it on the x-axis. I want to scale it on the
y and z to lock one axis, we can press shift and x. And with this command, we are not going to
scale on the axis, but we select, in
this case x, xs. So I'll scale it
something like that. Maybe I need to scale it
up a little bit more. So S Shift X, maybe something like Matt
analogist in the ground. I would like to move
it a little bit up. So I'll press G and Z, and I will move it a little bit. That's great. We have our log n. I will move it a little bit
on the y-axis to the back. So again, g, y and
something like that. And now we need a campfire for this campfire and
we need some rocks. And for rocks, I will
add another shape. So I'll press Shift a and I
will maybe use ecosphere. Let's add it and
see how it looks. It looks, okay, I will
move it a little bit up. So g. Z. But it is too perfect
to symmetrical. And I would like to
make it like a rock, to make it asymmetrical at
some bumps, just deform it. So I will go into the Edit mode. I'll press Tab, and
now I'm in edit mode. And I will choose this
vertice vertex select mode. It will be easier to
work in this mode. I can select, for
example, both parts, and I will press G, and
I will move those in. Again. I can select both g, n, maybe those out. And I will deform
it until I like, if I select half of the rock, it looks like that. I select the half of it. But in reality I selected
only both vertices bad, I can see in my viewport, I didn't select it
vertices in the band. If we want to select all
the vertices in our range, we have this button,
the X-ray button. And now I can see through, if I select those, I can select basically
all of those vertices. So if I play G, I can move it like that. I can scale it down. I select very random things and I try to
randomize this rock. And I will tap it out to the object mode and
I will not be x-ray. And we'll see how it looks. I think it looks like a rock. That's quite fine. So we can scale it down. We can press S and
decrease the size. And let's move it on the ground. So GZ and move it on the ground. Maybe let's scale it
down a little bit more. And now I need more rocks. First of all, I will move
this from the center. I will move it to the
side a little bit, so I'll press G. I will disabled the
z-axis, so Shift D. And now it will, it moves only on x and y axis. It doesn't move up and down. I'll move, it's just
somewhere here. So now I would like to duplicate this rock and I
will press Shift D. And if I move my mouse, you can see I have another
rock and wet grade, but I would like again to disabled movement on the z-axis. So we'll press Shift Z
and I'll move it to here. And I will do this
again and again, and I will make it in a circle. I will press numbered seven, and I will look at our
scene from the top. I can use this gizmo
and press on z and now also achieve the same thing. I look at it from
the top to you. When I look from the top view, I can't move basically
in the z-axis. I can, for example, press G and Z. And in that way, I am moving my
object on this axis, but if I only G, it just moves on
the x and y-axis. So it's easier to
work in that way. Let's make a bunch of
duplicates of this rock. And let's create,
became fire, ship D. Let's move it shift
D. D, shift D. I think they are too
close to the log, so I will move here. Does here. It doesn't
have to be perfect. And now both rocks
look exactly the same. I will use the same rocks. I am not going to
deform that Megan, but I will adjust them, will rotate them a little bit, and I will scale some of those and we will look
a little bit different. So for example, if I select this rock and then if I press R, I can rotate it. And now it looks different. I can move it up. And G and Z, again, I can do the same with this one, just
rotated differently. And if I select this, I can rotate it. But I can press R twice. And now I can rotate freely
so I can rotate like that. So let's do this exercise
with all of those rocks. Well, I select the wrong thing. Okay, couple more left. Now, I will go into this
view, into top view, and I will scale up some rocks to make them
in different size. Well that's too big. Rotated. Well, I think that's good. All of those rocks
look different, but they are exactly the same. Now I think it's a good
idea to add votes. Things bad. We duplicate it in one
folder, in both collections. We can press this. Let's select missing collection and press this Plus button. And that will create a
new collection or folder, or you can call it
whatever you want. And I will name this rocks. And our rocks are
both Ico spheres. So I'll select them all. I will select the first one, hold Shift and select this one. Now I'll just drop them
into Iraq's collection. That's the basic election
we can rename most things. For example, the cylinder
we can rename to log. The ecosphere is
our default rock, which we can drop it into
the rocks collection. The plane is the ground. And now we have cleaner file
and we did some work so we can save our file
because it happens, computers crash and I would recommend save files regularly. Just File Save As I'll name it. Blender intro verse
shouldn't do. And that's going to be my file. And the next time when
I will need to save, I'll just press Control S
in vegetables, save a file. So now we can work on the wood in big campfire and
we can work with a similar principle
to creating this log. We can create another cylinder. Make sure that you
are in object mode. I will keep the
same nine vertices. I will scale it, press Shift C,
something like that. And I will scale
it on the z-axis. Something like
Matt, I'll move it up with G and I will rotate it. I mean, I think
that's good to hear. It's quite good. I'll go into the top view by
pressing number seven. I will rotate it a
little bit and again, I will duplicate it. A lot. Shift D, rotate,
Shift D, rotate. Move it here. Shift
d Rho d Phi d. Rho d did maybe all data
lake that a little bit. Shift, D. Rotated. Maybe let's add one more. And how does it look? Okay, I I will adjust the
length of both a little bit. I think I would like to make this one a
little bit bigger, so I will scale it up. Maybe the front one's
own make some smaller. And I will duplicate it
and make it even smaller. Down to something like Matt, I think that's quite good. And we have our scene. I'll save it by
pressing Control S.
6. Add the Colors: And we can add colors. Maybe let's start with log
n. Let's click on this bowl. I don't know how to call it. And we have the materials tab
I'll press Plus on venue, and I will rename it to and
here in the base color, I can change the color. I can make it some
kind of a brownish and make it a little bit darker and we don't
see any color. That's because we are
in the solid mode. Here is another modes bar
which you need to be aware of. So the first ball is
the shading view that shows all our objects
in the wireframe mode. We see the vertices and we
don't see any fillings. Here. We see the fillings only, and here we see
everything in color. So that's the color of the word. And it's a little bit bright, but don't worry too much. We will adjust the lighting
and the vet should be fine. It just reflecting
the light too much. So let's scroll
down a little bit in here and adjust
the roughness. For example, if you
increase the roughness. So again, I will select
this one and I will add the same wood materials so I can create new and select wood. And I can do that with either logs or I
can select them all. Where our logs, this one, I think I selected
all n as the last. I would like to
select the word vet. I would like to take
the material from and I will press Control L and
I will link materials. Now, all of those will
have the same material. Let's add the color
to the background. So great. New will name it background
and I will make it black. We'll move this down. And again, I will increase
the roughness to the max. And now we have rocks. Again, another material,
I will rename it to rock. And I will make it great. Again. I will select all of the
rocks by holding Shift. And the last stroke will
be the one that has the material on Control
L link materials. And all of the rocks will
have the same material. So that's great. We have everything ready. Again. Let's save control S
and our file is saved.
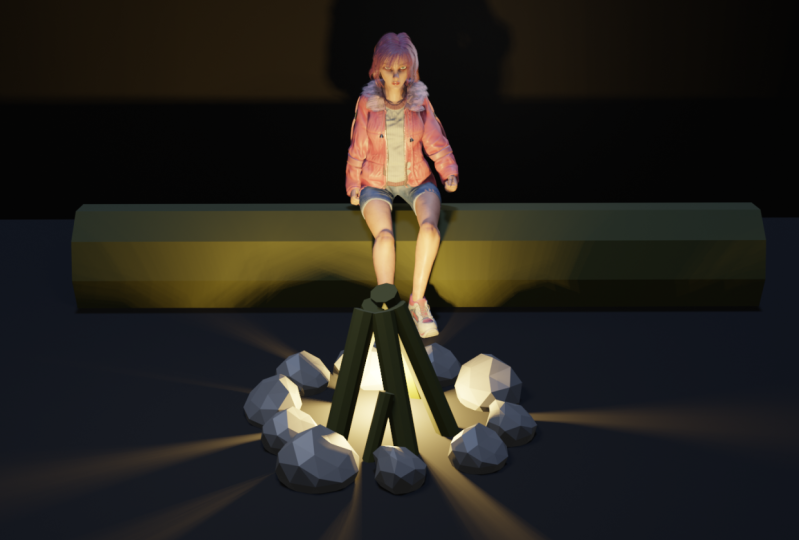
7. Import the Character: And now I think we can add the character to be seen to make resume a little
bit more interesting. So there are two ways
to add the character. We can file, append
and go to the file. I will give you a file
that I'm using right now. I will leave the link
in the description. So to do two. So this is going to be the
character for the course, and it will have a
Textures folder. So I will open this up. It will take a second to open. And what's cool about the
blender that you can open as many Blender
files as you want. Maybe not as much
as you want because we have the RAM limitations, but it will let you to
open multiple files. And you probably see
this security reasons. Just allow that. Because of the array. And I have my character, I have this collection. We can select all by pressing a in Racine and we
can just copy it. So Control C and go to our file and press control V. And that's how you can add objects
from other files. So that's the super
convenient way to add objects from other files. Now we added a bunch of
things which we don't want. And I will get
back by Control Z. I will reduce this. And I will create another
collection for the character. So I'll press this, we'll rename this to character. And now I will press control V. And now all of this, all of those things we'll
go into this collection. And if I want, I can disable it and enable it. It will be easier to
work in that way. I don't know why, but this copying of the rigged
character has one flaw. And here it is. If I select basically the rig, this pink, and I will
move it on the x-axis. So g and x, you see that I have this
skeleton and duplicate it, and it's in our way. And I don't really want
that. I want to delete it. So I will disable my collection and I
will disable the rocks. And I will select all of those. And I will press X and delete, and now those will be deleted. I will re-enable my things and I will move on my character. I will select this rig, and I'll press G and X
and I will move it back. I'll move it closer to the
logs so I'll press G and why? And I think it's kind
of in the right scale, but if it's too big
or too small, again, you can press S and you can
scale up or scale down. Now, we will learn about another mode I mentioned
in the beginning, but we will work with
free mode so far. We had object, edit,
and edit mode. But now when we
have the rig, this, this thing, when you
select this pink, we have another mode, and that's the pose mode. And if we go into pose mode, we can adjust for REG. And B character will
move based on bad. For example, if I
select this cube, if I will move it
down, for example, g and f, I will
move it like that. Character will sit on the log. And if I select this, and if I'm will
move it like that, He will lower his arms. And if I go to the side, I can move them closer to him. And I can move this
closer to him. And that's basically setting the boats the elbows
goes too much in. So I can select this. I can look at it from
actually have to select this. And I can go into a little
bits view from the top. And I can rotate it and
I can rotate elbows out. We'll do the same with this one. And that's basically setting
the boats and envenomation. We said a lot of poses and
that's basically animate. We just need to
add the keyframes, and that's how we
animate both characters. So I have a character
sitting on the log. You can do your own stuff. You can adjust all the scene. You can not just be character. You can adjust both in
the way that you want. You just select the
bones and for example, you rotate, you can move it. It's up to you. You can adjust,
for example, legs. You can actually, we need
to press this and you, we can make him sit with the wider bows and
something like that. So it's up to you. Now you can play
with with the scene, make it in the way that
you think it looks good. And once you're done, continue with this video.
8. Lighting and Camera: So I get back to object mode. And now let's talk
about those things. That's the camera that we have, and that's the
light that we have. If we will go to this mode, Viewport Shading mode, now, our scene will react to
the lighting that we have. So for example, if I will move my light closer
to the character, it will be brighter and it
will cast shadows, etc. So I can adjust the lighting. Here is the camera. We can move the camera like we do with all
of the objects. We can press G and move it. If you want to go
to the camera view, there is a button, this one. And this is what I
see from my camera. Of course there is a shortcut. It's numbered 0. It jumps to the camera view. And from the camera view, you can just select the camera, press G and move it. But there is one very cool
way to move the camera. And that's when you
in the camera view. You can go view navigation
and walk navigation. I'll press right mouse
button and here should be. I'll do that again. View of navigation,
walk navigation. And if I press
right mouse button, I can add two quick favorites. And when I add it, you see I already added
two quick favorites. You can press coup. And you can see I have a
flight and walk navigation. I use basically only
reward navigation. And if I press this, now, I can move like in
the computer game. If I press E, I'm off to the left side. If I press D, I move
to the right side. If I press W and move forward, if I press S, I moved back. And if I press E, I move up. And if I press Q, I move down. So of course I'm adjusting
review with my mouse. So I will select the view that I would like to see
from my camera. I will get back a little bit. And I'll put like to
see it like that. My background is a
little bit too narrow, so I will select my
background right now. And I will scale it on the
x-axis to fit my scene. And that's basically my scene. I think I will move this light
a little bit to the front. Just something like mat. And let's see how it looks. And I will go to
this light settings. I will change the
color to move a little bit bluish to something
like maroon color. And I will decrease the
power to something like 500 to make it not
that powerful, maybe 302, something like that. And that's how my
image looks like. And if I would like to
render my image icon, go to Render and render image. And that's home. My
image looks like I can go to Image, Save As. And I can save this
image to my computer.
9. Outro: Congratulations for reaching
the end of this course. Now you probably have a
question on what to do next. I would say try to create
something by yourself. Try to play with Blender a
little bit it to the program. You will see that variable has a lot of things
that you can learn and learn which are interesting in and if you create something interesting
after this course, you can add it to social
media and tag me as, as Bill J. I left just t
my students work online. And yeah, that's probably
it for this course. And see you in the next one.
 Gytis A., Motion designer