Transcripts
1. Intro: Hi, I'm glad too soon. For scores. You choose to learn blender and bads and excellent choice. Blender is a super
powerful 3D application and it's growing like crazy. More and more people
are using it. And it is an excellent time for you to jump on this train. I know it can be intimidating if you open it for
the first time. But my goal of this
course is to get you more confident
using Blender. I like teaching and
creating some kind of freely scenes
at the same time. In this course, we're going
to create a Rubik's cube. After this course, you will have a basic knowledge on
how to use Blender, and you will be
able to follow up more advanced courses or
grade something by yourself. So let's begin.
2. Downloading the Blender: Because you're
watching this course, I assume that you
already have a blender, but just in case you don't, you can download the blender
from the blender.org. Just press download
the blender and you can download it from here. If you use Mac or Linux, you can download your
version from here. And if you feel experimental, you can scroll down and
go to VSCO experimental. Here you will find the
better and alpha versions. Both versions might be unstable. And BS still in testing mode, but you can download it
and use it if you want.
3. Navigation: When you open the
blender or you should see a screen similar to that. You can just click
on any part of the window and that's
green disappears. You can move in the viewport
by using those gizmos. If you click and maneuver, you can just go. In review, there are
also two more gizmos. This one is to zoom
in and zoom out. If you press and
move your mouse, you can zoom in, zoom out. And this one is to
move it in the view. So we can move to the
sides up and down. You'll get the idea. But the thing is bad. Almost no one uses both gizmos. Blender has its own shortcuts, which are way more easier
to use when both gizmos. So for example, if
you have the mouse which has right-left and
middle mouse button, you will need middle
mouse button a lot. So for example, if I pressed
middle mouse button, I can rotate it. That's way easier than
rotate with this one. Just pressed middle mouse
button and you can rotate it in your viewport to
zoom in and zoom out. You can use again
middle mouse button. You can scroll in
and scroll out. You don't need to go here. If you need to move
your view to the sides, you can press shift and
middle mouse button. And now you can
move way you want. You can rotate, move
by holding Shift. And that's the easiest way to navigate in the
blender viewport.
4. Moving Objects: So now when we know how to
navigate on the viewport, Let's see how to move the
objects in the view port. Here on the left corner, you can see this tab. If you don't see dry pressing T, try pressing T, it will
enable, disable it. It should be enabled by default, but if you accidentally
pressed T, it might disabled it. Also, you can enable
it by this arrow. If we extend it a little bit. You can see that we have
labels for those tabs. If we press move, we will select the object. You can see that we have
those three arrows. That's the axis of
the 3D Viewport. Red is always the x-axis, where green is the y-axis
and blue is usually, if we will press on
any of those axes, we can move our objects. If I press this, I can move it on the Z space. But as I mentioned in
navigation lesson, blender has great shortcuts. For example, to move objects versus a
shorter shortcut, G. Also, if you hover over here, it will give you a hint
about the shortcuts. As you can see, shortcut Shift Spacebar or
G. So if I press G, I can navigate my
cube on the viewport. If I press G and X, I can navigate only
with the x-axis. That's great. If I press GMI, I can navigate on y-axis. If I want to isolate one axis. For example, if I wanted
to move on x and y, but I don't want this cube
to go higher or lower. I want to isolate the z axis. I can press G, Shift and z that will
isolate the z-axis. And I can navigate
on all the axis, but my cube one go up and down. If I move it here, it moves through to the side, but it wasn't moved
on the z-axis.
5. Rotating and Scaling: Moving objects is not the only thing that we
need to do when we model. For example, very often we
need to write it for objects. We have this option here. And we can rotate it freely. We can rotate it
on certain axis. But again, I would highly recommend you
use the shortcuts. And if I want to rotate, I use shortcut R. And I
can rotate my object. If I press R and for example Z, I can rotate it on the x's, but I selected that same
principles as navigating. Very often we need
to scale the object. Again, same principles.
If you press this, you have those gizmos. You can scale on y-axis. You can scale on
x-axis, on z-axis. Very same principles. And it has the shortcut because everything in
Blender has the shortcut. If I press S, I can scale it freely and I can
scale it on all axis. If I press, for example, why I can scale on one axis. If I press S and for
example, Shift Z, I, isolate the z-axis and I
scale on both two axes. X and y basically axis.
6. Edit Mode: Now let's move to
modeling basics. But before doing that, I will go to Edit
and Preferences. I think on my, I think I will
change the scale of video a little bit for you to, better to see it to 1.2. Here you can adjust
the view scale. So 1.2, I think it will be easier for you
to see what I'm doing. We have this cube, default cube, which is
not very default anymore. So I can delete it by
pressing EX, Delete. To add a new object, we can just go
press Shift or add. And here is the object. I'll press Shift a
because it's easier. And I will add an average IQ, which is the same as
we had at the start. If we need to model something, we need to go into
the edit mode. Here you can see where
we are in object mode. By each, if we press this, you see that we have
many more modes. Usually we will use
object and edit mode, but we have a scope
mode where it explains weight paint
and texture paint. I don't think that we will use
both in to begin a course, but we will jump between
object mode and edit mode. If we will go into
the Edit mode, you see we have a little bit different view and a little bit different menu. I will get back to default. You should probably see this just like fat and
one more shortcut. Moving between edit
an object mode, you can easily do that by
pressing Tab on your keyboard. If I press Tab, I'm in object mode. If I press Tab again, I'm in edit mode. So it's very easy to
jump between both modes just by pressing Tab and
not going into this. So that's usually what
we are going to do. We will press tab,
tab, tab, tab. If we will need to
change the modes. When we go into the Edit mode. You can see that our cube
looks a little bit different. It has both dots and
both called vertices. The line between those dots
baseline it called edge. And we have free modes
into editing tab. Here you can see that we
have the vertex select mode, edge select mode, and
face select mode. What's the difference? When I am in the vertex select mode, I can select vertices. If I select this,
select vertices, I can select both dots vertices. If I go into edge select mode, now, I don't see those dots, but my lines edges a
little bit brighter. If I drag, I select edges. I can select by typing
them or by dragging. I selected both free. And the third mode is
the face select mode. I can select faces. You can jump between those
three by clicking both. Or you can press one
for vertex select mode, two for edge select mode, or three for face-like mode. Both are not non pads numbers. Most are the numbers
on your keyboard. Above the letters
above big Q, W, and E. Both numbers.
7. Extruding: You can see that in
the edit mode we have a different sidebar compared
to the object mode. For example, if I jump
into the object mode, we have those options in the
edit mode, we have photos. Here you can find modelling
tools, for example, extrusion, insert faces,
bevel loop cuts, both. I remain tools that
we use in modelling and in this lesson let's
have a look at extrusion. And in the next lessons
we will cover at a free extrusion is the
most used modelling tool. Basically in modelling this, we can select vertices
and we can extrude it. We can select edges, but it would be easier
to understand it. We will try to
extrude the phases. For example, if I select
this face, grab this. And I can extrude, I can make manure phase, for example, this and this. But basically we never
use extrusion as I did right now with
this plus button. It has the shortcuts because everything in
Blender has shortcuts. If I select the face and I press E on my keyboard,
I can extrude it. And I can extrude it. As I mentioned before, we can extrude not only phases, we can extrude
edges and vertices. For example, if I select
an edge, I can press E. I can extrude it. I can press it again, and I extrude the same
as with vertices. I can select which one
vertices and extruded. I can select multiple of woes, and I can extrude it. I will delete this object
that we just created. So I'll press X and delete. One thing. If you can't delete the
object that we had, make sure that you
are in object mode. When you delete objects. If you're going to delete
something in edit mode, it will, it will give
you a different menu. It will give you an option to delete vertices, just phases. For example, if I delete
faces, it looks like that. If I go to the object mode, I can easily delete object. So in object mode, I will add the cube. Sometimes I will go to
a face select mode, and I will select
those two faces. And sometimes we need to extrude things into
different directions. If I press E, I
can't really do it. It gives me the option
to extrude like that. I can cancel the action with
the right mouse button, but extrusion still
created new faces. If we select this
and we will press G, you can see that we
have new phases, so we can cancel the
action by Control Z. Now it deleted both spaces. It's not deleted,
it just undid it. And now I can move faces
and we're not extruded. One more thing, we can
extrude the faces inside. If I press E, I can
extrude faces inside. I get back with control Z
like I did the last time. And if we want to extrude
faces, for example, into different directions, outside or inside,
it doesn't matter. We have more options
by pressing Alt E. If I press Alt E, it gives me more options
extrude faces but standard, and it gives me the option
extrude faces along normals. That's very useful. And we use that a lot. Also. It gives me
the option extrude individual faces and manifold, but that's more advanced. Let's keep with normals. So extrude faces along normals. And I can extrude both
phases outside or I can extrude them inside
just by moving my mouse. So that's the basics
of extrusion.
8. Instert Faces: Let's go into
object mode by tab, select the cube,
delete the cube, and I will create a new cube. We are creating a lot
of cues recently. Let's press Tab and go
into the Edit mode, and let's go into
the Insert phases. Inset faces. If I select this and I
breastfed circle and I drag it, I can insert the phase, I have another phase
into this space. Again, it gives the shortcut
much easier to work with. If I select the face and I
press I on the keyboard, I can insert it just like that. What's happened if I select
a couple of phases and I press I it didn't
serves like that. Or if I press, I again inserts
individual phases. Now when I moved my mouse, it makes some strange things. But here at the top, I hope you can see when
we inserting phases, it gives me more options. For example, if I press I it
changes individual phases. If I press I eat
enables or disables, you can change outset
with o, boundary with B. So blender gives you
some hints what we, what you can do with the tool
that you are working with. Usually it inserts
spaces, lake bed, but if you press it, again, it inserts in individual phases. You can cancel that action by
person just by pressing I. So that's the basic source
of inserting phases.
9. Bevel: Bell, another
interesting tool that gives us an option
to bevel the edges. You can bevel with faces. If I select this, I can bevel face or you can
Bell edges and even vertices. Again, we never use this, we just use shortcuts. So the shortcut is Control B. If I go into edge select
mode and I select this edge, I can press control V. I can bevel edge. If I scroll my mouse wheel, I can add more edges
into the battle. And I can make a very
smooth and detailed battle.
10. Loop Cuts: Now let's talk about the
loop gets this tool is used a lot into modeling. If we press this, you can hover above your object and you can make a loop cuts. Basically, you can create an
extra mesh for your object. But again, we never use this. We usually use the
shortcut Control R. If you forget your shortcuts, you can hover above
the tool you want and the blender will give you
a hint about the shortcut. For example, bevel
is Control B. Loop cuts Control R. So if
I press Control R, I give the same options
to make a loop cut. But now I can move my loop, but when I confirm with
my left mouse button, I can move it here. Or even if I press
Control R again, if I scroll up my
mouse wheel button, I can increase the
number of loop goods. Or I can decrease
by scrolling down. So I can change that. I can create a lot of loop cuts.
11. Duplicating: There are two ways to duplicate
the object in blender. You can press shift D and it
will duplicate your object. And that's gonna be
a separate object. You can see here in outliner we have the
cube and cube 01. That's the one way
to duplicate it, but we can also duplicate
that with Alt G. If I press Aldi, that looks we're saying
it creates a new cube, but most cubes share the
same object information. For example, if I go here, you can see that this is using the cubes, zeros 06 information. This also uses 0 cubed zeros,
zeros Six information. And this one which we
duplicate it with Shift D, uses cubed zeros 07 information. So basically it created a new Cuban information
in the object mode. It doesn't mean anything. For example, I can scale
this cube on x-axis. It doesn't change
anything in both cubes. But if I get back by Control Z, if I go into the Edit mode, you can see when I go into
the editing with this cube, everything in this
cube also changes. This one with shifty keeps the same without D, it's changing. And if I, for example, go into face select mode, and if I grab this face, if I move it, this one moves. Also. For example, if I'm make an
extrusion, if I press E, extrudes also, this is the
clone of this cube and it acts exactly we've seen
in edit mode as this cube. In the object mode, I can move it, I can scale it separately. But if I change anything
in the edge mode, basically, if I change
anything to be mesh, if I, for example, go select both and I will
bevel it with Control B. This one Bibles to, this one doesn't change. There are two ways to
duplicate the objects. With shifty, you create
basically the new object. With Alt D, you
create a new object, but this shares the
same object data from the original object.
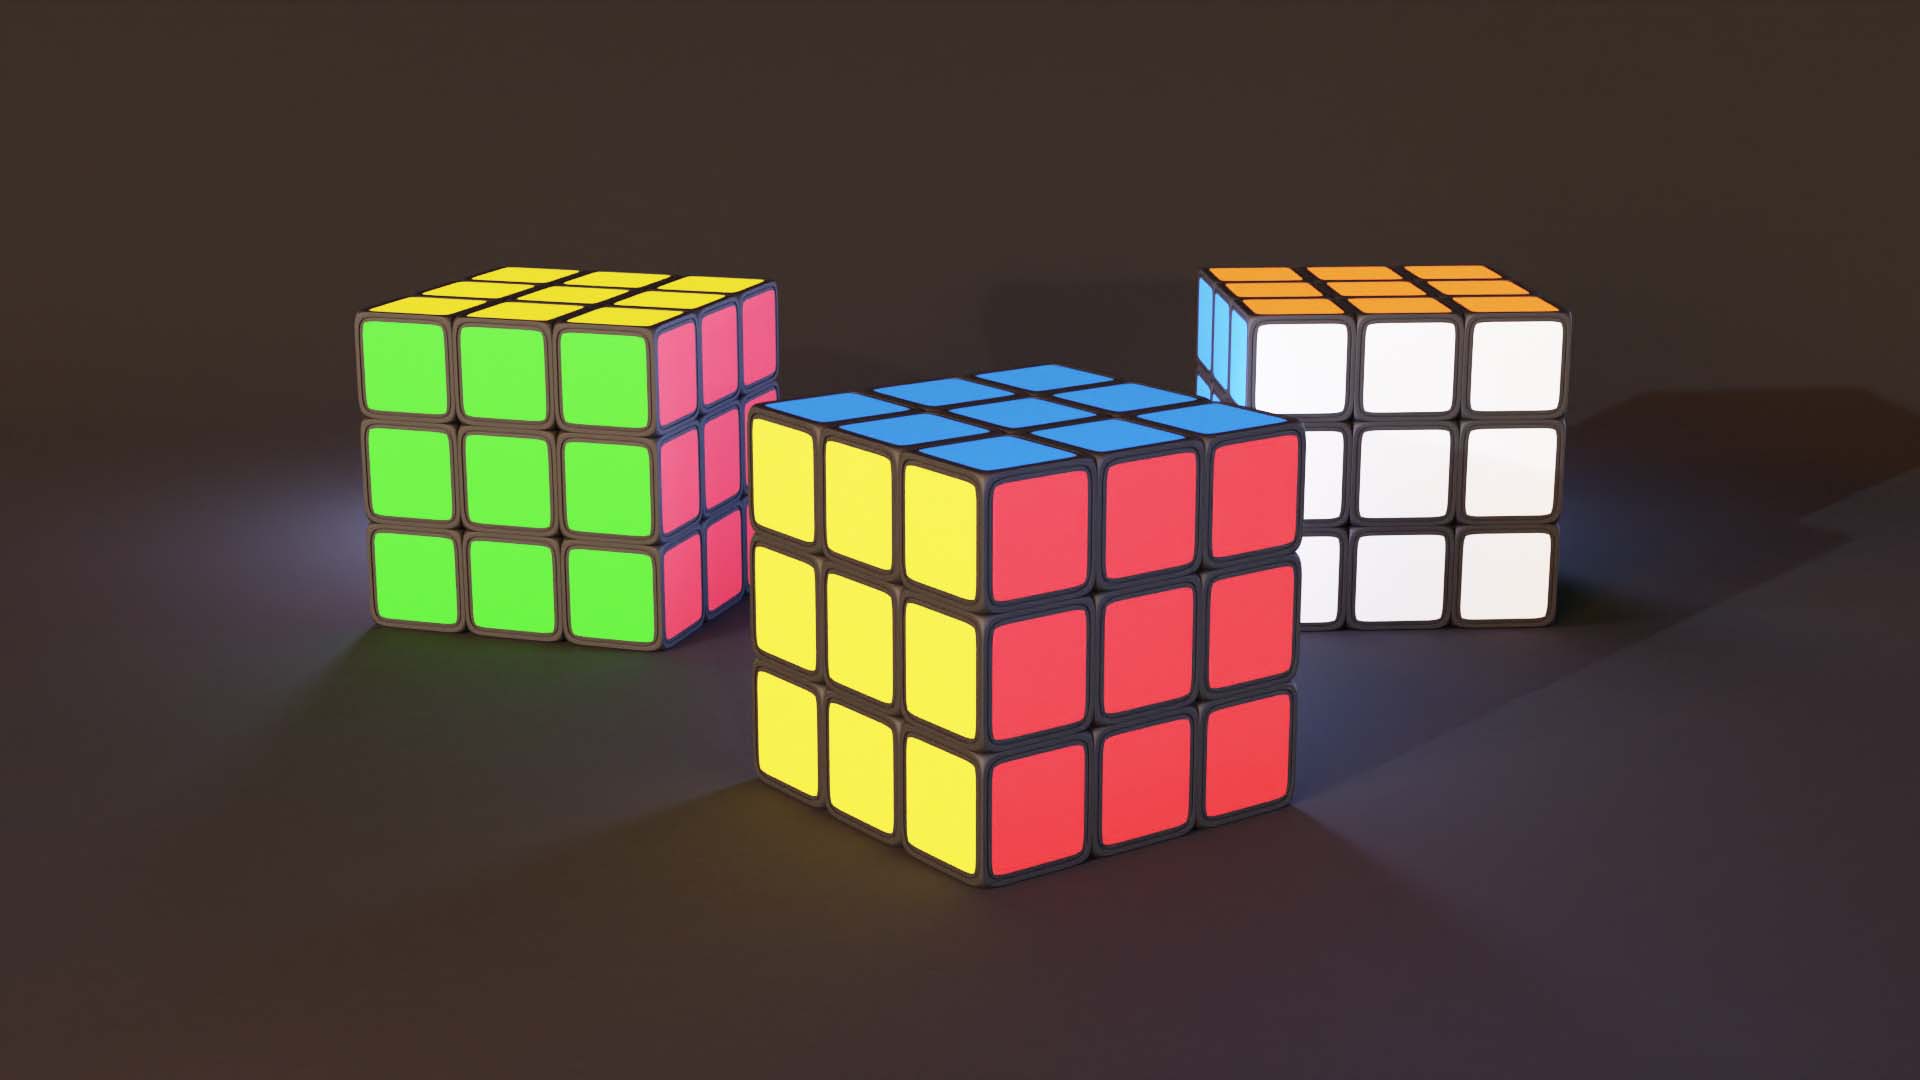
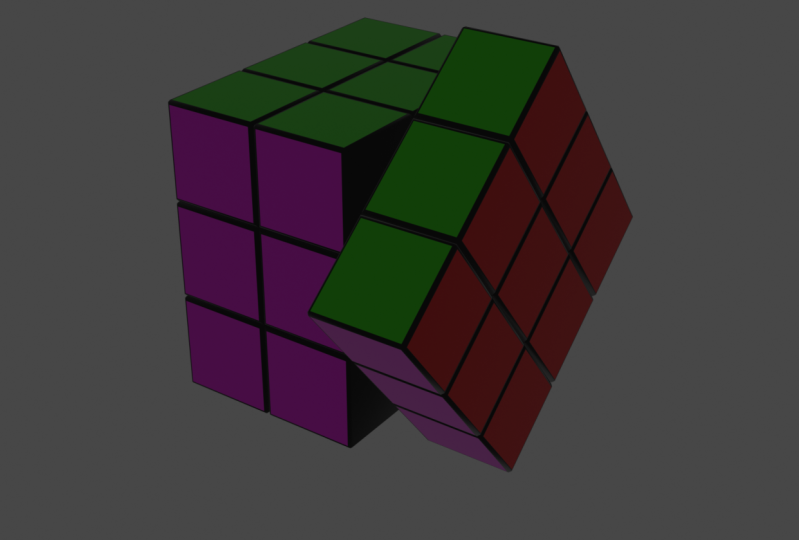
12. Rubics Cube: So now when we go through
all of those basic lessons, we can create something real. So let's create
this Rubik's cube. It's a very simple object
and we can easily create, and now we can easily
create that in Blender. I bought this Rubik's cube as
a reference for the scores. But my son play a
little bit with it and I don't know how to solve
it into his default colors, but we will do that in CGI. And let's jump into a blender and let's try to
create something like that.
13. Creating the Shape: I opened a new blender. We know that default Blender. Again, I enable
screencast keys so you can see what I am doing when
I'm pressing something. You can see that for example, now I'm pressing
middle mouse button. And if I press this
and if I press G, You see what I'm doing
when we will be modelling. If I will forget to tell
you some shortcuts, you can find them here. So let's jump into
the edit mode. Rubik's cube is made
from 27 little cubes, which rotating at the
different directions. So I would like to make one
little cube from this cube, and we will duplicate that, and we will create both
27 a little cubes. If I counted correctly, my math might be wrong, but it should be 27. This Rubik's Cube have
colors on besides, maybe let's jump into my
camera so you can see it. It has those. You'll see that it has voce black parts and inside
it has both colors. So let's create that. Most are not very sharp, so we will make that in Blender. Let's turn off my
camera At first. We need to insert faces. We already did that. So let's go into
face select mode. We can press this or we can
press free on our keyboard. And we can press I. If I press I, you can
see nothing happens because there are a lot of phases and we want to send individual phases
here we can see what individual phases are off. We'll do it again. And if I press I again, now I can insert the faces. I need to instead
just a little bit. Basically, something like that. I think that might be enough. Now what I would like to do, I would like to extrude both
spaces a little bit inside. So if you remember, we have this option
extrude along normals. If I press Alt E, I can select this extrude
faces along normals. And if I move my mouse button, I can extrude it outside or
I can extrude it inside. I will confirm with
leftmost button. I extrude the Jess tiny bit. Don't deselect anything. Inset faces again, so I will press I again. Now my individual phases
are on because I used wet and I will insert
vet little bit, just a tiny bit, maybe even less than marriage, maybe something like that. And I will extrude
this outside again. So I'll press Alt E, extrude faces long normals. And I will extrude basically
to start position. So we created this gap, which is quite realistic. Usually, that's how
voce cubes are made. Sonar. So we have this cube. Weekend start adding the colors.
14. Add Colors: To add the colors, we need to go to this. I don't know if that's a
bowl-shaped, probably best. And here is the material tabs. We can select the face and
we can add the material. Here. We can change the color. For example, we can make the red first, something like that. But you see nothing changes because we are in
the solid mode. And here you see format. Basically, the first
one is wireframe mode. If we press this, we can see our object
as a wireframe. Here is the solid mode we
worked in Vizmode so far. Here you can see the
material preview mode, and here you see we added
the color to the wall cube. That's not exactly what we want, but that's okay.
We will fix that. And here is the render view. This mode counts
all the information from our lights
and the background and gives us the information how this image would look
like in the final render. Let's get back to them
material preview mode, and let's make that
the base color. And we've been, our
base color is black, so let's make it met base color. I will rename it, and let's make it black. We can slide this down and this is going to be pure black, or maybe it's slightly not
black, something like that. We can reduce false, so it's going to be white, but we make it very dark gray or maybe black.
Let's make them black. Here you can see a lot of
options we can adjust. I don't want to go too deep into intervals options
for, but for example, I can show you that if we
slide with metallic tab, it will give us
the metallic look, very shiny, metallic load. But I don't want to cover all of those settings in
the beginning course. I want to adjust the roughness. Because if I decrease
the roughness, It's become very shiny. And if I increase the
roughness to the max, It's become very rough and it doesn't reflect any background. I would like to keep this at 0.7 around that number,
something like that. I can add VIN number
with my keyboard 0.7. If I press Enter, that's give me this number. I feel bad. Variety number for
the Rubik's Cube material. And now we can
create other colors. If we want to
create more colors, we can press this Plus button. And we can press knew. We have new material. Let's name this red. We already tried to
create red color, but we didn't succeed. So let's select the face, but we would like to work on, we can press this. Let's change the color
to some kind of red, maybe something like that. And let's increase
the roughness. Great. And you can see nothing habits. Because we didn't
assign the color. And we created the color
of beds perfectly fine. The color is here, but it's
not assigned anywhere. So if I press this phase, and if I select red
and if I press a sign, now we have a color. It's my little tricky at first, but let's practice even more. Let's select this face
and let's make it green. Let's make it
green. We'll create another color by
pressing plus brace new. Let's name it green, because we wanted to be a
little bit more organized. Let's change the base color
to some kind of be green, which virtue like maybe
something like mad. Let's change the
roughness to 0.7. Something like that,
and press Assign. Easy-peasy. Let's make this, let's make this blue. Let's press the plus button. Let's create a new material. But we don't necessarily
need to create new. We can reuse the
existing materials. Here. You can choose the
material that we created before. For example, if I choose red, it created an average material. It's the same thing like we
lend in the duplication part. Where we duplicate the cubes
with shifty and algae. This is the same, this RED uses the same data
from this red, but we can press this and it creates a new
material, Red O one. But we can rename it to be blue. And that's our blue material, but it's still red. We can change the color. That's not a problem at all. We can change to
something like Matt. But we already had set the brightness material because we copied all the
information from that. And don't forget to assign. And now we have a blue material. Let's quickly create
an materials. We have orange material. So plus, I will go a
little bit faster now, I will select this
face to create menu. Let's name this orange. Let's make it orange. The side. Let's make
what colors do we have? We have white color. We can adjust this. If we need more space, we can move both lighters, new material, reuse this
breastfeeds to create new. Let's make it white.
Let's make it white. White is in the middle here. If that's not your
white, like you want, you can just met
with these sliders, mats, your whites,
and we can assign it. Now we have mostly
all the colors, whereas one left
and I'm looking at my Rubik's cube and
that's probably yellow. Let's create a new material
which is going to be yellow. Let's choose any material and let's change
the color for it. Yellowish. Okay, we have the roughness
value already said. We have set and let's assign. Now we created all the
materials for our cube. I will go into object
mode to see it better. We have everything, but
it looks really bad. I have to see it has most sharp corners in which
we do not like that much. Usually in the real-world, we don't have that
many sharp corners. We can bevel both, but that would be a little bit painful process
and a lot of manual work. But luckily, blender has modifiers and we
can add modifier. And actually it has
the bevel modifier, and that's the bevel modifier. If we slide this, you can bevel the corners. You can increase the
segments of battles. But in this case, bevel one give me
rounded corners, but I would like. We have another modifier which is called the
subdivision surface. It's subdivides our objects. And if we go into the edit
mode by pressing Tab, you see that's our object, looks like that, but it just subdivided and it
changed quite a lot. That's not exactly what we need. First, I would like to increase the levels of viewport to two. If we increase met,
it goes smoother, but we don't need that
many subdivisions. Let's keep it at
two, maybe three. We will see in the
process how it will look. We can actually sub-divide it
a little bit more manually. If we press a on the keyboard and we select all we can
press right mouse button. Here you can see subdivided. And what makes it makes more geometry and more geometry
makes it more accurate. Now, it is closer to what
I would like to achieve, but I think I need
one more subdivision to have the look that
I would like to have. So I will press a to select all and sub-divide
it one more time. Now I have quite
enough geometry. This looks quite good. It's actually very close
to the Rubik's Cube, but I would like to achieve, we can press right mouse
button and choose sheets, move and it will
smooth our object. I think we need to
increase this to free to have a little bit
smoother experience. So I will increase the
level of the subdivision to free on viewport
and on the Render.
15. Array Modifier: From this cube now we can
create the actual Rubik's cube. We need to duplicate it
a couple more times. For example, Alt
D and move it on x-axis again and move it on x-axis and duplicate
that 27 times. And that's not exactly
what I wanted to do. I will get back by Control Z. Luckily, we have another
modifier called array modifier. This one allows you
to do a lot of stuff. For example, I can
increase the count to 42. And now I have a long
line of Rubik's cubes, but we need only
free at this time. And we can offset it. We can mega lot of things, but opposite is going to be one. In our case, we
need another row, two on the y-axis. So let's add another modifier, fire another array modifier. Let's make it count to
three because we need three rows and let's
change but x to 0. But let's make the y at one. And now we have the ground. We need an adverb
modifying one more. We can add num one or we can just duplicate this
by pressing Shift D. Or we can select this and
press Duplicate. Again. We need free. This time we need one on z-axis. Let's say we have our cube. I hate to save ad, but we finished modelling a really simple object and we model it in a
couple of minutes. But before morning, I would
recommend to save this file. So file save, and we'll name it. Rubik's Cube, zeros 01. I will save it. Now every
time I would like to save, I can press Control
S and save it. We're going to apply
array modifier because we are not going
to change anything. We will have the
cube free and free. I'm free, basically 27 cubes. But if you want, you can increase
vet and you can, for example, have
five on five on five. That would look very different
in the Doo-doo-doo-doo. Whereas my last
ray here is this. If I want five on five and
that would be huge cube, I will get back to free
and free and free. And we will apply the array modifiers because we are not going to change that. Here it is free
and free and free. I will keep the subdivision
modifier active because we might need to reduce
the subdivisions. We can apply that by
pressing bys and apply. Or you can see the
shortcut Control a. So I will press vista
apply and hammers, I will just press control a. That's it. One more thing, blender acts on the tabs on which you selected. For example, if I
press Control a here, it won't apply anything, but if I press
Control a heat here, it will apply my modifier. So let's keep your mouse on the things that you
would like to work on. Because sometimes I see people try to make
something to bear cube, but we're mouse is somewhere
on when different tab. And that will work. So that's the solution to some problems that you
might face in the future. Yeah, so now we apply it with array modifier and
we have our cube. Yeah, that's great. One more thing, but I would like to change in this lesson, we have this origin point, which is on our original cube. And our objects change bear position-based on
the origin point. For example, if I'm going
to write it, we cube, it will rotate on the
position of the origin point. I would like to move batch
to the middle of the cube so I could easily
rotate it at any, any point I want. It would be easier
to work with that. We can change this, but we have to go through a couple of steps. First, I will go into the
Edit mode, select all, and I would like to separate every cubed to the
separate object. That might sound complicated, but if I press P, I have this option to separate. And usually we use
separate selection. It will separate
selection from the object and it creates a new object. But we will separate
it by loose parts. And that means that we have those 27 loose parts that we
created with array modifier. And it will give us basically
27 different cubes. So here you can see that
we have 27 different cues. I will go back to object mode. I will deselect everything. I will select one cube because I want to select the
cube in the middle. So I will press H
on my keyboard, and that will hide. With cube. I will
select this one, go to the edit mode. And if I select all, and if I press Shift S
cursor to select it, it moves my cursor to
select that object basically to the
middle of my cube. In the middle of middle. The middle of the middle,
I can press tab again, go to object mode, but I have missing cube. I can easily enable
it by pressing Alt H. Now it shows all the
cubes where hidden. We need to select everything
except those objects. Let's deselect those
by holding Control. And we can go to Object, set origin to 3D cursor. And now all of those cubes
has origin at the center. So I don't need all of those cubes in separate
objects anymore. And I would like to join
them into one cube. So I will select all of those. I need to select one separate. It doesn't mean which one. This is just going
to be the main cube. And if I press Control G, it will join bed into one cube. Now we have the cube
and we can rotate it. The world, the origin
of it is in the middle. And that's exactly what we need.
16. Background: Now when we have everything
ready modeled in the cube is basically
prepared from for rendering. We can go into
camera and lighting. Let's go into the render mode. And here you can
see how it looks, how this cube looks with our lighting and
with our camera. I moved my light a
little bit because it doesn't allow me to
select all the cubes. I don't know if I got it it
from from what I did or not. But just in case if your light
has a different position. I moved it a little bit. Previously. We have a camera and we can go into
a camera view by pressing 0 on the numpad. This is where our
camera is facing. We can adjust the camera view
like we do with everything. We can select the camera
and we can press G, grab it and move it. We can press G on z. And if we press Z again, it will lock with z axis of the camera and we can go away, but we can make it a
little bit different. We can hover in our, in our viewport, find
the angle which we like. For example, I like this angle. Maybe. We can press Control
out and numpad 0. Now our camera and just
jumps into this position. If we press G, we need
to select the camera. We can select it here or we
can select it like that. And we can move it
to somewhere here. If I press numbered one
here, the front view, I would like to move
this cube a little bit up to match baseline, basically 0, bad, basically
the center of our world. Easy board. So I'll press GZ and I will move it a little bit
up while I'm doing this because I will
add the plane as my background and it
will appear here. And I want this cube to be basically standing
on this plane. So that's why I
needed to lift it up. As we speak, we can add
this plane and it is going to be our background
because now we have this interesting view. But before that we
can press Shift S. Let's set the cursor to
world origin because we changed the cursor settings
to the middle or the cube. Now we need it at
the world origin, where all the axis
teams together. Let's say like that. Let's add another object, press Shift a, and
search for v plane. We can scale it up. As you know, it's
the shortcut S. And we can scale it up by a lot. That's going to be good for now. We can go to our camera
view by pressing 0. We will adjust that
a little bit later. But now let's set up with
background a little bit. I'll get like wet. I will rotate our
plane on z-axis. I'll press R and Z. And I will rotate it like Matt. I will go into the top view by pressing Seven on the numpad. Now in the top view. And now I can press G and
move it a little bit to here. Maybe you can scale it
up a little bit more. Did here. I will go into the
edit mode by pressing Tab to the edge select mode. And I will select this
edge. I will extrude it. As you remember with
shortcut for extrusion is E. I can extrude this edge. I will look it up on the z-axis. So I'll press Z and
I will look it up. Something like that. I have this view and now all my world is
blocked by this plane. So I have this nice backgrounds. But I have this very rough
edge which I don't like, so I can bevel it. So let's press
Control V, bevel it. And let's increase the
number of segments. Quite a lot. I don't
know how many beds. Six probably. It doesn't really
matter that much. And if I go into
the object mode, I can see it and I
can press Shift, move to make it smoother. And let's go into
the shading tab. Add a new material. Let's name it Vg
as a background. And let's make it dark. Let's make it black. And let's increase the
roughness a little bit. Let's try at max at first and we will see how
it looks in the process. That's how my cube looks like. Right now. I can move my camera
a little bit up. I think.
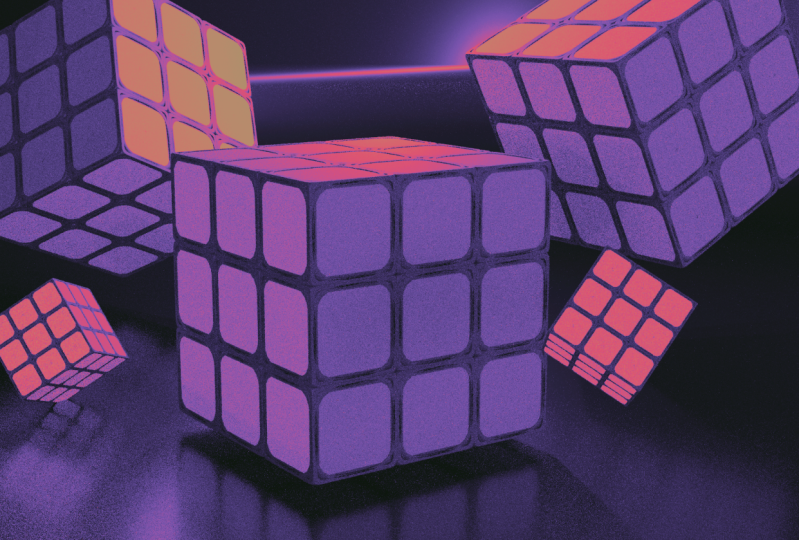
17. Lighting: We have a really simple object
in our scene and varies, not that much to show. So I would like to
make it a little bit more stylized and I will work a little bit more on
the lighting to give more character
for this object. Let's talk about the
lighting a little bit. We have many ways how we
could light the scene. First, let's go to
the render view. And that's how our object
looks like in the render. If I press number 0, this is how it looks. In our scene. We have one light, it should be this one. And let's go into the
camera view by numpad 0. And if we go if we go to
the lighting settings, when we selected the light, we can adjust the
power bar of a slide. For example, if I changed
with our 50 watts, we have less light. And if I change by
two pi 5 thousand, we have quite a bright light. If I select this and I will
need to select the light. And if I press G, I can move a light and our scene is reacting
to his slide. Bad grade. But for now
let's delete this slide. Just select the light
and I will delete it. And we still have
some light bands because we have our
background lighting. Let's go into the shading tab and let's select
the render view. Here we can change the
shading view to the world. And you can see that we
have the background, which has the dark gray color
and the strength of one. If we change the
color, for example, if we make it white, we have quite a good
lighting already. That's how our render
would look like. If we change the color to
something like greenish, we will get more green light. On the other side
of the spectrum. We can add. We can change a lot, but the great thing about
the background light is wet. We can add the image or even HDRI and we can get white
realistic lighting. For example, if I
will press Control T, here, I get more option. It will enable my
environment texture. But if it's not working for you, Let's go to the
Edit Preferences. The atoms and search
for Node Wrangler. Most likely what it is disabled
in your, in your blender, so enable it and
you will be able to add this by selecting this
node and pressing Control T. This environment texture gives us an option to add an HGRI. I would recommend you to
go to the poly haven. Here you can find HDRI textures, models, a lot of stuff. Here, you can find a
lot of environments. And I would recommend
you to download few uploaded to your blender and see how everything looks. I would like to get the
night environments and some kind of the city and maybe
this one, Shang Shanghai. I will download it. I will upload it to my blender. As you can see, my cube already
looks quite good. It is lighted and we have many lights from
his three basically. That's quite realistic. One thing about
environment texture, it doesn't cast the shadow on. And let's talk a little
bit about render engines. We were working in EB and
we will switch to cycles. What's the difference
between those two? If very simplified,
EV is very fast, but it's not that realistic. It's a real-time engine and the, it gives a fast results, but it's not wet realistic. And in our case, it doesn't cast
shadow from the HDRI. Recycles are very realistic
rendering engine, but it is wasteland
where have an EV. Sometimes we want to work
in EV and to render in EV. But since we are
making a still image, I would recommend to
change review two cycles, we will get way, way,
way better image. I will choose the cycles. Here is a couple of settings. We'll change that to GPU compute because they have
a GPU on my computer. In the viewport, I will
change my samples to 512. Here on the render, I also change it to 512. Or maybe I will change
the viewport samples to be something like 64 or 128. I will keep it at 128. If it is acting very
slow on your computer, you can decrease
viewport samples to something like 16 or 30 Jul. That's totally fine. We'll look, we'll be a little bit grainy, but you will see the details, but you need to
see another thing. Let's select the cube, go to the modifiers and we have a level on the viewport as free, we can decrease that
and decrease by a lot. I will decrease at one. And if your blender
is still slow, you can decrease it to 0
even it destroys our cube. But on the render, it's still set S3 and
it will render as free. You just see it a
little bit different. I will set to one. I will have a lower
resolution on my viewport, but in render it has the normal resolution
that we already set up. That's how we can make our
viewport a little bit faster. And you see that we have
a shadow, we didn't, can't bet in EV, I will switch back
to EVA real fast. We didn't have it. And then cycles we have it. That's really great. And here in the mapping
on the Z rotation, we can change the
direction of the shadow. So for example, I can, you can see that
my background is moving and I will
change the shadow too. Maybe this angle, I think, I think that looks good. I'm going to my layout for now. We can actually add
the shading here. Blender is very adjustable
and you can create your own windows in
the way that you want. We enabled shader editor here. We can change the world. We will have those
settings here. We might need to change the strength or
the HDRI lighting. I will keep that at one for now. We're just looking good. Our cube is in good. One more thing, I will add
another screen on my blender. I can do that. You can see
if I slide it to the corner, I Canvas Plus button, and if I select it, and if I drag it, I can have multiple windows. I can add more. If I need to remove it. Again, I can go into the
corner and if I slide it, I see this arrow. It will dissolve the window. It needs a little
bit more practice. It's sometimes it's
tricky, but it's working. And that's very helpful. So in this window I will share my view without relighting. Here, I will have a look how everything is looking
on the camera. So for example, in this view, I will press numpad seven and I will look at everything
from the top. So here I have a camera, I can scale it up. It won't change anything. Just have a bigger icon. Basically, I can select
your camera, press G. It is way easier for
me to move on machine. We became, I see where
it is and I see how everything looks
like in my renderer. So We'll move my camera
a little bit back. And I will press G and Z. I will move my
camera a little bit up. That's great. I will duplicate this group and I will create two more cubes. I think that free cubes will fill the scene a
little bit better. So I will duplicate this cube
with Alt D. It one degrees my performance on we've
seen that much because we will use the same
data from this object. I'll D will place one here. I'll, I'll place an array here. And that's instantly better. Now I think we need to rotate
those cubes a little bit. So I selected this. I will press R, and let's
rotate it on y-axis. And let's rotate it 90 degrees. So I press 90. And I noticed one
thing that we have two yellow colors on the cube. Let us go into the shading tab and we have green
color, which is yellow. Here. We also have the same problem. And I see that I use this color. At, at two parts. So I can select this. Now I can change this to
green. Nothing changes. So let's select our cube. Let us go into the editing mode. This has happened because we didn't assign this material
to any part of this cube. For example, if I select
this and if I press Select, it selects all the
parts of a cube which maybe it will
be more visible here, which are assigned
to this material. We need to assign
this material to this part of the
cube or risk part. It doesn't matter. I'll get back to machining
view and we'll press L here. It selects the linked mesh. But we can expand this and
we can change the material. Now it will select
well-linked material. If I hover above
this and a breath l, and here and here, and here and here. I will select all of those. I will go to my green material
and I will press Assign. Now we have a green
material on this one. We fixed the problem
very quickly. Now it fixed. I will get back to my
camera roll by number 0. That looks good. Let's rotate this one, and let's rotate this one on x. So maybe 90. I think we have too
much yellow color. So I will rotate this on Z
because we have yellow color, color here, yellow
here and here. So our Z, I will
rotate it like that. Maybe to something like different angle because
both have the same angle. I will rotate this one a
little bit to me like that. I will move this a
little bit to this side. Right here. I would like to cover a
little bit both of us. We have our scene and we need to make it a little bit more
interesting with lighting. If I press Shift, I can add the light and
we have point light, sunlight spotlight
an area light. I will add the point light. I will press G and move
it behind this cube. And if I go to reside view, you can see what my light
is a little bit too low, so I will press G and Z. I will go into the
lighting settings here. When I selected the light, I will increase the power by
large to something like 500. It's not even visible
yet on our render view. Oh, it's not render view. Here is Burundi review. Here. We will have a better
understand what's happening. I will power it up
to one, maybe 1500. Now we have a little
bit of lighting. I will change the color
to something like bluish. Light will give us quite a nice shadows from
behind or the cubes. And I will duplicate this
lamb by pressing Shift D. And I will add another
one in somewhere in here. And we already see those
shadows behind it. That's quite nice. Maybe I'll increase the
power to three files and I will see how it
looks. It looks like. I think it looks better. I will increase the
radius a little bit to something like one meter, and I will place it here. I will do the same with
this 13,001 meter. Now, we have some, some lighting from behind. I can try to add another
light behind this cube, but it might light
voce cubes too much. But let's try to do that. Shift D. I will add this one here. I kind of like it. Maybe here it gives this
interesting shadow. And that's really interesting. I really like how
this looks now. But I see, but that voce
do cubes are better. Let it when the main cube, which is a little bit
darker than both. And I think that we could
add two spotlights. Or to realize facing this cube, I will go into this view and I will press Shift
a and search for light. And I will add an area light. I will write it in my
view a little bit. Or maybe ONE, get back to a
top view with number seven, I'll press G, I'll
move my lambda here. I will rotate my view
with middle mouse button. I'll move this lamp
a little bit up. So G and Z. I will rotate it with our now it should
face the main cube, this lamp, it's only turn watts, so it's not powerful enough. Let's one-bit up
to something like 500 or maybe even 1500. And change the color
to something bluish, maybe more bluish,
something like mad. And let's agrees besides
of it to make it softer. Let's have a look from the top. I will rotate it a little bit. Maybe I'll move it to somewhere here and I will rotate it. Let's change the shape just to disk at one camp both corners. And I think this slide is good. Maybe we can move it more. Doorway is besides select it and move it to this side. Looks good. Let's create another one. So we can just select this and press Shift
D to duplicate it, move dirt or deed it. Let's move it somewhere here. I will change the color
opposite spectrum to something orangey. I will try to adjust to
face my main QB better. And I think that's it. One more thing, I like more contrast in the
scene so we can go into rendering settings and
go to color management. In here you can see that we have coupled
settings and I would like to change the look to medium high contrast or
even maybe high contrast. And I think that
would look better. You can adjust the
exposure if we want. But I will keep that at one. We default midterm. And if we have our picture.
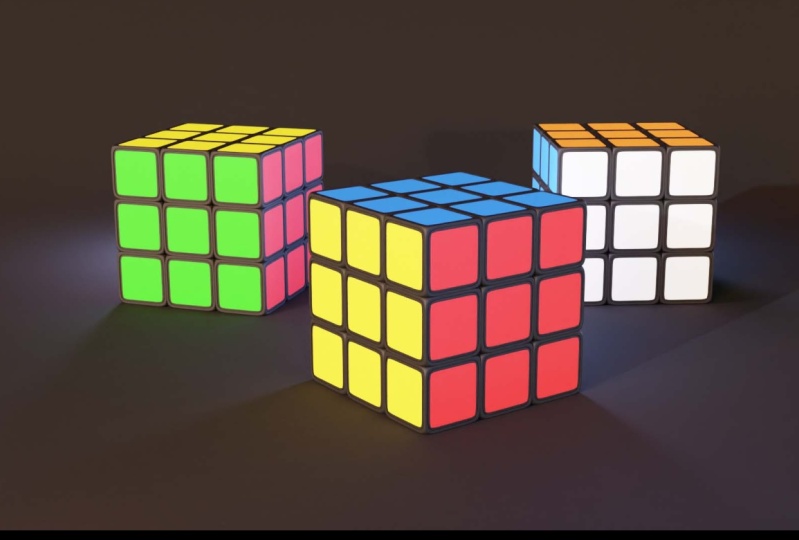
18. Rendering: No, I think we can
render our image. We can go into our
rendering settings. We basically have
all the settings set up here in the rendering
settings we can, you can change these samples if you think that it is
rendering too long for you, or you can go into resolution and decrease resolution
or increase it. And another thing, if you
go into the cube settings, you can decrease the
number of subdivisions it wanted to impact
your image that much, but it will boost
your render times by a lot if you decrease it
to two or maybe even 21. Adjust your settings
based on your computer. And I have quite a good computer and I will render
in both settings. To render, we can go to
Render and render image, or we can press F12. So I'll press F 12 and
it will render my image. It took me 35 seconds
to render this image. And I really liked result, I think is going to
be my final image. And do we can go to Image. Save As we can navigate
through your folder. Name it. I will name it
Rubik's Cube render. You can call it as you want. I will just save the image. My image is on my
hard drive right now. Here is how it looks.
19. Outro: So congratulations for reaching vandals this course. I hope you way more confident in Blender now. And if you created something interesting shared on social media and tag me as, as Bill GA, I love to see my students work on land. And the ones I am. Congratulations, and see you in my next course.
 Gytis A., Motion designer