Transcripts
1. Intro: Hi, I am liters, but you probably know me as, as-built J. I'm lattice
unit discourse. We are going to create
this scene and lender. This course is designed
for beginners. I will explain every step I do. But if you have
never used Blender, I recommend watching
my beginner course here on Skillshare is a short and simple course
where you will learn all the basics of Blender
Vegemite need in this course. In this course, we will model
this bicycle and we will create the night
bridge environment to have a nice composition, we will focus on
techniques to model most parts of the bike
from only one vertices. We will study different ways to apply textures and
great materials. If you follow me
through this course, you will read this scene. So let's begin.
2. Setup the Reference: So I would start this
project by searching for a reference for a bike because we need to know
the proportions for it. So I just searched on Bing. I know we use it's being but it gives me
pretty good results. And I search for bicycle
blueprint, blueprint. And they gave me both results. And I need some kind
of some kind of a bicycle blueprint
or image from beside. So I could easily get the
proportions of the bike. I like most suppose I really like this one and I
think I'm going to use this. This one is good. This one is really good. This one is weird, but it's good if you want
to make this type of bike. This one I think is the
same like this one. And can just go and see
what, what you like. And you can even choose
the bike off your own. Principles of modelling
the bike will be the same. So you can choose a
different image if you want. It will be slight difference. But if you want to
make the same bike, I will choose this one. And I just save image as, and I will save it
to my computer. So now we can import our
image to the blender. And before doing that, I will delete all the
objects from my scene. So I will press a to select all and I'll
just press Delete. Now, I will press
numbered free to go into the side view and I
will import my image. I'll just drag and
drop it into here. And it is important. I've already named
this image too. Object, which is
imaged to reference. So let's be organized and we'll rename this
collection also to reference. If we will have
anymore references, I will put everything
into this collection. And to move the reference image, we can just select
like any other object, press G and move it. I'll move it somewhere
in MS center like that. And if I press number one, but it's going to
be my front view. But I would like
this image to two. Basically, I would like
to flip this image, would like this bike to look
into the front to back. So I get back to a side view with numbered
freeze, my number three. I select my reference image, I'll press S to
scale and minus one, and that flips it, which is not good. So let's try as y minus one. Yeah, S lock it on the
y axis and minus one. And that will work. Sometimes it's
tricky to do that. So I needed to try
multiple times. Anyway. So I will go to my image
properties and I will change some settings because now this image is
blocking all review. I will quickly add a default Cuban centers so you could see
what's happening. If I'm, will start to model something and my model
will block the reference. That's not the ideal thing because I'm not going
to see what's going on. The reference in this settings. If I select the reference image, I have this image settings. And I can change some things. For example, depth. I can change the deaf
from default to front. And now my image is going to be on the front all the
time, which is good. But now I can see
what I'm modeling. For example, I can see this cube and that's not ideal ligand and we can adjust was
also an Opacity option. If I click this and
I will decrease it. Now, I can change the opacity
of my reference image. And Ireland need
very bright image. I, something like 0.25
is perfectly fine. I see all the details of a
bike and I can model it, model on top, so
that's really good. And the last thing I want to see Vref reference image only
when I press number three, when I am looking
from this side, either need to look at
the reference image when I'm at this angle because it's not
gonna be accurate, I will check this on the x axis aligned and islands he was referencing management
and modelling something into this angle. But if I press number three
and I'm in the side view, I see my reference image, which is really good. Now, I will delete the cube, which I mean for
demonstration purposes, I will select my image and
I will try to center it better because now
I can see my grid. But so I'll put it
somewhere here. And I think it's
pretty centered. The last thing in this lesson, we'll go into this filter
and enable this arrow. And now if I disabled this
arrow from the reference, I will not be able to select
my image accidentally. For example, if I
select something, I will not be able to select
my image and move it. So it stays in the same place, which is important for
the reference image. And now, once we set up
the reference image, I think we can start
modelling the bike.
3. Model the Frame: I think we can start
to modelling the bike. And I will start from
modelling with frame. And I will have a little bit
weird technique for service. If intuitively, we would add
cylinder for both objects. But we are going to start
modelling from one vertices, which might be looked weird
at first, but it actually, that's a really simple
method pump for modelling. So to add one reference,
one vertices, we can add any mesh, plain cube, circle, any. For example, if I add plane
and if I go into edit mode, I can press M and merge
everything at center. And now I have one
vertices from this, from this object so I can move it and you
can see it's here. I'll bring move my
vis plane object. It works with any objects. For example, I can
use UV Sphere, go into edit mode m,
merge and center. Now I have one vertices
which I can adjust, but there is an easier
way which I prefer. So we can go to preferences to Add-ons and the add-on menu. Let's search for extra. We need extra objects. So if you select this, now, if I press Shift a, I will have more objects, which It's kind of cool. We have extra objects we
wish we didn't have before. And the most important
thing in this, we have an object which
is single vertices. And now we can just
add a single vertices. And we can work with this. So whatever you prefer, you can use this
extra object menu or you can add the vertices
by adding any object. So I will get back to
numpad free and I will move my mercy seat to
some where here, and I'm going to extrude it. So I'll press E and
I will extrude it. If nothing happened for you, it might be that you
are in object mode, so make sure that you're
in the edit mode and you are in the
vertex select mode. Because it happened to me when I was in face select mode
or something like that, and I couldn't extrude this. So make sure that
you are using both, both to edit mode and
vertex select mode, and everything will be easy. So I have this
part of the frame, which is good, and I need more, I need another frame. Maybe let's do this one. And I think this one
is going to be one. I will make a separate one. Because I think this one is a good idea to leave
it as a separate object. Again, we can press Shift a mesh single vertices
at Singularity. See, it adds in here, so I'll move it to here. And I will extrude it. And I will extrude it like this. So I have an ANOVA
part of the mesh. I have this and I have this. Now we need this. So this shift a add vertices might be a little bit long
way to add a vertices. So we can make it
simple, even simpler. We can go into any mesh
which has vertices. We can select from texts, press shift D, cancel,
be separate selection. And now I have another vertices which is
only one word vertices. I can go into edit mode, press G, mold it into
place where I want it. And I can use this one, but feel free to add
it from the Mesh menu. So I'll extrude it
to some way here. And I will extrude it to here. And before making
this part of a frame, I think we can add the bevels to this areas because if we don't, we will have some problems
on both hard angles. So this and this, we need to bevel
this a little bit so we can press
Control B to bevel and v to enable beveling
in, into this vertex. So b and v, I'll keep it like that
with four vertices. And I will move it
a little bit back. And I will go into object mode. I will, I will select this
frame parts of a frame. And I will bevel this one too. So I'll go into the Edit mode. Select this pink, it's
selected too much. This one, this control B. Nothing happens if I press
V to babble vertices. Now it works, just
something like that. And I will select
those and I will move over a little bit down. Now let's create this
part of the frame. Again. I will select this, go into edit mode, select these vertices Shift D. I'll place it somewhere
here, go into it. I made a mistake. I have this but I
didn't separate it. So P separate selection. And now I have a separate
object, which is this. And I can select this. But again, if that
will work for you, you can just go Shift a and add the vertices in the way that we
did in the beginning. So I will move it to here. I will extrude it to here. And now we have this part where we'll come up and this
will go like that. And we don't have a reference
for how wide it should be. So I will go into
the front view and I will extrude it to
the side a little bit. Maybe like that. This might work. And I will add a
mirror modifier. And now when I'm going
to extrude something, it will mirror to
the both sides, which is really good. So I'll get back to
my reference image and I will extrude it to here. So that looks like that. It's very stiff, but I
think it could work. We can bevel this angles, so Control B, P. A little bit. Here is also, we need to add the mirror modifier to
this part of image, because here's
going to be a wheel and it can go straight through. But we'll we have this part of a frame in
both sides of the bikes, so we'll do the same. I will go into the edit mode and I will add a
mirror modifier. I will select both
and press G and X to move it on the side. And it is splitting. I don't know how wide
I want it to be. I think I'm going
to split both true. So G and X just lightly. And this one to g, x but very slightly, it is possible that the wheel will come
into interests mesh. So we might need to
add more geometry and make it not straight
and a little bit angled. But we will see that in future. So we created the base
and now we can create an actual mesh from false shapes because it
has some frame off a bike, but it doesn't have any mesh. We can select all of those
by pressing a and objects. Transform shouldn't
be somewhere here. Convert, not transform and
converted to the curve. And now all of those
vertices became curves. And you can see we have
both curves options. And if I go to the side view, let's select, for
example, this one. And let's go to geometry
and to the Bible. And if I will increase depth. And now I have both curves with some bevel
which looks like a pipe, and it works for our bike. If I will select another one, I can do the same. But i'll I'll have a look at
my reference. Number three. How thick both pipes or
something like that should work. I can select this one. And again, I can
increase the depth. Maybe we could do this in
this separate objects. For example, this one might be a little bit thinner
than this part, but let's keep it
this way at the edge. For now at least
this one is going to be thinner than a mirror. Other ones and
something like that. So that's quite good. We have the frame of the bike and we can
create either details. But before doing that, let's save the project
and don't forget to save once in awhile
if something happens, you don't want to lose your
approach, your progress. So file and save, file, save as save as increments. So maybe we'll be able to share what working
files we view. And some increments and beds in vet will be easier for you to work
invest in West Point. So I will save As and I would recommend to save the
project for you to control. S is the shortcut for saving
just for you to know.
4. Model the Wheel: So now let's create the
trickiest part of the bike. And that's going to be
wheels out-breath number, free to go into the side view. I will select this part. I will go into edit mode, select this part
and press Shift S. And I will select
cursor to select it. And now I will have my cursor
right here in the center, and I will create a new object. My objects will appear in here. So I'll press Tab to go
into the object mode, and now I will press Shift
a and I will add a circle. So this is a circle, but it is placed in space. Is it the right
board horizontally? We need to rotate
it and we need to rotate it on the y-axis. So our, Let's lock
it on the y-axis. So why 90? So now we rotated it. Let's get back to
the side view by an MP3 and go into
the Edit mode. So tab. And we can scale it down. Just something like that to
match the reference image. So now I will go a little
bit to the front view. I will rotate my view
a little bit and I'll add mirror modifier. And now I will move my wheel
a little bit on the x-axis. So g and x, Just some way here. But Ireland see the
mirrored object. So I will pick this, pick whip, and I'll just pick this three, which is the base
of my, my bike. Now I have another circle
which is mirrored. And now I would like to set
the thickness of my wheel. I think this one is to fix. So I'll press G and X and I'll move it a
little bit closer. Maybe something like that. I'm maybe a little bit thicker. So g, We don't have a
reference image for a bit, so it's a little bit tricky. But I think we will find
the right, right spot. I think this one is good. And now I will press best clipping because I
will extrude my wheel in. And I want both extrusions
to clip together. I'll press E x and I will move in until it
will touch one another. Now be clipped. And we have a base of our wheel. We can select this
part of the wheel, this outside part of the wheel, and we can press F to fill it. Let's go back to the
side view right now. And now I will insert this wheel into up to this point
somewhere around here. So I'll press I and I will
insert it somewhere here. Something like that should work. And I think we can remove this, this fill in the middle. So x and delete faces. So we have something like that. Now, again, I will select
this outside loop, so I'll select this
back by holding Alt. And I will extrude it
a little bit insight, but I'm not I'm not going to touch both sides together yet. So let's extrude
it a little bit. Something like that. Let's have a look
at the reference. And I will, I will insert it and I will make
the same steps again. So let's press Fill. Let's insert to this point. So let's insert it. Something like that. I'll delete faces. I'll select this loop with Alt. And now I can merge
those together. So e. And until we touch it. Each other. I will go into edge
mode to see it better. And I would like to add a little bit of
bevel tourist wheel. So I will select this
part and press Control B. And I'll move it, move my mouse a little bit, and I'll add a
couple of new edges. I'll select this one, this loop, and I'll do the same control
B, something like that. Maybe there would be an atom
if we have this one here, again, Control B,
because this berry O, I pressed V, by accident. This fixed it. And
this one, Control B. Something like that. And here
I will add a couple more. That's more edges. Probably. That's the right word. And now our wheel is going to be a little
bit more smooth. We have the base of the wheel, and now we need to
create those spokes. And that's the tricky part where where it's
kind of difficult. And at the same time, if you know how, how, it's kinda, it's really easy. So I will create a new circle. I'm rotated on, on x, on y axis. Again, 90 degrees are why in 1990 are why 90? That's 90. Go back into the side view. I will go into edit mode
and I will scale it down. I will fill this with f, and I will insert
it to the center. Now when I inserted it, I have voce kind of
spokes that we need. We have way too many spokes. So I can, I will try to
deselect half of it. So I will go to
select and deselect. And now I have selected
only behalf of those folks. I will separate vote. So B, separate selection. And now I have two circles. I can hide the first one. I will need only
this second one. So the first one,
I can delete it. Actually. Then I'll go into edit
mode a little bit. And I will delete both
things that we don't need. We need both spokes. Probably various an easier
way to select those, but I don't know how so. I'll delete those edges. I'm wondering. Yeah, we have if they're
the same things. So I'll select those real quick. Maybe I will select all. I'll press Control. And I will deselect those. Yeah, That's mismatch. X and edges. Now if I select all, I have only votes. Yeah, there was a smarter move. But it took me a little bit
of time to figure it out. Great. So we have those spokes. And if I will look at
from the side view, you can see that they are
straight and by the end B, they are kind of rotated. If I go to this
edge select mode, we can try to replicate this. So if I select only those
vertices in the middle, I can press R and I can rotate those
two, something like that. I will eyeball it. You can, for example,
be accurate. And let's try to be accurate. Let's rotate it by
minus 60 degrees. So it looks like that. Now we can move it to the site. So g, x, something like that. So that's kind of
good-looking spokes. I'll go into object mode. Press shift D to
have another one. And I will, I would like to
move it to the other side, so S minus one. And now it's rotated. If we will look from the side, we have all of those books. We just need to. Take this one and rotate
it to the other side. So let's go into the Edit mode. I'll press F3 and our 120, so they will be rotated 60
degrees to the other side. That's looking quite good. I think. So let's select both together
and we can join them. So Control G. And now we will have one object. Let's rename it. I have caps enabled spokes, and this is going to be, we'll have a good
naming is kind of important because when you
have a lot of objects is quite difficult to find which
circle is which it's, it's a good idea to have a good naming at first,
at the beginning. So I will select my spokes. And again, we can
convert it into a curves and bevel it
like we did before. So let's select this box and press Object
Convert and to curve. And those folks are curves now. And we can go to this menu. Where is the bevel and
increase the depth? I'll press Shift to have
smaller increments. Because I need both tiny. And that looks good. This middle part is
not the greatest, so we will add new shapes. So shift a cylinder, again, rotated on the
y axis by 90 degrees. Tab into edit mode and scale it down to something like that. We can scale it down even more and scaled up
on the x-axis as x. Something like that. To merge this together, it looks way better, right? So we have our spokes, we have the wheel, and we can select all
the parts of the, we'll go into a
side view and press Shift D Lockett on the y-axis because I want
to be on the same level. And let's move it
to another wheel. So we will have two
wheels right now. And that starts to
look like a bike.
5. Modeling the Handlebar: We have quite a good
base for our bike and we can start to
create smaller details. So maybe let's create a wheel. I'll get back to side view. By number three, I'll just jump into the ED
mode real quick. I will select these vertices are at this point of the curve, and I'll press Shift S and
the cursor to select it. And now when I will
create a new vertices, it will appear at
exactly at risk plays. So shift a mesh single
vert, Edison Gilbert. And now we can extrude it. Again, make sure that you
earn in the edit mode and new wine at vertex
select mode grades. So I will pick this vertices, press shift D, release, go into object mode. Oh, I forgot. This one. Be separate selection. Now I can go into Object Mode. Move it here. Go into the Edit mode selected, extrude it to somewhere here. And now, again, I will have
to create a steering wheel. It's not a steering
wheel. Handlebar? Yes. So bike has a handlebar? Of course. Yeah. So I'll have to create this handlebar
without any reference. So I'll press, I'll select these vertices and I will extrude it on the x-axis. So e and x to some thing
like that probably. And I will add a
mirror modifier. Where's my mirror? And it looks like that. If I go to the side view, you can see that it's
not perfectly straight, It's a little bit curved. So I'll just look at the first. It's a little bit straight man, corrupt and bills
and straight again. So let's subdivide this part. And then now we will
be able to adjust it. So we have a little
bit straight, then a little bit curved. So G and y. G and y. And this one, g and y. Straight. To make
straight again, there's look like a
bicycle handle break. Maybe let's suggest where the Z position,
something like that. This one to G. That could be quite good. I think. Maybe it's too small. We extend this
part a little bit. Again. I will select this and I think I will extrude
it all the way along. I fought about creating another kind of pipe a little
bit smaller in diameter. But I think I will
extrude the same curve. Tilly here. So e, e and probably like fat. How does it look? It looks okay. Let's convert those into the, into the curves and
convert to curve. And the curve editor, we can change, bid up the bevel. So if we will hold out, it should change the deaf
for both for both curves. Yep, it does. Something like that.
How does look? I think this one
should be a little bit thinner than like Matt. And we have those empty
ends of the pipes. So if we press this fill cap, it will fill those ends. So we can do with
all of those El Cap. Do we have any empty parts? And this one probably to camp.
6. Modeling the Seat: Now, let's try to create
receipt for my school. I don't have a say top
preference for it. So I'll try to make it in the way that I
think it looks good. Luckily, we have some
kind of beside reference, but I will simplify a little
bit. We'll see how it goes. So I'll select this one. I will select this point. Maybe I'll make it
a little bit lower. And I'll press Shift S to end
cursor tool to select it. Now, I will add a planes, so shift a plane. And I will go into the top view. Of course, our plane
is way too big, so I will go into the Edit mode. I will scale it down
to something like mad probably or maybe
even like that. So I can move both on y-axis. And from the side view, we can have a look and g, y. And at least have a better understanding of
the we made a mistake. I will undo those sections
and I will enable X-ray. So now when I select something, I will select both points. And if I move it to here, this one to here, I select both of the vertices, so I'll disable X-ray right now. That's basically the
size of our seat. I'll press Control R to
make some leukocytes. And I will make a
multiple offers, maybe for something like that. I'll select all and I
think I maybe only those points and I will scale
them down. Again. This one should be like
that, Probably like Matt. Maybe a little bit wider. If it's sports seats is
probably a little bit narrower, but if it's not, then it should be white. I think. I can select all by pressing a and extrude
it to make it thicker. Maybe something like mad. And so far receipts
is looking terrible. But we will add a subdivision
surface modifier. So we can go to here, add a subdivision surface or
we can press control tool. And that will add automatically. And this ITO instantaneously
look better. Now we can adjust
it a little bit. So I'll go back into
edit mode again. Maybe scale. I need to enable X-Ray mode. I will scale a
little bit of this. And maybe this. Let's go to our reference view. Grab those. And I will, maybe I'll jump into object mode and we'll move it
somewhere here. I'll grab both and I'll
move it like this. It's hard to see
from my reference. So I'll select my
reference object mode and I'll decrease the
opacity a little bit. So it will be easier
to see my seat. And I'll select my seat again. I go into edit mode and now I can adjust
it a little bit more. So g n, like this,
problem, like this. We can grab both points and
move them a little bit down. Let's see how it looks. Can say movies. And that looks better. That looks quite okay. I think we need to adjust the
bottom part a little bit. So even without the reference, I think we need to move this
a little bit further and up. Should be probably okay. And we can have a little
bit of an angle in here. And how does it look now? I think it looks quite
good for a receipt. Of course, we don't need
I will share this move. And we don't need
both spaces in here. So I'll go into face select, select all of those phases
with holding Shift, and I'll bread sticks
and delete faces. So now this C doesn't
have any faces. At the bottom. I will go
into edge select mode, select the bottom edge, and I will scale it. Probably not. I will
need another loop cut. So Control R. I will add another loop
cuts to somewhere here. And I'll select the
bottom one and I will scale it down a little bit. So I think bad way,
it looks better. And now we can create
both spots, I think. But let's do that
in another lesson. So let's save a file Control S and see you
in my next lesson.
7. Modeling Smaller Details: Okay, So let's try. So let's model both
parts above the wheel. I don't even know how
we call it in English, so I'll just call
them both parts. I think I will select
the part of the wheel. I'll duplicate it, and I will model this from the wheel part. I think that's the
easiest way to do that. So let's try this. I will select the front wheel. I'll go into face select mode, and I will need the
faces from here too. Here. So I'll hold Control and it
will select it like that. I'll hold Shift and Control. And I will select this
and I'll jump into front hold Shift Control and select this
and this and this. It's a little bit tedious
way to do things, but I think I select it all. Make sure that you select
all the faces till the middle of the wheel and
let's try to duplicate it. So Shift D be in selection. So now we have a
separate selection. I'll go into a side
view and press G. O. I'll go into object view. Select only this, press G, and I will move it here. So let's see how it looks. It looks, okay, that's not bad. Let's go to our reference view. And I will enable X-ray. I'll select both edges. And I don't know, should I extrude it,
I'll just move it. Let's extrude it. Let's Create New faces
and read too much. We saying with this,
I will extrude it. So E, just something like that. I'll select both and I will
move them a little bit back. How does look? It looks quite okay. Both ends are a
little bit angled, so let's do that. So I'll select this. I'll go into a front
view and I will look, just rotate it,
something like that. And let's do similar
thing with this part. Let's see it from the back view. So if I hold Control and one, I will see it from the back. And we can rotate it like fat. If we select all, I think we can scale
it on the x-axis. So let's try S and X to
make it a little bit wider. And let's double-check
how does it look? This edge is very
close to the center. I'll select it and I'll
press double G, G and G. And I will move it a
little bit to here. I'll disable x-ray
and I'll have a look. How does it look? I'll, I'll just jump real quick into object mode and I
will adjust the position. I think I'll move it a
little bit up in like this. So I think we can select most. Just select them all. But we need to be an
X-ray because if we not, we will not be able to
select it properly. And we'll adjust
those a little bit. But that should be good. If we add a little bit of subdivision, it
should be smooth. And that would work. I
think that would work. I'll remove this
subdivision right now. We will add a
subdivision that band to the wheels and other details to make everything look smoother. And let's do the same
thing with this wheel. So I'll select the wheel. I will need to select faces. So I will go into
face select mode. And let's do this in the
way that we did before us. Start with those. This, this, and we need to
select it till somewhere here. Okay, So now, now we
know the diameter and we can press shift and
control select both. Let's go to either side. Shift control select both. Both, both. Shift control to this and
this and God **** it. It's so tedious. Great. So we selected all of those Shift D, B,
separate selection. We have another, another object, which is this one. Let's go to side view. Move it a little bit up. And I will scale it on the y-axis because it
goes inside the wheels. So S and Y make it a little bit wider,
something like red. And we probably need to
scale it on the x-axis. So S and x, something like that. And let's apply the scale. So Control a in scale. So from the side view, let's adjust it a little bit. I'll go into edit mode. I'll go into edge select mode. I will select most, and I will move them
a little bit inside, and I will move both
a little bit outside. I will move those down, but I will extrude
those two here. Maybe let's suggest
this a little, Let's adjust this a little bit. I think we can add
another loop in here with Control R and move
it like, like fat. Let's see how it
looks on the bike. That's quite good. We can move it a little
bit down if you want. It's a little bit further, further from the wheel, but we will be able to adjust it a little bit
later if we need to. But I'm not sure if we need. I think that might be good. So don't forget to save
File and Save or Control S. And let's move to
another license.
8. Modeling Pedals: We have quite a nice
bicycle all ready, but there are some very
important things missing. We still don't have battles. So let's create both. For that. Let's select this will
jump into the edit mode, select one of those
vertices, press Shift S, and cursor to select it
will jump into object mode. And here I will
insert a new shape. So she hit Shift a mesh
and let's add a cylinder. This is a huge cylinder. I will disabled x-ray mode. I will scale it down and I
will rotate it on the y-axis. So RY and 90, It's still too big for me, so I'll scale it down even more. And something like
that should work. I will apply scale because we scaled
everything in object mode. So my scale is very off, so Control a, Control
a, and scale. And now it's 111. So that's really good. I will jump into the
edit mode and the pig, the face select mode. So number three. And I will select this face. I wouldn't say
it's a little bit, so I shortcut or something like that I think and I will extrude
it just outside. So something like that. I think it looks good. Okay, now I will select
couple of faces in here, and I will extrude bows down to make the
handle for the pedal. But I need to add
another loop cut here. Because if I select those faces, both a very wide, so I need to separate
both a little bit. So I'll pick this
and I will move it. So you probably know
this shortcut that's Control R. Confirm it
with the left mouse. Click and then you can slide
it and confirm it again. I really don't know
how many faces I need. Maybe something like
that would be enough. Let's jump into this side view. Press E and extrude. I think that will work. Something like that.
Yeah, that looks good. While I have this selected, I press Shift S
cursor to select it. And I will add another shape. Here. I will add it in Vim object
mode as a separate object. So shift a little, let's add a plane. We'll jump into
edit mode already. I will scale it
down in edit mode, something like Matt, G and X. To move it on the side. A little bit. I'll
select this edge in G and X to make it a little
bit more rectangular. And I will add a loop
cut here in the middle. So I will separate
this into two parts. So Control R. And
I will confirm it. I will jump into
face select mode, select low spaces, and
I will insert both. So I vet and set like one phase. But if I press again, that will insert as
individual pieces. So maybe something like Pat. And I will delete
both x and faces. I will jump into
vertex select mode, and I will select this, and I will move it on
the x-axis, not the y. Just something like that. And let's select all
by a and extruded. Extruded up. I will press number two to, to go to edge select and I'll press Control V to bevel
this, something like that. Maybe we could move it a
little bit on the x-axis. So g and x two
connected like that. And G and Z a little bit low to make it a
little bit lower. But overall, I think it's good. Maybe it's a little bit too big. Look. Let's have a look
from this angle. I will connect this to this. So I select the petal first and then this handle. And I will. Press Control B and
set parent objects. So now when I select this, I can rotate it and the pedal rotates with the object also. I'll make it a
little bit angular, like it is in the example. But for now, I think we need
another, another pedal. I think it's too
big a little bit, so I will scale it down and press Control
a and apply the scale. Maybe it's better now
and we need another one. So let's duplicate rows. So Shift D, something
like mad and we have a separate and we can
rotate it on there. Y-axis. So our z-axis, I'm sorry, z and one AD. And now it is rotated
to the other side. And now I need to rotate
it on the y-axis, RY 180 degrees, and we'd
get back to fifth place. Let's rotate it on the z-axis. One small r, z one AD. Now it's good. And I will
select this one too, and we'll rotate it on the side view to match
the reference better. Now, I will select the petals only if we select them both. For example, if I rotate, it will rotate from here. But we can change to individual origins
and measured work. So if I press rotate, now we rotate on beer,
original origins. And based on the reference, I think we can move them
a little bit lower. So I will select this and this. So we selected everything
and we can move it to here. Those two are overlapping. For example, this and this. So I think we can
join those together. So Control J. And to avoid overlapping, I will jump into the
edit mode and press M and merged by distance. And bad removed 64 vertices
which was overlapping. So we clean the
mesh a little bit. And now this petal off, moving to here and
rotate it a little bit. So that's quite good. We have the petals and
now we need this island, even know how to
call it in English. But the chain and the part of
the bike probably be gears, if that's right word. But let's do it
in an adolescent. So let's save the file
and let's jump into it. Another lesson.
9. Modeling Chain and Gears: Okay, Now let's work
with the chain and both gears probably we
need it in the centers. So I'll select this, I'll press Shift S
cursor to select it. And in object mode, I will add circle. I will rotate it on
the y-axis 90 degrees. So our y and 90, I'll jump into edit mode
and I'll scale it down. Something like that to
match the reference. Something like that should work. I'll jump into object mode. I'll press Shift D. And
I will move it here. In the edit mode. Again, I will scale it down
to something like that. Again, I would like to
match the reference. In the object mode. I will adjust the
position a little bit. But that should be good. I will select this
one that we created. I'll jump into the edit mode and into the vertex select mode. I will select basically
both vertices. Both vertices will be
the part of the chain. So I'll duplicate it and I'll press P to
separate selection. So now we have n different
objects in here. Here it is. And I'll do the
same with this one. I'll jump into edit mode and
I will select both vertices. I'll press shift D, cancelled action with the
right mouse button, press B and separate selection. So now I have both new objects to make
it easier to work with. I will select this actual
gear and I will hide it by pressing H. So now I have only this and I'll do
the same with this. Press H to hide, and now I have only votes. So I'll press this, and I'll press this, I'll press Control J to join it. And now we have one object. If I select this, both are selected and I
will jump into edit mode. I will select this one. And this one, I need this. And I'll press F to fill. So if I press F metric
will join both. And I'll do the same with this. And by holding Shift, I'll press this and press
f n. Now we have a chain. I'll press Alt H to unhide everything and wildlife
have everything selected. I would like to move
it on the x-axis to somewhere here probably. So I'll press G
and X to move it, and I will move it. So now we can select
this and this, and we could fill it. So I'll select this, I'll jump into edit mode, select all press F. While I
have everything selected, I will insert the face, just something like that. Drinks it. I need
to select basis, so I'll select both by holding
Alt and I will insert. But now it is inserting individual phases because
we did vet for the petals. So I'll press again and now it's just inserting the thesis. And I have both selected. And we will do a similar thing like we did with the spikes. So select and deselect. I have deselected half of the faces and I
will delete those. Probably we don't
need that many holes. We could make it in
the lower resolution, but that would work. So I'll jump into object mode. I'll select this. I'll jump into edit mode by pressing Tab it as you
know, and I will fill it. And now we have the chain
which is made from vertices, which is very, very thin. And we could do the same like we did with the bike modelling. We could convert it
into curve and we could just the
bevel of the curve. That would be a good option. But I will show you
another way how we could make this tiny mesh
into the bigger ones. So we could add a modifier
and bads skin modifier. And that added a huge skill, modify it and huge
skin for this mesh. But we could scale it
down and just kill you. You probably think we could
press S and scale it, but that would just scale everything to scale
as skin modifier. First of all, we need
to select our object, go into edit mode, and select all and press
Control a to scale down. And now you can adjust
the size as you like. I can make it thinner,
you can make it thicker. It's up to you. And another
thing I would like to extrude both a little
bit to make it thicker because both
are paper-thin. So I'll jump into edit mode, select all and press
E to extrude it. Something like that. And I will probably need to, need to move it a
little bit insights. So g, x, something like that. And I'll do the same with this. I'll press a, I will extrude it. I'll jump into
object mode G and X. I, o, move it inside. So that's quite a
good-looking bike. Rides. It is a very low poly, but we will fix that later. And let's say verify
also Control S.
10. Modeling the Back: I'm probably the
last modelling thing that we would like to do. I would like to add this string, which I don't know how
to call it in English. This is payback. Think I don't know, you already know how to
model things like that. You already made
all the bicycles. So we will add vertices
and we will extrude those. I don't have a reference
for the top view of this, so it might be a little tricky, but I looked at some
photos and I have an idea how does it
look? It's optional. You can leave the bike as it is. It is a good-looking bike, but I will add this extra detail because
I can have like it. So i'll, I'll add
my cursor to here. I can do that by pressing Shift and pressing right mouse button. So to here. And you already know
the process meshed and Gilbert mesh single
birth at single word. And here's my single birth. I will move this
out of the view. We can jump into edit mode. It's already in edit
mode and make sure that you are in the select mode. I select this extruded down
and extrude it to the side. I can select this, press Control V to bevel. It doesn't work, so
we press V because of its vertices and we
will extrude it. We don't need that many points, so something like that. And that will be good. We can model everything
in one object, so we can just pick any vertices and press
shift D and move it. We want it. So probably I will move it to here because I'm not going
to boil this this thing. I don't know what it is. So I will connect it to the base mesh and I will
extrude it to here. Again, I'll select this press
shift D. I'll add it here. And I will extrude it down. And I don't see what's going on, but I will extrude
it up to here. And we can press numbered slash, and that will
isolate this object. So now we can see
what's happening. And we need to bevel it. So Control V and V. Just something like that. And I will press numbered slash again to jump into
the front view. Of course, we can go into the wireframe
mode to see it better, or we can enable the x-ray view to see
better what's going on. So based on the reference, it is growing like that. But I'm not sure where it, where it is connecting. So I will move it some way here. And I think that will work fine. And this is what
we modeled so far. And now we need to move it a little bit to the side so we'll select all while
I'm in edit mode, and I'll press G and X
to move it to the side. Now, I will select both stop things and I will move them
to even more to the site. So g and x, something like that. I need to select this n, I need to connect it to this part of the
frame of the bikes. So I'll select this and
I'll move it to here. And that's probably good. And we can add a
mirror modifier. And let's try to do that. Mirror. And now we have the same
thing on the other side. Let's enable the clipping
and let's extrude both vertices and connect
those we need to extrude. Or so, look it on the x-axis. We need to extrude
this top vertices, which is also the last. So Let's extrude
it on the x-axis. I need to extrude this one too. So e and x. Let's connect those. So I'll press Control R. And I will add one
here in the middle. And I will extrude it
on the y-axis to here. So e, y. And I will extrude it to here. Something like that. This corner is very sharp, so I will press Control B and
v2 storage it a little bit. I'll connect this one to that. So E, x. Let's do the same
with this E and X. And how does it look? I think that might be
enough for this frame. This one is not
connected to this. So I'll go into a side view
and move it a little bit. We can go to the top view also and adjustment or position. So now it looks better. And I will jump into
object mode and I think we can
convert it into mesh. Maybe Bruce could go outside
of the wheel because it's not a very
smart way to model the bike with most things
inside of the wheel. So I'll move it to here. And everything looks good now. So object mode, Let's go to
Object, Convert to curve. You all ready know the process and adjust
the bevel depth. I'll go to the side view to see a little bit of
references for the depth. But I think that's good. And I will disable
X-ray to see it better. And that's really good. That looks, that looks good. Let's save the file and let's
jump into the next lesson.
11. Finishing the Bicycle: So we already have a
quiet, nice looking bike. And I think it needs some slides that just on the details and we will
be finished with a bike. So first they think
we need to improve both parts of the wheel
because it doesn't, it doesn't look good right now. I think we can select both and we can press control
and go to Edit mode first, press Control R to
add a loop cut. Let's add one loop
cut in the middle. I think I will delete
half of your thesis. So I'll select this, go to x-ray mode, and I will delete those. I do that because I would
like to mirror that later. Or I can mirror it. Now, add modifier in mirror, mirror or by the object this. So now whatever I am
going to do on beside, it will happen on WebAssign. So I'll add two more
loop cuts in here. I can select both loop cuts and move it on the
x-axis a little bit. I can select those spaces
inside of a loop cut. And I can scale
it on the x-axis. And maybe let's move on the
x-axis a little bit more. So g, x, something like Matt, I want both spokes to
be in the middle of it. And now I'll press Alt
E and I will extrude faces along normals,
something like that. Now, I can select this face. I can insert it a little bit. I can extrude it. I can insert it even more and extrude it to
something like that. Maybe G and extra,
something like that. So now it has a little
bit better shape. If we press sheets move, it will have
something like that. I think we, we can move
this to the other wheel. I will hide this for
now, should d y. And I will move it in here. We can select those. Go to the back view. I won't go into the edit modes. I will go into x-ray
mode or wireframe mode. I will select both
and I will move them into a place like this, yeah, As a better place. And I will press
Control numbered one. And I will move this just some way here and miss
one to somewhere here. Let's try to fix this. Okay, so can boast in here. Move votes in here. I hope I select both of them. Something like that. Maybe we couldn't make
them a little bit wider and wider two. Now we can see more details and I think meds, meds better. Okay, so we fixed those parts. What else do we need to do? I think we can add
handles to the handlebar. To do that, we need to convert both curves into a measure. So we can convert not
only mesh to the curves, but curves to the mesh. That works too. And now if I go into edit mode, I have a mesh. So for both handlebars, I need to add another loop
cut in some way here. I would like it to be straight. So I will add this
loop cut here, and I will move
it on the x-axis. Some way here. I will select those faces. So I'll go into
face select mode, and I will extrude
them along normals. So Alt E will make this part a little bit thicker and I think I will add
another loop cut. So Control R. Right here. I will select those
faces and press Alt E, extrude faces long normals and I will extrude both even more. So something like that. But I think this handle, handle might be a
little bit wider. So I will select this loop and I will try
to move it to the side. So G and X. And they think it should
be something like that. Now we have those inside
faces, which are zigzaggy. We can select those by selecting the first
base and when selecting the last base and by
holding Shift and Control and EDA screencast keys. So you could see what I'm doing. So yeah, I'll go
into wireframe mode. I can delete those
faces and I can select this loop and
just fill it by F. So that looks quite good. I would like to make the
same in the other side, so I'll go into the
wireframe and extreme mode. I will delete those faces, and I will add a
mirror modifier. So now I have same
thing on both sides. We can shade smooth
and see how it looks. It looks a little
bit angular still. I'll get back to ship
flat and I will add a subdivision surface modifier. So from the modelling seat, you know that we can add division service
by clicking this or we can press control
to control, control two. And this two is not
a numpad to its two above a W letter
on the keyboard. So now we have a
waist mover geometry and we can shade
It's a little bit. We can add a loop cut here to make this angle a
little bit harder. So Control R and we
can move it to here. This is quite good I think. But we can press Control R and move it to here to
make it also a little, a little bit harder. And that will looks quite good. For RBIS. We sheets move should be enough. For this part. Just shade smooth. For we'll, we'll, we need
to add more subdivision because we will see
those angles even if we shaded smooth. So punctual tool. And that's looking
good right now. Those spokes, they think
they are too thin. So we need to make them thicker. I will make them zero-zero point for FEC will do the
same with this. So I will double the thickness. Let's shade it's moved
this one and this one. Let's add more geometry
to this wield. So controlled two
and shade smooth. It seems here, controlled
two and shade smooth. Control tool and shaded smooth. Let's shade smooth petals. This one to you, we have more things
we can shade smooth. Both spokes. It would be great if they
would be very smooth. Bag, Shade Smooth. And this one. So that's pretty much it. I think our bike is finished. I'm not sure about this one. Yeah, I think I would like to change this
part a little bit, so I'll go into a side view. So I'll delete rows,
delete vertices. I will move this a little
bit down till here, and I'll press Shift D to
duplicate, be two separate. And this is my new vertices C. It's not vertices. We
started the curve. And if I go into the side
view, can extrude it. I can. And I made a separate curve, which is not gonna be bad wide. It will be a little bit thinner
and it will be metallic, so it will look a
little bit better. I think this way. I hope you understand this. This part, I did the same like
we did with the vertices. I duplicated this part, separated in object mode. I selected this, this thing and I just basically extruded
and new geometry which I made fin up
because I really can't make a part of
this geometry finished. So I needed to create a new one, not geometry, it's a curve. I think our bike is finished
and we modelled with bike. I told that the naming is important and I messed
it up completely. I added everything in the reference folder,
which is terrible. So I will create a new collection which
I will name reference. Because it's easier. And we have only one,
the reference image. I will drop that into
reference and I will rename this to a bike. And all of those parts are
the part of the bikes. So we can disable
reference right now. We are not going to see it. And if we would like to disable
the bike at some point, we can disable it by like bats. And one thing I would like to select all by holding shift, I would like to select this last and press Control P and set bear into the object. Now you see those
dotted lines at birth. And that means that all of the parts of the bike I
parented to this object. And if I move this object all
the bike modes altogether. The one thing when I parented this petal gets off a place
and I'm not sure why. So I will try to scale
it on minus one. And I will move it
in the right place. Like I know why it it goes off, but we fixed that, so no problem with that. And now if I select this and I will move,
everything will move. So I can rotate this by
because we will need to rotate it a little bit later. So that's cool.
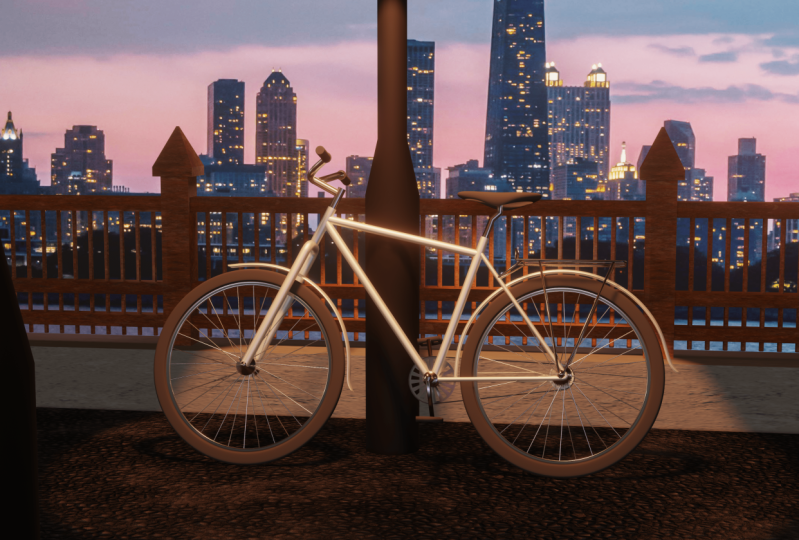
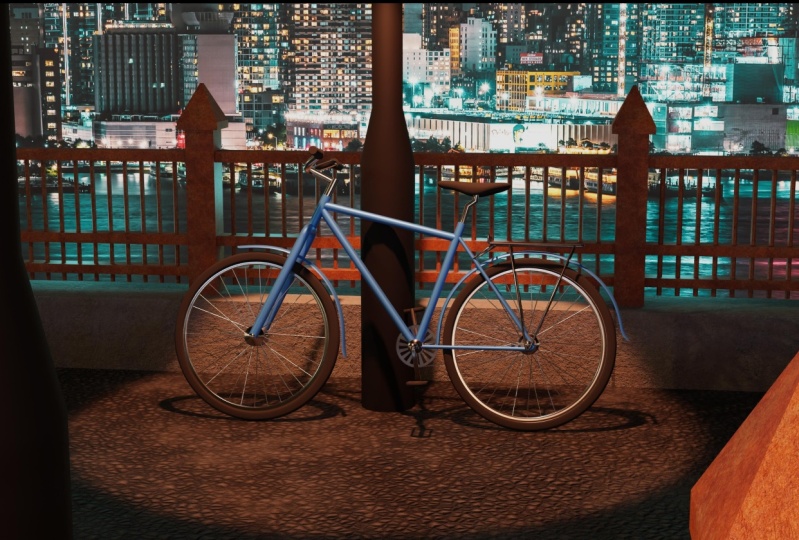
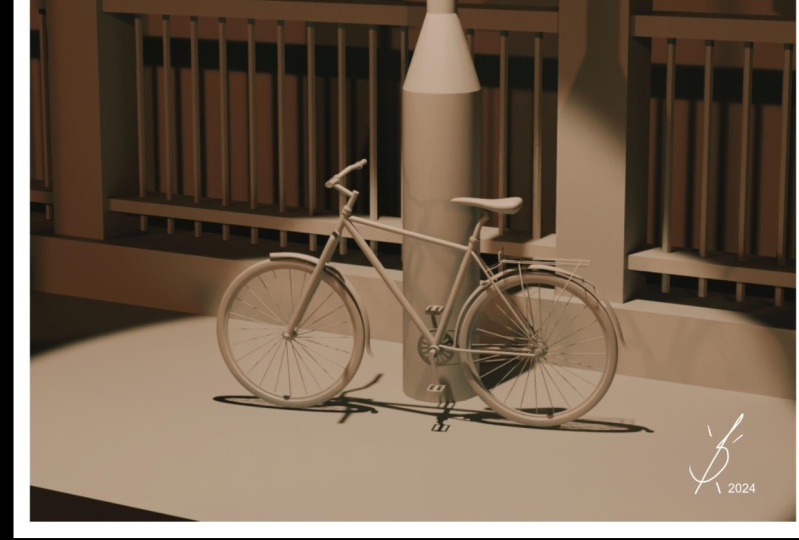
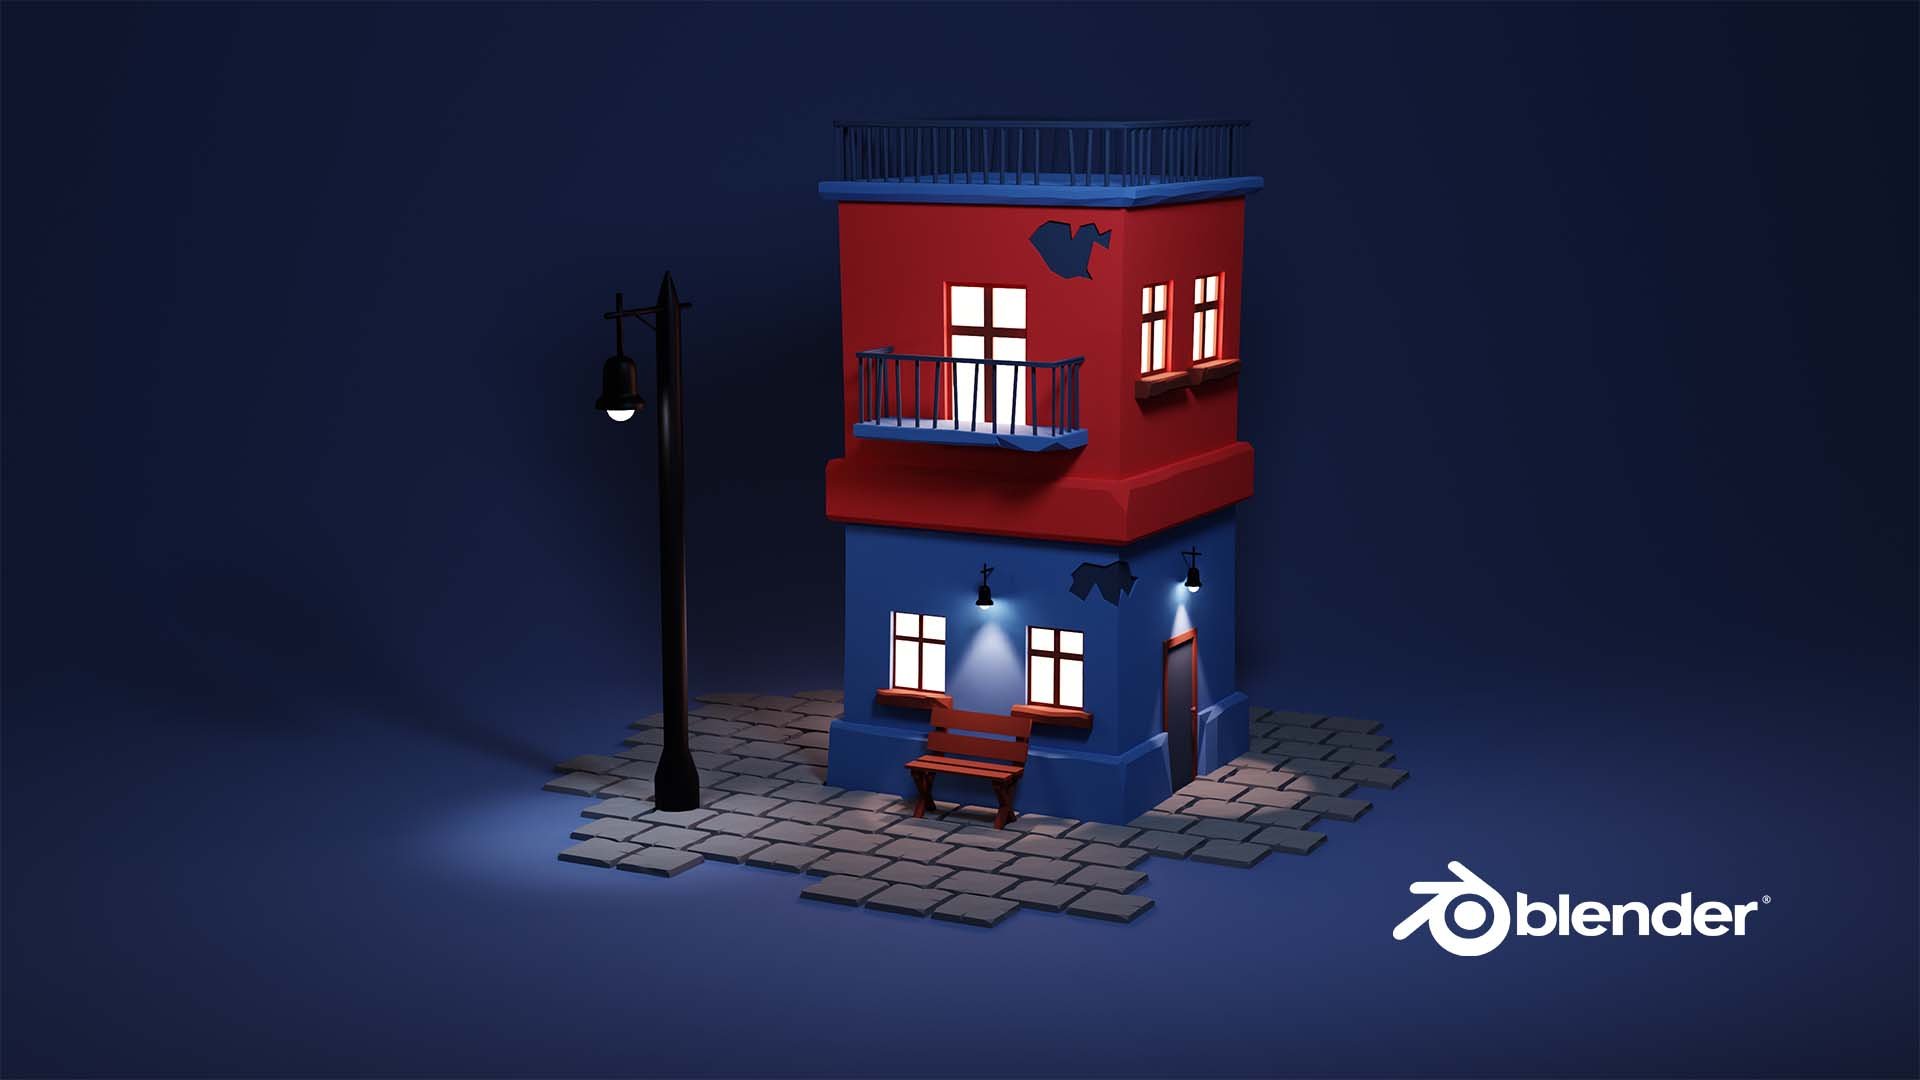
12. Modeling the Environment: So now when we have bike, we can create an
environment around it to make a good-looking image of it. And I would like to
make a scene where his bike standing on some
kind of a bridge and bainite. So I will go into a top view and I will
start to model the bridge. So I will add a plane and I will go edit mode and
I will scale it up. Something like that. I think that yeah, so let's redo this. So Control Z in this cursor is not in
the center of the scene, so I would like to
move it to the center. So I'll press Shift S and
cursor to world origin. World origin is
where this x and y, X is crossing each
other and z-axis, of course, 000 coordinate. So that's the world origin. And if I press number seven
and if I will add in plane, it will appear in the
center of our scene. So I'll go into the Edit mode. I will scale it up. Something like that should work. I think that's good
enough for the bridge. And I will scale up even
more on the y-axis. Just something like that. Or maybe we could make
it a little bit wider. So S and X even more. I don't know, We will
see if something 14k, we will be able to
change with this. It's not that hard to do. So I will create another plane and that's going
to be beside of a bridge. So G and X, I'll go into the edit mode
and I will scale it on. I'll just scale it
down a little bit. I'll go into object
mode and I will move it a little bit to
the side even more. And in edit mode, I will scale it on the y-axis. So S and why? I would like to create some
kind of blocks from which we will have kind of on the
fence side of the bridge. So those blocks, I'm not sure
how long they should be, but let's try to extrude those. So let's press E and let's
try something like that. And I'll press number seven. I will I will hold Shift and
press right mouse button where vents should
be. Number seven. And I will add another plane. In the edit mode. I will scale it down. And if you are scaling
objects in object mode, make sure that you apply
the scale later on. And in the object mode, I will move it to the
side of this block. And in the edit mode, I will extrude it. I think it might be
a little bit to fit. This time I will scale it or in object mode because my object
origin is in the bottom. So if I scale it, it will scale like that. This happened because we created this thing
from the plane. So I'll move it to the side of this and I'll
select the top face. Face, select mode, and G and Z. I'm thinking like mad. Now I think it's good. Maybe a little bit. Something like Matt, I
will duplicate this face, so Shift D, but I'm not
going to separate it. This is going to be
the top of this thing. And I will scale it
up a little bit. I'll extrude it a little bit. And I will extrude it even
more and I'll scale this part. So we have this kind of, I don't know how to call it. But the great thing, because we duplicated that face and we created from that face. I can press L. And batch will say, if I would like to change
the scale or something. So I can select only this
part by pressing L and bad, select the loose parts. And those parts are loose, one from each other. And this is the same object. I think I need to make it a
little bit smaller, G and Z. Let's move it a little bit down. And that looks
quite, quite good. I think. Now I will look at this from the side and I would
like to create three bars which goes
from this horizontally. So I will add a loop cut. So Control R. And the first bar is going
to be somewhere here. I need to create a
new phase in here, so I'll press Control B to
make one level of bevel. And now if I would like to select this
face and extrude it, I can just select
it and extrude. I will do this two more times. One somewhere in here, and then I have a
near to the bottom. So control are some way here, unfold, be something like that. And control are somewhere here. Control B, Something like that. I would like to make
voce not that thick. I would like to make those
a little bit smaller. So I will insert both spaces. And if I press I,
I can insert it. If for some reason it does not inserting for you as
individual points. But it should be tried
to express I again, but it should be inserted
as individual points. And while those selected, I will extrude both along. Just extrude both till here. So I'll press E and I will extrude it,
something like that. I can go into side view
and be more accurate now, I can press G and Y and extruded still here,
something like mad. So that looks okay. I will go into a top view and I think this cursor is
in the right space. We can move it a little
bit to the side. And I would like to
create another bar which goes through all of
those things that we created. So we can create it in
many different ways. But I think this time
it would be easier to add just a small cylinder. So I'll press Shift
a mesh and cylinder. That's a huge
cylinder and we can expand this and adjust it. If you don't see this, delete the cylinder head again, don't touch anywhere else. And you will find this this thing because
if I touch anywhere, that box is not
appearing anymore. So I need to delete it, shift a and another cylinder and venue will have this menu. So we don't need
further two vertices. That's a lot of geometry for
this kind of small thing. I think something like five or six will be more than enough. And I don't need
this huge radius. Of course, we can adjust the radius by scaling
and the depth. Also. We can adjust it by scaling. It appeared on the
weird position. But in object mode, I will move it G and
Z. I'll move it down. And I think it's way too long. So I'll jump into the
edit mode real quick, select all by pressing a and I will scale it on the z-axis, so S and Z. And now I will try to
move it down G and Z, just something like that. Let's see how it looks. It looks quite good, I think. Now we can select it. We can jump into
the Modifiers tab and add an array modifier. And what array modifier do, it grades more
instances of objects. For example, if I will
move the account, it will create a lot
of both cylinders. And it is going on the x-axis, which we don't need. And you can see we
can adjust this here. We can adjust. So I will change
the x-axis to 0, and I need more or more of
those things on the y-axis. So I will increase the
y-axis and I will adjust the distance between those
bars by adjusting the y-axis. And Ben, I will adjust the count as much as a need by changing
recount basically. And I think I need 23 this time. There's low good habits, quiet. Okay. Actually we count
and just a little bit this and we can change this to 22 if you would like to make it a little bit different, that's
perfectly fine. So now I will apply this modifier because
I would like to join everything into one
object and Ben to have an array modifier
for all of this fence. So just click this and Apply. And now we have all of this
as one object and bows. So I'll select everything
and I will select this bottom block
as the last thing. And I'll press Control J or
Control J naught Shift G. And this is now one object. And again, I can add
an array modifier, change x to 0 and adjust the Y. And Y is probably going to be 11 is a little bit too much. We have a gap. So by holding shift, I will adjust it a little bit. So 0.98, it's perfectly for me. And I can make as many
as I want elbows. But I don't need that much. Maybe something like like
tiny minute too much. 55, not 50 will be enough. I just need to move this
into the frontal little bit. So I'll press G and Y and move it to here and maybe increase
the count a little bit. I would like to have this fence also on either side of a bridge. So I'll add, I'll just
add a mirror modifier. Whereas my Milgram,
milgram Mirror, Mirror mirror moo, moo, moo RAM. Here is my mirror
modifier. Mirror object. I can mirror plane because
it's in the center. And now I have it on the
both sides of the bridge. And that looks quite good
for the environment. We need to model one more thing, and that is probably
going to be it. Again, I will adjust
this coarser. So Shift S corps
such a world origin. And now we are going
to model the lamp, which is going to
be somewhere here. And to model this, I'll go into top view, press Shift a and add a circle. Circle with fair
to two vertices. It's quite a lot. So I will reduce this by half, just something like 16. I can adjust the radius, but I can adjust that
by changing the scale. It's even easier for me. So I'll press G and X
to move it to the side. Something like that. I think it might be a little bit too big for the
base of the lamb. So I will jump into edit mode. Select, Select All, and
I can scale it down. So that's probably good. And we can try to extrude it
a little bit on the locket, on the z-axis,
something like that. It's still a huge, huge lamp. I can select all
and scale it down. But if I am scaling
on the edit mode, it scales to the middle, which is not perfect. But if we will scale
it on the object mode, it scales based on
this origin point. So it stays on the ground. So I can scale up
and scale down. So I'll scale it
down a little bit. But now my scale is off, so I need to press Control
a and apply the scale. And now scale is 111, which is perfectly fine. So I'll select
both top vertices, G and Z. I'll move them
a little bit up to something like the
height of the bikes. Move them a little bit more up. And now I will extrude it up
a little bit, not too much. So I will lock it on busy. I will scale it down and I will extrude it on
the z-axis even more. Just something like that. G and Z me even more. I would like to make the rest of the lamp by creating the curve. It would be easier
to make it from the curve like we
did with the bike. So I'll press Shift S
cursor to select it. And now cursor appeared
in the center of this. I'll jump into object
mode, press Shift a. And the process we can add the mesh single verte
at single words. I will go into this front
view by numbered one. And in the edit mode, I can extrude it up. But if I am going
to extrude it now, it doesn't work because I'm
in the edge select mode. If I click the vertex select
mode and just working now, I'll extrude it a little bit up, and I will extrude
it on the x-axis. Something like that
to sit through. In the final image, this lamp is not
going to be visible. Maybe it will be visible in some kind of different
renderers for Instagram, which image is not very wide and it has more space on top. We will see, but I will
model the land properly, so I don't want to have
problem in future. Plus it's a good exercise to do. We can bevel this. So Control B and press
V to model vertices. Before will be enough. You can adjust both by
scrolling the mouse wheel. You know that already. So I think that looks good. And you know, Objects
Convert to curve. Let's jump into the curve. And let's adjust the offset. And why it doesn't work. Oh, that's wrong works. That we need to adjust
the bevel depth. And you can see we have a different number of
geometry from vista service. We can adjust the
number of geometry by changing this
resolution part. So I think resolution at six matches with
geometry art the office. But it doesn't really matter. It, it won't be visible. And I don't want this to be
bat that wide as this one. I would like to make it a
little bit smaller at the top. And for this one, I can select both
and press F to fill. And again, I will select this, go into edit mode, select this shift as
cursor to select it. And we will make an offer lamps. So to do that, I will add a UV sphere. I can press numbered one
and go into edit mode. I will go into wireframe mode, and I will toggle x-ray. I will need only the top of this all going to face
select mode, only the top. So I will delete
everything in the bottom. So x and delete faces. And now I would like to
select half of this. Let's see how it goes. I select it a little
bit too much. So I'll try to be more
accurate Ms. Time. Yeah. Now, I succeeded with this and I will move this
a little bit on the site. So g, x, something like that. Now, I'll Jim real quick
into edge select mode, select those edges
at the bottom. So I can hold Alt
and select the loop. And it will select
all of the loop. Press F to fill. Our will press I to insert, and I'll press E to extrude it. So extruded up a little bit. And maybe I'll jump
into face select mode, select this and press Alt E, extrude faces on normals. Little bit, just to
add a little bit of shade to this lamp. And invaded mode, I can
select all and scale it down. So G and Z More button to
replace a little bit better. Now we have the origin
lower than the lamp. We're not going to animate it. So it's not a matter that much. But if you would like
to animate something, to rotate or
something like that, it would cause some problems. So just be aware of that. Now when we scaling in, scaling on this point. So, but if you want to move it, you can go to Options. Affects only. Options, affect only origins. And you can press G and move it into a place where
you want them to be. Non forget to disable those
sergeants when you will work again and move it
something like mad. So now we have lamp, which is still a little bit big. And bad looks quite good, I think right now. I like it. Yeah, I really like it. And I would like to
join those things into one right now
because we can circle, we have plane which is,
let's rename rounds. This plane is the bridge and this vertices is
the curve that we have. And this is vSphere. I would like to join everything. So I would like to select
this, this and this. And I would like to
select this at last because then we will have this origin
point at the bottom. And if we would like to
scale this lamp up or down, it will stay on the ground. But because we have
this object as a curve, it is not going to
join those objects. Let's try it, but it's not
going to work. So Control J. And you can see this is the one object and this
one is a separate. So we need to convert
it to the mesh. And this is the mesh now. And we can select this at
last and press Control J. And now we have the one object
we can shade and smooth. And maybe we can add it to
the other side of a bridge. So mirror and the
mirror via the ground. And that's perfectly fine. I think we finished
modelling it. Maybe in the other steps we will need to change
something in the models, but I think the model
is looking good. So in the next lessons, we will add colors and materials and we will
start lighting the scene. So don't forget to
save control S.
13. Simple Materials: Whereas so many ways to
add colors to be seen, I will go through
three different ways to add materials and
colors to be seen. First of all, to add some
colors to the scene, we need to jump into this
viewport shading mode. As you can see now,
everything is white. It doesn't have any colors. But before that, let's jump
into the render settings and add ambient occlusion bloom
and screen space reflections. So that will add both
springs to be EV. So maybe let's
start with the bike and let's add the color
to the base of the bike. Triadic colors. We
can go to this bar, which is material properties. And we can press this
Plus button on renew. And that will create
the material. We can rename it to buy
a base, for example, it is going to be the
color of this part, and that is going to be the
color of a bike basically. And you can choose
the color you want. I will make it some kind of
bluish, something like that. We will see we will be able to change that
anytime we want. Don't stress too much on this. We can change more
settings here. I would like to increase the metallic thing
here because this part is painted metal and
maybe metallic at 0.6, something like that for the roughness, 0.5
shouldn't work. Good. I will select this
and I would like to keep the same
color as this one. So I don't need to create new. I can just go into
this menu and select the color that I already have. So I can select this and I
can do the same for this. But if you have a lot of things on which you would like
to add your color. I don't have this, but
I would like to show I need to add the same
color on here and here. So you can select both
strings and you can select the last
thing, last object, which has this color
and press Control L. And you can link for details
from the active object. And active object is this
one which is in yellow. Where are those objects? In the orange and there
is one in the yellow. The yellow is one we, which we selected the last. So it will link properties
from this objects. So Control L. And we can link object data,
animation data collections. A lot of stuff, but we
need to link materials. And if we press this, it will add materials from this, from the act of objects. That's very handy
if you would like to add materials to lead
to a lot of objects. Because to select and to
choose the material from this, It's kind of a lot of work on. Now we have this and I
think we can jump into creating more metallic
look for most parts, which is going to be
something like Chrome look. So let's create a
new name it metal. That's going to be the
color for spokes and probably this part.
So we will see. So the metal and the base color is
white, it's quite good. We can increase the
metallic look to him a lot and we can reduce
the roughness. So if we are going to
reduce it is going to be very shiny and metallic. I'll increase the
roughness just a tiny bit, 0.10.2, something like that. It will look better. So I will add the same
thing, two spokes, so metal and for both books. Metal. Where else do we need middle? I think we need
the metal in here. And for this we'll part. And for this we'll part. We will add a different
material for both handlebars, but for now, let's
keep it this way. Think metal is going to be on this on this part and this part. So I will do this in that way, but I show you control
L link materials. We will need to add the
metal on both parts, where I'll just add the
metal to all of them. Of the wheel and later on
we will add the tie and materials on the
parts of the tire. So I'll do the same here, metal. So I'm not sure about those. I will make them in
different colors, maybe something like white. And here it should have
a base of bike material. So far it looks, it is looking good. It's very shiny back. So we can create
the material for the tires and that's going
to be black material. First of all, we need to create the material for the tires. So I will name this rubber,
something like that. And the base color is of
course going to be black, but I'm not going
to add full leg, maybe very dark gray color. And the roughness, of course, is going to be very rough. It's not going to be shiny. And let's see how it looks. So I'll select part
wherever tire should be. So here I will hold Shift and Alt to select this
loop and this loop and this, and this, and it's not
selecting as I wanted. So this, this and this, and this, and we need to select the
material that we want to add. And we can assign objects, could have more
than one material. We just need to
assign it to objects. I assign the rubber material here where it should
be, the metal material. It's really hard to select
with the subdivision modifier, so I'll deselect it
and I'll select both. Both should be the tires. I think. I will select rubber and assign and I'll select both parts. And this should be metal. And here should be
metal two and assign. I see that this part should
also be the rubber parts. So assign. And here is a tiny loop which is kind of
complicated to select. It's kind of tricky. Yeah, I got it. So let's assign the rubber
let's reassign subdivision. So I'll press this and
subdivision is on. Let's do the same
with another wheel. Or if you don't want to do
that, you can duplicate this. We'll add it to
this part and this, and you can delete this wheel, but I'll just make
it in this way. Again, I will disabled
subdivision in this, it will be easier for me
to see what's going on. I need to select most and bows, and I will assign
the new material. I have only one went
to your role in this. So I can add this
plus button and I can assign the rubber
and just press Assign. Okay, So I need to select
this and this also, this is going to be
run by to assign. And yeah, that looks good. Let's re-enable
subdivision for receipt. I think we can use the same material material
that we created for the tires. I don't think it's bad, it's different from the tires. So I'll just use this material, the same material, but you can create a new one if you want. And I will add retire
materials to those handles. I'll go into this selection
and face select mode. I'll select everything in here. Make sure that you are in the X-ray mode to
select everything. Let's try this again. If you want to concentrate
on some parts, you can press period
on the numpad and it will jump into
view that you select it. Great, so let's
add a new material and the rubber material, and don't forget to assign. So this thing is mirrored. It, add it to both
verbose and let's add the color to this thing, which I don't know
how to name it. So let's create new. I will make it also dark gray, but this one, I will make really metallic to make it shiny. Roughness, maybe less roughness. I'll make it shiny
but maybe not bad, dark, maybe a little
bit more gray. And let's see how it looks. It looks quite good. And I will add the same material to the part of this
part of the pedals. So Material, one, I will
rename it to dark metal. Sounds like music style, but, you know, and I will add a
rubber material to a petals. Petals aplastic. It's not rubber, but I think
that will work in our scene. We can create a new
material which is more plastic looking
for the petals, but I don't think
that we need this. And the chain, the chain
is going to be the same as dark metal lifting. Something like that. Should be good. And we added all the
materials to the bike. We can save the scene. And I'll show you
a different kind of ways to add materials
in the next lessons.
14. PBR Materials: So now when we have added
the materials to the bike, we can move to the environment. And I will show you
a different methods, how you can add materials or
textures to your objects. If you want, you
can continue to add both simple materials like
we did with the bike, to the environment and
bad will be totally fine. But I will show you a little
bit different methods for this area, for this block, I would like
to add a concrete material. In my opinion, one of the
best website for materials, which is free is ambiance CG. It has a lot of materials
and they are really good. So we will use this website
to get our concrete material. Also, I would
recommend poly haven. It also have HDR
res textures and models which are totally free. So it doesn't have that much, but it has quite a lot. And the third one, which I would
recommend is polygon. It's a great website for textures and I don't know how many models in each
DRIs and brushes we have, but I used it for textures
and we have tons of votes. But they don't have that
many free materials. It's not that much. Only two pages. But
if you are willing to pay the vets probably the
best site to get materials, premium materials.
You can choose. The one that you like,
you can festivals. And so I will jump to NBN CG, and I need a concrete. So here you can see the categories where
you can choose from. I'll just search it
for for concrete. And they give me
tons of options. Voce ones with the letter S, the substance painter materials. So that won't work for Blender, but it would work. I will show you in my next step how to add those
kinds of materials. But in this step
it wouldn't work. So choose from, those were the ones that you
like for our model. I think this might work so I can click on it
and I can download. So there is a lot of options. We have materials in different resolutions
from one K to eight K. And when I was a beginner, I always went for the highest resolution and
the better, the best quality. But as advanced, I understood
that you need to be conservative about
this because if you add very high
resolution materials, it will slow down your
project by a lot. In this case, I will use, I don't know, maybe
for k or two k. It depends if you have a
slower computer would say, use to k, I'll choose
four key material. So I'll download this. I will put it into the
folder where my project is. It's, it is added into Ventura. In Windows, you can just
click extracted or you can use when NRA, this program, it's not free, but if
you don't activate it, it still allows you
to, Due to use it. It's a great program, but I will just extract it
like that and extract it. Can see I tested a lot
of materials and stuffs. So it opens like
that for us and it has a different maps
for our material. I'll show it to you
in the blender and then it will be easier for you to
understand what's going on. So let's jump back into Blender. And I selected my object in which I would like
to add my material. I will create a new material
just like a placeholder, which is going to be something
like very random color, which we will change
a little bit later. And I'll go into edit mode and I will select
this cube it we have. So however, a barbecue
and press L, Again, L. And that allows us
to select the link to objects because we created
this cube as one object. And when we added a
separate object into edit mode as this fence. So we can select linked objects. For example, we can
select both one-by-one. We can select this. This one is a separate object, but I need this cube. It will be easier to see if I will disable x-ray mode service, we need a new material for
this and I will assign it. And now we have this material and this
is going to be concrete. I will expand this timeline and we're not going to
animate anything here. So I will change the
timeline to shader editor. Of course, you can jump to Shading and you will
have the same thing. But I think it's easier to just adjust relay out
based on your needs. You can see how our
Shader looks like. And we have this
principle be SDF shader, and we will add our
textures to it. So first of all, before adding textures, we
need to add a new add-on. So go to Add-ons and
search for Node Wrangler. You can see I have enabled it. But if you didn't, didn't, you should see
something like that. And that's the add-on which is really great if you work with nodes at
least a little bit. So I think it should
be enabled by default. It's very useful
and it's amazing. So enable it, glows it
and you will have it. You can see it here. And if you click here, you can even had a button to add the texture setup and match. We'll add a texture
which is not ideal. So I'll delete it. And I think at principle the
setup would work better. So we can select the area
where we have our texture, select all add
principle texture, and that will add our texture. We also have a shortcut. You can use Control Shift T, and you will get
the same result. So that's a super easy
way to add texture. But you can see that our concrete on the top
looks kind of good, but in besides, it's
stretched like, I don't know. Let's select our cube by pressing L and just
jump to UV Editing. And I will show you why
it looks like that. So we have our faces
selected and they are just basically unwrapped
and it's hard to see. But for example,
this face mounted on our texture like that and it is mountain
on all the image. This one is very tiny. You can see it is it is
very tiny vessels. Why? It is stretched like that. And the other faces
to look like that. So I'll press L on this and I'll press UV marked UP project. And I'll press Okay, and now it is placed on
our texture more smartly. So for example, this
face is like this face, and this one is like this. And this one is here. So it added our cube on
our texture more smartly. Let's jump back
to Layout option. And you can see we have
our concrete block, which looks quite good. You can see that our images, for example, basically all of those images were
added to the blender. Base color. Is this end. It was connected to the
base color roughness. You can see that we
have a roughness and app and it was connected
to the roughness. So we don't have this number
adjusted by, by hand. The Node Wrangler just
added images that we have and the roughness will
be adjusted based on this image that
we don't load it. The same as with a normal
map and the displacement. So that's the way to
add PBR materials. And if you want, you can add those materials
to bike to the tires. But I will leave it as it is. I will show you a
different method to add the materials
to the fence, and I will do that
in the next lesson.
15. Substance Materials: In this lesson, I will
show you how to add the substance
materials to Blender. And that's the method
that is also pre, and you don't have to
subscribe anything on Adobe. You just need an
add-on from Adobe and you'll be able to add
those substance materials. If you'll remember. In the last lesson,
I said that we will, I will show you how to
add both materials. And you can add this with this substance in
Blender add-on. You can just search substance in Blender or something
like that in Google. And badge will direct
you to this page. This is not my preferable
way to add materials, but I would like to
show you this option. So you can just go to substance
free add-on for Blender. If you press this button, it will ask you to
login to your account. So I'll continue. I have an account on Adobe, so I just login to my account. If you don't have it, I would say you can
create it for free. When you in this page, just scroll down and you need it shows all
the other things that you can do with this atom. And here in the bottom, you need to unload
the substance freely, atom and substance free. The integrational
integration tools. Here you can delete the atom
at the bottom of the page. And again, I will download it and I will download my
fried integration tools. And I needed for Windows, if you're using other
operational system, then loaded for your
operational system. And now in the edit, we can go to Preferences
and we search for node. But now we need to install. And I will go to my folder. And here I need to
install this substance free Dean blender that we downloaded and just
click install add-on. And you can see I already, I get this add-on. I will enable it. And I need to install both tools that
we don't load it also, so I'll press Install from disk. And again, I'll go
to this folder. I'll select integrational tools. And it is just installed it. And we can close it. And now we will be
able to add textures. So now we need to add new
texture for the fence. And I can go into
edit mode and I can press L and select all of those. Or I can just select the
placeholder that we have. And now the placeholder
is why fence? So I'll select placeholder
and press Select, and that will select
all of those things. I will lower this thing down and I will
expand this sidebar. I can press this arrow, or I can use N key. So if I press N, it will expand and it
will close the sidebar. And here you can see
substance free D. I have probably a little bit
more add-on spin you have. And if you click it, you will have this menu. And it's quite simple. This one will load material, this one will apply
material bys one will direct you to
community page. This one will direct
you to substance page. And here you can do the
duplicate materials, refresh and delete materials. So let's press this. It will direct you to
substance 3D community assets. It has a bunch of assets, all types about
files and assets. We can use all of
those in the blender. It has a huge library. This one, this button
will direct you directly to substance 3D page. It has also a huge library and, but it is accessible to substance free the subscribers who have an active subscription. So we're not going to
use this in this course. So I will close this. We are going to stay in
this community assets page. And for for our fence, I would like to use some
kind of metal materials. So let's jump into our community page
and search bar metal. If you remember, I
said that we are not be able to use
all the materials. For example, both are
smart materials and that one pork on
Blender evolves, used to Substance Painter. So we can just ignore those
into, into this view. Or we can just use
this menu and go to Materials and metal materials that will give us
a better result. Here in the middle tab we have
a bunch of steel objects. And I would like to add
maybe rusty materials. So I like this one or this one. I maybe use this a
little bit simpler. So I'll press this, will save it to my computer. So you can see we have about 790 materials
that we can use, and we have about 293 smart
materials which we can't use. So if you see this stranger
looking not sphere, it's a smart material. And if you see the
sphere, it's a material. But we can use, and you can see we have
really nice, nice ones. So it's a huge library that might be very helpful
to work with those. So I will close my browser, maybe select the placeholder, and I will select in that way. So it will select
replay thing that I would like to use and I
will load mine material. This is rested material
vet we'd unload it and I press Load substance
substance thing. And I will apply it. And nothing happens because we have still this placeholder. We need to apply this
solid rest while we have selected the fence, the area in which we would like to apply
them in our material, we can select our rested
material and press Assign. And now we have our rest
of material assigned. But I see that we have
the same problem like we have with this block. So I will select this, go to UV Editing. And it is very stretch. You can see those
are very stretched. So I will go to UV
and smart UV project. And I'll press okay. And we will see
how it looks now. Let's go to layout and
it looks way better now. The great thing about
the substance materials, but it is changeable. And it's changeable a lot. You can see all of those
sliders which you can change. And that's, that's,
that's a lot. You can change the
color of the rest. Can see it is changing. You can change the roughness
to less rough material. You can see it's shiny now. You can see, you can increase the roughness and
make it very rough. It was 0.5, something like that. 0.5. And you have a lot of things which you can adjust inverse and that's
really, really cool. You can change even
for resolution. Did you remember we downloaded the last one in for K you can add for care
resolution here. Does it make any better? I don't know if you
look from close view, it might, but I will leave it on to k or
something like that. So this substance
thing is really great. It might help you a lot. So use it if you want, if you don't use it. So it's up to you. You can just search
the material on NBN, CG, or oversight and
add it to your project. I just wanted to show what
is possible in Blender. Let's wrap up this lesson
and in the next lesson I will show you even different
way to add the material.
16. Procedural Materials: Now we're going to
create the material for the ground and Matt is
going to be an asphalt. If you want, you can use the
methods that we used before. You can add PBR materials
downloaded from somewhere. You can use the
substance material. You can add a plain color. But I will go a little
bit advanced in this and we will create
material in lender. It is a little bit similar to what we did with the
colors on the bike, but we will add more
features into it. So yeah, let's see how
this process looks like. So as always, we need to
create a new material. So I'll select the ground plane and I'll press New
and we have material. I will I will rename
it to asphalt. And we have this material
which is usually white. I will expand this this tab. And you can see we have
principled be as df, like we always do. We have all those things
we, that we could change. We can change the color
like we did before. We can change, change the
roughness, et cetera. But the great thing
about those nodes, but you can add more nodes. Let's add, for example, Shift a and search for color n. And we can add this and
connect color to base color. And now we can add
a gradient color. So this grade, but I will
leave it as it is for now. I will add another node and
I'll press Shift a lender, you add everything with Shift a. And I will search for the bump. And what bumps do. Bump adds some height
to move material. We don't have any, any texture yet on it. So I'll put the normal and I will connect
it to the normal. So far, everything is easy. So now we need some kind of a little stones because
bats and asphalt, so we need some kind of material
and the blender has won. So let's search
for voronoi more. This one, Voronoi texture. Let's select it. Now let's change this
F12 distance to edge and connect distance to the risk
factor on the color ramp. And you instantly see
that we have some kind of material and connect
with distance to a height in the bump. Now we have this texture which is nothing like
asphalt. Asphalt. Let's increase the scale
on board my texture. And let's increase it by a lot. And that's getting closer
to the asphalt, right? We can change the color
ramp a little bit. We can increase blacks
and whites a little bit. And now it looks like we
have shiny stones in here. Of course. They are very big. So for an asphalt we need
to increase it by a lot. And maybe we could
decrease the whites, but I will change the color. This very, very black
is not like an asphalt. Nothing in nature is really
pure, purely Belt black. So I will change this to
dark gray and the white, I will change it to medium gray. I'm thinking like mad. And that instantly
adds some realism. And asphalt, you look, our texture is a little bit
stretched on the y-axis, at least it looks like that. So I would like to add texture coordinates and
that should fix it. So we need to have an odd
rank Node Wrangler add-ons. So go to Edit Preferences
and such for node. And we enabled this
Node Wrangler and on previously when we added the image textures,
PBL textures. But in case you don't have it, makes sure that you
are enabled it, that you have enabled
it and select born with texture and press Control T. So now we have two extra
coordinates which we could connect to all the
textures that we will have some. Now, let's change one thing. Connect texture coordinates
from object to vector, not to generate a two vector. So let's disconnect. So let's reconnect rows and our texture
became very small. So I will adjust the
scale right now. It's still very small. And I think something
like that looks good. You probably noticed that
those stones are very sharp and I would like to reduce the sharpness
a little bit. We can do that by
adding texture, adding a little bit of noise. So press Shift a search for Noise and add the noise texture. I will add it in here. And I would like to connect with no noise texture to the
color ramp and to the bump. And to do that, we need another texture which connect both
this and this int1. We need to search for mix RGB. So search mix and mixed RGB. So now we can connect more
noise texture to color, one. Nice texture to color to this, we can reconnect to color
ramp into the bump. We can change the
color from both, so it will be easier to see. So this added a little
bit of noise and we can see it like if I
slide it like that, I see the pure noise. And if I slide it to the one, I see the pure warmer. And I'll slide it to
the noise right now. For now to see what we have. And I will adjust
it a little bit. So first of all, I will increase the
detail to here to see how does it look and it
looks a little bit stretched. So I will connect
vector to the vector. And that will give the same coordinates
like to warm line. And now it looks better
but I think we detail this is a little
bit to to detail. So maybe let's reduce it
to something like 1112. And the scale, we can
leave it at five, I think. But we can increase the
roughness a little bit. And that's looking good. And now, if I will add a
little bit more voronoi, you see that those
are not very sharp. This might be glider goods, asphalt texture, but we can
work on it a little bit more. It's not that
comfortable to control the amount of noise
and borne out by this, by sliding this vector thing. The great thing is that we can control it with color ramps. So let's add the color ramp. Let's add the color ramp and connect color
to the effector. And now I can control
it with the Colorado. For example, if I
increase the blacks, I have the pure noise. And if I increase the whites, I have the pure Voronoi. I can increase both, and I can regulate
it even better. And of course I have
this vector slider, which on trawl, like I did here. But that's very linear
and I would like to add a little
bit of randomness. So I will add another
noise texture. So shift a noise, noise texture. I will connect the
factor to the factor. And I will connect both
mapping nodes, two vector. So we could have the
same, same scale. And now I can slide the blacks a little bit and make
it a little bit like that. I can slide the
whites a little bit. And this texture is too small, so I will decrease the scale and make it a little bit bigger. Something like that. Maybe like that creates
the detail and roughness. That instantly looks better. I will play with both
leaders a little bit to adjust it in
the way that I want. Here can see that we don't
have those very sharp edges. Those are still very sharp, but we have roughness
on it and it doesn't look that sharp. I maybe need to increase this to make
it a little bit darker. And we can change linear to B-spline to make it look better. And here we will
need to do the same, but now blender is
calculating things. And I think that is going
to be my asphalt texture. I think it's good enough. We can make it a little
bit darker if you want. For example, this it could be
a little bit darker color. If you would like to
make both whites a little bit whiter or any
other color you can do that. It's up to you matters how you create the textures
in the blender. And as I said, it's an advanced way to do this, but it's a very powerful tool. It's, if you have
those textures, it's easy to add them
anywhere and very procedural so you can change
the parameters anytime, which is really,
really handy thing. But it's hard to create them. And it takes quite a lot, quite a lot of time. I wanted to show that there
is an option of that. And to learn this, I would say just try
to create one another. And you will notice the
patterns and you will see how everything works and venue will be able to create
something new by herself. So that's my advice on both. And if you don't want to waste the time creating
goalpost nodes, and so just use, another way is to add
textures. Substance. Add-on is great. Bbr textures are great, so it's up to you how you would
like to add the textures.
17. World Lighting: So before jumping into creating the lighting
and the background, I would like to add with
textures, travels, lamps. And I just create new and
I will add a solid color, so the base color, and that's going to
be some dark gray. We have dark gray
lamppost and street signs in my city, that's new thing. And those are looking
really great. So I think I will create
the color like that. And here I will add
metallic to something like, I don't know, 0.50.7. And I will increase the
roughness a little bit. So that's gonna
be a rough metal. And I think that's looking good. And one more thing, I will add a texture to. Two here. I'll press New and assign. And there's going to be the, the glass which will, which will emit light. So I'll change the
emission color too. White and emission strength increase it to
something like 78. And that is a shining lights. That's it. That's
it for the light. And now we need to create
the basic lighting. So before doing that, I will expand this shading thing and I will change this to
Scene Lights and seeing world. So now we have it like that. It's a little bit dark. So there are many ways to light. We see one way to light the scene is by changing
the world settings. So you can do that in here
and change the color. Now it's dark gray and
we can make it white. And the world is lighting
the scene, which is great. By default, it's
something like that. Dark gray. You can change the color or you can
make it like that. You can increase the strength
or decrease with strength. So it's up to you,
the world settings. It's up to you. The
cool thing about world settings that you
can in the shading tab, you can jump in, change
the object to the world. And you can see the same nodes. You can see the same settings. You can change the
color of the strength. And one more cool thing that you can
add an image texture. And you can even add an HDRI. And let's try to do this. So you already
know this website. I showed the polyhedron in the previous lesson when
I showed PBR textures. But it has a quite
great HDR rise. So we can browse it. And we can search for
outdoor night scene. And I will show how, how how does it work. So I would like some kind
of night city scene, maybe something like
mad hands up lads. I'll download it
to add this HDRI. Or you can even add a
simple Image Texture Unit. Need to select this background
plane and press Control T. If you have Node Wrangler enabled and you can
open your texture, mine is somewhere here. Hence, hand suppliers. I'll click like this. And now I have an
HDRI around my scene. And it just sliding my my
scene basically my object, everything you can
see on the metal, it is reflecting things
that are in the background. So that's really great. But in my scene, I would like to have a little
bit more dramatic lighting, which will go from the lamp
and from the background. So I will decrease it by a lot. I will leave a little bit of it. So maybe something like 0.1. So it lights my
scene a little bit, but not too much. And I will get back to object
mode on objects shading.
18. Lighting the Scene: And the next thing that
I would like to do, I would like to add some
background in the back. So we need another add-on. So go to Edit Preferences
and search for image. And you need to
enable this import, export images as blends. And when you enable it, I will send her my cursor. So Shift S and
perceptual world origin. And I'll press Shift a
image in Images as Planes. And I will, I need some kind
of image to add to my scene. Let's go to another website, which is really great,
and that's Paxil. So it has a lot of free images which are very high-quality
and I would recommend it. So let's search for city and night because we need
the city and bainite. And I would like to
search for the view from a bridge to the cities, which will have the water in the background and
the coastline. So this one is great. I will in it, open it
in the other window. This one looks the same I think. But let's open it. This one looks good. This one looks good. So it has a lot of options. This one looks good,
but maybe it's a little bit too morning. I need a little bit darker one. This one is interesting. This one interesting. But if we're looking
from the bridge, Adam think that this would work. Yeah. So you can scroll down and see if you find the
picture that you like. I personally like this or this. I don't know. Maybe this one. This
is also really good. It's very wide. And this one is really good. But I think I'll stick to
this and I can download it. I can just press freedom
load and unload it. And now I will jump into my computer and search
for this image. And I import image as plants. I'll move it on the
x-axis, so g and x. And I'll scale it up. Quiet a lot juice
can see this image. I will rotate it on
the x-axis 90 degrees. So our x and 90, and I will rotate it on
the z-axis 90 degrees. So I would like to face
it into, into the bridge. So z, x, and I don't
want it to do like Matt. I select the image are z and 90. Now this image is
facing towards me. In when shader editor, you can see that we
have this setup. We have principled
be as df and we have image color connected to the base color and
alpha connected to alpha because this is
not a transparent image. So I will disconnect
alpha and I will connect color to the emission because now our image is dark. But if we will connect
our colors to emission, our emission will emit light colors from the image and the dark one
atom emit that much. So the darker color
one VM meeting and the lighter will be
emitting some lights, which is really good. And we need to scale
it up a little, quite a lot, actually
not a little bit. And that's gonna be the
background for our scene. And now I think
we need a camera, then we will be able to adjust this image a
little bit better. So in object mode, I'll press Shift a
and add a camera. Camera is here. We can move it so G and
move it somewhere here. And I will have a
look at my scene. I think something like
that is interesting. Maybe something like Matt and
I press Control Alt and 0. Yeah, That's naps
camera into my view, which is not ideal right now, but it's still better than it
was before for you to know. You can jump into the
camera view and out of the camera view by
pressing 0 on your numpad. So I'm looking like
right now freely. And if I press 0, I can see everything
from a camera view. And when I have a camera, I usually expand my
in my blender view. So I hover in the corner
when I see this plus button. I click it and I will
slide it to the side. So now on this image, I can have a camera view. And in this image, in this side of my window, I can hover freely and
change things in Blender. Here I can disable this. So for example, I can press D, need both those things. And then yeah, that's my med is going to
be my camera view. And you can adjust your
camera, for example. In many ways. For example, you can press G
and move it like you want. You can rotate it just
like any other object. But I like 11 navigation thing. When I have cameras selected, I need to do it in
this window because I want to walk
navigation in here. So viel, navigation
and walk navigation. And now I can walk like in
video game with my camera. And I can go like
that, like that. And I clicked somewhere and my work navigation
disappeared. So we have very cool
feature shortcut queue. And if I press Q, I have favorites,
which is really great. So I can go to View Navigation
and walk navigation. I can press right mouse button and I can add it to
quick favorites. I already had it in
my quick favorites, so it gave me the Roman Forum from quick favorites action, but you can add it for
an amplifier remover. I can add it again. And now if I select my camera, I can press coup, walk navigation and quickly
walked in my viewports, in my view, and adjust
the camera very easily, which I really love. So for example, I will
set it up like that. But we also need to adjust
the position of the bike. So I'll select this
part of the bike, the parent object
that we created. And I will, I will move
it towards the bolt. So I'll press G and
move where I move it, g it to here. And I will look at it from
the front view, G and X. Now, I will lock it on the x-axis and I will
rotate it a little bit. So now it is hanging here. You have a pole. Someone
leave it in here. I will adjust my
camera view even more. Just something like that. Maybe from a little bit higher. I would like to adjust
my camera view. I would like to see
this a little bit and listen a little bit. I would like to have a feeling
that someone on the bridge is making a photo of this bike from some kind of either
side of the bridge, not either side from
the side of the bridge. And maybe we can get
back a little bit. Maybe something like that. Now we have our camera view, which is which I kinda like it. And we can adjust
the background. So I'll press number three and I will
adjust my background. So for example, in here, I can scale it down. I can move it to the side. And a little bit up to
something like that. I think that looks good and
we can scale it up a little bit to fit in the camera view. We can move the close
and we can move it further out and see
what works for you. So but I think that
looks quite good for me. And now we can add some lights. So first of all, I would like to add a light in here because this emission color is not lighting the scene
as much as I would like. So I'll press Shift and
right mouse button, and I will add a cursor here. When I press Shift a and light, I can add a spotlight in
the area of my light. I'll go into the side view
and move it a little bit down so it won't be intersecting
with actual lights. And now in the lighting
settings, this light bulb, I can increase the power and I can increase a lot
by just something. 5050 is not even visible
in my viewport. So 500 It's better but still, let's try five thousand. Five thousand looking at it is, it is giving the ethics some
kind of effort right now, which is really good. And what's great about this sliding that we
can change the color and I don't want to
make it very white. I would like to have
some warmer colors, so I'll go to the
orangey looking color. I don't need to go too much. Maybe something like that. And I would like to
rotate it This lamp. So I will press numbered one to have this side
view and I will rotate it. So I would like to light
the fence a little bit, the concrete and to have
some shadows on the ground, I think we can decrease
the radius a little bit. This radius settings basically
controls the shadows. So if you can see we have
a shadow from the wheel. And if we increase the radius, our shadow because
becomes very soft. We still have shadows, but it's very soft. And if we decrease
our radius by a lot, we have hard-edged shadows, which is what I would
like to achieve. So maybe 0.15, something like that
would work in this case, and we have very hard
shadows from this slide. Another thing I would like to
add lamps behind the fence, so they would give some some aligning to the
fence from the back. So it will give a little
bit of feeling that this city is lighting our
scene and about the acidic, we can increase their mission. I think to a city
it is not admitting enough so we can increase the mission
strength a little bit. 1.41 by 1.5 would be good. So that's looking
better I think. And let's add some lamps. First of all, I will move this cursor to the
world centers. So Shift S cursor
to a world origin. And I'll press seven to go to the top view and press Shift
a light and pointless. You can see this light is
basically like a light bulb. It is emitting the
light around it. The spotlight that we created, this one emits the light to the point where we directed it, and this slide
just emits around. So I'll press number seven and I will move it
behind the fence. And I'm President
at one and I'll move it a little bit
up to somewhere here. I can move my lamp and see
how you can see how it adds some nice looking
light into the fence. And I would like to
change the color to some bluish cholera because
our background is very bluish and we can even pick the color from the background
to something like that. But I think it's a
little bit too dark, so I'll increase the lightness
to something like Matt. And I will increase the
power by, let's try 500. Whoa, that's too much. I think. Maybe let's try hundreds. Or even 5050. I think that's good. And now I go into number seven. Maybe I'll go a little bit back and I will add
more lamps like this. So Shift D, I'll add
another in some way here, Shift D. And let's try to add
another one somewhere here. And maybe we put
lower them down. At least last lamps. I like this lambs position when vetted this shining
into this butt. I make it like
fatuous even better. I will over where visit down to add more light
on the concrete. Let's try to lower it
down a little bit. Just this one. This one is not visible at all, so I will make, but
it's even lower. So that gives some blue light and that's pretty
much it may be, I would like to add
a lamp behind this. So it would light a little
bit of events in the slides. We have, of course, we can create an avalanche
thrombus light pole. But when I tested it, it had a little bit
too much light in the scene and we lost
their focus from the bike. You can try it too. You can experiment with the lighting and you can see
what works the best for you. But for me, it wasn't
working very well. So again, I will
add another lamps, so shift a light, and this time I will
add an area light, so G and X, I will move it behind
this fence, G and Z. And if I press number one, I can rotate it free and I can
move it to somewhere here. We can make it a little bit orangey like we did
with this lamp. And I can increase the power and decrease
the size probably. And I can move it and
see how does it look. I don't know if that's
necessary actually, when they tested this out, I didn't CAD world lighting, so I added something like that. But some more lighting is quite good and it gives a little
bit of a light to dark areas. If we have very dark
world lighting, then this lamp works
a little bit better. Of course we don't
see everything. They're very good in this
material preview settings, we need to jump into the
cycles to get a better look, but let's do that
in the next lesson.
19. Rendering: So now we can change
the render properties and we can jump into this. We can change the EV two cycles. And I will change CPU to GPU, compute in the viewport either
need that many samples. So I'll change this to
32, something like that. And I don't even enable
denoising for a purpose. For the render, I will change
it to something like 512, and I will have de-noise, and I will change
this to optics. If you don't have this option, this means that you
don't have an RTX GPU. It's only for NVIDIA, RTX. So maybe not RTX, just basically that's
an Nvidia things. So I'll choose the
optics. It's faster. It's really good. What else? Iron need many things. And in the Render Settings, we have both really cool
options render region. So it will render on only the region and it is not going to
render anything outside. And I will crop
to render region. So we didn't saw
any changes yet. I will disable those
and we need to go to the Render Settings,
viewport shading settings. And now we see this cycles view. And you can see render region. It only renders the region, the camera region, and
crop to render region, it will crop view. So this is how my
cycles view looks like. It's a little bit low res. We can maybe increase
the samples, just 64. Maybe it will be better, but we see the basic things. So my idea is to have a
better look at the lighting. And I think everything looks good and we can
try to render it. So that's maybe what to change one settings in
the column management. And let's check those. I would like to keep the
transform to fill mic and look. I would like to
increase the contrast so we can try medium contrast. And let's see how it looks. It looks basically the same. Medium, high contrasts. It. I liked it better. And let's try very
high contrast, very high-quality dressed. I think it's too high. So let's keep medium,
high contrast. And we can see how we can check how it looks
in the render view. So if I press F2,
it will render. It took me something
like 15 seconds. But now I can see a rendered
image and how this look. I think it looks really good. I can save it. And I'll show you
need to flee from my computer from
which I am recording. Bike version one, save as image. And so that is how it
looks on my computer. I think that looks quite good. We can also increase the resolution if
you would like to see those smaller details
because that's ten ADP, if we would render it in for k, that would look even
better, I think. So let's do that right now. I'll show you how to
change the resolution. Here in the render settings. We can change the format, we can change it to
before k, for example. So now it's ten ADP. So we can change this x to create 40 and y to 160. And now it's going to
be for carrier renders. So let's try to render this. So if I press Render, render image or you can
see the shortcut F2. So it took me almost a minute
to render this Forky image in AT RTX image Save As
I will save it again. And Forky image will have a better resolution so we can
see it a little bit better. And I like what I see. There are some things that
I would like to change, but in general, bet is
looking really good. If you worked with me
and you followed me in, if you rendered something, feel free to add your results
to the class project. I really like to see my
students work online. And if for some reason don't like to add it to Skillshare, you can post it on social
media and tag me as, as bulgy. I would like, I would love
to see what you create it.
20. Outro: Congratulations on reaching
vendor the scores. Hopefully you are way more
confident in Blender now, if you created
something interesting, share it on social media, tag me as LGA, or upload your projects
to student's project. Here on Skillshare. I'd love to see my
students work online. So once again, congratulations, and see you in the next course.
 Gytis A., Motion designer