Transcripts
1. Intro: Hi, I'm leaders and Gladys, you in this quarks together
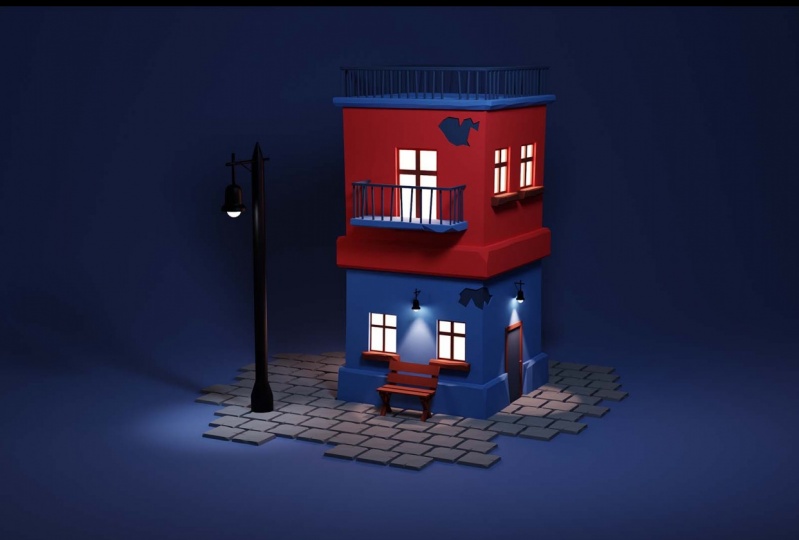
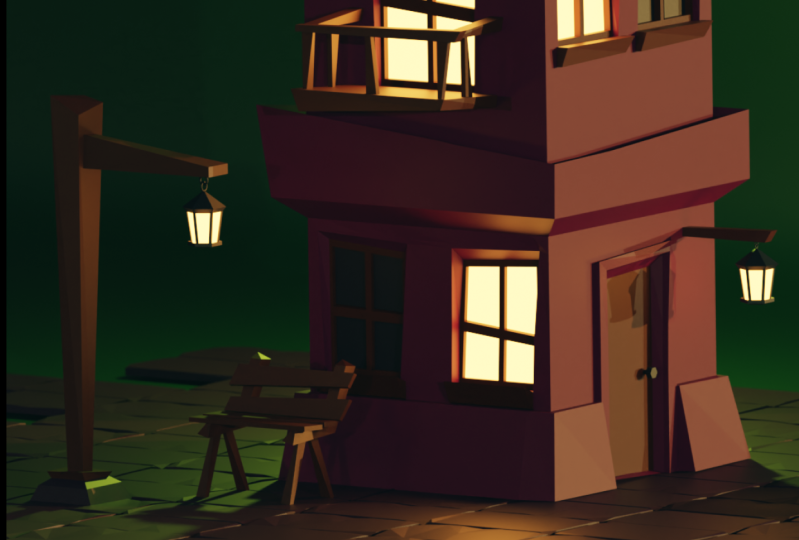
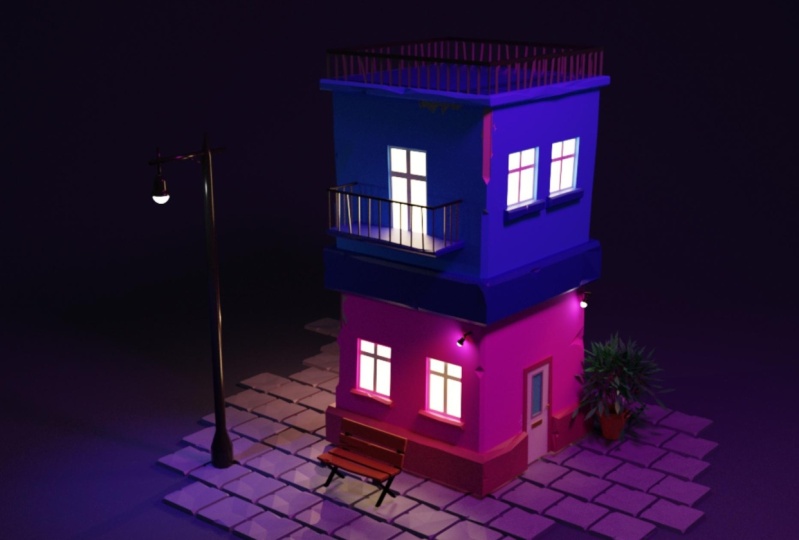
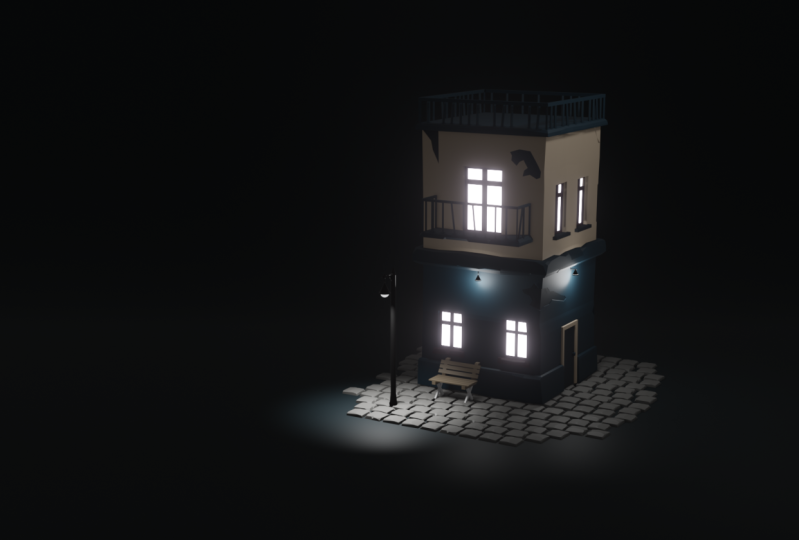
we're going to create this 3D scene and
advent of the course, we will animate a
short animation. I'm going to use Blender
through all of the scores so you don't need any
additional software. I named this course as
detailed as possible, so it should be
suitable for beginners. But if you are using the
blender for the first time, I would recommend to jump into my short beginner course where I explained the basics like
navigating through viewport. And if something is unclear or if you
stuck at some point, feel free to leave me a comment. I checked Skillshare
almost every day and I will try to help
you as fast as they can. So what do you think about
jumping into the next less?
2. Advices On How to Learn: So before starting this course, I wanted to share my thoughts about the most
effective ways of learning. I think that depends
on your skill level. For example, if you are
very new to the blender, I would recommend to follow me and do what I do it in that way, you will lend bad mind
muscle connection and you get more
comfortable in Blender. If you are a little bit advanced and you know
what's going on, you can watch the
lesson and after that, try to recreate it. In that way, you will
think a little bit more and you will
get better results. And if you are an advanced user, I would say you can watch
all the lesson and then you can create your own scene by using the
techniques that I use. Anyway, that's just
my suggestions. Do the course in the
way that you prefer. And there is no right
or wrong way to do it. I just find that those techniques works the best for me when I'm
learning something new. And yeah, I just
wanted to share this. But we can jump into the next
class and straightlining.
3. Creating the House Shape: In this course, I
will try to explain everything as best as I could. But if you are very
new to the blender, I would recommend you to
watch my beginner course, which will give you a basic
knowledge of at least a very, very basics of the blender. End. By finishing this course, you will have all
the knowledge you need to do go
through this course. And if you never
openly blended and there before and
UI and discourse, I'll try to explain everything
as best as he could, but it would be better
if you would have at least acknowledge
how to move on, navigate in the viewport. So let's begin by removing all the objects
from this scene. We can leave a cube, but it's easier for
me just to select all by pressing a and
just delete everything. We can insert Q by pressing
Shift a and mesh in cube. And now we have a default cube. I wanted to create a house, so I would like to scale
with cube on the z-axis. To do that, it will go
into edit mode first. So I'll press Tab, and now I'm in edit mode, and I will press S Z. Now I can scale it, but I will press two. It will just double the
size on the z-axis. And I'll press Enter or I can press the left mouse button. And now I have a cube which is four meters long on the z-axis, so four meters high and two
meters width and length. So it's not very
realistic proportions, realistic measures. But we're creating a
stylized illustration and the vet would work for us. We just need to have the right proportions
and we can change bad anytime soon if
we, if we need that. So let's get back to Edit Mode. In the firstly, I would like to create two loop cuts in
the middle of the object, which will separate
the first law. The second law because it's
going to be a two floors building so we can
breath control. And when we are on the edge of our cube or figure, it will give me an
option to add a loop, but if I will scroll my
Wheaton mouse wheel bottom up, it will give me more loop gets in my case I need only two. So I will leave it on two. I will press left mouse button. Now I have those luke cuts and I will press right mouse button. It will stick voce
in the middle. I have more geometry
on my house right now. But was Luke goods
are a little bit far away from each other. So to make them
closer to each other, I can feel them a
little bit down. So if I press S and
I will press Z, I can scale them on the z-axis and they will
come closer together. So let's make it
something like that. It doesn't really matter
how high this is gonna be. It's gonna be kind
of a separator between the and first
law and second law. And I need to extrude
it on the sides. If I press E. And I will try to extrude it. As you can see, it doesn't really
work as I would like. So I can get back by pressing Control Z because I created new gym geometry just by
pressing E. So Control Z. And then now I don't
have any new geometry. I need to extrude
along the normals. To extrude it along the normals, we have a shortcut, Alt E. If I press Alt E, it gives me more
options to extrude. And I need this option, extrude faces along normals. And if I press E, whew, I don't need
to press anything. If I slide my mouse, you can see that it is
extraordinary inside or outside. In my case, I need to
extrude it a little bit outside and
where it's perfect. If I press one, I numbered 1, I I will see the front
of my house in here.
4. Modeling the Window: I would like to create a couple
of windows here and here. I will need some more geometry. I will create a
couple loop guts. So actually any free loop gets, will explain why
free in a second. So I will press Control. R will scroll my, my mouse wheel button. And I'll create free leukocytes. I probably, I will
keep them here. I don't know if proportions yet. And I think the bottom loop
gut is on variety, position. I need to slide visit
down, weigh more. So I need to select
all the loop cuts. So I, if I press Alt
and I select this, it will select
everything around it. So I can press G, z and move it down to
somewhere right here. And I probably need
to move this down. So if I press Alt and this, it will select
everything and G and Z, it will move liquid. So what I did, I said the ranges
for my windows. Here is going to be a window and here is going
to be a window slow. So that's basically the
proportions for a bat. And I will create a couple
of vertical loop cuts. So again, Control
R to loop guts. I will move them somewhere here. And I need to move this loop got a little bit to the left. So I'll select everything G, and this time x and move
it to somewhere here. And now I think that my window might be a little bit too low. Yeah, let's move it
a little bit up. So let's deselect everything. Let's breaths out this one. And by pressing Shift, Shift and Alt, why
it doesn't work. I can select this brush Shift. Yeah, I can move it
GZ, a little bit up. And here, I think it might be
a good place for a window. If I go to Face Select, I can press F3 or I
can press this button. And I will have faced select, I can select faces. I will need to extrude the
window inside a little bit. So I press E, extrude something like that. Because if you look
at the houses, all the windows are
a little bit moved, a little bit inside, and we have frames
and et cetera, and we have window sills. So let's extrude this window. So a little bit
outside my pricing, ie, Something like that. Let's select both spaces. And let's extrude
both along normals. Because if we just extruded
them, that wouldn't work. So I'll E extrude
basis long normals. And we need to
extrude them outside. And that's great. Now we have this face and
I'll need to add couple of Luke guts because I want
to add window frame. So I need one loop in the
middle, vertical one. So control our vertical
Lukert just in the middle. So I'll leave it right here. And one horizontal Control R. And I will need to
move this, do well. Breast right mouse
button by accident, but I can break GZ and move
it in a place where a one. Now I need to select
all of those faces. But first I need to go to Face Select mode by
pressing F3 or this. And by holding Shift, I can select all
of those spaces. And now I would like
to insert both spaces. It's the shortcut for that is I. And if we press, I can certainly basis, but I need to insert individual phases, every
face individually. So if I press it again, it will insert
phases individually. And that's exactly what I need. And once again, I
need to extrude the glasses of the window
a little bit in science, so e and little bit inside. And that's our window.
5. Creating other Windows: Now let's create another
window in the same way. I'm gonna do that a
little bit faster than I did with
the first windows. So we're gonna create
two loop cuts, vertical ones,
something like that. More of them somewhere here. I think we can move this a
little bit closer to the first one by pressing
G and X, I believe. Yeah. Again, we can go
to the face select mode, select this and this. Extruded inside a little bit. We can create a window
sill by extruding outside and selecting
those spaces. And extruding along normals. Accidentally try to
extrude it normally, but E, extrude faces long
normals, extruded outside. And we need one loop cuts vertical loop that
so Control R here. And we can select the faces. I do something like that. And that's our visits
second window. So we created with Windows, you can save it by
pressing Control S and save it like that. And now we will need just
press Control S to save it. And that's it.
6. Adjusting Position for a Window: I think week rated this window too close
to the side of house. So I would like to
move it a little bit closer to this window. And we can do that by selecting those faces, not both species. We would need to select both
pieces by pressing Alt. Now, if we're gonna
hold Shift and Alt, we can select those faces. And we need to select
all of the window faces. So if I still keep
shift and control, I can select those BOS voce. Here's one unselected. I can select voce and I
need to select window sill. That's too much control Z. So I'm going to select
those for a minute. Just Bye, pressing shift. This, this, this, and this. So we selected all of
the window thesis. That's a good exercise for
moving through a blender. And we can press G
and X or Z and X. And we can move this
window wherever we want. So I think somewhere like here would walk,
work much better. So again, just press Control S, save it and see you
in my next lesson.
7. Modeling the Door: So in this class Let's create
with door forum is house. And I think I would
like to create this door at this wall. The process is very similar
to creating windows. We can press Control R, n, scroll the mouse wheel up. In that way we will get ducats. And let's confirm that my left mouse button and
right mouse by them. I think. I'm going to make the
doors in his height, but it's probably need them
to be a little bit narrower. So let's go back to them. Edge select my blessing
to and select vote to. Look at edges by
holding Alt and Shift. And now we can scale
them on y-axis a little bit till the proportions is going to be something
like the real door. Okay, let's get back to the
face select mode by pressing F3 and select those
three phases. Now, I would like to
insert this a little bit. If I press I and I insert. Okay, let's keep it this way. But I would like
to insert it and keep the bottom
part of the door. Modern, Sarah, there is an option for a vat
at gold boundaries. So I and j, we have most options. But it didn't work. It didn't work because we have elegant back control Z
because it didn't work because on our house we have the ground and we don't really
need that in our model. So I will delete that. I'll select this face and
my shift and control. I will select this face
and it will select all the bottom
parts of the house. And if I breast x, I can delete faces. And if I insert this, now, you can see I have an
option to have a boundary. So with all of the
boundary and with it. So that's exactly what I
need and minimize that. And now I would like to extrude both faces outside a little bit. So I will press E and
we'll extrude it. Just tiny bits.
8. Modeling the Door Knob: So now we have the
form for our doors. And the next thing I think we can create a very
simple little door handle. So I'll press Shift
and right mouse button where my door handle should be. So somewhere around here. And the blender will snap
the cursor at that point. What that means, if I
will insert any mesh, it will insert that mesh
exactly at that place. So I think I will need
to insert the circle. And the blender inserted
a huge one meter circle. I need a little bit smaller one. So I need to scale it
down to something 0.2. And I don't need
that many vertices. It's going to be a very
small object and we probably hardly
even see that on, on our camera view. So I'll reduce vertices
to something like eight. And I would like to
rotate it on y axis. So our y and 90. So now I have a circle at a
spot where I wanted to be. I just wanted a
little bit smaller. So S and I will scale
it down a little bit. And I will move this
one a little bit. Just somewhere here. I don't
want it to block my view. And I would like to extrude
it a little bit outside. So if I press E and I will
extrude, nothing happens. And the problem is
because I am in the face select mode and the circle do not
have any phases. It has only vertices and edges. So I'll go back to
edge select mode. And if I will extrude
it now, it works. So I will extrude on
x-axis just a little bit. I would like to add another
object on this part. And if I will add my object, it will appear right here. So I can press Shift S. And now I have a lot of options. What can I do with my cursor? And I would like to select
the risk cursor to select it. And it will snap
to this position. And now my new objects will appear at this
exact position. I'll press Shift a. And I have this menu, so I need a UV sphere B's time. And again, we can't see
anything because this UV sphere is one meter in radius. So I'll reduce met and
I will zoom in again. I think this time we need
something like 0.03. Probably if you press
if you press Shift, you can be more precise with your scaling because it's very without shift is hard to
scale and be precise. But if I hold shift, I can be more precise. And again, I don't need that
many segments and rings, so I'll reduce both to 88 also. And yeah, that's cool. Now, I would like to move
it a little bit outside. So I'll press one and I will see everything
from the side. And I can press this
wireframe mode, or I can press Z and move
my mouse by holding z. And I have both options. So I'll go to wireframe mode. I'll press G, and I will move
it a little bit outside. And I will press X and x, probably a mixed sex axis, and that's going to
be our door handles, so G and move it here. How does it look? I think that looks quite great. So let's get back to Solid mode. Again by pressing Z, I can go through
all of those modes. I will tap out. And that looks quite good. And it's actually a really good, It's a little bit low Bali. But we will fix that at the end. So vasco and we have our door. I just noticed that boasts
windows are not extruded in, so let's do that right now if
you didn't do that before. So extruded in, maybe I didn't save it or I forgot
at the last lesson. I don't remember. Now it looks better.
9. Modeling the Balcony: So I think we need a balcony
somewhere around here. I think I will place the
balcony door in the middle. And some where Around here, the railings in the balcony. So let's create
the balcony door. It's gotta be a similar
process to the Windows. Let's create a duplicate my
Control R and release those. We can select this
one and the breast g, z and move it in the place
where it's gonna be. The bottom of our balcony. I think. That's quite good. And the second one, hi. Again, I'm selecting
with Alt and select is going to be the
top of our balcony doors. So from leaves, good, I think that might be a good proportions
for the balcony door. That's going to be
the same process. Let's get back to a
face select mode. Select this part inserted by extruding in TSO E and
extruded a little bit. I think I will need a
loop cuts ron here. So control our loop cut in the middle and have a
look at some way or here, Control R and move
it a little bit up. Let's insert those faces and go to your face
select mode by three. That's select those faces. I, Let's breath I
again and insert individual faces,
something like that. And let's extrude
those in a little bit. So bed, basically
a one big window, which is going to
be a balcony door. And now let's create a balcony. Let's go to edge select mode
by pressing F2 or miss one. So let's select. I'm thinking about grading
the balcony floor this wide. And since I don't know if that's the right size
for the balcony. I will duplicate
this vertices and I will create a new object. So yeah, I'll shoot you, press shift D and
as you can see, I have a new vertices. I will snap back that
to where it was, my breathing right mouse button. And it's year. I'll press P to separate it and breathe
separate selection. And as you can see, I have another, another mesh, which is if I will get
back to object mode, this cube, Let's
rename it to house. And this cube is going
to be Balkan a flaw. So house and balcony floor. As you can see, we have
only this edge selected. So I will tap in
into the edit mode and I'll press a to select all. And I will extrude
it on the y-axis. So e, y. And let's extrude it. Just something like
that probably. Yeah, I think that's good. Maybe a little bit more. So breast g, y. And okay, that's awesome. Now let's select
both free edges. So this one, my person control. Let's select it here and here. And let's do the same
thing like we did before. Let's separate this edge from the balcony
and create a new, a new object. So. Shift D. Let's press right mouse button. Be selection. And let's name it. Balcony railings. I can space here. Again, let's damn about
select balcony railings. Let's dive in into the
edit mode, select all. And let's extruded up. So e, z. And it's going to be
a balcony, railings. I would like to
be both railings, even because we are
going to create a bunch of Luke goods and
create both loop cut. And we will create
both loop cuts into the railings by using
wireframe modifier. So I would like to
select those and press X price service and
we deleted with most edges. So now we can press Control R. Scroll the mouse
wheel button up. And I think something like that, or maybe like that. Let's keep it this way. And that's going to
be our railings. So let's confirm and
let's do the same here. Control R. And we just need a
little bit less verbose. So let me free. And let's create three
loop cuts here. Great. Now we get tab out and
we don't see anything. And let's go to this
modifier option and let's add a
wireframe modifier. Boom, is busy. We can change the
thickness if we want. So I will make it
something like that. So we have our
balcony, our railings, and one more thing, I think our balcony floor
is a little bit to, to, to, to, to slim, to do tiny. So we can select
that in object mode. And let's go to the Edit mode, select all and
extruded by pressing E. So let's extrude it a little bit to
something like that. And I think that's good. One more thing, if we select
the house and move bread g, we can move it, but our balcony
stays in the same place. I would like to
bearing to do house. So I will select the railings, the balcony floor,
and then rehabs. You can see that
house is selected in a little bit different color. This means that it
is the main object. And that means that we
bear in both objects, do this object so I can press Control B and said
Baron to the object. And now all of those objects
goes into this object. And I'll select my house
and Bryce G, I can move it.
10. Modeling the Roof: Let's create the rooftop now. So let's select the building. Let's go into the edit
mode by pressing tab. And let's select all of those edges around on
top of the building. So it doesn't select all. So I'll select this way
by holding Alt and Shift. And we have selected
those edges. We already use this technique
so you know how to do. We will separate those
edges by pressing Shift D. So we have the duplicate
of those edges. I will cancel action by
Ri, right mouse button, and I'll press B, and I will separate
with selection. So now we have here, Let's rename house railing. I will go to object mode. I will select on me
only the railing, and I will go into
the edit mode. Now, I can extrude
it up by pressing E, or I need to select it first. So I selected by pressing a and I will extrude it by e. I will fix bit z-axis
by pressing Z. And things, some things
like that might work. We have voce edges selected, so I will duplicate rows again. So Control D. And I will separate. Both might be. And we will have railing, don't. So now I will go to Edit mode and I will select
on liver railing. And I delete all of those edges in the middle of the wall. I don't know how to explain, so I'll select those
xs and delete edges. Let's do much. X
and the salvage. Let's select those. That was my mistake. X this old edges. Let's do the same here. And on the last wall. Okay, we will canvas same
process like we did here. I'll press Control R. And I will add many Luke guts. I think something
like that would work. So I'll keep better that way. If I will expand this. I see that we have 16 loop guts. So I would like to keep the same proportions
on other sites. So I would like to do the
same here of control are we'll do something like Matt and I did variety
number. That's next. Actually we can change
that if we missed. So I need 16. Same here, Control R,
Something like that. Yeah, I mean 19. So
I will fix it to 16. And will last. And last. Shouldn't be something
like 17 m is by 1, 16. Great. So now we have all
of those goods. Let's go back to the object
mode by pressing tab. Let's select this and add
a wireframe modify up. Yeah, that looks really good. I maybe I can increase the
thickness a little bit. I think that's good. Okay. Let's go down. Let's go to the railing top. And we have this and we
can add the skin modifier. And that will add the skin. And if we will go to
the edit mode by tab, like we always do. And if we press Control a, we can adjust the
thickness of the skin. So I think something like
that would work very well. And I would like to add a little bit faker
edge here on the top. So I will go back
to the object mode, select the house, and
go to the edit mode. And control are somewhere here. Now, I can go to the
face select mode. And by holding Alt, I can select this. And I have the loop
selected around it. And I needed to
extrude along normal. So Alt E extrude faces along normals and
extruded out a little bit. Now it looks a
little bit strange, but if we press this offset, even, it will fix that. So I think we extruded it
a little bit too much, but we can scale it down. So you can just
press S and scale. Now, one more thing. Let's go back to object mode. Let's select house railing
and the railing top. And I would like to move
it a little bit down. I would like to move it
inside of this block. So g, z, Something like that. So now it looks bad. It's going from the block. And I think we can do the
same with the balcony. We can select this. I'll make it a
little bit thicker. So I'll go to Edit
Mode, a, s, z. Let's make it a
little bit thicker. Let's select both railings. Will scale them
down a little bit. And if I press F3, I can and just the
position of them. So I would like to insert this inside of the
wall and this inside. So now it looks like it's
going from the wall. And here is from this block. I believe that's how
balconies I made. Probably there are many
different variations how it could be made, but at least mine, my balconies Min, in this way.
11. Windows on the Second Floor: Now I would like
to add something on this wall because
it's very empty. So I'm thinking about creating
two new windows here, just like we did here. The same technique,
same everything. So I will set up those lions. So I will get to the edge
select by pressing too. And I will select, I will adjust both lines. This line is going to be the
bottom of my windowsill. So I'll select Close, press G and Z, and I think it will
going to be somewhere. Here. I think that's
very reasonable. Height of a forum, the bottom of the window. So I'll select this one, also. Gz, that's gone, be
something like that. And the top of my
window is going to be maybe it can be at the same height
or the balcony window. I think that's totally fine. And that's the window. So,
and that's the window. Let's create a couple loop cuts. We basically need to. Loop cuts. Can be the right
side of the window and we need left side
for this window. And for this one, no, we need the other parts. So control RA here. And I think maybe here could
be the side of the window. Here. Also, we need one loop cut. I will select this
one by pressing Alt, and I will press G. And why? I'll move it a
little bit to the side. Same with this. Gy. Most Windows doesn't
have to be identical. So think of that, could be good. This one, no, this window. Maybe let's move this a little bit to the right G. And why? Because we will see this
house from somewhere. Here. We can actually
set up the camera. It would be easier for us to understand how this
will look like. I'm not going to add
anything on this side, on this side of the building because we are not going
to see those things. We will look at the window from the house, from somewhere. Legs here. This is gonna be
our perspective. And I think Windows will
FitBit view quite well. So if you remember
like we did last time, Let's go to the edge mode. Let's select both windows cells, breast e to extrude it out. Extraordinary window
sills a little bit. Let's select those faces. I will do the same
on both Windows. I'll extrude along the normals and extruded out a little bit. Now let's select those faces and let's extrude
it in a little bit. Now, I need to loop cuts. So control are in the middle of this one and control are
in the middle of this one. And I need a loop cut
somewhere around here. Let's get back to it. Face select mode by pressing F3. Let's select those. Bose. Let's insert it by pressing I. And if it is inserting
like this for you, you can press it again and it will insert
individual faces. So save that. And let's extrude
both a little bit. Once again. So this is great. We created during
the windows and something like a minute or
something like that, I guess.
12. Base of the Street Lamp: The basic editing far
of a house is done. We will add some details for it. But for now, I would like to create
the rest of this scene. I would like to create a street lamp
somewhere around here and the bench somewhere
between when both Windows. So let's start with
the street lamp. For bad, I will
create the ground. I will add a plane, so Shift a and add the lane and it adds
in a weird position. So I will remove
it by Control Z. If I will press Shift S, I can select the
cursor to the war, to the world origin. And now I can add the plane
at the center of the scene. I can scale that up. And my house is in the middle. My basically my
house is too low. So I can select the house. I can press GZ and move it up and I already see the problem. My array, my roof railings are
not parented to the house, so I will cancel the action by pressing right mouse button. I will select those
combos. And house. I'll press B, control B, and said Baron to object. And now if I select
the House, press G, z. Every film works fine. So I don't know where
Mahan's the spirit. So GZ, Let's try it again. I'll go into the front view. I wanted to be a little
bit more precise. Gz. So yeah, this is our scene, this is our house. And now we can create
the street line. I'll press Shift
and I will press right mouse button
where I would like my street lamp to appear. Like to be here. We will be able to move
that to the other position. We will need that. Let's add the circle this time. The circle is way
too big and it has way too many or
too much vertices. I think we can make maybe ten and reduce very
ideas by a lot. Mu is 0.2, something like that. I think that's good. Let's extrude this. So if we press E and we can't
extruded in object mode. So let's go to the edit
mode by pressing Tab. Let's press E. And let's extrude
it on the z-axis. Make sure that you
are in the vertices, vertex select mode or
in the edge select, because it does not go on to extrude in the face select mode. So I'll select this one and see if maybe let's keep the
vertex select mode. Let's extruded a little bit. Again. On the z-axis. Let's scale it
down a little bit. So that's the base off
the street light ball. And we need I know that's
the right proportions. It's loose, huge. But anyway, let's
try to extrude it. I think my street lamp is
going to go to there maybe. So we extruded z-axis. What's happened? Control Z, extrude on the z-axis to
somewhere around here. And let's extrude it once again. So let's press E, z and then a little bit
more and scale it up. And maybe like Van GZ. And it's extruded a little bit more on the z-axis
and skill that. So we will have a little
bit more control. We can go to the wireframe
mode by pressing Z and lead. We can select those and we can move them
down a little bit, my G and Z. And we can create
machine that we want. Okay, I will get back
to the solid mode. I think that womb street
lamp oil is too thick. So I would like to scale
it down a little bit. So let's press a to select all. Let's press S and Shift Z. I don't want to scale it on the z-axis only on x and y axis. So now I can scale it like that. Let's make it like that. And I think that's
way, way, way better. Maybe this one. And this is a little
bit too high. I need to go to the
wireframe mode if I want to select all the,
all the vertices, because if I am in this mode, whose vertices are not
gonna be selected. But if in the wireframe
mode, it's Select All. So GZ I've been in length
that would look better. And that's great. So I'll press F3 and I will go into safe mode. I'll tell you about
brands, shades move, and that's the base of our bowl. So I'll get back to the sidewall by addressing
three number three.
13. Details of the Street Lamp: And I will create an ownership
by pressing Control a. And this time I will
create a cylinder. Again. Way too much vertices. Let's keep it. Dan.
And radius is way, way, way too, too high. 0.03. I think that's enough. Let's keep it at depth at 0.8. Let's rotate it at 90 degrees. And we will place this
one somewhere here. So it's going to
be another part of the base for our lamp. I still think it's to fit. I will go to the edit mode and I will scale it down a little bit. And now I will adjust the length by going into
the wireframe mode and will more bys on the y-axis and little bit
and this one also G and Y. Two, something like that. We will be able to adjust
that if we will need, if we will need. So let's go back and let's
duplicate this object mode. So Shift D, We have another one. I will cancel the action by
pressing right mouse button and I will rotate it 90
degrees, or maybe 270. I needed like rats. And I will move
it on the y-axis, so G, and why? I'll go to the edit mode
again to the wireframe. G, z. Nothing happens. G and Z. That's weird. Edit mode. Let's look both G. It's working now. And this one G and Z. And that's where we are
going to hand our lamp. But this construction
doesn't look very stable. I would like to add
another shape here. So I'm probably gonna
duplicate this one more time. So shift in D. I have this one. Will go to the Edit mode, select all, scale it
down a little bit. I'll get back to object
mode, will rotate it. Just something like that. And I will move
it some way here. I'll scale it down a little
bit more on the Edit mode. I needed a little bit tinier. So basically I am
moving the object on the object mode and I'm scaling and editing
it in the edit mode. Why I'm doing that? Because if I move this on
the edit mode, for example, I'm in edit mode and I
will moderate my orange. My origin point is staying
at the same place. And now if I'm going draw dated, it is going to rotate
around this one. So it's not one. It's not very cool. That's why I'm moving the
object in object mode because the pivot point
stays in the same position. So let's have a look
how from other angles. I think we need to shade smooth ovals to
make them smaller. And that looks quite goods. Maybe we will need to
shorten those things, but let's add the lamp now. So would like to select this press Shift and
right mouse button. And now if we will
add new things, it will appear here. So let's add the circle. So we have a circle
with n vertices. And let's adjust the radius. 2 is a little bit smaller. Let's go to the Edit mode. We'll fill it in my bracing F. And now we have this thing. And once again, we
can extrude it. So I would like to
extrude it down E and Z. Z, and maybe scale
down a little bit. Let's extrude it down again. And once again. Let's kill it out a little bit. Let's extrude it once again. It could be our shape. I think maybe we can
go to wireframe mode, select all of those, and move them down by G and Z. We can select this edge and
scale it down a little bit. But that could be our lamp. Shade its move. We'll move this to here. And now I need to
decide the proportions. I think this one is a
little bit too big. It looks massive on
most tiny sticks. So I'll go to Edit Mode, select all scale it down
a little bit. G and Z. Does it look now? My
name is too small now. So I will undo my actions. Yeah, it was better
to first-time. One more thing that
we need to do. We can select this, go to the Edit mode, go to a face select mode, and let's remove this
faces at the bottom. And let's add a subdivision
surface modifier. Because it has a lot of edges and that would
fix a lot of things. It changed the
shape a little bit and I think I kind of like it. We can adjust it a little bit. We can select. Let's add another
loop on this side. Move in here. And if I go to okay, that looks quite good. I think one thing that
I would like to adjust, I would like to make those
a little bit bigger, a little bit more
thicker, mean not bigger. So I will get back
to the side view. Let's select this one. Go to the edge and
go to Edit Mode. Select all S. And I would like to
fix the scale on the y. I don't want to scale
lit on the y-axis too, so I'll press Shift and y. And now it is scaling
only on Z and X axis. So I'll scale it
a little bit up. I will do the same
with this edit mode. A mistake, either one
is scale on the z-axis. So S Shift Z,
something like that. Maybe let's go to
the wireframe mode, select this GZ a little bit and just select this G and why. And let's see how it looks now. I think that's way better. We can keep it
like that for now. And when we will
add more details. So yeah, let's keep
it like that for now. And if we will think
about something, do not work with the scene. Or if something is
out of proportions, we can fix bad anytime. And one more thing with this
street lamp, we would like, we need to bear everything to the base of it because
now if I mod it, everything, it has
its individual parts and we need to remain, rename it to keep our
project ID and symbol. So let's select
this, this, this, and this makes sure
to select the part of the lamp to the
base of the bart. The last, it has the
different color. Again, Control P set
bearing target object. And you can see both lions. Now, it parented
everything to this one. And if I am all it,
everything moves together. And here I would like to remain, rename it to treat LAM. And now we can save its control. I just press Control D, but we need to press control S.
14. Modeling the Bench Base: In this lesson, we are
going to model the bench. Thinking to add it somewhere
here near the house. Let's add the cursor somewhere here by pressing Shift
and right mouse button. And let's go to the side view. And Let's start modeling by adding the lane thin or cube. Let's do it with the blame. There are some reasons for that. First of all, let's
produce besides it's going to be the leg
for four-bit bench, so it needs to be kind of tiny. I choose the plane because the object origin is
going to be on the ground. What I mean, if I
will add cubic cube, it will have it or the origin
in the middle of the cube. And if I want, if I will want it on the ground, I will need to go to the
edit mode and move that up. And now I will have the world origin
at the bottom of the office shape
and on the ground. But when I have a Blaine, Blaine, I have this
from the beginning. So let's delete with
educational cube. I'll go to the side
view by numpad free, and I will go to edit mode. And now I can extrude it. And I can extrude it
to somewhere here. I can remove this fixation
on the z-axis if I press Z. And now I can extrude
it like that. And let's see how it looks. I'm not sure about
the proportions yet. So let's keep it that way and we will scale it up or
down later in the process. So we have one leg
for the bench. I'll go back to the object mode. I will duplicate this
by pressing Control D. I will rotate it on
Z-axis, 180 degrees, and I will move it on the
y-axis to something like this. And that's gonna
be the base. Okay? I will need another
shape right here. So Shift and right
mouse button on, on this, this dime, I think I will add a cube. And it's way too big. So let's reduce
the size of it to something a little bit
bigger than the Venn. This we can navigate
to have a front right now and we move it up
and something like bad. If we will go to the Edit mode, we can scale it
out a little bit. In object mode. We'll move it a little bit up. So we have a cube here, and I'll go to the face
select mode, select this. And I will move
it on the y-axis. Just some way here. I'll move this one also on
the y-axis a little bit. And I'll go to object mode, select all of those, and I will move all
of most barbs on the y-axis a little bit
because I'm running into the house soon. So I don't like that. Gy a little bit more. And now I would like to to
angle this a little bit. We can do that in
many different ways. But this time I think we
can use this tool share. So if I enable it, we can shear is we can angle this my moving
those handles. And it's kind of the
handy thing to do. Let's see the result, what we just did. That's cool. As you can see, we can move it on the
directions we want. And we have many, many options. But I think I'll
keep it like that, maybe, something like that. And I will get back to this
and we'll extrude this. I'll deselect. This is the thing. Looks like that. And again, we will need the
same tool, this shear thing. And just a little bit, we need to make it
wider, wider, wider. Even why that we need
to move it like that. And then a little bit why it up? Something like that
thing is good. So we have one
side of the bench. And let's select all of those. And let's create a duplicate. But this time, do not
use Shift D, use Alt D. I'll show you what I do. I will go into the front
mode and I'll press Alt D. And I will move it on the
x-axis to somewhere like here. And by Aldi we have an instance. If I will select this. As you can see, both of those
ghost into the edit mode. If n, If I will, select this part
and I'll move it, both of both buyers will
move symmetrically. And since we want both of the bench sides
to be identical, That's exactly what we need. So I'll get back to
the object mode. It looks a little
bit blocky for me. Maybe let's select voce and move it on the
x-axis a little bit. But we can try to add
the Blaine's here and to finish the
bench and see how it looks at as final broad.
15. Modeling the details of the Bench: I'll add my cursor here
and I will add a cube. I think you might work. I'll go to the
side view by free. Will, rotate it to
match the angle. And I was gay, let's on the y-axis. But as you can see, this y-axis do not align. Files kill. It scales
a little bit weirdly. But if I press Y and Y again, now it aligns to the
object that I'm scaling. So once again, Scott, as I would like to scale
it on z-axis and z again. So now it creates
something like Matt and move it by g
to some way here, I will rotate it a
little bit more G. And if I go to some thin
layer to the front view, I can select this edge, this phase actually not edge. And I can move on the
x-axis, so g and x. And I can move this face
on the x-axis to g, x to the side. Can move this G
on z and z again. So we have that go
back to object mode. And we need to apply with scale, because if we go to the item, you can see that our
scale is chaotic. So if we select this object
and if we press Control a, and we can apply locations, rotation and other parts. And if we will apply the scale, both values go to one. So control our control
a and apply the scale. Now most values goes to one. And keep in mind that
you need to do both if you scale a lot in
the object mode. So let's duplicate this. Control D. Both a little bit too big. So I'll go to the Edit
mode, select all. And we'll scale
it on the z-axis. I'll do the same with this
edit modes as on the z. Nothing happens because
I didn't select all. So a, s, z and z again. And we can scale it and
go to the object mode, and I'll move it up. Okay, Now it's bad up. And I'll go to a side view. I'll duplicate this. I'll add it somewhere here. I will rotate it. Something like that. Magnet little bit G, D and added here. So let's have a look at how
our balance sheet looks like. It's not that bad. I think the angle is
a little bit crazy. And doesn't look right. We can move this one
up a little bit. Yeah. So couple of things I need I think we need to fix
the angle a little bit. We need to mean make it
a little bit steeper. And I think we need to make
this a little bit taller. So let's try to do that. Let's select this,
go to the Edit mode. Let's select this face. I'm going on sideview G, and I will make it like vat
and a little bit taller. And we can again fix
the angle a little bit. Let's get back to object mode. Let's select this. And just select this. And just this one needs a little bit
more adjustment. And that looks way better. Instantly. It looks way, way, way better. There's a little bit
too big, I think. So we can scale it down and
we can select all the parts. No need to select this. Select this. And if we scale it down a little bit up,
That's quite good. I like it. Now. I think we can
join some parts. For example, this,
this and this. We can press Control J. And now it's one object. We can do the same with this. So let's select
those and Control J. And now it's one object. And we can barons all of those objects
to maybe this pink, so this doesn't joined
all the things. Let's select Visine
this Control G. Now it should work this, this, and this to this. So Control B to object. And now everything
is parented to this. And if I am moving,
it moves together. And I think we can rename
it to bench and ln, two browns because it's
a little bit confusing.
16. Modeling the Tile: Now when we have
all the objects, the house below the bench, we need to create
the last object. That's going to be the
tiles on the ground. So basically the
ground for this scene. I'll add my cursor to
somewhere like here. And I will press Shift a
and I will add the plane. And this time I will make
it a little bit bigger. And it depends on what size of the title you would
like to to use. I think something like that will work for me and
now I will extrude it. So I will go into the edit
mode by pressing Tab. And I'll press E, and I will extrude
it a little bit. So this is my tile, but it is very perfect. And I would like to
make an old house or damage house and I
would like to make me same with this treats. So let's damage
mystyle quite a lot. Let's go to a vertex
mode by pressing 1. And let's bevel this, this corner a little
bit so controlled BY. And as you can see,
nothing happens. So let's press V. And now we can bell
the bell this corner. I can select this
edge, press G twice. And now I can slide the
vertice c on this axis, just some thing like that. This 12. We can do the same with
this control B, V. And move this to this, this one to control b and v. And this one Control V and VI. I would like to add a
little bit more damage to this tile, but I can't add a loop
cut, for example, Control R, do not work it for me because I extruded with
style and it doesn't work. So we can add a little bit more geometry
in a different way. Blender also had the knife tool. It can be found right here. And it works like mad. We can select the vertices. It snaps Davos, and we can finish action
by pressing Enter. And it added new geometry to us. So I would like to add some kind of the
gut into the style. So let's go to the Select mode, select this vertices
and bill it. Let's bevel it. So Control B. Nothing happens like
with the corners. But if we press V,
just bevels, it, it doesn't look like
a crack right now because we have this phase, but we can delete this face. We can press X and delete faces. But now it has a hole in it. And to make it
look like a crack, and we can select both freeze free vertices
and press F to fill it in and do the same
with this side and fill. So now we have some
kind of a crack and into Warner we can adjust
didn't by pressing, for example, GnG,
this, G and this. So here is our
correct in the tile. And that looks
quite, quite good. Do we need to add more damage? I don't know. Maybe a little bit to
this are this side. Let's add another
crack like this. Just lets make it wider. So again, knife tool, the shortcut is key. And I will select
this control V, V. Let's make it like that, and let's delete the space. Let's select most
vertices and press F. Let's select both
vertices and press F. And now I don't want it
to make it this deep. So we'll press G and
G and move it up. I'll press G and G and move
this to this side, gene G, this side and probably
this one by g and g looks different. And since I don't want
it to make very flat, I can move the middle of
this object a little bit up, so G and Z. But it looks a little bit weird. We can add the
proportional editing, the shortcut for business 0. So, oh, it's select
and deselect it g. And it moves all, all the tile because
the diameter of the proportional
editing is huge. And if we move it a little bit narrower
by scrolling them, mouse, wheel button,
we can adjust it and move it to
something like that. Probably. It's not gonna be a bad flat. And if I tab it out, it looks kind of cool. Okay, so we have a style. And I would like to
create a bunch of those. I will press seven to go to
the top view and now decide, I think it's relatively too big for the skill of the house. So let's scale it down
to something like mad. And let's apply the scale
because as you remember, our scale is not one. So Control a and scale.
17. Spreading Tiles on the Floor: And now we can start
duplicating it. So firstly, we'll add it here. And I will duplicate
this time by Shift D because I might need to adjust
most some of those tiles. And I don't wanna make
them all as instances. And we'll start right here
and shift D. Shift D. And either need to repeat that. Blender has an option, an awesome option repeater. So I can press Shift R. And it will repeat the last
action. Awesome, right? So we have an awesome
option because I accidentally can
select the ground, my ground, and I don't
want it to select it, I can disable it. But for example, I
have this option, and if I click it, I can deselect the ground and
I no longer can select it. So that's cool. Because if I accidentally
drag like this, would definitely select it. So we have those tiles. I will duplicate votes. And before that I think I
will need to add both into one folder because now it
just creating the mess. So just by pressing M, we can add those into
the new collection. And let's name it dials. And as you can see, both just Bowles was thrown
into the tiles collection. And since we are going to
create more duplicates, control D, Control D, control D, or Control D. Control D. And let's repeat whispering. I'll create a little
bit more than I need. It's easier for me to remove the tiles by
just deleting them, then creating new one-by-one. So let's go back to the side view and let's
see how it looks. We have a bunch of tiles. I think we need a little bit
more tiles in this part, and some rows here. And maybe one row
behind the house. And that will look good. So let's get back
to the top view, Shift D, and let's add it here. And I'll select Shift D. And bows. That looks not too bad, good. Anyway, I will adjust those. My g. We already know what's going on. I'm just selecting both. And by pressing G, I'm adjusting the
position of the tiles. And let's add a couple
more rows in front. Just to be sure. I duplicated the
lamb by accident. Much we can delete
it very easily. Okay, so let's go to front view. And what we can see, we created way too much
styles when we needed. So let's delete all
those three rows. And that looks quite good. Now, let's delete
some of those tiles. Maybe this one, this voce. And that looks quite good. Okay? Now we need a little
bit more variation because all of those tiles are the same. Male looks the same. But if we will rotate some of them bad, we'll add some variation. And that one's looked
at Rabbet repetitive. So I will select random tiles, a bunch of random tiles. Every, I'm trying to be
as random as possible. And I'll press R and
90 and that's a mess. I will disable. I will cancel this section
by right mouse button. So let's change the
transform option to individual origins. And now if we will rotate, every tile will rotate. I'm on its own axis. So let's breast are 90. And that looks a little
bit different, right? Let's select a bunch of tiles. Again, as random as possible. I'm just clicking anywhere. They're trying to be
random as possible. And again, r and 180. So bows will be
rotated 180 degrees. Again, very random. Sometimes I believe I will
click on missing tiles, but it doesn't matter. I'm trying to be as
random as possible. And let's rotate wet on to 70. And now we didn't look
all the same rights. Maybe let's suggest most. Whoa. Our Z, 90. And this one are Z1A. Our z just 70. Yeah. So that looks way better. We can also, So I don't know if we need
to adjust for height. That looks quite good. I was thinking about moving
some tiles a little bit down, and that would add a
little bit more variation. What about looks quite good and I'm not gonna do that now. Maybe I will delete some tiles to have this more random look. We created the tiles and we
can save the scene right now.
18. Fixing Modeling Issues: So before moving to texturing, I would like to fix some issues
that I see in this model. And I would like to damage the house like
we did with both titles. So let's start by
fixing some things because I see some things
that I would like to adjust. First of all, we have this edge and this
edge of the house. I would like to add something
similar at the bottom. So let's select the house
and go to it and edit mode. And let's create a loop cut. And I would like to add just
some where, maybe link here. And I will go to the
face select mode, select this face BY, select this by control. I would like to basically to, to go around till here. But if I will select this
and then go select this, blender will choose
the the fastest way. So we need to select this, this, go a little bit around, and Ben select this. And that way we will select everything around this
except for the doors. So now I would like to
extrude it along the normal. So Alt E extrude paces along
normals and extruded out. Now it looks a little bit weird, but we can select offset even. And maybe let's adjust
the offset a little bit. So that's good. And that's what, so that's the first thing
that I wanted to do. Maybe let's suggest offset
even a little bit more. The next thing I
would like to add the top for the balcony, railings, like we did
here on, on the roof. So let's go to the object
mode, select the railings. Let's go to the edit modes. Lacked this. Yeah, we need to go to
the edge select mode. Select this control D, cancelled action by
right mouse button. We still made a duplicate
or I can move it. And now I would like
to I would like to separate so we can press
B separate selection. And if we go into the
house where you can see we have balcony railings
and balcony railings. 000 001. If we go to object mode, we are in wireframe mode. So let's remove
the wireframe mode and add the skin modifier. And let's go into the Edit mode, select all by pressing
a and Control a and reduce the size of it. Something like that. Maybe. Matt looks good. And the last thing
that I would like to fix our votes doors, you can see that something
weird is happening here. And I believe that I moved the door to the side or
something like that. And I missed to
select some vertices. So I'll go into VR
TC select mode, and I will press Z to
go into wireframe mode. And to do what we can see, I think we have those
vertices which, which just in the
wrong position. So if I press F3, I will go into a side view mode. And I can adjust
those jazz by g. And same with this one. G. No, no, no, no, no, no, something wrong. No, it's good. Okay. Free. G. And if I move it
here, pitch low. It should fix beds. And now everything looks good. And one thing we
have is door handle, which is very low Bali. And I can't say sheets move it because I will sheets move all the house if I will do that. So I would like to select this and this was door handle and this door handle handle. And I would like to separate us from the
house so I can press L. And that will separate this
Vet will select this object, and I'll press L here, and that will
select this object. And if I will press B, I will be able to
separate selection. And now the same like we did with the railings
three minutes earlier. So now we have house and house. One. We can rename it to door handle. And we can just go in, into object mode and shades. Move it. Okay, one more thing. This is clearly not
linked to the house. So I will move the house a
little bit and we will see what's not linked
to the house also. So if I will move it
on the door handle, is this out of the place? So beds good. I will get back my Control Z, select this saliva house, Control P, thread
barren to the object. And if I will move house this time, everything moves together, but we are not gone and
more the household, it doesn't matter that much, but it's a good habit to
keep everything neatly. So we fixed the most things and I think we can
save it, save files. So I'll Control S.
19. Adding Colors to the Base: Now when basically all the
modelling is then I fought that it would be a
good idea to break down the house a little bit. It's kind of perfect right now. Perfect shapes, perfect angles. And I would like
to break a lot of things down to make
it like an old house. Maybe put some
holes in the walls. Holes in the walls. Yeah, nice. And a lot
of stuff like that. But I think that the
better process for it, it would be to add
the color first, so to texture it,
to add materials. And having fat would be easier because when
we break down, we will add a lot of geometry which will be part to
select basically end. It would be a little bit
Bain invest to color it. So yeah, I think in
this lesson it would be a bad idea to add with color first and then go into the details and then
into the lighting. Let's switch from this viewport shading to material
preview option. And as you can see, we don't have any material
on our scene yet. Let's go to this
material properties. So let's create the
first material real. It is going to be the
base of the house. So press New. And let's name and a house. House. We will choose very
simple materials. In this course. Basically, we will
change the color and some slight parameters. So far we house, I would like to use some
kind of bluish material, maybe a little bit darker. Let's try something like that. I think that if we will add a different color
for the second floor, it would give a little bit of character for
40 of your house. So we can go into edit
mode and select one, go into wireframe
mode by pressing Z. Or we can proceed, or we can press this. And let's select
all the second law. As you can see, everything is selected and we can
create a new material. So by pressing this plus
sign and pressing New, and we will name it house. What's wrong with my spelling? House2. And now if eigenvector, this shaded mode,
if I press Assign, it will assign this material. As you see we hit, our color is white, but if we will choose some
kind of brownish color, it had gone on to be brown. Maybe it's too brown because I would like to
have brown window sills, but we'll see this material is a little bit too shiny
floor of a house. It looks like a fresh paint
or something like that. I would like to add a
little bit more roughness. So if you scroll down, you can see the roughness option between all of those
many, many options. And if I reducer the roughness, it is becoming very
shiny like I am. Then even though like glass
metal, something like that. But if we will go into the, another side of the
spectrum and we will reduce our roughness is becoming graph. It doesn't reflect that
much of the environment. Our house is made from concrete. So I'll, will increase
the roughness to a max. And the same with this material. Maybe on this color, it's not that visible, but also on the house one, I would like to increase
the roughness to the mix.
20. Adding Colors to The Windows: Okay, now we can
go to the windows and we select your house. If we will get into
the edit mode, we can go to Windows. And now I would like to go
to Interface select mode, and select on all the windows, windows cells, everything
in this frame. K sides also is not selected. Let's select all of those. Here is not selected. And now when we
selected everything, I would like to add the
color of my window frames. I will create another material. So new material, new. I would like to choose
the color or some kind of brownish like
similar to the wood. Maybe something like that. I don't know if that's
not too similar to the material that we have
on the second floor, but we will be able
to adjust that. And don't forget to press
Assign because if we don't this material one
be added to this frame. So if I press Assign, now you can see
it's, it's brown. Let's rename it
to window frames. So we have windows
frames material. Again, I would like to adjust
the roughness to Emacs. So that's good. I think we can change now
the material for Windows. We are going to create the
animation and it's going to be the day and night
scene end tonight. I would like those windows
to shine and emit the light. To do that, let's create
another new material. And that's a little bit annoying at first when
new creating those materials. But when we, when we will
have all the materials, it's going to be very easy to, to just added to the scene. So a little bit of patience, and I'll name it glass. And now I can change it, do the emission material, but we can do this
in viz be SDF thing. Let's try to select some
kind of bluish color. And I will assign it to the glass so we will be able
to see what we are doing. So the glass materials
kind of Louis shaping and emission as black right now. So we can change their
mission to pure white. And just some of
the warmer color, yellowish, orangey,
something like that. And emission strength. We can increase that, but we can see much yet. But let's keep it
wet way for now. And we will adjust that later
when we will add lights. And basically in my next steps, Let's add the materials
to window sill. So let's select all
of the window sill. If we press Slash on, on the numpad number slash, we will see only the house and Matt might be
helpful for you. So keep in mind about
this shortcut because in this position bench is is
covering the window sill. So I can see it very clear. Here. I will add them. The window frames material
for the window sill. So we are going to reuse
a lot of materials. Here is the same process. Let's select, Well, let's select all of the window frames. Selected a little bit too much. We can actually select and the windowsill T2 because we
will add the same material. And because we have a lot
of details in my house, in the window, it's a little bit tedious process to select it and to
select everything. And let's assign the
window frames material. And four votes, four squares. Let's assign the glass. So that's basically
the coloring process. Let's do the same here. And now we will see a viz brown material will
work for window frames. And let's assign window
frames material. And it has some difference, so I'm happy with it. And that's great. Let's select those
and glass material. Awesome. Let's select
this window this time. And one more time. With this one, we can
press Slash again on binom pads and we
have the material for for the house. Great. Let's go into object mode.
21. Adding Colors to Other Details: And let's select the ground. This huge blame. One thing I can select it
because I adjusted this. I disabled the selection. So if I get it back, now I can select it. And let's create a new
material for the backgrounds. Some kind of file name ID, VG as a background. And I will greens creates bluish our blue
material for this. So for bench, we can reuse the wood material
from a window frames. So select both window frames. No frames. For both. Also, I will
add window frames. Great, So we have
a bench grated and let's now add a material to the tiles for that,
I would like to. I have a couple options. I can hide the house. For example, I will disable
the ground selection again. And we can select all of those. Because now if we select that, we select the house too, so we can hide all
of those mature, all of those things, objects, and select all the
tiles or ORM we have greeted with tiles
in a separate folder. So we can go into this and select both great new material. Let's name it styles. And let's add some kind of
the concrete color or so. Some kind of a gray. We can't add the materials just by selecting
multiple objects. There are other ways to add it, but let's add the
material to this one, tile and Len, and then we will
add it to the rest of it. Okay. So let's add the roughness because the
concrete is very rough and that's probably good enough to adds material to
the multiple objects. So if we select multiple
materials, multiple objects, and we select the
one that has the, for example, material
that we need. As you can see, the object that we selected,
the last he has. Let's, let me try again. The object that we
selected, Velazquez, a little bit different color, bats, the yellow
instead of the orange. So we want the object that has material that we want to
copy to select the last, for example, this one, if I select it and
press Control. Well, it gives me the option to link many detail from the
active object, which is yellow. So let's link materials. And now, as you can see, all of those objects get your material from
the active object. I hope it makes sense. It, it doesn't leave me a comment and I'll try
to explain better. So now if we want to add material to all
of those objects, we can select all of those. And a lot of planes here. A 150 Exactly. And let's select this or this, or any objects, but he has
material are already the last. So by holding Shift, I can select any of those press Control L, N link materials. And now all of those tiles
have the concrete material. Now let's go to the railings
maybe or maybe less select this block and we
can add the house one material I think magical give a little
bit of contrast. And let's go to the railings. For railings, I would
like to add some kind of a bluish but a little bit
darker material then this one. So we will need to create
the new or we can end this. So we have this material
and we can press this, and we will create
a new material from the existing material. So. By then, and now we
have a house 000 001. I will rename it to house free. So that's the third material for our house and now
we can adjust it. And let's make it a bit
darker house material. So let's add this material
to this railing top also. So how spree material? And let's do the same here. How is free? Free? We can think we can add a different material
for the, the stop. So maybe let's add how spree
also or house to hide. No. Let's go into the Edit mode. And if you press Alt and press like this,
it's selected wrong. But if we do this, it's
selected perfectly. And let's add the
house material. So let's select this
and assign its great, Let's select this and,
and house material. The same is low. Museum is here we can use we can use Control
Shift to select all. If we select this
and this and we holding Shift and Control, it will select all. And let's add house material. So that looking good. Okay, what's left? We
still have the lamp, which is going to be metallic. Some kind of black
metallic probably. And we have the doors. I forget, I forgot the doors. So let's go into the Edit mode. Let's select this frame, and we need to
select this frame. Also. Let's add the window frames
material and four doors. We can change the
material for both parts. We can create new material, and let's choose the house premature material and
we need to assign it. Nice. Okay, So the door will have a house free material material
and for this door handle, I don't know if we can reuse
any material from MIT. We have, for example, if I will add tiles material, but we can create a new
material really quick. Let's add a new material. Let's name its door handle. And let's choose the color
to something like like vat. And we will be able
to adjust it a little bit later when we will
have the lighting. Right now, I don't know what material I would
like to add to this yet. So it's a little bit tricky. So let's move to,
uh, to our lamp. And we can create a
new material lamp. And I would like to add
some kind of Lachish, maybe a little bit blue color, but here I would like to change and I would like to
increase the metallic look. So here, here we can
see this option. And if I increase it, it, this material will
look like a metal. And again, we can
adjust the roughness. I don't want to reduce
the roughness by a lot because it will
reflect everything. So 0.5 might be great for this. And I would like to add this
same material for both. So I'll select
both and this one, the last Control L
and link materials. So we have the
materials for our lamp. And that's it. We added all of the
materials right now. N Let's move to do
the other part.
22. Damaging the House: In this lesson, I
would like to make this house a little
bit more cartoony. I would like to break
it down quite a lot. And I don't want it to
make it all this perfect with the perfect angles and perfect corners and
edges, et cetera. So will, we are going
to damage by a lot. So let's select the house, let's go into the Edit mode. And the first thing that
I would like to do, It's just basically
a perfect cube, scaled on the z-axis
two times as so, I would like to select, go to face-like mode and
select this is loop. Go into the
proportional editing. And I would like to scale
it down just a little bit. So it's gone to add a little bit of
cartoonish look for it. So if I press S, you can see I can
scale it up and down. And if I adjust the
proportional editing by by scrolling my mouse wheel, I would like to make it sin basically to the
size of the house. And now I can adjust and scale basically a little bit more
proportionally. So I'll scale it
down a little bit. Maybe something like bad. Maybe I need a little bit
more so as a little bit more. And now it's not that strict. So that's really good. And and yeah, we can
start to break down. The process is very similar to what we did to both styles. We added a lot of guts, a lot of bevels to the corners, and we are going to do something very
similar to the house. So maybe let's start
with this with this middle loop that we extrude it in the
beginning of the course. And yeah, we can go
into a faceless vertex, vertex select mode and probably
beveled this Misko RNA. So Control B V. And
we can bevel it. We can select this
GnG and probably this GG and make this
kind of cut in recording, I will go into
vertex select mode, and I'll select this vertices. And one more thing, I would like to add a lot of
details into VOS to walls. I don't care that much about the back of the house because
we are not gonna see it. I projected with my scene will be visible from this angle. So I don't really care
what's going on in here. So I'll select this bottom
edge and I'll press Control. Beat, bevel it. So bevel it a little bit. I will do the same with this. B. I don't care how it looks. I don't even want it to look. Great. Old Bell will this edge and this case. So one thing that I
would like to do with bevels and especially when
I am breaking down things. So I would like to go
into face select mode, select some kind of base and disable proportional
editing and rotate it slightly. It immediately adds some
kind of a wiggly effect. And our eyes notice is that it's not straight line
and something happens. And that's what I
wanted to achieve. Let's do the same with this. So if we select this control B, we can bevel it. Let's do this. Let's bevel of its vertices. And more details to it
near near the doors. I think we can adjust that. And again, I would like to
rotate it a little bit. Let's go into the window sills. Let's do the same thing. So let's move to
other windows since we already working a
lot when those cells. So maybe let's continue case. So that looks better. Already. Looks like
low poly break down. We have this. So I'll go into edge select mode and
select everything in here. I'll Bevel it. And we'll do the
same with the top. That's Elvis. Do. And I'm not gone and break
too much things here. Maybe I'll just rotate
it a little bit. So I'll go into a pay
slip mode and slightly rotate every two or free basis. So one be that straight. For railings, we don't have
that much geometry here. We can add a bevel modifier. For example, here we can go to a Modifiers tab and
add Bevel modifier. It will bevel this slightly, something like mad, so it
won't have much corners. I will do the same here. Belmont, something like that. And that will be enough. Maybe I will damage by
removing some of the railings, like it would be broken
or something like that. Or maybe we can make
them not Vets even. So for example, if I go to a front view by
pressing numpad 1, and if I select Bose, I can rotate them a little bit. I can select a couple
more random on those. And I can rotate them
to the other side. Let's select them. Both. Rotate. I don't know. That's rotated like that. And let's see how it
looks. It looks better. And maybe we can even
take this one and press, press X naught z
and dissolve edges. So one of those is even
removed or broken. So that's good. We can do the same
here. By pressing F3. We can go into here. And let's select
no free or four. Let's rotate them a little bit. We can select either. It's possible that I'm
selecting the scene. And maybe let's delete
lists and dissolve edges. And let's see how it looks. And I think it looks
better, right? It has a little bit
more things going on. I'm not sure how much of those railings will be
visible in missing, but to be honest, I will adjust those two. It's really quick process. So it's not very hard. Whenever fingers
straight and perfect, it doesn't look very good. And it's not that interesting. We can do the same
with both railings. My balcony and then my balcony railings are not
connected to the house, Manhattan probably because I scaled the middle
of your house in. So both paths left
hanging in the air. So I'll select those and
g and x axis, y axis. And I will move those in. Now let's Wall work
a little bit on this balcony and go
into the edit modes, maybe less bell this vertices. And let's maybe adds the crack some somewhere
here at control B, control B, x phases. Select both filled by
F and fill this in GG. And maybe let's move both
a little bit closer. This one. G and G. It's going on next. Anyway, we can press
Shift G and adjusted. And we can select those
control be slightly. We can bevel this my Control B. And we can do a slightly, a slight bevel on this
control and be very slightly. And I will go into
face select mode. I will adjust the
rotation a little bit. This Let's see how it looks. One thing I would
like to probably add a little bit thickness
into those railings. I can adjust the thickness here. I can add a little bit more
and add the bevel modifier. So now house doesn't
look that bad. Perfect.
23. Adding the Crack on the Wall: Another thing that I
would like to add, I would like to create
some kind of the cracks in the walls and it should look like the bane would be
cracked and fall off. Somebody like that. So we
can do that by selecting the house and going
into edit mode. I will remove this cursor
and selecting a knife tool. Live to old wall. Knife tool can be found here. And we can just press
it and use the knife, or we can use the
key, key shortcut. And we have an eye. With knife tool. We basically can draw any shape. It snaps to do the vertices. So that might be useful. And when we draw the
shape of the loop, we can confirm it
by pressing Enter. And now we have this shape. So what I would like to do, I would like to
select all of those. And I would like to extrude
it inside just tiny bit. So E. So GOP, and we have this
and I would like to change the color of this. Justs Probably house1 assign. That looks like that. And I think that adds a
little bit of character to, to, to be seen. I would like to add
another one here, and I would like to
add this on duals on, on this one and
continue on this one. So in the corner. So let's press K, the knife tool, some kind
of random wiggly stuff. And like that, enter. Okay. We can select the most. And both. This time, we can
just extrude it. We need to extrude
it along normal. So I'll do E, extrude faces along normals. And let's extrude it inside. And this time I will
use House free. Maybe let's use House
three in base 12. To keep it consistent. Across three, assign the
darker color on my bed. And those you can create
as many as you want. You can create as many
cracks as you want. I don't think that
we should overdo it. Two or three should be enough. And that looks
quite, quite good.
24. Creating the Camera: I think we are nearly
finished lane already. And I think we can
greatly camera now. So I will center my Coursera. So I'll press Shift T, Shift C. And that will add it to
the center of my scene. And I'll press Shift a and
I will add the camera. It should be here. I will move it to
some where here, so g and something like that. Let's try again G and
something like that. And we can toggle to the camera view by
pressing the number 0. And now we can adjust
the camera by many ways, but my favorite is view
navigation and walk navigation. And now I can walk
with my camera, just like in, just
like I am in the game. For example, if I
press S and goes back, if I press W, it goes forward. If I press D, it goes sideways, I can move my mouse
and I can view in different locations by that vats my preferable way to
adjust the camera, for example, if a breast q, I can move down. If I press E, I move up. So that's super cool. It's just a little bit annoying
to get into that walking, walk navigation, for example, view navigation, walker,
walk navigation. So I added that into
my a quick favorites, walk navigation and
flight and navigation. And yes. So if you go to any any
option in the blender, you can add it to
your quick favorites, which the shortcut is q. So you can just press right mouse button and
add two quick favorites. And now when I press Q button, it shows my quick favorites. So basically, I'm using
that only for Quicken, for a walk navigation because
it doesn't have a shortcut. And that's how I can
choose it vary quickly. So let's adjust the camera. Week. We will be able to
change bad anytime later, so it shouldn't be perfect, but it just going to be a good guide how our
scene will look like. And it will be just easier for
us to set up the lighting.
25. Lighting the Scene: So now when we have camera, we can move on and
create the lighting. So we can move to this
viewport shading. And as you can see, it's breaded dark. And our scene. Firstly, I will
create one light here and it will replicate the morning light or
something like that. It's going to be bluish light so less press Shift a and
create the area light. I'll move it up. And we'll look from the
top by numbered seven. Somewhere. Here. I will adjust the
angle by rotating it. And I will increase in density. And you can see it. It is lighting the scene. I'll change the color to a
little bit bluish color. In our camera, this plane
doesn't work very well. We see the edges, we see the rest of the world. So I would like to cover all the camera area with
this background plane. So I can select this right now because we disabled with selection
for father ground. But if i will enable that, I can select it. I can go into the top view. I will write it a little bit
to match the camera angle. Move it to somewhere here. I will go into the
edit mode by tab, go to edge select mode. I will select this
edge and I will extrude it on the z-axis,
something like that. Let's see how it
looks on our camera. It looks quite good. And I will select this edge and I will bevel
it by Control B. I will add more leukotrienes. And that should work fine. Let's have a look
from our camera. I'll go into edit mode. I'll press G and Shift Z. I don't want to move
it on the z-axis, and I will adjust
it a little bit. So now it covers all
the camera view. Let's go back to our lamp. Only increase the power
a little bit more. And that should be good fun. Now maybe I would like
to bring a little bit to be fraud and to light
this VC area better. But we will add a couple
more lamps here and here. So I'm not sure how
that will look when we add those most lamps Plus, we will add one lamp in a year, so that will look different, but we can move it
a little bit to the front and rotate
it a little bit. And I think I'm thinking
about adjusting the background
layer a little bit. It I think it's too dark. I'll make it more bluish. So I think that's better. And now we can add another lamp into the
lamb that week rated. If you press Shift S and we will drag the mouse
to any, any, any part. We will see votes options, and I will select
cursor to select it. And now our cursor appears here. And we need to create
the light bulb. So it's going to be just
mesh and UV sphere. So we don't need that
many, many segments. I think 10 segments
and ten rings would be more than
enough radius. Of course it's too big. Something like that should work. Now we can press GZ morbid. Down. And that's gonna be our light
bulb for the pubis lamp. We can scale it up. Press Control a to
apply the scale. And let's add the material. So go to the
material properties, create a new material and
select emission material. We can leave a color
as white and increase the strength to
something like 50, but we don't see
any glowing yet. To see the glowing, we need to go to
the render options. We will render the scene in EV. So let's play with those
settings a little bit. If we enable bloom, it will enable the glowing
thing on our scene. So let's see how it looks. So everything just glowing
and we have light. That's great, but I think that's a little bit
too much so we can go into the settings and we
can decrease when density. That's quite good. And I was setting but I
would like to adjust. I would like to
increase the sampling. I have quite a good computer and it has indeed handles
bigger samples very well. You can leave it as it is. But I will boosted
up a little bit. I will make 512 for the
render and for the view port, 120 for something like that. So I'll have a little
bit bigger quality, but it will require more
power form from the computer. We will get back to those when
we will render the scene. So we needed the
bloom effect for four and screen
space reflections. That would be good too. As you can see, it's, it gives the reflections on, on other things, for example, on a lamp stand because it's
metallic so it reflects, we made very rough material
for the concrete blocks. So they do not
reflect that much. But madame bad and adds a little bit more
realism to be seen. Motion blur. We don't have many
motion and now I seen so we don't need that. We can add hybrid shadows, but we don't see
any shadows yet. Let's leave everything
else as it does, and we will get back to
this a little bit later. So we have bloom in, in, in this lamp, but I would like
to add an additional lamp. It's just glowing for now, but it doesn't light anything. I'll press Shift a light and I will add the spotlight in here. Let's increase the power because ten modes do not
lie at anything. I will move a lamb lower, so G and Z, two here. And now we have a spotlight. We can adjust the
color, the power. And we'll add a little bit
bluish light for this power. And with 50, maybe the thing
that I would like to change is the blend and
maybe the size of it. I would like to cover a bigger area and blend it
a little bit more into it. I don't want to have
that spotlight ring. So I'll Blaine blended. I wanted to say just tiny bit, but I'll blend it
to a match to one. I think that looks good. And the next lights that
I would like to add, I think that was sports. Here in here, a
little bit empty. And it would be cool
to have some kind of, of the hanging lamps in here. I'm a bit too, a little bit lazy and I don't want to
model another lamps, so I will reuse
this lamp for both. We will see how those look. So I'll select this, this and this, and
maybe a lamp bulb. I'll press Shift D. And I will move that. I will go into the front
view and I'll move at two somewhere here. I'll press F3. G in it see, it's huge right now. It's basically food. It's too big. So we
can scale it down. If you press S and
scale it down, it scales all the
parts individually. We didn't invent, so
we can cancel with the right mouse button or if you confirm that you
can press Control Z. So we need to change this transform from vivid
0.2 bounding box center. And now we can change weekend scale objects and it doesn't lose its,
its form basically. So I'll scale just
something like that. Maybe I will move
it up a little bit. Bad, should be good. A small, tiny lamp. Firstly, maybe I will link it to the house because now it is
linked to this slide poll. So we'll select this, select the house as
the last control P, the air into the object and now it is parented to the house. Let's select the lamp again. We don't need to
select the house. Okay, let's select
it again. Shift D. Let's move it on x-axis. We can go on top and we
can rotated 270 degrees. And we can move it
somewhere here. And again, we can look at from the front and move it
closer to the wall. Okay. Well, that's good. We didn't duplicate this, so let's try to do that. I think that's good,
it's in the right place. And now let's add the real
lamp like we did here. So I'll select this and press Shift S cursor to
select its shift a light. And this time I will
add the point lamp. So we have a point lamp. Radius is huge and we'll make the color
a little bit warmer. So yellowish, orangey,
something like that. And I'll increase the this to something like
50 bad grades lamp. I will duplicate with by Alt D. And I'll end this lamp here. So the same settings,
same everything. If I press Z and slide this top, you can see how it looks. I can go to a camera view and see how the
scene looks like.
26. Fixing Lighting Issues: I think we need to
move this bench closer to the house because it's too far
away in the light, do not lie at it
properly so we can move it closer to the house and
see how that will look. I will select only this
because as you remember and you can see those those lines, all parts of the bench is bearing to this
part of the bench. So if I press G and
I will move it, I can move it closer. And I will move it
a little bit down. And let's see how that looks
from a camera view now. And that looks way better. Now we have lied on the
bench, which is goods. I see. And I'm a little
bit strange thing here. This part of the door
frame is painted in blue. Let's repeat it into, into into the door frame color. Let's select visit. Go into edit mode. Make sure you are in
face select mode. Let's select this. And let's select those
by pressing Control. Let's choose the window
frames and press Assign. And that already looks better. So we still have
those weird shadows. So it looks like the
drawer is a little bit away from the house. We can fix bad by
enabling contact shadows. And that already looks better. We can play a little
bit with the distance and adjust the settings
in the wave at we want. But now when we
fixed those shadows, a little bit weirds. Shadows in here, up here. I think we can fix bad by adjusting the
position of the lamp. If we move it down, it fix those on both parts and
we have some shadows here. But those are fine. We usually have something
like that with the lamps. And I will add I
will adjust bet two. And let's see how it
looks from our camera. Let's leave it
like that for now. And if we want like
that later on, we will fix that. Still. I think we need to
adjust this Moonlight, but we have this one because
this area is quite dark. And I want it to be
brighter on overnight. So let's try to
increase the power. And maybe let's direct it
more to this bar charts so we'll adjust it, will rotate it a little bit. And let's see how it looks now. Now this part is a
little bit better. I think we can adjust the emission of the
windows or we can go to the EV settings and adjust bloom in density or the
amount of emissions, emission from a Windows. Let's see how this
emission looks like. I'll select that. And it should be glass. Emissive is this Emission
Strength is fairly eight. If we will adjust it
to something like 25, maybe it will be better. I think that it would be better. I think that it is better. We can even try to increase
in density a little bit. So emissive parts from
this lamp will be better. I will go to my camera
view and now I like it. I like how it looks. Maybe my background is
a little bit too blue, so we can adjust the grounds base color
a little bit more. Firstly, try to increase the
roughness a little bit so we want to have that
much of reflection. And then I will make it
a little bit darker. We basically light it was seen. In the next lesson, we will
create the animation and we will grade the daylights.
27. Animating the Sun: So let's create this day
and night animation. For bad, we will need the sun. So with sunlight basically, so we can press Shift
a and nothing happens. And now it happening, but I would like to move
my cursor to vCenter. So shift Fs, corrosive. Shift S corps to 0, of course would to
a world origin. I'm sorry. And we can press Shift
a light and sun. What's cool about a sum
that it can be anywhere. We can adjust the sun. If even if it is
below the house, it doesn't matter the
position of the Sun, but I will move it
up a little bit so I could see it better. And it works even
if it is going to, even if we place it, for example, below the ground. So now the sun is
lighting the scene. We can adjust with dram
and I'll move it to a max, and that's gonna be
the midday for us. And I will adjust the color
of the sun a little bit. I'll make missing a little bit warmer just like in the summer. And I just noticed one
thing, both both rows. We can fix those by enable
shade, enabling sheets move. And that's it. We don't have those
rows anymore. So I will select my son. Firstly, I will set
up my mid day seen. So I'll go to the top view. Here is our sun. We can actually mold it to silo little bit so we can,
could see it better. And now I would like to rotate
with some a little bit. I would like to create the
angle to something like that, or maybe even more. And that's how our scene will
look when it is the middle. So that's good and we
can set up our timeline. We will make an 8
second animation. But before that, I
would like to go into the properties and set the frame rate of 25
frames per second. It doesn't change much, but it is easier for me to calculate the
length of a scene. For example, if I need
8 second animation, that's going to be a 100 frames. So I will set up the end of the animation
edge to 100 frames. You can hear setup the length, start, the end point. So it is going to
be our animation. I can pray, press space
bar and it is playing. I'll add a little
bit more space here. So my mid day is going to be somewhere around
with frame 10, 100. I will add a couple
of keyframes here. Firstly, I will go to the, some options and I
will add a keyframe on the length of the
strength of the Sun. So that's when the sun
is going to be the brightest and the
strength is going to be strength num number is
going to be the largest, so it's going to be ten. And we can add a keyframe
by pressing this. Or alternatively,
we can press i, then that will add our keyframe. Another thing that
I would like to do, I would like to change
the timeline to the dope dope sheet. It is easier in dope sheet
to adjust the keyframes. We have strength of our Sun. And the next thing that
I would like to do, I would like to keyframe
the rotation of the son. So I will go to number 72, the top you will
select with some, I'll press I, and I will insert on Lieber
rotation key frame. I can serve many key
frames for the Sun, but I need on liberal rotation. Here we can see some
object transform. And here we can have the sun, basically lighting keyframe,
strength keyframe. I will add another screen. If I am going to any corner, you can see that mouse is
turning into this plus button. So if I slide this plus button, I can add another screen. And I can disable it again by
sliding it into our scene, for example, like that. So we can add as much screens as we
want. I will disable this. And in this one, I will have the view
of the rotation. And here I would like
to have a camera view. My camera view basically, and I wanted to
see how it looks. Now when we have validation,
Let's add up for nights. So I will get back to frame 0. It's gone on VM midnight and
our sun strength will be 0. I need to add a keyframe here, because as you can see, we didn't add any difference
due to this part. I will, I will press I. And the color of
this just changed and we added the keyframes
here in the mid night. I would like the sun to
face the other side. So just throw data by a 180 degrees or
something like that. It doesn't really
matter because it is not going to be
visible at night. So now we have this animation and we don't
have a son animation. We just have only the
strength animation because we didn't add a keyframe
here when we rotated it. So let's rotate it and
press I and rotation. And now we have this animation. The sun is rising, but it is rising in
from West to East. Okay, we can fix bad
by rotating like that. I are. And that should. Yeah. Now it is rising
from the East to it, moving to the west. And it stops here. At the end of this scene, I would like to add
another key frame and I will rotate it like that. And I will insert a
keyframe of rotation. And I will more
strength to the 0, and I will insert a keyframe. And let's see how
everything looks. Now. It is rising and
it's moving to here. One thing that I noticed, we have it just
slowed down here. And I would like to
sum, move constantly. I don't want this
Bezier interpolation. Select the keyframes. Select interpolation mode, and it is now by
default is Bezier. When, when we move an object, usually all the movement starts
slowly and it gets speed, it gets faster and adventure, it slow down again. So that's the more
natural movement. But for the Sun is rotating all the time
and it doesn't stop, it doesn't start slow. So we need a linear
interpolation. And now it should work better. It doesn't slow down,
it stops at the end. We can move both keyframes to, but it doesn't really
matter that much. Acclimate we want see
the movement of the sun, we will see on live
stream movement. So that doesn't mean that much. So that's good. But the night is very short. So I would like to increase
the length of the night. So I will move the
strength of the Sun. Both keyframes. I will move a little
bit, a little bit, maybe 20 something,
20, 30 frames. Let's try 25, one seconds. So this is going to be night. And this term from the sun is 0. If the sun is still rotating
like like it just naturally. And then we have an early
morning sun is lighting. We have the May Day
and we have evening. And again, somewhere
around here, I would like to have
a complete darkness. So I will select this
and I will move here. Now we have the dark
part of the night. And it repeats, it loops
and repeats again. Let's see how it looks at night. And shining again. So great, that looks great.
28. Animating with Drivers: Okay, Now that sun looks good, but I don't want to have
the lights open on day. We can do the same
like we did here. We can add keyframes. When the lights turn
on and when it lights, man-made lights turn down. But I would like to introduce you to one very cool
option of the blender. It calls drivers. If you ever used something
like After Effects. After Effects have expressions and drivers basically
is the same thing. You can add the relation
from one object to another. For example, what we are
going to do, I will tell, for example, this lamb to be bright when the Sun's
strength is low. And I will tell to
turn off the slide when the Sun's strength is high. So that's basically what
we are going to do. And what's cool about this. If we will decide to
adjust, we'll amphotericin. We will be able to
move both keyframes and we want to
reorient, reanimate. All the other lights will turn on or turn
off or based on myths, triumph of the sun, we will be able to make
400 keep animations. That's going to be 16 seconds. We just need to adjust
those keyframes. We need to adjust all the above. All the animation will depend
on the sand animation. I hope that makes sense
if it doesn't keep up with me and I will show what
I meant just in a second. So let's work with this lab. Let's select the lamp. That's the spotlight
with we created. And I would like to animate
this feature of the power. I will press right mouse button. We can insert a keyframe, but we will add the driver. So the shortcut is Control G, or you can just press right mouse button
and add the driver. You can see that the
color of this is changed and we had a
window that's popped up. And there we can, for example, press Edit driver and we
have this window again, it is a little bit annoying
because if we press anywhere else, It's
disappears again. So we can open drivers editor with basically
the same window, just we have a little
bit more controls. We have this window. It might look difficult
to understand it. The first time you, you view at this, I'll try to show you and to
make understand it better. I don't want to go too deep
into those Driver things. In our case, we will use
scripted expression. Here we need to do change this
option to single property. Here we need to choose our sons. So first thing we need to
change the type to the light. And here we see our lights. So we will choose the sun. And I will move this
up a little bit. We have the path. The path is basically, we need to show this driver, but we need to look at
the strength of a son. So here we need
the strength path, but I'm not sure about the
terminology of both paths. But Blender has a cool feature. For example, if we select my son and go to the strength and
press right mouse button, we can copy data path, and that's exactly what we need. So let's copy this. Let's go back to the spotlight. And we can press
control V and added. And our path for was energy, not a strength at all. So that's a little bit tricky, but when you can copy this bath, that's not that hard. So we have our energy
and it already shows the value of the
keyframe that we in. For example, at keyframe 1909, we have energy value of 9.995. Keyframe 100. We should have a term like we set up a keyframe
and add a frame 25, it should drop to 0. So that's exactly what
we need for our lights. We need to set the power
to 150, about a 144, we said said it, but let's set it up to 150
or something like VAT. So how we can do
this at a frame 100, it should be 0, but for example, add frame 200. It should be 150. So we can write an
expression now, it's just a default expression. Var plus 144. So it's like that. And it's clearly do
not work for us. Now. It, it is even
brighter at the day and not that bright at night, which is not what we want. Usually when we need
to reverse the values, we multiply everything
by minus one. So for example, var, that's our energy we added
with variation times S1. And theoretically,
at reframe 100, we have minus1
power and at frame 200 we have 0 because our value is 0 and that
doesn't work at all. So we need to make a difference. In our case, we can set
up something like that. At this frame, we have
the strength of den, that's our maximum strength. And to have the 0 light
at, at this point, we need to set the
expression term minus water at our variation, and that's going to be 0. At this point. It's going to be 10. But then is not enough for us. We need a 150. So we can multiply that by 15. And that's going to be 150. But it doesn't work because if you remember
from your math classes, when we multiply, we
multiply our first. But when we add
the brackets here, like in the math class, now we have 150. And that works perfectly here. Here we have 0, and
here again we have 150. One thing that I
don't like usually delights in the streets do not decrease va value gradually, they are just turned
on or turned off. It doesn't shine, add a half
of a value in the morning. So we need to change that
and we can go to F curve. And we see, you see we
have those keyframes. By default we have
Bezier interpolation, and we need to change
that to two constant. And now we can see at risky frame when we
need the full power, we have only one watt, and when we need no
power, we have 0. So that part is good. But here is not that good. So we can change
this one to 150. And here are our key frames. And we can set up when it
is turning off basically. Because now we have 150. And it turns off only
on the keyframe 100. So we can zoom in a little bit and we can
adjust with keyframe. We can do it by hand or we
can change this number. So I will have a look here
and something like that. And I think at this point, we can turn on maybe
a little bit later. At this point we can turn
off the slide, right? So let's go to our graph and
see where this point is. It is here, so it
is AD something. And we can move
it to this point. And it's actually 1904. And we need 150. And now Muslim does
not yet visible. But if we play the
animation, It's turned off. And now it's turned on again. So that's great. That's exactly what we need. We set up the first driver and the other ones
will be way easier. We can just copy drivers. So that's super cool. We can, That's, I see the things that
I don't want to see. For example, here we have 75 watts and I don't
want to see that. Let's see what's wrong. Let's get back to
the drivers editor. And we have this
keyframe interpolation, which is not constant, the constant like we did interpolation mode and we need constant and now
we have constant. I probably made the
constant interpolation just for one keyframe. So now it's just 0 or 150. Now it's good. Okay, we can copy this keyframe. Copy driver, sorry. We can press right mouse
button, copy driver. And we can do the
same thing for Islam. But this lamp, we will need the same timing,
the same everything. We just needed to make
it less powerful. That one was 150. This one is going to be only 50. We can base driver. And it has everything. We just need to change the
voltage and edit driver, not edit, sorry,
open drivers editor. That's what we need. And let's go to F curve. Let's zoom out. We can select this one
and we can just change, change this to 50. That's it, is busy. And now when we, we
can select this, we see how smooth. So we have 0 here and
we have 50 from here. Awesome. We can copy this copy driver, and this is an
instance of Islam, so this one already
have his driver. That's awesome. We'd need
to add this anymore.
29. Drivers in Materials: Basically the last thing
that we need to do, we need to add drivers to
the emissive materials for, for the lights and for
Windows because LTV, they are still shining and that's not what we need to
make this process easier. I think we can copy the
drivers from the lamps, but we have and we can add the same drivers
to the light bulbs. So we can select both. We can go to the
materials settings. We have a color
and with strength, we can give a color, but we need to
adjust the strength. Strength is about 54, so we have 50. That should work with 50. Let's base with driver. And it is shining on overnight and when
the lights go out, this one also gets out. The problem that we have. A mission material goes black
when it is 0 at the day, we need to make it
something like 1. It is not going to shine, but it's not going to be black. At least. Let's open
drivers editor. Let's go to F curve. And let's see. So we have this, and at this point it is 0, and here we have 50. So we can select this
and enter a value one. Is it going to fix our problem? Yeah, met fixed it. So we have 50 and now we have only one
and it is not blowing. That's what we need,
this fixed already. And that's called, so
that's got be the driver to visible or when we don't even have to compute
this, have the same. We used the same material and we changed that
for all of us. That's goal, and that was quick. That's very good. Now let's go to the Windows. I don't think that we
need this window anymore, so I will disable it. Windows and we have
a glass material. We can do the same
with this one. And we used a little bit
different approach in this. We didn't use a
mission material. We use this principle be SDF, but the principle is the same. We have the emission material. At this point, we have about
25 of emission strength, so we will adjust that. But let's base for driver
and open drivers editor. Let's go to F curve. And where our keyframes. Here. This one is
good at 0, it's one. And here we need to change this keyframe
value is going to be 25. And virtual work. Let's see how that looks. And it's like that. And then touched,
we have lights.
30. Offset the Lights: Let's not keep
everything bad simple. I think it would look way better if we would
offset both light. For example, couple slides on Ben and I have a one and then another one
and another one. And that would look way better than all the lights
turn on at the same time. So first I think
we can offset this most lights a little bit
from the streetlights. It's okay when the street lights turn on at the same time, but I don't want to do non
Windows at the same time. So we can adjust those
open drivers editors where our keyframes. And here it is. We can go to F curve and we can make it appear
a little bit later. For example, we can
adjust this because street lamps lighting
a little bit earlier than the lights
inside the house. So let's see how it looks. How slides turn off. And a little bit later as the street lights
turned off, Let's go. Again. Streetlights appear and then the home lights appear. That's cool. Now, I would like to offset those different labs. So we need to create
one materials. Basically, we can go
into the Edit mode. To our materials tab. We have one glass material and the weekend create a new
material by pressing. Plus. We can create a new
glass material by pressing this new
material on the glass. And our default glass material. Now glass 000 001. But if we go to
the new material, we can select the glass. And you see this 0 H, it says that this
material do not, it is not used on
any, on any mesh. So we can select this one. And for example, we
can use this material, material on this window. So we can select
all the windows. It's not very visible, so we can go into the
shading menu and to be sure that we selected rows and we can select
glass and assign. And now if we
deselect everything, for example, we select blah
000 001 and press Select. We see that both Windows
and both Windows ugly, that glass is 000 001. And if we deselect
everything and select glass and select both Windows,
eyeglass, so great. We need to offset most, create new materials
for both T2. So we need two more materials. Again, great new material. And I will create new, this new. And here I will add
the glass because bats to non changed
into glass 000 tool. So this is going to be this one. And we need one more. So I will create one more. And we'll choose the glass so glass free and glass are empty. Because if we select
nothing selects. So let's make this window. The last free assign in
this window, glass assign. So let's see if we made
everything in the way that we want make glass 000
001, select most Windows. Both I in the corner, I assume that this
is the same room, so it has the same lighting. Let's deselect 000
to miss window. Great. 000 free this window. And just last visit window. Awesome. So we have our material, we can get back to the this window and we
can work on our offset. So GLA 000 001, we can keep as it does. It is a beer on this frame. And 000 two, we can make it
appear a little bit later. So edit drivers,
not edit drivers, urban drivers, editor, f curve. And I want to see what
I'm doing on the curve. So. I just slightly
adjusted. And that's it. So now we have actually, I don't see many changes. It looks like they all
appear at the same time. 000 two should be, can go into edit mode
and select this window. Okay? So it should appear
slightly later. But it seems that it's
appearing at the same time. I'm not sure what's wrong. 000 to f curve. It shouldn't be offset it, but maybe it's obsoleted,
not enough. Now. I need a big change, so now it's visible. This one lights up. And a little bit
later, this one. Great. So let's do the same thing
with other materials. 00. Again, the same thing. Let's go to F curve and
offset this even more. And let's do the same
with jazz glass. And let's offset it even more. And let's see how it looks. I think they are too
close. One to another. We have this offset. For example. This appears, then this, then this, and when this. But I think we need to
offset it even more. Let's go to first or maybe two free to be
glass to the last one, which actually we have all
of those glasses selected. So maybe we can adjust
those at the same editor. So I think we can
just select both and we can adjust both
at the same editor, which is super cool. I even make this
one a beer later. At this point, I would
like to add last lamp, maybe address 180 points. So sad, the last line here. Let's offset this by
two here and here. Let's see how it looks. We'll slide it a little
bit to the side. And I will play the timelines. It's good. I will disable overlays. So just a little bit
distracting for me. I don't think the last
window is even showing. It should appear at this
point, but it doesn't. So we moved it too far
and emits and being here, which I didn't want it make. Yeah, Because our last
keyframe is at this point. Maybe at this point. And we moved this for further
away from even from bad. And this we know is never
never, never, never shines. So yeah, we need to make
it something like that. And that's good. I
will disable this. And we have our animation. Let's go to the camera view. So we will see it better.
31. Rendering: So that's basically it. We add. At the last stage of our
course, we created everything. We just need to
export our animation so we can go to
them Rendering tab. And before that
maybe let's go to the scene tab and you can
adjust those settings. You can choose the resolution. For example, if you want to
export for social media, you can make it square for
something like like that. And it's going to be square. You can, you can make it for k. It depends on your computer. If you make the
larger resolution, it will render longer. File format PNG, which is which what we need compression to do. We are not going to
change much in here. So let's go back to the render properties
and adjust some things. And little in here, we can go to the
color management and we can increase the
contrast a little bit. So we have this look and we can change to
medium high contrast, which will add a little
bit of contrast. Let's say if we are
in high-end corn, maybe I like the high
contrast in this scene. Let's see how a look at how I think it's to
contrast the ad day. So I will go back to
medium high contrast. But at night, high-contrast
light looks good. I think I will keep the
filmic look, view transform. And yeah, I'm not going
to change anything. Ellesmere on brand or
I have 512 samples. It depends on your computer, but EV is rendering really fast. I expect that you know, the difference between
EV and the cycles. Cycles is the photo realistic
render which counts all the information and it gives more accurate lighting
shadows, et cetera. Ev, speaking a lot of things, but it's super fast. And since we are
rendering 200 frames, EVs rendering one frame at something like two
seconds and cycles. It trainers something like it takes something like 20 seconds
to render a frame for me. So it takes a lot of
time with cycles, but it gives a better results. I made the scene for the EV, So I will render it in EV. And if you want to try cycles, you feel free to do that. Let's go to, to do
this scene option. Let's set up the output where you want to
export your files. For example, I would
like to export it to. Here. I created the folder
already and 51 format PNG. That's fine. So we can render animation
by pressing Render. Render Animation or just
pressing Control F 12. So I'll press Control F 12
and it starts to render. It takes a little
time to prepare. And my first frame
is four seconds, second frame is three
seconds and is going down. Plus I have some programs
running in the background. I will turn off and I will see you when
this render is done.
32. Compositing the Frames: So now everything was rendered in ten minutes
or something like that. Maybe even faster. And I have all of the
frames render it. You can see to a 100
frames and you can compile those fame frames into video in any video
editing software. But because we are
working in Blender, I will do that in Blender. And I opened the
new blender file. And if we press Plus button
and we go to video editing, we can go into
Blender video editor. It's cool that blender
have this feature. I'm not using that
in my project. I'm using Premier Pro for
compiling frames into video. But since this is
a blender course, let's do that in Blender. So to do that, when we can press Add image, sequence and select the folder
that we have, our frames. Let's, we can press Alt
H naught, we count. So let's select everything. First frame by holding shift, we can select the last frame and all the frames
will be selected. Let's change the end frame to do hundreds because we render it 200 frames and
add image strip. So we have this and make sure that the resolution is the
same as your animation, as your animations resolution. So we made in 1920 on 1080, we made 25 frames per seconds. So let's change that. And let's change this frame, start and end our frame. Our animation ends
at a 100 frames. And that's basically it. We can select the output folder where we want to
put our animation. So for example, here, and the name animation piles accepts. And let's see, do we need
to change anything else? Basically not, we can render it. So the rendering is the
same as a J peg rendering. Or maybe we need, yeah, So we need to change the
output a little bit. It was hidden behind this one. So here is the output. We don't want to
have output PNG. Again. The reason why we
rendered that sequence in PNG, because it happens bad to free
the software is crashing. And if we are rendering
at first in video format, like we will do now. And in the render crashes, we lose how all of
our render data. So it's a good habit to
render everything in frames, in JPEGS or PNGs, and then compile everything
into the animation. In bed way, if
something crashes, you can start from the frame that the last was
sprained wrist. So it's not that big a deal
with this short animation. And in EV, when everything
is rendering really fast. But if you are rendering
in cycles and for example, your one, it takes a minute or two minutes
to render a frame. It's really disturbing
if you lose three or four hours of rendered footage because
something crashes. So as I said, it's a good habit, render in frames and then
compile it into the, into the pile null
video animation after everything is rendered. So let's change it to FM,
BG, FFmpeg, probably. So it's going to be
an MP4 weekend change to output quality to
high or lossless. It depends on you. I will choose the high end, that's
basically it. We can render it.
So rendering is the same as rendering
image sequence. We can press Render
and Control F 12. So I'll press Control
F 12. And it's gone. Brenna, that's going to be fast. This time is going to be fast because we have
everything render it. So let's see how it looks. If we go to this, we have our compiled animation. And it looks like that.
33. Adjustments After Render: Sometimes it does
happen that after VR rendering you notice
some things bad. You didn't notice in the
viewport or the blender. And that's noticeable. Most shadows are awful and I expected them to be better
in the final render, but it is still
awful in veranda. So I would highly recommend to disable them by clicking on the lamp and disabling those shadows and
instantly look better, I will render another version of this scene with
those settings, and I would recommend
you to do the same. Here we can see how it looks.
34. Final Adjustments: So I rendered this scene and I have to say I'm
not a big fan of it. When it is shown
from the nearby, it looks quite good, but I added it on
the thumbnail and the very small image
looks not that good. And I think we need to add a couple simple changes to
improve the quality of it. So the first thing that I would like to change
is both lights, those slides over, lighting
the scene too much. And I can, I think we
can easily fix that by going into this lamp mode and changing the point lamb
to have a spotlight. It changes both of those slides together
because both are connected. And I think that already
it looks better. I believe that it would
be better if we would expand this area of lighting so we can
go select the lamp, go to spot shape and expand it. I don't know. 65, maybe, something like that. And I will enable shadows. So that looks way better. I really like it. Another thing that I think is not that good if
I go to a camera view, I think our background
is too dark. It's cool to have a
dark backgrounds, but our black lamp is
not visible at all, basically at at this scene. And on Mondays seen it's okay, but I think it could
be a brighter. So I will adjust them. Background on VDS seen. So on the frame 100, it is the brightest part of
the day of the animation. So I will go to that and we'll go to Materials settings and change your
background settings. First, I will increase
the lightness of a color. By this. And I may be change
the color a little bit to something more neutral. If I go this to the
side of a circle, it gives me more color, but I will go towards
been neutral. I think it gives us kind
of almost white color, but tonight we have this slide, gives us this bluish color. And another thing I will
move this to somewhere here. I don't want it to interrupt us. Maybe I will move
it behind my house. I can do that by Shift
and right mouse click. And I would like to
add a nav allied here. Just for visual composition. This corner is very dark, and if we add variety, will give us a feeling
that variable there is a window or maybe
something like here. So let's add it in. We will see how it looks. So shift a, whereas our lights and let's
add a point light here. I will move it up a little bit, maybe closer to the house
and will boost to the power k. I'll make it a little bit more yellowish,
something like that. Maybe not that much
power. I'll decrease it. But this is how it looks with
this lamp and without it. I think it's better with okay. Next issue that I
found is the house. It's a little bit
too dark. I think. I think we can add more light to make it more visible because on
the small image, it blends too much to a
bet with a background, so I think we can
make it brighter. I have any DM maybe
if we would change the color to a lighter color, It's better to change
bet on B day lighting. Maybe I could make it a
little bits like fats. And let's see how
it looks at night. I think that all
ready improves it. I love it so much better. I am considering to change
the basis house color. Too bright or too
maybe more contrasty. And let's see how it looks. It's not that good at night
with with this bluish light. I will get back with control Z. Maybe we can light
it up a little bit, but not too much. And to give even more
light for your house, I think we can move
this a little bit down and maybe increase the power
of a power a little bit. So we'll move it down. I will rotate it. Let's see how it looks. I think it's a little bit too
close to the house. So we'll move it a
little bit away. And I don't think that we
need to increase the power because than it is too bright. Or maybe we can add it
to something like 180. It was 150 before. So 180 is maybe quite good. What about the color change? And I think this is
looking all ready better. So let's keep it that way.
35. Render Settings for Cycles: I was planning to
render the scene in EV, but recycles became quite good recently and they
are white fast. So I think we can render it. And cycle acts in
cycles actually, and we will see how it looks. So we can go to the settings, to the random properties and choose the engine two cycles. We can change the
device to GPU compute. And let's go to the settings. There is not much settings that we need to
change in the cycles, four cycles, I will enable
this noise threshold. It gives us, it gives you
a computer the options. For example, if there is not match that much
noise in the scene, it will render less samples
and it's going to be faster. So that's really cool. And I will enable
denoise for ender. I can enable it for review port. And it just removes the noise, which is cool, but in viewport, tool looks a little bit clunky and I don't know if I
want to add it here. Maybe I'll change my
denoise or to optics. You can enable its
optics if you have an NVIDIA GPU or maybe I think
it's available to AMD now, but I'm not really sure. I'll do the same. For for render. I will choose the optics denoise or in the advanced settings. I don't think that we need
to change anything here. I think we can press F 12 and see how this scene looks like because it just give us a better understanding
in the render view. So it renders quite
fast in six seconds, which is quite good. And this is our scene in cycles. And I think I like it. I can, we can keep it that way. And we can use both settings
that we just adjusted. I will render both of
those things in cycles in EV and in a second
you will see results.
36. Outro: Congratulations for each
band of the scores. I hope you are way more
confident in Blender now. And if you created something,
prove this course. Share it on to other
projects here on Skillshare. Or if you share it
on social media, tag me as, as LGA. And I just left to see my
students work on land. Once again, congratulations, and see you in the next course.
 Gytis A., Motion designer