Transcripts
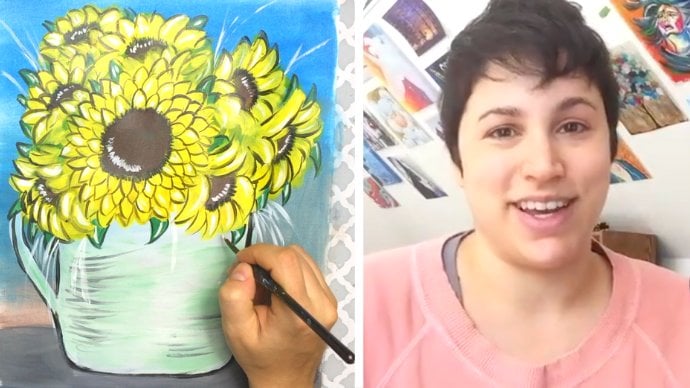
1. Welcome to the course: Hey there and welcome to the course. My name is Amanda, also known as the Bust Artist on YouTube and on my social media, I'm a self taught artists, and I teach painting and drawing tutorials on YouTube as well as offer premium courses. And in this course, you're going to learn how to make water color effects using just acrylic paints and how you can utilize theme benefits of acrylic paint to achieve a nice watercolor look in your paintings. And in this course you're going to learn color mixing. How to blend your colors properly, how to handle your brush stroke techniques as well as how to apply paint on your campus properly. And in addition to all that, you're going to learn the basic equipment that I use. When it comes to acrylic painting, this course is broken up into key fundamental steps where each step builds on the previous step. This allows you to take multiple breaks in between painting sessions as well as understanding the basic principles behind putting a acrylic seen together. And when it comes to acrylic painting, it's all go practical application and practice, so I always encourage you to follow along with me in real time As you're going through these video lessons, I find that my students who end up doing this with me have a greater chance of success with their final painted piece. And after all is said and done, you're going to have a completed painting that you could hang up on your wall or give us a gift to a friend. And lastly, to help make this course in all future courses that I make much better, please be sure to leave a review at the end of this course so I could get your feedback. Provide further improvements to this course as well as apply those critiques to my future courses to help make your student experience better. I hope you're super excited to dive into this course, and with that all being said, let's just get into it
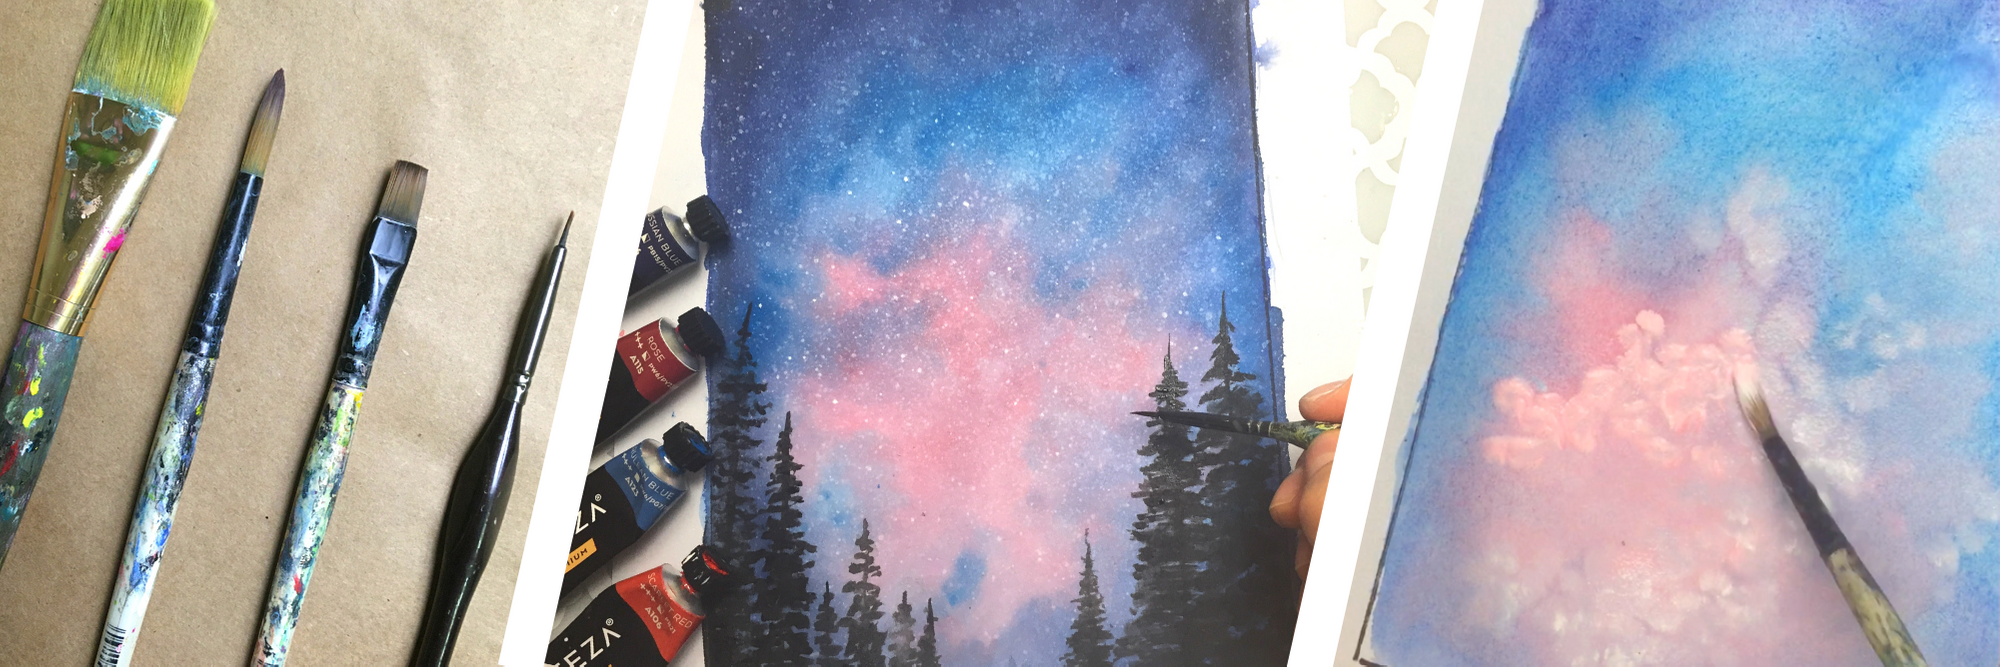
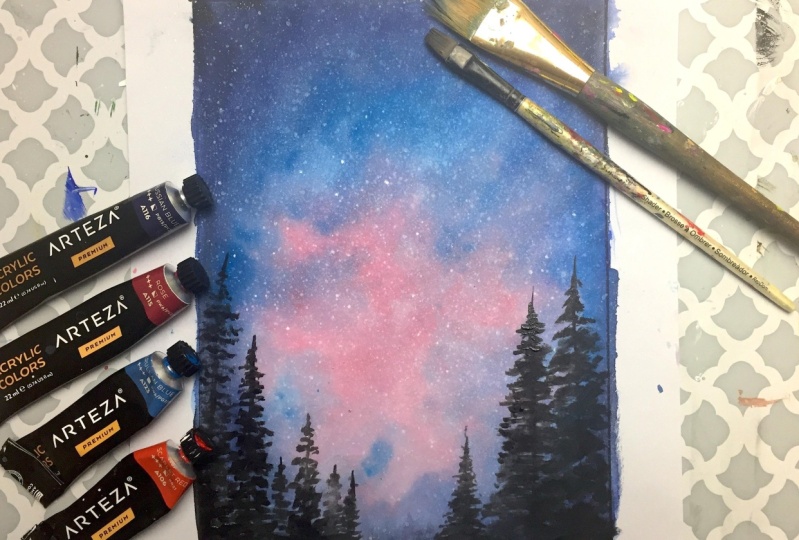
2. List of Materials: Now let's talk art supplies on what you'll be needing to make this painting, starting with acrylic paint. Now the pink colors that were going to be using for this tutorial will include rose scarlet , red, Russian blue, cerulean blue as well as Mars black and Krilic Titanium white. Mind you, these air all acrylic paints that we will be using to help us create a watercolor effect. Now let's talk brushes when it comes to brush is we're going to be using for different types will be using a one inch flat wash brush a number 10 shader rush a number eight round brush as well as a number zero detail round brush. Now, when it comes to the brushes and the pain selections that I've already mentioned here, if you don't have these exact colors or these exact brushes, but you have something that's kind of clothes, you are totally in the clear. It's totally okay to not have the exact same materials that I have. In addition to this, you will also need a jug of water close by, as well as a spray bottle that has water in it. This is going to really help us achieve that watercolor effect that we're really looking for. Now let's talk about your support, a k A. What you're going to be painting on what I'm using Here is a mixed media paper that especially designed to handle all sorts of mediums like acrylic paint and water color paint , so you can choose to use a mixed media paper like I am here. Or you can go with any sort of pre Jessel canvas that is totally fine for this project. Now a big thing when it comes to your painting is your palate choice. And I just wanted to go over some of the different options that you have for your palate. If you don't know what a palette is, it's basically just a holding spot for your paints so that when you're mixing with your acrylics, it can hold all that together. So you want to make sure when you pick a palette that it can be durable and that it could withstand the friction of using your brush when you're mixing your colors. But not only that, you want to make sure that your palate does not absorb the paint. You want to make sure your powers made with some sort of material like glass, plastic or a sort of compound that will ensure the paint will not absorbed right through. And here, just a few examples that I've that I actually have a pallets. One is an actual plastic pallet. You could find this basically at any hobby store, but these have. This is all made out of plastic, and you can directly place a paint right on here really great for mixing. I will not absorb your paint. However, The surface is a little bit on the smaller side, so you don't care about that. That's that's a whole good. You can also use a glass palette. So this is a power that I actually made myself very easy, actually. But basically it's got a glass, a service so that you can properly mix your pains that can withstand the friction of your brush, and paint will not absorb through. You can also use tracing paper, or you can even go a step further and do aluminum foil plastic wrap, even place right on top of your class. Take pellet, or what? One of my favorites that I like to use his palate paper this palette paper is made with smooth poly coated surface, so whatever you put on top of this will not absorb through. And it's got a huge surface area for mixing, which is why I usually go with this and it's disposable, so you can just rip it out, tear it up, throw it out, and that's pretty much all you have to do with this palette. And if you want to go even more simple, you can always use a Styrofoam plate or even a plate that you have in your house. My one recommendation. If you have to choose a pallet, try not to use paper plates. Paper plates will tend to disintegrate with the use of paint pigments, and it will warp, and you won't be able to use it for very long. So if you're trying to be a little more serious about your acrylic painting, you may want to stick away from the paper plates and maybe explore one of these options here. So for this course, I'm actually going to go ahead and to use palette paper. So I just gave you a little bit more insight into what palette options are available to you
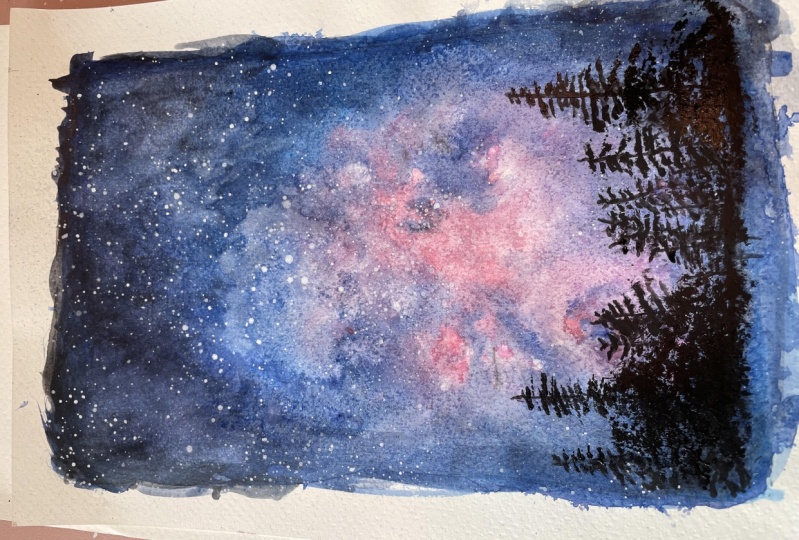
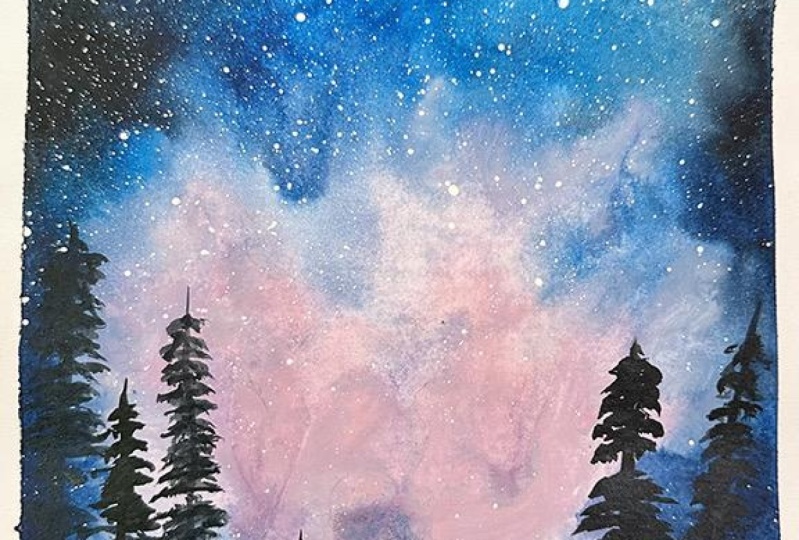
3. Step 1: Creating Watercolor Effects with the Background Sky: now, First things first I go ahead and grab my support. Whether that be my paper, my canvas and I create a one inch border. And then once I have marked everything appropriately, I Then go ahead and create a nice little black box. This is just going to serve as a boundary of where we're gonna be putting our acrylic painting, which is gonna be inside of that box. Once you have that, we're ready to go. So the first thing I do is create a wet surface. So I just did my brush in water and what the entire surface that I want to work with. This going to create a beautiful blending surface for us. Next, I'm grabbing some Prussian blue and start to lay down some of that color. Now you can see because I already pre wet the paper. The paint has already started to spread out very, very nicely creating this wash effect. Now wash really is just another way of saying a very transparent layer of paint. So with my wash brush, I'm applying the Prussian blue to the corners of my painting, letting the water that I have previously laid down to soak up that paint and disperse it out so it gives it more of that watercolor look. Next, I grab some cerulean blue, and I do the same thing again. I always make sure my brushes nice and wet and that the surface that I am applying the paid on is also nice and wet, and I let those colors soak into each other, creating really beautiful looking blends. This is where you can really get the effects of watercolor while still using just acrylic paint. Next, it's time to make some of that more red pinkish areas of our galaxy sky. So I grab some that rose and scarlet red combined that together with some white. Now I really want to make sure that I have this paint watered down so that again it's more like a watercolor. It has a lot more water in it, making sure my brushes nice and wet. Once I have that all set up with the color that I like, I go ahead and add in that portion of color into the white space, as well as blend bits of it into the blue areas are painting to help keep my surface nice and wet. I just do a couple sprays of water onto my canvas, just so it helps with the blending, but also to keep my surface nice and workable and wet so that might. Acrylic paints don't dry as fast. Big difference between watercolor and acrylic paint is that when you're painting with water color and those watercolors dry, you can always reactivate with water. But with acrylic paint, it is water soluble when wet, but once it's dry, it's dry for good, and it cannot be reactivated with water. So you always want. Make sure you're working with what paint when you're trying to get a watercolor effect with acrylics. So now I switched over to my number eight brush, dipped it in some white with lots of water and just adding little bits and pieces throughout the sky again, you just want to make sure your paper is nice and wet. You could do that again, but dipping your brush in water or spray your canvas with some water as well to ensure a nice, workable wet surface and then proceed to go back and forth between the varying colors. Sometimes I'll grab that rose that we made before, or I'll just grab some straight up scarlet red with a little bit of white mixed into it and just add in layers of color again, always making sure my brush is really nice and lubricated, that the paint is wet and that I'm keeping a nice wet surface so that my pains can blend very nicely with one another, and I go back and forth with different colors. I grab some more of the rose a little bit with white and blended into scar Loretty laid down previously. So really, it's just about playing around with your layers and feeling out your painting. My main focus here is to really get that nice pop of color in the center to really show the contrast between the outer portions of the night sky with the inter portions, which are a lot more light pink and just to help me with the edges of my pain. In case I had too much on my canvas, I just simply went my entire brush in water and go at the edges of where I want to thin out the paint, and it'll do that perfectly. And of course, a little spritz will always help. Then it's time to go back and work on the edges once again with our oppression blue. So I just make sure again my brush is nice and what my surface is nice and what, and that I'm concentrating more on the outer edges of the paint to achieve a nice, darker edge of the sky. Again, this is a galaxy sky. It's in middle of the night, so we want to give that nice, dark appearance, and I'm certainly not afraid to blend in some of those corners with the pink that we've just previously laid down. Because their colors are still very wet, they will blend with each other and bleed into one another very, very nicely again. To help create that watercolor effect, I then reinforce those other layers with the cerulean blue, blending it into the Prussian blue as well as into the parts of the pink areas of our sky. I will say that this does get very, very wet, so if you're much more comfortable working on a campus where it won't warp as much, that's totally fine. But I'm using a piece of paper here. You can always opt to tape down the edges of the paper so that it remains nice and taut. But there's always going to be a little bit of war Bage every time you're working with a lot of water, so just keep that in mind when you're working with acrylics and kind of trying to make a watercolor effect. So I'm continuing with the Prussian blue, mixing with SARU, Liam blue and areas and reinforcing the edges of the painting, making sure to really get that Morven yea style process pretty much repeats itself over and over again. I always want to make sure I have a very wet canvas, a very wet brush and very wet pools of paint that lead and blend into one another on their own, and then proceeded to add a little bit of Prussian blue with black so that I could really, really get. The more darker edge is more dramatic contrast to the painting and again, a wet brush. What puddles of paint A wet canvas is exactly what you need here, and, of course, I always take a little bit of water, smooth out the edges, blend them out a little bit more, so they're not as stark and creating a massive color border. I want to avoid that as much as I can. A little bit of water going to the edges with your brush conduce exactly that. - And , of course, don't be afraid to go back and forth between your other colors to help with your blending. I do that with the cerulean blue. Once I've laid down some of the black more oppression black vignette days. I go back in with cerulean blue and just touch up those areas. Make those blends even mawr blend herbal and more of ingredient. You'll find that you'll get these really nice color blends and a really cool looking sky. - And now a word of advice to any of you when it comes to doing acrylic painting in general. Layering, layering, clearing. It's a very crucial part of acrylic painting or just painting in general. Something that a lot of people have asked me is is a natural. Is it okay that I'm adding multiple layers or something? I feel like I'm kind of repeating the same steps over and over again. That is actually a big part of what painting is all about. It's adding layer on top of layer, seeing more Grady INTs happening because of those layers, and it creates a much more complex looking painting, and it actually helps achieve a really cool look as well. So it's totally natural toe. Add multiple layers and toe work with the same types of layers over and over again. I'm always constantly going back between this truly in blue, the mix of black and Prussian blue and the rose red pinkish areas of the sky. I just keep working back and forth, back and forth, playing those colors, play with one another and build off of each other and and for even added contrast, once again, I take my number eight brush, dip it in some titanium white, make sure to really nice and lubricated and just kind of work on the edges, primarily worth e pinks. Meet the blues just so we couldn't get that really, really cool looking transition. - And then, after applying some of those colors, David number eight brush that's been freshly cleaned, and I kind of go at the edges off where the pink meets the blue and just to a kind of sideswipe motion getting the water to mix in with the surrounding areas of the paint and with a very wet surface, the pain is gonna splay out on its own, creating a really natural spread out look and oh, my gosh, it really starts to come together. And once you are satisfied with painting of background, you are now ready to proceed to the next step. I'll see you there.
4. Step 2: Adding Stars: then it's time to make the stars. So what I'd like to do first is just make sure my entire canvas is dry. Then take my toothbrush, dip it in water and in titanium white, mix it together and then flick the brush onto the canvas surface. And, man, look at those stars. Just come toe life. Isn't that amazing? It's just so cool, the simple little brushstrokes that you need in order to make a very convincing, realistic looking galaxy sky. Now, of course, if you don't have a toothbrush, you can totally do this with any of the brushes that you yourself own. You just have to let it with your titanium white and flick it, and that's all there is to it.
5. Step 3: Painting Trees: and now it's time to put in your tree line. This is a really fun part because you get to really complete your painting so you could use either a number 10 shader brush, which is has a flat tip or a detail brush totally up to you. But to make my trees, which are going to look like fir trees. I start with a straight vertical line, and then I just take my brush, turn it horizontally, and I just make horizontal strokes going down the tree. And basically, when it comes to trees, especially these types of trees, the bottoms are much bigger than the tops. So I always make sure that the lines get bigger and bigger as it goes down towards the bottom of the trees, and I repeat the step over and over again, making as many trees as I would like. And that's really the gist of how you make these trees. You can even opt to do like a dabbing motion with your number 10 shater brush turned horizontally as well. It gives it quite a different look and appearance to your tree. Maybe a little bit more abstract. That's totally up to you both ways are correct. It's just really up to you and your preference on which one you like better. And then I'm just gonna show you how to make trees with the detail brush, which is basically the same premise like we did before. You just going to start with a nice vertical line and then you're just going to do a series of horizontal strokes moving down the tree, and you want to just make sure that those horizontal strokes get gradually bigger as it gets towards the bottom of the tree itself, and you're just gonna work methodically with the detail brush. The strokes are a tad bit different. They more look like squiggly lines than they do straight lines. And again, this is another aesthetic. It's something else to consider when you are going ahead and making trees. But there are multiple ways to do this, and they're all pretty much correct. It's just up to you how you like him. And of course, you always want to make sure that your brush is nice and lubricated that your black paint is flowing very nicely from your brush. You don't want to have a lot of paint crusted on your brush because I just cause a lot of issues and a lot less control on your end. So a lubricated brush. It's a very happy brush. So at this point, you basically know how to do trees so you can add as many or as little as you'd like old . Then, once you're done creating all the tiny little details of your painting, you are officially done, and I would totally love to see what your own galaxy watercolor effect sky looks like. So be sure to post your final painting in the Projects area of this course. I would love to see them and remember, I'm always looking for feedback and review on my courses so that I could make them better for you in the future. I sincerely hope you enjoyed painting with me and maybe learned a thing or two about what you could do with acrylic paint.
 Amanda Rinaldi, Teaching you to Art with Confidence