Transcripts
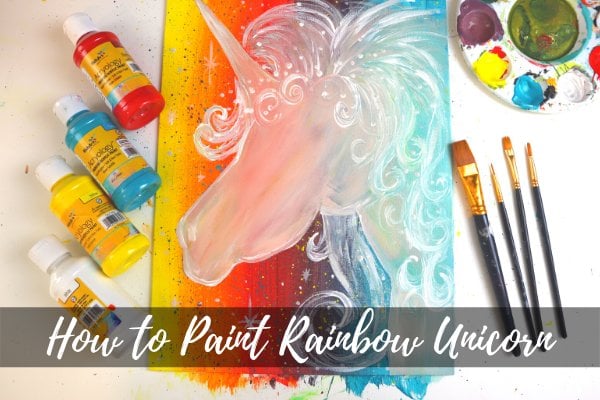
1. Welcome to the Class!: Hey, there. My name is Amanda from thebuzzedartist.com. I am a self-taught artist ready to show you the magical world of acrylic painting that will dropkick your fear of failure and fill you with that delicious creative confidence that you deserve. Welcome to Beach Waves Acrylic Painting. If you've always wanted to make some paint-slapping magical art with acrylics, occasionally have dabbled here and there on the canvas, or you just want to brush up on your acrylic painting skills and learn how to paint a gorgeous beach with crashing waves using layering and blending brush techniques, this is the class for you. Each lesson within this class is broken down into key steps of building from each other to give you a final gorgeous painting at the very end. In this class, I will show you the supplies that you'll need to complete your own beach waves acrylic painting, including my favorite art supplies that I personally love using for all my paintings. Hint, it's really not that much stuff. You'll learn specific techniques that'll get you [inaudible] in the canvas faster, like how to create a blended background, how to mix colors, how to color block, and layer your paint to create depth and dynamic ocean waves. The [inaudible] resistance, how to add the fine, tiny details to really breathe some life into your canvas painting. Did I mention you're also going to have a completed painting of your very own at the end of this class? This class will give you the hands-on, kick-in-the-pants approach that you need to paint with acrylics and fall in love with the process. We're going to cover a lot of information in this class. But by the end, you'll have the know-how and most importantly, the confidence to create gorgeously colorful acrylic paintings. Head to the next video and I'll see you there.
2. Ocean Materials Needed: Hey there and welcome to this lesson where I'm going to be showing you how to make a seascape painting. This is really fun and a really great way to learn about how to paint water and to create this really wonderful dynamic looking element. You're just going to need a couple of things in order to get started. First of all, I have here a 8 by 10 canvas paper. You can use canvas, canvas paper, multimedia paper, pretty much any medium that can hold and take acrylic paint. If you are using canvas paper, any sort of paper, just tape it down onto your working surface so that it won't warp as much as you're working. We'll be using four different types of brushes. We got here a 3/4 inch flat wash brush, a number 10 shader brush, a number 10 Filbert brush, and a number 1 detail round brush. Of course, if you don't have these exact numbers of brushes, something close to these brush head types would be just fine for this. Also, we're going to be using just three different colors as well as white. We're going to be using cerulean blue, scarlet red, cadmium yellow, and we're going to be using some titanium white as well. Now, in terms of the colors here, you just want to find colors that tend more towards the yellow biases of the color wheel. Cadmium yellow is a bit more in the middle, but if you find a yellow ocher would work just as fine. But we just work with what we got. I have here a little palette knife to help with mixing, a cup of water, just a little rag that you can wipe excess paint, and this is optional, but I have here a sprayer of water so that we can help keep our paint nice and wet as we're moving and working along. With that being said, let's go ahead and get started.
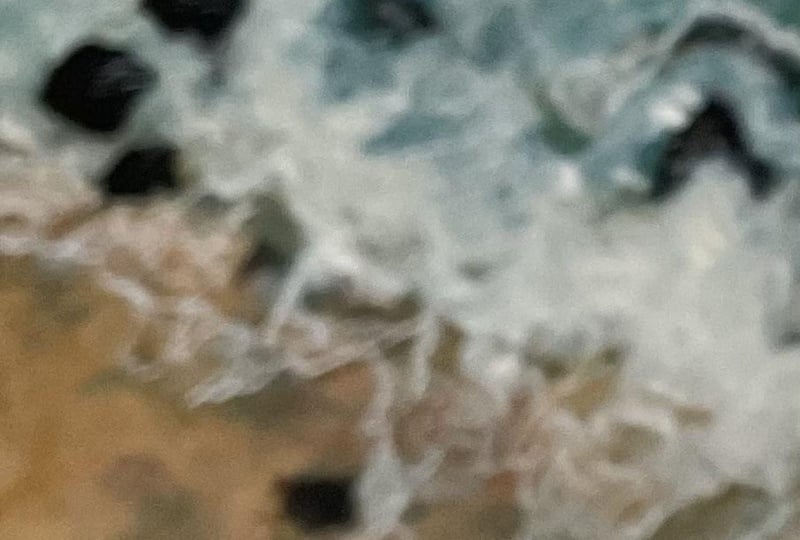
3. Step 1: Painting the Ocean: I've laid out my paint in their little pools onto my palette paper right here and we're going to go ahead and start to flesh out our painting. Now, I have also included the reference picture that we're looking at, so be sure to take a look at that as you are painting. I'll be referring to it as we're going along in this painting here. To start off, what we're going to do is we're going to start by making all the colors in our background, aka the water and the sand. We're just going to grab our three-quarter-inch flat wash brush, and I'm dipping it in some water and then I'm just going to wipe the excess off on my little towel. That's also nicely prepared. I'm going to go grab my palette knife and we're going to start to make the color of the water. I'm just going to take blue. Now, I want to take a good significant amount of blue with my palette knife because I want to make a lot of this color. I don't want to keep remixing over and over again. Then I'm going to take a nice chunk of yellow, just like that, and then we're going to mix it together. Don't be afraid to use a little bit more paint when you're trying to mix colors for a new light color that you're using. I can see here that this is turning into a nice dark green. I don't want it to be too green, so I'm just going to go grab more blue. Basically, I want this to be like a teal. I don't want it to be completely blue, but I don't want it to be completely green. I'm just going to use all that blue actually. You know what? We'll just add a little bit more of that blue. There we go. I'm liking that a lot. Then what I'm going to do is I'm going to wipe the excess off, just like that. I'm just going to grab my towel, wipe off any excess. It's better to do this on a towel to wipe off the excess than in your paint water, it's a bit more environmentally friendly. I'm going to grab a little bit of white, maybe like about that much, and mix it. The reason why I'm using a palette knife instead of a brush is because the colors as you're mixing them, some of them might be unmixed in the bed of the actual paintbrush itself. So it starts to muddy up the colors a little bit and that makes it not for a very good time. Doing with a palette knife gives you a clean even mix without having to also waste paint because it gets all trapped in your brush head and stuff. Now, that we have that, we're going to take our brush, dip it in our mixture, and then we're going to start painting. Now, something I always tell everybody, don't be too concerned if you're using a different color or a different size canvas, we're just going to go by proportionality here. I'm going to start to print the blue maybe about a third of the way on this canvas. Like on this corner here, to about maybe a quarter of this part of the canvas here. We're filling all this part right here with this color. With that being said, let's just go ahead and fill this in. Look at that brilliant color. Now, we're just blocking in a lot of the color here, so don't worry if you're not going completely in within that area that we've portioned out already. That's okay because it's going to get covered a lot later on with the foam that is created by the sea, by those crashing waves. I wouldn't worry too much about it. I'm just going to grab a little bit of water just to help loosen the paint up just a little bit. Here we go. Isn't that fantastic? That's all going to get covered up. Just for good measure, I'm going to take my spritzer of water and I'm just going to spritz a nice even layer on top of my palette paper just so I can keep this paint workable for a little bit longer. Because you all know this, when you're working with acrylics, once it's dry, it's done. You can't really use that color anymore. It's not like watercolor where you reactivate it with water and it's workable again. Once acrylic dries, it's dried. We've got that first part done. Excellent job. Just give our brushes a rinse. On top of this, we're going to do another layer of color. If you are still working on this part, keep on working on it, but we're going to move on to the next portion, which is creating more variations in the colors of the waves. That's the beauty of the ocean; it's never just one color. I'm going to grab my Filbert brush actually, dip it in some water, get it nice and wet, and this time we're going to make a lighter shade of this water. I'm going to grab on that palette knife some white, and just off in the corner of the color. I don't want to completely cover up the previous color that we just made because we will be going back to that soon. But I just want to make a lighter version of this color. I like that, liking it. Then I'm just going to spray it a little bit with water just to keep it working. I'm just going to take my brush, coat it nicely on both sides. I don't want it to be too wet, so I can always just go in with my washcloth and tap both sides. Then I'm just going to use my brush. I'm turning it to the side, so I'm using the side of my Filbert brush here. I'm just doing side motions, like making little circles with my brush just like this. Just observing my reference picture, I'm just looking for those areas that are lighter in the water, so I'm seeing that there's a lot of light areas right around this part here, so I'm just going to concentrate some of that color over here. I don't necessarily want to do a constant circular motion everywhere. I switch up the brush strokes a little bit, so sometimes I'll be doing this on the side, sometimes I'll be padding, tap, tap, tapping the colors and some varying between different types of brush technique patterns. One of them is scumbling, which is scratching the paper with your brush, and another one is more of a tapping, so you're applying paint a little bit at a time. I'm seeing a lot of lighter areas towards this part of the water. Obviously having to do with the fact that the wave is breaking here, so there's less of that blue and more of the white that's showing from the actual crash falling off the waves. Okay. Then of course, there's a little bit of color that comes up here, it doesn't come up in a clump, you can see I'm making a line looking at the swirls in the reference picture, they look like they all have clumpy lines to them, so I'm just imitating that here in carrying it down. I don't want it to be too stuck, so I'm just tapping. The thing with oceans, it's really dynamic, right? There's just a lot of movement, there is a lot of action happening. You're not painting like a landscape, like a field of grass where everything is pretty much stationary. When you think about water, water is so incredibly active, it's alive really, so the way to represent that really is by doing a lot of different texture and color in your painting so that you can better see the amount of depth, and it gives your eye more to look at, thereby makes it feel a little bit more active. It's a little trick. [inaudible] bit of water here. I'm just going to have a little [inaudible] right here. Notice I'm not just making a line of this color, I'm just working in a little bit of a segment, so I add some clumpage here, add a little bit of clumpage here, and I go back and forth, right. Sometimes I'll do this scratching side motion, scumbling, and sometimes I'll tap. Basically, I want to get a lot of texture here. Okay. We're just going and we're playing, we're just building, building, building, and now I say this in all of my tutorials, you're not just done when you make the first layer, no, this is a common mistake a lot of beginner artists think they're making. Why I feel like I'm just doing the same layer over and over and over again in this painting? That doesn't seem right. It is, it's fine. By you doing that, you're building depth. These colors, usually acrylic paint colors dry darker, so you want to keep up building, if you see there's more opportunities to add another type of color or another layer of color, you can do that, there's nothing in the rule book saying that you can't. That's something that we have to get over as as an artist is, it's okay to be going back over the same parts and reworking a layer. That's okay, that's another part of being an artist or just painting in general it's experimenting, you're feeling out something, you don't have to have a plan like set in stone right at the get-go and a certain part. I'm looking at these waves and I have an idea of what I want to do with this scumbling and what these tapping motions, and I'm just looking at my reference picture trying to see where those are all located for the light areas of the sea, I'm figuring it out. If something doesn't feel right, I don't do that and if something feels good, I keep going with it. What matters is that you're learning here. Then I can always go back in with that darker version of that water we made, and I can go in further refine some areas, if you felt you added a little too much of that lighter color, you can bring it back. See. That's pretty neat. You can even use your fingers too, if you want to just give a nice little blend there, and this is why I like using the [inaudible] for this. It helps you really get those really, really nice soft blends, which is exactly what your water is calling for right now. I'm actually liking where that's going and I'm going to stop right there. You can keep on going with this. You can keep on massaging and adding different layers, going back and forth between these two shades here. But we're going to move on to the next step, which is adding in our sand.
4. Step 2: Painting the Sand: We're going to go back in with our flat wash brush for this part, but before we do that, we're going to clean off our palette knife really well on to the napkin, washcloth and then we're going to make the sand. To make sand, we're just going to make the color orange first, so I'm going to grab some yellow, a little bit of red. I got the color orange here. Then we're going to add blue like that. Then the colors are going to transform before our very eyes. Now I'm looking for a tan color, so this part we're just going to have to massage and feel out as we're going but it's going to take some of that excess. Put it there. I'm going to do a lot of scraping just to get, and I'm going to put it over here actually. There you go, see. That's a nice brown. I'm just going to grab some of my titanium white and add it to the color. When you add white, you see the true color emerging. I'm liking this. I may be you want to add a bit more white. I'm going to add a bit more white, and again we're just mixing with our palette knife. That's looking really nice actually, a bit more white. Actually want to lighten it up a little bit. I think that's looking good. A bit more. That works for me. I'm going to again, grab any excess created over here. Cool. We're going to grab three-quarter inch flat wash. Now, we just give this a little bit of a spray to keep it nice and wet. Then we're going to grab our sand color, and then we're just going to fill it in into this white space here. It's just so easy. I'm using a diagonal motion with my colors here because I want to show that it has a bit of an action. You feel the direction of the sand in this way. I'm just adding this in and just a bit of that water to help carry out the color, and also serves to lighten the color just a tad. That's just another little painter's trick. Now, I'm going to bring out some of this color out this way so that it comes out onto the water itself. Again, don't be too alarmed at this part because a lot of this is going to get covered up anyways, but I do want to have a little bit of a point where they crash into each other, if you will. See that. If we were to look at this proportionally wise, I have the sand up to about halfway in this canvas just so you can get an idea of proportionally where we're putting everything. Don't be too concerned about being perfect. A lot of this is going to get covered by the white of the sea crashing. Once we've got that, there's another little thing, another little trick I want to show you guys. We're just going to go in with our brush, we're going to take, grab a little bit of blue; just the tiniest bit of blue, you can barely see it on my brush here. I'm just going to go to the side and mix it into that sand color and it's going to make a tiny bit of a darker shade of that color, because now what I'm going to do is just get my brush nice and coated and I go here and just make a horizontal or a sideways set of strokes. I don't have a lot of my brush. What's going to happen is, you're going to see just very, very small strokes of color that comes out. If you look at the water and the lines of the sand, there, you see some darker lines emerging. That's what this is doing. It's very subtle. [inaudible] can't even see it on the screen here, but it's ever so subtle and you only need to do a couple of strokes of that to make it happen. Excellent. Once we've done that, we're going to go ahead and make some rocks that are showing up here.
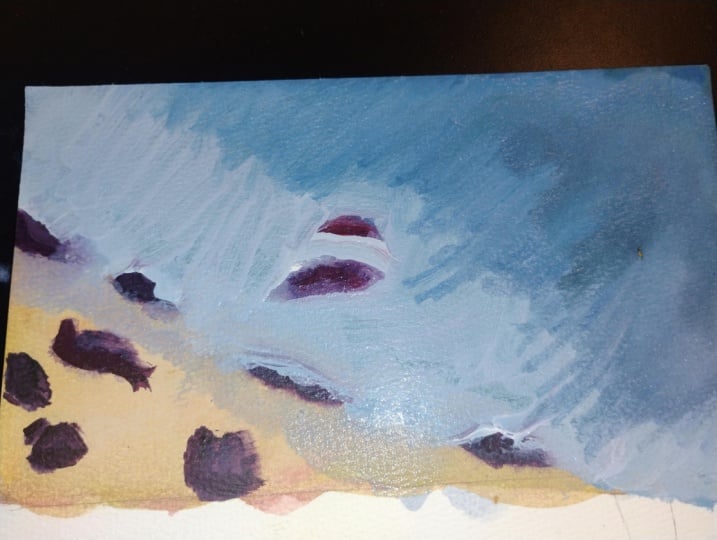
5. Step 3: Painting in the rocks: We're going to be using basically the same color that we did the sand, but it's just going to be a little darker. I'm just going to take a subpart of that sand that we made right over here. Let me just grab my palette knife. I'm just going to remake that color again because it did dry out a little bit. Now we have a formation of many ways of a dark blake brown starting to come together. Let's get the excess off. Let's see here. It's looking a little green to me, so I'm just going to grab some red. If ever you're mixing and you're making the color brown, and that brown is looking more purple to you, add yellow. If it's looking more green to you, add red. Because if it's looking green, that means you have a little too much yellow in there. Blue blue yellow and green. We're going to grab our shader brush this time. We're going to dip him in some water, tap him on our little washcloth, and then we're going to grab that brown. This is a nice dark brown, so just to help set the tone on what's going on here. We're going to start making the big rock that's right over here. In the reference picture, it's partially covered, but that's okay. We're just going to go ahead and make the whole rock pretending that it's actually there. I'm forming it in the middle of the Canvas, plopping it right there. It has this curved shape here then it comes down just like so, I just fill in very lightly that part. It has a back area, so using the tip of your brush, you just going to move it up and do a squiggly. You just going to squiggles that look like this, then comes down like this. You can just go ahead and fill this part in. It doesn't have to be perfect, but you just want to make sure that at least you've got the brown going and setup so you know that there's a rock here. If you don't have enough to fill in this part over here, you don't have to if you don't want to. We have established this part, then we're going to do some more rocks. Let's do one that's right around here. If we go about maybe two inches from the top and about an inch over or three inches from the top and an inch over, we'll do another rock. This one has the curve side like so, I'm using primarily the tip of my brush to do this. We have another line that comes downward like that, or maybe up and down like that, then fill that part in like that. These don't have to be perfect, rocks come in different shapes and sizes to be honest with you, I'm just using the tip of my brush here to help me guide where I want the lines to go really. Rocks are very imperfect, some are squares, some are circular, some are oval shape. We'll do another one right over here, right next to it. It's got a nice curved top, then it goes inwards like this. This one's a lot more circular in shape, just think of that, think of the shape that it looks like, it's like that. We have another one, here, I'm using the broad side of my brush and then bring I down like that. Nothing crazy, doesn't have to be perfect, it's rocks. Another part rock that's coming out from the edge here. We have another one, this one circular in shape, so it's got a round top, has a slant on this side, and it comes in just like that. We have another one right around here I would say, slanted side just like so, comes in down, rounds out the bottom here, then it goes in just like that, pretty easy. We got another one, and I'm looking at the reference pictures, locating my rocks and seeing what shapes they look like, this one starts like a rectangle and then fans out like that. There's some more here, another one here, and there's another one that's right over here. I'm using the tip of my brush here to just dot them. I see there's another one here, this one is very covered by the foam of the sea. I'm just going to go ahead and add that in, because a lot of this again is going to get covered. Don't feel like you have to make this perfect on the first shot. I know there's another rock right on here, it has this backwards C-shape like that. That's pretty much that when it comes to rocks. Another thing we want to do is, you want to add the highlights of the rocks. You can continue on adding more rocks as you see fit but I think I'm good with this. I'm going to go ahead and add a highlight portion of those rocks. The highlight portion seems to be a little lighter than obviously the darker portions of the rock. I'm just going to grab some white, go to the edge here of where I made that brown, mix it up, maybe just a little bit of yellow. Now we're going to go in and I'm just going to add some highlights to those rocks. I see that the lighter part of the rock on this one is more on the right side. It has lighter tones, so I'm not completely covering it, I'm just taking the tip of my shader brush and just adding portions there. You don't need to be precise, but you just want to show different areas that have those highlights. This rock here doesn't necessarily have that many highlights, so we'll move on to this rock. This rock has a highlight that's just down this way. Again, look at your reference picture where you see the light areas, add that in. I see one here, and I see one right there. This one's going to get covered a lot, so that doesn't really matter. Lets see. You can switch over to another brush if you're not feeling like you're getting a lot of control. You can always move to your detail round brush, and really start to keep on adding. You know what? This is not the last time you're going to be adding these little details here, towards the end, you can always go back in and add more. Again, here's another layering example. I can go back in with the brown that we worked on earlier with the rocks. I can go back in and re-add areas that maybe I thought that I added a little too much of the highlight. This is my opportunity to fix that. That's what I can do here. One other thing I want to do, you'll notice that there are parts of that sand color that seem to see out right around here in these areas, so I'm going to go back in now with my filbert brush, make sure he's nicely washed and we're going to grab some of that sand color again, not a lot, just a little bit and right around this area, there's some of that brown that's showing up. Using very light strokes, it's an oval shape that's coming out on this end here. There's another set of this color here, another little part here. We're not trying to be super precise, but we're just trying to show where we're seeing these colors show up. Because again, when we start working with the foam, that's when it all comes together. I'm seeing it here, I'm seeing these little parts. Of course you can always go back in later and keep adding. Now that we have that, it's now time to work on our sea foam. This part is so much fun. Get ready for this to be the majority of what you end up doing for this painting, because that's really what makes this come alive.
6. Step 4: Painting the Seam Foam: We're going to grab our filbert brush once again. Make sure it is nice and clean. Then we're going to make our sea foam. We're just going to grab our titanium white. Go to where the blue that we made prior. I'm just going to mix in a little bit of that blue with the white. We want to be primarily white, but it's not pure white, at least not yet. Then we're just going to go ahead and start to build. So let's start with the wave, with a set of misty foam that's happening right around the rock formation here. To do our foam, you're just going to do these brushstrokes. They're like upside-down c's or upside-down u's. You're building one on top of the other. You're not putting a lot of pressure on your brush as you're doing this because I need to have it loaded a lot. But you're just going to clump a lot of those colors together, and you're going to keep on building. Now, I'm just going to try to make a lot of these. I don't want it to be so apparent that I'm doing a lot of upside down u's. I'm feathering in, going on top of what I've done previously so I can disguise that brushstroke. You don't want to be so obvious. That's one. Let's do another set. Let's do another set over here. Somewhere here and then you've got a lot over here. Again, just doing those same strokes to get those going. It's really starting to come together. It's really magical when this starts to happen. As I'm approaching some of those rock areas, I don't completely cover it. Like that part where it looks like it's a little bit of that sand, I go around it [inaudible] the strokes for the foam. You're going to keep on building the same strokes. You're just repeating. You're just looking at the reference picture. We still have a lot of foam left to add in here. Some here. I don't want to completely cover everything in white when there's clearly some foam that's thinned out right around this area. Leave that off for now. We're not going to paint those with these strokes yet. We're getting there though. Then we can actually start to add some of that white on top of that rock there. It's coming over it like a little rainbow. I'm using the side of my brush here to make sure that some of my color is transferring off, but it's not completely covering. This is something else that you as a painter will start to realize more and more is that you don't have to have a glob of brush on your canvas when you're doing these details. Having a little bit at a time to help take the paint out and put it onto whatever working surface you have is a good call. You can always add more later. It's harder to take off than to put on. Once again, we're going to go back in now and repeat those strokes. This is where layering once again, plays a vital role. Now, as you get to the point in the shore where it's the final big area of wave, we're going to reverse the stroke. So instead of it going like this, it's going to go like this. Let me demonstrate to you what that looks like. You see how I'm swooping out this way. So it looks like it's gathered. Now I'm just looking at the shape of my coastline. Looks like some of it comes out this way. Some of it comes out this way. Don't worry, we're going to be going into details very soon, but right now we're just establishing some shapes here. Now, I'm just going to go back in again. I'm just going to keep repeating the layering. I'm going to build up. I see more foam that's happening right around this area that I want to add. We're just going to go ahead and add that. You can always take a step back from your painting as you're working on this. Seeing like, okay, now, I can add a bit more here, I can take away more there. That's totally up to you. If I want to cover more of the rock, I can do that. Because I can always add rock back in. That's the beauty of painting. You can always add stuff back in. You can see I'm also doing your tapping technique like how I was doing before with the water. It's a great technique to use. I always recommend it. Just like so. You know what, now that I'm looking at this, that rock can go up a little higher. I'm just going to cover the majority of this with the white. See, this is what happens when you're painting, you're constantly course correcting. If you feel like, you know what, I put that rock a little too close than I would like. You can change that. It's totally fine. I'm going to do that right now. I'm just going grab that brown with my shader brush. I'm just going to remake that rock and I'm putting it up just a tad higher. You can keep the rock where we originally had it. That's totally okay. But this is where we can really play with our flow. If you're feeling like, I wish that rock was higher, move it. Move that rock. It's okay. You can totally do that. See, I moved it up a little higher and it took me less than 20 seconds to do that. No big deal. Then, of course, I just want to add some of that lighter area that's right around here. No big deal. I might be moving a little fast, but I'm trying to show you the technique, because basically you're just going to end up repeating it over and over and over again, ad nauseum. I'm really not kidding when I say that once you got a technique, you just have to keep on using it because that's just how it's going to go. It's very repeating. It repeats itself a lot here. I'm just going to do a little tapping around the front part of the rock. Some there. Then it comes down like so. That feels much better to me, to be honest with you. It feels much, much better to me. We have some right around here. I'm just tapping. I'm just locating where I've seen the sea foam. I'll just go ahead and add it in. Once again just varying my strokes. Now I want to call your attention to some details of the foam here. You'll notice that the foam itself has some undulating patterns to it. That happens because some of the blue from the ocean is popping up from underneath. I'm going to show you how you can go ahead and represent that. We're going to use, again, our Filbert brush. I just gave them a nice little quick clean. Now I'm going to go back to the blue, what we made of our ocean. Just going to grab a little bit of that. Then I'm going to go in here. Just looking at my reference picture, I noticed that the lines of that darker blue or that blue just go down like this. I'm just tapping it in, and it repeats itself over here. Just tapping it in, just like so. Again, we're going to be going in later on with the white to fix this up. But for the most part, it's a billowing of layers. Just tapping it in like so. I know it looks weird and cartoony right now, but you're establishing something. We'll go back in later and blend. Like that. There's some more over here. Like that. Now, grab that white. Then you're going to go up to those lines that you made, and then you're just going to partially cover it, almost all the way covering that line you made. Again, this is another layering thing. You're just adding more and more layers, giving that illusion of depth and of a lot of moving parts here. Like that. It's subtle. But again, it helps give that appearance that there's more happening in this painting than meets the eye. You start to see it looks like it's rippled. There's ripples happening. Just build, build, build, build. You can never do too much building, honestly. You can keep going with this. You can keep adding more of those blues and then covering it up. The world is your oyster here. Cool.
7. Step 5: Adding the Water Details: Now we're going to move on and do more of the details of what's happening on the shoreline here. We're just going to grab our detail brush. We're going to dip it in our white. Then we're going to first make that clear separation between the water and the sand and you'll know what I'm talking about. But we start at this point here, that rock that we made down here. We're going to make a line like this and make another line going out like this. Now, with our brush, I'm going to move it to the side like this. Then you're going to just do a wiggle like that. So that it blends into the majority of the sea foam here. I'm going to do the same thing on this side, but not a lot, just a little bit of a wiggle on the brush. Just a little wiggle here. Now we do a wiggle right over here and a little wiggle right there. What we're doing is we're trying to help blend whatever is happening here to what's happening up here because it's like a thick mass to a little mass. So we want to just ease into that separation. Just do a nice side scrubbing, if you will, do another line. We're going to start doing more and more of these little lines that show up. They almost come together. So if you imagine this shape right here, and you have another line that comes out like that, that reflects it, another line and then another line and they all connect together,i f you see what I mean. Then you have another. I'm just looking at some key lines that I'm seeing. I'm really following the reference picture here on the types of little lines that I'm seeing. But I form a line, do a little side wiggle by brush. So it thins out out here, but then it gets thicker as it joins the bigger waves. Then I just do little side wiggles with my brush. Got some white over here. Everything in water connects together. You'll see some lines and patterns that form. The lines all mold together if that makes sense. If you have, again a line like this down here, you have another line that follows it, and another line that follows it all up until it starts to connect itself back to the bigger lines, to the bigger foam areas. This part's going to take some time for you so really be patient. It does take a little bit of getting used to. Again, just doing my side wiggles. But really what you're doing, again, you're just trying to take whatever big thing is happening here and making it smaller as it comes down here. Just like that. You just be patient. Work with your lines. I know it looks weird right now. You just have to trust yourself. But if you're even doubtful, take a step back every once in a while, take a look at what you're doing. Then you'll start to see "Oh wow, I see what's happening here. I get it now." Then you just keep repeating. Sometimes you'll get it so much that you'll start to come and you'll start to make up, "I can see maybe this can go over here and that foam reaches out this way." That's where your creative energy starts to really fly. Again just taking the time. Then of course, if you feel like, "You know what? I want to bring more of that sand up this way. It feels like I got cut off a little bit. I don't have much room to work with to make these little shore swirls." You have that color of sand that you made previously. You just always go ahead and add that in. In fact, let's do that. I'm just going to grab a little bit of that sand color and that blue color we are working with for the water. I'm going to put those together really quick and just going to add that in. What this does, again, it saves you a little bit of real estate. You're like working with the negative space that's around the swirls that you were just working with. Guess what? You can always go back in and fix up those swirls if you're just not feeling it. It's all like accomplishing the same thing. Go back in with the white. I'm just going back and forth playing around using the same brush wiggle technique. I'm just going to add some over here because why not? Doing that almost side scrub really helps it to establish that part of the wave that breaks all in the scrub. Now I'm using that same scrubbing, this is partially covering what we did before with that white and turbid blue. Really all this comes down to as layering, you are just doing one layer at a time, applying it as you go. Here I'm making the letter C with my scrub. You can be here all day doing this and I highly encourage you to take these new techniques that you're learning with me and just keep applying even after we're done with this tutorial. Because now you have the idea, you have the know-how to go ahead and do these techniques. But for the sake of this tutorial do not keep it from being five hours long, we're just going to move on to the next portion, which is adding in those really cool swirls in the water. Then once we do that, we're going to go in and add just the final bits of details. Using the same brush, detail round with that white and blue combo, mostly white, a little bit of blue. We're going to go in now and add the tiny lines that come out of the water and this is where it really comes alive for us here. What we're going to do, I'm going to start at the big rock here. Actually right around this area here. Just using the tip of my brush very lightly, I'm just going to make small white lines and then I'm going to make one line very squiggly coming out to the corner out into the page. Then I repeat that. If you think about lightning, where a lot of the lines are connected to each other. This is the same thought process, except that you're just doing a lot of lines that are just squiggly, some of them branch off of each other like a lightning does, some of them are just lines on their own, but there's a lot of these lines. You're just going to basically just add lines and interconnect them as like so. Now you can take your time with this, because there's a lot of these, but slowly the more you add, the more it starts to look like water. I'm looking at my reference picture just to get an idea of how these lines are happening. You just want to take it nice and slow. The lines, they go into the foam little bit here. Again, you want to be very subtle with these lines. There's some that are going into here a little bit like so. If you take a step back and look, this starts to look a lot like water. It's really neat how that starts happening. Down here is where we see a lot of that happening. A lot of those lines start to become a little bit more foamy. What we're going to do is we're just going to make those lines first of all, basically according to how we think we see them, I like that. What we're going to do for these lines down here, we're going to do that step, that scratching technique. We're going to turn our brush to the side and just follow the line that we did. Again, when we're doing that, we don't have to be perfect with the lines, some of them go up, some of them dip down a little bit. It's never a perfect straight line. Of course, they all blend into that sea foam area. It's like what we did on the shore, but this time it's on the other side onto the ocean. You just want to keep scratching on the side your brush just like so. Then it all blends into that larger area of foam right there. I'm going back in more with white this time now than ever. Using the side again with my brush, I'm just rubbing, scratching that area of the foam and then just trying to scratch it off so it looks like it just naturally breaking. It doesn't look like it just suddenly breaks off, it looks like it's gradually coming off. That's achieving a gradient, if you will. Again, just repeat the process over and over and over. Because a lot of what happens with the water here in the ocean is just repeating up the same thing or making just multiple layers of what's going on here. Again, using the side of my brush, then go back up here to where that rock is, using the side of my brush, I'm just fixing up those areas that look like the wave is crashing into it. Again, I'm just using that side portion of my brush. Once you get comfortable using a certain technique, you can carry it over to other areas of the painting. You don't have to just keep it in one spot. Because I can go back now and start adding just almost white at this point, I don't really have very much mixed in with a blue anymore. Just pure white, and start to make that side stroke using the side of my brush again and layering with different strokes and different shapes. If you notice, it's like I'm doing a backward C with my brush. I'm constantly maintaining that course. As it comes to this area, it doesn't really become a backwards C, it actually becomes a C shape. Like that. I'm not going heavy-handed. I'm just going in certain areas and doing this because, again, I don't want to lose that whitish blue that we established earlier. I'm playing with layers. If anything you learn from today is it's layering. We're just going in constantly, adding more and more layers, and I'm using the side of my brush to help me better achieve that, of course. As always, if you feel so inclined, so inspired, go ahead and keep adding more and more of these lines. But this is the gist of it, quite honestly. I'm just going to keep repeating, playing around, adding more layers as you see fit. You can also take this opportunity to go back in and fix up any of the rocks. If you feel like some of them, an element was erased as you are adding some foam, you can go back in and add some more; more of that brown to it. Purely up to you. Something I also like to do as well, you can always go in to where you did the scumbling, a white line at the top portion. Again, just to show a little bit more of a clean-cut line. I like doing it because I think it adds a cool effect; of course, you don't have to. I could be doing this all day long. It's actually really relaxing. One final thing; again, if I feel like I missed out on some of the blue areas, I can always go back in with the blue. Add that part in. Just like that. Again, you're working in lots and lots of layers. Go back in. Just add a little bit more over here, some over here. Again, I'm just using the side of my brush. I don't have a lot of paint on it, but I'm just doing little bits at a time and filling it out. Just so I can get that nice, clean edge on the rock, just go in, just get that nice edge like so. Then you know you can always go in, add a little bit more rocks to what you see fit, but this is the gist behind how you would make your very own sea painting. You can just continue on adding more and more of those details as you see fit, but for the most part, this is what you can do to create your very own sea painting. Now, I highly encourage you to just keep on going with your painting. In the next video that I have here in this course, I go ahead and do that and you could follow along with me if you would like. But once again, we're just going to be using the same techniques that we have already covered here. Have fun, and happy painting.
8. Step 6: Adding Those Extra Touches: Hey, welcome back. The context of this lesson is basically a reiteration of all the techniques that we have covered in the previous lessons. I'm just building more and more layers and progressing with the painting here. Really, I know that this may be a longer project, but I just wanted to show you exactly what it was that I was doing to help continue building this. Like I said, this can be a super long lesson and I could be spending all day doing all these little details. I just want to show you, just very quickly, all the additional little details that I was doing. Totally not required if you've already followed the other lessons previously to this. But I felt like this would be super helpful for you all to see. It's all a reiteration of the techniques I'm just consistently building. I sped it up so you can see that process building up for me as well. Basically I just went back in with the blue of that ocean and filled in those areas of the white, further accentuating the white caps of the sea as well as the mist, and then painting over that with the titanium white. Doing this helps to build that underlayer. It gives that illusion that there is still an ocean or so water underneath those white caps and the white mist of those waves. I hope you find this helpful at the very least. I do talk a little bit more later on in this video, telling you more techniques and more of the details that I'm putting on the rocks, different colors that I'm adding, but by no means are you required to go any further or follow exactly what it is I'm doing here because quite honestly, you can let your creativity takeover, and this a video representation of my creativity completely taking over. I was just going in hand. I want to show you this process and what that looks like realistically. I hope you enjoy it and have fun. Now another little trick that I'm also doing is taking that blue of the ocean and combining it with titanium white but a little bit more blue, concentrating a little bit more on the blue instead of more white so that it comes out like almost experiment gum, or like, I don't know why toothpaste is the color it reminds me. I match that along the crashes of the waves underneath the white lines that we made previously. It just serves to add a little bit more to the scene. You're just going to continue building little bit more at a time and layering. Really you're just repeating what you've learned here over and over and over again but with slightly different colors every time. I'm even carrying a little bit of it down over this way. A little bit over this way as well. It's almost like we're making the crash the underneath part of the wave. I'm not doing it everywhere, just in certain spots. Sometimes I'll end up just losing a rock in the process and that's okay. Totally okay with doing that. Then you just go over again with a white in those spots. I went back in to make another brown, and this time I added more red to that brown. I took equal parts, ultramarine red and yellow, mix them and then add a little bit more red to the mixture this time. Let's get it more reddish brown. I'm just adding tiny strokes of that in various places on the rocks here just to, once again, add a little tiny bit more depth to these rocks. I'm just constantly layering, doing the same things that I'm doing over and over again. If I'm making a new color, I try to add it somewhere else in the painting here. I'm trying to think about what the waves would be doing against the rocks. Some of them would cascade over it. Sometimes they go around. For those other parts that are different colors, I have covered them up with that white. Again, under the guise of the sea breaking at that point. I'm always using the side wiggle motion of my brush to do this. Taking the teal, adding it to some of the undersides again. Again, this is nothing new. Just repeating. Just constantly layering, and layering, and layering. I decided to give my rock a little bit of a tail. Again, just playing around. Now that you know all the techniques, you can just keep on playing with this and going and adding more and more layers. I mean, you can take a couple of days and just keep reiterating, and adding layers, and putting more on top, taking a step back and taking a look. But at least you have the foundation to know what to do. I hope you enjoyed this lesson and learned just a little bit more on how to paint water.
9. Do this if you're stuck on painting the waves: I'm actually going to grab my filbert brush and go back and forth. Instead of using my detail brush all the time, just using the bluish-white. I'm using the side of my brush like what we did with the detail brush, doing that scumbling. But this is again, to just add more of that texture. So I noticed that the waves weren't quite looking the way I wanted them to, so after just taking a day to just think about what it is that I was trying to do with this, I went back in and what I think was missing was the sea foam just needed to be more dynamic. In order to do that, I just would need to grab my filbert, fill it with a little bit of paint, and just use the sides. Make that C-shape with the waves and just connect some pieces together. I'm taking a look at the reference picture to see, just how the waves are moving in relation to each other. Some of them are doing that backward C. Other ones are doing backward C, so going like this. Others are doing backward Cs right towards the shore area, and it's very subtle the amount of paints that I'm putting on top of here. But it's again just to serve that purpose of showing just how tumultuous these waves are, that there's really not much super control over the waves. I went back in with the blue just to cover this area and then went back in with the white. Literally, again, layers, I'm just adding more and more layers as I go. Just going back and forth between the bluish of the ocean with the crashing waves. I'm just concentrating more with my filbert brush. Using my fingers sometimes helps blend out those edges. But I'm relying on my filbert to help get me there. Very light pressure. Very light pressure. Then just going back in with the white [inaudible] on top. This is the big weeks now. We are putting a lot of the final details in. This could take a little bit for you, but that's okay. This is not very easy to do. Just being able to patiently go in observe new instances that are happening in your water, that's what's important here. By doing these layering techniques that water really starts to look awesome. The filbert is really good for that. But that's just a little tip to help you further along with this area of the crashing waves and mist.
10. Thank You & Next Steps: That concludes our beach waves class. I hope you learned something new and that you're excited to dive more into the world of acrylics and all it has to offer in making gorgeous art. I want to offer some next steps. Well, the first thing I always recommend is to play and experiment and give yourself that freedom to play around with your acrylics and supplies and keep on practicing. Know that as a first-time acrylic painter, you may not get the results you want the first time or the third time, and that is totally okay. You're not supposed to get it right on the first go. It's really not about comparing yourself to others, but comparing yourself to yourself. I also want to offer you to challenge yourself when it comes to your painting experience. One way to do that would be to do this whole entire painting again without actually following the steps along with me. This is a really great way to take up the training wheels and learn a bit more as you go along. Trust me, you totally will learn something new every time you step up to the canvas. Please share your completed projects with me. I'm pumped to see them. You can do that by using the class Instagram hashtag and tag me on Instagram with my handle @thebuzzedartist. I would love to see what you come up with. If you really want to dive deeper into the magical world of acrylic painting, my Skillshare class, The Magic of Acrylics: Acrylic Painting Basics for Beginners, will help you answer all of those burning questions, like what supplies do you need that best suit your project? How to mix dozens of bright colors without paying hundreds of dollars in paint tubes? How to stay motivated so that you're always brimming with ideas for future paintings? If you've always wanted to make some paint slapping magical art with acrylics, occasionally have doubled here and there on the canvas, or you just want to brush up on your acrylic painting skills and learn something new, this is the class for you. You can find that via the class URL, thebuzzedartist.com/acrylic-magic, or in the class notes. If you want to go a little further with acrylics and manipulate them to make them look like watercolor and make some really cool art, you may want to consider taking my master watercolor effects with acrylics class. This is a great way to harness the power of acrylic paint while at the same time giving you the smooth, sexy natural blends of watercolor, with the versatility in water solubility of acrylic paint. I show you how to do all this in bite-sized lessons that are easy to follow and very hands-on. You could find this class via the URL thebuzzedartist.com/watercolor. Finally, if you want to explore the wide world of color with acrylics and get a look behind the curtain on creating head snapping, super colorful, eye-catching paintings, you might want to consider the magic of color class. This is the complete guide to creating eye-catching vibrant colors and palettes that'll turn heads and not require a bajillion art supplies. You'll learn how to paint any scene or picture using your own colors without needing to follow all those YouTube tutorials, even allowing you to go off script and add your own style. This class will help you create vibrant, eye-catching acrylic paintings without the fear of messing it up. No more praying and hoping that your paintings turn out halfway decent. This class will help you understand and know that you will not fail. Keeping you feeling motivated and positive even when your painting doesn't look like it's going in the direction you want it to. If you want to check this class, I'll just go to thebuzzedartist.com/color class. Of course, if you want to see the full listings of courses I do offer, you can just go to the buzzedartist.com/courses. Once again, I want to thank you so much for being a part of this class. Don't forget to use the class hashtag and I cannot wait to see what you create.
 Amanda Rinaldi, Teaching you to Art with Confidence