Transcripts
1. Introduction: I've recently put out a couple
of classes that use the colo am effect and fractal
noise in Adobe After effect. So I thought, why not
make a class dedicated to these two effects and
how they can be used in unison to create
some pretty neat stuff? Hopefully spark some
creativity that you can go on and use in your own work and
wait to see your creations.
2. Getting Started: Getting started with this class, you'll need Adobe After
effects to follow. Your class project will be to create any
animation you would like using the fractal
noise and Colama effects. I'll provide a
completed version of the project files on the
project and resources page. And when you're
finished, feel free to post your projects
to the project gallery. I always love seeing
what you create.
3. Intro to Fractal Noise: If you've been doing motion graphics for any amount of time, then you've probably come across fractal noise at least
in some capacity. It's a very useful effect
that can be used to generate texture and
drive animations. If you've never
seen fractal noise, then this lesson is for you. We'll take a quick
look at the effect, we'll go through all its options and how to generate animation. In order to use our
fractal noise effect, we'll first need to create a new solid layer to put
our effect on. We'll go up to layer, new solid now let's search in our effects and presets
for our fractal noise effect. We'll add it to our
new solid layer. Now let's take a look at
some of the options we have. Besides fractal type, we have a whole list of options
to change our noise. We'll take a look down
the menu and see how the different types affect the
look of our fractal noise. So many different
options to choose from. Similar to our
fractal type menu, we could also go
through our noise type. The invert button will invert
the black and white values. We could turn up our contrast. We could also change
our brightness. The overflow menu,
I almost always leave it on the default
of Allow HDR results. I don't think I've
ever changed it. The complexity option is similar to most other effects
in after effects. If you turn it to a low number, the effect becomes soft. The more you increase the
number, the sharper it becomes. Under the transform menu, you can change the
rotation, the scale. You could also click the
Uniform Scale button, change the scale width
and height separately. You can come up with some pretty cool looking textures
by doing this. Click the reset button to get back to our
default settings. The offset turbulence option
is one way we can animate our fractal noise by moving it up and down and
left and right. I'm not quite sure what the
perspective offset button does, as I've never used it. The evolution option is another way we can animate
our fractal noise. Under evolution options, we could also animate
using our random seed. If you want a more
choppy animation, animating the random
seed is the way to go. If you want a more
smooth animation, animate using the
evolution option. Like most effects
in after effects, there's an opacity option, which just changes the opacity of the effect on the layer. It also has a list
of blending modes, just like our layers
do in the layer stack. Now I'd like to
point out something very important is that after effects also has a
turbulent noise effect, and turbulent noise, for
all intents and purposes, works exactly the same
way as fractal noise. I've used both effects interchangeably as it
really just comes down to which effect my brain
decides to type into the search bar. I
4. Intro to Colorama: Now we'll have a look
at our second effect, the colorama effect. Because of how colorama works, we'll need a solid
layer with black, gray and white values. So we'll create a solid layer, and we'll add a
gradient ramp effect. We can leave our
gradient ramp effect on the default settings. Now let's go ahead and add our colorama effect
and see what happens. And right away, you can see it's already
remapping the colors. So I want to make it
clear before we start this tutorial that 100% of
the time when I use colorama, I use it for the
output cycle tab, which allows us to remap
colors based on the black, white, and gray values
of other effects. While I'm sure there's
some great stuff that we can create using
the other tabs, I just personally have never used them to
create anything. So for this class,
we're going to be focusing on the output cycle. So now let's break down what
the output cycle is doing. This circle represents
our gradient ramp in a clockwise motion, and it's remapping the
colors of the black, gray and white values
based on where they land on the circle in
relation to the gradient. It's a little bit hard to wrap
your head around at first, but it's just something
that begins to make more sense the more
you use colorama. We can change our colors by
double clicking on our tabs. I'm going to go through
each color and turn down the saturation just for
demonstration purposes. Like I mentioned earlier, our colorama effect is remapping the colors of our gradient
ramp based on the gray values. When we move our
tabs on the circle, it changes where the color
shows up on our gradient ramp. To remove colors, we
can drag the tabs off to circle. Hey, there. This is the teacher
from the future. I forgot to mention in the
original tutorial that to add a color to the circle,
you can double click. We also have the option
to change the opacity of each color by
dragging this handle. The cycle repetitions option allows us to repeat our pattern. We're still remapping the
colors of the gradient ramp. It's just repeating our pattern. The interpolate
palette option just creates a non gradient
version of our circle. Another important
thing to note is that Adobe has created a
whole bunch of presets that we can use for
when you want to create something quick and don't want to create your own
color palette, let's choose the sunset preset. You can go in and edit these presets, however
you would like. They make a great
starting point. Now, even though
we won't be using the other options in
Cloama in this tutorial, why don't we take
a quick look at them and go through
them together? First up, we have
the input phase. We have an option
to get phase from, which by default is
set to intensity, the intensity of our
gradient ramps gray values. As you can see, we
have a whole list of other options
such as the hue, lightness, saturation,
value, Alpha, and more. As I said earlier, I almost always leave this at the
default of intensity. We have the option to add phase, which is basically what layer
in the project we're using. Since we're using
the same layer as our gradient ramp, we
don't need to change this. But if we had multiple
layers in our project and wanted to get our gradient
ramp values from that layer, we would choose it in
the Add Phase list. If you're familiar
with blending modes, the Add mode option
should work very similar. But to be quite frank, I have very limited experience
using the Add mode options. The phase shift option allows
us to give a little bit of animation to our colorama by allowing us to
animate it up and down. Now let's close up input phase and look at the other
options we have. Now, the next couple
panels we're going to look at are most likely
used for color keying, if you're familiar with
what color keying is. Next up, we have
the Modify panel, which I'm pretty sure
allows you to edit specific color channels
in the Cloama effect. If you're a colorist or understand the
science behind color, then this panel should
make more sense to you. If not, then I wouldn't
worry too much about it. Then we have pixel selection. Similar to the modify panel, this panel would also be
used for color keying. Next, we have the masking panel. Under this panel, we would
point at a different layer in our layer stack and use it as a mask on our
colorama effect. We can change the
masking mode as well. And like many other
effects in after effects, there's a blend with
original option, which is basically like changing the opacity of the
colorama effect. And that just about sums
up our intro to colorama. Like I mentioned earlier, I'm not claiming to be
an expert on any of the other panels other
than the output cycle, which is what I use colorama for 100% of the time that
I use the effect. I'm sure there's some
cool stuff that can be created using
the other panels. I just personally
have never used them.
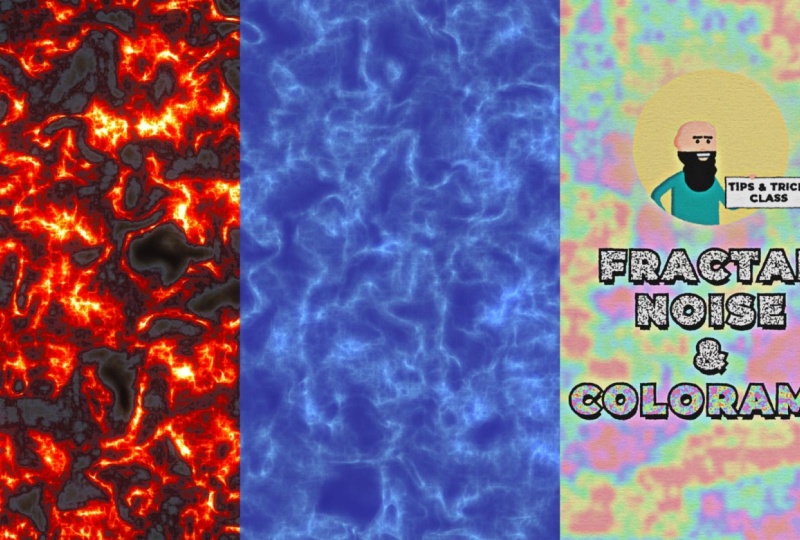
5. Examples 1: Water & Lava: Now, here's where things
get interesting when we combine our fractal noise
and our colorama effects. The first example
I have for you, we have something
that resembles water. I'll quickly close up all these effects and turn them off, and I'll go through
them one by one. So first, I created
the solid lao and then I added a
fractal noise effect. I'll toggle open the settings. Under fractal type,
I chose smeary. I have the noise
type on soft linear. I click the Invert button to change the black
and white values. Then I adjusted the
contrast and brightness. I might as well
round it off to 55 and brightness to zero
for tutorial purposes. I changed the complexity to ten. How I animated it, I
used the evolution. I'll double click on evolution to bring it up in
the layer stack. And I animated it using a simple time times
100 expression. To add an expression, you would hold the Alt key
and click on the stopwatch. This will allow you to
type into the field. In our case, we'll
type time times 100. And what that simple
expression does is it animates our evolution 100
pixels per second. So next, I added
our Cloama effect. And under the output cycle, I only have two colors, a dark blue and a light blue. As a final touch, I added a couple glow effects to make it look like sunlight is
shining on our water. The glow threshold
to 80%, the radius, I'll change to 25, and glow intensity, I
can turn down to 0.5. To give it a more radiated look, we'll duplicate our glow, and on glow two, we'll change
our glow radius to 125. The next example I have is lava. I used a very similar
technique to the water. I'll close up all the
effects and turn them off so we can go through
them one by one again. First, I added the
fractal noise. Again, I have the
fractal type to smeary, noise type soft linear. I inverted it. The contrast and brightness I can round
them off to 155 and zero. Again, I animated the evolution with our time times
100 expression. I added our Cloama effect, and this time under the output
cycle, I used a preset. I'll toggle open the menu. I chose the fire
and smoke preset. And right away, we get
something that resembles lava. I again added two glow effects. And one more additional
thing I did was I added a curves effect
and only adjusted it a little bit just to bring
down the Blacks. I
6. Examples 2: Colorful Noise & Glitch Effects: Before we start off this
section of examples, I just want to make
it clear that it can become a little bit
overwhelming at parts. That's why I'm providing the
project file that you can download so you can have a hands on look at how I
created these projects. So the first example I
want to show you is how I created the fractal noise
and colo rama animation. I started off by creating a solid layer and added
our fractal noise effect. I changed the fractal
type to rocky, noise type soft linear, contrast to 500,
brightness to 30. I turned the scale down to
two and complexity to six. For this animation, I animated the random seed with a time
times four expression. Then I used it as a track mat. By using the track
mat pick whip, I connected it to the text so that it only shows
up on the text. Then I created a duplicate of the fractal noise layer and
added the colorama effect. I drew a mask on this layer, so it only shows up
on the word colorama. I'll open up Cloama so
you can see the colors. It's the basic hue cycle that
Cloama chooses by default. I just turned down the
saturation on each color. I also tweaked the fractal
noise just a little bit. I turned the contrast to 180, brightness to zero, scale to 16. I'll turn Cloama back on and
give it one more preview. My next example, I'm going
to show you in two parts. First, I'll break down how I created the glitch animation, and then I'll show you how
I brought in some color. Here's what the original
glitch animation looks like. So what's basically
happening here is I have three separate circles that are separated by a couple
frames on the timeline, and each circle has a
displacement map effect. And the displacement map is what's creating the distortion. I'll walk you through
it step by step. So first, I created
a solid layer and put on my fractal noise. Although, in this case,
I used turbulent noise, which I explained earlier is the exact same as fractal noise. I set the fractal type to basic, contrast to 400, brightness
to negative 100. I separated uniform scaling so that I could change the scale's width and height separately. I changed the scale width to
46 and scale height to 20. I turned the complexity to two. To create the animation, I animated the random seed. I used the same time times four expression
that we used earlier. By the way, the reason we
can see the background here is because earlier when
I was creating this project, I moved this layer's
position so we can go ahead and ignore this the
rest of this tutorial. Now let's turn our circles
back on and see how the displacement map effects
create our distortion. So as I mentioned earlier, each circle has a displacement
map effect on the layer. And what we're doing is we're pointing the displacement
map effect at that turbulent noise
layer and it's using the turbulent noise layer
to create the distortion. We selected in this menu. We also have to
select effects and masks because turbulent
noise is an effect. Here is where we can dial in the amount of distortion
we want to use. We've got a vertical distortion and a horizontal distortion. See how when I
change the number, the amount of
distortion changes. We can actually turn this layer off because we don't
need to see it. So I have the circle separated by a couple frames
on the timeline, and each instance of
the displacement map, I have a little bit less
horizontal displacement, and that is what's giving off the effect that the
circle is glitching in. And by the way,
if all of this is overwhelming to you, it's
completely understandable. That's why I'll be providing a project file for
you to download, and you can go into the project and have a look at
how I created this. And finally, this
last circle here is just a regular circle
with no effects on it. The circle down here
at the bottom of the layer stack is just
to create the glow. As you can see, I have
some glow effects on here with some directional
blur to increase the glow. And then I have my
character animating in, and I'm using a
track mat so that my character only shows
up on the circle. Now we can go over how I brought in some color
into this animation. We'll start things off by duplicating our
displacement layer. We can rename it Colama because we're going to be
adding colorama to it. We can turn the layer back
on in the layer stack, and I'll move the colorama layer above the first circle
on the animation. Now I'm going to use
the Track Matt pick whip and connect it
to the first circle. Now that colorama layer only shows up on
our first circle. Now let's bring in
some color by adding our colorama effect.
And there we have it. We're already getting some
really psychedelic colors just with our basic cycle. I already have a color
palette chosen out, so I'm going to paste
it onto my colorama. I'll bring up the output cycle
so you can see the colors. So now it's just a matter of duplicating our colorama layer, putting it above our
other circles, again, using the track Mat piqui to connect it to
our other circles. Duplicate it one more time. Put it above the next circle. Use the track Mat
piquip. And there we go. We've got our psychedelic colors as the circle animates in, and that is essentially how I created this glitch animation.
7. Examples 3: Revisiting Projects: And finally, I thought
it was worth revisiting a couple classes where I used colo rama and
fractal noise. And while both of these
projects are actually being driven by a
gradient ramp in Cloama, our fractal noise is being
sandwiched in between these effects to bring
in some extra texture. If you're interested
in learning how to create these projects
step by step, I would recommend
taking my gold text and my chrome text classes. That just about sums
it up for this class. I hope you enjoyed learning
about these effects, and perhaps I'll see
you in a future class.
8. Outro: Congratulations. You've made
it to the end of the class. Now you can post your projects
to the project gallery. I would love to see
your animations.
 Tyler Bennett, Motion Graphics Designer & Photographer