Transcripts
1. Hello and Welcome!: Hello and welcome to create
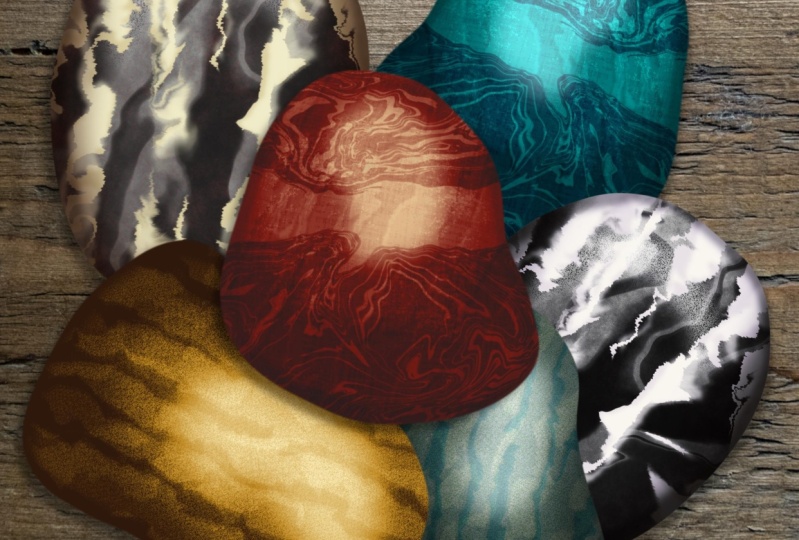
rock art in procreate. Take a look at this image. The ward and the
background is a photo. The stones and the
pictures on them is what you're going to be
painting on this course. And I do mean everything in
the first part of the course, you're going to be creating
stones from scratch using a variety of
techniques that really harness the power
of what Procreate. You'll be using the
liquefy tool to create original marble textures. You'll make those textures
console around the shape of the stone using the liquefy
and transform tools, you'll be using layers and layer blend modes to build up the complexity of the stone. I'll show you how you can create hundreds of variations
from just one stone. And I'll show you
the best way is to combine real-world textures
with your art work. Trust some fun facts, and if you're not
sure what to draw, I've got you covered as well as supplying 15 stones for
you to base your work on. I'm also supplying you with
72 different sketches, all of which have been made, whether art painting in mind. And I will take five
of these sketches and I will show you how to
apply them to the stone, how to login to the stone, how to build up an ink
layer on top of the sketch. The most efficient
way to lock in your artwork on how
to paint your images. Oh, and I should also mention, I am also supplying you with various different
color swatches, including acrylic
paint color swatches, Golden Age color swatches, a whole variety of different oil paint hues in swatch form with shade and
tint built into the swatches. We will go through those
five projects together. At the end, we will take those five stones and
I'll show you what to do if you want to combine those various projects
into long composite image, the image you saw at the
beginning of this video, a whole variety of
different techniques. 15 stops the paint off, 72 sketches for
you to work with. Five of them you
see as exercises plus a whole load of
different color swatches. Schools is offering you a whole load of
tuition, resources. Enroll now. And together you
and me are going to make some great
looking on her rocker. I'll see you on the course.
2. Let's Start our First Stone: Okay, Hello and welcome to
create rock art in procreate. And just at the
start of the course, I'd like to say, thank you
for investing in the course. I think I've got a lot of
stuff for you to learn, plus also a whole
load of resources for you to practice with once
you've completed the course. Okay, let's get started
for this lesson. I just want to create a stone. And by the end of the lesson, you're going to get something
that looks like this. And the good news is, it's actually very easy. In fact, it's practically
self working. Let's make a start. I need a new file, so I will come to the plus sign and the top right and tap, what shall I have? Look, I'll just go
with a square file, 2048 by 2048 sRGB. This is all fine. There we go. And I'll pinch in a little bit just so I can see
my entire canvas. The next thing, open up my layers panel and I want to change the
background color because painting against a
white background can sometimes make it a little bit difficult to judge how light or
dark you should be. Paintings come to
a midtone light, h gray around here. But you'll notice I'm not
going completely gray and I don't want mid gray because that's just a little bit dead. I'm gonna move
install little bit, not as far as theirs. That's way too much. But I'm going to come to about there and I'm going to change the color to a kind
of a bluish color. It doesn't matter which
color I'll tap on Done. And one thing I should say at this point is if you're
following along, which I hope you are, don't expect to get the
exact same result as me, because the way we're going
to make this involves a lot of randomizing
your brush strokes. So yours will be different. Just follow along
with the process. Okay, so the next
thing is we need a stone shape layer
one is selected. I will tap and I will
come to my airbrushing. I want from the
bottom of the list, I want hard airbrush. I've got it set to maximum
opacity and the size, I've set that to 100
per cent as well. So I got a fairly broad
stroke like that. I will two-finger
tap to undo that. But the color, not much
of a stony colors. So I'll come and make, let's make it a slightly lighter gray than I have
for the background, but also still a little bit
of color in there instead of yellow out like kind of a slightly brownish
color maybe about there. So my brushes selected
full-size, full opacity, and I'm just going to make a vaguely round shape
like this there. That's the outline of my stone. And I want that filled
in so I can just come up to the very top right
where I'm circling, that's my current color. And if I rest my finger
on there and drag over, I can flood the entire area. Now when you do, you're
gonna get something called a color drop threshold. And that's going
to vary depending upon when you last used it. In general, with the
color drop threshold, you want this set as
high as possible. So you slide your finger to
the right and can you see the slider at the
top moving when I slide my finger
from left to right, I want this going all the
way over until audit. That's a little bit too far. So everything gets flooded. And now I want to drag
my finger back just a tiny little bit until
the area is flooded. That gives me the maximum
flooding potential. Let me show you
something if I drag my color drop threshold
so it's quite low. Can you see just where I'm circling because my
threshold is set low? What, 28.6, the flood
tools getting a little bit fuzzier about what it wants to flood and what it
doesn't want to flood. But if your slide your
finger over to the right, you can see it gets a lot more happy about what
it wants to flood. So I'll take it to about there. Alright, that is my
basic stone shape. Now let's do some
little bands of color. Well, now let's
be good. Come on. Let's rename this
to stone shape. Because on all my courses, I keep on saying
name your layers because it makes your
life much easier. And sometimes I even
listened to my own advice, especially in a
tutorial like this where I'm telling somebody
else to do the same thing. Let's create a new layer. And I'll call this bans want, because I want to put
down some bands of color. What I will be doing
that with this, we'll be setting the
mode to clipping mask, but I won't do that just
yet because showing you a before and after can
help make things clear. So if my colors, I don't want the hard airbrush, lets try a soft
airbrush look like, and I need a different color. I want to make this
some darker bands of color may be down like here, or maybe you vary the hue, so I'm getting different tones, but also slightly
different colors. And that can help to mix
things up a little bit. Now what have I got with this? Is that big enough? Big enough. Is it soft enough? Yeah. I suppose this kind
of soft enough, but what I will do is I'll
two-finger tap to undo that. I'll start off by
making things a bit bigger and I'll come to about halfway opaque so I can build up a few areas of color. And we're going to come up here and build but
area of color, they're very my brush head. The size of it. You notice I'm making some
pretty big strokes here. That can help me later on. My brush bigger and
just a little bit lighter just down
the bottom here, make my brush a bit smaller
and press fairly hard. They're actually make it
a little bit bigger and press here and do a couple of strokes and just very
things a little bit. Not all the way in, that's fine, but I do want a little bit of
detail just on the outside. Alright. Those are the dark stripes, but you may notice
they're kind of going off the edge of
the stone a little bit. But that's not a problem. If I come and choose
clipping mask. What that means is if you have
my bands one lab and it's sitting on top of stone
shape in the layer panel. When you turn Clipping Mask on, you'll only see the
pixels in the bands one layer where there's already pixels in the stone Shape Layer. One of the nice things about it is if I come to
where I'm circling, which is the transform tool, and I have uniform selected. I can move this around. So I can very whereabouts
those bands of color are, and that can be useful. But now let's come
to the fun bit. And for this, I want to turn off clipping
mask again so I can see my layer and I'm
going to come to my adjustments and I'm
gonna come down to liquefy. Let's show you the basics of this with the Liquify
tool you have. At the moment, I have
pushed selected, I'll make my size fairly big. And if I just push
around with my brush, you can see I can distort
the brush strokes like this. Well that's nice, but
here's the fun bit. I have some more controls here and one of them is distortion. I'm going to crank that
all the way up to maximum. And if I draw now, can you see if I just jiggle my brush head
around a little bit, I'm getting all kinds
of distortions. That is way too much. So I will come to
the reset button, which takes everything
to how it was when I first opened
up liquify a while. I'm here as well. I'm going to take a look at the momentum. This is a symbol, fluffy brush stroke with it off. Which is quite nice. But if I crank up
the momentum to maximum and do the same
fluffy brush stroke, you can see the brush stroke. It gets a life of
its own and it goes flying off and distorts
things way down the line. That is quite nice because
I want that randomness. Or to a couple of more
brush strokes like this. You can see I'm really
starting to get some nice squiggly lines which look like the kind of shapes that you do
get on a stone. If I vary the slicer now it's small and do the same thing. You can see I'm getting some
slightly smaller shapes. Now there are other
things I can do as well. There's crystals which I'm circling now and
I've just tap that for make this a bit bigger
and we'll look at this. Can you see how I'm getting
a little kind of well, crystals on the edge
of what I'm doing. And these are just light,
fluffy pen strokes. I'll come back to push again, maybe alter the size a bit more. Yes, I like what that is doing. I'm also doing bits
that you don't see once you come to the layers panel
to commit that liquefy. And then if I turn on
the clipping mask again, part of what I did,
you don't see now. But like I say, if you come to your
transform tool, you can very whereabouts which bits of those bands
of color you get to say, I will two-finger
tap to undo that. To get back to where
it originally was, because now I am going
to add a new layer. Let's call this bands to, for this odd like
some lighter bands. What do I have? Soft airbrush, that's fine. I will come to my colors. Now. The original base color
of the stone is stored. Yeah, fair in history. If I circle it now and
I'm going to tap it, that was my original color. I want a lighter version and
also I'm going to vary it. So it's just a little bit
more yellowish about there. And soft air brush is selected. I want to take the opacity up. I want the size set
fairly small because I'd like needs to be some
fairly fine bands of color. And as before, I just make
the brush strokes like this. I don't want it to be too, even I'd like them to be grouped
together in some places, I'd like the size
variable a little bit. Maybe slightly concentrated
in some areas, not so much in others, just to get that kinda
random effect you do get. And let's do the same
thing with this. Let's come to liquefy. What do I have set size is
set small, that's fine. That's what I want.
Distortion is set to maximum. That's good as well.
Let's make this a little bit smaller so I
can see what I'm doing. Let's do some light fluffy
brush strokes on this. Yeah, I like that. Now I wonder just to mix
things up a little bit. I have not tried this. Maybe it will work.
I will come to the next one along
which is 12, right? Distortion momentum,
everything is set. I take the size down,
so it's fairly small. And that's just try
this top left squiggle. Let's try doing that. And let's make it a
little bit bigger. Oh, yeah, that's
looking quite nice. I like that. The twirl
right into the left, drag the brush strokes
around in a spiral, which can be quite nice.
What about crystals? Let's make this a bit bigger
and put some crystals. Yeah, I like that as well. I think I will go with that. Let's come to my layers panel, which commits those various different liquify
things I've done. And I'll do what I did before. That's turned on clipping mask. Now we're starting to get
the basis of a stone.
3. Add Light and Shade to our Stone: Okay, We're back now. The first thing I'm gonna
do is I'm going to come to gallery and I'm going
to slide to the right. And I'm going to duplicate my artwork because
what we have here is just the foundation for something that hopefully
looks like a good stone. And some of the things I'm
going to do in this lesson, like create some
lightened, some shadow. I recommend you do with any
stone you want to create, but other stuff, a
case of experimenting. I'll be honest with you, I have no idea what I'm
going to end up with because I can take the same file
and just develop it twice. And I'll probably come up
with a very different result. And for that reason,
I just want to keep a copy of my stone in place so that I can come back
to my gallery at any point, duplicated again
and just work it up and probably come up
with something different. Anyway, let's tap on my
duplicate. So here we are. I'll make this stole a little
bit smaller and off to the side so I can open
up my layers panel. Well, the next thing
I want to do is create some shadow
because let's face it, this is looking very flat. To do that, Let's
create a new layer. Let's tap on it and
let's rename it to shadow one because I'm meant to be doing more
than one shadow layer. The next thing I could do with
a color to paint on that, let's take a look at my history. That was what I used for
the original stone layer. I think what I want to do is to have a much
deeper version of that, but also a little
bit more saturated. I want a little bit of color in the shadow and come back
to my shadow layer. Want what brush too, I have that's come to my
airbrushing and I'll choose. Yes, the hard airbrush is fine, precise is that large? Uh, what I wanna do,
start drawing down an area of color which cuts
into my stone like this. I want to make it so
the light is coming from the top right. So I'd expect to be shadows to be more in the
bottom-left area. And as you can see,
I'm cutting quite happily into my stone like this, but I'm leaving the
top-right corner untouched. And I'm also going to
extend this by quite a bit. I know it looks messy now, but there was a reason for this. There we go and come
and I will turn on clipping mask and I will set the layer blend mode of this to one of the
dark and blend modes. I do that by coming to
this little n which I am circling now and I tap
on it, I get two things. I get the opacity that controls how transparent or how
are painful areas. But also I have the various
different layer blend modes. By default, any new layer
starts out as normal, but above that you have things called the
dark and blend modes. And I'll make my opacity
just a little bit lower. So you can see this. Can you see how
well they changed these different
darker blend modes? It changes how this
top shadow want layout plays with everything
that's underneath it. Like multiply gives you a
different effect to darken, two different effect
to collarbone, different effects
or Linear Burn, different effects and normal. I'm gonna go with
multiply for now, I'll make the
opacity quite high. But now I come to my adjustments and I
come to Gaussian Blur. I put my finger on my screen somewhere on the left-hand side and I drag over to the right. And as I do, can you
see that that hard area is now getting blurred
and it's starting to look like a shadow. Now it depends what kind
of a shadow I want. If I had a very flat stone, I would expect to have a fairly tightly defined shadow area, maybe like this. But if I had a more
rounded stone, I would expect to see us softer, more rounded shadow like this. And I'll go with what? Twenty-two percent. Yeah. Okay. I'll go with that. I'll tap on my Layers icon
and there's my shadow. Now the reason I asked you to do a large blurry area like this is because once
you've done your shadow, you may decide you
want to adjust it a little bit by coming to
your transform tool, which I'm circling now. I have uniform selected and I can move this around
to wherever I want. Like, I might want a little
bit more shadow there in the bottom left to create
more of that kind of effect. Or I may want a little
bit less like this. I can, even if I zoom
out a little bit, I can make the
entire shadow area larger so you get a
more spread out shadow. So it's just hanging onto
the outer areas like this. In fact, I think I
quite like that. I prefer that so
I will keep that. So tap on my layer icon. Let's do that. I'll
zoom in a little bit. Let's take a look
at what we've got. The opacity, I can alter
that to whatever I want. Here's a little tip for you. When you are trying
to figure out how strong you want this layer to be like that maximum and
it's really quite strong. Take your opacity slider
all the way down to 0. Let's make sure we
can see everything, open up our layers, then. Graduate dial in the
amount you want and I want something about
about there for now. Now, what have I got? What 79 per cent having I
put this down at a 100%. But then I decided that I prefer it to be a
little bit lower. So don't be afraid to
ride the opacity slider. When you do this, now I did say I'm going to do more
than one shadow area because as well as
the general shadow which is creating the
form of the stone, I also wanted to talk a little
bit more intense shadow just around the very edge of the stone
where the light maybe getting lost in various different cracks and
stuff like that. So here's another layer. Let's call this shadow. To this. Mark can use the same color, I can use the same brush. I'll make it a little
bit smaller though. And I just want to come
right the way around, just the very outside
of this stone. Like that. Let's take a look at that with a clipping layer turned on. Yeah, that's about right. You'll notice it's not
completely smooth. I want it to be, well,
I'll exaggerate. It will cut in a
little bit more in some places and not
so much in others, not so much as that. So I'll two-finger
tap to undo that. But now I do what I did before. I will set the blend mode to one of the dark and blend mode. Again, I will go with multiply. Let's take down the
opacity just a little bit and do what I did before
I come to Gaussian blur. But this time when I drag, I'm going to make it as small. Tipler, something like that. What have I got? What I was what, seven per cent. That's hardly anything. But it's just to get a little bit more
definition just on the very edge of my stone. And that is a bit too strong, so I'm going to drag that down. So the opacity slider
is set to none and gradually dial in
the amount I want. I'm thinking just maybe
right about there. And just while I'm here, I've set to multiply. What about if I said
to one of the others, like Color Burn can give a slightly more colorful
shadow as Linear Burn, but not at the moment because the colors are very desaturated. Anyway, I will just
stick with multiply. Let's quickly take a look
at that before and after. That's without that shell is just around the
edge and you can see it's looking a bit
more 3D with a shadow. Let's take a look at what we
had with no shadows at all, all of a sudden
looking very flat. So yep, the shadows are helping. Okay, so that's the shadow. Now what about a highlight? Should we do a highlight? Yes, let's do a highlight. Create a new layer. Let's call this highlights. And for this, I
will just choose a straight up white my paintbrush. Again, I'll go with
the hard airbrush. And actually there are
different ways of doing this, but I'm trying to make this
a self working as possible. So you don't have to
practice too much to get an effect that you like. So I want to paint in white, my heart airbrush is
selected it on full. A 100% brightness. You can see that was
definitely a highlight. But what I'm gonna do now is I'm going to come to my eraser. And yeah, I have it
set to the same brush, hard airbrush, same brush, same opacity, same size. And now I'm just going to
rub out one or two bits. So I get thinner
bits just around the start of this brush and maybe just wave up the line or the outline just a little bit
a while I'm here. Let's come to my
brush and I want to extend this
down around here a little bit and then come back to my eraser and just
take out some of that. So I've got just kind
of a moon shape just towards the top right where
the light is coming from. Now It's a new layer, so it's set to
normal blend mode, but as well as having
the darken blend mode, which just make it invisible, I have a lightened blend mode. And I'll start off with screen because for making something realistic in a fairly
natural waist screen does quite good job. Or maybe take down
the opacity look. If I take it to halfway, you can see it's
interacting with the colors underneath in a different way that some of the other
blend modes would do. But now what I'll
do is I'll come to Gaussian Blur again
and do what I did before. Put my finger on the screen, this slide from left to right. And you can see
that that gradually fade into a general purpose
highlight like this. Let's come to our
layers panel again, it is quite subtle, but if I make the layer
invisible for a second, just by ticking where
I'm circling now, that's without that width and that little highlight is rarely starting to make
the stone look 3D. It is set to around
about halfway, so I can increase the opacity
to increase the highlights. I can also do things like
change the layer blend mode. Like if I take it
something like add. Add is a very, very strong layer blend mode. But if I take the
opacity down to 0, gravity dial it in, you can see getting a
certain kind of effect, that kinda blown out effect, which can be nice. Let's take that
back to screen for now and raised
we're about there. What about I'll maybe
make it about there. And because we want to be neat, Let's do the same thing. Let's turn on clipping
mask. And there we are. Now just before I wrap
up this video and go on to make this a little
bit more interesting. Let's create a shadow underneath the stone. So
that's simple enough. You come down to our
original stone shape, swipe to the right
and we duplicate it. Now, all those layers above the stone shape layer or all clipped to the layer which
is currently highlighted. It's the layer underneath
which I'm interested in. So I select it and come
to my transform tool. I'm set to uniform and
all I'm gonna do now is just drag it down a
little bit like this, down to the left. Because I want a shadow area underneath the stone
which makes it look like you're looking at a stone lie on a surface
pictured from above. And it's not working
very well at the moment, but that layer is selected. So I will come to Adjustments, Hue Saturation and Brightness. And I will take the
brightness down to 0. So we have black. That is one harsh shadows. So again, we can come to our adjustments
and I can come to Gaussian Blur again
and slide to adjust. And I can create a shadow
underneath the stone. I've done minus
twenty-three percent. You go with whatever works
for you, then come back. It's such a neutral, I would like you
to set to one of the dark and blend modes
like multiply because it helps the shadow
area to blend in just a little bit better
with the layer underneath. In this case, our
background layer. I want to take my opacity
slider all the way down to 0, then gradually dial in the opacity to get the depth
of shadow that I want. In this case,
somewhere around 70%. Yeah, I can go with that. So if I cut back to what we had at the beginning of the lesson, we have a stone with
a pattern but looking rather flat, kill me
back to where we are. Now. We now have a much
more 3D looking stone, but we're not done yet, not by a long shot. There's lots of things we
can do with this stone, and I'll go on and do
that in the next video.
4. Getting Creative with our Stone: When I was recording
the previous video, I thought there
was something like an eyelash or something
like that on the screen. And I'm circling it right there. And I thought I'll dust away the eyelash once I've
finished recording, it wasn't till
afterwards I realized that what you remember way back when I took my
stone shape layer and I flooded the layer, it didn't quite flood
everything that I want it to. And if I make
everything invisible, you can probably just see
that area right there. And I didn't notice it
beforehand because I didn't have that shadow layer
underneath which come on, let's rename this stone. Shadow. But one that's that. All of a sudden you do see it. Well, that's really easy. Just come to our
stone shape layer. I will sample the color. What brush do I have? The hard airbrush that's fine. And just color
that in like that. I will quickly pinch inwards just to
automatically resize. And let's take our suddenly
rarely boring looking stone. Add the layers. And this is where we are, right? Let's have a bit
of fun with this. I just experiments. I'll be adding new layers and adding new textures in there. Where they go in this
layer stack will matter. I might try a layer
mask on the highlight. I would use the hue, saturation and brightness to
alter the look of layers. I will be playing with
our layer blend modes to alter the look of layers. And I might even transform things as well as
blurring things. So if that's
thoroughly frightened, do I'm sorry, come on. Let's get on with it. Okay, So getting started, my bands one lab, that one, those colors are darker, so I'm going to use a
dark and blend mode like, well, that's multiply, which
gives a different effect. Color Burn is giving
you a very rich effect. As is linear burn
is very strong. I will take down the
opacity and gradually diluted a bit like this. But already that's given
me a much richer effect. And the point I'm making
here is that it does pay to experiment with the various
different blend modes. Because blend modes always work because the layer
is sitting on top of another layer and it changes how my bands one layer plays
with the layers onto leaf. Let's take a look at bound 0 to, at the moment it's
set to normal. And if I make it a pasty really low and bring it back in,
okay, that's alright. But what about if I take it
to something like light? And did you see that? Let's zoom in on this particular area here just to the left of
the layers panel. Maybe it's set to normal. Those bands just sit on top
of whatever is underneath it. If I said it'll lighten it, playing with the layers underneath in a
slightly different way. If I set it to Screen or color dodge, look
at the difference. The screen gives a fairly
natural looking effect, but Colored Dodge is starting
to play with the colors a little bit depending
upon what is underneath, like him getting
some yellow areas in those lighter colored bands, depending upon whether the
lighter band is sitting on top of the stone shape layer
or the bands one layer. So that is interesting. Ad is going to complete
blower everything and you have to take the a
posteriori right the way down. But actually that's looking
interesting as well because I'm getting some of the darker layer
peeping through, some of the slightly
lighter browns peeping through as well with those very light balance
sitting on top playing with what's underneath them and I'm getting a more natural effect. I do quite like that, So I think I will go with that. And now I'm in uncharted
territory because look, I practiced this
video a couple of times before I
started to record. And I can tell you for a fact, I didn't choose add either of
the two times our practice, this, this is what
I suggest you do. This is the bit where you play around a new judging whether
something has worked or not. This simple, you simply
say, Do I like it? If you do, it worked? But anyway, I will zoom out
a little bit because look, I quite like the
way those colors are playing with each other, but I want a little bit
more texture in there. So what I'm gonna do is my
stone shape layer is selected. I'm going to add a new layer. And when I do it, automatically clipped to
that layer underneath because the layers above
are clipped of outlet. And then what I'm gonna
do, it sets a neutral, okay, that's fine by me, but I'm going to choose
a different brush. They used to be a category in
procreate called touch ups. They changed that to materials. So if you've been doing one of my older courses and I talk
about the touch ups category. It was renamed to materials. They also added a few
new brushes in there, which is all very nice. And actually I haven't tried this one black wood that
it looks interesting. I don't know what this
is going to look like, but that's part of
the fun of this. Just for the fun of it. I'm going to choose a
sort of some warm brown. I'm going to choose
a cooler blue there. My brush is set to black. Would my opacity is set to a 3%? I'll try size of what, 17%. Let's see what
happens with this. Oh, that's looking
rather interesting. It's not quite working
at the moment, but it's providing another
layer of complexity. If I brushed over again. Okay, that's looking
a little bit thick. Let's try changing the
layer blend mode for this. Let's change it to maybe one
of the overlay blend modes. Nope. Hard Light, it's giving a
different color to this, which I quite like Linear Light. I'm getting some tone there. What about some of the
dark and blend mode? Multiply is looking
quite interesting. Darken, color burn, yeah, that's looking rather nice. All of a sudden that's
starting to look like one of these fake dark pebbles that you sometimes
find on the beach. But the problem with that is now the highlight is too strong, so you can only play with the highlight and you reduce
that down a little bit. So all of a sudden, I've got
something rather interesting that I think are
past he is too much. Let's take it down a little bit. Let's take it down to
about there. Yeah. Okay. I'll go with that. But
now because I like that, but I want an overall kind
of a texture to this. I'm going to create
another layer. What brushes do I have? Well, I was trying
one earlier down here called the zombie skin,
which looks interesting. And again, I'm going to choose a different color here because
I want to mix things up, add a little bit more
saturation to it. I'm not sure what's choose
it because I've got no idea what this is going to look like. Let's take a look. My brush size is set
to about twenty-nine, thirty percent, my opacity
is set to about 40, 41%. And because it's clipped, if I just make
some brush strokes that hasn't really worked, it's not giving me
a textured effect. The colors look nice, but I'm looking for
texture as well. Now, what can I do about this? Maybe if I change the blend mode to one of the
overlay blend modes, which makes things
darker and lighter. But I'll set it to
one which is quite strong, like hard light. I want to choose
different brush. Let's try. That's
trying noise brush. Now what do I have here?
So the size pretty large. I'll set it to maximum. My pasty is around
about the halfway mark. And let's do this. And oh, that's
looking interesting. Book, if I zoom in and make the layer invisible or
not, that's invisible. That's with it. That's given me the kind
of texture I wanted. Just a rough stone
a little bit so it doesn't look too smooth. And so I'll scribble that
in a little bit more. Now this is where things start
to get a little bit fun. I have my layer nine selected if I know I
should rename them, but you're gonna get bored. So instead, I'll come to hue
saturation and brightness. And just play around with the hue and look when I do that. As I move my hue slider around, I'm getting lots of
different hues for this. And some of them are
looking very nice, but also looking quite
natural like that. Kind of a blue color. That's looking nice. If I add the saturation, it looks a little bit cartoony. If I lower the saturation, he gets more of a subtle effect. The brightness. Looking rather interesting,
just a little bit low, but I'm automatically
getting much more of a textured effect
that now I wonder, what about upping
the saturation. And then surrounded. I'm getting some lovely
kinda see greens here. Or I'll go with that. Now what about the
layer underneath? Let's try that hue
saturation and brightness. Move that around. And again, I'm getting, well this time I'm getting
more of a kind of a reddish, warmish turn to this. And it's really breaking
up things nicely. I'll other saturation
a little bit. The brightness as I lower that, I'm starting to get
more Partner Field as I lighten it last
part and revealed. So I'll go with some around. Now, let's come to our bands to, that's the one with
the lighter bands. I'm going to swipe to the left
and I'm going to duplicate my layer all of a sudden
looking very, very harsh. What I'm gonna do
with this is I'm going to pinch out a little bit. And I'm going to come to
my Transform because I can move this around relative to the layer just
underneath to start, get some rather
interesting effects. What I will do is I
will come to just on the N REM cycle
in which says warp. When I do that, I
can start to distort this relative to
what's underneath it. You can see it's, it's twisting
things around like this. And I want this to be so the bounds are sitting pretty much on top of
what's underneath, but just offset,
just a little bit, like maybe something like that. And our tap on one of the icons on the right
to commit to that. But I will come out, zoom in like this, and I'll come to Gaussian
Blur, and I'll blurb is. So it's more of a softer effect, but it's just enhancing what's already underneath like this. That's what 5%. But now it's not looking
like the same image, just slapped down on top
of what was underneath. It's starting to interact. Now, if I take the blend mode, what's going to happen if
I change this overlay? Light-colored. Okay. Color Dodge is interesting. I'm starting to get, can you see that little
flecks of color? If I change that back to add, it's all the same tone. If I change it to color dodge, I'm starting to get little
bits of color in there. I wondering with this, I've not tried it,
but let's try it. If I come to hue saturation and brightness color play with
the color a little bit. Yes, I can I can get some little bits of color just peeping through
those lighter areas. What about saturation?
Let's take it down a little bit so it's
not too strong. Let's play with the opacity. I can make it very
subtle like this, or I can make it pretty loud. I'll make it a little bit
more subtle there just to add a little bit
of interest in there. Alright, I've done various
different things to this. And you can see I'm getting some really quite
interesting effect. Look if I go into my stone shape that is set to
normal blend mode. And it's probably
the only thing which is set to normal blend
mode in this entire image. And all the layers above
are all playing with each other to create the
overall effect. But if I come to
my starting shape and I kept a hue
saturation and brightness. I can make the shape any
color I want like this. That's looking quite nice. I think for this tutorial, I've gone more towards a C kind of stone,
which I do like. And I can play around with
it as much as I want. If I make it very
light like this, then it kinda makes
sense to come to my shadow layer and maybe just reduce the
opacity of the shadow. And you can see me
doing that now. Just so we get an
overall look to this. I can come to my bands layer. I just did the opacity
of the top bands layer, but what about the
bands layer below? I can adjust that
so I get more of a subtle effect or more
in your face effect. Supposing I have
this highlight here. Take it back up again like this. What happens if I take
the highlight layer and I stick it underneath those bands, two layers, that's looking
interesting because I've put the highlight layer
underneath those to light. Means that one and that one, they're starting to poke
through a little bit more, which I do quite like. In fact that highlight layer starting to get a
little bit lost. One thing I can do is
I'll up the opacity, but I will create a mask. So now I'm going to
use a layer mask. Whenever you create
a layer mask, blacks couldn't get selected. Now what's my brush? The noise brush, I think it's
going to be good with this. So what that is
going to do is if I make sure I paint
on my layer mask, not my actual layer
by layer mask. I'm going to paint black and I'm going to paint some noise. In fact, c'mon, let's zoom in so you can see this more clearly. Yeah, that is starting to work. I'm starting to get the effect that there is a highlight there. But instead of reflecting off a completely smooth surface, it's reflecting off a slightly textured, slightly
pitted surface. Look. I'll make it invisible for a second and make
it visible again. And yeah, that also
works at it just helps to sell the final look. But what I will do is
I'll come and let's just try taking a look at the various different blend
modes to see how it looks. I'm actually overlay look quite nice for a
fairly colored effect. Vivid light, linear light. Now I will go with, I'll try it out again. I'll just take it down a
little bit like this. Okay. I'm going to call this for now because I just
wanted to show you the various different
things that you can do just to vary the effect. But there is one final
thing I want to do, just to make this look a
tiny bit more realistic, I'm going to come down
to my stone shape, the shape on which
everything is based. And I'll zoom in for this. Can you see how it's got
a very, very sharp edge? Well, I'm going to come
to my Gaussian blur. I'm going to slide to adjust. I'm gonna adjust to
a very small amount. Maybe 2%, 1, 2%, 3% percent, even 3% is too much. I'm gonna go with 2% like that. And I'll just tap on my layers
panel to commit to that. Because what we've got here
is a fairly realistic stone. And when you are
drawing or painting, especially with the
digital art program, you can create some
extremely hard edges. And if I just come in, I
just double-tap to undo. That was our
extremely hard edge. But when you look
at a photograph or photograph of a painting, you don't get ages,
which are this hard. You just don't take a
look at any photograph. And finally, an edge which is either completely stone
or completely background. You won't find
that what you will find even on Ages
which looked hard, if a three finger tap to redo, you get a slight blurred edge. Now if I zoom back out again, if you just saw this
picture and you hadn't seen me do
what I've just done, you probably won't even
realize that was there, but it just helps
make the shot just look a little bit
more realistic. Okay. I'm going to stop now
because I'm looking at this, thinking I want to do this, I want to do that, but
that's the whole point. This does invite
experimentation. In the next lesson, I'll
create another stone. I won't go through
a full explanation of every step because
you've already seen the process and
action and you know what? I'll stop talking and
I will see you there.
5. Importing Textures: Okay, In the previous lesson, we created a stone, will do the same thing again, but this time we'll use one or two different techniques just so that you're
aware of them. So as before, I will
come to my plus sign in the top right of my gallery and I'll do the
same thing again. I'll create a square file. I will pinch in a
little bit just so I can zoom out and
see what I'm doing. As before, I have my background color on my layer
one will this time round. Instead of just changing the
color of the background, I'm going to drop a file in. To do that, I will
come to the top left, that little wrench icon, which is my actions palette. And you get a number
of sub tabs here. I want the one on the far left, add panel on the top
item on the list, I will insert a file. Now, any bitmaps I use on this course will be available
for you as a download. And in the case of this, I want fabric zeros six
rough Beijing tap on that. My file gets imported. And anytime you
import a new file, you're gonna come to
your Transform options. And you can see that I'm just
circling in the top left. There's my little transform
icon at the bottom, I am set to uniform. And you can see around the outside of that
file I just imported, I have a number of
little blue dots. Well, if I come to the little
blue dot on the top right, I can drag it up like this until it gets to the
top of my canvas. Now I do have
snapping turned on, which means I get a little
guidelines like that. You can see that little
yellow line at the top. If I come down to where I'm circling now the snapping and I turn it off, tap away. I don't get those snapping
lines and I can position this without the guides if
that's what I want to do. Let's just come back
and turn snapping on again and comes my
little blue dot in the bottom left
and drag that down until that will
sometimes happen. I ran out of screen, not a problem two fingers and just drag with the two fingers. Zoom out by pinching in. Zoom in by pinching out. And yes, that's a
bit of a mouthful. Anyway, let's drag
that down to there. Now be sure this is the
size that you want. Because once you
tap away by coming, say to the Layers panel, all that bit of the cloth
around the outside is lost. Some programs, you can keep
it not with procreates. Okay, so there's our base and
that came into layer one. And let's do the right
thing and rename this to, well, let's call it cloth. I want a new layer and I'll do what I did in the
previous lesson. Greater symbol stone shape, and work it up from there. Before I do though, I'm going
to insert another file. So come to our wrench icon
to add, Insert a file. And this time I'm going to come up through the directories. I'm on my iCloud Drive at the moment and I'll
come to pilot PNGs. And there's a file here
called Iraq hue 01. I will tap on that other
imported and I'll put my panel thing in the
middle of that box and just drag it up
to the top right. And what I did was I just took some photographs of some
stones or I got them off the internet and I
sampled the colors from those stones and I put them
down as little dots of color. And so if I want some of
those colors, for example, I'll tap on my layers panel
just to commit to that, I'll create a new layer. And supposing I wanted a gray stone or kind
of a bluey gray stone. Well, all I need do is put
my finger directly on top of one of those little dots
and I can pick up the color. You can see my
existing color is in the bottom half of that
circle around the outside. And the color I'm
about to pick up is on the top half
of that circle. And suppose you wanted
a lighter shade. If I drag up, you can see the top half of my
circle changes depending upon whereabouts are
little cross hair in the middle is centered on. So supposing I wanted
this mid gray, I let go and that
becomes my new color. Now the advantage of doing
something this way is that I don't have to
keep on coming back, for example, to my palettes every time I want to
choose a new color. And I can give this
file to someone else who doesn't have all
the palettes I have. And I know what colors
to use because they are included as part of the file. Same thing if I came
back to this in five years time where I've
lost all my palettes, all the colors I want
will be right there, just waiting for me. And if I don't want
them there, invisible, visible again, I will come
and I will rename this too. And I'll even spell it
than not British way. Okay, let's make that invisible and we'll do what we did before. Come to my brushes. I'm in my airbrushing brush set hard airbrush, That's fine. Actually what I will do, I'll choose colors again
and I'll try and draw. And you get, this message is letting me know that my
current layer is hidden. And what I like to
open the layers panel. So I open the Layers
panel and it gives me the option to make
it visible or not. I'm just showing
you that so that if it happens to
you, you know, why? But now I want a layer three
and let's make our shape. There you go, a nice round shape and we'll do what we did before. We'll come to our color
swatch in the top right and drag down and fluid
to take our pen right way over to the
right and then just drag it slightly over
to the left until my color drop threshold
at the top is as high a number as I can
get it and let go. Alright, let's do some of
the things we did before. I will call this stone
and I will duplicate it. I will come to my
transform icon. I will drag down a
little bit like this, which is a bit confusing
at the moment. But what I will do
is I'll come to my adjustments and I'll come to hue saturation and brightness. If I make the brightness darker, oops, I'm making
the top one darker. Not a problem. I'll
come here and I will drag it down like this. And now I'm starting to
think head because I know I will want to change
the layer blend mode for this so that
it's darker colors just sit more naturally
with what's underneath. So I will come and I will
change my blend mode to say, well, multipliers a popular one. And you notice when I do that, you can start to see the pattern of the
fabric peeping through. So let's hear if a blend
mode that is useful. But now what I
wanna do is come to my Gaussian blur like we
did before on our slide, my finger from left
to right to gradually get blurred effect about
what works for me. I think maybe just a
little bit softer. Yeah, I'll go with about 20%. But the nice way
about doing it this way where I've set up
the layer blend mode and I've done the blur
is that if I come to my Hue Saturation and
Brightness again, I can move my hue around
because there are still a little bit
of color in there. And I can blend it a little
bit more naturally with that cloth background because that cloth background is well, it's kind of a beige color. So I don't want a kind
of a warm red shadow. I want a shadow which is going
to be kind of orangey hue. So it looks more like
the kind of colors you would expect to see in the
shadow, maybe about there. I can even increase
the saturation a little bit like that
if I want or decrease. This is going to vary depending upon what background
you're doing. But the point I'm making is
set your layer blend mode. Do you blur and then just
play around with the color see gradually guide what
you want into place too. I wanted a little bit darker. No, that's too dark. I'll go with about there. And I come up to my layers
panel to commit to that. Just while I'm here, I set it to multiply. What does it look like with
some other blend modes? Darken, not very nice. I'm losing some of the detail
of the fabric. Color burn. That's too strong.
And I'm getting those little dotty bits
which I don't like. Linear Burn is too strong. Darker color is
losing some detail. Normal just looks terrible. And so you can see I have
various different blend modes here, but experiment around. And in this case, I find
multiply suits the best, right? Last thing, let's
rename this to shadow. That's coming up to
our stone layer, create a new layer on top of it. And we're going to
come to clipping mask. And for this one look, I could use paint
brushes, but instead, I'm going to import
another file, come to our wrench icon
again and add a selected, and we want to insert a file. Now, what do I want? I'm going to come
down to texture 2020. And I have textures
like stone textures where I photographed with
various different things. But it doesn't have to be a stone texture to
create a stone effect. For example, I was playing around and I came to
my skin's folder. And I came across this file, tile bull human's
skin 01 blotchy. I will tap on that. It will get imported and
there's the texture. It's basically a
photograph I took of some skin and turned
it into a tile. But also that is a nice
texture for stone. I think it's looking
a little bit small and fine for my needs, so I'll pinch out just on the
outside actual file area. I'm just pinching out in that dark gray surround
where all the squares are. And then I'll do
what I did before. I will come to the top left blue dot, just where I'm circling. And I'll drag that out. And I'll drag down like this. Just to make that text should
look a little bit bigger. I prefer the scale of that. Can I even make it a
little bit bigger? Yeah, I'll go with that. I will come to my layers
panel to commit to that. And you'll notice
that that layer five, because I clipped it
to the stone layer, you didn't see a
huge square texture. You only saw the texture
where the stone was. And that helps me to judge
things a little bit better. But if you look at this, this is a mid gray texture. It's not perfect because we're stone is round and
you would expect any textures which are on
there to get a little bit more angled as you go to
the edge of the stone. And I'll show you
what I mean by that, by showing you what
to do about it. Come to our transforms at the
moment it's set to uniform. That's what I use
to scale things. But just on the end there is a very useful
feature called warp. And you know what, Just
before I show you that, I'm going to turn
off my cloth and I change my background
color to any old color, but I want a plain background. So that when I do this, you'll see more clearly
what it is I'm doing. I will come to warp. And you get this little cage of nine squares with dots
just in the corners. Well, I can take those dots
and I can move them in. Like if I come to the top
right and I pull it in, can you see that text
starting to distort as I do. And as I push this in, you can see the effect
I'm getting what I want just around the top
right edge of that stone. If I zoom in a little bit, you can see the texture
starting to compress. And that helps sell
the effect that this is a round stone. I'll do the same with
the other corners. I'll post them in like this. I can also come to
say this intersection here where I'm circling and I
can pull that down as well. And if I take everything and
just pull all the bits in, I'm guessing the effect
which I laughter, which is the texture looking
quite wide in the middle, but looking like it's going around as you get to
the edges of the stone. In fact, these bits in the middle where you
get two lines crossing. I can also drag
those outwards like this to stretch the inside. And then I'll tap on my layers
panel to commit to that. And I'm getting a much
more 3D effect with this. It's kind of mid gray with some darker bits and
some lighter bits. I made it that way because
it is designed to work with contrast layer blend
modes and find them. You come down from
normal and you come down to well overlays
the first one, then you get soft,
light, hard, light, vivid Light, Linear
pen add hard mix. These are all variations of the contrast layer blend modes. I'm basically with that mid gray turns invisible
and the lighter gray is make everything underneath
them lighter and the darker grays make everything
underneath them darker. Look. I'll just choose Overlay
and I'll leave it to that. And yeah, I think that works, but I want to do more. I want to build up various different bitmaps into a more complex stone shape. So new layer, clipping
mask and come certifier. Now watch when I use with this, I think for this one, I
will come to my stones. Know what should I use? Let's try puzzle
0 to d saturated. I haven't even downloaded this. You can tell that because there's a little white
triangle in the top right along with an even tie
the icon which says Come up, download me from iCloud. So I will do that. I'll make it bigger like this. I can come to this
little green circle at the top which I'm circling and
I can rotate it like this, which I'll be honest, I
particularly well, yeah, maybe I'll give it a try
and maybe around save that, come to my layers panel. Now, this is predominantly
white with some darker bits. So I can come here and I suggest I use one that
darkened layer blend mode. I'm going to take the
opacity right the way down. Just fade in just a little bit, just a break at that
service a little bit more. And it's by riding
the opacity of one texture layer
on top of another, you start to get more
complicated effects. Now that I've done
that, I'll turn the cloth layer back on so I get a feel of what it looks like on top of a semi
real background. I quite like that. Just before I move on, I'll come to my actual stone
layer and I'll do what I did before because this edge
is looking very, very hard. Come to Guassian blur
and hours before, I will just increase the
Gaussian Blur just by just 2%. Just to soften that edge a little bit could even go to 3%. No, I won't, because
eventually I'd like to have a whole load of different stones which I can put onto one file. And I'm creating them
all on a square file, which is 2048 by 2048. So let's keep the boiler consistent two per
cent. There we go. There's our basic stone. I've been talking for a while, so I will carry on with
this in the next lesson. I will see you there.
6. Playing with Blend Modes: Hello, and we're back. Let's create some shadows and
highlights for this stone. Before I do though,
housekeeping, Let's rename call it texts 01, which stands for texture
010 to which stands for, we'll look, I'll let you
guess what that stands for. Now, up until this point, I'm creating a stone
and I'm starting to get something which
looks quite realistic. But basically, I haven't
done any painting at all. I've just been
calling in textures based on photographs I've taken around my house and just converted them
to black and white, drag those in, tweak them around to get the
effect I'm looking for. Now, some people might
call this cheating, to which I might reply, Oh, come on, get real. For starters, let's
come and find a nice texture
brush like Glover. If I tap on it and you see that the kind of
effect you're getting, but the actual shape of it. Well, that's the shape and
also that's the grain. They are both bitmaps. They are textures
which from the look of it have been taken
from real life. And you stamp that
shape, for example, down several times to get
look you're looking for. Well, what we've
done with text and text to is exactly
the same thing. But instead of painting with the texture in the
form of a brush head, we've imported the
textures and we've manipulated them to get
the effect we want. This is a huge advantage
of digital art. If I paint, I'm painting
with real-world textures. And if I laid down
textures like this, I'm doing the same thing, but instead I'm just
importing textures and manipulating them to
get the effect I want, but that won't automatically
make things look good. You can do the same technique
and make things look awful. It is the skill you develop
with this technique, plus also the choices you make about what layer blend mode, how it blends in
with other layers. These are all
artistic choices you make if you can learn
stuff like this, in addition to using paint strokes with your
pencil or your finger, you're going to have
a whole new tool set to create your
art work with. Okay, and around. Let's create a shadow. For this. I'll create a new
layer and come on, let's call this shadow. Now in the past,
you saw me create a hard outline and
then blow it for this. I'm going to speed
things up a little bit just to show you a
different way of working. I will do what I did before. I will come to clipping mask. I will set this to, well, that starts off with multiply. For my brush. I'm gonna come to
my airbrushing. I'm going to choose
my soft airbrush. I'm going to make it nice
and big. Maybe about there. And I'm going to set
the opacity low. I want to set it down
to what say around about, around about 2425%. Now for the color,
I'm going to stick my finger on my screen
just where the circle is. And I'm just going to choose the same kind of blue
and paint with that. And that will work because I'm painting on a layer which
is set to multiply, which will make things darker, brush size set to maximum. And I'm just going to
come down to the bottom left and to start making
some soft brush strokes. And you can see it's
starting to happen there. Paint a little bit lighter, just towards the
center of my stone. I'll make my brush size quite
a bit smaller now because I want a little bit just
around the top left, because there will be
just a little bit of shadow just in this
top left area. I'm painting along the
outline of my stone. I'm doing it this way. I can mix it up, like I'm coming down to the bottom right. It makes it a bit bigger. I'm just making things a
little bit uneven around here. Just to give the
impression that this isn't a completely round stone. I'm getting one or two little slightly deeper shaded areas because the surface of
the stone is uneven, so the shadow won't
be completely smooth and completely evenly spaced
as you go around the stone. If I come to my shadows
layer and just briefly, I'm going to turn off
clipping mask and you can see where I've
drawn around the outside. I'm going to create a little
bit of extra there for me. I'm going to make my
brush size bigger. Because, well, you'll see why I'm doing this
in a little bit. So my clipping mask back
on and that's my shadow. Now for the highlights, let's calm and rename my
layer two highlights. I'm going to set this one
to a lighter blend mode. I'm going to choose
Add, which is a very, very strong layer blend mode, because what I want to do is gradually build up my colors. I'll come to my paintbrush. And I have been using materials which has a whole
load of nice effects. They're like the noise
brush might do the job. Come on, let's mix
it up a little bit. Let's come to spray paints. Instead, I was using fat nozzle. Let's try let's try flicks
and see what that looks like. Now for this, I've
set it to add. Let's put the clipping
mask on as my color. Let's choose different color. Let's try a slightly lighter
version of that mid gray, just around maybe there. Now a pasty is set to what, between 3540 per
cent my dress size. That will affect what
the final look is like. Let's try it on our own. We know, Let's try around 12, 13% and start to draw. And that's quite subtle,
but I'm getting, let's try upping the
opacity a little bit more. Now, you're starting
to see this. If I make another
brushstroke That's looking a little bit large for me, so I'll two-finger tap once
and two-finger tap again. I will make the brush
size a little bit smaller and I'll come here. I'm just gonna go over
everything like this. And then I'm going to come
to my fat nozzle again. I will take the
opacity way, way down. The size around what, 6% on my pasty is on around, well between 30, 35%. And because the light is
coming from the top right, I'm just going to make this
actually, you know what? Two-finger tap, two-finger
tap again on my brush size, larger to around about 19%. Do this. Now you're looking at
that thinking, Wow, that's a little bit of
overkill, isn't it? Well, I've done it
deliberately because what I'm working towards with the shadows and the
highlights is the ability to create a number of
different styles from this. So what I'm gonna do is come to my highlights and I'm
going to create a mask. And I'm going to come and
choose a black for this. I'm using the same brush
and the opacity is set low. But now what I can
do is just come around wherever I want and just get rid of these highlight
areas like this. I've got rid of it mainly
in the bottom-right, are moved towards center
a little bit like this. If I write my brush size
a little bit smaller, you can get a bit
of a harder edge just on the edge of there. If make my brush bigger, I can get rid of a softer
edge on the other side. But here's the thing
supposing, I think, well, actually that's
okay for one stone, but I'd like a bit of variety. I can come and instead of painting in black
on my layer mask, you can paint it white
and white reveals. So now I will come just where
I can see that highlight. And I can gradually put in the
highlight where I want it. So effectively I have
one highlights layer, or by concealing or
revealing bits of it. By using the layer mask, I can create all different
manner of reflections. Anyway, that is my stone. That's the basics of it. And I do think I need to have fairly plain stones because
the whole point of this is creating some stones to
act as if you'd like a backdrop or a canvas for me
to paint things on top of. And so while it
is nice to create really highly decorative stones, sometimes you just need a
fairly plain Canvas so it's not fighting with whatever it
is you're painting on top. I've got my basic stone. I will come to my gallery
and I will duplicate this. I will call it my duplicate. Let's play around with it. The shadows. Those could do with being
just a little bit lighter. What about the actual
stone layer itself? Maybe it could do with being a little bit brighter overall, which is so easy to do. Do I want a different color? Yeah, I can do a different
color if I want. Let's play around
with the saturation. That's fine. Do I want the
highlight to be like it is, or do I want it to be a
little bit more, not back. Well, I've got a
choice. I can come on, let's move over to the side. I can reduce the
highlight overall. So we're getting quite a
subtle effect like this, or I can take it
back up to full. I go to my layer
mask and I can come to black and my brush. Fat nozzle is selected. You could use any brush and
I can fade it out just in the areas where I don't
want it like this. Now let's take a look at that shadow at the moment
it's kind of a blue shadow. Can I do something with that hue saturation and brightness? You can see I can change
the color of the shadow, which can give me
some nice effect. Maybe to something like that. Looking at the little
thumbnail on the shadow layer, well, actually that's purple, but because it's in a
different layer blend mode and all these layer blend modes are interacting with each other. It doesn't look purple. It looks like a nice deep shade of that light green stone. And now here's a
fun thing as well. If I come to the stone, the stone layer is where everything on top of
it is clipped to. So if I come to my adjustments
and come to liquefy, I don't want any distortion. I don't want any
momentum pressures. Final Max, I just want push. And we're going to make
my size nice and big. Watch what happens now? I'm just resting my pen
on edge of the stone. And you can see, I can pull
it around to what ever shape. I want like this. Maybe I want to slightly more
egg-shaped stone like this. Maybe I want a little
bit more here, a little bit more here, and
a little bit more here. So I end up with a
different shaped stone. Because I've done
that. That means things like the shadows on the stone and underneath
it are a little bit off because they were
based on the previous shape. So I'll come to my
shadow layer and repeat, come to liquefy same settings. But now I can adjust the
shadows where it wants. I could pull it in a little
bit so I get them all shaded area in some areas but
not in others like this. A little bit around the top. Come back to my layers
panel to commit to that, let's come to the
shadow underneath, liquefy and I can pull the shadow around to
where I want it to be. Come back to my layers
panel. What else do we have? We have the highlights which are already covered by
the Layer Mask. Let's see what
happens with this. I can pull that around as well. I have a completely
different shaped stones. Let's come to our gallery
and duplicate that. Let's call it the duplicate
of the duplicate. See what we can do with this. Underneath the shadow
and the highlight layer, I will create a new layer which automatically
gets clipped. I will call it my stone
colors and come on. That's throw a little bit
of vibrant color in there. Let's choose. Well,
it says brown, but in my book that orange and make our stone
colors invisible again, let's use a paintbrush, just wondering what
spat would look like. Let's make it nice and big. And straight away
with an orange color. We've got really a
very attractive bit of marbling in there. Quick issue like and
that's just set to normal. What happens if I start playing around with the
layer blend mode? You can see almost every
single layer blend mode off. Some of this stuff is nice. Almost every layer blend mode is giving me a different effect. Let's create another
layer and let's choose, well, let's choose
fat nozzle again. Let's call up our colors. Let's choose another color. Let's try, let's try
a brown like this. It's a slightly
different color to the one we chose before, but layer blend modes can shift that around, turn that off. And what we gonna do
with this, Let's try. That's a bit too big for me. Let's make that a
little bit smaller. Make sure the layer is
where it's supposed to be. And let's just create
I wanted to Strips. You'll notice when
I'm doing this, I'm kind of trying to follow
the contours a little bit of the side of the stone. Maybe vary the brush
size a little bit to get one or two lighter
areas in there. Let's try changing
the layer blend mode for this and see what happens. Screen is looking rather
nice colored dot au. Just look at some of this stuff. It's rarely, the
possibilities are endless. Oh, look at that. And I can vary the opacity
as much as I want. Like that. I can come to liquefy and this time I think I
will do some distortion. I'll make my brush
size a bit smaller. I can just push this around
like this just to monkey around and create some
interesting effects like this. Then. Alright, good. Well
let's duplicate it. Let's change the
layer blend mode. Pen light is giving me some
rather interesting breaker perfect there. Let's come to liquefy, can make my brush a
little bit bigger so that those two different
wavy line layers aren't directly sitting
on top of each other. There's a little bit
of variation in there. Let's come to our hue saturation and brightness for the top one. And we can vary that around. Take a look at the brightness. Too dark to light. Hello Goldilocks, we're
somewhere in the middle. Maybe play around
with the saturation and play around with the
layer underneath lot. By now you've probably guessed. I'm just having fun with this. There's so many different
things you can do with this. Every single time you
tried doing this, you will come up with
something different. But also if you think about it, all I've done is made
one or two wavy lines plus also shaded around
the outside of the stone. This is easy. The rest of it has been
important in textures. Having knowledge of
how to do things on that is really the key to creating these various
different effects. I can up the highlights, create a sharper
highlight there as well. And you can see it's
sitting nicely on top of those bands of color. I wonder what'll
happen if I just come here and I just duplicate the entire layer
so everything gets added that is way too strong. But what I can do is I can
take that back down to 0 and increase it just
by a little bit to just where I want it. I'll count to the
top layer mask. I will come to block again so that I don't get too strong. An effect where I don't want it. Like just there for example. I did want to start out with a fairly simple stone so
I can paint on top of, made it a little bit fancier
and change the shape. And then really went
to town with this. And then if I decide
you know what, that's a bit too strong, just play around with the opacity of the layers
to get the look I want. And this is all technique. It's not skill. And that you're
spending a whole load of time carefully painting in all the shadows
and highlights and all the textures by hand. This is knowledge when it
comes to any art form, whether it's a
traditional oil paints or whether it's digital art. Well, with oil paints, you need knowledge how to make
sure your pigments, what pigments work
well with each other. How to size a canvas, putting down thick paint
on top of thin knowledge. With this, the knowledge or getting at is how to
work with textures, how to work with
layer blend modes, how to use the Liquify tool, the value of adjusting the
opacity of your layers. You can create some pretty
realistic looking style means if you take a
look at my gallery, they all look different. Hopefully they all look good. Here's one I did earlier. And you can spend
hours doing this. But by now, I think
you certainly have enough to be
creating your own stones. So now it's time to move on
to think about what we're actually going to
paint on those stones. So let's move on and I will
see you in the next video.
7. Using Real Textures with our Stones: Okay. It's been about three weeks since I recorded the last video. And the reason being is I wanted to make the course
better and give you quite a few more resources so that you have more
things to play with. And so in this video, I'll show you one
of those resources. But before I do,
I made a mistake. This is pretty much where we left off in the previous video. And I wonder if you've
figured out what it was. It's subtle, but it is there. If I come to my layers panel, I grouped all the various
different layers that make up the stone into a
group called stone. But it's not the stone,
that's the problem. It's the cloth
underneath because look, if and a little
bit on the stone, we've mentioned this before. The direction of the
light is coming from the top right down
to the bottom left. But now, if I zoom
right in on a cloth, that might be a bit
difficult for you to tell, but the lighting
the cloth is coming from the top left down
to the bottom right. It's the wrong way round. So I'll quickly into center, I will select my cloth
that I'll come to my transform icon and it's
very easy to correct. All I do is come
down just where I'm circling to where it
says flip horizontal. And the whole thing flips over. Now the light
direction is coming from the top right down
to the bottom left, which matches what
happens with the stone. So thank goodness, I realized that in the
past three weeks. Otherwise, I'd never
have forgiven myself. But I was talking about
some extra resources. Let's take a look at
the first of those. I've opened up my
layers panel and I will open up my stone group. I come to the very top layer and I'm going to add an extra layer. Let's move this over a little bit so I can
see what I'm doing. Then I will come
to my wrench icon and then I'll come
to insert a file. I have a folder full
of grayscale images, which I will give to you. And let's choose one at random. Let's try say stone texture 04. Tap on that. And this is what you get. Basically, I took a
photo of various stones. The stones that you would
use forced own painting. And I played around with the texture around something
called a high pass filter onto it and doing various different
cloning operations. I've come up with variations
of stone textures. Now these are designed
to be used a certain way because at the moment
you can see their grade. That's not much use to us, but let's do a couple
of things to change. That. First thing I'm
going to do is tap on the icon and come
to clipping mask. And then the next
thing I'm going to do is come to the little n which I am circling now to access
my layer blend modes. Now, maybe I've mentioned
this before on this course. I probably have
because we'd been using layer blend modes
a lot what we want now, other contrast
layer blend modes, these grayscale images
do not work too well with the darker colors. Well, they're not bad, but they make everything darker and they don't
work too well with the screen colors because
they make everything lighter. Although that might do as
an effect in its own right. Now, what we want of a
contrast layer blend modes, and the first one of
those is overlay. There are several contrast
layer blend modes, and the most useful ones
tend to be overlay. Soft light, hard light, vivid Light, Linear Light
Pin, Light, Hard Mix. Not so much. But let's go back to overlay. Now this new layer, this grayish stone layer with variations in dark and
light where the cracks are, it's still a mid gray color with dark and light variations, but with any of the contrast
layer blend modes made gray becomes invisible and
look just very quickly. I'll take this back to normal. You can see most of
that is mid gray, that all becomes invisible, but the areas which are
darker like this crack here, which I'm circling now, when they are in a
contrast layer blend mode, they will make
everything underneath them appear to be darker, and the same is true of this lighter area here in the
contrast layer blend modes, that area will appear
to be lighter. So let's take this
back to overlay. And if I make this entire layer invisible just for a second, There's my stone without
There's my stone width. And you can see I'm getting
dark and light of variations, which looks like
cracks in a stone. So I'm getting an extra
layer of realism here. Now there are a couple of
things I can do with this. I can derive the opacity. So it's more or less visible. I can play with the
different blend modes. Overlay is a good
overall compromise. Soft lights is a bit softer. Hard light, as you'd
expect, is a bit harder, and I'm not so keen on what it's doing in the shadow areas because I'm getting
some light areas that I don't really like. Vivid light can work. Linear light can look, look. All of these blend
modes can work, but it all depends on what it is you're
combining them with. When you see a
tutorial on YouTube which says use Overlay
or Soft Light. It is worth playing around with the different blend modes to see what you can come up with because no two pictures are alike and hard light might work well with
another picture. But for this one, I think
overlay works best for me. Now, if I wanted
it to be stronger, I can also swipe to
the left and tap on Duplicate because you can stack blend mode on
top of each other. Now if I decided
that was too strong, I can always lower the opacity from anywhere from
maximum down to 0. So if it's on 0, That's what we had a couple
of seconds ago, but now I can dial in the
intensity of the effect I want. So I've got a huge
amount of control. But what I am going to do
is I'm going to backtrack a little bit because there is
one more problem with this, which I'm not keen on. I am going to swipe
to the left on that new duplicated layer
and I'm going to delete it. I'm also going to tap
on my icon and turn off clipping mask because there's something I want
to do with this. And in fact, look,
I'll go the whole hog. I'll change this back to normal because this can give
you some realistic effects. But if you take a look
at that stone layer, it looks a little bit
like a flat paving stone. But if I make it invisible, the underlying stone is rounded. And you can tell that because it's got shading in the bottom left and a bit of a highlight
around the top right. So if I'm putting this which
is flat on top of this, which is rounded, some
of those cracks around the edges are going to be
a little bit unrealistic. So this is what I'm going to do. I want to change
this back to, well, I'll change it to one of the harder blend modes so you can see more
clearly what I'm doing. And from there, I'm going to
come to my transform icon. Now the little magic
tool for this is just where I'm circling
now, the warp tool. And you can see when I do that, I get a nine square grid
laid over this entire layer, basically that box around every bit of the area
which has pixels on. So if this layer was
just a few pixels in the center of the picture, I get a much smaller
box, as it is. My great texture
covers the entire less so my surrounding
box is also bigger. Look enough of that is
the interesting bit. I'm going to come to that little blue dot in
the top right-hand corner, and I'm going to drag it in. When I do that. What's happening is what
it says on the tin. It's warping this layer and you can especially see
it in those darker areas. Can you see just where
I'm dragging in and out? The texture is getting
compressed just around the shadow
area of my stone. Look, I'll come to the one at
the bottom left and you'll see it even more
clearly now, I bet. Look at that. See. So I'm squeezing the texture
into a more circular shape. And also the edges are getting more compressed
than the center, but it's not just the
corners I can move. I can move any of
these points and look, here's a tip for
you just where I'm circling now can you
see advanced mesh? I'll turn that on.
Now you can see the control points for every
intersection of this mesh. So I can push the
various control points in so they get close to
the edge of my stone. Look like this. I can even take those
central four dots and pull them out slightly. So I'm getting more
of a rounded effect. And that means that this
texture is behaving more high. You'd expect it to behave if it's wrapped over
a rounded surface. The only thing I would
say is be careful not to get too happy about this and start to cut into the mouth so that just that little bit which I've adjusted, the very bottom of the stone, doesn't have this
texture on anymore. So I'll do that. And then if I just come to my layers panel,
that will apply it. And if I turn that so it's normal again,
that's what we've got. Instead of looking like
a flat paving stone, it's starting to look more
like a rounded stone surface. So that's like an extra layer. Realism. I must be
careful when I do this. To turn clipping mask back on. Let's take a look before
and after, before, after. And I'm getting a little
bit more realism. And as before, I can play
with the layer blend modes, but I'm finding things like
hard light or Vivid Lights. Actually vivid light
is not too bad. But hard light, I'm
starting to get some little light flux
in the shadow areas, which I don't want. I think for this case, overlay suits me fine. I might duplicate it. And yeah, I prefer that. That's a little bit
strong for my taste, so I'll just fade it
out a little bit. This second layer to get the
exact effect that I want. So there you go, That's a
little bit of the extra. And if I come to insert a file, I have 11 different stone
textures which I came up with. Play with these for your various different stone
designs on that score. This is a stone we
were working on, but if I come to the gallery here of 15 different
variations of stone, all done using the
exact same techniques that I've shown you. And these will be
made available for you as a download and you can use them as
they are or you can play around with
them. For example. This one here. I set it against a
goal cloth background. But if I open up the stone, Let's try layer nine, which has given me some
of those green effects. All I need do is come to hue
saturation and brightness. Or what if I play with
the hue a little bit? Yeah, I started to get some
nice interesting effects. This is not a subtle stone, so I'll increase
the saturation like this and you can play
around with the brightness. And actually that is
quite nice because it's starting to give me, well, have you noticed
with certain stones which have a lot of say marble, they get just a little
bit of depth to them, like you're looking
into them a little bit. I can simulate that with this. And like I said, any color I want, and I can play around with
the colors for any layer. Also play around with
the layer blend modes. All the things that I've
shown you how to do. Or it will be really nice to see some original designs because this technique is
practically self working. Once you understand
the concepts, these stones practically
make themselves. So those will be
sent off to you. And in the next video, I'm gonna show you the
main thing I've been working on for these
past three weeks, I hope you're going to like it, but you'll find out about
that in the next video, and I'll see you there.
8. 72 Sketches to Play With!: All right, so we've
got our stones now. It would be nice to have something to actually
draw on them. Well, I think I've got you covered there because
another thing I was doing over the
past three weeks with some sketches
for you to draw with. And maybe you can
see on the video, I have 123456 files with doodles
on 12 sketches per file. So that's 72 different
things for you to draw it in case you can't
think of anything yourself. Hopefully, that will keep
me going for a while. Let's just call it
one of these files. Let's try doodles. Buildings are 01. I'll just pinch and a little bit so
you can see the whole thing. And let's quickly go over this. If I come to my layers panel, you can see I have my doodles, I have backgrounds, circles, and my background color, which is just a plain
white like this. Okay, so what I'm showing you
here is the procreate file. And for some reason this
file is a lot of megabytes. So what I am supplying
with you are PNG files. That's the doodles without the blue circles with a
transparent background. So if you want this
as a Procreate file, I will show you how
to set that up. I'll come to my gallery. I'll click on my plus sign in
the top right-hand corner. And I've come to
this little plus sign here for the dimensions, while I've already
got it set up here, this is in pixels and the
width is 4 thousand pixels, the height is 3 thousand pixels. The DPI does not matter. Now are my few
years old iPad Pro, this gives me a
maximum layers of 40. That's gonna be plenty for
me to do what I want to do. But you may have an iPad which is more powerful
or less powerful. If it is less powerful, you should still have plenty of layers to be working with. That's why I chose
the dimensions I did, the color profile. I've chosen Display P3, that gives plenty of
colors to work with. So that's all I really need. So I come to create
and there's my file. I will pinch and a
little bit like this. And you can see all I have is a background color
and layout one. The next thing I'm
going to do is come to my wrench icon and I'm
going to insert a file. This file is supplied to you. It's circles guides
for k by three, k it as a PNG file. And I get this 12 circles
in a four by three grid. If I come to my layers panel, you can see that as layer one. And yes, I'm gonna be
naggy and I'm going to rename this two circles. Now the reason I've done
this is because one, it helps with composition, but also you've got 15
stones to play with. You also have 72 sketches. And each one of those
72 sketches has got to fit on one of 15 stones. And so the reason I have
these circles here is because if each of my sketches
fits inside the circle, there's more chance that any
one of the sketches I gave you to fit on the stone of your choice or one
you've made yourself. What I will do
though, is I'll take the opacity and I'll drag it right the way down
because I just want that to act as a guide. Okay, so the next
thing I will come and I will insert another file, because just down here, which one shall I do? Let's try doodles. Missed a 01, it's a PNG file. And that just drops straight in for me to start working with. If I just come to
my layers panel, you can see inserted
image and yes, we're going to treat neonates. Doodles. Look, I'm sorry, I know I keep
on nagging you about this, but it does make
your life easier. Anyway, you call up a
file 4 thousand by 300. You insert the circles
image to act as a guide. And then you can
insert any one of the five PNGs to get this. And if I zoom in on one, let's try, let's try this one. You can see I've done a sketch. I didn't do finish line work. I did a sketch. Maybe you could
drop that straight onto a rock and start
working from there. But what I'm hoping is that
you're going to draw over the top of that
maybe some line work which is in your style. I'd like you to
develop your style, but also I'd like
you to practice with some line work because from
other courses I've done, for example, on the solid
foundations course, I try and stress
the importance of good line work thick and thin. For example, using thick and thin to have fast
lanes and slow lanes. And by mixing things up, that's when you're gonna get some interesting artwork anyway, very quickly, just before I
move on to the next video, let's take one of these files
and drop it onto a stone. So I'll come to my gallery, I'll come to my styles folder. Let's try. Let's try stone 11. I'm not going to tap to open it. I am going to duplicate
it first because I want to keep my original stones without any artwork on there. So I'll take my duplicate, I'll drag it out of
my stack and just drop it in here somewhere
and open it up. Okay, So let's take a look at
that ice cream cone we did, for example, I'm going to
show you a little gotcha. Before I do though, let's
make sure my stone group is closed and let's come
to insert a file, not worry about it. Doodles Misko 01,
this is the PNG file. Once you've done your sketching, you don't need the circle. So just come here, imported and o straightaway,
we've got a problem. You can't see the
sketches because they're brown against a dark stone. Oh dear, what a disaster. Look, it's not a problem. Look, I'll come here and I
will just delete that layer. I will add a new layer. I will come here and I will flood the entire
layer with white. Then I will drop down the opacity so I can
just see the stone. Let's do it again. Insert a file, come down. What was it? Doodles, misc 01. Okay, so now I could
drag out by the corners, but it's much easier to
place my two fingers on that ice cream cone
I was showing you earlier and pinch
outwards that way. I can very quickly position
it to exactly where I want. Say that for example, actually let me make
it just a little bit smaller because there
is a little gotcha. I want to show you top of my layers panel
that commits to it. Now one thing I want
to do with this is I want to use the warp tool, just a shape this
around the stone a little bit before I
start tracing it. But the problem
with that is look, if I come to my Warp tool again, you can see the surrounding
box is a little bit big. And the reason is some of
the other sketches I did, I still there on the outside
of that ice cream cone. So this is what I'm going to do. I will come to my Transform. I can use freehand or
I can use rectangle. And I'm going to draw around my ice cream so only
the icecream is selected. Now what I want to do
is to clear everything, which is not that
ice cream cone. But the problem is if I was
to come to my layer and clear it now I've
clearly ice cream cone. So what I have to do
is come down to just where I'm circling
and press invert. Now, everything apart from the ice cream cone is selected,
which is what I want. So I can see my
layers panel tap on the icon and come to clear. Now everything's gone apart
from my ice cream cone, I'll tap on my Transform again to make it a
little bit bigger. I'll come to uniform
and do this. Then I will come to warp. I'm just going to
try and make it bulge out with
just a little bit. I'll tell you what, I'll come to advanced mesh so you can
see all the nodes I'm using and just drag
out just a little bit. You'd pinch in a
little bit down here. What I'm trying to do is make
my sketch sit on the stone. Because if you are painting
over the top of the stone, the stone is ever
so slightly curved, so I'm just trying to get
my sketch to match that. Now in the case of this, well, you can see it's
a fairly flat stone. But if I was to come
to my gallery again, come to say stone 05, which looks much more rounded. And I'll do the
same thing again. Create a layer
flooded with white. Take the opacity down
and I'll come and insert a file. And I'll
do the same thing. I'll do that ice cream cone. Make it like this. Come to my selections, freehand, drag around like this. Invert. Clear. Now if I come to my
transform on a warp, because that stone is
really quite round. I might need to distort
this a little bit more. Let's turn on advanced again and make it more of a
rounded shape like. And also when I've done that, I might want to
consider Liquify tool from my purse fairly large. I don't want to push it
this sketch around a little bit just to give the idea that it's wrapped around that stone. Anyway, let's come back
to my gallery because I'd rather work on the
original look. You see, I've done it. I've made the exact state I was
telling you not to do. I've drawn over my
original stone 05. Now that might happen to you. So I'll show you what to
do about it if it does, and it probably will just swipe left and
duplicate your file. Let's take one of those files
out of my Stones Group. Come back into my stones, open up my original stone five, and get rid of those layers. The reason I'm showing you
that is because what looked, it was a couple of
minutes worked for me. But imagine you spent an hour working on that
one particular stone. You might panic and not
know what to do with it. Anyway. There's our stone
ready for painting. I will keep the layer 13, my white layer in place just while I do my initial outlines. But in the next video, let's start to ink this in, and I will see you there.
9. 06CreateSwatches01: If you're looking
at this video and you're not on the
rock art course. Don't worry. Because as part
of the rock art course, I thought I'd do an extra treat and provide a few
different color swatches. But then I thought, well,
actually this is gonna be very useful for many of the
courses I do with procreate. So this is a crossover video. So we've got a stone
with a background, and you can see I've
inked in an ice cream, which we want to
paint on the stone. And so that's gonna be a case of blocking in which we'll come to, but also we need to choose
some colors for it. And that can be a bit of
a problem because well, warm colors do you use? And if I create a new
layer just to draw on, let's try the medium airbrush that should be
alright to show you, and I'll open up my colors. And one thing you notice
people doing a lot is choose from this part
of the color palette. For example, if I think, oh, I need a read while I come and
I find a read and I think, oh, that's red and it's
especially red up here. I'll draw with that because
it's red and I want to read and you end up
with a whole lot of colors that are
way too saturated. Or you can end up with colors that don't quite go together. So what do you do? Well, if
I come to my wrench icon, I'm going to insert a file and I've created a few
swatches for you, which I will supply to you. For example, let's
take a look at this one, color codes 01. If I zoom in a little bit
so I fill my picture. What you've got here are a whole load of different
color combinations. You'll notice hopefully that they're divided up
into groups of say, six or five or in some
cases close to ten. But the point is,
according to color theory, these are colors that go
nicely with each other. Let's take, for example, use two fingers to
make this bigger by dragging it outwards.
Take a look at this one. You have a mix of warm
reds going through to some rather neutral
colors in the middle, going through to
some cooler blues. And so if you're confident
that those colors go together, then those are the
colors that you use for your compositions. And the theory goes,
you have a whole load of different color combos here. But once you find the
one that you like, I can come to my selection tool, the rectangle is
selected and I will select those colors and I
want to get rid of the rest. Now I will do that by coming to the layer and pressing clear. But my problem with that
is that if I do that, oh dear, I've got rid
of the wrong one. So two-finger tap to undo that, I will come to my
selection again, which of course,
de-select everything, but it's simple enough,
rectangle select. And this time I'll come
down to where I'm circling. And it says invert, tap on that. Now everything apart from the color swatch I
want is selected. If I come to clear, everything else
goes and I'm left with just this one Color Swatch. And that can be the
swatch that I will use to get the colors
for my illustration. Now at the moment it is plant right in the middle
of my illustration. I do not need that, but that's not a problem. Come to our Transform tool and you can move it
around by dragging. I prefer to do it by the
outside and move it around. I'll turn off snapping. So I don't get those blue
lines all over the place. But here's the thing. You might decide who
I want to make it small so it doesn't
interfere with my picture. I can just about
get away with it, but just think about it. You have your rotation
node at the top, which I'm circling,
that little green one. And you can just rotate the
whole thing around and move it to where you want to tap
the Transform tool again. And there you go,
there and my swatches. Okay, so a couple
of things to note. If you look at these swatches, I've tried to give a little
bit extra at either ends, all of the swatches arrived
at darker or lighter. Every single swatch in every single group is going
to have this feature. Now, I can work nicely, but supposedly I have
saved the yellow there. Supposing I'm drawing
and supposing I've got an extra layer
which I want to draw with. Do a little bit of
drawing like this, and then I cite, all right, let's get a little bit
of deeper shade of this is making a
life so it's easy. Thank you, Simon. Get a bit of a
lighter bit there. I want the base color now. So the middle third, remember, is all the same base
color and I can do that. And I can touch up the darker
areas and lighter areas. But then I decide or actually
get so happy about it that I end up covering nearly
all of my darker area. And then I think I want the same deeper shade
that I had before. So I put my finger on. But because this has graduated, you think, which bit was it? Was it this slightly
deeper shade? Was it the slightly
more subtle shade? I'm not sure. That can be a problem as it is within
most of the color panels, you get the history where
you get some recent colors. But if you're selecting a
lot of different colors, eventually your
original color might run off the end of
the history panel. So this is what you do.
17, I will clear it. I'm going to choose my orange. Just make a little
dot like this. Let's choose a different brush. Let's try medium hard, so I have a slightly
harder edge. And then I choose, I want
that particular shade, and I choose that
as my deeper color. And then for my highlight, I don't want it
quite as bright as I want it a little
bit more subtle, like say there, and I do that. Then I think, well,
what else do I want to go with this or I like that. Tilly color there. And I want just slightly
shaded version of that. And as bright as I can
get for the highlights, I make my own palette
based on the swatches. And let's come and
actually call it palate. Once I've chosen all the colors
I think I'm going to use, well, I'll lock and
make this invisible. So now I have all
the colors I think I'm going to use for
this particular drawing. The nice thing about it is supposing I'm zoomed
in like this. I don't want to have to keep
on dragging up like this, but because I have all my
colors in a localized area, I can go to my transform
tool and just move it down to the bit where I want to work
and I can move around. I want to accidentally
made it bigger or smaller. It doesn't really matter as long as the colors are all
still intact by the head, which they should be allowed. I'm painting my ice cream. It'd be very certain that
you choose the right layer. Now in the case of this,
I'll have to create an extra layer for my
underlying colors. And now I can just come in. I will choose a pen. Let's try just blocking in and supposing I want that color for the cone of the ice cream. I'm painting like this. Choose my shaded area there, and if I want a slightly
deeper shade, I choose that. Now, I'm not working
very efficiently. I will be showing you a more
efficient workflow soon. But for now, this is
the way you do it. And if you decide you
want some blue ice cream, there you go, you're good to go. So I will clear that. So just quickly, where do
I get the colors from? In the first place? I've just switched
over to my desktop because I just find it easiest navigate around
things like Chrome on a desktop as
opposed to an iPad. And I've just googled
color palette generator. And you can see I've got
quite a few hits here. Now this one's a
very popular one, coolers.co that's come to here. And I get something like this. I'll just lose this for a second and I will
just get rid of this. This is very easy to do and it automatically generates
color palettes for you. Let's try it. If I come to start
the generator, I got a series of colors which are designed to go
with each other. And if I press my space bar, I guess new version and a new
version and a new version. Now supposing I say, oh, actually, you know what,
I like that, What is it? Dark sienna, I can
lock that one. Press the Space-bar again, had a new set of colors
get generated for me, which is supposed to go with that dark sienna That's
looking quite in your face. I quite like that. Let's lock this one as well. And then I can go through
like this and then whichever ones I love
will stay the same. Now supposing I liked that, but I think, you know what? I want to alter it a little bit. Look, there's a little thing
here called adjust palette. And if I come here, I can make everything less saturated
or more saturated. I can alter the hue
around like this. The brightness,
temperature, warm or cool. And I can have all loads of different variations of
my original palette. Now once I find a palette, I like you can save things, but what I tend to do is
just take a screenshot. In the case of a
Mac, that will be Command Shift plus four. And I can take both of them. I can just do this, let go that will get
stored on my desktop. So I can use that to
sample my colors from. If you choose to go pro,
amongst other things, you can have more colors on
your palette at the moment, we've got 12345 different colors which are supposed
to go together. Anyway. That's cool. As.co color palette generator, you can upload an image and
get the color from there. Well, what about Adobe? You can do a similar thing here. And all analagous recovered that on the solid
foundations course triad, yes, we did that
complimentary split, complimentary, a lot of this on the solid foundations course. And you can move things
around like this. And as before, you can save various different colors here. Or if you have a particular
color you want to match, like supposing I have read
118 Greenwald more three, blue 96, our knee too much stuff to their you've
just seen it happen. If I adjust this one, generate a whole load of other
colors which go with it. That has gotta be useful. Again, you can save
or you can take a screenshot of it and generate your color
palette that way. In the case of this, if I want
to get them onto my iPad, I can do that just by
dragging and dropping my saved screenshot into iCloud, which you do get if you're using an iPad so you're sorted. Okay, I am back in Procreate
and I think I will make a new file so that I don't get distracted and I'll come
to the screen size. So I just have a canvas that's
the same size as my iPad. I don't need anything bigger. And I will come
to insert a file. And you remember I
took a screenshot. Well, there it is. Screenshots, blah-blah-blah,
and important. Those are my base
colors and I'll show you how to do
it in procreate. But there are other
programs which make this a little bit easier. Things like Affinity Photo
Affinity Designer, Photoshop? Yes, because with
those programs you can specify gradients which makes your life just a bit easier. Also, if you're
using vector shapes, you can edit the gradient at anytime so it speeds things up. But I can't assume you
have any of those. If you do, I have
tutorials for them, but what I will do is I will
just create a new layer. Layer two, I come to my paintbrush and supposing
I want that peachy color, I will just tap on it
to select it like this. And I want a gradient, so
you would think, well, okay, let's use a soft airbrush and gradually build up darker
bits and lighter bits. But I'm not, I'm going to
use the hard airbrush. I'm going to make my
brush size nice and big. And I'm just going to create a solid band of color like this. Then I'm going to come and I want a shaded
version of that. So I might come down like this
and make a darker version. Common wisdom says you
make it less saturated in the shadow areas because there's less light falling
in the shadow areas. So colors get less saturated and put down a darker
band down there. Then select my original color and I want a lighter version. Now I'm trying to keep
the saturation fairly high by not moving
over to this side. So maybe around about
there, for example. And there's my lighter version. And look, it depends upon the calorie theory
that you're using. Because if I choose my
original color again, some color theory says
that if you're going to make it darker
and less saturated, you also want to make
it a little bit cooler. So in the case of this, well, I have a pretty standard read, but I'll move it in towards some of the cooler
colors like this. And maybe do
something like that, that might be a little
bit exaggerated, but I'm just trying
to make a point. And similarly, if you're choosing a lighter
color like this, you might move it
more towards warm. I'm pretty sure would be based
upon if you're painting on a sunny day because you've got the warmer
light from the sun, which is a warm lights. If it's in shadow, you're still going to get some
of the blue sky, which does give out
a little bit of light reflecting in
the shadow areas. So warm highlights,
blue shadows. But if you're doing
cartoony stuff, you might want to
fairly saturated shadows for a more
vibrant effect. If you're doing a Picture,
moonlight with say, a shop window just to the
side of a person's face, then you're going to get warm
light on the person's face, even if it's on the shadow side. And you're gonna get some fairly cool highlights from the Moon, depending upon which way you
want to paint it anyway. So what I do is on my new layer, I have my three bands of color. And then all I do is
I come to Gaussian, a Gaussian or Gaussian
blur and blur like this. And I'm starting to
get these transitions. That's why I made
this fairly big. Because look, I'm
starting to get my image fading against
that light background. There's always a risk. I'm gonna get a little bit of background pollution
in these gradients. But supposing I
wanted to say about there, that's 13% blur. There's no fixed
number for this. All you need is the middle
area fairly distinct. So you can always
pick your base color plus a little bit of light
and a little bit of dark. And all they do then
is I just drag like this and then come to invert and then come
to clear my layer. And I'm left with
a color swatch, then repeat for all
the other swatches until you fall
asleep from boredom. Speaking of which, I think
it's time to give you a break. We'll carry on in
the next video.
10. Inking in our Ice Cream: Oh, carry. So I've got my file. I hope you've been following along and you've got to
have very similar point. If not, just go back and review the previous video on how to
set up something like this. It is good practice for you, but the next thing I want to do is to ink the whole thing in. Okay, So for that, I want to take my sketch
layer which I renamed, going to fade it
again like this. I've just got enough of an outline so I can
see what I'm doing. And then I'm going to
create a new layer. And I'm going to call this ink. Now for the color, I'm
going to use black. You use whatever color you want. But black is a very
common color with this, especially because
eventually it's going against quite
a dark background. So I need something
that's going to stand out okay for the color. I know I said I was going
to use black like that, but instead, I'm going
to use a very dark gray. It's not really black, but not quite because I can
do whatever sketch I want. It can be realistic
in style or it can look very
cartoony or stylized. But the stone itself
on the background, while they're quite realistic. And so I want that cartoony
or stylized picture that I'm drawing to look like it belongs on a fairly
realistic stone. And if I'm doing that,
unless someone's done quite a bit of touching
up to a photo, you rarely if ever get
a true deep black. So dark gray is what I want. Okay, so the next thing is, what Penn do I use? Well, I'm in Procreate, inking, brush set, and I have
a load of pants here. Let's try a few of them out. Let's try mercury. Interesting but not
really what I want. So double-tap to undo that, Let's take a look at some other, Let's look at basketball. That's not bad, but again,
not quite what I want. Look, I did some experimenting
around with this. And the closest one for my needs would either be the gel pen because
people use gel pens. But the one I almost like was
minsky occasions ski ink. There. If I zoom
in a little bit, there's test stroke
and it's nearly there. But my only problem with it
is is that at certain angles, it's thicker than others. And that's not
quite what I want. I want the thick and thin, but I don't want
that ribbon effect. I want to try and get the effect that you get when
you use a gel pen, which is going to be
thick and thin ideally, but also a bit
blobby rather than this ribbon effect
double-tap to undo. Instead, I will come to
my gives you and ski ink. I will slide to the left
and I'll will duplicate it. And then I'm going to tap
again on the occasions key ink come into my properties because there's
two things I want here. I want to look at the shape
and sure enough you can see I've got that oval shape. I don't really want that. So I'm going to
come to where I'm circling now and
I'm going to edit. I'm in the shape editor
and I will tap on import. And I'll come to
my source library that all the brush heads
that Procreate supplies you with an all I want with this
is gonna be this one here. Medium, round like
this, and tap on, Done. Let's take a look at this. Now. That's giving me
all the effect I want. I'm getting thick and thin, but it's a rounded,
thick and thin. The owner other thing is, if I take a look at grain, Yeah, I've got a slight grain
there. I don't want that. I just want this to be a
simple, straightforward, thick and thin, with no texture inside the
actual brushstroke. So again, come to edit
and come to import. And again from my
source library, I just want a
straight blank file. That way there's no texture. I might just get a
straight line like this. Now let me take a look
at stabilization. I don't want any
streamlining on it. I don't want any stabilization
at all because I'm trying to emulate a hand working across the
surface or stone. Now, if you've ever tried
to do that for one thing, gel pens with a
thick acrylic ink can be quite blobby and
difficult to control. But also, I'm not drawing
on a flat surface. I'm drawing on the
surface of a stone. And if you've ever
tried to do that or face painting, for example, you will know that it's
very difficult to get a smooth line because it's very difficult to adapt your hand to the roundness over the stone
or the roundness of a face. So no streamlining. Okay, Let's come to and give
a test stroke with this. I have it set at
eight per cent and those are knocked there as well. Let's give this a try. Yeah, that is giving me
the kind of effect I want. And if I zoom in on that stroke, you can see I'm just getting a little bit of a
soft blurry edge. That suits me fine. Because if you're a member, I made the edges of the stone is a slightly blurred
because again, this is quite realistic and in a photo you never get a
completely sharp edge. We spoke about this before. Anyway, I will clear
this and I will turn on my layer 13
so I can see what I'm doing just while
I'm here as well. This gives you an ski ink. I'd like to add that
to my own brush set. So what do I have? Dc inks? I'll tap and hold. To wrap this up to where
it says DC inks and isn't really difficult
to do sometimes. But if I let go dearly go in there, no,
of course it didn't. I bet anything there. Look, I don't know about you, but I find it very difficult
to place in the brush set. I wanted to go to
Come on, be nice. Yeah, there it is. Pigeon ski ink. I will tap on it. Come down to about this brush. Thank you very much,
Jonathan Kaczynski. I will leave that there, but I will just call this landscape inc,
adopted and done. Let's make a couple of test
brushstrokes before I start. I created a little notch
there at eight per cent. Is that the right
size for this one? Here's a good idea.
Let's first of all, clear my ink layer
because I managed to put down a couple of blobby
brush strokes there. But also, let's come down again. So I've got a dark gray, not completely black, and we're on the right
layer, the ink layer. So let's do a couple
of test brushstrokes. That's quite nice. But look if I zoom in just on the top of the
ice cream and I do some thick brush strokes and some thin brush
strokes like this. And I'm thinking,
Oh yeah, this is looking really, really nice. But then if I pinch
inwards to zoom to fit those brushstrokes
which looked pretty thick. What I'm drawing up close, all of a sudden don't
look quite as thick when you're zoomed out to
the final viewing size. And so while I quite like 8% for some of the finer detail, maybe I want to try something
a little bit bigger, maybe just even 12 per
cent and give that a try. Here's my thick,
There's my thin. Yeah. That's giving me the right amount
of thick and thin, which I think is appropriate for this particular bit of ink work. If there was a lot
of fine detail, I might use the 8%, but for this, I
prefer 12 per cent. So I will come to my
slider at the side, tough and my slider button. And I'll create another
size at 12 per cent. So now I have two notches, and now for anyone drawing, I'll either use 12% or 8%, or if there's a lot
of fine detail, I might create another notch
on my slider on the left. But if I'm getting a bit
happy with my slide on the left and varying the
size all over the place. That's not mimicking what
happens in the real world. Instead, I'd rather a lie
on pressing harder or softer with my Apple Pencil to get the line
thickness I want. Anyway, let's come to my
ink layer and clear it. And let's make a
start. So zoom in. At this stage, I'm not
getting creative with a composition like how long the drips are
on the ice cream. All I'm doing now is
concentrating on getting some nice thick and thin lines. This is kind of designer, he tight work rather
than splashing a load of color down
on your canvas. And when you're doing design
every type illustration, It's nice to have one bit
of time to do one job. That's the sketching, and then another bit of
time to do another job. This is the inking is, so let's come to the side
of the ice cream first. And I'm going to make the outside of the ice
cream quite thick. This is what's known
as a key line. And often around the outside of an object or around
the principal shapes. You do get a slightly
thicker key line because it helps to separate out the shape
from the background. That's not to say that I want the whole thing to be
really thick and blocky. You can do that if you want. Make it fairly thick
down the bottom. Now, I've already decided that the light's
going to come from the top right to the bottom left to match it with a stone. So on the right-hand side, I might make this a little bit thinner because then you get the thicker key lines
more in the shadow area. It helps to emphasize
the effect rod here. Now what I will do
is this sketch layer is looking a little
bit indistinct, so I'll make it a little
bit more visible. But now, look, I've
got two shapes here. I've got the ice cream and
I've got the ice cream cone. So in theory, I should have a fairly thick border there.
But here's the thing. Look, if I come
here and do this. Rarely I want thin around here because I didn't like that. I'll undo that, make
it a bit bigger. Sometimes it's a bit difficult to talk and
draw at the same time. But what I want is for the drippy bits of
the ice cream to have a thinner line there
because the ice cream is stretched out at that point. So I want my line to be
stretched out to match that. If I wasn't talking to you, I brought in some fairly
gentle background music and just concentrate on a
few deep relaxing breaths to get into the right
mindset because I want a steady hands do some
nice sweeping lines. Let's do this. Bit thicker at the
bottom because the liquid is moving
slower at that point. And I want it to
look heavier there, but a little bit thicker here, just in this corner. A little bit thicker here
and around like this, a bit heavier in this corner. Rod like this. Now I've got
some lines joining here, so maybe a bit thicker out here. Like that. Just while I'm here, there is a lip to
the ice cream cone, which I'm going to
make it a little bit rougher like this, just to suggest that
slightly crunchy texture of the ice cream cone. There's my line. It's
also an example of what I'm talking about when
I say thick and fit, because part of the craft
of doing thick and thin is knowing where to make it thick
and where to make it thin, slightly thicker on the shadow
side, slightly thinner, where you get these
long running shapes like that big drip of ice cream. Because if you imagine
the long bit of that drip of icecream
is a first line. Just while I'm here
though, before I carry on, I'm going to come to liquefy
my brush size, pretty small. No distortion, no momentum,
nothing like that. But what I want to do is
just come to this bit of the trip to make it a little
bit thinner at the top. Just to make that
look more blobby. Because it was a little
bit straight up, straight down, maybe just a little bit on this
ice cream here. I'll go with that
for the bottom of the ice cream cone or the top, whatever you call it,
I want to do this now. The temptation is,
and you saw me do it to slow down at that
point where the drip is. There's no need. Come here straight through if you want to make it
a little bit thinner on the sunny side
because then I'm going to tap and hold
on my Erase tool. I want to do that because I held down for just
a short while. If I open it up, I get the same pen I'm drawing
with as my eraser. And now I can come in. Rid of those lines. This is something you
can't do in real life. You lay down some ink
or some enamel paint. It's really difficult to
get rid of it and you definitely can't get rid of it as cleanly as I've just done. But this is digital. You
can do it, it's easy. And there's one or two
areas around here. I think. Also, I wouldn't
mind just taming one or two of these areas because
I went over with my pen. Anyway, those are all
the basic principles. I will speed up,
then I'll draw this. And if I think of anything more important to say,
I'll let you know. Otherwise, let's have a
bit of background music. Okay, I've got to a certain point with this
of two things to say. One is those little sprinkling
bits on the ice cream. I added some extra ones there. And the other thing to say is, look if I make this
invisible for a second and I make the sketch
much more visible. There are certain
things like say that crisscross pattern on
the bottom of the ice cream. I didn't include it
in my inking layer. And also, there's one or two
extra little swirly lines on the ice cream itself, which I didn't include. And that's the point I
want to make with this. I did these sketches to serve as a starting point for you
to do your own designs. But if you want to add bits or take things away
or change things, or maybe even combine two
of the sketches into one. That's great, That's all good. You don't have to follow
the designs that I'm doing. They're just there
as a starting point, hopefully for something
nice for you to do. Anyway. Now, let's take a look. I'll make my sketch
layer invisible. I will also make my
pale layer invisible. I can see what this looks like on the actual stone itself. And as soon as I do
that looked very clear. Not quite so clear. Now bear in mind,
this is going to be filled in with some
bright colors. But by looking at
my inking in, well, it's actually sitting
on top of the stone. It's supposed to
be going on. I get a better idea of what
it's going to look like. And so there's just a
couple of things I want to, I'll create a new layer and
I'll rename this to extras. This is going to
get merged down, so I didn't need to rename it. But what I am going to
do is just to show you that just in this corner where this bit of juices dribbling
down the ice cream. I'm going to come
and I'm going to add just a little
curvy bit there. In fact, now's the
point where I'm making. I choose my 8% notch because I want this to be a
little bit finer. And we're going to just add one or two little
corners in just to strengthen certain areas. You do not have to do this. I'm just giving you an example of how you can vary the style. Just something extra
for you to do. Okay, I've made those changes. I'll turn on my lighter
light just for a second, just so you can see the
difference in what I've done. And so if I turn off my extras
layer, that was it before. And that's it with just some of those corners filled
in and contoured off. You don't have to do this. And it's just an extra tool in case you want to
develop your own style. Anyway, for this extra layer, I'm just going to merge it down. Turn off my layer 13. That is now LinkedIn, hopefully with some useful
tips for you along the way. The next thing is, well,
we want some colors. I'll see you in the next video.
11. Welcome to Swatches!: If you're looking
at this video and you're not on the
rock art course. Don't worry. Because as part
of the rock art course, I thought I'd do an extra treat and provide a few
different color swatches. But then I thought, well,
actually this is gonna be very useful for many of the
courses I do with procreate. So this is a crossover video. So we've got a stone
with a background, and you can see I've
inked in an ice cream, which we want to
paint on the stone. And so that's gonna be a case of blocking in which we'll come to, but also we need to choose
some colors for it. And that can be a bit of
a problem because well, warm colors do you use? And if I create a new
layer just to draw on, let's try the medium airbrush that should be
alright to show you, and I'll open up my colors. And one thing you notice
people doing a lot is choose from this part
of the color palette. For example, if I think, oh, I need a read while I come and
I find a read and I think, oh, that's red and it's
especially red up here. I'll draw with that because
it's red and I want to read and you end up
with a whole lot of colors that are
way too saturated. Or you can end up with colors that don't quite go together. So what do you do? Well, if
I come to my wrench icon, I'm going to insert a file and I've created a few
swatches for you, which I will supply to you. For example, let's
take a look at this one, color codes 01. If I zoom in a little bit
so I fill my picture. What you've got here are a whole load of different
color combinations. You'll notice hopefully that they're divided up
into groups of say, six or five or in some
cases close to ten. But the point is,
according to color theory, these are colors that go
nicely with each other. Let's take, for example, use two fingers to
make this bigger by dragging it outwards.
Take a look at this one. You have a mix of warm
reds going through to some rather neutral
colors in the middle, going through to
some cooler blues. And so if you're confident
that those colors go together, then those are the
colors that you use for your compositions. And the theory goes,
you have a whole load of different color combos here. But once you find the
one that you like, I can come to my selection tool, the rectangle is
selected and I will select those colors and I
want to get rid of the rest. Now I will do that by coming to the layer and pressing clear. But my problem with that
is that if I do that, oh dear, I've got rid
of the wrong one. So two-finger tap to undo that, I will come to my
selection again, which of course,
de-select everything, but it's simple enough,
rectangle select. And this time I'll come
down to where I'm circling. And it says invert, tap on that. Now everything apart from the color swatch I
want is selected. If I come to clear, everything else
goes and I'm left with just this one Color Swatch. And that can be the
swatch that I will use to get the colors
for my illustration. Now at the moment it is plant right in the middle
of my illustration. I do not need that, but that's not a problem. Come to our Transform tool and you can move it
around by dragging. I prefer to do it by the
outside and move it around. I'll turn off snapping. So I don't get those blue
lines all over the place. But here's the thing. You might decide who
I want to make it small so it doesn't
interfere with my picture. I can just about
get away with it, but just think about it. You have your rotation
node at the top, which I'm circling,
that little green one. And you can just rotate the
whole thing around and move it to where you want to tap
the Transform tool again. And there you go,
there and my swatches. Okay, so a couple
of things to note. If you look at these swatches, I've tried to give a little
bit extra at either ends, all of the swatches arrived
at darker or lighter. Every single swatch in every single group is going
to have this feature. Now, I can work nicely, but supposedly I have
saved the yellow there. Supposing I'm drawing
and supposing I've got an extra layer
which I want to draw with. Do a little bit of
drawing like this, and then I cite, all right, let's get a little bit
of deeper shade of this is making a
life so it's easy. Thank you, Simon. Get a bit of a
lighter bit there. I want the base color now. So the middle third, remember, is all the same base
color and I can do that. And I can touch up the darker
areas and lighter areas. But then I decide or actually
get so happy about it that I end up covering nearly
all of my darker area. And then I think I want the same deeper shade
that I had before. So I put my finger on. But because this has graduated, you think, which bit was it? Was it this slightly
deeper shade? Was it the slightly
more subtle shade? I'm not sure. That can be a problem as it is within
most of the color panels, you get the history where
you get some recent colors. But if you're selecting a
lot of different colors, eventually your
original color might run off the end of
the history panel. So this is what you do.
17, I will clear it. I'm going to choose my orange. Just make a little
dot like this. Let's choose a different brush. Let's try medium hard, so I have a slightly
harder edge. And then I choose, I want
that particular shade, and I choose that
as my deeper color. And then for my highlight, I don't want it
quite as bright as I want it a little
bit more subtle, like say there, and I do that. Then I think, well,
what else do I want to go with this or I like that. Tilly color there. And I want just slightly
shaded version of that. And as bright as I can
get for the highlights, I make my own palette
based on the swatches. And let's come and
actually call it palate. Once I've chosen all the colors
I think I'm going to use, well, I'll lock and
make this invisible. So now I have all
the colors I think I'm going to use for
this particular drawing. The nice thing about it is supposing I'm zoomed
in like this. I don't want to have to keep
on dragging up like this, but because I have all my
colors in a localized area, I can go to my transform
tool and just move it down to the bit where I want to work
and I can move around. I want to accidentally
made it bigger or smaller. It doesn't really matter as long as the colors are all
still intact by the head, which they should be allowed. I'm painting my ice cream. It'd be very certain that
you choose the right layer. Now in the case of this,
I'll have to create an extra layer for my
underlying colors. And now I can just come in. I will choose a pen. Let's try just blocking in and supposing I want that color for the cone of the ice cream. I'm painting like this. Choose my shaded area there, and if I want a slightly
deeper shade, I choose that. Now, I'm not working
very efficiently. I will be showing you a more
efficient workflow soon. But for now, this is
the way you do it. And if you decide you
want some blue ice cream, there you go, you're good to go. So I will clear that. So just quickly, where do
I get the colors from? In the first place? I've just switched
over to my desktop because I just find it easiest navigate around
things like Chrome on a desktop as
opposed to an iPad. And I've just googled
color palette generator. And you can see I've got
quite a few hits here. Now this one's a
very popular one, coolers.co that's come to here. And I get something like this. I'll just lose this for a second and I will
just get rid of this. This is very easy to do and it automatically generates
color palettes for you. Let's try it. If I come to start
the generator, I got a series of colors which are designed to go
with each other. And if I press my space bar, I guess new version and a new
version and a new version. Now supposing I say, oh, actually, you know what,
I like that, What is it? Dark sienna, I can
lock that one. Press the Space-bar again, had a new set of colors
get generated for me, which is supposed to go with that dark sienna That's
looking quite in your face. I quite like that. Let's lock this one as well. And then I can go through
like this and then whichever ones I love
will stay the same. Now supposing I liked that, but I think, you know what? I want to alter it a little bit. Look, there's a little thing
here called adjust palette. And if I come here, I can make everything less saturated
or more saturated. I can alter the hue
around like this. The brightness,
temperature, warm or cool. And I can have all loads of different variations of
my original palette. Now once I find a palette, I like you can save things, but what I tend to do is
just take a screenshot. In the case of a
Mac, that will be Command Shift plus four. And I can take both of them. I can just do this, let go that will get
stored on my desktop. So I can use that to
sample my colors from. If you choose to go pro,
amongst other things, you can have more colors on
your palette at the moment, we've got 12345 different colors which are supposed
to go together. Anyway. That's cool. As.co color palette generator, you can upload an image and
get the color from there. Well, what about Adobe? You can do a similar thing here. And all analagous recovered that on the solid
foundations course triad, yes, we did that
complimentary split, complimentary, a lot of this on the solid foundations course. And you can move things
around like this. And as before, you can save various different colors here. Or if you have a particular
color you want to match, like supposing I have read
118 Greenwald more three, blue 96, our knee too much stuff to their you've
just seen it happen. If I adjust this one, generate a whole load of other
colors which go with it. That has gotta be useful. Again, you can save
or you can take a screenshot of it and generate your color
palette that way. In the case of this, if I want
to get them onto my iPad, I can do that just by
dragging and dropping my saved screenshot into iCloud, which you do get if you're using an iPad so you're sorted. Okay, I am back in Procreate
and I think I will make a new file so that I don't get distracted and I'll come
to the screen size. So I just have a canvas that's
the same size as my iPad. I don't need anything bigger. And I will come
to insert a file. And you remember I
took a screenshot. Well, there it is. Screenshots, blah-blah-blah,
and important. Those are my base
colors and I'll show you how to do
it in procreate. But there are other
programs which make this a little bit easier. Things like Affinity Photo
Affinity Designer, Photoshop? Yes, because with
those programs you can specify gradients which makes your life just a bit easier. Also, if you're
using vector shapes, you can edit the gradient at anytime so it speeds things up. But I can't assume you
have any of those. If you do, I have
tutorials for them, but what I will do is I will
just create a new layer. Layer two, I come to my paintbrush and supposing
I want that peachy color, I will just tap on it
to select it like this. And I want a gradient, so
you would think, well, okay, let's use a soft airbrush and gradually build up darker
bits and lighter bits. But I'm not, I'm going to
use the hard airbrush. I'm going to make my
brush size nice and big. And I'm just going to create a solid band of color like this. Then I'm going to come and I want a shaded
version of that. So I might come down like this
and make a darker version. Common wisdom says you
make it less saturated in the shadow areas because there's less light falling
in the shadow areas. So colors get less saturated and put down a darker
band down there. Then select my original color and I want a lighter version. Now I'm trying to keep
the saturation fairly high by not moving
over to this side. So maybe around about
there, for example. And there's my lighter version. And look, it depends upon the calorie theory
that you're using. Because if I choose my
original color again, some color theory says
that if you're going to make it darker
and less saturated, you also want to make
it a little bit cooler. So in the case of this, well, I have a pretty standard read, but I'll move it in towards some of the cooler
colors like this. And maybe do
something like that, that might be a little
bit exaggerated, but I'm just trying
to make a point. And similarly, if you're choosing a lighter
color like this, you might move it
more towards warm. I'm pretty sure would be based
upon if you're painting on a sunny day because you've got the warmer
light from the sun, which is a warm lights. If it's in shadow, you're still going to get some
of the blue sky, which does give out
a little bit of light reflecting in
the shadow areas. So warm highlights,
blue shadows. But if you're doing
cartoony stuff, you might want to
fairly saturated shadows for a more
vibrant effect. If you're doing a Picture,
moonlight with say, a shop window just to the
side of a person's face, then you're going to get warm
light on the person's face, even if it's on the shadow side. And you're gonna get some fairly cool highlights from the Moon, depending upon which way you
want to paint it anyway. So what I do is on my new layer, I have my three bands of color. And then all I do is
I come to Gaussian, a Gaussian or Gaussian
blur and blur like this. And I'm starting to
get these transitions. That's why I made
this fairly big. Because look, I'm
starting to get my image fading against
that light background. There's always a risk. I'm gonna get a little bit of background pollution
in these gradients. But supposing I
wanted to say about there, that's 13% blur. There's no fixed
number for this. All you need is the middle
area fairly distinct. So you can always
pick your base color plus a little bit of light
and a little bit of dark. And all they do then
is I just drag like this and then come to invert and then come
to clear my layer. And I'm left with
a color swatch, then repeat for all
the other swatches until you fall
asleep from boredom. Speaking of which, I think
it's time to give you a break. We'll carry on in
the next video.
12. Creating Swatches: So finally, let me show
you what I've got for you. I will come to insert a file. Well, you already
saw color-code 01. These are various color
combinations I got from websites like the
ones I've shown you, what I went over to my desktop. Let's make that invisible. So as a file at acrylic
pen 01, these are colors. I've got some of
the exact kind of acrylic paint sets that people buy in-order to
paint rocks with. And so if you want
your rock art, look fairly convincing, well, you can make a start
with these colors. As you can see, they are for the most part, pretty bright. Alright, so make that invisible. Gold and copper. These are various different
shades of gold and copper. The three on the right, will
they have copper tones, the six on the left,
those you gold tones. I sampled various shades, golden copper from various
different photographs. And rather than
having amid third, which is your
representative color with a little bit of a
light and a little bit of dark at the bottom, I've done a more
continuous set of shading so you can pluck out
the colors that you want. And here's 1. I did want to make a lot of times when people
are using swatches, they want to know what
is the definitive set of gold terms or copper
times or here's my favorite, what are the definitive
set of flesh tones? And if I use the perfect
set of flesh tones, I'll get perfect flesh colors
in all of my paintings. He doesn't work like that. You'll find certain
color swatches, which will give you
a wide variety of flesh tones that
people expect to see. But there is no
one size fits all for flesh tones or for
these gold tones here. Just while we're on the subject. And if I come to my color
pallets, there we go. There is little plus sign at the top where I can
create a new palette or I can go to New from camera on you from File and
New from photos. Alright, well let's try that. And I will choose, say, the Fed what I'm circling now, I'll tap on that and look here. I've got palette from image. Some people think, Oh,
this is really useful. It's so quick, it's
so convenient. I do not like that one bit. I've got a representative
set of colors from here, but I don't know which
colors belong to which and procreate has made an
effort to group them together. You can see some blues together or some reds on the
bottom together. But I don't know which
colors belong to, which I think a much
better way of doing it is, is to, well, in this case, I'll come to insert a photo. I will choose the
exact same photo. There it is. Those are all
cars I want to sample from. One I'll do is I
will duplicate this and then I recommend you do this if you're
sampling from photos, I'm going to come out, we're going to do a Gaussian
blur of one, maybe 2%. Just a blur ever so slightly. Now, why am I doing
such a weird thing? We'll let, let's
come to say this. A visor here. That's my son. If I come
to say that offers helmet. And the point I'm making here, when you take a photo, all those areas of color like a clear blue sky or
the top of his helmet, for example, you think, well, it's a smooth color so I can sample from anywhere
inside that. But if I see him a ride
up close and personal, hopefully you can see this
on the screen recording supposing I sample
my color from there. Okay, That's my
definitive color. For the top of his helmet. Will look. If I come and I sample just from a little bit
off to the side, I'm getting a slightly
different tone. Because in a digital photo, you rarely, if ever, get a completely flat set of pixels to represent
an area of color, I would say when you
sample your colors to make up your palette, you may think you're getting the definitive gray of
the helmet, for example. But he may get these
slight drifting color, which could throw you
off a little bit. If you compare that
with a top layer, which I did a slight
Gaussian blur on. You see how everything
gets smoothed out. So you're more likely to get a representative color of
your slightly blurred image. Now I think I set
my Gaussian blur to 2% because I wanted to be sure
to illustrate this point. If I was doing
this in real life, I would probably do it
one per cent blurred. Because if you come
down to this bit here, you can see because it blows. Take a look at that
highlight which I'm circling now. Not blurred. Blurred. If you
blow it too much, you start to merge
the colors together. You can end up with losing
some of the brightest or the darkest points of where you're assembling
your colors from. Like, okay, so I've got this. Now suppose I want
to say some of the purples off that
jacket in the foreground. That's easy enough. I come to my palette, I'll create a new pallet. And supposing I want
to say that I think that is the brightest of
violet I'm going to get, I just tapped in
my top left slot of my new palette
and it's there. Now I can, when I
choose another color, Let's choose a slightly
darker version there. Tap in slot next to it, choose another darker version, tapping slot next to it. Choose another version,
tapping the slop next to it. Is there anything darker? Is that darker?
Yes, that's darker. So now I have five
colors which I think are representative of the color
range of that violet. You compare that with a palate below where you can
see the violet colors, but they're all over the place. And I'm not sure if this one I'm not sure why that
was actually taken from. I mean, look, I can use
the bottom palette. It's got some colors in
there which are nice, but I prefer the
control of actually importing my photo,
blowing it slightly. I'm pulling the colors
that I know are representative of the violet
on that jacket, for example. I want to get rid of these two. I'm going to come to
my palette again, and I'm gonna get
rid of that one. I don't like it and
the one on top well, I may add to it at some point, so I'll keep it there for now. But you can see I've defined a few palettes that
they can be useful. But supposing my iPad crashes, supposing I get a new iPad and I forgot to backup
my color palettes. At some point, I may end up not having these color palettes, which I've spent a
long time creating. And then supposing I call a picture which I've
painted before. And I think, oh, I don't know what colors I
originally used to get those beautiful light and
shade tones which I got. But if you do it this way,
a series of color swatches, you can keep your
color swatch with your actual file so
you will never lose that palette again
because it's on a layer within the file called the
layer, whatever you want. And here's the other
thing as well. What he saw me do it here, I chose them a lighter
and darker shades of that violet jacket
and I stored it all my new palette which
I've just created. But with the swatches
I've got now, I can incorporate the
lighter and darker shades plus all the shades in between. And so instead of having
five shades of violet, for example, with this, I have a continuous
gradation from my lightest, warmest highlights through
to my orangey mid tones, through to my more brown shades. And as we saw before, I can choose any of the
points there and create my new palette on the spot
to draw my colors from. Okay, Let's pinch out
a little bit because certain none or file
the rock hue strips. The first nine are all directly sampled from photos of stones. And you can see, I've got some really nice
gradations going on there. You can see the little dots in the bottom right-hand corner. Those are the actual
colors which I turned into the gradients
that you can see. Now the swatches from ten to 18, that's where I started mixing
some colors from one of those little set of five
dots on top of each other. And the mid tones might
be from another of those five little tone
sitting on top of each other. So you've got those
kind of variations, make that invisible and we
will insert another image, the Golden Age color strips, the golden age of illustration, that's children's illustration. Think late 1800s, early 1920s. It's called the
Golden Age because people took a lot of
time illustrating. And these are a whole set of color strips are sampled
various different colors. Take a look at number
13, for example. You'll notice that
the darker greens are really quite cool, but the lighter greens go through to a much
more yellow green. I may not have thought to do that if I'm doing my
standard color theory, but that slight drift in the hue as you get through
towards the lighter tones, that can look very, very nice. And the final one, this is one I hope you're
going to be happy about. These are oil paint swatches. If you go searching
on the Internet, you can find the red, green, and blue color values for
each manufacturers paint, like for example,
cadmium red light, as with a lot of
the other swatches, the mid third is the actual hue. What I've done is
provided a neutral, slightly desaturated
shade plus a tenth or the lighter area
for every one of these swatches
where I've tried to keep the saturation high. I've chosen what I
think are probably the most popular colors that
you get for oil paints. And if you're into oil paints, I have this enough here to
put a smile on your face. I have three columns. The column on the right is the various different neutral
tones, silver Davies gray, Payne's gray, and what have you, the left column with the cadmium red and using yellows
and whatever. And you'll mid column with
your burnt sienna and your cobalt violet and two different versions
of Prussian blue. Those are your hue pigments. And supposing, for example, you're choosing cadmium orange. As I said, the highlights
and shadows are fairly neutral than
either warm or cold. But what you've
actually got here is a color wheel which has been
compressed into two columns. Now let me show you this. I'll make this
invisible and I'll import the file that
this was based on. This, it has a color wheel and I arranged it according
to the red, green, and blue color values in terms of warmer colors
and cool colors. Now there's always gonna
be a little bit of debate over what is
the coolest color, what is the warmest color? But for my purposes, I've called phthalo turquoise
as the coldest color. I've chosen cadmium red
light as the warmest color. The way this works is you've got your various different
shades and tints. Now supposing I'm using cadmium red and I want a lighter
color or a tint of it, but I want it to be warmer. In that case, I'm
going to start heading towards the warmest
color, cadmium red light. And every step around this clock is gonna give you a slightly
warmer highlights. So if I choose cadmium red as my base color
and then I think, Oh, okay, I want a
warmer highlights. I might choose the
bones yellow tint. Now supposing I've got cadmium red and I want a cool highlight, in which case I would
go anticlockwise. Maybe I want to say a permanent magenta highlights the same thing with the shade supposing I've got cobalt blue, but I want a warmer tint. Might come around and I might choose the deepest shade from cobalt violet
because I'm heading towards the warmest
color around the wheel. That's the way the wheel works, but that just takes
too much space. And I kept on adding
some extra bits like the flesh tint or the sap green. And so I've taken that and I've condensed it into two columns. If you're on the
left column with the academy and
reds and yellows, and you want to make
things cooler, go down. If you've got a color
there and you want something warmer, go up. The same thing for
the middle column supposing I've got permanent magenta and I want to
cool a tint for that. Or the lighter, I go down and maybe choose ultramarine blue. Now there are a few
words of caution here. The first thing is
that digital paint does not behave or mixing the exact same way as pigment paint without
going into the reasons. Pigments and digital
code different things. The second thing I've tried
to get these as accurately as possible to how things
appear in the real-world. That will depend on what kind
of light is shining onto the picture and how much light is shining onto the picture. And the second thing, I've got two versions
of Prussian blue here because I saw what the
official manufacturers, red, green, and blue values were for Prussian blue on my
reaction was why, you got to be kidding, that's nothing like the Prussian blue. I know and love. And so I've included it here, but I've also included another
version of Prussian blue, which I thought
was more similar. The Prussian blue that I
learned all those years ago. So if you do the same thing and you're looking
at this thinking, I'll come on, you
gotta be kidding me. That's never permanent
rose or Alizarin. I'm sorry. I did the best I could. This is wrapping up my series of videos about color swatches, all the swatches I've shown you apart from the
color wheel swatch, you will get us downloads. They took a long time to do so. All I would ask is that please don't pass them
on to other people. Let's keep these unique
to the courses I do. Those are the color
swatches you've got plenty to get on with. And I hope they're
really going to help you when you ask yourself, what color can I use here? Okay, Let's move on.
13. Block in our Ice Cream: Okay, so we've got our rock, we now have our line
drawing as well. So let's start
adding some color. Just before I do though, I'm going to come
to my layers panel. And there's a couple
of layers here. I just want to get rid
of my sketch layer. Well, I'm not using
that anymore, so I will slide to the
left and delete it. And that layer 13,
which I use to position my sketch,
I can go as well. So slide to the left and delete. Okay, So let's color it in. I need some colors to
color it in width. So let's come to our
actions panel and insert a file and use one of the swatches that I
was talking about. Well, for this
lesson, I'm going to show you a very simple method. So let's get some
straightforward colors. Let's come to acrylic pins 01, and let's position this just somewhat out of the
way and maybe make it a bit smaller by pinching in with my two fingers and moving around to where
I want it to go. So maybe about there. Now I can see all
of the ink outline, but I also have my colors. Okay, so the next
thing I'm gonna do, I'm gonna create another
layer and I'm going to rename this to palette. Now the reason I've done
the pilot is because for reasons I discussed
in previous videos, you can move it around
when you're zoomed in. But also, I'm gonna do your
typical ice cream color, kind of a creamy color. And I can see three or
four different swatches there that might do the
job, which is nice, but supposing I'm
in the middle of my painting and I want to come back and I want to
select the same color. And that is the
exact point where I realized I can't remember which are the four
swatches I was using. And I know I'm gonna do
that for a fact because when I was doing a practice
run for this tutorial, that happened to me. So let's create an
actual color palette. I can always come back and
add to the palette later. For now. Okay, What brush am I using? When you're doing palettes? Don't bother with soft
airbrush as you'd get something fairly hard
edged. So what do I want? Just double-check. Yes, I'm on my palette layer. Well, I think for the ice cream, I think this color
here which I'm sampling, I can try that. In fact, I could do something, he'll blow a little bit
lighter, maybe there. And this is another reason it's a good idea to do a pilot. Look if I come down here
in the middle where it's all the same
color, that's fine. But I want something a
bit lighter about there. What are the chances of me
finding that same color? Not very good. So what I've done that I
managed to get myself, I'll kill myself the
standard color there, although there's not
much difference. And I'll come down
and I'll choose the darker version that I'll also choose a bit of
a highlight color, just slightly off white, and I'll put that
there while I'm here. What about the cone underneath? Well, let's try this
orange brown at the top. Let's try some of that fat. Let's make it a little bit, a tiny bit darker. I'll put that there. Let's get the
darker shade of it. Let's get a bit of a
highlight there as well. For that source tripling down, I think I'll go for the
very first one on my list. I don't know about you,
but when I was younger, it was always raspberry
flavored source. So let's get a sample for that. In fact, can I get something a little bit darker
than that on top? I definitely want
to highlight here. Let's just drag this
down a little bit. See what I'm doing
maybe about there. And that little
flake of chocolate. Well, I've got the brown here. Let's just try us
down the brown. One. Dipa. Yes, I do. A little bit lighter as well. Chocolates, not very reflective, so I don't need a particularly
bright highlight, but come on while I'm here, That's just play safe. Alright, so now I make my levels in invisible and these are
the colors I'm going to use. I'll come quickly to my transform icon
and I will just move them off to one side so I
can see what I'm doing. Okay, so the next
thing is getting that color where
I need it to go. I said the first thing
I'll do is I'll come to my ink layer and I will
create a new layer, but I will drag my layer
underneath and rename it to be 0 while because I can't be bothered
to write block 01. But whenever I see BL unknown, it's a block layer. Alright, we'll look, I'll
start with the ice cream. And the obvious thing to
do is to select my color. When you're blocking in,
you want a hard brush. You don't want to mess
around with anything else. And I can come in and just check my brush size
that's way too big. Let's take it down
to around about that fully solid as well. Yeah, that seems about right. And so the next thing I
can do is just come in and start drawing in like this. I'm painting in all
the areas where I want this particular color, which is going to
take a long time. So let's choose another way. I'll double-tap to
get rid of that. Now one thing I can do is imagine I was drawing
around the area. I draw a circle like this, and then I come up and
the current color is shown right up in the
top right hand corner. And I can. Tap and hold and drag and come down to here and
fill in like that. That's another way to do it after you traced
around the outline. But there is another way
of doing this as well, just a tiny bit more involved, but it will save you
time in the long run. And that is by using something
called a reference layer. So I will double-tap
to get rid of that. Come to our ink layer, tap on the icon. And just here you can see
something called a reference. That means the ink layer
is now a reference layer. So any other layer, like the BL 01 will refer to the ink layer when
you're doing the flooding. And what does that mean? We'll look, I'll
do the same thing. I will come and I
will drag and I will flood into this area here. And the flood spreads
outward from where I dropped the color
until it meets a border. I'll double tap to undo that. If I didn't have the ink
layer as a reference layer, and I came to my blogging and layer and I did the same thing. The entire layer gets flooded. I do not need that. But because we have the
reference layer are blocking in layout is
referring to the ink layer because the ink layer is the reference layer
and the ink layer is telling the flood how far it's allowed to go before
it has to stop. And that is wherever there is
a border in the ink layer. So you get this effect. Now you may be thinking great. And yes it is, it's
very, very useful. But there are a couple of things I want to
tell you about this. I will zoom right in
on this area here. This time what I drag my
color into flood the area. Look at what it says at
the top of the screen. While I flood, I leave my finger on the
surface of the iPad. Okay. Don't remove it because
it will be sliding it from left to right
in just a minute. Color drop threshold thirty-seven
point three per cent. This describes how tolerant the flood is when it's flooding. Let me show you this. If I come and take this
right the way down, can you see as I do, there are certain bits
around the outline which are no longer
being colored in. Take a look at the area I'm
circling at the moment, and I'll bring up my
threshold again by dragging with my finger
or my pen to the right. Can you see how it gradually
fills in like that? That's because the
high of a threshold, the happier the
floodgates about how much it cuts into the borders of
where it's allowed to go. So if I let go, okay,
well that worked nicely, but supposing, I wonder if this is going to
work, moves across. I will flood and I'll
keep dragging up and up and up and up till
eventually, yeah, there. If I get to a color threshold of a 100 mile flooding is so happy that it's
flooding everything, that it starts
skipping over borders. That's something
you need to watch. So you gotta get a balance between that, which is too much, and way down to the
color threshold of 0, which is nowhere near enough. If I was to put up with that, I'd have to go in afterwards
and start tracing around the edges just to get some clean outlines on
what will be the point. Why not just do that
in the first place? In general, what you
want is you want the threshold to be
set high as possible. And in fact, look when I
flooding the next bit, Let's try say this
bit down here. In general, the rule is
dropping and then take your threshold as
high as it will go until odor it's flooded, everything which you don't want, then just take it back a little bit and as soon as you get it, not flooding all of it, you don't want to let
go at that point. Alright, now let's show
you something else. I can keep on going with this and flooding all the
different areas. But there was a quicker
way to do this. And I'll show you this now. Look how flood another area here and come up to the top and
come down, That's great. Then continue filling
with three color. I'll tap on that. And you can see it's
very conveniently already flipped in that area
of ice cream underneath. But if you take a look, can you see you've got a
little crosshair in there. If you put your pen or
your finger on that, you can drive the
cross hair around to decide which bits
you'll go into flood, like supposing I want
that bit, that's nice. And I can adjust
the threshold or the flood level this time with this little
slider on the bottom. See. And again, I
want to crank it up as high as I can
get away with that. And the nice thing
is I can tap and you get the cross-hair
again and I can tap and you get the
cross-hair again. And I can tap to get the
cross-hair again and again. And now it's made a mistake because it's
got a bit too happy. It started to flood the
ice cream cone underneath. So at this point that's
where I take my flood, slide it down until that, I just get rid of that
little bit in the middle. Once I do that, then I let go. That's continue
filling with re-color, but I'm going to show
you a gotcha with this. So top of my brush and
then I'll double tap a few times to get rid of stuff. Supposing I have down here, there and I flood like
this and I think great, That's all very nice. I continue filling
with re-color. One thing that can
happen is as soon as you press continue
filling with re-color, you get that little cross sign, which I am circling again. Now sometimes that can be in an area where you
don't want it to be. Like, for example, if I was
down here, for example, you may end up flooding a bit of your picture which you
didn't intend to do. But also you can simply not
notice that it's flooded, an area that you don't
want it to flood. So just be aware of that. Anyway. Let's take that down and
then tap in another area. If I tap in an area and I think, Oh no,
I've got it wrong. I can always place my pen or my finger on the
cross out and then drag it to where I
do want it to go. Like that. And while I'm here, let's write
the layer to about there. And then a bit of hair, and then a bit here. Alright, that is my ice
cream cone colored in. Now I will create a new
layer and I'll call this BL 0 to four block layer 0 to let's do the cone for this. Let's try that there. Zoom in a little bit. Flood, slide up as far as I can get away with
and slide back a little bit. And then it's done it again. It's colored in a little bit
with the actual ice cream. So drag back until it doesn't continue filling
with three color. That's a good example of
what I was talking about. Your little crosshair just plugs itself down in the
middle of your screen. I can start coloring and things you don't want coloring in. So I'll tap there and
it's doing it again. I will slide down on my flood
slider until I don't get that bottom bit of ice
cream colored in and then tap set my crosshair there. Can I slide my slider
backup a little bit more? I know I'm being a little
bit fussy about this. But this little Flood tool is one of those things that
makes you think great. I can color and
things really fast. And so you tend to do
things really fast. I wonder if I can get that. If I didn't my floods slider
up a little bit more. No, that didn't make
much difference, but supposing I had to set
my flood slider down to say 30% because I've got an
awkward bit of flooding to do. But then it works and
I think, Oh great. And I start tapping
rarely quickly all over my picture with a
30% flood tolerance. Well, I may end up with those
little fringes just around the outline of the ice cream that we were talking
about earlier, where the flood doesn't quite
go up to the edge and that is always a pain in the backside to try and fix afterwards. So come on, beef fussy with your sliders triangle that flood up as high as it will go. Alright, next thing, new layer. Rename that L 03 block three. And for this, I want
that raspberry flavor. Let's start off with a nice
bright color with that. And I come and flood
color threshold up high, then drop it down
just a little bit. And I think that is it for
that, We'll look, okay. As a general rule of thumb, you want as few blocking
in layers as possible. So for that chocolate
flake at the top, I will just come down
to my blocking layer 0 to just flooding there. Let's zoom in like this. Come and flood this bit here. Take the threshold
up, drop it down, continue filling
with re-color and my cursor plunks down the
center of the screen. Let's drag that away so it
doesn't mess everything up. And they got to track
that down a bit. Ah, that's good to
know why that happens. Can you see by mistake, instead of tapping
in-between my black lines, I tapped accidentally
on the black line. And so you can see I'm floating in areas on
the outline like this. And you can see the tolerance
really working well there. Okay, I don't need that, so let's just carefully drag in. So I flipped on
the inside of it. I take my tolerance
up a little bit. Can you see that
just at the top, you can see the
tolerance and action. Drag it up, then drag it down. Now the very last layer are those little
sprinkling bits now, now going to take a
long time to flood. So here's an easier
way of doing it. New layer, call it b 04. And I'm going to tap and hold
on that until lifts up and then drag it underneath
the ice cream layer. This is going to make
life easier because look, if I make my swatches
layer visible again, what color should I make
sure I make them kinda nice baby blue color like this. And if I'm doing that, don't
forget to put down the color I'm using on my
baby blue palette. Now, come down. It's about blocking
layer I just created. And because it's sitting
underneath the ice cream layer, all the colors get blocked. So rather than having
to carefully draw around the various
different shapes, I can just scribble. And anything I don't
need is just going to be hidden by the layer on top. So I just have to make sure I don't swap the
order of my layers. I'll just come into
this bit here and just coloring that bit
that's professional, a little bit big. Let's do that. And there's a little bit of blue peeping out just from the side. I don't care about
that because well, it's supposed to
be rock painting. If a bill, a little bit
of paint spills out. All that will happen
in real life. But I'll try and get it neat
but not obsessively so, alright, so make
those two invisible. And at its simplest, That's your rock art because
people will often do a key line and then
do simple blocked in colors to get the effect
they're looking for. But of course, we're going
to be doing more than this. So you have a go at practicing this where
he blocked colors in what I will take this image
further in the next video.
14. Paint our Ice Cream: Okay, We have our image. Let's do some coloring in. I'll show you a
simple way to do it. And that is just come to
our various blocking and layers and just
turn on Alpha lock. This will do is mean
that we can only paint on that layer where there
are already pixels. Let's give you an example. Let's come down to our
code and supposing I've got a color to
shade the cone in width. If I turn off alpha lock, so it's just a normal layer. Let's choose a brush, Let's try. Let's try medium
airbrush for this pasty on full size about there. That'll do without
the alpha lock. I can just draw
straight over it, two-finger tap to undo that. But if I turn on
Alpha Lock again, I'll do the same Scribble. See that you can only draw where there are already
pixels on that layer. That is very useful. So come on, let's do it. Let's take a look at
my ice cream now. I believe that was a killer
I used for my ice cream. Well, there's a
shaded color for you. Let's try that out. Let's make sure we are
on the right layer. With all the ice cream. There are certain way pasty
down low on my brush, fairly high because
I want to draw a large area of shading
on the left-hand side. Now one thing I have noticed
from students who have done my other tutorials is that
when it comes to shading, people can be very shy about it. They'll do this. They'll say, alright, let's
do a shaded area here. And I'll do a very small, tight area of shading like this. And so you get this rather
large flat area of say, ice cream color with just a little bit of
shading on the end. I don't want you to do that. I want you to try
lower your opacity, make your brush nice and big. I color in general areas
like I'm coloring in now. Because you can
always just sample from your original color. Knock it back if you don't
want it to be that size. I'm trying to color
in the overall form of the ice cream by using a big soft brush like this
to color in certain areas. Then when I've done that, then I will make my
brush size smaller. And I'll start doing in
more localized areas. Even with that, I could do with it being
a bit bigger, I think. And gradually build
up like this. If I go over a line which
you can see I've done that just in the
area I'm circling. I'm not going to
worry about that. I'm just working
fast just to get shaded areas where I want them a little bit at the
bottom of these trips, because I can always
choose my original color. I can make my brush
even smaller and I can make crank the opacity
all the way up, come to this area and I can just paint those areas out again. Uh, we learn to draw
using a pencil and paper. And we love to paint using probably poster paints on paper. And we learned from that. Once you put pencil
or Python something, it can be quite
difficult to get it off. And so we have this habit, which we've learned over the
years of how to paint very carefully into all those
little nooks and crannies. And we're very careful
not to go over the lines. But this isn't traditional art, this is digital painting. And so you can paint on and paint off as
much as you want. So it is okay to
go over the lines as long as you can paint
them back in again. Alright, let's take a look. I'm going to get a little
bit just some lighter colors of light just around here, especially around the
top of the ice cream. A little bit there. Take those shadows
back in again. Choose my original color because there's still a
little bit of shading just around the top of
the ice cream like this. Now I don't want to be a
slave to this thing where I've got my palette of colors
which I defined earlier. And I'm going to stick to them
no matter what because I'm thinking with this,
let me try it. Let's open this up and I want something a little
bit deeper again, I'd also something a
little bit warmer. I know shadows in theory is supposed to be the
saturated and cooler, but come on, this is, this is an illustration,
not particularly realistic. We want it to be. I just want it to be a nice
little fun kind of a thing. I just want to
deepen the shadows. Just here. Just in certain areas. That's my, my brush,
a little bit bigger. There is another way to do this. I'll probably show you
that after I've done this, but this is a quick and
dirty way of doing it. We did all the hard work while
we blocked in our layers. And the nice thing about
it is I'm painting down here and I
don't have to worry about going into
my ice cream cone because it's on a
separate layer. So good times. Just want to make things
just a little bit more 3D by a little bit all depth
into the shadow areas. And again, this is simple. I'm not going for a
huge work of art here. I just want something that
looks like it's been painted. Stone. Now I've done my darker areas. Let's choose that highlights. Now I've got my airbrush. Look. Let's try something a
bit more textured, shall we? Let's come to painting.
What do I have? Autistic? Take a look at the autistic
tool set and let's try. Tara Leah, was that like I'm
experimenting at the moment. So once I mean, just a
little bit more textured, make it a little bit smaller. Now what do I have here? Oh, that's quite nice. The texture is looking a
little bit ice-cream me, but I'll take it my pasty take
my size down a little bit. Oh, yeah, I quite like that, but I'm experimenting
at the moment. Drop the opacity
down a little bit. Next slide is just a
little bit bigger. And that's giving
me more the effect. I want a little bit there. That went too far. Little bit here. That's the ice cream. Let's take a look at
the cone underneath. So come to the cone, my brushes, I'll come right up to
the top where it says recent because then I will find the brushes
I've already been using. Okay. That's terrible. Yeah. Let's try the soft brush, which is from the
airbrushing section. As you can see there. That was my base color. Let's choose a
shaded color here. And pasty, fairly low
brush size, quite big. And let's see what
this looks like. I'm just going to paint. Can you see how that
whole left side suddenly got a
little bit darker? That's because I'm making
big brush strokes. I'll make the brush size quite a bit smaller because
I want a little bit of shading underneath that
around but at the top. And then I'll come in and
make my brush even smaller. And do just a
little bit here and a little bit here as well. Our Samsung, my original color, because I think that's
gone a bit too far. And I just make one or
two little light debbie brushstrokes around just to give a little bit more for
where it's needed. And come down here and just
give a little bit of texture. Just an account
area I will tap and hold just to get a
little bit darker, just around the right part
of my code. Top again. And take it away from
areas where I don't particularly want it just
to knock it back again. You can paint on and paint
off until the cows come home. I do. I want a little bit of
a light color in there. I think I do, but not much. Because ice cream cones
tend not to reflect light, particularly the mat
objects, they're not shiny. You have shiny object, you get quite as
strong highlights. And Matt object like this is
going to be much less so. Just a little bit of light just down the central part
of the ice cream cone. Add on the same layer, we have the flakes, so let's choose darker color. A flake is very
math thing as well. So pasty, fairly low size, fairly small, and I can just
paint around the base of it, the underside of it. Let's take my pasty
higher and my size lower just to get deeper shade. Just around the base of it, just around the bits where I think light's not going
to go very readily, maybe a side like this. And for my highlights with my brush size just
a little bit bigger and just tapping down few highlights here and there make my
brush size smaller. Few highlights just around
the top. So that's my flake. And finally, I have
my raspberry layer. I'm going to use
the same brushes before to that darker version. And let's see how this
looks a little bit bigger. And just put in one or
two little shadow areas. You can see where the
light's being buried on the underside in the corners. And this is gonna be a
little bit blobby as well, I think because the
juice is a bit blobby, so it's not going to be
even all the way round. Some bits, you'll
get more shadow like this little
corner a bit here, or maybe still a little
bit on the other side. They're just come down. It's a fairly small brush with a fairly tight,
definite brushstroke. Like that. I'll make my brush a little more transparent and
a little bit bigger. Because I want
just a little bit, some softer areas
just around here. The larger area. Then I'll make my brush
smaller again because I want just a little bit of
shading around here. Maybe make my brush a
little bit bigger just to blend that in a
little bit more, I want areas of light, areas of shade, one or
two little highlights. I want areas of color, not tiny, timid little lines
of color which are cleaned to the outlines
of the ice cream. Okay, Last little bit. What we'll do a
little highlights. Pasty, fairly high brush size. I'll make 2% at the moment. I'll put an area of
color like this. But then I choose
my original color. Remember size, smaller, so I get a harder edge and maybe do that. In fact, that was
my highlight color. I want something a
little bit stronger. Let's choose that great
light yellow, which I had. And put that, yeah, I prefer that I can
always lower the opacity, so it goes on more subtly. But I want a little bit
of a highlight there. Maybe you want to a
little higher, it's just around the drippy bits. A little bit of a
highlight maybe in the shaded areas as
well, down here. Oh yeah. A little bit of highlight
down the side of it. But also just a little bit of a highlight just in
the shadowy areas because it's a shiny surface so you're going to get
light bouncing off it, but also it's semi-transparent, so you gotta get some
light going into it. So you start getting some
rather interesting effects. One or two little flecks, which sounds a
little bit bigger. Student better out here. Alright, that is the
basic coloring in, and it is basic, but it's enough to
get you started. Now supposing, I come to this
ice cream layer and decide, well, I want some
of these colors blended in a little bit
more pushed around. Well, that is where smudge
tool is going to come in. I can come down to, for example, my soft airbrush in my
airbrushing brush set. Let's take a look at verse
midsize fairly small. And I'll set my opacity to about midway so I can control
this a little bit better. But if you come to the area
I'm circling now you've got some fairly
strong borders there. I can also soften them
just by rubbing onto them, which has the effect
of softening them. Maybe I want to add a little
bit of large texture. I can always drag backwards
or forwards to create a little bit more
of a ripple effect on my ice cream like this. Oh, and I just managed
to smudge heart one of my highlights
at the bottom. So you can either soften
the borders or you can drag them around
like I'm doing now. Take kind of a
little spiral effect in Britain we call
them Mr. width is. Or if you're feeling
adventurous, let's come try say well, let's try artistic Talia, we can use that as much
brush, but with this one, when you drag it
around, look at that, you get a much more
textured finish. I will lower the opacity
plus the size of this. And I can start to get
some interesting effects. Has been the strength
a little bit stronger. So you can see more
clearly what I'm doing. Can you see how I didn't
quite work at one bit, but maybe it'll work
around some other areas. You can start to get
it textured smudge. And this is the other thing
about digital painting. It's not just
paintbrush to apply a brush strokes may be using your fingers or whatever
to smear things around. With digital, you have
so many more options, so many more different
ways to make brushstrokes. And I think this
would work nicely. Just around here. Just to put a little
bit more texture, I probably get a better
result if I was to experiment around with
different kinds of brushes. But a light, a little
bit of texture that this particular brush is
pulling down on here. It also makes it look a little bit more like the paint's being dragged around because it
was thick acrylic paint. Well, sometimes you will get a slightly textured
finish because it's thick paint on what is quite often an uneven
surface stone. So that's the basic way of
coloring in our ice-cream. Just use alpha lock, using our little custom swatch to paint various
different areas in. Don't be afraid to come up with new swatches or go back to your color palette if
you're not getting quite the color that you want. And also as well as painting, your smudge tool and your
eraser tool for that matter, can be every bit as effective in making brushstrokes as
your actual paintbrush. Sometimes it's just what we expect a brush
to do or what we expect a smudge tool to do from real life
that holds us back. But this is digital. Or once you learn
how to control it, you Van Gogh wants
to realize that the possibilities
are nearly endless. Okay, I'll see you
in the next video.
15. Placing Photos on our Stone: Before I go on and do another
full piece of art work, I just want to show
you a couple of quick ways of using your photos. So for this, I'm in
my stones folder and I think I'll choose
stone 14 for this one. So do what we should be doing. Swipe to the left and duplicate. Dan takes down 14 and drag
it up to where it says stones until eventually I
get out of that folder. And this is the file
I'm going to be using. I'll just take it a bit
smaller and let's take a look. I'll add an extra layer. Strictly speaking, you don't
need to do that because any imported artwork should
come in on its own layer. But I'm just being
ultra cautious just in case at some point
something goes wrong. Me paranoid. Who told you that? So come to insert a file. And for this one,
I'm going to come down to doodles faces, whether our couple of pieces, which I just want to explain
a couple of techniques. Now for this one, I want
that little baby's face, and once more I want it to be
very large in the picture. I just want the baby's face. And I will tap on
my Layers panel and that's the
baby in land nine, I'm wondering, do I have any stray bits of our
work from other areas? I don't think I do. So let's go with that. Okay. So what I want is just
things like the baby's eyes, the nose, the mouth. I just want them appearing
on the stone, nothing else. So this is what I'm gonna do. I'm gonna come to that
little n which I'm circling now in the Layers
panel and tap on it. And for this, we're going to use one of the layer blend mode that doesn't get used very
often, but it's useful. And that's the one just above normal that is darker color. And straight away
you're getting close to the effect that I
want to come on. Let's rename it to baby. Okay, so what's happening with a darker color blend mode is that anything on
that layer which is darker than halfway gray
is visible and anything which is lighter than halfway
gray becomes invisible. That's the way it works. And so I'm only seeing
the darker bits, which in this case
is quite lucky because the darker bits
are the baby's eyes, the nose, and the mouth. And you know what? I think I'd like that
to be even bigger. There you go. About that. And incidentally, if
you have any photos, I've loved ones, which you'd like to do this exercise with. By all means do that. What you do is call
up the picture and then you come up
and you can choose hue, saturation and brightness, and just take the
saturation down to 0, that will make things
black and white. You can try fiddling around
with the brightness, but I find that
brightness a bit of a crude tool I must admit. So take the saturation down to 0 or leave the
brightness where it is. I'll show you something better. So just to cancel that, Let's tap once and
tap on, Cancel. And then when you have
he desaturated image, the most powerful
way of adjusting the tones is by using curves. I will use this because
I want to fine tune this image because I'm getting little bits of the
side of the nose, maybe just some areas around
the cheek and the forehead, which I don't really want. So if I want them
to be invisible, I've got to make them
brighter because we are in the darker color
layer blend mode. I'll come to my graph
at the bottom and you see that little
blue node at the top. I'm going to drag that
over like this so that all the lighter areas
are getting lighter. And as I do, can you
see what happens as the lighter areas get lighter eventually they become
a light for them, whatever is underneath and
so they become invisible. When I can take
this bar as I want, I can get some really
quite extreme results. But instead we'll
look, this is curved, it's not straight lines, so I can put a node in the middle of my
straight line like this. Now if I move that up and down, now you're getting a curve. And this lets you fine-tune the darker bits and the
lighter bits like this. I can even put a little
note down the bottom and just darken the very
darkest areas like this, you see how dark bits are
getting more darker, modified. I think that's a little
bit too dark for now. I think maybe I'll
do about that. That's just for the darker bits. Basically I'm just controlling the bottom under this curve, up and down like this to
fine tune the effect side. Yep, That's the effect I like. So I just come to my
layers panel and tap on it that commit to the
changes you've made. But actually, I can do more. Maybe I'd like the baby's nose to be a little bit
better defining, can I do something with that
mouth underneath the lips? Could they be more leverage or just a little bit more defined? I think they could, and I'm
gonna be cautious about this. I'm going to make it
duplicate layer and make the layer underneath invisible
and welcome the top layer. And so in case I
completely messed this up, I always have the
layer underneath as a safety backup. Okay. So now I'm going
to come this time, I'm going to choose Hue,
Saturation and Brightness. I am going to use the
brightness slider, but I'm not going to
make overall changes. Instead, I will come
to just where I'm circling that little
triangle on. I'll tap on it. At the moment. If
I make changes, the entire layer gets affected. But if I come to pencil now, I can just draw it
in the changes where I want them know what kind
of a brush do I have? Soft airbrushed, that's
perfect for what I want. I will make the opacity lower a little bit so I can build
up the effect on the size. I want the size
fairly small as well. So now lower the
brightness a little bit so you can see the changes
I'm going to be making. And now I'm going to brush
just in the nostril area. You see that, You see how that nostril is
getting more defined. That's because I'm making the pixels darker just
where I'm brushing. Let's do the other
nostril and yes, I can, I get a
better definition. What about the
sliders knows, yes, I can do that there and
around the other side. Now what about the
lips and the mouth? Yes, I can instantly I have brightness of
thirty-seven percent. That's what I've
been brushing in. If you want even more control, you can always adjust the brightness slider like this to get the effect you want. That's way too intense effects. Let's take this down to, well, I think I'll take it
down to about 40 to 43%. It's a little more subtle
than what I had before. But now you've seen the
technique and action. I can afford to do that. Okay, so now there are just
a couple of areas where I would like to get
rid of the eyebrows, the side of the
nose on the left, but I can make those
adjustments while I'm still in the hue saturation
brightness using the brush. So just tap once
with one finger. You can see where I did it, apply what I've just done. And I'm still in the brush mode. And if I tap on brightness and slide that up and then start
painting in certain areas, I'm just getting rid
of the eyebrows now. And so I brighten those up to the point where
they are invisible. My brush size a bit larger. Let's try the side of the nose that gradually gets
made invisible. Maybe a little dark bits around the eyes and just the sides of the nostrils are now here's
a very subtle little gotcha. If I commit to that
and I make this layer invisible for a second
and visible again, maybe you can't see
that on the recording, but there's one or
two areas just in that red cloth where the highlights are actually
gray now instead of white, because of the way the layer
blend mode is working, I'll come to my erase tool and that's kinda
had to airbrushing, just use, well, I
can use the soft, I can use the medium. The important thing is crank
up the opacity to 100. Get the brush the right size. And if I just zoom right
into these good re, highlight, which I don't need, I will just paint
them out just by using my Erase tool that
has the baby's face. Very easy, very straightforward, provided you know about the darker color
layer blend mode. Okay, that's it for this one. Let's move on to the next video.
16. Create a Silhouette: Alright, here we go again. I'm going to do
something a little bit similar to
what I did before. So as before, let's slide stone 09 to the left
and come to duplicate. And let's choose one of those
stones and bring it out of my stones folder and
into my main area. Here we have our
stone and you can see it's a whole load
of different areas, their top on a new layer. So let's come to insert a file. I'm going to load up the
same thing as I had before. But this time I want to use this I want that
filling up area. I've got a reasonable amount about that and tap
to commit to that. Now I do want to get rid of those red sketch
outlines as well. So come to our selections. I want free hand and I want to draw just around the outside. Be careful that my
silhouette tap. I want to get rid of
everything on the outside. So in that case I need
to invert my selection. So everything on the outside of that silhouette is selected. Come to my layers
panel and tap on. Clear. Alright, so for this one, this is a photo of my son when
he was doing some drawing. And so of course
I was going, Oh, he's the most beautiful boy, everyone, stuff like that. It's very easy for
you to do this. Just import photo stretched
out to the size you want. Then on a new layer, just get a pan like the pen we've been using
for inking in things and just trace
around the outline flooded in annual end
up with a silhouettes. And in fact, that might be
a nice thing for you to do. So instead of a
picture of my son, you're doing a picture of
someone that you like. I'm gonna go with
this because it's, my body is beautiful. Now, just with what
I've described, you can leave it there, but I want to push this
a little bit further. So this is what I'm gonna do. I'm gonna make everything
invisible apart from the stone. Animals are going to go into the stone because there's
some shadows in there as well in the background,
which I want to get rid of. So I just have the
outline of the stone. I am going to come to
my spanner icon and I'm going to copy canvas and
then I'm going to paste. So I have that entire stone all on one layer
instead of many layers. And there it is,
my inserted image, I will call this base. I'm going to drag it underneath
my silhouette layer, turn it on, and I'm going to clip this layer
to my stone base. The reason being is, what is the inking brush I've
been using DC inks, gauging ski ink adapted. We use one finger to tap. And I'm going to come down to the bottom and I'm
going to extend. Let's make our brush
a little bit thicker. Shall we want to extend the silhouette down a little bit like, what do I do? I'm going to come
around like this, because as it goes around
the side of the stone, you would expect to see a
little bit of curvature. And let's do the
same on this side, curving around like that. Now because this layer is
clipped to my base stone layer, when I get to the border, I can't draw beyond that.
That's what I want. And just scribble. Hi and scribble on. So now I have the
silhouette going around the border of the stone and
I've done that. Come on. Let's turn everything on again so I can see what I'm doing. And if you think that's
looking a bit strange, it's because I've got to come into my stone layer
and turn on the shadow. Now, it looks like it's sitting on top of that
cloth underneath. Okay. I would like a little halo around
the outside of that. So this is what I'm going to do, slide to the left and
come to duplicate. I'm looking to my
bottom layer and let's zoom in a
little bit for this, I'm going to come to Gaussian Blur and I'm
going to slide out. And when I do, can
you see I'm getting a little halo around the
outside of the silhouette. That is because I'm blowing the layer underneath so I
still get the hard outline, but because the exact same image is being blurred underneath, I also get a dark halo, which is not really what I want instantly when
I do this, look, if I slide down
with it set to 0, that outline is
looking quite harsh. But if I slide up
just a little bit, it can really help
to sit your designs against the stone so it looks a little bit more
like it's sitting on it, but that's not where
I want to be now. I want to move it up
to say, let's try 9%. And now if I turn it off, you can see there
is the halo there, but it's still too dark and it's two indistinct, not a problem. I'm going to duplicate so To lay sitting on top of each other and the effect gets stronger. But what I will
do is I'll tap on the top layer and
I will merge down. So there's two layers
become one layer. I'm going to repeat,
duplicate that. So now I'm getting a much
stronger layer and I'm going to merge that down. Now just to show you
what this looks like. If I come to hue
saturation brightness by tracking the brightness up. Can you see now
I'm getting a halo around the outline
of the silhouette. But at the moment,
well, why it is okay, but I'd prefer
something just a little bit more golden car. I would like this to be gold. So I'm going to turn on
Alpha lock for this. If I paint on it, I can only paint where
there are already pixels. I will come to the top and add an extra layer
on top because I want to import
those gold swatches I showed you a few videos ago, but I want them to be on
top of my layer stack, not sitting in amongst
all these other layers. So Insert a File, palette, PNGs, golden, copper. I can make that a little bit
bigger and put it there. Without brush. Do I want I want brushing and I will
go with a soft airbrush, come to my layer which has
the halo effect on it. And I need this goal
to try and match the shading on the stone itself. And if I just make these
layers invisible for a second, there you can see
there is a highlight where I'm circling now, plus there's also shadow areas around the outside of the stone. So with that in mind, control airbrush, soft airbrush, that's good. Come on. We need to make a
silhouette layer there so we know what
we're painting onto. Let's try the third one
along because it's quite colorful and I'll choose
the darker areas first. Now for this, I'll just block
in solid colors for now, just to get the colors
in the big airbrush. Around the bottom
there, I can do that. I will tap a slightly
lighter area now and do this around here. I will make a much lighter
yellow crown these areas. And in fact, I will
come right to the top and choose the
very lightest areas, just where I can see the highlight peeking out
from underneath the stone. Now it's getting there. I just need to do a little
bit of fine tuning here because I think it needs
to be a little bit darker, a little bit sooner
down the bottom. And in actual fact, I think just where
it curves around, it's still looking a
little bit too light. So come here and just make
everything darker like this and get this to match more closely
what I expect to see. I'll make my brush size
a little bit smaller. I'm putting just wanted
to darker areas just around the mouth and nose. But one thing I will do as well. What should I do? A little
bit of reflected light in my brush size, smaller, and just worth just
playing around the bottom and putting
into it a little bit of reflected light
because gold paint is going to be more reflective
than that Matt Stone, even though it's quite
shiny stone and so on. But again, just a little bit
of reflected light just in those shadow areas because it's more likely to pick
up those shadows. Alright, That's a certain
point where the gold paint, I will duplicate
the layer again, make it visible, invisible,
and wanna do that. I'm getting a
sharper outlined or do I like that? Not entirely. What I will do is I'll take the opacity of this
extra layer down to 0 and then gradually sliding the opacity
of this layer. So I can really fine-tune that border where
I want it to be. And I'm thinking no
more than around about a quarter in
this particular case, that's 29 per cent, that's fine. I will merge that down. Then what I'm going
to do if I zoom in, is I'm going to add a
little bit of noise. So when I do that, put
my finger anywhere on the screen and just slide
backwards and forwards. Can you see when I do that, I'm gonna be a slightly
mottled effect. Now I want the noise
to be set down low no more than say, nine per cent. If I take it down
to 0, I'm getting an ultra smooth
gold paint effect. I don't really want that. I want to do a little bit
of roughness in there, but it's gotta be
set pretty low. Print 56, even six per
cent using Cloud scale on 0 Tobin 70 Octavia non is just breaking up the surface of that gold
paint a little bit. Okay, I've got to a
certain point with this. I want to make one or two
changes because for one thing, when people are doing
a stone painting, don't really get a
soft halo like that. It tends to be a harder outline. So what I'm gonna do is
come to my layer 17, which has a gold paint effects. And I'm going to
duplicate that again. And I'm going to merge down. I'm going to duplicate it again. And I'm going to merge down. And every time I do that, that soft fuzzy outline around
the edge gets a little bit harder because around the border there are
semi-transparent pixels. But what I'm doing
is stacking the semi-transparent pixels
on top of each other. And so when you get
a semi-transparent plus a semi-transparent pixel, the border becomes harder. Now I think at that point, that's become a bit too
hard because I'm starting to get it or not very
nice hard edge there. So I'm going to get
rid of that layer. So yeah, in general, I
think I prefer that halo, that because I've
made it more opaque. There's maybe one
or two more changes that I'd like to do to it. So turn the alpha lock on again. Let's come to our brush. What do we have
the soft airbrush? Make it a bit smaller, make it a fairly low pasty, and there's just certain
areas down around about here. I'd just like to fade it
just a little bit so it's not quite as in your
face as it was. Maybe just an area around here for that to be slightly lighter. Now the next thing I'd like
some of the texture of the rock to be appearing
on the silhouette area, but also the halo area as well. And one of the first
things I'm gonna do is I'm going to come
to my silhouette. I'm going to come to
my hue saturation and brightness up the brightness
just by tiny amount. Because as I said before,
when it comes to paintings, you've very, very rarely get
a solid black like that. So looking at it a
little bit too intense. So by default, the brightness slider
is set to 50 per cent. I'm going to up it by
just a little bit. Just fifty two fifty
three percent. Fifty three percent here. That's making that just
a slightly off black. It's a very small thing, but I think it does help. Okay, so the next thing, I want a little bit
of the texture of the stone to be in
that silhouette, plus also the halo as well. So the first thing I do is
I come to my base tone. Do you remember we made
that by making everything invisible apart from the stone and then copy and my canvas. Well, this time, because
we've already got it, we're just going to duplicate that and drag it up to the top. Before I do anything
else, I just want to D saturate this as well. So I just have a dark to
light version of my stone. I'll make it invisible for now. Because the next thing is, I want that new stone
I just created that one to appear on top of the
silhouette plus the outline. I'll do that by using
a clipping layer. But the problem is look,
that's clipping mask. I'll also set this one to
clipping mask, and that works. I have a hard edge, but if I make the base layer visible and I said
that clipping mask, I'm trying to do a clipping
mask on top of something that already has a clipping
mask, that doesn't work. So this is what I have to do. Take this layer, turn off clipping mask that
turns off everything. And I'm left with
this little bit sticking out at the bottom. But that's okay because
what I'm about to show you, I already did on the
gold outline layer. Can you see with that how
it's all nice and smooth? This is how I did it. I come to my base
layer and then I come to my select tool. I make sure that
automatic is selected. I tap anywhere outside
the border of that stone. I get this outline. That is the area
which is selected, which means that everything outside the stone is selected. So then I come up
to my layer 17, which has the silhouette. And I just tap and
come to clear. That clears everything
which were selected, which leaves me with
a nice sharp border. Now, things can start to work. I'm going to make
everything invisible apart from the two layers of the
silhouette plus the halo, I'm going to Copy canvas. Then I'm going to paste. And now if I make
everything visible again, my two separate layers of the silhouette plus
this around invisible. I'm left with this
all on one layer. And now when I come to
my base file at the top, which I desaturated and
come to clipping mask. It only appears where
the silhouette is. Now that's quite hard
to see at the moment, but if I change the
layer blend mode, what did we have before? Lighter color, then
you can start to see it at the moment,
it's way too much. Now, while we're here, let's just take a look at
a couple of other ones. Hard light is
looking interesting. Vivid light, maybe
not linear light is quite interesting as well. I can lower the
opacity and gradually dial in the amount of the
texture highlights that I want. But what I will do is I
will come to lighter color. For this. I will come and
do what I did before. Play around with
curves. And this time, instead of making
everything lighter, I'm going to make things darker. And as I make things darker, just move that new node
around about the mode of this layer I make
darker the more of the underlying layer
is starting to show through like that. And I can fine-tune it
a little bit like this. Maybe around about there. I can jump back in. And it can also be a
pasty as much as I want. If there's certain areas where I don't want it just around, say the cheek area. What I can do is tap on this
layer and come to mask. That applies to a layer
mask to this layer. If I draw in black on my Layer Mask, everything
becomes invisible. And sure enough, if I
open up my layers panel, you can see on my little
icon for the layer mask, you can see those dark
paint strokes that I made. Here's the interesting thing. If I then come back
and paint it white, I can paint all
that detail back in again because this is not
like erasing something. The layer mask just makes things visible or invisible based upon it's got white or
black wherever you paint. That's it. The nice thing is if
I come and paint in black and white in my
brush size larger, but my opacity down lower, I can gradually paint
away the detail, all the pixels on this layer
where I don't want them, maybe make my brush a
little bit bigger and just gradually fade out
the pixels like this. And if I decide, oh, hang
on, I've gone too far. Well, if I was erasing,
that will be tough. I'd have to start on doing. But all I need to do now is choose white and paint
in the same areas. And I can paint the details
on this layer back in. That's the way a
layer mask works. Anyway, I don't want that, so I will come and choose
black again, just faith this. So I can have the detail
just where I wanted an edited all I want.
17. Redoing the Light and Shade: Alright, I just want to
show you a technique to deal with a situation
that you may come across. And I'm going to supply
you with this file after I've done a
couple of things to it, y will become clear pretty soon. So this is, I think, stone 15. And I used one of
the sketches from, I think it was doodles misc, which stands for miscellaneous. It's a painted person. And the process I use to
get to this point, well, we've already done that, so I'm not going to do
the whole thing again. Instead, I will just quickly talk you through
one or two points. I brought in the doodles
sketch, I resized it. I use that as a base and then I put down my ink
layer just quickly. I am going to unclip this. And can you see just around
the outline of the stone, I put a solid line so the whole area is
completely enclosed. The reason I did that is
because I made the ink layer a reference layer like we
did in a previous tutorial. And so I could use it to create my various different
locking layers and then flood them
easily just by dragging down my
current color into the area I wanted to
flood if I hadn't put those black
surrounding lines around the outside of my
stone when I tried to flood, I get loads of areas flooding, which I didn't want to flood those lines around
the outside just to contain the flood so I can float in the various different
areas efficiently. Now I've explained that Let's
take our reference layer and let's the clipping
mask back on. For the swatches. I imported the Golden Age
swatches and use that as a basis for the various
different colors for the brush. I just used the
simple soft airbrush from the airbrushing brush set. I'll just add brushed in the
various different areas. And I used alpha lock all my various different
blocking in layers and I call it everything to
this layer hole stone. And that was where I
took the entire stone, but I made the shadow
invisible plus the word plus the
background color. Then I came to my actions. Underneath the Add tab. I did copy canvas to copy
everything that I can see, and then paste, then
turned everything back on. And so I have my whole Stone which I renamed to all stone, and they use that as a
basis to clip everything. So I end up with this, okay,
I've done my painting. I had some fun with it, but it's completely flat. The stone itself has a shadowy area and
the highlight area, but I wasn't
concentrating on that when I created my artwork. So the shadow to the side of the stone is
helping a little bit, but the whole thing
looks way too flat. What do I do? Well, the first thing I'm gonna do is get rid of quite a few of my layers because the
fact of the matter is I'm using an iPad Pro, which is a couple of years old. And so the memory
is not bad there, but I'm starting to run
into memory problems. I simply have too
many layers as well. I'm not going to send
this file to you as it is because some of you
may have older iPads. You may have an iPad
Air, things like that. So there's no point you won't
be able to open the file. But what I'm gonna do is
decide what I can get rid of. Well, I've already
got my colors, so my swatches
layer that can go. But the main thing is the stone. I already have my entire stone
on my highlighted layer, also my stone group with all these various
different layers on, it's now completely invisible. I don't need this anymore, so I'm gonna get rid of it. But just before I
do, I'm going to come down the bottom in check because right at the
bottom I have shadow. I don't want to get rid
of that because look, if I do, I'll just make the entire group
invisible for a second. I lose the shadow and
it looks even flatter. So come down. I'm going to tap and hold on my shadow layer and just drag it down until
it's out of the group. And so now I can go
up to my stone layer, slide to the left
and tap on, Delete. So now I have a lot less stones. That is good news. So I
will come to my gallery. I will rename this
to fine face 01. That is the one I will share
in a Procreate file format. Airdrop Simon's iMac. That is now sand, tap on Done. So now I can carry
on working on it. I'll just be completely paranoid and slide to
the left and duplicate. So in case I mess this up, I can always come back and
show you all over again. Alright, the next thing
I want, light and dark. Well, one of the aims of
this course was to give you a little bit of a masterclass
in layer blend modes. We've used them all
the way through here and they can be a
bit confusing at first, but hopefully, as we've gone along and you've
used them more and more, you're starting to get a
feel for what they can do. They can make things
lighter or darker or more contrasty or
things like that. I'm going to use them again to quickly create some dark
and light for this image. The first thing I'm
going to do is get rid of everything that
isn't the actual stone. That means getting rid
of the background color. Oh yeah, and definitely
get rid of the shadow. What I'm looking at
now is a mixture of the whole stone layer
which everything is clipped two-plus by blocking in layers 1234 and my ink
layer at the top. That's good. So now I'm going to
come to my actions and come to copy, canvas and paste. So now I get everything
all on one layer. I'll make my layers
visible again. Actually, I don't need to make the background color of visible because the word layer is
covering everything anyway. My shadow layer visible as well. And just to keep things a little bit neat, I'll come to my house, don't swipe to the left is select all the
layers which made at the Stone originally,
put them in a group. And I'll call the group
height because I can hide it. Because everything I want is
on my inserted image layer. I'm going to rename
this to safety, and I'm going to duplicate
it and call this one base. I don't need to do that. I'm just suggesting
another way for you to work where you name
your safety layer, the layer you do not
touch in case you mess everything up as
your safety layer. And then the layer
above that will be the base layer on which
I build everything else. Okay, just to be sure, I'm going to slide to the left and I'm going to
unlock my safety layer. I will also make it invisible. Okay, next thing,
I'm going to come to my base layer and I'm
going to duplicate it. And for this, well, what
are the problems I've got that this is too
smooth on a stone. You would expect to
see a little bit of a texture even on a smooth
stone just a little bit. So let's add a little bit, come to our adjustments and I'm going to
come down to Noise, our slide my finger
from left to right, anywhere on the screen
to get the noise. Now that I think he's
gonna be too small for me. So I will come down
to the bottom and I'll move my scale slider
up by quite a bit. Maybe to about what, 27
per cent. Yeah. Okay. I can do with that.
Let's yeah, 28%. Now the type I'm using Cloud, well, what about
the other kinds? Pillows, ridges? Which one? I think for this? Well, if it's below, it's
going to have to be bigger. Now the turbulence I do
want set fairly high. If I said it will allow
you're getting like little cells rather than
it being broken up, I need to be more broken up. So I'm going to raise the
turbulence up by quite a bit. So I've got a bit of a
stone texture there. And I've got the overall look, how much noise do I want? I'll come back to my main
screen and just slide my finger up or down a
little bit until eventually, I think maybe, maybe
around there, 17%. Yeah, I'll go with that. But then I'm going to tap
my adjustments and tap my adjustments again because I want this a little bit blurred. This is too crispy for me. So it goes gambler
just by a tiny amount. So the finger on my
screen and move it. Even 3% is too much. Let's try about 2%. Yeah, I'll go with that. So compare that with
what we had before. That's looking very
crisp and smooth. That's just a little
bit more broken up. Let's move this
just to the side. And from here, let's give
this a name so I can say the name of the
layer so you know which layer I'm talking about. Let's call this noisy. And now I'm going
to duplicate noisy. I'm going to rename this to darken because I want
this to be my shadow layer. So tap on the N or the mode was set to
normal layer blend mode. But any of the blend modes above their dark in color
burn, linear burn. They make everything darker. Look about Linear Burn is dark. Color, burn a bit too strong, darker and we went over
darken in a previous video. The one I'm looking
for is multiply. Now the image itself is, it's bright, it's colorful, but I want an idea of
realistic shadows on a stone. For that, you'll find multiply
gives you good results. But as you can see, it's
covering everything. But this is where it
starts to get interesting. Tap on the dark and lab. We're going to come to mask. When you do that, you create something called a layer mask. On what the layer
mask does is show or hide bits of the layer
it's attached to. In this case, the
darkened layer. At the moment, it's just
a load of white pixels. Now when it comes
to layer masks, white reveals, black conceals. And I will show you what I mean. If I come to my Layer Mask, I'm going to invert it so that instead of being
filled with white, it's now going to be filled with black and the whole
layer becomes invisible. That's because black pixels conceal whatever is on
the darkened layer. But let's check. I've got my soft
air brush selected. I want it to be, I make the opacity fairly low so
I can build the effect up and I'll start off with
my size being pretty big. Now Fill Layer
Mask is covered in black pixels and it's
hiding everything. And I want to reveal
parts of this layer. And they come to my colors. And I choose white because
white reveals black conceals. I'm going to make some
brush strokes in the bottom left of that stone and watch
what happens when I do. Can you see that? I'll make my brush really, really big because I want a
fairly broad shadow here. Like this. Remember our size
a bit smaller because also I want to go around just
the outside in general. The shadow quite small and
tight around the top right, but I want it to be bigger and broader around the bottom left. Now let's take a look at
this now, before and after. This is without the shadow. This is with the shadow. And you can see I'm definitely
getting a shadow there. Now just while we're
here, let's work on a couple of things because
one side effect of using layer blend
mode is that it can affect the saturation
of your image. If you take a look at
this before, after, because it's darker, those
colors have got more intense. But here's the thing. I'll go into my darker layer and I will come to my Adjustments, Hue, Saturation and Brightness. If I come to my
saturation slider and slide it all the way down, can you see how all of
a sudden I'm getting much more realistic
colors in there. And what I will do is I'll bring up the saturation a little bit because that's what
we had before. We're really quite intense. That effectively is
turn that layer into a black and white layer and
things look more natural. I want to make
this just for now, a little bit high
again because I just wanted to show you a
couple of extra things. Do you remember
her saying how you can get cool shadows
and warm shadows. If you come to the hue
slider and move it around, you can get warmer shadows. And you can get cooler shadows. And you can control how
saturated the shadows. I like this.
Supposing your side. Well, that's nice, but I'd like the shadows to be
a little bit deeper. You can affect that with
the brightness slider. And you can make things
really quite deep like this. And in fact, that might
be a bit too deep for me. So what I'm gonna do is
I'm going to accept that. And if I tap on my layers panel, make sure my layer
mask is selected. But now I want to do the other really nice
things about layer masks. I reveal the shadow areas
by painting and white. Now I'm going to
choose black again. I brushes selected. I want to set my brush opacity, really, really low price
side, nice and high. Again, I'm going to start
working from the center of the stone outwards like this. I wanted it to look. I'll
make it really obvious. I'll crack the opacity
right the way up and I will look at that. I painted in black
and that top layer, the darker layer, got concealed just in that
brush stroke area. And so you see the underlying
layer which is lighter, two-finger tap to undo that. Instead, I'll lower my opacity down my brush size,
nice and big. And I just want to
remove a little bit of a deeper shadow just from
the main part of the stone, but I am going to leave it
just in the very bottom left to be pretty dark because here's the
other thing as well. I'm set to multiply. I played around
with the opacity. I played around
with the lightness. I played around with
what colors are there. I played around with
the saturation of it. I played around with how cool
or dark the shadows are. But I can also take the opacity right the way down
to 0 and gradually bring up the slider to dial in the exact amount of
shadow that I want. So I'll stick around
what, 60% for now. Let's take a look
before and after. Without the shadows.
With shadows. Alright, well
that's the shadows. Now what about the highlights? Let's come to our
noisy layer again, and I will make another
duplicate of it. I'll drag that up to the top. I will rename that
to highlights. And this time, instead of using one of the
darker blend modes, guess what I'm gonna
do? Tap on the end. There's a whole load of
a lightened blend modes, lightened screen,
color, dodge, add. I look at some of these
colors, lighter color. Then you've got the
contrast layer blend modes, but we're not talking
about them now. All of these screen is good
for natural highlights, so we'll go with that for now. We can always take a
look at it again later. But as before, tab and
press mask as before, we will come and
we will invert it. And then we will do
what we did before. The layer mask is selected, not the highlights layer. You don't want to be
painting on that layer mask. For the highlights
layer selected, I will come to
white because white reveals highlight
about that size, a pasty about what
let's go with halfway. And now I'm going to
brush in just around the right eye of this
character in the picture. And I'm going to gradually
build up the brush strokes just around the
eye area like this. Let's make our
brush size bigger. I wanted Rod highlight here and can you see that just
slowly coming into view, I'll make my brush size a
bit smaller and just get a little bit of light
just down the bottom. Let's take a look at what
we've got so far before. Without the highlights. With the highlights,
I want a little bit more just around the top. And while on Halo,
I'm just curious, I'm going to make my
brush size smaller. I can dance the bottom. Maybe I can add
just a little bit of reflected light there. In fact, come on,
What am I doing? I'm doing this little
thin line there. Come on, let's make
our brush size bigger. And just make a bigger
brush stroke like this. So I get a smoother
effect and then just swap the colors
over because I keep on telling you no brush mark is permanent and just
brush on and brush off. I'll follow my own advice. Here we go. Alright, let's see
what that looks like. Before. And after a year, I'm definitely getting a
lighter effect while I'm here, let's take a look at the various different blend
modes that I've used. What about Color Dodge? That's a little bit too bright. What's it look like if
I lower the opacity? Now I'm still getting blown out. Areas on the eyelid,
for example. Add what's that like? Well, actually no, I
do quite like that. But again, it's a
little bit too bright. I could always come back in
and paint that back out. I think I'll stick
with screen for now. Let's take them up to
maximum again, allocate. Let's come back. Let's
choose the highlights layer, not the layer mask,
the highlights. As with the shadow layer, I can play around with
the brightness to make the overall
effect just brighter. That's interesting. If I think it's a
bit washed out, I can always increase the
saturation of it to taste. I can decrease it. Desaturated highlights,
but I don't wanna do that. I want to make it, if anything, a little bit more saturated because more light
falling on that area. Now what about altering the hue? I can make it warmer or
I can make it cooler. I might consider making it
just a little bit warmer, just in that area for
a warmer highlights. Now, is that everything
I wanted it to be? Yeah. I'd like it to be
bright and colorful, so I'll keep the
saturation of light, the overall effect
brighter or darker. Look, here's the thing. I can also make it
brighter like this. Then if I decide I
want to tame it, I can just come to the
actual layer and I can alter the opacity of
it overall like this. So let's take a look at this. Let's choose our darkened layer, slide across to
select my highlights. And I'll put them
inside a group. And if I make the
whole thing invisible, That's what we had when
we added the noise layer. This is what we
started out with, all of a sudden looking very flat in terms of
light and shade, but also in terms of texture. So that they're, now if I want, I can always play around
a little bit more. Take our noisy layer that
is set to maximum opacity. I can always fade it out just
to get rid of the noise in certain areas if I want or
make it less in certain areas, just a very things a little bit. And in fact, I've just decided that little bit of reflected
light in the bottom right. I don't really like it. I think it's making
the stone look a little bit flat on the edge. So that was from the highlights layer that I want
the Layer Mask. I painted in white to
reveal the highlights. So now I will paint in
black to conceal it again, That's looking at bit more
how I want it to look. Alright, so there you go. There's a very, very simple, straightforward way of
adding some light and dark. Now I suppose I could have
done it by putting down light or dark paint strokes on the same layer as my base layer. But this way it's just given me so much more
flexibility because at anytime I can come back
in and I can alter how intense I want
the shadow areas. I can change the color
cast of the shadow areas. I can have more of
a shadow or less of a shadow by painting
on my Layer Mask. And the same thing
with the highlights. It's just so much
more flexible and you get plenty of
interesting effects. So in case you do a complete
cover of your stone, this is how I go about adding
shadows and highlights. Okay, Let's wrap this video up.
18. Paint a Butterfly: All right. Shall we do one more? Yes, Let's do one more. And for this one, I think
I'll choose stone number six. So I will slide to the left
as before and duplicate it. Then take my duplicate out, drop it down, open it up, and we are ready to go. Let's just rewrite this
slightly off to one side. See what's happening here. I think for this, I'm starting to get a
little bit concerned about the sheer amount
of layers I'm using or whether your iPad
can handle this. So what I'll do is I'll
come to my stone layer. I'm going to take the
shadow out of this layer, which managed to go
into a new group. That sometimes happens.
Let's deal with that. Just two-finger tap to undo and let's take
shadow out again. No, not on there. Try give in-between. There you go. So now I'll tap on the stone icon and
I will flatten this. So now I have the entire stone
with a shadow underneath. And if you're flattening
layers like I'm doing now, I suggest you do that. And the reason I'm doing it is because after I've
done this project, I wanted to take the various
tones that we've done on the course and put them
together in one image, you have a group of stones with various paintings on them. And the shadow is
going to vary from the various different stones
that I already painted, but I need the shadows in the group shots
to be consistent. Let's create a new layer
and let's insert a file. What are we going
to use for this? I fancy doing, I remember
doing a butterfly now. Which one is it? I think
that is in animals. Is it doodles animals? Is there a bit difficult
to tell because I should have put on by masking
layer. Yes, it's there. I can just see it but come on. Let's get into a good habit. Before we do that,
let's clear this layer, then select white
and I can flood or I can just come
to Fill Layer. And that achieves
the same thing. Let's drop the opacity
down a little bit. So I can see more
clearly what I'm doing, choosing new layer and I'll choose doodles,
animals again. Now I can see more
clearly what I'm doing. So I'll move it
around like this. Now, I'd like this
to be completely horizontal and vertical because I want to use the symmetry tool, but that's not so easy because I'm moving it
with my fingers and it's very difficult to get
that little dotted line, completely horizontal
or completely vertical. So this is what I do. I come down to where it says
snapping and I turn that on, or what I want is
magnetics turn that on, then I have to tap
away because if I try and resize this without
little pop-up there, I just move the whole
box around like this. So I need to tap once just
to close that settings box. Now, can you see how
I'm getting a sudden, rather jerky, snappy movements. That is because that butterfly
is getting snapped to either 0 degrees or 50
degrees or 30 or 45 degrees. So that can be useful. Now I know I'm making this butterfly bigger than
the actual stone underneath. But what I want to do is create the entire butterfly than I'd like to try and get
the two wings so that at an angle with a
shadow underneath. So I'm going to be
resizing this anyway. And if you're going to do that, especially if you're
working with sharp edges. Like I am working
with sharp edges, make the artwork you're working on larger than the
finished image. Ignore size things down. You don't get much of
a loss in quality. But if you make things
very small like this, and then try and make
them bigger afterwards, then you risk getting some fuzziness around the
edges of your artwork. Make it nice and big like that. So just tapping my Layers panel and there's my basic sketch. Okay, so the next thing I
want to layer in, don't I? Create a new layer? I'll rename this
layer to ink 01. And that's for our brush. Well, if you remember
a few videos ago, I did create my own brush. I'll be using black as well. But here's the thing I
was talking about using the mirror function
so I can draw the two halves at the same time. To do that, I need to
come to my spanner icon, what we call it a
spanner in the UK, you might call it a wrench, but let's be all
official actions icon. What I want is Canvas and
I want the drawing guide. There we go At the moment
is set to grid and you can see that fine grid overlaid everything.
But I don't want that. I want symmetry turned on. So can we choose symmetry?
And there it is. But you can see the problem is, it's off to one
side a little bit. That is not a problem. Look, just zoom right in
and you see the little dot. Just tapping my dot and just
drag it to where you want it to where you want it to go. And I think for me that
is about it, about there. Let's zoom in even more. It's not really going to matter because I'm only going to be concentrating on one side of my drawing and the
rest will draw itself. So I'll come to Don for that. Oh, that's interesting. I accidentally managed to change the color of
my symmetry line. Look, I'll show you that edit drawing guide zoomed right in. Instead of tapping on Done in
the top right-hand corner, I moved the color slider for the symmetry line
around an accident. He made it very, very
light like this. Maybe you can't see that now. I'll make it a
little bit thicker and a little bit more opaque. There you go. There's a symmetry line
with me able to see it, but I'll make it a slightly
different color to the black that I'm doing. Tap on done. And yet now we can start. Alright, I'll let go all
inky with Gagarinsky. The final thing you
have to do to make sure you're working
with the mirror drawing aid or the
perspective drawing aid or the grid drawing aid is just make sure you have Assisted on the layer that
you want to draw on. If it's not, well, you can see Drawing Assist. It's toggle switch just
in the Layers menu. Alright, so let's come
and take a look at what size do I want? I've got my two notches, Juan, set to 8%, the other
one is set to 12%. For this, what I
want is to have, well, we call them
red Admirals here. I don't know what you call them, but it's basically
a black wing with some orange and white
patterns there. So for the outline
at least I don't really need to worry about
the width of my price, so I'll make it a
little bit smaller. So if I walk crisper edges, I can get crisper edges. And look if I do this, I'll quickly trace along the
side of the wing like this. And you can see if I do that because mirroring
is turned on, I get two brush strokes
for the price of one. Great, good times. Now let's double-tap
to undo that. Make this as big as I can. If I make my brush
stroke like this, you may find when
you're doing this that if you're a
bit unconfident, your hand gets a little
bit wavy because you're going quite
slow like this. And certainly for the
wings around the outside, I'd like this to be
a nice smooth line, double tap to undo. And I'll count my ink
brush. I'll tap on it. And I'm in the brush studio. If you want your brush to
have smooth brushstrokes, you come to the
stabilization tab. Now at the moment,
for another project, I turn the amount
up quite high, 63%. If I turn this down to 0, and I'll make a slightly
jittery line like this. That's with no price
stabilization. If I take the
stabilization amount up, can you see how the brush start smoothing out into a
smooth brushstroke. And the higher the value, the more the stroke
gets smoothed out. And if I make another
brush stroke, you can see it feels a bit weird drawing
with the stabilization set as high as 100
per cent because it's trying so hard to smooth out the brush strokes
you're making. It feels like you're
trying to walk around a very excitable puppy
on a very long lead. It goes more or less
where you want it to go, but all over the place
while you're doing it. But if you take your
stabilization down to nothing, your brush stroke goes
wherever your pen goes. But I do want a little
bit of stabilization. There's various ways to do it, but stabilization is probably the most straightforward
way of doing it. Because what that gives
me the ability to do is if I draw a fairly fast come on, let's clear our drawing pad. If I make it fairly fast stroke, it helps move things out. But if I make it faster, I
can certainly slowed down. I can always get sharper
corners like that. And it's simply a
case of rocking the stabilization around took place that you'd like for now. Look, I'll just take it around halfway and see how I get on. Now with the
stabilization turned on, Let's try my brushstroke. I'll try and do this in one. If I don't like what
I came up with, I'll just erase and
start doing it again. I'm telling you that from now because especially when you're starting out or you're not
that confidence at the moment, the temptation is
to go very smaller, do little scribbly
strokes like this. Now with other circumstances, doing a little
line with a lot of angles on that, I
can look great. But certainly for
the wing pattern, I need this to be fairly
smooth for most of it. And I'll show you what
I mean by that because I will make my brushstroke. I'm trying to make it
fairly fast, fairly smooth. Er, when I get to this point, I want to start putting in
one or two little sharp edges like you to get on a butterfly
wing. I'm right handed. So it makes sense that I
draw on the right side of my mirror because I can see the brush strokes that are
making much more easily. But when I zoom in like this, this curve underneath it is going to be difficult
for me to do because I'm using an unnatural movement
of my hand. Think about it. Get your Apple pencil. Any pencil or brush or
whatever in your hand. Most likely you'll find
there's only one way to make a natural
arc with your hand, because your hand pivots around your wrist in a particular way. Try and do it any other way, you can have a problem. But the good thing about
using an iPad and procreate. You can tilt the iPad, but you can also rotate
your canvas just by putting two fingers
on and moving it around. So you can always
get to that position where your hand draws a natural curve like that. Alright, I'm quite
happy with that. And I have mentioned
this before, but I'll mention it
again when you're doing these kinds
of brushstrokes, it is a good idea. Put on some relaxing music, ideally without words
so they don't distract. Just get your breathing
nice and slow and even against self into a calm state because
when you're turns, it's very easy to make
timid brushstrokes. Ideally, what you're
going for is just nice and relaxed. Like that. And I didn't talk while I was making the pro stroke because I just needed to concentrate entirely on what I was doing. And if I'm going to
concentrate on anything else, It's just breathing
slowly and carefully. Remind yourself
before you start. If you make a brown
brush stroke, you can always
two-finger tap to undo it and start again and do as many brushstrokes
as you need once you realize that you will start
to work with confidence. And when you're doing
smooth sweeping lines, working with confidence
Is everything. Alright? Let's move this
around so we can use a natural curve of my hand. You'll notice when I did that, I didn't talk again and I did very brush stroke a little bit, but I stopped at the point where the brushstroke would have suddenly started getting awkward and I couldn't see
what I was doing. Instead, let's make this as big as I can and just carry on. Didn't quite join
up nicely there. So two finger tap to undo
because I can there. I'm going to close these off. So that should they
have any to flood I can without the black spilling absolutely
everywhere arcade, that is the basic
outline of the wings. So now I have a choice. I can either flood
everything in black, then erase the bits
out of the middle of the wings using the same
brush but as an eraser, which I can do just
by pressing and holding on my Erase tool, which sets my arrays to whatever
my brushes or I can come in like this and
then start drawing the shapes are like this. Either way there is a fair
amount of work to do here. But whichever way I
am going to do it, I'm going to take my layer five, which is my sketch layer, and drag it so it is on
top of the work I'm doing. The reason being is once
I make my black ink mark, I won't be able to see my sketch if it was underneath
the ink layer. So this way, I always have an
idea of where the sketches, you do have some fairly
small shapes here. So in the case of this one
which I am circling now, bear in mind that the shapes
are gonna be visible. But in between the shapes, those are the areas that are
going to be filled in black. So if you work to the inside
of the shape like this, you're going to end
up with a very, very small area there. And I'll show that to you if
I just flip this in black, suddenly goes way too dark. So I'll undo that. I'll undo that. And
one thing I will do is come back to my ink layer because I made the
classic mistake of making brushstrokes
on the wrong layer. Let's do that again. I can afford to have a
lighter touch like this. So that now when I flood, you get a much more
realistic shape. And it's only the inside of the outlines that
I'm doing that matter. The outer bits,
they're going to be filled in black so
they don't matter. Anyway, this is a
fair amount of work. So I think what I'll do is
speed up by quite a bit.
19. Ink in our Butterfly: Okay, I've got to a certain
stage with this now. You'll notice that I didn't do those little circles
just on the outside. That is because
having to go through every single warm like this, I think it's gonna be
a lot quicker just to flood the area and then just use the erase tool to hollow out those areas. So I won't do that. Instead. Drag and drop, like we've
done a 100 times before. Take the threshold as high as we can get it
so it completely flood and just drop it back by as little as
we can get away with. So we don't get any
little ghost edges just around the outlines where the flood tool didn't
quite loud enough. Let's try the other 100%. Then. I get back just
a tiny little bit. That way you will
get clean floods. Alright, now I did say put the sketch layer on top of the ink layer so
I can see things, but it's not very clear at
the moment because it's a dark brush mark against an
even darker background now, so let's just come to hue saturation and brightness
brighten up a little bit. Now I can see what I'm doing. So Anxur want assisted my Erase
tool because you can ski, I think adapted
That's what I want. The same brush I was
using all along. That stabilization
which I added, is possibly going
to work against me now because I just want to do simple round lines or maybe with a little
bit of character. And when you're working
in a small area like I'm doing now with all
these little circles. That stabilization is
going to work against you. So just take it down to 0. That is another point. The better you know
the brush engine, the more you can ride
the sliders to find you in the brush for your
needs as you go along. And just in case you wanted to learn about
the brush engine, my solid foundations course has possibly the biggest tutorial
on the brush engine, but certainly I've ever seen. Anyway, let's come
in and carry on. One thing I am going to do, It's trying to make
a little bit of character rather than just
a brown dot like that. I can have a few of them, but I just want to have
something a little bit more blobby than around circle. Because in nature, things
aren't really perfectly around. They are blobby. That's the technical
term for it, by the way. With no idea what
he's talking about. All right, I've done
that. Let's check that by turning off my sketch layer so I can see things
more clearly. And yeah, I quite like that. But what our sketching I was
working my way through what, 72 different sketches and they'll come certain points
where I think will come on, I've got deadlines I need
to crack on with this. So they'll reach a certain
point where I stopped. But with this, because we're
concentrating on this piece, I just want to
experiment a little bit. So what I'll do whenever
you experiment, duplicate the bottom layer invisible and it's
going to come back in. And I'm just going to add a
whole load of smaller dots. I asked you tend to
get with a butterfly. Okay, there we go. I'm not sure whether I
will use this in the end. I'll see how it goes because
the good thing is I always have the spare layer from
the couple of minutes ago. Should I change my mind? Okay, now the very
last thing to do this, I need to have the body. And I think for the
body first thing. Let's make this a
little bit darker again so I can see the body, but I think it will have the
body on a separate layer. I'll make it assisted. Because I may want to do
things with wings afterwards. I don't want the body
getting in the way. So just the outline. This shouldn't take too long.
Actually, you know what? I'm back to my brush.
What did we say? Or ride the sliders
on your brushes? Well, let's do that so I get
a slightly smoother result. It doesn't matter which side of the symmetry line you draw on. As long as you're comfortable. Don't like it. Go through, make it thinner to a point
and then back on itself. Come back in and just erase
the bits that I didn't want. Bit difficult to see that. So make everything invisible. Make sure they're selected. If you're a Lepidoptera just, I'm sorry about the
inaccurate anatomy. But really, again, I went
off the sketch a little bit. But when you're inking in, you may have one or two ideas because you're taking
your time to ink. In which case, great. You don't have to follow the
sketch slavishly. Let's turn on my top layer. Turn off my sketch layer. And there's my butterfly
ready to go off to you. I don't need the
sketch layer anymore. I'm gonna get rid
of it because I do want to set this off to you
so that you can work with it. It is going to be a big file. So let's just save
whatever layers we can let come to gallery. Let's rename it. Butterflies 01. Butterfly first. I hate it when Apple helps
you with your spelling. No, I like it when it helps
you with the spelling, but I don't like it
when it comes up with creative
alternatives, suggestions. So share that Procreate format. Airdrop, Simon's iMac, and that will be waiting for you at the start of
the next lesson. And I will see you there.
20. Block in our Butterfly: All right, by now hopefully
you know what comes next. We need to block in our layers. So let's come to our layers. Powell are actually, you know what Freud
or anything else. I'm going to rename
this layer to body because that is the
body of the butterfly. And I've got a feeling
that I'm going to be using quite a few layers
on top of this. And I'm a little bit
worried about you're running out of memory as
you're following along. So we'll look, do I really need this white
layer underneath? Because I don't need to
see my sketch anymore. So let's get rid of that. So one less layer
to worry about. And let's create a
new layer on top. And I'll rename that to be 01, standing for blocking layer 01. And I could do with some
colors as well, couldn't I? So let's come to
the wrench icon. Insert a file or which one
of these Hammond I used yet. Okay, let's try the
oil hue, swatch 01. Let's make it a
little bit bigger. I think for this, I'll
pick colors from it and then just make
the layer visible or invisible as I need. So which of these colors do
I want for my butterfly? And I realized I call this
butterfly or red admiral. I think I got that wrong. I think it might be
a monarch butterfly. So for anybody I've
mortally offended. I do apologize. I love these colors while
he can't see the writing, but that's cadmium red light right up at the top
right-hand corner. I've used that as the base
color for most of the wings, but I think for this, so I can show you another
way of doing things. I'll stop layers on top, on my blocking layer and use
different layer blend modes. So make that layer invisible. And what an idiot, I created a new layer, I renamed it to blocking in 01, and then I imported in
my color swatches there. So create a new layer, and let's call this one B, L 01. And so we don't get confused, come to this layer
and call it swatches. And let's drag that
up to the top of. Here's an idea that slide
across and let's lock this layer so that I can't make any further changes to it. And through this course, occasionally I do
make a mistake, and more often than that, I make a deliberate mistake for the simple reason that
they are the kinds of mistakes you are very likely to make when you are
doing your own work. So, you know,
you're not the only one and what to do about it, then it's all for the best because I'm about to
make another mistake. But let's move on to that. Okay, So I need a blocking
in brush will look. I've got my Kaczynski
ink adapted brush, so I'll just use that. Come here and start to
fill in this area here. It's not all orange. There are some areas of white. So I'll do that on a
separate blocking in layer. But for now, let's try and make sure the areas I
want to keep white, like those little
dots I'm avoiding at the moment aren't
covered by this. And take this down to
there to close things off. At dragged down. Threshold is on 56.9. Let's crank it right up
until the early floods, everything and it
didn't. So that's nice. Let's come down a
little bit more because I still have this bottom
wants to do, don't I? Take it round like
this and plot this? Let's come to here. Just draw around
the shape that I want to flood in orange. Now I did accidentally
go over something. I didn't want to come
to my Erase tool, press and hold until I arrays
with the current brush, which is gonna be my
kitchen ski brush. If I'm pronouncing Gish and
ski role, I do apologize. Let's finish off. Let's try and avoid
that little dot there. Flood. The last bit. There we go. I think
we're good to go with that camera around. Hi, you go. There's the next mistake
I made because I didn't have Assisted
turned on for this layer. So I didn't mirror the artwork. And if I turn on drawing
assist at this point, well, it won't magically copy everything on one side of
the mirror to the other. And if that happens to
you, then just come, I'll turn off drawing assist on our slide across to the left. And I will duplicate this layer. Then I will come to
my transform tool. And just at the bottom, you can see it says Flip
Horizontal. I'll do that. Let's zoom in a little bit so I can see more clearly
what I'm doing. I have a couple of videos ago, I turned on snapping
magnetics and that is good because
now if I drag over, Can you see because I have
biometrics turned on, I have that little blue line
going across the middle of my screen that lets me know
that this area of orange, which I'm sliding across, is staying on the
same horizontal axis. Oops, I've pulled down too much. I got that, but if I
bring it back up there, so now I only have to
worry about fitting this duplicated shape and
getting it right horizontally, rather than having to
worry about the vertical. And that would make
my life difficult. So what I'm looking at is that little point
which I'm circling on the one side and try to
match up to the other side. Can I zoom in? Now I can't. It makes my Transform
Shape bigger. Double tap to undo that. Just try and carefully judge
this about they're not up on my layers and just merge down means everything's
on one layer. I don't think I'm going to be drawing on this layer again, but just in case, let's turn on Drawing
Assist just for that lab. Okay, so now I need one more
blocking in layer four, what are going to be
the little white dots? And so tell you what, let's not make the
same mistake again, let's come and choose
Drawing Assist. So now I know I'm gonna
get everything mirrored. Now what color do
I want for this? Let's turn on our swatches. And I think for this, I'll choose zinc white is white but with a slightly
pink tint to it. Turn this layer off. Layer nine, Come on, rename it be L 0 to
standing for block two at. That's just start scribbling in various different
areas like this. I don't want to get
to the larger areas. Just draw out a shape like this. Flood the area. Take it up to a 100%, then drop it down a little bit. And with this, you may notice
that suddenly I might speed up my brush strokes around the
time that I'm not drawing. The reason for that is that I'm speeding up the video
because one of the things about doing videos like
this is to try and stop people from falling asleep in the middle
of what you're saying. So if I can speed things up to save you a bit of
time, then why not? Like I just did that. Okay, that is done. Let's take these and
drag this underneath. My two layers are just
little while I'm here. I'll do the body as well. One more layer, PL 03. And this is going
to be for the body, nor can we shall
use for the body. I think I want something
pretty neutral for this because they tend
to have darker bodies. I will go with the charcoal and I will go with darker version about there. Let's turn on assisted just to save me a
little bit of time. Oh, and also let's make the inking layer invisible so I can actually see what I'm doing. Okay, that is the inking in. Let's make a start
with the painting.
21. Paint our Butterfly: Okay, let's start painting. Let's come to our layers. Let's do the orange bits first. Now the simple way
of doing this, which we did when we
did the icecream, is to turn on alpha lock and then just paint
on that layer. But I want to show you a
different way of doing things. It's more advanced, but it
offers a lot more flexibility. So I'll turn off alpha lock. Just to make a point with this, I'll create a new layer. I'll turn on clipping mask. One idea, you get that
little arrow which points downwards
about little arrow is telling you that layer 11 has been clipped to the
blocking layer 01. And what that means,
look, if I turn off the layers above and I
have my layer 11 selected, if I turn off clipping mask
and I'll make a brushstroke. There's my brush stroke. It goes everywhere. Two finger tap to undo, put every turn,
clipping mask back on again and make pretty much
the same brush stroke. It stops. What clipping mask means is that you can
make brushstrokes, but they'll only
appear where there are already pixels on the
layer that is clipped to. In the case of this layer with
the orange blocking here, I turn off clipping mask. You can see I did make
a whole brushstroke, but if I turn it back on again, look at that, it
gets made invisible. I'm going to clear this layer
and I'm also going to tap again and turn on Drawing Assist so that I can
do this symmetrically. Turn on my ink layer. So now, because I've done that, I can make my brush strokes quite freely knowing
that they're not going to spill out over the edge of the butterfly wing. Now I could come and I could
choose a color from here, supposing I wanted
some lighter colors. So I can, when I choose. Very hard to see. Let's try it. Let's try zinc yellow,
the standard tone. Make this invisible. Come here, choose a brush. And I think for
this, I want to lay down the big areas first. So airbrushing, soft
airbrush that suits me. A pasty set too low. And my size that's pretty big. And then I can just build
up areas like this. But instead, I'll come and
I'll clear that layer. And I'm going to change
the layer blend mode because a very common way of working that people
who know about it is to use your
layer blend modes. Now if I want a lighter effect, I've got what lightened screen color dodge
a lighter color. But underneath that. Just to remind you they are the contrast layer blend modes, which means if I
paint a light color, it will lighten
everything underneath. If I paint a darker color, it will darken
everything underneath. And so sometimes
people might choose a layer blend mode
and you have plenty to choose from overlay soft, light, hard light, like
the light pen light. For this, I will go with
vivid light because it gives quite intense highlights
and shadows make my brush size and
nice and big my pasty low because I gradually
wants to build this up. And let's start putting
in some colors here. I'll make the bottom wings
slightly lighter overall, and I'll make the top wing
lighter in one or two places. I would say my slides down, my pasty up a little bit. Because I noticed
that they do get some more other
interesting variations just in certain areas. Maybe some people know why. The butterflies
definitely know why, but they're not telling us. Okay, I'll go with that. And already it's starting
to look quite nice. Then let's choose a color
for some of the shadows. Now I think a vivid color light your cadmium red alizarin ones. I think those are
going to look too saturated. I don't know yet. I haven't tried it. Let's try a slightly less saturated color. Let's try it venetian red. I choose one that's slightly
darker shades of it, make my layer invisible. Let's take a look around here. I want my brush size set fairly small for this and pretty low. Now let's just come around the
edges of that bottom wing. And you can see
that even though I chose a fairly
desaturated color, what I'm actually
getting are still some quite saturated dark areas. Okay, I'm adding a note here after I've
done the recording. Darker red tones aren't picking up very well on the
recorded video. Trust me, they are there, but it's not that obvious here. Anyway, let's carry on
with the recording. You do tend to get some
rather saturated colors in certain areas, more saturated than if I was
using normal blend mode. I'll show you that
just very quickly. If I change from vivid light
just to normal blend mode, you can see that less saturated. Take it back to vivid light. It gets more saturated. What about certain areas
around here, for example, up the opacity and make
my size a little bit smaller. That's too much. Resize a little bit smaller, a bit more careful
with my brush strokes. Starting to put just wanted to streaks in there just to give the idea of the veins on
the wings of the butterfly. In fact, let's make this much smaller than if
I'm gonna do this. I'll do the little
streaks of color, but I'm going to make it so
they crisscross slightly. They're all falling out from where the wings
joined the body. But I don't want them in
completely straight lines because while they're
supposed to be representing the veins and veins don't travel
in straight lines. I'm pressing very lightly
with my brush at the moment. I want these lines to be
pretty thin and quite subtle. And I think there are
certain areas like those darker couple of panels. I will need something a
bit darker like that. I could do with my
previous color now, just for these lighter bits. So just press and hold
on my color area. And it calls up the
previous color I heard. And let's put a few in here, just in these top areas. I think some of those
darker areas have gone a little bit too dark
in some places. So I'll tap and hold on my eraser so I can
erase my current brush. If I come to this area here, we're starting to annoy me. What I'm doing is I'm erasing
using my soft airbrush, but I've got the size set pretty small and it's just
chlorine back. Some of those areas
which I had before. And what it's doing is revealing the orange
layer underneath. Because if you
remember, I'm basing everything on that orange layer. Now one or two areas, I think we've gone
a bit too far. So we're getting some rather
ugly brushstrokes there. Now I could come back
in and start trying to paint back in those
areas, but instead, I'll come to my smudge tool that's coming out
it airbrushing, soft air brush is selected, make it fairly small. And I can just blend the colors in where I think
I've gone too far. Like around this panel here, I can just blend some of
those colors in like this. While I'm here, I can use
the smudge tool just to streak the colors around to
get a slightly softer effect. I can crank up the opacity here, maybe make the brush size
a tiny bit smaller and it can vary and streak
of color around. Maybe I should have done
this in the first place. But then again, if I did that, I won't be able to show you
different ways of doing it. As I've said before, the
blend tool is every bit as valuable tool for making marks as the paint tool
and the eraser tool. Every bit as valuable, you
have three tools to play with, and I'll find it by doing it this way, I'm
starting to get, rather than just streaks of
deeper red or lighter yellow, I'm starting to be
able to make them look a little bit more
like they belong. They're sitting together
a little bit nicer. Yeah, I think I'll go
with that for now. Now. What about our layer
with the white bits on loud MIT for this layer, I don't really want to
build up layer upon layer of different blend modes because it's a
fairly simple white. So for this, if I don't need to, I'll just turn on Alpha lock. So now I can only paint on the areas of this layer
which already have pixels. Let's find a brush. I just want to roughen
things up a little bit. So let's come down to, well, let's come down to
textures and see what we've got. I've got this one
down the bottom. Grunge. Let's give that a try. Let's see what color I
want to use for this. What about Davies gray? Just use a lighter
version of that. Maybe around there. Make
this layer invisible. I'll make my pasty low because I don't want this to be
particularly strong. My size, I have no idea. Let's try what? 2223%, and let's do a few test strokes.
Just in this area. Yeah, that's subtle, but
you can see it's just adding a little bit of texture
and that's what I want. I don't want any more. That's very low. What about if I
take up the opacity to what did I take it to? Quarter, just so I
can speed things up a little bit around here. That is working for me. It's just breaking
that intense whiteness was looking at bit unnatural. And it's just giving
you a little bit of texture so it
doesn't look unnatural. In fact, while I've done that, let's load up what was I using? Davis gray, I'm going to
choose a darker version. That's the color I've
been using at the moment. Let's make it ever so slightly darker just to mix
things up a bit. Make this invisible. What's that look like? That's looking a bit too dark. But what I wanna do is increase the size of
the texture because I think the texture
is a bit small. And now if I do this, I'm getting some
variations here which I prefer public as the
texture set bigger. It's not all concentrated
in one area, it's more spread out. So and look, if I
open up my swatches and choose the cheapest
version, make this invisible. And I will zoom out
a little bit for this and maybe make my
brush size a little bit smaller rather than a very fine grain
like you're getting just in these areas
which I'm circling. That's getting a broader texture mixed into it like down here, for example, what basically the size of the texture
is a little bit bigger. So you get this mix of bigger blobs and
slightly smaller blobs. And it just helps create the feeling of chaos
just a little bit more. But while I'm here as well, I want to choose a
straight white just to mix up things a
little bit further. I'm just making one
or two variations in one or two areas just to further break up
the different areas. I think that's all
I really wanted to do for the white areas. Since we're here,
I've got my layer 11, which was the layer with
the layer blend modes, and I put the different
oranges and reds on. You can vary this. You can
take the opacity down to 0 and then gradually
bring it in like this. You can also change the layer blend mode look a
completely different effect. Vivid light, hard light
again, a different effect. Slightly less saturated soft
light is very, very subtle. Overlay is kind of
a halfway house. Hard Light or vivid Light. Vivid Light is what I had it on. And if you decide that
effect isn't strong enough, you can always duplicate it, which doubles up the effect. If he'd site that
is way too strong, take the opacity down
to 0 and just dial in. However strong you want it. I will get rid of
that later for now. And I think I'm going
to stop at this point because I've got so many
things to show you. And so I'll do those
things in the next video.
22. Finish Painting our Butterfly: Okay, carrying on from
the previous video, we have this layer sitting
on top of an orange layer. And so the colors
are interacting with the orange layer
in a certain way. But one thing I can do is
I can come here and I can change the hue of this
particular layer like this, or getting all kinds
of strange effects. I can change the saturation as well to take things
a little bit, and I can alter the
brightness as well. And you're getting all kinds of weird and wonderful effects. I will tap with one finger
to bring up my options. I will come to Council for that. Instead, I can come to
the layer underneath. I can run hue saturation on
that. I want to do that. You can see because the
top layer is basing a lot of what is on the orange
layer underneath. If I adjust the orange
layer like this, I'm getting I'm getting a
much broader overall effect. Again, our top again, and cancel for that. I can come here and I can stack another layer on top of that and change the layer blend mode. And we can change that
to another blend mode, like supposing I want to
say a lighter blend mode. Let's choose screen, and
let's choose a brush. Actually, while we're
here, let's just stick with that grunge brush. See what happens. I want this set a
pasty fairly low. First slide set fairly high. I have white selected. Let's just see what happens. The moment that is too strong. And also, let's clear that out. Let's turn on Drawing
Assist so it's symmetrical. And also let's clip it. So this is also clipped to
my orange blobby layer. And what I'll do
is I will sample that lighter orange
color instead of choosing white.
And let's draw again. I want that is doing is just
breaking up the surface of the butterfly
wings so you get a slightly noisy effect, which looks more like
the kind of thing I would expect to see
on a butterfly wing. Now at the moment, I think
it's a bit too strong. So what we do, why do you think
it's too strong? Take the opacity down
and then dial in just the right amount
of the effect I want. Just for now, I'll take
it back to Max and I'll play around with
the blend modes. Because look at that color. Dodge gives a very
different effect. Add gives a very strong effect. But again, with this, I can play around with the hue
saturation and brightness. I'm getting he was like
pinky effect there. In fact, I'm getting all
kinds of effects there. Play around with saturation
that has an effect as well. Maybe I'll do this saturation. I can also play around
with the brightness to vary the effect. Nothing is fixed in stone, everything can be altered. And again with this, I'm going
to take this and I'm going to take the opacity
down to about halfway. I just want just a little
bit of texture in there, just to break up
some of the effects. It's affecting the
lighter areas more. So choose another
layer, clip it down. Drawings us turned on. And for this, I would choose
one of the darker colors. And I will choose darken blend mode are
pretty much repeat the same thing for this, just for the sake of choosing
something different. Let's try a different brush. What do we have? I'm just looking at random here. What about charcoals? What about something like Birch Creek? Is that a very strong texture? Take the opacity down. Now what happens with this? Oh, I like that. I'm doing it just in a
slightly darker areas. Pool. That is a nice effect. That's really giving me the kind of effect I was looking for. But it's looking really
quite strong overall. I think the
butterflies getting a little bit too colorful. So hue saturation and brightness and saturation,
that kind of works. Now while I'm here, What
about the terrible? That's not so nice. We just nudge it
around a little bit. Saturation, kill
that a little bit. And then the whole thing down, gradually dial in
the amount. I want. Just in those areas. Now since we're on
a bit of a role, let's choose another layer
like this, drawing assist. Clipping mask. I fancy a different color. What about Prussian
blue version one. I know you can't see
it, but I'm taking it from there. For this. I'm just going to drag and drop the whole thing down like this. Now at the moment, you thinking, okay, you've just
killed everything. There's no more texture there. But if I change the blend
mode down to color, what that means is that
it takes my basic Whew, my blue, and makes everything underneath it the same
hello or the same hue. Saturation and the dark to light values that's all taken
from the layers underneath. And if you decide that
effect is too strong, you can take it out or you can provide a little
tint of blue. You can make it
much more blue and until eventually you get
this kind of an effect. But supposing from that, you fancy some yellow
tips on the wings. What have I chosen there? What is that? Zinc yellow make this
invisible to our brushes. I'll choose a simple
airbrushing for this soft airbrush. That's fine. Make it nice and big. And I'm drawing on that layer. I flooded with blue and
I can change the hue, I can change the color. However I want, and I still pick up all the textures and the dark to light
values from underneath. But I combined them with
whatever is on top. I want something a little
bit more orangey in there. I can do that. And actually painting using
a color layer on top of, for example, a black and
white image to colorize it. This is basically
the way you do it. Again with this,
I can come and I can come to hue saturation
and brightness. I can alter that to
where I want it to go. And I end up with a completely
different butterfly. And I can fade a little
bit of that in with what I have underneath that layer
is partially visible. And if I decide all of a sudden that's looking
a bit, say me, I want a little bit
more dark and light, but I don't want to play
with stuff underneath. I can add another layer, clipping mask and
drawing assist. And this time I'll set
this one to luminosity, which is right down the bottom. Then look, I'll choose a
neutral, darker color. It doesn't have to be neutral. It can be any color because if I paint using
my soft airbrush, for example, I can make area's darker like this
as much as I want. And it will keep
the basic color and the saturation from all
the layers underneath. But all I'm doing here
is affecting the overall dark to light of what I'm doing if I make my
brush size smaller, little bit more intense so
I can mark a bit faster. Again, I can build it
with veins like this. Just to mix things up.
I don't like that. I can always use
my blending tool just to blend those in a little bit better because I'm just painting with dark to
light values here. I'm not painting with any color, just dark to light, and I keep the color which is underneath. Again, this is a very
common technique and I don't like it there. Okay, look, I wanted to show you the possibilities when you're
using layer blend modes. The possibilities are huge. You've seen the kind of
changes you can make. And since we're
here and we've done quite a bit with the
layer blend modes. I may as well let you know now. Yes, I wanted to do a course
about rock art and yes, I wanted to give you a course
about blocking in things, but also I wanted this course
to be a masterclass in using different
layer blend modes on my solid foundations course, I go into detail about the different layer blend
mode, what they do, why they're good, and
showing you some of the flexibility that
you get with them. And I go through every
single layer blend mode and say what it does. But I think it's a good idea
also for you to see them in action because they can be
a bit daunting at first. But once you get used
to them as possible to all the various things
you can do with them. I don't think you're going
to want to look back anyway. I've done that and
you know what, just while I'm here, let's
just very quickly do the body. I don't particularly
want the body to be anything spectacular. So I'm just going to make
this, an Alpha Lock. Drawing assist is turned on that sample from
the body itself. Choose a lighter
version of that color. Software brushes,
fine, posted, low. I'll just leave
the body for that. Now to decisions, decisions. I did want to read
monarch butterflies, so I will lose some of those
top two layers and I'll make that the butterfly I want to take forward into
the next lesson, where we'll transform the wings around and create
a shadow for this.
23. Sit our Butterfly on the Stone: Okay, so we've got
our butterfly, or let's make it look like
it's sitting on a stone. Now what I've done is gone into my gallery and I've duplicated the work that I've already done. I'll just rename this
to butterfly is 05. And this has absolutely
loads and loads of layers, many of which I don't need. So I'm gonna do some pruning now and
get this to the stage where I can transform it and add a shadow to it. So what can go? Swatches layer,
Let's unlock that so that I can delete it. Now I could start
grouping things. We've done that in
a previous video, but instead I want to be a
little bit ruthless with this. One reason is so that I
can send you this file and it's not going to be
absolutely massive, but also it's just
going to make life simpler when it comes
to explaining things. So what I want either
complete wings on one layer and the body of the butterfly on
a separate layer. So to that end, let's make everything invisible
apart from the wings. So that's most of the
things I like the way, but I do need to get rid of the body wherever I've got it. So that's just a wings. Everything else is invisible. So I come to my wrench icon, I'm in the Add tab. And I came to copy canvas, which covers everything you
can see. And then paste. If I take a look, I have a new layer called
inserted image, which I'll rename two wings. And I have to do the same
thing for just the body. So that's the outline
and the filled-in bit. And I need to hide everything
to do with the wings. And yes, that would have been easier if I grouped everything. So maybe I missed a trick there. Anyway, do what we did before. We come to our wrench icon, Copy Canvas and paste. And it gets a new layer
called inserted image, which I'll rename too. So now I have two
layers, body and wings. And straight away,
I'm going to slide across my body outline
layer and get rid of it. I'm gonna get rid of my
assisted ink outline layer. What do I need to
make my final image? I need the cloth,
I need the shadow, I need the base or where the stone is, and
that's everything. So everything we just currently invisible I can get rid of. So tap on the bottom
most invisible layer in the layer stack
can just slide, slide, slide, slide,
slide to the right. Anything which isn't currently visible and delete it. Yes. I want to delete
everything there. Oh, hang on. Nobody
missed this one. I don't need that value
there, so we get rid of that. I don't need that. So slide
to the left and delete. So now I just have the
elements I want to work with. And to that end,
let's come to gallery and slide to the left. And I'm going to share
that in Procreate format, send it to my computer. And so now there is
a file waiting on my computer called butterfly 05, which I can send
to you on already. That's 63.5 megabytes. Imagine if I tried to send you that file with all
the layers intact. But the fact of the
matter is I already have my previous file
with all the layers. If ever I have problems, I can always just refer
back to that file. This is just iterative saving where as you
work up your artwork, you call it butterflies 010203. C, always have the earlier
work to refer to that. And butterflies 05,
I will slide to the left and I will duplicate
and work on the duplicate. So if I mess this up, I always have the
previous ones work with. Okay, so the next thing, I have my wings and
I have my body. I want this to look like it's sitting on the
stone and I'd like the wings just to be a little
bit more three-dimensional. So what I'll do is I'll
choose just my wings layer. I'll duplicate it
and make the layer underneath and visible
as a safety layer. Then with my duplicate
layer selected, I will come to my select tool. I can just use
rectangle for this. I'm going to drag out a
rectangle over the right wing. Then I'm going to come to my Transform tool.
Now what do I want? I want distort,
because then what I can do is I can come to
this little blue node, just which I'm circling now. And I can drag that. And
I'll drag it up like this. And I'll come to the
little note at the bottom. And I'll drag that
down like this. What I'm aiming for is a slight perspective
just on this one stone. So it looks like being is up in the air rather than
being completely flat. I don't really need
to do this with a left-wing because all I want to do is get the idea that
the wings aren't lying flat. So that works for me. One thing I will do as well, I'll take my body layer and
I'll drag it underneath the wings and take a look just where the wings
meet the body. That the wings are now
sitting on top of the body, which is where they should be. The next thing my
body is selected. I will slide across from the left to the right to
select that one as well. And I will take both of these. I will transform them. Now for this, I want
to choose uniform. I don't do anymore
distortions and i'll, I'll the body around like this. I think it needs to
be a bit smaller, which is a bit of a shame. Move it around so that it's sitting at a slightly
more interesting angle than just flat on the rock. Maybe about there. Yeah,
I can go with that. Now the sharper either
amongst you will have noticed that the left wing is going
over the edge of the stone. Not a problem. Let's come to our
selection tool again. And this time I'm going
to choose freehand. And I'm going to draw
around that wing, just cutting into it a
little bit like this. So that is selected. Then I'll come to
my transform tool and I'm going to choose warp. Zoom in a little bit on
what I'm doing here. I'll come to that little
note just in the top left. And I'm going to drag
it down like this. And also, look if I
turn on advanced mesh, you can see all the
nodes in action. And I'm just going to
start pulling them around just to gradually fold, just the end of the wing. So everything gets
kinda squished down. So it looks more like it's wrapping over the
edge of the stone. Like this. I'll come to my layers panel to select that it's nearly there. But just to finish
the effect of I will come here and I'll
drag this down so it's sitting right above
the actual stone itself. And if I'm gonna
do that, I need to drag the body down as well. Then I'm going to clip the
body to the base or the stone. And I'm going to do
the same to the wings. Watch what happens when
I do because I clip it. The end of the wing
gets cut off and it's starting to wrap around
pH of the stone. Alright, so I've done that now, what about a shadow? On that case? I take my wings
late and I duplicate it. Choose the one underneath
and we'll call this shadow. Now I can't just below this and offset it a
little bit because that raised wing would presumably create a little
bit more of a shadow. So this is what I'll do. I'll come to my adjustments or take the brightness down to 0. So if you look closely
of a thumbnail in the layers panel
that is all now black. But then what I'll do is I'll
come to my selection tool. Freehand is selected,
and I will select just the right side of the
wing, the shadow layer. I'll apply Gaussian
blur just to there. You can see me doing that now. I've chosen what 13, 14% around about there. Then I'll go into my transform. I come to distort for this. And I'll pull the whole
thing down and out. Like this. I'm getting that kind of effect now it's very strong
at the moment, but we can work with that. Also. One thing I
noticed with the shadow, it's sitting on top of the body, which I don't need
any of the shadow to be in-between the stone
and the butterfly. And I'm going to change this to, I want to change it to
multiply because I find it gives slightly better
shadows to take the opacity down to 0 and then just
dial in mountain of shadow that I want like that. Okay, That's 1.5. Now, what about the other half? Because I do want a
shadow there just not as big as before. Come to our selection
tool, choose freehand. And this time I'm going
to choose everything on the left side is
we're looking at it, come to Gaussian Blur. I want this to be a
slightly tighter shadow because it's not going to spread out as much as the other one. But now I come to
my transform tool, drop this down a
little bit like this. And so now you can see I
have a tie to shadow on one side and a more extended
shadow on the other. Just while I'm here, just to wrap things up, I'm going to come to my wings. I'm going to create a new layer. I'm going to clip it to
the layers underneath. I'll change the layer blend mode to a dark and one
light multiply. I'll choose a simple
gray for this. Come up to this top
right-hand corner. What brush do I have by
soft airbrush, that's fine. A pasty, fairly low
brush, pretty small. And I'm just going to make just the very edge a little bit darker so that it matches
the shadow of the stone. Like this. Just to
sell the idea that, that butterflies sitting
on my stone at all. I know he missed a
trick to my body. Duplicate. Choose the layer underneath. Make it black. First of all, let's
just move it down a little bit so it'll be
about down about there. And then when I moved it, Let's change the blend
mode to multiply. Drop it down to what was
the shadow of the wings? What was that? So to 71%. So I'll make the body layer
71 per cent, that's fine. Zoom in and then just
come to Gaussian Blur. And just a slight blur for
this because you want to keep the detail like that. And it's okay for the top. I don't like it
around the tail end, so I'm gonna come to
Gaussian Blur again. But this time I'm
going to come to my pencil. What do I have? My soft air brush is selected
and I'm going to blur just the bottom bit and
leave the top bit intact. That blends in better. And there is my butterfly. Just while I'm here,
I'm going to duplicate my wings layer and
just have a play around with the
top layer because I can have any color
butterfly I want. We already did this in
the previous videos. So I won't go too
much with this. So I'll make the hue where
it was around 50 per cent. Maybe the saturation down
just a tiny weeny bit. So it's not quite as bright and in your
face because look, that's just way too strong. So chose to somewhere
around there. Just a task that
I've tapped once with one finger and I
have my options here. If I just tap and
hold on, preview, maybe you can see
that, maybe you can't. I'll make this very obvious. I'll tap again, we'll preview. While I tap on Preview, I see what I had before and what I'm going to get if
I commit to this. So for this, take this back to around about 50% brightness. Dare I turn the brightness
maybe just a little bit. And that's helping
to lose some of that dead black
of the butterfly. Because as we've said before, there's very rarely a complete dead black in a painting on, unless you're going
for that effect, it can look a bit unnatural.
I'll go with that. So I'll just tap on my layers
panel to commit to that. Close my layers panel. The very last thing I'm going to do is turn off Drawing Guide, so I don't get that
little symmetry line running down the
middle of my picture. And there's our butterfly.
24. Create a Composite of all our Work: Okay, We've seen how to create a variety of
different stones, and we've also seen how
to paint things onto the stones using a variety
of different techniques. Let's take these various
different stones and put them all together into
one composite shot. This is what you do. Come
to your Layers panel. And we've done this before. I want us to lose everything from the picture
apart from the stone, whatever is painted
on the stone. Now, depending on what you did, you may have to hide the
background color as well. So you're left with this
on what you're looking for is just the stone plus what you've painted
on there with this checkerboard pattern
in the background. Just to be careful and show you. If I came to preferences. If you have a light interface, you will see
something like this. I prefer dark, but once you
have your image like this, come to share and I want us
to export the file as a PNG. The reason being is
everything will get exported on one layer.
That's what I want. But also you will get a
transparent background which a PNG file supports
that jpeg won't. Also a PNG is a small file size. So PNG, exporting that, where do I want to put it? Well, I'm going to
come to save to files. At the bottom. It'll ask you for a directory. I have a directory called
rock art in my iCloud. I'm going to tap on the name
because I want to rename this to rock, butterfly. And at the end I'll
call it P and G and capital letters so that I know
what file format this is. I will tap on Done in the top
right and then tap on Save. And that's how you
do it. I will supply the PNGs for the
files I'm using. If you've been following
along, use those. Just before I go back
to the gallery though, I will turn on everything
that was used to make the image so that in the gallery the thumbnail
looks accurate. Now I've done that with
the various pictures apart from now,
where was it? Yeah. Stone 14. Because there may
be a problem with this one. Look, if I turn off
the background color, the red cloth, and the shadow, I'm still left with the
parts of the baby's head that I didn't erase when I was doing the
exercise because well, I didn't need to, but low fat
is straightforward enough. I could use a layer
mask if I wanted, but instead I'll just
come to my Erase tool. Soft air brush is selected. I need it to be a
100% opaque by size. Make it nice and big, and then just come
and erase the bits that I don't want like this. Incidentally, if you're
doing something like this, don't have it for size because you may erase various
bits and think, Okay, this is good. I'm doing a good job
and then export that. But then when you
pinch in a little bit, you realize, oh, I forgot
a few bits at the top. Anyway, there it is. So once more come to
our Actions tab Share, PNG, save to files. Rename this to rot
Baby, P and G, which is a pretty cool name. Safe. Okay. I've already done that
for the other three files that we've been working
on during this course. So now what I need
Just to come to the gallery and I'm going
to import one of the files. I've been using
it as a backdrop. I think for this, I
will come to old wood 0 to pinch a little bit. Just let me check
the file size for this because I'm not sure
how big this far worse. So if I come to our actions
and I've tried to Canvas, and then I'll come
to crop and resize. And if I tap on
settings at the top, it lets me know how big
the file is in pixels. So it's 4 thousand
pixels by 2667 pixels. I'm happy working in that size. If you don't have much
memory on your iPad, you may have to reduce
the size of that a little bit if you are going to re-size
the first thing you do, welcome to re-sample
canvas and turn it on. Then supposing I want
to half the size, I'll tap on my 4 thousand 2000s. And because that little
lock symbol is active, it means the height
and width are linked. So if you change
the size of one, the other one will figure
out how big it has to be in order to keep
the same aspect ratio. So I've got that and then
I can tap on Done it, resize it to Canvas, and you get a half size canvas. But I don't wanna do that. So I'll double-tap, which takes me back into
crop and resize. Double-tap again, that takes me back to 4 thousand by 2667. That's what I originally had. So now I'm gonna make this smaller because I want
to see what I'm doing. But also I want my layers panel to be open at some points. So let's just resize
that so it's as big as I can get it without it
being crop by anything. Then come to our actions panel, come to Add and insert a file. Now, whereabouts are
they there they are. Okay, let's load
up the butterfly. I'm going to try and keep
these as big as I can for now even if they overlap. Because what I want to do
is to get them all into my final picture that I'll
worry about the position. And that's the point I start thinking about resizing them. The reason being is
if I was to make this very small so that
I know it fits. If I then resized up
again for my final image. I will lose some detail, but if I keep them big and
then shrink them afterwards, shrinking from large to small, you'll keep a lot of detail. If you're trying to size
up from small to large, yeah, you can lose
a bit of detail. I want to try and avoid angling this because for
all of my pictures I made the light
source come from the top right down to
the bottom left. If I start rotating that around, it might change the apparent
angle of the light. So I'll just put that
off to one side there. Then same thing again. Up baby. Put them
just here somewhere. You'll notice when
I do it as well, I'm not taking this
to the edge of the canvas because if I now
press any of the buttons, commit to that right side and the bottom of that rock
is going to be lost. Okay? Insert a file. Insert a file, and insert a file. All right, those are the
various images I've used. They're too big now they
need to be resized. The stones can be touching
each other and they can go off the side of
the canvas like this, for example, which I
might do with this one. Maybe resize it. The only thing is they can't
overlap with each other. So I'll put that one there. Just before I do
though, you notice that with the backdrop,
the old wood, you can see that the
top right-hand corner is lighter than the
bottom left corner. So the duration of
the light is matching up to my stones.
That's what I wanted. So let's take that
and put that there. Maybe just a little bit
smaller because I do have a lot of stuff to get
on there for my money. Idle like the butterfly, the ice cream, and the
face. I prefer those. So I'll take this one and
make it a little bit smaller. And I would just maybe
and commit to that. Then I fancy the ice cream. More of here. I'm happy with the size. I'll keep that size for now. What about the butterfly? I want that to be fairly
central because I do like that image and come on, let's zoom in a little
bit so I can see a bit more clearly
what I'm doing. I don't mind that touching those stones but
they can't overlap. Look, I'll make this a little
bit smaller because they still have other things
to fit in there. Maybe look at the Canvas as a whole so that I
can see where I am. Maybe make that. For example. I'll keep this fairly
big for now because I might need to make
it smaller later. But I think this could be a case of nudging things into position. And in fact, I'm
gonna come back to my ice cream and I'm
going to take this off the side of the screen are a little bit to make it
a little bit more space. The baby image, I'm not
that bothered about. So I'm going to take it maybe down and shrink it
down by a fair amount. And maybe make it down
here, for example. Which means I can take
my butterfly image, move it up a little bit, and they come down to my face image and move
it down to what here. Maybe about that. And then my butterfly image. A little bit about just spread
things out a little bit. Which means that I need to
take my ice cream image, which now you can see
because I cropped it, the very left edges
gone slightly. But I'll make that about that. Okay, so I've got my
various different images. The next thing to do is to
make everything invisible. And we've done this before, that's come to copy
canvas and paste. And I get my inserted image. I want to drag one of these
above all the others, only going to make
everything invisible. I don't really need them.
I could even get rid of those other
images that I did. But I want one composite image, which is everything
altogether other top. And also I want one
right at the bottom. And I wonder if
you can guess what I'm gonna do with this. Possibly you can make
more visible again. We're going to take this image and move it down a
little bit like this. And then we are going to come to our hue saturation brightness,
make everything black. Yes, we're doing the shadows. I'll change the
layer blend mode. One of the dark and blend
mode to multiply as good, and I'll make this
about 63% visible. Then come to Gaussian blur. And blur if you want a
very hard looking light, in which case you'd have
some sharp highlights. Cute. You blast out low. If you want a softer
area like this, which would mean
softer highlights and softer shadows increased
in size to about, well, wherever you see fit, I'm gonna go with about 15% now. I'll give a little bit more 18%. But let's play around with capacity now that
I've done that. Yeah, you could do with
being a little bit darker. I think that's making the
stone sit on the wood. But one thing I am
going to do is use this top composite image and I'm going to
create a new layer. I'm going to set this
to multiply as well, and I'll lower down the
opacity to something, a similar level of
opacity to the shadows. I'm going to click this layer. They inserted image
because what I want to do is choose my soft airbrush. A pasty, fairly low, about a quarter
opaque brush size, about the right size to add extra shadows
because these stones are now sitting
next to each other. Which means they're going to
start casting shadows like just the top of that baby stone and making that a
little bit darker. What about the side of my ice cream stone that could
do is being made darker. So it looks like there is a shared shadow area
between two stones, which means they're
going to sit a bit better next to each other. Just while I'm here. Whoops, I raised that shadow. I'll quickly we do it again. While I'm here. I think the lighter edge
of the ice cream stone is looking at this
dark next to the word. So I'm just going to turn that down a little bit bare in mind. When I did this, I was creating every stone on its own against
different backgrounds. So now I'm putting
them together. They just need a little
bit of weaving together. So in the case of this, a little bit more shadow in certain areas where the
stones meet with each other. What about the bottom edge of that butterfly stone
against the face stone? Yeah, That could
do with darkening. What about the top
of that face down against the bottom of
the silhouette stone? I can do that or
one thing as well. While I'm here, I want to
make my opacity much lower. Well, a bit lower and
increase my brush size because one thing
I didn't do with my butterfly with just
lower the tonal values just on that bottom left wing, which would be in shadow. So let's create a
little bit more shadow around there and maybe the bottom of the
rightmost wing. So that's sitting together
a little bit better. Now I'm actually
working this up. This is a bit like
doing dodge and burn techniques when you're
using an image editor. And the thing about it is
you don't really realize how much another fact you've done until you come to your layer. And you make it invisible. That's before, that's after. And you can see by putting
in those shared shadows, this composite is starting
to sit better as a whole. Other nice thing is my
opacity wasn't set to false. So if I want it stronger,
I can make it stronger. If I want it more subtle, I can lower the opacity. So when you're working
with stuff like this, setting your opacity. So it's not just the
default maximum. If you lower it
down a little bit, you get more flexibility. And another rule which I haven't mentioned
on this course so far is when you are playing
with your opacity slider, don't look at the slider. Otherwise you're looking
at, oh, 6474% percent. What you need to do is rest your pen or your finger
on the opacity slider. Move it around and look
at the picture to look at the effect rather than the
slider and the numbers. And that will do for me. Okay, one more layer. This one I'm going
to set to screen, which is a lightened blend mode with the opacity
down a little bit. I guess what I'm
gonna do now, Yes, I don't want to get some white soft air brush is selected. Again, set pretty low. The size I want a
little bit larger. I'm just going to paint in just a few common highlights just in the top
right of each stone. Maybe oh yes. A little bit
on that butterfly stone that needed doing and maybe a little bit on the
ice cream stone, just they share a similar
level of highlights. Now one thing I
did do with this, I went a bit too far on the butterfly because now
that shot has been affected. In theory it would be because
that shadow is painted on, but I don't really like it. So look, I'm not going to bother with a layer
mask for that. Instead I will
come to my eraser. Soft air brush is
selected right up, slice at fairly low. Now we'll just get rid of the highlight of
that shadow like that. Okay, that is my composite
image on right there. On that one composite image, you can see a whole
load of stones, which are all generated using various different
paint techniques, plus layer blend
modes, plus masking. And then you can see
the various images, all of which have been
taken from one of 72 different images for
you to practice with, along with a 15 stones
that come with the course. You've seen how you can
ink in those sketches. You've seen how you can block in the various different areas. And you've seen a whole load of different painting techniques plus a masterclass in
using layer blend mode. Practically, we've learned
how to use layer masks. You've learned how
to edit a brush and write the controls while
you're working on. You've also seen how to combine
real-world images alike, that wood background, light, real-world stone textures which you see on the
silhouette picture. And you've also seen
how you can use various different
adjustments like the hue, saturation, brightness, all the Gaussian
blur or curves to change your images in all
manner of different ways. So I hope you've enjoyed the course and let
me just remind you, you can now create one of your own stones or use one
of the 15 supplied and use one of the 72
different sketches and use the techniques on the course to create your own stones. Come up, Let's see some stones. Let's see what you can do. I wish you many hours of
making stone artwork, which makes you happy. Speak to you later.
 Simon Foster