Transcripts
1. About that class: Ever feel like the new year is your chance to hit the
upgrade button on life? If you're better sure
where to start or simply want to elevate your
skills to a new horizon, well I have an invitation for you in that skillshare class. We're diving into the world
of three D. No complex stuff. Just a fun way to
explore and kick, start your journey to a cooler version of
you in the New Year. And there is no better
topic that aligns with our goal than creating a
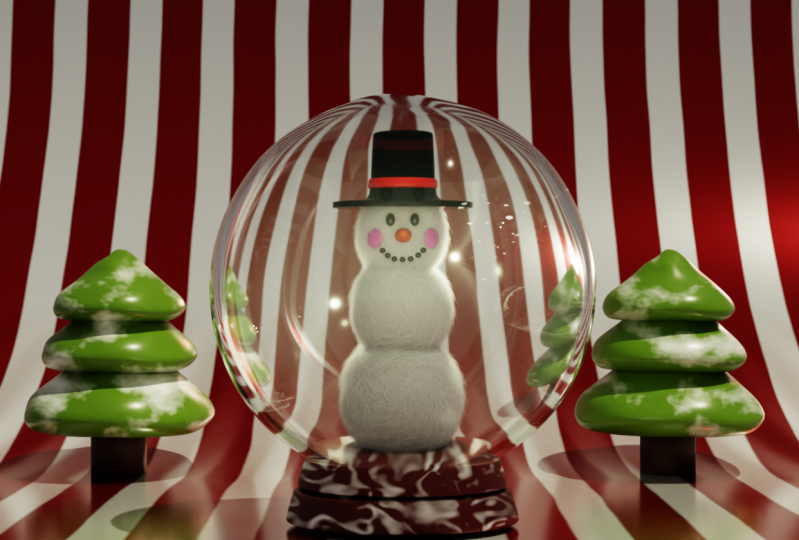
realistic holiday terrarium. But what can you expect? Firstly, explanations
are bent here. Get ready, because
in this class you'll learn mastering all the important fundamental
tools in blender. From navigating
different interfaces to modeling,
detailing your work, Understanding modifiers and
much more unveiling tips and tricks for better textures that will have you
feeling like a pro. Exploring realistic
materials and discovering hide and gems
within blender software. Discover the art of
creating realistic fur. The particle system will become both exciting and
easy to understand. Be the end. Exploring
dope body fires that can elevate your work
through their imperfections. Breathing life into
your render by establishing various
sources of light. As you can see, this
class is packed with all the necessary
information that will lead you to your
first final result, marking your confident debut into the world of
blender three D, for whom everybody, this
class is beginner friendly, is suitable for
anyone interested in three animation,
illustration or design. No prior knowledge of blender or three D modeling is
required to get started. All you need is a
computer with Blender 4.0 instead from Blender or for free to download the
resources file that you can found under this
class in just 2 hours. You'll go from, I've
never touched Blender to proudly presenting your
first finished project. And feel free to upload it in the project section
gallery to inspire others. As you can see, this class is
definitely worth your time. Even if you're not aiming to
turn it into a profession, you'll lock a new
skill that will make your spare time
more enjoyable. Join me in the
skillshare class today. And together, let's
turn that page to a new chapter
of our creativity.
2. Lesson 1: Snowman body: Hello everyone and
welcome a friend. The lesson number one. The golden rule of every
successful project in blender is having fun. Bring your coffee, tea, or chocolate, or
whatever you drink. And let's start, of course, everything that a press you
can see on the left corner. Let's start with small tips and tricks in case if this is
your first day in blender. So if you want to move
yourself around the world, just hold the mouse wheel. If you want to keep
the same angle and to move yourself around, hold shift and mouse wheel. Zoom in, mouse wheel forward. Zoom out, mouse wheel a back. Okay, This is more than
enough for our start. And a few more things, but I'm going to tell
you about them later. Let's click on our point, This is the source of
flight and delete it. Then choose your cube
and press control to which bring the subdivision surface
modifier, long story short, blender contain a
lot of modifiers that can make our work better, doper cooler and all
of that subdivision just increase the amount of
polygons around our object. Bring yourself in that window
where you can find the name of the name of each object and double click Snowman
underline Head, Create. Then let's apply our
subdivision surface modifier. Apply right click, shade smooth. Now one more time, control two. And he even is more smoother
than it was before. But don't apply that. Why did I told you you
can move yourself around the world or you can press
100 empt for the front view, 300 empt for the side view, and seven to take a look above. Instead of trying to
somehow catch that angle, 13 or seven. Let's go with one. Zoom out, let's bring this
one a little bit higher. Another thing, how
to move objects, Three main functions
to move around, to rotate and to scale. Also, blender contain three Xs because this is a three
dimensional world. Green one, K, red one, X, where is blue
one, the blue one. We check our snowman head, move this one above. As for scale, create, Then to duplicate our
objects, shift D, and that's how you
can duplicate, but we need to move
this one below. Press now. You'll move your object
only around the z axis, or in other words, blue one. Let's go here and make this
one a little bit bigger, a little bit higher. Let's call this one
snowman body underline, which means middle, then shift. As for scale, that's
what we have. Let's choose all of them. Let's keep this one above of these three cursor or
the center of our world. I also think that we can make
them a little bit smaller. As for scale, this
is what we have. Snowman body, I call this
one, which means below. Let's save our
file Control Safe. Choose wherever
folder do you want? Wait a second, I'm going
to create a new one. I'm going to Skill
share Snowman. Let's call this one
Holiday Safe Blender File. I think it's more than enough
for the lesson number one. Yes, you will say
that it's too fast, but I don't want to
keep these lessons very long because otherwise
it's going to be tedious, boring, and all of that
stuff. Think less. Think, let's bring them
in other collection. Or do you see here the
collection Double click. Let's call this one Snowman. And let's remove our remove, but move another collection. How press M, which mean move to
collection. New collection. Let's call this one Camera Acts. Okay, now we have two collections
where we're going to keep all of our files. Thank you so much
for your attention. In the next lesson,
we're going to create all of these
face attributes. I'm going to see you
in the next one.
3. Lesson 2: Face : So let's number two
where we're going to create the face
of our snowman. Under this class you can found a zip file with a
few references. At the end of this class, you'll have a personal project that you have to share
with other members. I encourage you to share. We are here to
support each other. That's why I would like you to apply all of your new
knowledge and skills. Choose one reference and to create your own work that
you're going to share with us. But through that class, I choose reference
number three and just drag and drop in blender. Then let's move this
one in the center. We press out to move
this one at the center, out to make it flat. Then let's make a rotation x 90, which means we turn our image on 90 degree on the red, or x x. As for a scale, remember that we
don't have a purpose to make a completely the same, we'll just use this one
as a small inspiration. Then one P is move it up 300. Move this one back, create. Let's go to, I'm going to
even move this one GX, because how I say this is
just a small reference. Let's create another collection. Let's go to the window. Right click New collection,
double click face. Let's bring our first object. Let's start with our Ice. How to bring new
objects in Blender. Shift a mesh here. We can choose, for example, in our case sphere, that going to be our ice. But let me show
you another thing. Let's create our ice
straight right here. Did you notice that the object appear where the three
dicursor is placed? Let's place our three
decursor right here. Shift click and now when we're going to bring
shift a mesh sphere, it's going to appear right here. We're going to save
a little bit of time in order to not move it up scale and all of these
things. Let me delete. Let me zoom in. I think
this one is great. Shift a mesh and sphere, right click, shade smooth.
Where is my screen? Because of the white
background you can see. Okay, let me make this
one a little bit smaller. Don't repeat after me
because you otherwise will not see the
key that I press. So that's why I decide
to make it smaller. Let me do this 11
more time sphere. Make it smaller with, with S
right click, shade smooth. And then let's go with,
make them like that. Smaller, like that. Seven ped. Let's check. Let's make Greek on the green one a bit
smaller, and then Greek. Let's move this one a
little bit forward. Yes, it's good. Then let's duplicate.
Let's call this one. First of all, I underline left and then we go
with the ship X. This is going to be
our underline, right? Good. Let's go with this. I think this is
how you call them. Shift, Right click on the
side shift, and guess what? Of course, sphere, right
click, shade smooth. What I think we
can do is to make a smaller rotation x 90, then we go make it smaller. Then let's go in the solo mode. How to work with
one object apart. You press slash on the Np. Let's make Greek,
bring it like that. Yes. Out of the solo mode, that's caused seven
to take a look above and move this one
around another way. Did you notice that usually we have three
Xs, You think so, but actually there are six
because if I'm going to press, for example, X, I'm
going to move like that. But if I'm going to
press X one more time, I have another Xs. The same thing we
can do right now. Now we can move on that, which will be a little
bit more comfortable. Move this one a little
bit more forward, and create controls
to save one ped. Let's duplicate, but
not with shift D. Let's mirror our blush first. Let me call this
one blush, blush. Let's go to the modifiers and
modifier search and mirror. Press one time, left
click, then mirror object, and choose the head
of our Snowman V. Now we have an object. Another blush, right here. Let's make this one
a little bit more. Thicker on how you can see. You can think this is two
objects, but they actually, because this one mirror, if you will make some
modification here, the same modification
will be applicable here. Remember that on one pat, I think to make this a
little bit more smaller, more toward each other. The mouth which let's
duplicate our go down. Let's go with the and make
it more like a sphere. A little bit smaller. Let's
coach it a solo mode. Do I like it? Yes, Rich. It's oh, let's make a
smile around his head. The good right now, don't copy straight after me. Just make a smile
around his face. You have to move around and
let's go shift one here. Shift on here, here and here. Take a look from the side. Three P you like probably to move them here
because there is no gap. They don't fly around the air. But I will not recommend
to do this one right now. Why? Because a little
bit later we're going to bring the particle system, the hair around the fur
around our snowman. That way let's keep our mouth on that space a
little bit more farther. When we're going to
bring the hair around, we're going to move them in
the right place right now. Don't worry, just keep
this one like that. Good. One more, the carrot, which is going to be
in the middle shift. Right click to bring
the three dicursor. Now we're going to
learn new things, especially if you are a
beginner shift a mesh and cube. As for scale, make it
smaller then 300 peds Greek on the green one Greek and keep it somewhere like that. Then we go with the control two subdivision
surface modifier. Now let's play around
at the moment. Right now I agree we
are in the object mode, but there is another
way, another mode, which means edit mode, where we can play
around with our object. Long story short, every object contains three main aspects. This is vertices which
is 101 on the keyboard, which are these points there, Edges two on the keyboard, which are these lines. There are faces, which is
three on the keyboard. These are our faces. All the three aspects
is what you're going to use in order to make it, for example, bigger somewhere. Or if you wanted to
move some edge around, it's going to help us to make
it more interesting things. Let's go in the solo mode. There's a thing
like adding loop. Let me show you control air. And if you're going to
move your mouse around, you can see something
appear or here or here. Bring the vertical
11, time left click. Bring this one on the
right, like that. The press one more,
time left click. When you set the place
one time left click, and this is how you accept
the place of your loop. We added additional edges, additional points, which
make our work more detailed. Then I want you to do
the same right here, but I want to make
that part smaller. Choose phase three
on the keyboard. Choose this one
face in front and for scale three
for the side view. Let's bring control a one
more additional loop. And bring this. I think here going to be great
for me one more time. Make it smaller, even more
smaller control save. I think this one is good in case if you don't like
where you do place. There is no necessity
to bring control. And then to do this one
again, let me show you. Let's choose the entire loop. For example, you want to move
this one more on the right, two, then left
click on the edges. That's how you can
choose the entire loop. Out, left click out,
left click out, left click out, left click. Choose the entire loop. Three for the side view Greek. And move this one a back. How you can move it, how
you can make it bigger, smaller, and all of that stuff. I actually even a little
bit smaller or no, I like that a little bit more. Great. Right click, shade, smooth out of the solo mode and our carrot look now a little bit better
than it was before. Greek. Make this one like that. Greek place this one inside. Yes. Don't repeat. Let me check. Subdivision
Surface Modifier. There is no necessity. There is no necessity to apply our subdivision surface
modifier the moment right now. Let's call this one carrot
Nose. That's what we have. Again, you can think
that I don't like it, don't worry, a little bit. A little bit later,
we're going to place everything on the right place. But this is number two problem. I'm going to bring our
mouth a little bit higher. As for scale rotation, this is my decision
to keep it like that. The same thing with ice. I personally want to make
them a little bit smaller, a little bit higher,
more like that. Okay, I'm good. Thank you so much, my friends. In the next lesson,
we're going to create the head of our snowman. And I'm going to see
you in the next one.
4. Lesson 3: Hat: Lesson number three
where we're going to create the head of our snowman. If you are complete beginners, this will look a little
bit complicated, but don't worry, like always, the golden rule, have fun. Right click, New Collection, and let's call this one head. Then go with a shift A, and this time we're going
to choose a cylinder. Then right click, shade, smooth, it look ugly. I'm agree go to this green triangle which
is the data properties. And there is a normal, open normal check in on auto
smooth. And now it's better. As for scale t then 300 p. Let's set this one
above his head like that. Great, let's go
to the edit mode, which is the hot key tap. I'm, I already did
hear some things. Let's make the part above
a little bit smaller, choose the face, and then scale just a little bit smaller. Now, take a look, and then we're going to
do this one together. I'd like to make that
round of his head. If I'm going to choose
the entire loop below, which is out left click, which we learned from the
previous lesson for scale, this is not the result
that you want to achieve. There's two important functions that you're going to use pretty often which will help you to make your
object more detailed. Let me go to the solo mode, which is slash and empt. There's a thing like extrude, which is that how you
can build new extrude, build new meshes, new shapes from objects that
you already have. Control, Control, control. You can try if you want
one more time control, but we need to make
it around how? Go a little bit above. And then we press, let me check. Yes, we go for the
trot and for a scale, and that's how you can
achieve that shape. Then go on one ped, let's make it a little
bit more thicker. We go the z and bring this
one below like that, great. Now it's something that
look more as our head. But there is another function, the second function
that will help you also back to the edit mode. You can try, you can
put this video on post, try this one alone, or re watch one
more time with me. The second one is insert. Actually you have all the
functions right here. For example, extrude, you
can go from these buttons. But why I don't show
you why I don't tell you because honestly,
no one used that. Every professional
beginner intermediate, they are going with the
hot keys because it saved your time because I
don't want to waste your time. I tell you from the start
about all of the hot keys. Yes, you can press here, but for the extrude, and this one is way more easy. Then go to the solo mode. There is another function, I suppose in English it's also A, or I call that one. That's how you can insert
face into your face. I know it sounds a little
bit weird probably, but you probably noticed because I want to create
a gap in our head. And that's how let
me control that. We have a simple phase and
then bring this one inside. Then extrude the
previous function and move it up as for a scale, and now we have a
gap right here. Let me show you
something. Don't repeat, because we don't need this
one at the moment right now. But just for future, to make you know, let me choose, for example, this phase. Let me go like that.
I choose this phase. Or actually let
me go Shift left, click, shift left
click, shift left. For example, don't repeat. I can press one time A. There is two options. If you're going to press E, you can insert like
that or two times. And you can insert phase. Inside of each phase, you can create one phase or you can create
phase for each one. I hope it does make
sense in future. If you'll work or think, just remember there's
like two options. If you want to remove
what you already did, just right click and that's
how you undo your actions. That is our head. But of course it's
still as for scale. In some lessons further, I'm going to show you
some dope modifier that's going to make
it look cooler, but we don't need
it at the moment. Right now there is a red thing, red loop that we have
here in the middle. Let's go with the edit
mode control air, remember for the loop. And now move your mouse wheel forward once to add
additional loop. So you can go like that, we need only two of them. One time left click, move this one below. And then accept with
another left click. Then let's make them a little
bit more close to each other to, to choose edges. And then out left click
to choose this one. Below this one, a little bit above the same
thing with this one, move it a little bit lower. As for scale crate. Now we can, in the same way, how we can choose
a loop of edges. We can choose a loop of faces, three on the keyboard
to choose face mood, then out left click. And how you can choose. Probably if you're going to bring yourself more
close to the edge above, you're going to choose
the vertical edge. But if you're going to choose a horizontal edge,
a horizontal loop, then choose one of these from
the site left or right val. I hope it does make sense then. And then the same
function that we learned, I think 3 minutes ago for
the extrude S for a scale and make this one a little bit more thicker one
in a keyboard control save. And that's what we have
at the moment right now. There is another thing
that we can try, not the subdivision surface
modifier but Bevel. Bevel is a dope modifier
modifier search for Bevel. I already have this one. And if you go to the edit mode, there is the two ways of
how you can call bevel. Okay, if I say that this is
class for complete beginners, let me explain this thing. If you're intermediate,
please be patient for our
beginner friends. Let me remove only watch and then you're
going to understand. Let me, for example,
choose this edge. Just as an example, I can call the Bevel modifier with
a hot key of control B. If I'm going to drag
my mouse how you can see I add additional loop. It just help us to make the
corner more smoother than, for example, this is sharp and this is more
smooth transition. If I'm going to add
additional loops, just moving my mouse
wheel forward, how you can see, I
can make it even more smoother than it was before. Let me remove, so
that's how it was before and that's how
we can make right now. I hope it does make sense, but I don't need to
choose each one of them. It is an option, especially if you're looking forward to be a hard surface three artist. But at the moment, right now, it's enough to call a bevel modifier which will help us to build
the shape in general, to make it smooth everywhere. I hope you understood. In case if you didn't, you can create a
discussion or ask me under this class and I'll
answer you with a big pleasure. Right click, shade
smooth. We already did, but I don't need it. Then you can bring the amount on the left or on the right. I'm going to keep it on zero. I think three segment,
number of segments, that amount of segments
that we're going to have in between of that corner, I already showed you segments more smoother or less smoother. I think 1010 is great. Let me look with, without width, I would like
to probably to make this one. Let's work with the
loop above two. For the edges out left click,
choose this one above. And then we go with the control. This one. Let me
decrease the amount of, let me make it three in
between, like that scale. What if this one do not
make it so perfect? A little bit on the right. Okay. Now I don't like
it what we have a scale, we're going to choose
this one below. As for scale, just make a
little bit more bigger. So let me check. God, great, Zeke bigger. I think the snowman, for me personally, is too big. It's okay that you don't make
it perfect from the start. We aren't here to
make it perfect. We are here to make it
pleasant for our eyes. Okay. That. Okay. Now I like
him more than it was before. Now let me choose all of them to move this one right
here to the bottom line. Let me bring the carrot above. I say a little bit
smaller again, that only what I told you. Don't have to repeat.
Thank you so much. I hope you enjoyed that
lesson and I hope you found a lot of useful
things. Tips and tricks. And let's go double
click cylinder. Let's call the swarm
head control save. And I'm going to see you
in the next lesson where probably we're going to create the trees and backgrounds than.
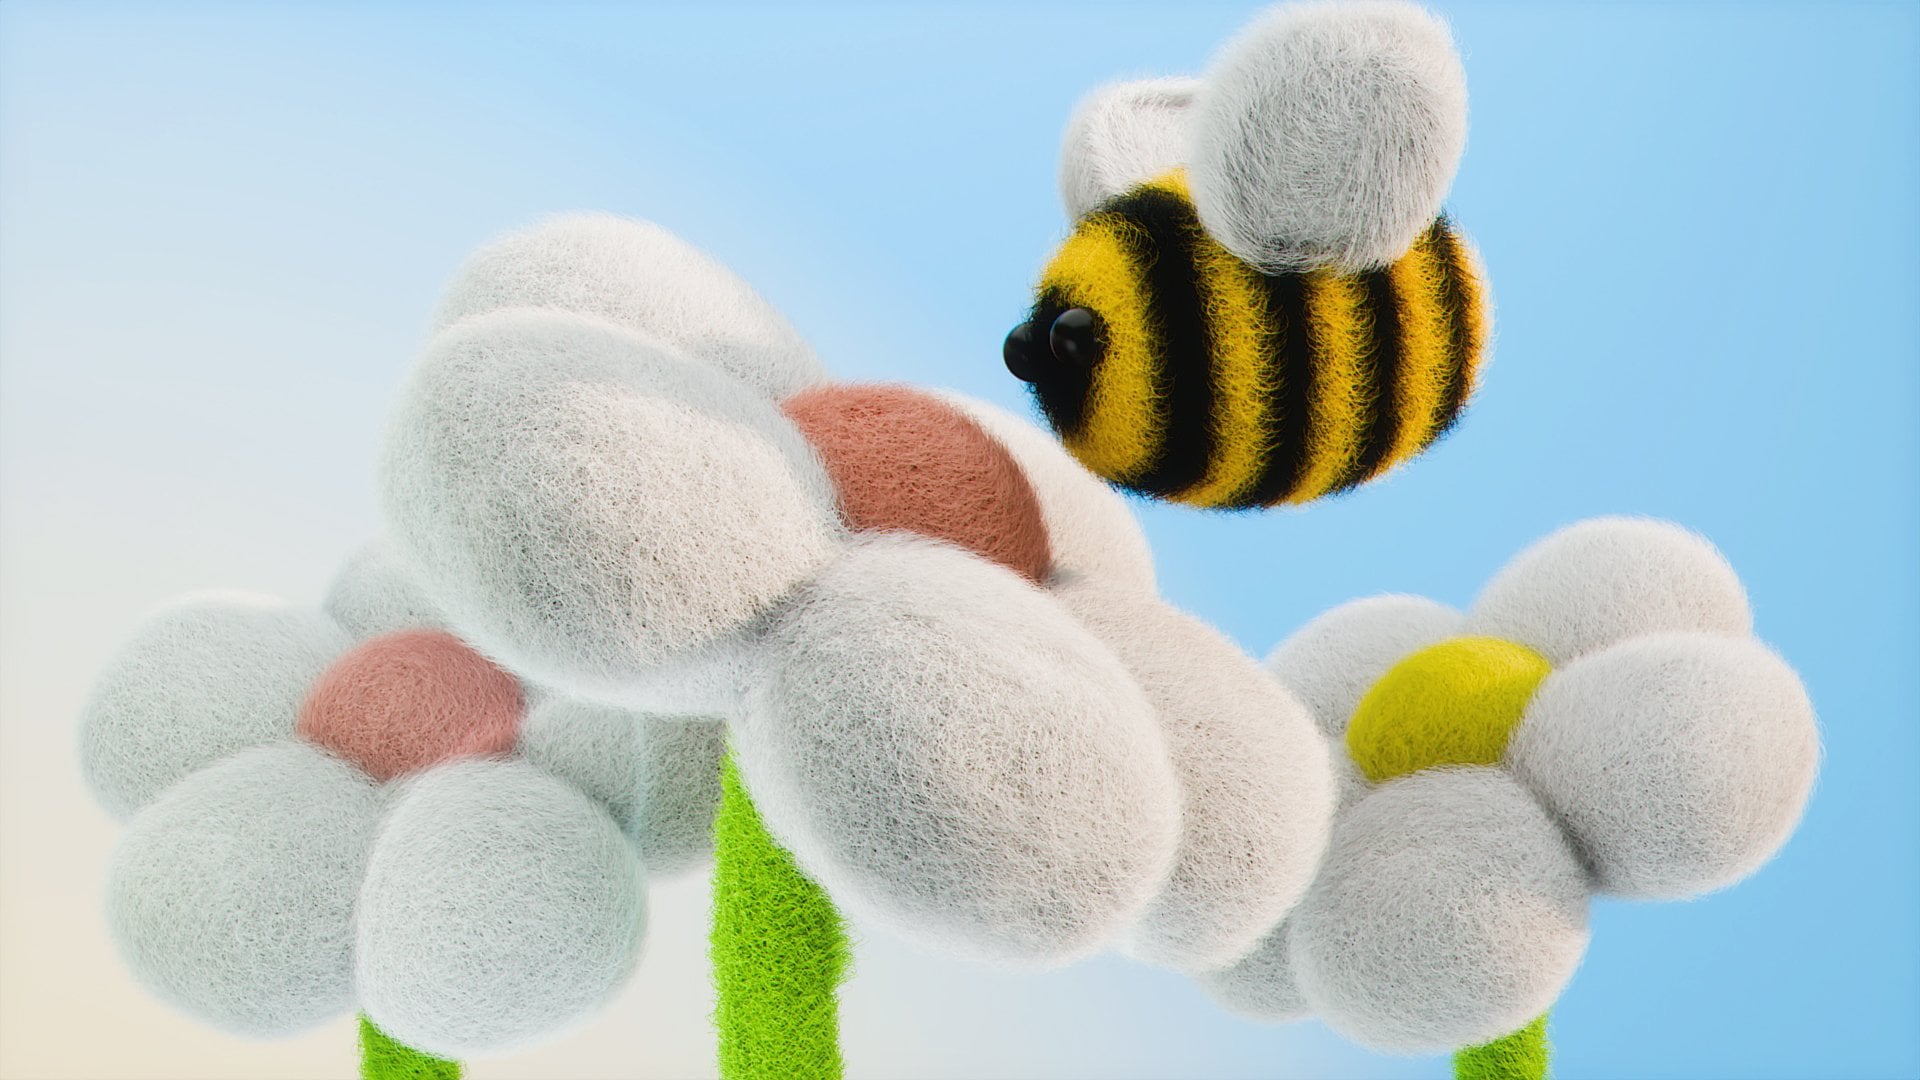
5. Lesson 4: Realistic Terrarium: Hello, my friends.
Lesson number four, where we're going to create the terrarium for our snowman. Probably, I did something not
really in the previous one. I'd like to make it a
little bit more bigger. Yes, sometimes you have
to play around that time. Let's use our snowman and
bring this one higher. Let's X. Okay, let's start with creating our background
new collection. Let's call this one BG. And Tim. Good, let's move our three
cursory in the center. How? Shift cursor
to world origin. Now shift a mesh and plane
first scale, make it big. And then we go to the edit mode, which is step on the keyboard. And choose this edge, a back extrude
which we learn from previous lessons and move it up control to call
bevel modifier. And this is another example
of how we can use that. Choose this one in the middle
control, drag your mouse, increase and bring
some bigger amount of segments moving your mouse wheel forward, left click, create. You see how everything
is applicable. Right click, shade smooth,
background is done. Let's call this one B, G, which means that round
control is to save. And let's go with the
terrarium part, shift A mesh. Wait a second, wait a second. I think cube. Let's go in a solo mode. Let's make it bigger,
make it smaller. Control two. Then we
go in the edit mode. And let's add additional loops. Control er, bring
this one right here. One more left click
and then here, and one more left
click. Shade smooth. Then let's choose
the phase below. As for scale, actually let's
choose these two edges, how we already have our
edge loop right here. Then shift out left click and that's how you
can choose both of them simultaneously and make
it bigger like that. Okay, What if we'll apply
subvigion surface modifier? Let me try one more
time control to you. And now the form is more
smooth than it was before. And how you can see, the topology is a little bit more
complicated than it was, but it's good if we'll try
to add bevel modifier. Do I don't see the
big difference? Or actually, if you're going
to move our bevel above. Because the same system you
can see in the Photoshop in many other creative programs, the layer system,
which one is below, which one is above, it can influence on
your final result. Honestly, with I like more, bring your Bible above, let me try to decrease problem. I'm going to keep
this one on 020. What going to increase
the amount of segments? Three? No one is good for me. If you want to make
your own form. No problem. Control safe. Let's call this one for the Terraium under
line and basics. Let me call basic level one, level one control safe, out of the solo mode. As for scale, I think we need to move everything a little
bit more, more higher. Let's go for the 300 and P for the side view,
choose everything. Let's go a little
bit more higher. Great, let's go with
the terrarium basic. Make it like that. Don't worry, we can scale
a little bit further. It's not a problem right now. Just something like that will
be shift down a scale one, I'm going to keep a small
distance in between, but this is the shape
of our terraium basics. Let's call this one, double click and two. Great, I told you that we're
going to create the tree. Yes. Okay. We're going to create trees in our next lesson. But now the glasses
that glass going to be shift a mesh UV
sphere, make it bigger. There is a right
click shade smooth. And there is a very
cool function that we have in blender like
transparent mood, which is the hot key at that help you to make
everything transparent. In our case, we can see what
is inside of our sphere. You can see that icon right now, this is transparency in
display shortcut al zet. When it's blue, it
means that you turn on. When it's gray, that
means that you turn off. Let's go with the Alt. Let's make this one a
little bit smaller. Let's bring this one inside. Probably, I would like to
choose our basics to make them. Let me get out from the
transparent mood with Az. This is the form
of our terraium. Let's call this one
not sphere, but glass. Let's actually call this
one for the terrarium. Underline glass. Great 300 and empt
transparent mood. Choose everything and go
above of our background. Create very easy, very fast. I know probably if you are
a beginner you struggle a little bit to repeat this
and that, don't worry. But we use the same functions that we lead in our
previous lessons. I hope it does make sense. Rewatch one more time. Remember that you can see
everything that a press in the left corner we
do with that lesson. Let's go to the next one.
6. Lesson 5: Christmas Trees: I hope you're excited
to share your project with us because I'm looking
forward to see your projects. We already have more
than enough, actually. Oops, Control that we
have a Snowman terrarium. But let's add our trees. Always new collection. Oops, with 2.1
good shift a mesh. Let's go to the solo mode. Let's go Edit mode, which is step for example. Let me show you
another way how you can use Smart Transparent Mode. Let me, for example,
bring one for the points and I'll choose this one. But let's say that I want to choose all of the points below. What I can do is to move myself around whole shift left click, but it is a waste of time. What you can do is
transparent mood. Drag out of transparent
mood and take a look. He choose all of them
with transparent mood of, I'll choose only
this one that I see. But when transparent mood is on, we can choose each one. I hope it does
make sense then as for a scale and make it bigger. Then let's go to the three on the keyboard
to choose faces. Let's insert the
face into our face. Then let's go the and move
it up as for a scale. Then control two, right
click, shade smooth. Then we go back
to the edit mode. Control additional loop, and bring it somewhere
above the middle. As for scale, then scale. This one also that form, what if transparent mood
chose this one below? For a scale, let me try. Don't repeat to extrude then. As for scale, what? Let's try together.
One more time. I emphasized all of the
points below as for a scale, and then we go with the extrudes
scale and make it lower, that one is more wider
than this one below. Let me choose all of
the points below. A little bit more higher. The same thing,
transparent moot on. Let me choose these points
for scale that or like it was before for scale crate that, what we have at the moment
right now what we got to next. We shift, make it bigger, shift to duplicate
and make it bigger. Now let's go a little bit
more inside of each one. Create your own scale,
your own rotation. How I say there is no
necessity to copy my steps. Let's call this 13 level, copy this one and at
one then then let's go here two and paste three. Then we go to the shift a
mesh of course, cylinder. Go down right click,
shade smooth. Then we go to the data
properties which is green triangle and auto smooth. Check in for scale Steam. Good out of the solo mode
with a choose all of them and bring set
up on the side. 300 keyboard, Greek. Move this one back
of your terrarium. I'll personally would like
to make them smaller and then duplicate with the
shift D X on the left. I'm going to drag this
one a little bit more on the right that we ladies and gentlemen have
at the moment, right? Now, in the next lesson, I'm going to show
you the materials. That part going to be
pretty interesting, but we've done with
another lesson. We created our tree. Let me hide or not actually, let me move like that. Control to save. Thank you. Another lesson.
Another 5 minutes. Let's go to the next one.
7. Lesson 6: Dope Materials Part 1: I hope you're very
excited for this lesson, because right now we're going to bring the colors like this is the same feeling
as a kids when we have to color our paint. What we've done, the materials, are going to be an
exciting lesson. But we need one source of light. We'll have a lesson apart
about our lighting, but just to see our colors,
we need one of them. Shift, I shift, and go to
the light and choose Sun. Then we go with
the X on the side. Let's switch. We have here
formuts in our blender view, push the 123.4 The
last one display the same image that you'll
see at your final render. Another thing is that,
let's go to that. I can render
properties and here in the render engine instead
of V, which is Dope. But let me quickly
tell you again, if you're beginner cycles
for more realistic, you can actually achieve
amazing results. Amazing realistic results also. But V, it's mostly used
for cartoon fortunes. For that more tune shading, we are switched to the cycles. You can clearly see
the difference Greek, and move this one
toward everything else. Then let's go here to
the light properties, which is that green icon. Let's make the
strength toward two. Let me move this one K. That's what we have
at the moment right now. But honestly, let me show you what Move to
the new collection. Let's call this one Light.
That's what we have. There is another technique
that I mostly use, especially in all of my
classes. Hide this one. Let me show you. We
go with the shift, a mesh and plane as
for scale, move it up. Then let's go to the
material properties, which is this red sphere
material create new, which means to create
a new material, Our first material, let's
call this one light plane. Instead of principal
BSDF, choose emission. And there is another way
how you can bring lights. I like the technique because
it helped me to create a general lighting in
comparison to sun is dope also. But I don't need it at
the moment right now. I don't need it for
this specific lesson. Choose your plane and, and move in the light collection in case if you
don't see this one, be sure that you are
rendering gene cycles here. One more time, Surface emission. And let's bring this 11.6
it's more than enough, or probably 1.3 Great. Let's go with our materials. Let's start with our background. Choose your background to make it more comfortable for us. Again, there are different
displays where, for example, you can go in the
shading workspace, and here you work with your shadings, with
your materials. For beginners, it can
look cool, but mostly, trust me, most people who are very comfortable
with planter, they create just another window. I don't need you to feel
like you are a beginner. You are, you understand. Go here you have two arrows, right click, vertical split and drag this one on the left. That's how you can
create two windows. Then let's switch here
on the render moot. Be clicking on this
icon or another way, the hot key, and then
choose above, Render it. That's how you can
switch in between of all of these windows. Let's go right here, because at the moment right now, blender contain a lot of things. Don't worry when I say that, blender have the
blender have that, you'll remember. Don't worry. We have an icon right
here in the left corner. If you are somewhere here, how to scroll yourself
around that menu. Just mouse wheel forward, down forward, a back. Let's go in the left corner and choose here, Shader Editor. Now let's hide this one. Let's start with our background. We go to the materials, and then here we're
going to bring new, let's call this one BG. They don't have to
share the same name. You can call this background
background material. I just call this one
BG because it's easy, take a look my friends, because it will be
way more easier for you to look once and then to repeat base color, which means you can
add some color, but it's too boring. Yes. Let me make this one white. How? Just bring the
saturation toward zero. And you're going to make
it perfectly white, shift a texture, and we're going to search for
wave wave texture. Just take a look.
Then color ramp. Then I'm going to connect the
color with the base color. And I'm going to
connect the wave texture color to the vector. Now it's more interesting then
we can bring some things. If I'm going to click
on the wave texture, I'll emphasize this one. I'm going to press Control and it will help me to add
texture coordinated mapping. In case if you press
and nothing appear, you go to the edit preferences, you go to the Dons. And here is here for Wrangler. Be sure that you have a
check in and then come back. Let me go this one
more time with you Control and now you have it. Great. What does it mean? It help us, for example, this is some additional
settings that will help us to achieve the result
that we are looking for. For example, scale scale, one Gri scale on the rotation. Yes, you have to play the
location and all of that stuff. But at the moment right now, don't worry yourself
too much with that. Mostly we're going to use these settings again just because there is
a lot of buttons. There is a lot of settings. It have to make you excited
because all of that will help you to make things color ramp. It's something that help
you to set the color. Let's drag this black
part in the center. White more toward the black. The more farther they're
going to be from each other, you can make very thick black or very thin black or wherever. Just drag and get the
result that you want. But we're going to
have not black, but we're going to have red, strong red because it's Christmas is party and
all of that stuff. I know some of you probably I'm to be honest with
you, to be honest, I'm not a very
holiday but I would like to increase your
disposition be via that work. Let's make it red.
Let's make it top then. Let me just make it more
toward each other like that. The color is flat. There is the thing
like roughness, roughness, even going to
drag this one toward zero. It's going to be
very reflective. If you're going to have
a source of light, you can see like the reflection
is on a very high level. If you're going to make
it not shiny at all, just keep the value on one. Let's go to the
roughness toward zero, then let's play around
with our wave texture. So first of all, we can
make this one toward 30. Just scale is something that you have to set under
your own taste. What if I'm going to
keep this one toward 13? I think it is too much, but something like 15
going to be great. Then the distortion. Let's go to the solo mode with our background and lighting
shift left click on lighting. We have emphasized both of them. Solo mode via slash on an empt. Let's move this one more
closer, choose distortion. If I'm going to
drag on the right, you see the difference. If I'm going to drag on the
left, this is what we have. I think something like
five is too much, but two is also 1.20 0.9 I don't want to distort them very much but small distortion want
to be very pleasant? Then we go to the details. Well, details is
something that you'll see more in the border but there is no big difference because not in our case details, you can keep on the same value. Detail scales, also
detail roughness. You can make it again
more shiny or less shiny. I'm going to keep this one on 0.4 that what we have at
the moment right now. You also can play with
a scale here and there, but it's more than of the settings that we have
at the moment right now. You also can switch the
direction, for example, on Greek on to make
it horizontal. I'm going to keep this one on X. Also sine or triangle. No big difference,
but it is what it is. Then let's get out
from our solomde. Let's go to our terrarium. Okay, click here. Let's call this one
underline base. They will share the same. Don't worry right now,
it will be enough. One material for both of them. What we can do is
to save your time, go to the background and copy color ramp control and then go here and control
color to the color. And that's what we have
at the moment right now. That time instead
of wave texture, we're going to use
another one which is grave control. Oops. And connect height with factor. At the moment. Right now,
there is no big difference. Let me go again, choose the plane and let's
go to the solo mode, one on an M ped and
move this one more O. Now take a look because there will be something that I
would like to tell you. Texture coordinate
will influence very much in your final render. Your material can be created, the normals be the UV, the objects. There
is a lot of things. I hold control, left click and direct this
one toward the window. You think there's
no big changes. But if I'm going to
increase the details, let me increase the
details toward 45, for example, Let me drag
this one more on the left, this one more to each other. Now let me, for example, come back to the generated, how you can see the results
are very different, how you can see if you bring
yourself from the window, if I'm going to zoom out, the texture is
different, zoom in. There is more of them. It helps you to
attain more able, more pleasant result,
in my opinion. Which will help you to
save your time because we don't need right now to
work a lot with the UV, With the topology, what we have, it's enough window
connect to the vector. Then let's play around with
our mass grave texture. For example, we have scale. I'm going to keep this
one on 45 details. It's something that you can
keep on five dimension. I don't know how to
pronounce this word. I'm sorry, Lecarity. This is the thing that can
bring us some dope results, you already can see. I personally want small points. I think that one look
interesting honestly, but I don't really need it
at the moment right now. I think the small white points is more than enough for me. What if I'm going
to keep this one on 1.3 antral S to save? And then let me
adjust the colors. The red, I'm going to
make it a little bit more darker like that. Let's play with roughness. We can make it very reflective
or less reflective. I'm going to keep this one on 0.250 Let me increase a little bit our color
and out of the solo mode. Then you go to the
Terarium below here. Search for the materials
and bring the base. Now they share the same material and you don't need to
repeat all of these steps. Well, we have a lot of things where we have to
bring our material. What if we'll finish
with our tree? Then in the next one
we'll have another part where we're going to
work with our snowmen and many more just to not make this lessons very long and
more easy to approach. Let's go to our tree. Let me show you one thing. Let's go here and
choose our abase. But let's duplicate
our material. This is the can run heel duplicate and call
this one tree. Now I can just switch the color and that's how I
save myself a lot of time. There is no necessity to, you can repeat these steps
just for your own practice. But if you can save your time, always save your time. Let's go here, let me decrease. But because all of
this is like toys, I think a real tree,
it's not very shiny. But because it's
a toy tree, well, we can keep this one on
the same roughness level. Let me make a green
one more darker, more something in between
of yellow and green. Adjust your own colors. I want the points to be more
toward yellow, like that. That's what we have then, Ralph, what if I'm going to keep
this one on 3.5 That's good. Take a look. Instead of going to everyone and
adjust the color, there is another solution. This class is packed with
chips and solutions. Choose all of that,
don't have the material. Just press shift,
left click, shift, left click, shift, left
click, shift, left click. The last one have to be
this one with the material. Yes, you can even
see the difference. These borders are more orange and this border
is more yellow. Quantrol L and link materials. That's how, just
in a few seconds, you make them all to
share the same material. Okay, let's make our tree
steam also right here. Choose the three duplicate. Let's make this one more
toward brown, which is red, and decrease the darkness here. Instead of this yellow, let's again toward yellow. And let me decrease
a little bit now. That's how we make it a
little bit more interesting. Then we go to the second
steam search for three, let's call this 13001, but three underline steam. Great that our results in the next lesson to
not make it very long, I'm going to show you how we're going to place our camera, but I hope you
enjoyed that lesson. I hope you found a
lot of useful things. And I hope it wasn't
very hard like always, if you have some questions, bring them into the
discussions under this class. But to rest, I'm sure you've
done an amazing result. Play around and don't forget that we will see
your final result. I hope at least I don't worry. We'll all encourage you
with like and good words. I'm looking forward to
see your final results.
8. Lesson 7: Camera settings: Hello everyone. In the previous
lesson I told you that we'll continue to work with
materials in that one. But I decided, let me show you, let's establish our
camera and then in the next one we'll come
back to our materials. So let's go, let's
set our camera and move ourselves more close to the final result
that we're looking for. So let me go out, let me go to the V
board shading and usually how all of
the tutorials start, they like go into the camera, go into that icon. But you know me, you already know that I don't want
to waste your time. How we can set our camera straight from
that angle that we want. For example, from here
the combination is control out and zero
Ped, for example. Or if you go from the site, control out, control
out and zero ped. This is an easy and
fast way of how we can establish your camera from the viewpoint
that you want. Control out zero Ped. Then let's say it's Ok. But we want something else. How to move yourself. How to move that camera, that camera angle to
zoom in, zoom out. Because if I'm going to zoom in, zoom out or drag
myself like that, I get out from
that camera again, someone will told you that, but it's a waste of time. Control how to move yourself in and out of the
camera is zero on an M Ped 000.0 Then we press and for the side menu
here we have View Look. And here there's a
thing like camera view. Check in and take a look at
the color of the border. Now it's yellow and
now it's more red. When it's red, that means
that if we use our bowels, we'll move around, we
stay in that camera. That's how you can establish that view that you want straight from the
camera, for example. I'm good with this one. When you think that
zoom, okay, it's cool. Check and close that, let me make the background
a little bit more wider, X. Then let's go to the
camera properties. But whereas we have
a folder apart and here we have an icon
green of our camera. Here we can change the focal
length like in the real one. I personally will choose on 85. And then n for the
side in camera view. Let me zoom out good, a little bit up. Check off another way, the type of perspective. If you want something stylish
like fish eye or wherever, you can choose the panoramic. And you're going to see this
one only in the render, but we don't need that
at the moment right now, if you want to have
the same angle like one ped three or the sharp one, then go to the camera
and type choose orthographic and this is the
same as one on an M ped, or they're very sharp, but I don't think
that we need it. I think perspective
is more than enough. Great, then it's
all for our camera. In conclusion, one more time, we have control at zero to establish from
whatever point we want, if you want to make
some adjustments. And for the side menu, camera, oops, camera to view, check in, move around, then check off and
close the menu. If you want to bring yourself
in the camera and out of the camera is zero on Mbed. There are also some
type of perspective, or potographic, or panoramic, but we don't need
the focal length. It's more than enough.
Now, in the next lesson, we're going to bring ourselves
back to the materials. I decided to keep it like that to make it more
comfortable for you.
9. Lesson 8: Dope Materials Part 2: Back to our materials. We're
going to create our glass. Trust me, there will be a lot of useful information
under this class. Not only the references, but you also can found another folder with some grunge
textures that we're going to use in order to make
our work way more cooler. Let's go to the materials
properties and bring new, let's call this one, which
terrarium underline glass? Please take a look one
time and then we're going to repeat because there will be some additional things
that we didn't make before. I will cut this connection. How I hold control? Right click, great. Then shift A and
search for glass SDF. Connect SDF with the
surface and voila, here we have a few settings. For example, we're going to make the roughness toward one. It will not reflect so much if I'm going
to keep this one on zero with the OR is something
like a distortional part. I played around before, the settings that I
liked was 0.0 950 here, 02 or even 030.19 Okay, there's a small distortion
because this is a toy and I really like the way how it look at the
moment right now. These are my settings. But if you want something
else, no problem. My friend then now
take a look shift a mix shader and I'm going
to drop this one here. I'm going to connect this one
glass with the point below. And principle BSDF
with the point above. Let me quickly explain
you the factor show which node going to influence more if I'm going to
drag on the left. In that case, let me just
switch the color just to make, for example,
principle DF is red. That means that principle
BDF going to influence more than glass because it's
connected to the point above. When you drop on the right, the point below going
to influence more, which in our case is glass
at the moment, right now, drop this one toward
zero, back to white. Take a look, shift
a image texture, one shift a color ramp, Two, control for
the coordination. And let's connect color
to the factor color, to the roughness, not
to the base color. Then, open image, search for our reference grunge texture
and choose the number one. For example there
instead of repeat, we're going to choose extent. And instead of color
space S, RGB non color. Then my friend, we
go here and hold control left click and drop
this one toward window, good. But there is no big
difference you think. So let me drop the black
one more toward the center. The white more toward the black. Now, if you'll pay attention. Small attention. But
you can see that the color flat but still
no big difference. Well, we go to the
transmission in zero. Yes, we go to the transmission and wait, bring toward one. Now let's go together,
Hold shift left, click on plane and solo
mode one and empt, oops, let me drop
this one towards 01. It looked like a flat color. If I'm going to bring
this one toward one now you can see
that grunge part, which I want to make
it a little bit dirty. The glass ain't
perfect in real life. This is exactly the same
that I want to achieve. Also, we can increase the scale, for example, toward 08 to 09, toward 06, or actually the way how it
was 0811 for me is good. Then you can play with the
roughness, for example, to make it less emphasized
or more emphasized. It's also depending
with the color, if I'm going to make it white, you can see what we're
going to achieve. If I'm going to make
both of them black, it's going to be
perfectly shiny. That's why you have the main role here is how far
they are from each other. I'm going to keep the black
some or more toward left, and I'm going to keep
the white some or more in the middle or probably a little bit more in the center. That's how we can achieve
more dirty type of class. This trick I compare without just a simple
shiny part and width. You see the difference.
Also, we can change the base color and to
make it more toward blue. Now let's bring back our glass because now we see only
principally D of glass. Don't have no influence because we direct the
factor toward zero. If I'm going to direct
this one more toward 09, in that case we'll see a small shading from
our grunge texture, a little bit of
blue, for example. Let me make correct, you
can see the difference now. Slash on an empt, let's come back zero for the empt to bring
ourselves in camera. Let me go, for
example, toward 085. That's how we did our glass
with small dirty parts, which mean more per result
than it was before. I don't see the real
influence because we have to play around
with our lighting also. But it's a little bit
here, a little bit there. I can drop this one toward 067. What if now it's more dirty? But I would like to keep it
toward 079, more like that. Play with your roughness. I can make white
more toward black. There is another thing, how
to make it more reflective. There is a specular, let's
increase the IRA level. There is a definition
which means to increase or decrease
the specular intensity. Or in other words, it
influence on the way how the lighting going to
interact with our glass. If I'm going to drop
this one toward one, the result will be better. I'm going to keep this 1.8 like that factor to 83. Take a look once, if you
need to see the nodes again, make a screenshot if you need. But I hope I explained
everything clear and I hope you like the small changes
that we already did. Actually, you can copy
these nodes and bring them, for example, to the background. Why not? Let's go T, let's go to the background. Move this one above
control V and connect here color
ramp with roughness. That will also bring a
environment difference. Then you can just drop white
more toward the black. That's how don't
see big difference. But trust me, in the
final rezoned it will be. I hope you enjoy it. But the lesson ain't done
because we have our snowman. And let's finish our
entire work right now. Right here. Let's go
back to the glass. You know what? Go
to the Turarium. Let's hide our glass for
the moment right now. Let's go to his face and
let's choose our eyes. Where are our new material? We're going to make them black. What if the routines
is going to be 035, Then where is our mouth? Let's go to the face collection. Choose mouth ice, right? And the last one, shift left click to make this one
with a yellow order. Everyone else with orange one control control L
link materials. Then we go to our
blush blush shift left click on the mouth
control L link materials. Then we go press on your blush once again and
then duplicate our materials. Let's recall this one. Let's make this one
more toward pink. We are going towards
something like, where is the perfect pink
like that, more toward red. I found what I personally like. Then go to our carrot. And let's go, for example,
to the arm base shift. Left click, This one
yellow, this one orange. Control L link materials back to our carrot and then go to
our materials Duplicate. Call this one carrot. And let's switch our colors. Red one going to be orange, and white going to
be completely black. Let's check, oops,
where you are. Now we'll have the small points. Yes, we have small points,
like in the real life, and the roughness, I'd like
to increase toward 35. Let me play around, let me make more dots via increasing
that setting. The lacarityI', 2.5 oops, 2.5 scale lets me
decrease toward 35. And that what we have at the
moment right now, the head. Well, let's go here
and choose glass. Then let's duplicate
and call this one head. Then let's remove our glass. Let's remove our mix shader. Let's connect principle
SDF with the surface. Then let's make this
one completely black. In our case, we'll save
the roughness part, the grunge. Why not? It will be more interesting. So let's choose other image, for example, the grunge
number three, SRGB. Choose non color,
and then let me make white more toward black to
make it more emphasized. The question could be
how to make that part so you see the difference
you see? I hope, yes. Let's make the black
one more brighter, which means less shiny
than it was before. I hope you see the difference. White more toward gray. Let's increase the
scale toward 1.4 now. I hope you like it. The question is how to make this
one red. No problem. Let's choose our light solo
mode via slash on an M pat. Then go closer and
take a look one time. We go to the edit mode
via the face mode, via three on the keyboard. Where are my screen
cast? My friends? I'm now you can see
everything that they press in the
left corner, 33. And let's out left click to choose the entire
loop of faces. Then take a look. We go here and bring the additional material. Let's call this one
underlying line a sign, that's how you can keep two
materials on the same object. Let's make this one red
and out of the edit mode. Out of the solo mode, let's bring back our
Terrarium zero Mp. Let me drop this
one on the right. Whoa. We've done
a lot of work and the most amazing party that
we actually didn't finish, we actually have some
things that we can do. What we have in the
particle systems is to bring the lighting. Then I promise you to show one dope modifier that we
will use, don't worry. And then in the
rest we finished. Thank you so much. I
hope you'll learn a lot. Even this one already is
enough for the final project. But of course, aim
to your best result. And I'm going to see
you in the next lesson.
10. Lesson 9: Dope Modifier : I suppose it's
lesson number eight. Welcome. I hope you
enjoy your time, and I hope you're satisfied,
will be your results. So this is what we
have at the moment. Right now, we have a few more
adjustments and we are very close to finish
our final project that I'm looking forward to see. I also like the
reflection you can clearly see on our background. The reflect that work
look more like toys. In that lesson, I'm
going to show you about that dope modifier that going to make our work a little
bit more interesting. So let's go here. And
I don't think that we need to use this
modifier on each one. I'll show you, first
of all, I'll show you, then you'll apply your knowledge on objects that
you'd like to see. Let's start with our tree. Choose, for example,
this one above. Let me show you one time
solo mode, like always. Take a look and then
we're going to repeat. We go to the Ed modifier, search for displace
modifier at the moment. Right now nothing special. Bring this one above of
subdivision surface modifier. First of all, before we're
going to go forward, let's apply our subdivision
surface modifier. And one more time control two. Now we go here and press
New Long story short, the displace modifier work. Why you don't move the
displace modifier work right with textures, you can see that the icon right here and the
icon right here, they are the same
because this is icon of our texture properties. Let's go forward. First of all, let's decrease this
one toward 02. Nothing special you think, but let's go to the
texture properties here. Instead of type, let's
choose, for example, clouds. Now you can see a small
distortion appear around. The purpose of that lesson is to show you to tell you about this modifier that can add a little bit of distortion
around or object, which can make it look more
cartoonish or not so sharp, not so smooth, which
can look very cool. Or for example, marble. If I'm going to increase
the size value, you can see the difference. Also there is a big
difference how I say before, a blender like Photoshop
and many more, they got that layer
system right here. If I'm going to bring the
displays under subdivision, you can see that the results
are completely different, but I don't need such
a big, big difference. Or wherever. Let's
just play around, let's move displays
under subdivision, for example, back to
the texture properties. You can just choose
different of them. Take a look what you
personally like more, but I'm going to stop on clouds. What if the size is
going to be 03 and what? There is also noise basis again, you can see here the
texture display. This is how the
texture look like. When you increase the size, you see that the texture
is increased and also it's not so
detailed on our object. And the same thing vice versa here a lot of details and here a
lot of details also. Let me keep this one on. Improved per line. What if I'm going to keep our displays
on the value of 01? That value of strength show how strong our texture going to
influence over our object. For example, if
I'm going to keep this one on one, you
see the difference. If I'm going to keep this one on 01, you see the difference. What if I'm going
to move this one above and I'm going
to make it, oops, I'm going to make this 102 or 03 small distortion without, if I'm going to move
this one under. Now it's time just to play. Here's the thing above. I like personally more. I'm going to keep
this one on 032. Great. I'm going to
go to the texture, I'm going to increase the
size a little bit more, not improve per line but let
me check some of them on crackle or two f
one is more smooth, I'm going to keep
this one on 07. Here are my values.
This is soft, hard, I'm going to personally
keep this one on soft. And that is for our lesson. But now you can see
the difference. Take a look on this
one, It's sharp. And take a look on this one. It's not so perfect.
And sometimes something imperfect look
better than something perfect. I hope it does make sense. First of all, what you have
to do is to go here and everywhere to apply
subdivision surface modifier on our three parts. Apply, Apply, Apply. Then to save your time, you go here, Shiftleft, click, Shift left click,
choose all of them. The last one have to
be with yellow border, this one with orange border. We already do this one
for a lot of times. Control L, again, I forgot my screen case
please. I'm sorry. Control L and link
copy modifiers. Not the materials but modifiers. Now in a matter of a few
seconds, you copy all of them, but remember they all share the same texture
and the same modifier. Which means if you're going
to change something here, they all will be changed in case if you
want, for example, this one above, to make more emphasized and
this one less emphasized. For example, on this one above, here's the texture name. Let's call this
one rims texture. If you have just to duplicate now this one will
share another text. In the same way,
like with materials, you can see we right now have two different
textures you can play around if you want to make changes on each one individual, no problem, just duplicate
because otherwise they all will share
the same texture. Great 075. What you can do next, if we'll try this
one with our globus, it shouldn't be so perfect
to copy modifiers. I think we can. Let's try. Let's go to our textures, and let's duplicate this one. And let's call this one less. Now let's decrease
this one towards 03. Let's choose not Veranoi
but improved Perlin. Let's go here to 01
before and after. Not a big change, but it's
enough change to make it look a little
bit more realistic because in real life we
have nothing perfect. That's why I think it's dope. Let's say like homework, if you want to play around. You can go, for example, to the basics just for practice because you don't
need to copy me completely. I give you the tools, I give you the skills we try on
this on our tree. If you want to move
forward, no problem. You can even try this
displays on our snowman. But in the next lesson, we're going to work with
our particle system, So you can try for
your own practice. But I'll not recommend
this one because he'll be covered with fur in rest. Thank you so much
for another lesson. I hope you enjoy our time. And let me move the background
a little bit higher. Just a little bit like that. Great goodbye my friends. I am going to see you
in the next lesson.
11. Lesson 10: Fur or Particle System: Close we are to
finish our class, let's hide our BG and terrarium, Christmas tree even
head actually, even face right now, we can hide and we are back to the beginning of our everything. Let's go in the
viewport shading. Let's go to our snowman head. Here is where we're going
to install our particles. Establish plus let's call
this one snowman. Why not? Then we're going to switch
from Emur to the hair. Not really what we are looking for here in the hair length. Let's keep this one on 04. Remember we're going to change. So this is not the final settings we're going
to play around, but right now even 02. Good. Go down,
children here choose Simple Most of the time in most of the tutorials they
are used interpolated. I don't say it's wrong, I
want Simple for our tutorial because there are a
few settings that I personally prefer more here. If you're a beginner,
this is very important. Because I remember I broke
my head because I didn't understood why there is a display amount
and render amount. Display amount is what you
see at the moment right now, render amount is what
you're going to see at the render and how you can
see the value is different. That's why if you
don't want to be disappointed why
your final work, don't look in the way
how you see right now. Keep them on the same value, 45.45 In our case, it's important because
I remember I did want a little bit of hair
and I have a lot of hair. I didn't understood why because my display and render amount
was on different values. And then we go to
the king or pardon. Here are types of hair curl, radial wave, Brad spiral
like in the real life. Let me, let's check quickly. Each one wave, Brad spiral, we're going to keep ourselves
curl always in the way. How I told you, there are a lot of settings but they
don't need to scare you, they need to make you excited. Let's back to the
hair length and let me decrease toward I think nine that
we're going to see. Then there are usually, I don't use too much
of the settings. For example, amplitude, this
is something that you can increase for around 25.25 Then we go to the
roughness here. Usually I use
random and uniform. Let's check uniform. Going to bring a small
distortion of our hair. 0.3 no too much, 0.150 random. I really like it.
Random will bring your hair in a random shape. I hope it does make sense. If you're going to
increase decrease, I personally going to keep
this one on 035 control S two safe then we're
here in the simple, we have radius and roundness. Also some small things that can bring a little bit
of interesting result. I'm going to increase
roundness toward 04. Let me play with radius. I think I'm going to
keep the radius on 022 create and then I
don't remember size. Do I use of size? No. End point? Not really. There is one very important thing,
frequency, flatness. Okay, We just check
with you together. We go to the hair shape. Here are some
changes right here. Let me just show you.
Let me show you. I press on zero, there's no changes but actually I come
back to the value of one. And now I'm going to
go to the render view. The hair make my PC to work. Let me connect. This is what we have at
the moment right now, Not the best result
that we are looking for now. Now take a look. If I'm going to switch
this one on 001, you can see that our hair right our right now
look more realistic. It's not so thick
how it was before. It's more thin,
it's more random. This hair shape settings are something that you can see in the render, not
in the Viewpoart. The same thing. I'm going
to keep this one on 02 and this one on 01. Let's take a look what we have. Tip is something that's going to make it thicker or thinner. For example. Let me go
with one and take a look. Right now, you see the
difference I suppose. Yes, come back to 01 and
that is what we have create. This is the result that
I personally like. If you're good with
all of the settings, if you want you can
still play around, but I'm personally completely Ok then there is no more thing that I'm going to use from here. This is more than enough for me. Probably I'm going to switch hair length a little bit later, but for now probably I'm going to switch this
one even right now. 03. Because it's very big. Also another value
that we can drag, that's going to
influence on the length, it's called length. Let's go to the viewport
and let's keep this 106. Now we go with a snowman
body, choose the last one. Have to be in with a golden border control
L and copy modifiers. That's how in a matter
of a few seconds like we did what we did. Let me make the
head a little bit smaller now let's bring
everything back face, Let's go to our face. This is why I told you
from the start that there is no necessity to be bothering the face
position because we're going to move it a
little bit later later. Let's go choose everything
from our face folder. Holding shift left click, and then we go to
the Greek and move it in front like that
one on a keyboard. And now it's better. Again,
if you want, you can drag, if you're a perfectionist, you can bring the mouth a
little bit more inside. But honestly, I don't
see the necessity for, I mean, it's looking good. This is our camera view. It's more than good. Let's go with our head. We need to make our
head a little bit, I think a little bit higher, but I was good with that one. If I'm going to make it bigger, what if I'm going to
make our head smaller? Then I can go with
the grips grit. Good. Let's go with our
terrarium, terrarium, Christmas tree camera
and come back to our render viewport,
what we have. There is one thing
before we'll move forward because we
don't with this lesson. But there's one thing that
we can play right now. Go to the render icon right here and go below
to the last one, which is color management. Here let me show you high
contrast, medium contrast. This is something where
you can play around with your exposure and to make it more emphasized,
less emphasized. I personally am going
to keep this one on. Medium, high contrast
or high contrast, Medium, high contrast.
I'm good also. There are a few other types like film standard Standard is what usually is used
for cartoonish. Filmic is like, I don't
know, industry standard. So I'm going to keep this one on filmic and high contrast and also their
exposure and gamma. If you want to make them brighter or less
brighter, no problem. It's on your own choice. But at the moment, right now, we are done
with another lesson. And I hope it was another useful and interesting lesson
for you, my friends. That is what we
have at the moment. Right now, actually, we will
do a few different renders, so don't worry because in
future, we, for example, can switch the color
of our background. We can make it
blue, or, you know, toward gray, toward black, and we'll do different things. There is a lot of
space for creativity, the same thing right here. We can make it blue
or green or wherever, but we're going to keep it on red at the moment right now. Okay, I suppose
the next lesson is going to be the last one
before our final render. Because one more
thing that we have to do is to establish light. Thank you so much and I'm going to see you
in the next one. I hope you will be there.
12. Lesson 11: Elevate it! Lights: Again, lesson where we're
going to establish our lights. Let's go here. And let's
hide our plan light. Then one more thing that
I'd like to recommend. Let's go to the snowman. Let's hide for this process, our particle system, go to the modifier window and
then he height height. Why we do this one again, if your PC is very
strong, no problem. My PC is a little bit broke,
is a little bit sick. So that way, in order to save
my time, I hide this one. For the final render,
we're going to turn it on. Lighting is very important. This one on the right, if you want to close
it completely, just when you have two arrows, right click, join area
and on the right. Let's start with our world. Color, how you can
see it's gray, but we can make it
a little bit more brighter, red on world. Let me show you color. We go to the second column. Here we can play with
different settings, the value they're
going to keep here. Show who is this thing around. How you can see when I move
my point, the hue is changed. Also something like 0.5
is more close towards the blue saturation
is something that can increase or decrease
the blue value. The color value, let's
keep this one on. Zero to 250 value is something that go increase
the common light or decrease the common light. I'm going to keep
this one on 01. We need just lighting
around our world. The strength is something that's going to make it very high, we can see or not really. I'm going to keep this
one on one great control. If you haven't desire to
keep other colors like red, yellow, green, no problem. But I personally going to keep
this one more toward blue, a little bit more
toward blue, like that. Great. Then we go a shift A. Now first of all, choose
the light collection to make sure that our lights will appear straight in
the right folder. Shift A, light sun T, move it up, X, go on the side. Now let's go with the air for the rotation and
move the lighting of our sun more
toward our terrarium. Let's go with the Greek a
little bit in front actually, and seven Pz and
move it more toward. Right. Another option, let's
go with the second window. Right click vertical split. Go here, one on Ped zero for the camera view Z
and choose Render. Now we can see the
lighting right here. Meanwhile, we work with
our lighting settings. What if, oops, let me above. I want a slight light
shadow somewhere here. I'm good with that sun position. Then we go to the
light propertings, which is this one,
the green one. Let's make it more toward, or blue about strength. Let me try with two, which I think is a
little bit too much, but something like 1.3
going to be great. Then what did I want? I'm going to tell
you I want to have three sources of light
under our snowman. Let's go with the shift A point. Let's go to the Viewport
shading right here. Let's hide our terrarium
for the moment. Right now where is
open the light folder, series for the point and
move it on the right, three under P. Let's move
this one behind our snowman, that then let's duplicate, shift up X on the right
side, somewhere here. Let's increase the power to 440. Right here, you can already see a slight shadow right there. Let's make the color
toward something like bright red here. Let's go with 450. You already can
see the lighting. And let's go with
the light blue. Let's go a little bit
more on the side. Great, let's try. Okay, let me activate
our particle system. You can see a small
lighting around which can make our work a
little bit more deeper, but I don't think
that it's enough. Let me go a little bit more. I need a little bit more light
A let me make it a little bit more stronger like 550 gray. The same thing right here. Let me go a little bit
more on the right. If I'm going to move this
one more toward our snowman. Yes. Let me keep
this one on 500. Good job, point Greek. Great. Let's have one more. Let's duplicate this
one above shift Greek. Move this in front
and let's keep this one in front
but not so strong. First of all, let's
choose another color. I personally going
to choose again, blue and I'm going to decrease the lighting. Let's the power. What about 75? We don't need
something very strong, but he look, keep a
little bit scary. Move it under a little
bit above too much. I honestly did like
the position before. What if I'm going to
even move it a little bit lower? That's great. That's very interesting.
Probably. I'm going to keep it like that. Yes. I'm going to
bring the blush a little bit more inside because
the shadow is too big, so I'm going to keep it
even a little bit more. Not really the same
thing with our eyes. I'm going to keep the
eyes a little bit more in. Let me check. Create, what are we going to
bring the terrarium back? Our terraium glass
and take a look. Now, our grunge is
way more emphasized, which I don't think looking
good at the moment right now. Because yes, because we
don't see our Snowman. It is what it is.
We're going to go back to the shader editor. Let's quickly change this thing. What we have to do is to
make the factor toward 0.93 here we're going to make it more white,
more brighter, white. Move a little bit a back
the transmission weight, we can make it like 07. Now it's not so emphasized in
the way how it was before. We also can play with
our scale with rotation. This mapping is scale
location rotation for our texture that you can play around and our image is going to move
around that object. Good. Now I think is better
now I think it's better. Okay, let's go back to the viewport and let's choose
our points where they are. You can see these dots that
show you where the points. Let's go with this
one which is on the left X. I'm going to
move this one inside. I'll do the same thing with this one behind our
snowman also. Great. We'll bring one more additional
light above of our head. Shift a light area
and move it up, but it have to be
inside of our Arial. Make sure that it isn't
above like that inside. Then we're going
to make the color more toward yellow like that. Let's again hide our
terrarium, like this Greek. Move this one in front, move this one toward our head. Let's go with 100. What if I think it is too much, but what if I'm going to keep this one more toward
white like that? I'm going to keep this
one more toward 45. Let's increase the size, 1.6. Now back with our terrarium, now we have an
additional light here. But I know what you don't
like, you definitely. First of all, I don't
like the fact that it's above of our terrarium. Let me bring this one
inside of our terrarium. And that's what we have. Let
me decrease toward 25 or 30. Lighting is always something where we have to
spend a lot of time. There is no necessity to rush. I really like these scribbles around our class and how I say. Because without.
Let me show you. If for example I'm going
to emphasize, oops, shader editor, let me cut. And just a simple class, boring. But when we bring this one, it's such a big
difference between a complete beginner and someone who spend a little bit
of time in blender. Let me decrease this one toward
350 because I don't like, it's really very strong. The same thing here, 50, 50 and okay, because it was
too strong for me personally. Then let's go forward, back to the three D viewport. Okay, we have a little bit more. Let's check our area, which we have right here. Let's duplicate X. Let's switch this one
toward our glass with using a rig behind seven to take a look above and
bring toward our terrarium. Let's make this one to
3.2 which means bigger. Now let's establish this one
a little bit more closer. I need just a small
outline around our glass. What if we're going to
keep this one on 50? 50. And then we're going to
keep the color more toward bright red like that, probably. I'm going to decrease
this light toward 35, a little bit above control to save The last
two things that I'd like to do to have in our
scene is two points of lights under behind our tree. Let's check our point from
from the terrarium inside 300 amped shift D and move this one A back
under one tree. Let's go like that, we can
keep it actually one behind. That will create a small
outline right here. Then let's start with shift X, move it here a little
bit, even more inside. Let's go with the color more
toward green and yellow. And then shift X and then move this one
behind right there. You can see the outline
here. The outline there. The same thing with
the other one. Just copy, both of them. Emphasize hoops, emphasize
these two lights. And then we go to
the shift D, X, and move it on the
left for that one. What if you're going
to do this one a little bit more stronger? What if shift D, move
it on one layer behind? That's what we have at
the moment right now. Then let's back to
our camera view. Let's check there
is the function, if you want to see, render your image a
little bit more clear without all of the
lines sun and wherever. Press here on the show, overlays. Turn turn off. Now your image is
way more clear. I like the reflection of
our background for real. Let me direct this
one on the left. Let's go down to the
color management. High contrast exposure,
I'm going to keep on 01. What if I will make our world saturation
a little bit higher, toward 0.4 Our sun,
which is above, will be a bit more brighter, not 1.3 but 1.6 Or not 0.6 but 0.45 So
my dear friends, this is what we have at
the moment right now, and we've done with
our last lesson. If you need to make some
adjustments, for example, you want to make it closer or to set your camera
in the other angle, there is no problem because in the next one we're going
to render our work. Thank you so much everyone for the fact that you're
watching. Take a look. I mean, the glass looking
really dope, the crunch, the scribbles, this
reflection of our toy, the reflection of
our background. I'm very excited to
see what you prepared. Probably one thing that
I like to do, you know, blender is all about having fun, so that's why you
always have what to do. I want to make them a little
bit thicker like that. Or probably eight. Yeah. Because it was
too much for me now, it's a little bit better for me. Make some adjustments and I'm going to see you
in the next lesson. And don't forget that the final render you can share with us. I encourage you to do this one, especially if this is your
first work in Blender. Bring it to our eyes. Thank you and I'm going to
see you in our next lesson.
13. Final Lesson: Render : The final lesson, the render. And you'll be surprised how
fast it will be because usually I don't switch
on too many settings. Check one more time if
you like the colors, if you like the
brightness, if you like the lightning, the lights. Then let's go to the
render engine here. Go to the render here, you'll have 4,000 and something. We long story short, the more samples you have, the more better quality
will be at the end. The less quality if your
PC is weak or very strong, actually something
like 256, trust me, going to be enough, going to be good for
an average quality. But then we can go, I
personally go for 888, or you can go to 1,000 It would take a
little bit more time, but the result will
be way more better. Then bring yourself down. Check one more time if you like. The contrast medium, high. I'm going to keep this one on high contrast on the filming. Let me close this one. Right click, join area
on the left side. Then very important thing, be sure that everything that you hide in the viewport going to be hided in
the final render. Also how you can see we have an E and the camera
is for the viewport, camera is for the render. So that's why make
sure that they both are turned off or turned on. Let me quickly check. Okay. Okay, everything is on cat empty which
was our reference. Then my friends, if you like, Everything is
everything is cool. You go to the render
and press render image. Now let's wait and
I'm going to see you after our final render
is going to be done. My render is done, my friends, I actually render it on samples 222 because I did before the render with
a higher quality, so I didn't want
to waste my time. But I hope your render is done. And then you go to the image, choose wherever folder do
you want to bring the name? Choose Color, Depth
16, and Save Image. Then you can bring
this image into Photoshop or wherever
other Photodor. Bring some contrast
highlighting and make it a little bit better than it is at the
moment right now. But for now, thank you so much, my friends for the fact that
you joined me on this class, that you went with
me till the end. I hope you found this useful
and very interesting. I encourage you to post your final result in our
project gallery section. Don't be ashamed, thinking that it has to be
better and better. Share in the way how it is. I'm sure you've done a great job in rest.
Thank you so much. Have a nice day,
have a nice year. Let's go together toward new
levels in our three D skill.
14. Congratulation! You did it: So first of all,
congratulations, this is your first step
toward a new path hobby or who knows what if this is your future career.
I hope you enjoy it. And let me review
because I'm wondering, what do you think
about that class, my teaching style and the
information packed here. Also, I encourage you to share your final result here in
the project section gallery. Don't worry, share as it is. We don't strive here
for perfection. We strive toward better results. Each time in rest, I have other useful classes on my skillshare page that
can improve your skill. And I'll be happy to
see you there. Goodbye.
 Sasha Luvr, Work in third dimension