Transcripts
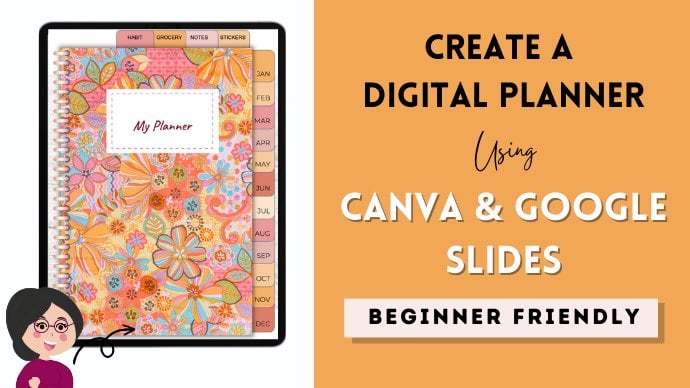
1. Introduction To The Course: Hi everyone. In this course, I'll teach you how to create this digital planner in InDesign. I be teaching you how to create hyperlinks. For notes. Stickers. And fall monthly pages. Also be teaching you how to import data into your planner. So for example, if Gorsuch to the first of January here, second, third, fourth, fifth, I'll teach you how to do all of this instead of having to manually amend each page. Out of this course is useful and you learn along. And you'd be able to create your own digital partner. Please make sure you share your designs with me and I hope you enjoy this course. Thank you.
2. Thinking About How Our Planner Will Be Structured : Two is we first want to just sketch out what we want our plan to look like. So we want a cover page. An undiscovered patient respond to, type my name and I just have my tabs on the side. Page notes. And for stickers. I wanted to create a daily as well. So I want to date to be here. And like a to-do list here. Perhaps some notes on this side as well. A top three priorities of the day. The reflection of the day. And just remember, this is just a rough sketch so it doesn't have to be exact and your plan doesn't have to look like this. You just want to jot some ideas on how we want to help them to perhaps look. Also want a multi-page. And on this monkey page, I want a calendar and a section for note to the button. I think I also want a notes page. Just perhaps a blank sticker page. Ozma, to think about the color palette of our planner. And a good way to do this is just go into Google and just search for some color palettes. So I usually like to use pink neutral color palette. So if you go into Google search, pink neutral color palette to build, to find a color palette is going to suit. You were just going to go into Google and find one now. So this is the color palette that I've decided to work with. I'm just going to leave him on my plan. So this is a rough plan on how our plant is going to look. Again, it's just a sketch, doesn't have to be exact. But if you want to make it more detailed, you can, if you want to make it less data which can, That's just a way for us to get some ideas.
3. Setting Up Our InDesign Document: To his want to open up InDesign. And we went to click New File. And I'm going to select inches. And I'm going to do landscape. And I'm just going to do a classic 11 by 8.5 inches. And I'm not going to click facing pages because I want this to be a single page document. If you wanted your planner to cover two pages, then you would click the facing pages. So I'm just going to click Create. We can see we just get one single page here.
4. What Are Master Pages & Why Are They Useful To Digital Planners?: So the good thing about InDesign is you've got something called master pages. And what a master page does is it makes life a lot easier to age page that we add here is associated with either a master page or did not think. For example, MR. I put in this a parent which is the a must. For example, if I put in a big circle and I just make it any page that is associated with a param, you can see the a here is also good to have the same thing on there. So for example, on the most page, if I just delete this, then it's deleted from the associates page as well. This makes it really easy because we don't have to go into individual pages to change anything. We can just go into our master page and make any amendments that we want. And it will be applied to all of our pages. So this is especially handy for our daily page is really planned to have 365 daily pages. So we cannot go through if, for example, we wanted to make a font change. Afterwards, we decide, okay, we don't make a font. We can't go to O 365 pages and change this. What you want to do is you want to go into the master page that is associated with all of the daily pages. And if you change it there, it will automatically be changed. And all of the daily pages. It might sound a bit complicated now, but once we start going through an example, it will make a lot more sense.
5. Creating Our Dates Text File For Our Planner: I want to do is we want to create a daily pages. And we're doing this fast because it's a lot easier to do daily pages first because we'd need to add our dates using something called Data Merge. So what we want is each daily page to have a plan and page. And also Long and his books here for there to be the date. For example, what it say Saturday, the first of January 2022, and the next spaceship to say Sunday, the second of January 2022. Again, to go through manually. And well, if this is really time-consuming, so we're going to use a function called date image, which is going to make life a lot easier for us. For day 2, my 2-AG, we're going to work with an Excel spreadsheet. Click a blank workbook. And what you want to do is how to talk, to write dates. And I want to write glucose right-click and I'm going to click Format Cells. And I'm going to go today. And I wanted to click on this date format. So here's 1 fifth 14th of March 2012, the press. Okay. And what I want to do is I want to put in 1st of January 2022. So I want to create a 2022 calendar. So you can see it automatically shows me such that if as of January 2020 to what you want to do is you want to drag this down. Once you drag it down, you can see all the dates followed. So I'm just going to drag it down all the way to the end of December and quickly just go all the way down to about here, 365 days. So MTSS today, the 31st of December 2022. So once you've done this, what you want to do is go into File, Save As. And I went to save it as a text document. I'm going to save it as a tab delimited text document. See when I click on this one. This is because we've got a comma in our data. So you need it to be a tab delimited text file. To click on this. And I'm just going to quote this and press Save. And the end of this course, I attached the text file, all of these states so that you can use it. We're just going to close this and go back into our InDesign.
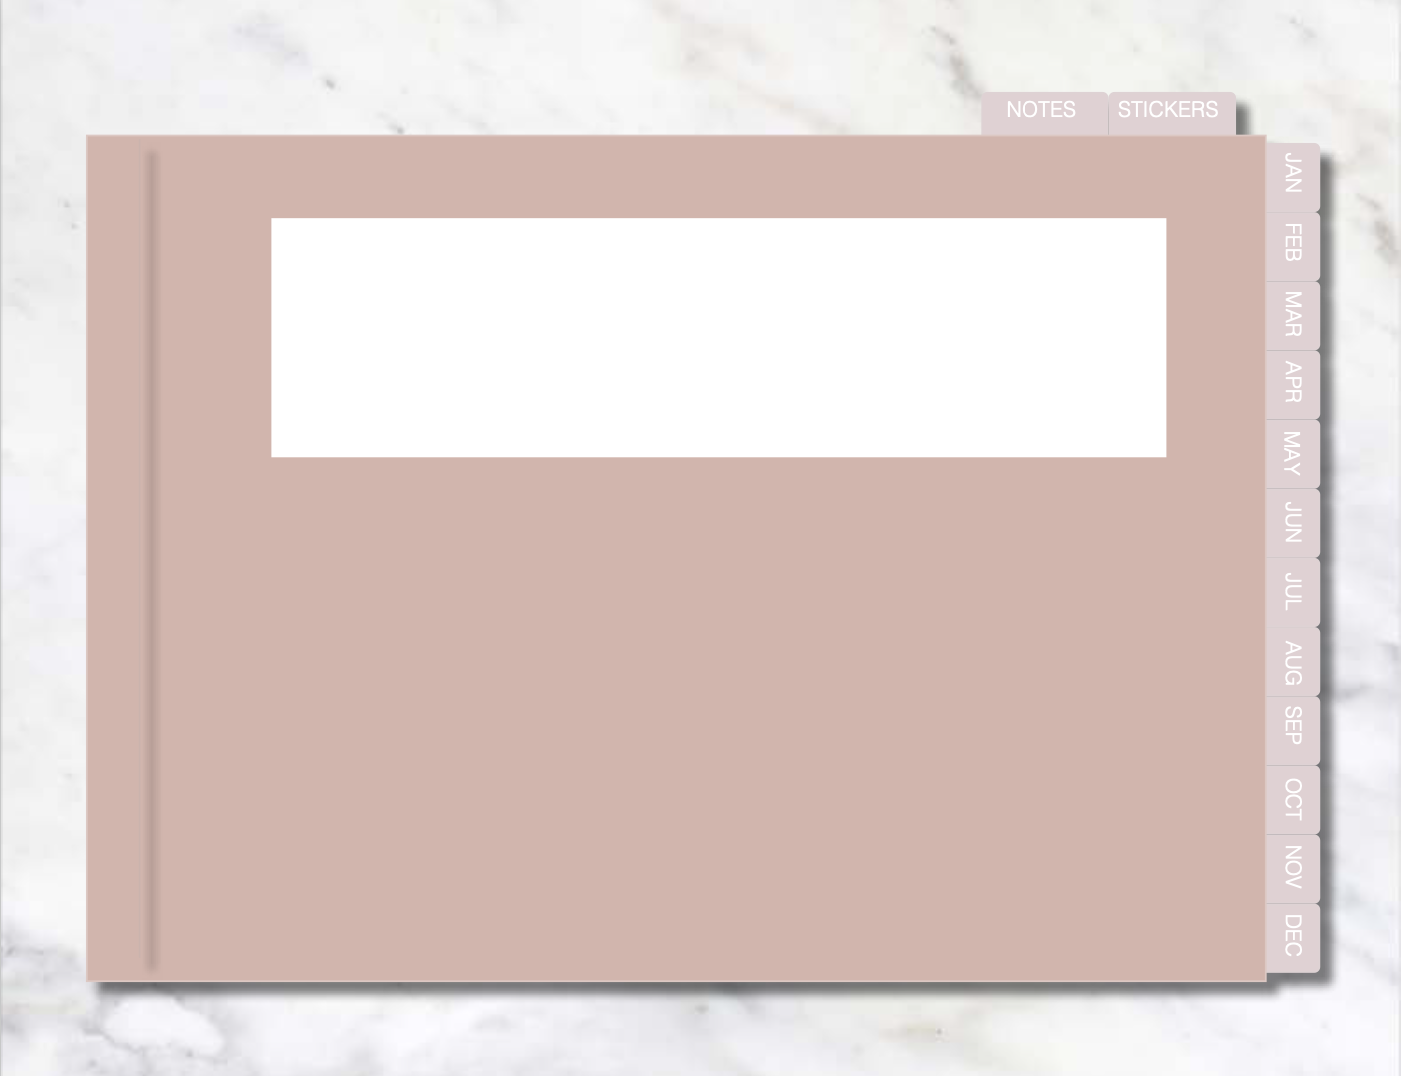
6. Creating Our Daily Planner Pages: So now we're back to our blank Adobe InDesign file. What we want to do now is start creating our planner. The first thing I want to do is I'm just going to insert a color palette that we selected earlier. So you can just go to File and go into place and just select. So we're just going to put our color palette right in the little corner here. First thing I want to do is I want to go into my a MOSFET and I'm just going to go into parent options and I'm going to rename this. It's a lot easier just to label them so that you don't get committees press. Okay. And what I want to do is go into the masturbate, click on it. And I want to go into my rectangle tool. And I'm going to click on create a rectangle for my planner. And you want to make sure we leave enough gap on this side so that we can add our tabs. So what I want to do is I want to change the color of this rectangle. So you want to go into the fill tool here, and you can see you've got drop icon here. What I'm going to just click on the dropout and drag it to one of these colors here that will go in and color palette. You can see automatically the dropper select the color that we're hovering over. We can use this for our planner. So I'm just going to choose this light pink color here and press Okay. And then I'm going to go into the line, click the dropper again, go back into the light pink numbers. Okay. The next thing I want to do is I'm going to create my tabs. So I'm going to go back into my rectangle and just create little shape here. And if you go into your select tool, you can see you've got a little yellow square here. And if you move the r squared, if you click on the square, you can move the square to make the rectangle more curved. So you just go back into it. You can see it's turned into a sort of circling rectangle shape. I wanted it to be slightly more. This is a bit more curved now. I just want to position this red top. And what I want to do is I wanted to come into film and it can go into my eyedropper. And I'm going to select another color in my color palette. I'm going to go for this light shade here and press Okay. And I want to go into my line again, go into the trooper. And I can just choose this color again. Say, Okay, hey, we've got our tab. I'm going to do is using your keyboard. You either want to press Command C if you're using a Mac, or Control C, if you're using Windows, it's me switch, press Command C. And then you want to press Command or Control Z. You can see it pastes it automatically there. And I'm just going to move it right next to this other tab. Again, just again, just move it right next to the other tab. And what you can do is you can just highlight these three by just clicking them like this. And press Command V. And you can see you've got three right there. It makes things a lot easier. I'm just gonna keep doing this for the rest of my tabs so that we've got 12 for each of the months. Okay. So we've got our tabs and you can see that they're a bit small. So we can do again is just highlight all of them and you just make them slightly picker. It's going to increase the width a little bit as well. There. And what I want to do is I want to select one of these. Then I went to go into Object and I'm going to go to arrange and I'm going to move them backwards and to be behind that cover page that we've got here, it's going to arrange them backwards. You can see just goes behind selecting want to do is I want to create a few tabs at the top for my stickers and my notes pages. So I'm going to press Command C Again, this commodity, just put this at the top here, just make it a bit bigger. This will be my notes page. I'll just copy this one here as well. This will be for my stickiness. Them slightly. And again, just click on them, go into Object, Arrange, Send Backwards. Just behind. I will cover. The next thing I'm going to do is I'm going to go into my rectangle again. And I want to create a white page. So I'll just draw a rectangle, go into fail, and change it to white. And do the same for the line. Which is, I chose this slightly. I wanted to make it bigger or smaller. Say Hey, we've got our daily page template. And sometimes I find it quite difficult to work with a blank page. So what you can do is you can go into, so you can go into layout and you can go into create guide. And you can just create a few guides for yourself. So we'll just go 10 by 10 percent. Okay? See you just create some guides here for you. Just so it's a bit easier sometimes to create any lines or any shapes that you want it. So I'm going to go into and textbooks and I'm going to map out where I want it to show my date. So I wanted to be here. I'm going to say he's gonna be on a date on what I'm going to do is I'm just gonna copy this and moves to the top here. Make it a bit smaller. And behaves. Well, I want to do is come into my line and I want to create some lines underneath here. I'm going to copy this and just put any two. And here is where we're going to write a code for the day and X1 to create a rectangle. And here we're going to put notes down line. Just add some text. And again, we can just create some lines for notes. At the bottom here, I went to add a daily reflections on the Cretaceous could be this and put it right to the platoon. Here is where I went to put my thoughts. And again, just copy these lines and place them underneath. So we've got our goals or notes on a daily reflection going to create a little to-do list section here. Again, just copy this text box and just put it underneath. I'm just going to copy this line again. We're going to do, is I'm going to create little boxes here. We can just take things off. So again, just go into your rectangle and just draw a tiny little books. We've got our to-do list. And at the bottom here, we're going to add our top three priorities of the day. I'm going to create eight books to point any of this so it's combined. Can move it to the bottom. And I'm just going to split this into three. And what we can do now is go into layout, coming to create guide, and just click move existing ruler guides, press. Okay, so let me just get rid of the egg. So here we've got our daily template page. So to get the date into this list to textbooks here, what you want to do is you want to go into Windows and we're going to go to TTS. And here's where we're going to add our text file that we created earlier and go into Data Mart. And then you'd seen still box comes up to date to manage. You were to click on these lines on the side and click Select Data Source. And you want to click on your text file. And you can see here that in that text file we only had one column and the column name was date. You can see automatically pulls in that column that we've had in our text file. We're going to do is you want to click on this and you want to drag it into this textbook right here. So just so it looks like this. And if you go into preview, you can see automatically shows up. And if you click Next, you can see Sunday, the second Tuesday, the 4th, and so on. What you want to do is I want to just format this. So I'm going to select it all and go into type code into size and make this fit pickup. And to see what looks like him. And think I'm just going to go into Type and change his old to help it. I'm going to do because there's a big gap here. I'm going to click on Select tool. Just make this slightly smaller here. And then I'm just going to create a few more lines for the to-do list. You can see here this is our de Pena page. The next thing I wanted to do before I create all of my daily pages is I just went to add labels to my tabs. That can, I'm going to go into text and just create in textbooks. And if you click on it, you can see you've got your rotating feature here. Just rotate them the center, and then change the font. And you can also change the text color. So I'm just going to change it to whites January. And you just want to do the same for the rest of the month. So just copy paste. I'm a tab names and I just want to add the tab names to the top as well. Just going to copy on top and just rotate it again.
7. Using Data Merge To Automatically Generate Dates: So we've labeled all of our tabs. Now, what we're going to do is we want to create all of our pages for our daily planner pages. So you want to go back into your day too much panel. Click on the lines again and you want to go into Create Image document. And what you do is you want to click all records because we're not all of the 365 days to be single records. And then everything else is fine. You want to press. Okay. You can see here, we've got 365 pages. If you're going to each of them, date changes for each of them. And this is a much simpler way than just typing it in manually. Do this in a few minutes. It doesn't take time at all. Once you do this a few times, it becomes really easy. Ends Saturday 31st, December by 2022. And the reason we did the pages first was because automatically what happens is a new document is created. So from him, instead of the pages showing up on our original document, it creates a new document. And it's much easier just to create all of these pages fast and then create your other pages separately.
8. Creating Our Cover Page: It's because we've done our daily pages. Now, what I want to do is I want to go into this a daily page and I'm going to create a new master page. And I want to press new parent, and I want to call this k. And this is going to be my cover page. I might want to do is just go into my a daily page. And if you press Command a or Control a, depending on if you've got Windows Mac and press Command C, go into a big cover. Everything just automatically pulls through. I'm just going to delete these little elements V1 to group objects to get home, you can just highlight will have them go into object and press Group. And just groups have been together. Makes it a lot easier sometimes. And you can do this step prior to beginning when we're creating our data pages. Just so it's easy and I think shifts and moves. For Nixon to do is want to create our copy page. So we've got our blank background. Poverty, went to zoom in. I went to go into AMP and press Create Guides and just create some guides again. Okay. I want to go into my line tool and I'm just going to create a straight line and we want to use this for the shadow. We go back into Layout, Create Guides, and just get you to remove existing, relocate. And we can just move this slightly. We want to do is much right-click and go to effects and click Drop Shadow and needs the passage of 75 plus OK. You can see it goes off shadow effect. But because this line is still black point want to do is we want to click on it, go into our line, and change the color to the color of the planner. That h sort of disappears and we're left with this sort of shadow shape here. What you can do is to give us a more of a realistic effect. They can click on our grouped objects. Right-click, go into effect and click truck shadow again. And I just wanna put this about 50. Okay? So you just crazy sort of shadow effect the back. And it's going to be our cover page. So we want to do, is I want to go into my rectangle again. And I just want to create a square heel for baby can just put a name. And we're just going to leave this cover really simple line chromosome. So hey, we've got our cover page.
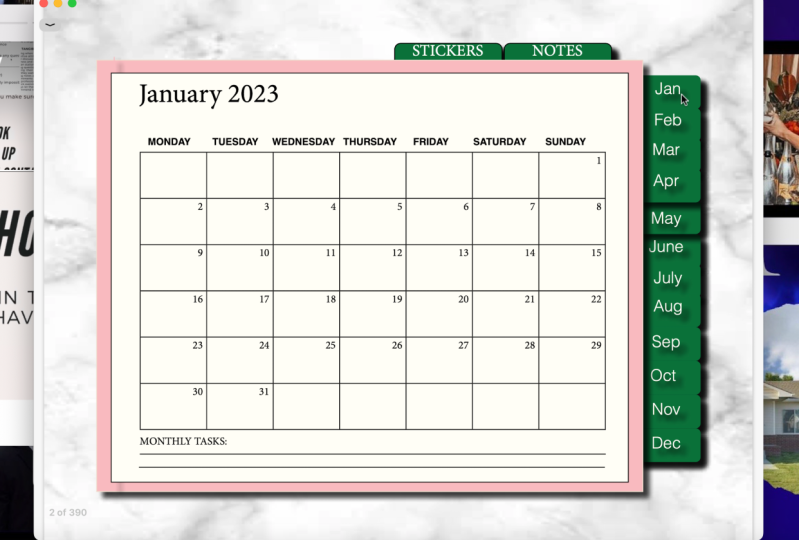
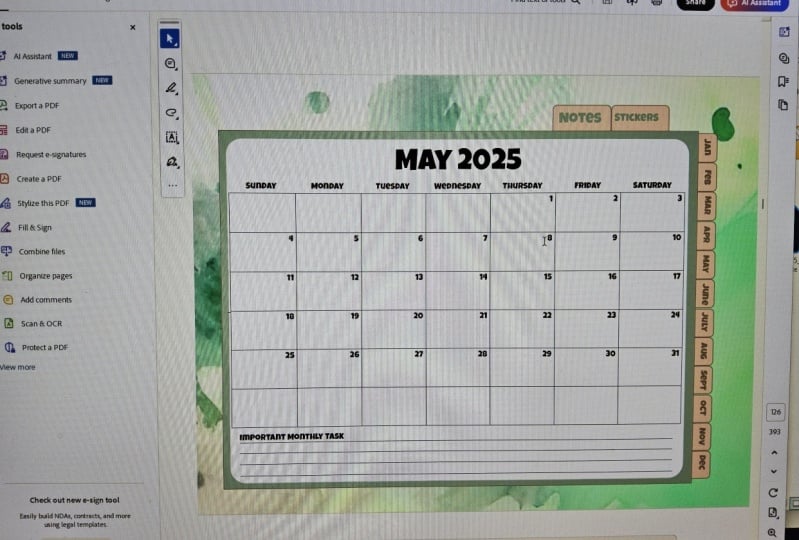
9. Creating Our Monthly Planner Page: So we've done, I will cover pages and we've done our day the pages. Well, the next one to two is we wanted to create our monthly pages. What went to is I want to go into a daily pages, master page, and I want to go into duplicate parents bread a day or two pages. And it just creates a new parents seek parent. And Americans do is just rename this right-click and go into parent options. Okay? And what I meant to do is I'm going to start creating my monthly pages now. Again, I'm just going to be and I want to start creating my monthly pages. Now, what I want to do is I want to add a calendar here. So to do that, I want to go into my textbooks again. And I want to move this here. And it's changed the type, change the fonts, Helvetica again, change the size. We wanted to create my calendar. So you want to go into table and press Create Table. And what I want is six rows and seven columns and press, Okay? And you can just start drawing your table. Could you make it quite big? It's still going up space. What you want to do next is go into your textbooks. Can you create a new textbooks? And this is going to be placed right on top of the calendars. And here's where we're going to put days. Shift this up. And what you meant to do next is you want to add the H of the month. So I want to do is I just want to go into google and just check what day. The first full sun on a Saturday. I went to go into your text option here. And we want to click on table here and highlight everything. And you just want to change the font to your preferred font, change the size to your preferred size. And if you click Command Option, he opens up this dialog box and we're going to do is, I want to click on this aligned right. Because if a slave we want our date numbers to be and the right and press Done. What you want to do is now aligned on the Saturday is the first, second. And you can just do this. So on. We're going to do is just add some lines of the petunia for some notes and key monthly tasks. So again, go into Layout, going to create guides, create doubt guide, so that we get straight lines. Go back into our line, just create a few lines here. They went to go to my textbooks, just add on here. So this is what our monthly page will look like. So we've got our daily page cover. I've got monthly page. What I want to do is I'm going to go into our pages here and click Insert Pages. And I went to create 12 pages of sea monkey page. Okay. Go on a trip. Monkey pages at the front.
10. How To Override Master Elements On A Page: Now that we've copied 12 of our monthly pages, we want to do is we want to edit the pages. So the January pages, fine. We come to the second page here. What we want to do is we want to change this to February, and we also want to change the dates around because obviously for February the 1st might not fall on a Saturday. So sometimes when a page is associated with a master page to actually make edits on here, it's actually quite difficult. So what you can do is, so if you click Command Shift or Control Shift, and you just click there, it can make the change on the actual page without editing the master page. So good at February 2022. And because February 2022, the first stops going to choose to eat. We went to edit these numbers. So that first folds here. What you want to do is just click Command, Shift and click. Yeah. And we can just highlight isn't deleted. Then we can go into trues m plus 1. So on. So we've updated after every page. If we go into the third page, you want to change this to March. And again, it changed the numbers too much. And I want to do this for all 12 of my monkey pages.
11. Creating Our Notes & Sticker Pages: Our next one to two is just add one of my cover pages. And I'm just going to click Insert page. And I'm going to click on our cocoa and create a cockpit. Just move this to the top. So you've got cover page and 12 months of pages now. And our daily pages. We're next going to do is create our notes pages and our sticker pages. So I'm going to just come into my monthly multipage and just duplicate this. Meaning this. Here is our black notes pages. I'm just going to go right to the end and click Insert Pages. And I went to create 10 note pages and press Okay. You see red end. You can see right here, let's just go ten pages. The last page that we want to create is our sticker page. I want to do is just duplicate minutes, master page and just call it sticker page. And just get rid of these lines. What I would suggest doing is saving this cover page and it's blank white document as a master page on itself. So if for example, I get rid of this and I duplicate this, and just call this pair of options. Let's call this a when for example, I'm going to create a sticker page or a newspaper. Or left to do is click on it and just click and just click Duplicate, and it will automatically come up. Printers can delete this for now. You've got a sticker page, and I'm just going to insert textbooks to collide. And again, click Insert Pages. I want to pages. So k pages now.
12. Adding Hyperlinks To Our Planner Tabs: So now I've got all of our pages sorted. What we want to do is create hyperlinks. Now, the first thing we do is we went to go into our cover page and click on here. And I'm just going to object ungroup. And now we want to create hyperlinks for each of our tabs. And the way to do this is you went to click when your object. So the January tab, right-click, go into hyperlinks and click New Hyperlink. And we're going to do is link to page. And I went to link it to pay to here. So I want to think to page two and press Okay, because this page too is that January page. And I want to click on the Library tab, right-click Hyperlinks, New Hyperlink. And I went to set this to page 3 because that's where the February pages. Okay. I want to click on the march right-click. Hyperlink. Whereas page full of April hyperlink. Hyperlink to page page 500 days for all of the month. So I did all of my hyperlinks to each of the corresponding pages. And then I went to add hyperlinks to my notes pages as well. So I'm going to go down and see where the nose patient starts. So it starts on three 79 here. So I just want to right-click hyperlink. So go to page 379. So K. And then the sticker page starts on page 389. Click on the sticker. 389. Okay. So we've got all of our hyperlinks down to one, it's one to two. So I'm going to use my select tool and just highlight one of these. And I want to copy all of this. And I'm going to go into my daily page and just get rid of this. And I'm going to just get rid of this. And I'm going to press paste and paste. This way instead of 100, two hyperlink, all of these again, hyperlinks that automatically they're just going to be covering a cockpit. The note and the stickers control C, come into a daily. Just delete this and go paste in place. And I went to go into Arrange Send Backwards. And again, I'm going to go back into my pico, just copy this again and go into the C monthly. And clipped is delete this until it tastes. Can just press, Paste in Place. Face-to-face. Object arrange, send to back to the same ham object arrange send to back. And go back into here. I'm going to copy these hyperlinks into all of my pages.
13. Arranging Our Planner Pages Into Order: Now we can do, is we can see here we've got our cover page and then it goes to a 150 pages. But we can do is we can move these Monte pages to go off to the daily pages. So for example, after the first, I would want all of the January daily pages and then the February and occupation, then all of the Fab remotely pages. And because this hyperlink I dynamic, if we move this February page, for example, I'm just going to move this February for page 12 it down. Put it into here for now. Just pick it up slightly. And you can see Monday 31st, January to February here. But because dynamic automatically, these links are going to link to page 44. So we don't need to worry about changing our hyperlinks. Can so this is March. I'm just going to move March all the way down into position. And they're just gonna do the same for all of the other month, dismiss them into position. So now we've got our cover page, our daily pages, amongst the pages. And I want to note pages kind of a sticker pages.
14. How To Add A Background: Now that we've got all of her planner pages and we've got them all in order. What I'm going to do is I want to add a background to my pages just to make it look a bit nicer. So I'm going to do is just go into my cover page and go into File and go into place. I'm just going to do is just get a background image di call from free pic.com, which you can sign up to 95, 99 per month. Or you can just get a stock image from online which you're allowed to use for commercial or personal purposes. We want to do is there's going to be sized this. You want to make sure it covers the whole document. And then you just want to click on it and go into Object, arrange, Send to Back. And then I went to go into my next most page and click Paste in Place. Again, Object, arrange, Send to Back. And I want to do this for all of my master pages.
15. How To Export Our Planner As A PDF: So now I've got a background and now we want to export this document. The way to do that is to go to File and go into Expo. And you want to make sure you export it as an Adobe PDF, interactive. And press save you and make sure you click all pages and press Export as pages. And click Next poll.
16. How To Import Planner Into GoodNotes: So if you open up good notes and if we click New and go to import, we can import our digital planner. So he is our planner. And you can see here that our hyperlinks are working. We've got all of our daily pages afterwards. First, second, third, fourth, fifth, and so on. We click February as when a qualified daily pages as well. So all our pages are there in order. We can click on our notes page is and our sticker pages as well. We can edit our planet and write your name on the cover.
17. Conclusion: I really hope this tutorial has been useful and you've learned too long on how to create a digital planner in InDesign, I really hope that dates function has been super useful. And you know how to import dates in a few clicks now, instead of having to do them manually. And that this would make your digital planning in the future very simple and easy. I have some other courses on digital planning on my website. So please have a look. I show you a cheat, create a digital planner in Canva, keynotes and PowerPoint. If you have any suggestions on other software on how to create a permanent, please let me know. I would love it if you would be able to leave a review on how you found this course. If you'd like to access this planner and other digital planning courses on Partners, please make sure you join my newsletter. Thank you.
 Janna Uddin, GRAPHIC DESIGNER & DIGITAL ARTIST