Transcripts
1. Intro: Hello everyone,
My name is Karen, and on this course
I will teach you how to create this
kind of animation. We will start by gathering the resources like
3D models, photos, some pre-made animated textures,
animate our character. Then we will move to Cinema
4D, create some crystals, a landscape, and put everything together using Octane Scatter. We play around with
a camera to create a dynamic animation and do the post-production
in After Effects. I would consider this an intermediate level
course where you will learn things like how
to animate a 3D character, model crystals, clone
objects in octane, use animated textures, work with octane camera and do the post-production
in After Effects. You will need Cinema
4D octane Render and After Effects
for this course.
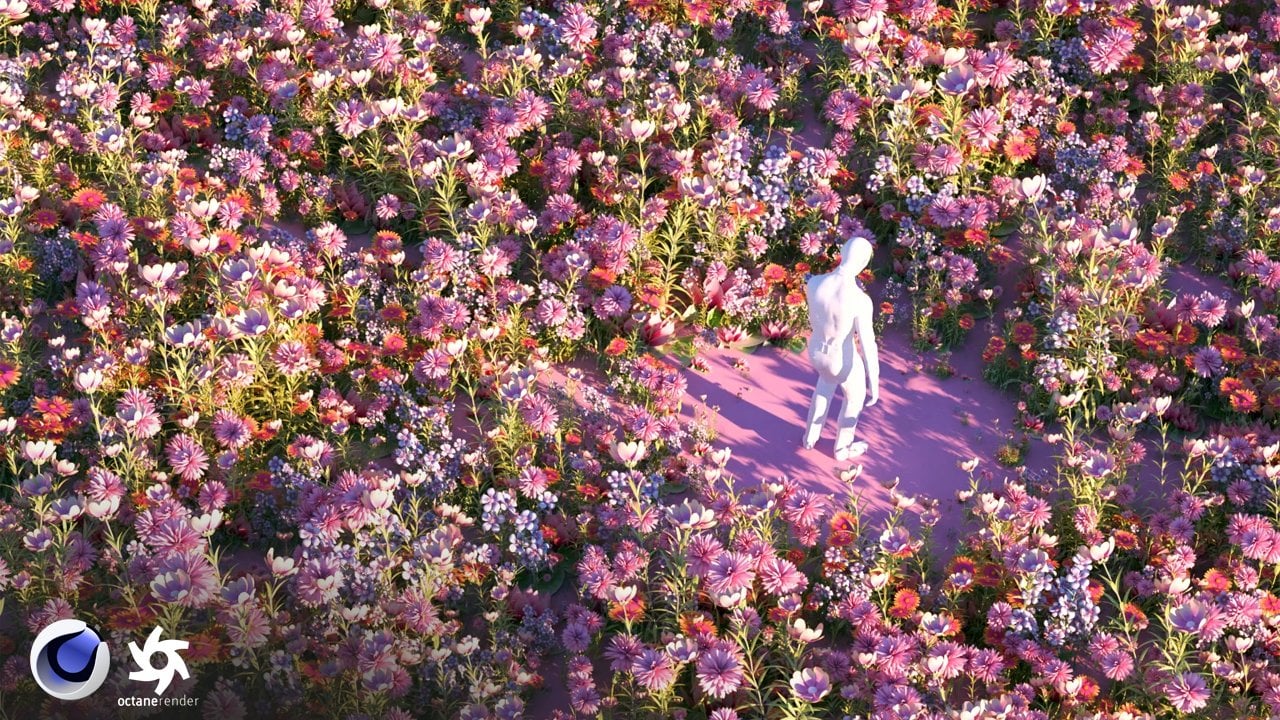
2. Describing the Process: Okay, first let's
see this example and what the scene contains. So as you can see, there is the main object and
there is this landscape. And on the landscape
there are some objects like grass and crystals. And you also see a
background which contains this pink light, the nebula, and the
glitchy effects. If you see the 3D scene, let me change the camera. Basically there is
this, yeah, Again, the main object Morty, and there is the landscape. And on the landscape
I've put the objects. Let me show you the preview. Here are the
distributed objects. And as the sky, I've created these cylinders. Let me show you
by checking them. Yeah. Here's the nebula, the glitchy effects
and this pink light. And of course then
I've worked with a camera to rotate it. This is the 3D scene and
now we will start gathering the objects are the resources that we need to create
this kind of scene.
3. Resources and Mixamo Character Animation: Now with the resources, first, I will show you
where to download some free resources that I've
created for another course, sexually for this course. But you can use it
also for this one. You can go to my Gmail account and there is this
free resource where you have these 3D objects
around five, I think. And also these glitchy textures, the main objects, can be used the same way as I
use more D here. And the glitter textures can be used as the sky background. So you can download them for free and you can
upload them on Mixamo. Mixamo is the website
that I use to upload 3D objects in
T-Pose and animate them. You have two options here. First option is to use any of the characters that
makes him a website has, you can just click on them. Yeah. And for example, use this character or you can
upload your own character, which can be one of these. Or if you want, you can use the same one
that I've used here, Morley, and I'll show you
where I downloaded it. Basically, I just
searched on Google and see what options I have. In my case, I found
it on Sketchfab. You can go on view all. It is. This one from this
user, 3D land. And you can just download it. Yeah, you'd have to login. And after you download
it, you can open it down. Cinema 4D. It is this one. What I will do here is delete everything besides
the one that I need, because otherwise you cannot
upload this on Mixamo. You need to have just one
character in this regular pose. So I'll just click on this
one and click Delete. Same thing here. You have also the layers here on
the right side. Now that I have only this one, I'll go to File export and export it as an
OBJ or as an FBX. When you export it as an FBX, it also contains the materials. So let's do it like that. Save. And now let's go again on Mixamo and go to
upload character. As you can see here
are the formats that it accepts. Okay, Let's open it. Let's click Next. And now we need to start
the rigging process. So you have this example on the right side and
you just follow it. Now let's click Next and wait. Let's click Next again, Next. And now we go on animations. And here you have some
pre-made animations that you can just apply
on your character. Let's apply one. Yeah, as
you can see, it works well. Now the next thing is just two. Find the animation
that you like. I'll show you the
one that I used. Yet is this one running tired? As you can see, there are
some glitches that happened. For example, the hands
go inside the head. And because of this, there are some options on
the right side, for example, the overdrive and the
character arm space. Based on the animations, you can also have other
options. Let's try this one. Yeah, it's the same here, but in this case you also have
the mirror are in place. It always depends on the, on the animation, but let's
try it with this one. And if you increase
the overdrive, let's see what happens. Basically it does
the actions faster, but I'll leave it as it is. And I'll just adjust
the arm space so we don't have this glitch. Yeah. Now I think it is. Okay. Maybe increase
it a little bit more. But this also depends
on the character. As I said. In this case, I'm going to use another
character from Mixamo. Character is because
since this is a tutorial and I don't know if I have
the rights to use this. So just to play, Save, I'm going to use any, I'm going to use any of the
default characters of Mixamo. But yeah, if you decide
to go with this one, just quick download and you will have the file
that you need to use. For now, I'll just pick
something from here. Okay, I think I'm going
to go with this one because it has some
nice colors and I think it goes well with with
the style of the animation. I'm just going to
adjust the arm space. Okay? Now I'm just going
to click Download. Leave these settings as they
are and click Download. Okay, let me show you real quick how it looks in Cinema 4D. Yeah, Let's click Play. And this is the
animation that we have. Now let's download a few
more resources. From here. What we can see is that we need some grass and Nebula background because the crystals
and these capsules, I'll show you how to
do them in Cinema 4D. Of course, you can also
download other resources depending on what you want to
add here on the landscape. But yeah, let's go
on Google and I just searched grass 3D model and you have different websites where
you can download them. For example, there
is turbo squid. Sketchfab. Turbo squid is a nice website, so let's just click
grass search. And since you want to
download something for free, you can go to Price
and go to three. And you have this nice
option here. For the grass. You can click on it and
go to Free Download. You have to create
an account first. And when you go
to free download, you'll basically find
it in my files section. And you can download
the OBJ format. And what you will get
is something like this. Let's Amtrak the transparency. Yeah, you can use them to
distribute in the landscape. But of course you can also
download other objects. Now I don't know
whatever you like. For example, let's search here. Flower. For example,
you can use these. Yeah, I'm just searching random
things that you can add. The same thing here
on turbo squid. Yeah, for example,
these are for free. Just make sure to download
them in the FBX or OBJ format and gather these resources to use them for these
kind of projects. Okay, and now the last
thing that you need to download is the nebula
background for that, I'll go to Unsplash. And here we can just
search for Nebula. Here, keep in mind to download a wide image because we will
apply it in a cylinder, like I showed you here. So wide image would apply
better in this cylinder shape. Yeah, You can download
different ones and test them. This is what I will also do. I'll just download
them for free. And here are also the users
who have uploaded them. So thank you. Okay, now what you can do is just
put all the resources in the folder and now we move
on to the next steps.
4. Model Crystals: Okay, now I gathered all the resources and I
put them in one folder. Here are the nebula images, Here's the grass object. And the other textures that I showed before and the LBJ's. So now we will
move in cinema 4D. And I will show
you how to create some crystals and also how
to create the landscape. Because the rest we
already have it. We just need to create
the composition later. But let's start with Crystal. I'll exit this. And to create the crystals, I use this a platonic shapes. And I added these
triangles shapes to create a more
distorted shape. Here are three main tools, the move tool, the scale
tool and rotate tool, that you can use to
edit the object. Also the same thing
for the camera. Yeah, and now to
edit this first, you need to go to
this icon right here, Make editable or use the
shortcut C. I'll click on it. And now from the model mode, we go to polygon mode. And now when you click
on each triangle, you can added them all by
using any of these options. For example, with a rotate, you can rotate it like this. Let's click on another
shape. Rotate it. You can also move, use the
Move tool and drag it up. And also do the same thing here. What I do is just click
on different shapes and use any of these
options to edit the object. We can also rotate and do the same thing on
these other parts. I'll continue like that until
I get a shape that I like. I think I'll make
three of these. Okay, I'm going to leave
this like this and now copy and paste Control C Control V. I'll do the same thing again, Control C, Control V. And move these by being
on the model mode. And I will now click on each of them and start adding them again, editing them again. So we have three
different shapes. Okay, Now that we
have the crystals, we can save this project
just so we can also use them for any other project
that we will do. So let's Save Project. I said it's project
three times, I think. Okay, now that we
have the crystals, we can save this
project just in case.
5. Create a Landscape: Now I will put this in a group. So group object and I can
also make them smaller. And for now, I will
make them visible. And we will create a landscape. To create the landscape, I will start by using a plane. And here on the right side, there are the object
properties, the width, the height, and the segments. Yeah, let me show the segments. I will increase them
and now make it bigger. By increasing the segments, we will get a smoother shape. So we can also change
the size later. But for now, to distort
this straight plane, I'll go to displace, displacer. And I'll hold and click down below the plane where we see this arrow pointing down. And by doing this, we will effect the plane
with a displacer effect. Now nothing happens
because on the displacer, when we click on it, we
need to add a shader. So we go to Shading
and on the shader, I will use a noise. And there you can see
some distortions, which are because of the noise of the black
and white colors. And here on the shader, what I usually play
around with is just the noise type
and the global scale. So for example, I can increase the global scale to
something like 700. And you will see a
smoother distortion. And now you can also try
different noise types. Yeah. And you can also
increase the contrast, decrease it, or increase
the brightness. You can play around with these. But as I said, I just changed the global scale based on the size of the plane. And now go back, go to object. And here I play around with
a strengthened the height. I can decrease the
strength or increase it. I can increase the height,
for example, make 20. And you can see what it does, how it affects the plane. And we can also
change this later. So I'll keep it
like that for now. And the plane, I will
make it editable. Now that we have the plane, what we will do next is
add the animation that we created and put
all the resources in this plane to create
a nice colorful scene. So let's save this project. Let's call this animation. And yet we will move
on to the next steps.
6. Clone Objects: Okay, now I will
show you how to add the objects in the landscape, how to distribute them. First of all, we will
use octane render. So let's open live
viewer window. Okay, yeah, we just see
the plane distorted. Also. Let's edit the
render settings. Usually I go with a
ratio of four with five. So for width and height, meaning let me show you this way so it's easier
for you to understand it. And now I can click
on log ratio. And usually what I do
is change the height to 1920 just so it is
optimized for Instagram. And yeah, they're under
go to Octane Render. Later we will go to
Save and the rest. But for now I just wanted to get the ratio of
the final render. And now first of all, I'm going to show you
how to add objects by just using one random
object like a capsule. I can make this smaller. Make it editable. Now, what you need to do is go to objects and go
to Octane Scatter. This is what we need to
use to add these objects. And now we need to put the capsule below
the Octane Scatter, like we did with the
displacer on the plane. Let's go to obtain scatter. What we just did
is saying that we need this capsule to be
distributed somewhere. And now we go to
the distribution. And the distribution
we go to surface. And we need to add the surface where we want the capsule
to be distributed. And the surface is the plane. So we click and drag it
and put it on the surface. And we can see right now
that it is distributed. Now, what we can do next
is edit it a little bit. For example, we can change
how many we want to see. For example, I can
put 500 or less. Depends on what you want. I also want to make
this a lot smaller. Xyz. One way to do it
is just go to capsule, go to scale and scale
it down like this. Or you can also go again
to Octane Scatter. And right here you
have the position. And here you can change
these if you like, or you can also
change the scale XYZ. Let's put this five or six
just to see what it does. Yeah. You get the idea. But I'll just leave
it like that. And now I will do the same
thing with a crystals. I'm going to drag them above and let's delete this empty group. Let's add another
Octane Scatter. And I'm going to select them
all and drag them below. Again, distribution surface and add the plane has a surface. We can see the crystals now, of course, again, we
can make them smaller. So right now you can make
the changes that you like depending on what
works best for you. I'm just changing the size
and of course I will also make a few more edits later. For now, I'm just
distribute the objects. You can also change the seed so you get different variations. Okay, I'll leave it like
that for now and see later. If I want to add
more, Let's save it. And now I will also
add the grass. I'll add this one. Before I showed you even other objects
that you can download. So depending on what
you download it, you can use any object. Of course also you can use
geometric shapes from here. I'm going to paste
this and it's really big so I can scale it down. And let's add another
Octane Scatter, put it below, make this
surface and add the plane. Okay, I think we
scale it down too much because it's really small. I'm going to decrease the count. And depending on how much, how powerful your
workstation is. Be careful how much you
increase the count, because you can
experience some lagging. Buddy. I'm going to
increase the size of this. Okay, I think that's nice. I can also add a material to it, but yeah, we can do that later. Yeah. Again, you can
work with a count, with a seed, with a
position scale and rotate. You can also rotate it here. But for now I just
wanted to show you how to distribute
the subjects. And now I will show you some effectors that you
can add on each of them.
7. Random Effectors: Okay, now I will show
you how to make each of these objects more random so they are distributed
in a more natural way, as you can see right now. Doesn't look very natural. So let's try it
with a grass first. What I do is add some effectors. So for that I make sure I
click on the Octane Scatter, go to MoGraph Effector, and let's try this random. And right now if we
go to obtain scatter, you go to affect her and
apply the random one. And now we go to random. And on the perimeter, you can see that
it changed because the XYZ changed. They are 50. If we make them 0 again, we go to that initial position. And as you can see, what you can change
here is the position, the scale, and the rotation. Usually what I do is just change the rotation
a little bit. For example, make
this 74516 maybe. And let's see how that changes. Let's try also the scale. Okay, just some
random small numbers. And the position, of
course, maybe the z. I don't know. That's usually what I do is just try some numbers
and see what I get. I guess you can make the difference how it
was and how it is now. And you can do the same
thing with the other ones. Let's copy this random effector and I'll put it on top
of each Octane Scatter. Let's put it on the
effector. On each of them. Now you can change
the parameters on, on each random effector. I'll do the same thing
on the crystals. Okay, Now that they are
more randomly distributed, I'm going to show you
another effector. Let's go to more graph again, and let's go under Shader. Let's apply it as an effector. And I'll show you
what this does. Basically. If we go to Shading, first of all, let's
uncheck the parameters. Here. We just need
to go to Shading and on the shader I'm
going to apply a noise. Let's go to noise. And I'll increase the scale. So you can see better
what this does. Below. I will increase
the contrast. So you can see that
the colors here, the black and white. And now to see the effect, basically what this does is the white-collar means that
the object is visible and the black one means that the
object is not visible and this noise is
projected on the plane and it affects the
object that we have. So let's go to
parameters and make sure to click on this scale
and make the scale minus one. And this is what this
does is you can see, I'll create a black material
just so it is more visible. Okay? Yeah. If I uncheck this, you can see the difference. And of course, if you'd like, you can apply the same
shader or another one. In all the octane scatters. I just wanted to show you
these two effectors that I, that I use and then you decide on which one
you want to apply it.
8. Putting Everything Together: Okay, what I will do next is add the animation
that we created from Mixamo and also a cylinder where we will add
the sky background. So let's open the
animation first. Yeah, okay, I will copy this. Edit. Copy. Go to Windows and the project
that we have, edit, paste. And now what we can
do is just adjust the position and the size
of the image of the object. Let's click Play. Yeah, what I will do
is actually start the animation only
from the part where the character stops and
put the hands on the head. So somewhere here I think, yeah, on 60 frame. So here on the timeline
we have the frames from 0 to 210 based on the length of
the animation output. This actually to 60. Okay, let's click Play. I'm going to exit
the live viewer just so we don't have this lagging. Okay, Let's also position
this somewhere else. And now actually I'll put
this in a group just so I can also scale it down if I
want or move the position. So group object. And now I will position
this here in the center. Click play. And I think it looks nice. Maybe I can also scale it down. Make sure to go to Objects, object mode and go to
scale and scale it, scale it a little bit. I can also change this later, but I'll keep it
like that for now. And now we can also
add cylinders. We can go to these objects
and go to cylinder or two, but let's go with
two bits easier. We can increase the
rotation segments. So it is more around like that. And here it has the
inner radius and the outer radius like that we just did is we just
need it as a plane. So for that I can just decrease the inner radius until it
looks just like a tube. And now I can just
increase this like that. Of course you can also
do that manually here, inner radius, outer
radius and the height. Okay? I'll make
sure that this is not bigger than the size
of the plane like that. And the after I apply the
texture as the sky textures, then I can decide
if I should make this bigger or smaller. But for now, I'll keep it like that and just
make it editable. And I will uncheck it for now and check it later when
we also add the camera.
9. Camera Animation: Okay, the next thing that
I will add is the camera. We can add an octane camera. And now I'll make the camera rotate around
this main object. And for that, we need to
right-click on the camera. Go to camera tags, go to animation tags, and click on this
align to spline. Now we need to add the spline. To do that, we go to this icon right
here and click Circle. Now the circle will be
around the main object. Like that. I'm holding shift, so we
get some regular numbers. And I will make sure that this is in the center and around
the main object like that. And if we go on the spline, it says in what spline path
do want to add the camera. So we drag this circle here. And now if we check the camera, we can animate it only
in this in this plane. So if I change the position, you can see that it rotates. But what we need to do is to have as a center
object, the character. Let me show it like that
so you understand better. Yeah, when I change
the position. So we need to add
another animation tag, which is the target. And on the target object, we can add this character, or we can just
create a new cube. From my experience, it is better to a cube and just put it in the position
of the main object. Because you can also
change it a little bit. For example, increase it. Put it higher or
lower depending on how the camera it looks better. Or you can also animate
the cube on the target. If we click on it, it
needs a target object. So for that, we can just
add the cube like that. And of course we can also
uncheck it so it's not visible. Now, if we click
again on the camera, you can see that it targets
our main character. And of course, if we go
to spline to animate it, we can change the
position like that. Then we have this animation. We can also put this lower. So it depends on where
you want the camera to be exactly n. Now, if we also click on
the octane camera, what I usually play
around with your soul. So the focal length. So if I put it like 20, we get something like this. Or we can put it 90. But for now, I'll just
put it as it was 36, the classic focal length. And I can change it later. I can also change or animate
the position of the cube. But that will also depend on
background that I will have. So let's check the tube for now, which will be the sky. And now what I will do
is animate the position. So first of all, let's, let's start from here. So we have the
character in front. Make sure the timeline is, make sure that timeline
is in the start. And now to animate it, we just need to
click on this icon right here and make it red. And when we go in the end, if you want to make it a loop, just add the one for this, so it is 100% plus. And let's click again
on the red icon. And if we click play, this is what we get. Something that you will notice
is that it starts slow, then it goes faster
and then add, then it ends in a slow way. I don't like that.
So to change it, we can go to this position. Right-click animation
showed track and just change the spline
to linear. Okay? And now if we click Play, you will see that
it is constant. Yeah. Okay. Now, if you like, you can also play around with a focal length depending on what you like or also
you can animate the cube. For example, in the start, it is in this position. You can click on this key. So you put the position here, go to the end and keep the same position again,
just so we have loop. And somewhere in the middle, you can put it below a little bit and click
again on this key. And we have this kind
of make this kind of animation when it
goes up and down. Okay. Something else we can add on
the camera to make it more natural is also the vibrate. And what I usually do is just enable the rotation and
change the amplitude to, I don't know, maybe two. We can put right here, one, right here, one. And if we click Play, we can see that we have
a certain vibration. That personally I like. Of course, if you increase
these numbers more, you'll get more
crazy vibrations. But yeah, it depends on how much you
want the camera to move. Okay. I'll keep it like that. And then now that we
worked with the camera, I can also increase
this a little bit. So yeah. Now we will work with textures.
10. Editing Textures: Okay, at this point, we will start with the textures. Again, we will use
octane textures. So first of all, we can convert this one that is by default on the character. So we can click on it, go to materials, convert,
convert materials. And we can also remove
unused material. We can also remove
unused materials. Usually what I do is
double-click on the material and turn the material
Type two universal. And it has this shiny
look that I like more. I'm not going to
explain everything that all these options do, but I'll show you what
I usually change. For example, I changed
this metallic. And you can see the
difference here. Usually I put this to one. And you can also work with the
roughness like that. Okay? Now the next thing that I
will do is create materials for each of these elements. First of all, let's
make this bigger. Okay, now go to create cinema 4D octane octane
material and now control C, Control V. And we can create some new ones for each element. First of all, I will
do the material of the grass. I'll
create on your desk. Send material. To do that. We go to material
type again to universal. And what I will do here is
just increase the roughness. And first of all, let's apply this so we see the difference. Let's find the layer. Okay, I'll make this colorful by going to thin film layer. And you can just decrease this film IO and
increase the float. And you will see
this kind of colors. Now, depending on what kind
of value you give to it, you get these different results. I'll just play around and
see what I like more. Yeah, I think I'll
go with this one. Okay, Now I'm going to create a new material for the
capsules and that again, I'll go to Universal. I'm going to make
this blue, I think. So on the first option, Let's make this blue or you
can just go to texture, color and the color, choose the color that you like. I will also increase
the roughness. Let's apply this to the capsule so we can see how it looks like. And now I'll add
some lightweight. So for that I'll go to emission. Click to this black
body emission. Let's click on it. And
I'll make sure to check this surface brightness so it doesn't affect the
whole environment. And now I can adjust the power here and also change the
color by going to color here. And I'll make this blue. Okay, you can see how it
affects the environment. I can decrease the power and the I can keep
it like that and then do adjustments later here. You can also change
the temperature. If you decrease it.
If we go to red. I can make changes
later depending on I liked the combination
of colors more. Now, I'm going to do a similar
thing for the crystals. Let's make them, Let's
make the material Type two universal, increase
the roughness. And here I will add
an animated texture. So let's go to
texture right here, Cinema 4D octane and
go to image texture. Now let's click on it. And here on the file, I'm going to use one of the materials that I downloaded
since the beginning. Yeah, I'll click on this one. On the first one, click Open. Now on the animation, it says Start frame
0 and frame 0. So it doesn't animate. Let's first applied here. On each crystal. Yeah, we should
make these smaller, I think, but I'll
adjust them later. And if we click play or if
we move to the other frames, you can see that
the texture is not animated for that
we'll go to calculate. And now it shows all the frames and let's make the movie a frame rate of 30. Okay, you can also loop this. And now you can see
that it changes. Now we will copy this texture and applied on the emission. Let's paste shader. And again click on this
surface brightness. We can decrease it. Okay, now, another
texture for the plane. Let's go to Universal. Increase the roughness. I'm going to just apply it right here by dragging and
applied in the texture. Or you can also drag
it here on the plane. And I'll do a similar thing
like I did with the grass. So just play around
with a thin film layer. Yeah. I think that's okay. And before I move on to the
texture of the sky, I will just adjust a little
bit the sizes of each object. I decreased it by going to
scale on the Octane Scatter. I'm also increasing the
count of the grass. Okay, Now I will
also add a grid to this plane and then
work with the texture. So I'm going to copy
plane control C, control V. And here I will use this atom array
and I'll make sure to drag the plane below this. Now you will see these
spheres and cylinders. You can see the radius
of each of them here. And I'll make sure to
make them really small, like 0.1 each of them. And you can see
how it looks like. Right here, I'm going to apply
a texture with a mission. I can copy this one, this blue one control
C, control V. And applied. And here I can double-click and make
sure to change the color. I can decrease the temperature. I can decrease the temperature
and increase the power. Alright, I think I can
keep it like that. It looks nice. Now I'll move on to the
texture of the sky.
11. Animated Sky: Okay, now let's start
with texture of the sky. I'm going to make
a few more copies. And let's click
on the first one. Make sure to put
this as universal. Let's increase the roughness. And I'm going to start immediately with the
emission texture, like that surface brightness. And here I'm going to add image texture and apply one of the textures that
we downloaded before. Okay, and let's apply it on the cylinder so we
can see how it looks like. I'm going to, yeah, I think we need to make
the albedo to black so we see the nebula more. And right now I'm going to uncheck the camera
so we can see how the how the nebula
images distributed. And yeah, we can see that it
is only from the outside. So we need to go to a mission and make sure it
is double-sided. Yeah. Now we can see that it
is also on the inside. And what I do now is
check the octane camera, see how it looks like. And now I can make some
adjustments on the image texture, for example, I can
click on it and go to this UV transform. And here, depending on how
your image looks like, you can make adjustments. For example, you can
make this smaller. You can also uncheck this lock aspect ratio
in case you want to just change the x, y, or z. Also you have the rotation here, rotation x, y, and z. And here you also have the
transform X, Y, and Z. You can see what this does. Actually, I can just
uncheck this and show you. This goes up and down. This goes up and down. And this one can
be used to rotate. So by using these, by changing these, I'm going
to try and adjust the image. Okay? Now I'm going to
decrease the power. And actually I can also copy this shader
and paste it here. And the next thing
that I can do is also edit texture a little bit. So I can go to cinema 4D octane and go to Color Correction. And when I click on it, you can play around with
the brightness, hue, saturation, gamma
contrast and so on. And of course, if you
don't like this image, you can test another one. Yeah, I think this
one looks nicer, but yeah, this one as well. Okay. I think I'm going
to keep this one. And now what I will do next is actually copy and
paste this tube. And I'm going to
create a new layer and apply the animated
texture on it. So let's go to our
mission again. Image texture. And I'm going to apply the
other one, this glitchy one. Again, calculate for these 230. Check surface brightness. Now, if I apply it on the
tube that we just created, you can see that it
affects the image, but it's not visible. And that is because they
are on the same position. So to change that, first of all, let's uncheck the octane camera. And what I can do is just
scale this down a little bit. Yeah, like that. That's also make this black so
it is more visible. And again, make sure
that is double-sided. And now when we click plate, this is what happens. Of course, you can also use
just this one as a texture. You feel like. You don't have to combine
it with a nebula. This one looks nice as well. Actually it looks
better I think. But one way to combine
them together is to go to emission. And first of all, let's decrease
this a little bit. And I can copy the shader and go to opacity
now and paste shader. And as you can see now, it's not fully visible. But it is a combination of the glitter
texture and Nebula. You can do the same thing
here with a color correction. If you increase the contrast, the glitch effects
will be less visible. Now let's test it here. I can increase the
contrast and you can see that it's
not visible anymore. But yeah, that's
that's up to you. I'm just showing you
what can be done. If you want it fully
with a texture, you can just uncheck
the opacity. Okay, now I'll do one
more thing with a tube. I'm going to copy
and paste it again. Let's apply this
new texture here. Let's uncheck this. Let's make this a
little bit smaller. And now I'm just going to add some light source
coming from below. So for that, I'm going to apply a gradient
here on the opacity. Let's click on the gradient
and now on the type, makes sure to go to this to
d v. Now here on the black, now here the black
one means that it's not visible and the white one means that it's visible. The more you
increase it, you can see how it affects the texture. And actually what I can
do is add an emission so it's more visible. Let's uncheck these other tubes just so we can understand
better what we are doing. Or I can apply a black texture
for now on the nebula one. Just for now so we
can see this light. So again, let's go to a PET CT. Okay, now let's check the camera to see
how it looks like. And here we have this light. And what I can do is just lower it down in
case we don't want to see this much light or we
can just play around with a black color here like that. So it's up to you. Now. Let's, now let's remove this black texture here so
we can see the whole thing. Let's also check again the
texture, the glitter texture. And now we can decide about
the color of the slides. I think I'll go with something like light blue or something. Okay, the last thing
that we can do is create an octane area light. Just so we can apply more
light on our character. I'll make sure to
put it behind it. And now go to this light, go to visibility and uncheck camera
visibility because we don't want to see it. And now on the light settings, you can add a color to it. And you can make it pink, blue, or whatever you like and also decrease
the power or increase it. I think it's needed
to have this kind of a rim light so
it's more visible. Or you can just go to the texture of the
character itself. You can copy it
and paste it here. Surface brightness. Decrease it a little bit. And yeah, in case you want to in case you want to make
the character lighter. But yeah, that's it
about the textures. And what I will do now is actually play around
with the colors and see if I come up with
a better combination. This is what I usually do. I just tried different
colors and see what I like more so you
can do the same thing. Okay, I also change the
angle of the camera here. And these are the colors
that I decided to go with. I'm going to save the
project now and do some post-production post-processing
on the octane camera.
12. Post Processing: Okay, now let's do
some post-processing. Just go on the octane camera. Click on this Red Octane Camera. Post-processing enable. Now what I usually do is play around with a bloom
power and the cutoff. So you can increase it and it
also increases the cutoff. So it's not, it's not
glowing everything. And right here you
can also play around again with a, with a lights. You can also go again to the
Octane material and maybe increase it or decrease it
based on how it looks on the camera when you
add the glow effect. And something else
that you can do is go on the Camera Imager, enable it. And here you can also play
around with some adjustments. For example, the exposure can
increase it or decrease it. Now usually what I do is just add Look press is
just add a preset. For example, I like
this, this one. It depends on what you
have and also you can decrease the
strength or increase it depends on also what
you have on octane, but you can increase the
saturation or decrease it. Or you can also increase
this saturate to white. Yeah. I like this one as well, but I think I'll
keep it like that. Okay, So these are the two things that I play around with, the post-processing
and the camera imager. Now go under Settings
and here you can change the maximum samples. This will determine how clean the render will look and how much time it
will take to render. I think I'll go with
something like 600. Okay. I will not change anything else in case you want to keep
a transparent background. If you don't have the cylinders, you can check this
Alpha channel. But yeah, now we can
go to Render Settings and make sure the renderer
is octane render. This is the width
and the height. Now on the frame range
output all frames, so from 60, 210, and now go to save, change the format to PNG and choose a folder where you want to save it. Okay? Maybe I also do another version
where I don't have the, the nebula sky but
just the texture. But yeah, now let's save
the project. Click Render. And now just wait.
13. Finalize in After Effects: Okay, Now that the
render is finished time in After Effects, and I'm going to
open the PNG files. So I'll go to project on
this space right here. I'm going to double-click. And I'll click on
the first frame. Make sure to check this PNG
sequence and click Import. As you can see, it
imports all the frames. I'm going to drag this to
create a new composition based on the render. And you can see that the
timeline is five seconds. And the size is the same
as the render image size. Let's click Play to
see how it looks like. Yeah, I think it looks nice. Now I'm going to show you
just some small edits that I usually do before I export
it as a video file. First of all, I tried to make my videos
around six seconds, so I'm going to do
the same thing here. I'm going to right-click go
to composition settings. And first of all, change
the duration to six. Okay? Now let's sum out the timeline and I'm going to stretch
this so it is six seconds. So right here I'm going to
right-click, go to time, time stretch and make
the new duration six. Okay, Now let's click Play. It will be slower. Okay? Another edit that I do
is go to these effects and presets and search
for color balance. And I'm going to
drag both of these. First of all, this
color balance, hue, lightness, and saturation. I'm going to drag it
here on the layer of the render and it
will show up right here on the effects and controls. I'm going to do the same
thing with the color balance. Let's put it below. Here. I can animate the hue. For example, I can yeah, beyond the first frame of the
timeline, check the hues. I can animate it,
go right here and maybe make it like this. It depends on what
colors you have. You can decide what
you like more. But I'm just going
to animate it. And now something like
this and go to 0 again. Okay? And now I can just also make a few adjustments on
the color balance. You can see the difference. Now, I think it is
ready to go, of course, you can also add other
effects if you like. But I'll just leave
it like this. So I'll go to File export, add to Adobe Media
Encoder Queue. Now we can decide about the folder where
we want to save it. And now to make the final edits, we can go to this Match
Source High bitrate. Okay, and here on the format, make sure it is
H.264 High bitrate. Here's the output name and
where we want to save it. We already decided about this. Here we have the size, the width, and the height. If you want to change
it, you can uncheck this and change the height,
for example, 1350. And it will automatically
change the width as well in case you don't want to maintain
the frame aspect ratio, you can uncheck this, but I'll just leave it as it was and leave everything
the way it is. And usually what I do is just
change the target bitrate. And this depends based
on how you change this. It also changes the
estimated file size. The more you increase
it, the more this increases as well. Now for Instagram, usually I create files
around 15 megabytes. So I changed the target bitrate, so the estimated file
size is around that size. And also check the use maximum render quality and
click Okay, and just render. Now let's open it. Keep in mind that this is exported
for Instagram. And I think it looks nice. I guess your result is
different from mine. And I would also love
to see what you create. You can share it and tag me on Instagram or
send me a message. And I hope you
found this helpful, learned something new and
created something unique. So thank you for watching and I'll see you on
the next courses. Bye.
 Klarens Malluta, Visual Artist