Transcripts
1. Welcome to the Class!: Welcome to the Class. Create a Boho Postcard in
Affinity Designer on your iPad. In this class, I show you how to use all the
skills you got from the previous classes
and put them altogether in your
first digital proof. If we haven't met yet, hi, my name is monja. I'm an artist and graphic
designer and a teacher, and I'm a huge fan of digital
products because they help you to create sustainable
and panic free business. In this class, I show
you how to create a postcard at texture and place the elements
you want to use. I also teach you how to create a Color Palette and how
to quickly change colors. Last but not least, to offer different
colorways at texts. Your Postcard. In the end, you'll have your first digital product
you can sell as a printer. Does it sound interesting? Then join me now
2. What Material you need: For this class, I
use the playful, seamless papers
from these glands. I also use here some false I have from
creative fabric car, as well as the ornament we
created in the last workshop. You can of course change
all of these materials. You don't need these textures, but they are really nice because they offer a variety
of different textures. As you can use them
for many project. You also don't have
to use these Fonts. It's just because they
have a lettering for, as well as a straight one. So I really liked this
combination of Fonts. Of course, I use what
we have already created because I want you to
work with what you have. But sure, you can change that. You don't have to
use these ornaments. You can use something
totally different
3. Set up your Document: We start by setting
up our document. So click here on you and
then say new document. And this is what comes up. And now you start by
making sure that you have turned on the
horizontal document, another vertical one, because
we start with a five. You could basically
use a four and then the horizontal one and
just turn it into half. But I'm going to
use it a phi from because I like to have
both things separated, but that's up to you. In the end. It's the same thing, so you could definitely do that. Then. Make sure you have the same
numbers I have for any case, you might not have the
templates anymore. Maybe you have
deleted them as fine. But then type in
here 210 by 148. And if you don't see
the numbers just tapping to the
circle and you can just write them here and you have the same thing I have here. Also make sure it has 300 DPI because it really
needs to be crisp. So 300 DPI is the
number we got with. You can of course also
change the unit here. If you prefer to work
in inches or something, you could go for that. But I'm leaving it
to millimeters now. Then I also toggle on Art
board because as I said, I want to have more
than one board, so I need these Art
core turned on. Then I go with RGB. Actually where
you're tab in here, you could go with CMYK. And I highly recommend that if you want to give that
to online printer, just because they
often require CMYK. But if we do it for
our whole printer, I like to go with RGB because the colors are more
saturated or more bright. So I like it more recent. Once done here, we go
to Margins and bleed. Then we need to
make sure that we have turned off
the margins here. You see, I do it again. Now it's dark. And when I go here, it gets a little bit brighter, so it fits much of
the background. It's now turned off and
that's what we want. We don't need any margins
and we don't need any bleed. If you don't have zero
here for whatever reason, just tap in here
and set it to zero. And then you are good to go. Just have another look. Everything is correct. Orientation as fine. A five is fine. Once we have set everything, just click Okay, and our
document is created. Now you can see already
that this is an Artboard. And now you need to turn on
here the magnetic snapping. When I turned it on, you see it's a little
bit darker and now it's turned off and now on. Once you've done that, you also need to turn on the rulers. So go into the little
triangle here, and it opens a new menu
and then make sure it has Brighter dot next to rulers. I already have that. If I turn that off,
you see it's lighter. And now I turn it on and
you see my rulers here. And I go out of that and set to the middle
of the document. Now, go to the middle
until it snaps. You see that it's screen. We do not really need that true light just
for our orientation. So I just put it in
the middle here and now you see it turns red
and here it turns green. Eye health center of my card. As I said, I don't really
need that right now, but you never know why
it's good to have middle, the center of my document. And you can better place
your elements here. We now need to
duplicate our artboard. And to do so, it's pretty easy. You make sure you have
the Move Tool selected. Then just select your
artboard. Click Copy. Then click paste, and
move it to the top. You see, that's how easy it was. Now we have both
over each other. What do that again to have
one here for the Qataris. So click Paste again and
we can move it here. You see, now we have
our three Artboards. We need for this class
4. Install Fonts in Affinity Designer: So before we can finally
start with our document, we need the false installed. So to do that on our iPad
in Affinity Designer, we go here to the open document. When you open up finches, I know this is what you
see is the gallery view. You go here on
bottom-left to settings. And then you have here
point a which has fonts. And you see, I don't
have any installed yet. But I can do just by
tapping here on the Plus and going to the folder I have created for
my bot postcard, and I have downloaded the fonts. I've showed you the cupcake
one and the handmade one. You just tap on that and click Open and it
gets installed. And I do that again
for the handmade one. Let's go again to the folder. Tab on handmade click Open, and the font is also installed. So just click them. And you have your phones
both in Affinity Designer
5. Create a Color Palette: Now let's create our color
palette and for that, we need to grab it
from somewhere. So I just open one
of my document with the color palette
and grab it from there. So I just tap in
here and say Copy. You can open it from the folder, from the material I
added to the class, and then you can copy
it from there as well. So let's go into the
document we just set up and say paste. You see you can copy it from one document to
another is not a big deal. So let's pretty cool
about Affinity Designer, and now we can create
our color palette. To do so, we just tap
here on the color wheel. And then if you don't see that, we say here swatches
on the bottom. And then you can see there are already a lot of color
palettes included. And we create our own now. Till you set. Go to the three lines
here on top and say AT application palette. Now we can give it a name. And I say just Postcard. And click. Okay, once done, you see
that it turns here into postcard and is a point in my menu now, postcard just here. And now we need to pick these colors and
get them in here. And we can also export them. So we have some
handy to do that. Go here to the eyedropper
tool and just pick the color. You see it's null there
if you have market, all, what happens now is that it
all turns into that color. If you tap on that, you see everything
turns until the color. We need to undo that. But we can also just tap here so we don't have selected
and then tapping here, you see nothing happens. And now we can go here at current fill to palette,
and it's there. Now let's do that again. Make sure you don't
have a stroke selected. But the fill here. And then we can grab second color and tap in here and then say
again, add current fill. Let's go on like that. We grab the color, tap on that, say
add current fill. You see, that works quickly. Now I have the eight colors
from my palette here. They are eight colors actually. So we can work with them. We don't need that anymore, but I leave it for
therefore now. But now we can work here
from our color palette, which is pretty handy.
6. Set up Artboards: So now we will add a
background to our app board. And for that, I go to my
folder I have created with the background from the
playful seamless pattern pack. And I go to the SRY lines
here and say place, it's a little bit different
than you'd expect in other programs where just
click Open and do it. Then in a vector program,
you always place. I go to place from files, and then I go to my folder. And you see here I have
my background included. I just copied from the playful seamless
pattern collection here into that folder. And once done, I click Open, you see nothing happens. But I have that in my
have it copied somehow. So I can now draw
over my Art board. You'll see it's a
little bit tricky because here's where my file and I have it there now and it's a pretty big
112 by 12. So it's fine. Make sure that your
paper is big enough. And once you have placed it, make also sure you add
lines to document here. So just need to make
it a bit smaller. So now my paper is on top. And what I need is I
need to copy that. To do the same for
the back side. I do so by click
copy, click Paste. Now I have them twice. You can see that right now, but when you go to
the Layers palette, you can see that I
have copied them both. And I know need to move them to the other Artboards so it just drag it here too awkward. One, which is a little
bit confusing because a postcard or port one,
but doesn't matter. So we can just put it there. One is placed correctly. Make sure you zoom in
if you can't see it. You say lock, and for that you switch to the
left and say lock. So it gets a little key here and you can't move it
anymore in this pretty handy. If you place something on top or all these things and
thanks, move. Believed me. So it's better to lock that. So again, we do that
for the front side. I have now both locked and now I need some color
for the front side. So what I do in a
vector-based program is I go here to my Shape tool. When I click on the bottom
right on the triangle, a lot of different
shapes come up and I need rectangle now, so I click on that
and I just draw here, my rectangle already
has the right color. I'm going to show you
how to change the color. Make it a bit smaller. We can grip the color here. We can also grab it from the
color palette we created. So when I tap now here you
see it easily change it. I want now or dark gray. And once done, I have
my document ready. But now I need to blend it into be able
to see the texture. So let's zoom in a bit so
you can see it better. And when you have
marked the rectangle, you can go here, are normal. Then you see you have different
different blending modes. And you can scroll over them. So you see, sometimes you
see more and sometimes less. So with this linear burn, for example, you can see
the texture pretty well. So I guess that's
what I will leave. But you can of course, change something to something else. It's up to you. But once you're done again, you should lock it because
it's ready and it's easier to lock it and don't need to worry
about anything else here. So we are done with that. And we can now
that great or Card
7. Create the Front and Back Side of your Postcard : Now let's create the
flip side of our card. So I go to the
artboard here on top. And what I want is a
hand-drawn line in the middle, and then one here, a few for the address. So what I do here, as I did on the bottom one, I just place a ruler here. Careful to grab a ruler. And as long as I have
my camera turned on, my snapping turned on. It should flip in the middle. It's not marked,
so I guess that's why it doesn't go there. So let me go in here. And click Art bought one. And now I grew up with
a ruler that works. You see now I have
duplicated that one, so I don't need an
extra ruler anymore. But that's how you
would go if you don't have it, if
you don't see that. But for me it there already
I can turn that off, so I just close it. And now we go here
to the pencil tool. This is one here. And I stick to the gray, maybe a lighter gray. And then I also need
to make sure it has the right with I don't
know what the right width is because it always depends on the resolution
of your documents. So I just draw
something for now. Like so center here. I don't want it to
be too straight. But maybe also know
that when case. So I just do it again and see how
that looks so dark. It's dark, black. The reason why is because I haven't changed to the stroke. I need to do that stroke. Then tap on that and you
see it gets lighter. And now I can decide on
the width of off my line. I make it pretty small. What I also do is
I'm going to go to the Layers palette and
set the opacity lower. Don't want to be really
that are Holiday scene. So that's what I do. Now I move on and
create a few more, few more of the slides. So let's do that here. The address. So you see now that it will have the same
color and everything, but it's also 100 per cent. So we need to make
sure we also set it to 28 to have the same
as we have before. So I just go over with my pencil and set it
to the same size here. You don't feel
comfortable doing that. You can also tap in here
and write the number. Once you're done, you
can even modify that. So let's close the
layers palette and we can modify here our notes. To do that. You can
go to the new tool here and you can
change the nodes, everything to your liking
recursively and Vector. So that's easy. I have it now as I want. And then I say copy. Then paste that me show
you another thing. I just move it
down a little bit. I want to have at
the same distance now with the next time. So I just say Paste again. You see it jumps to the next. Or actually it should, but it does do that again. Paste, it doesn't do it. Usually. It would go
to the next line, have the same distance. Now we need to check the
R cells that you can do. It says April and seven here, and you can move it
here as well to 8.7. So here you're going to go. I can't grab it. I go to the pelt. Here you see now it
says ate as high. I do the same for this
line. Set it to eight. As I said, usually it
should work on its own, should just jump there. Now it's 7.9, don't
really care. It's okay. It should look hand-drawn. So I like that. Now I turn off my layer palette
and I have my lines here. So I now have a front of the
card and the background. Now we need to decorate it
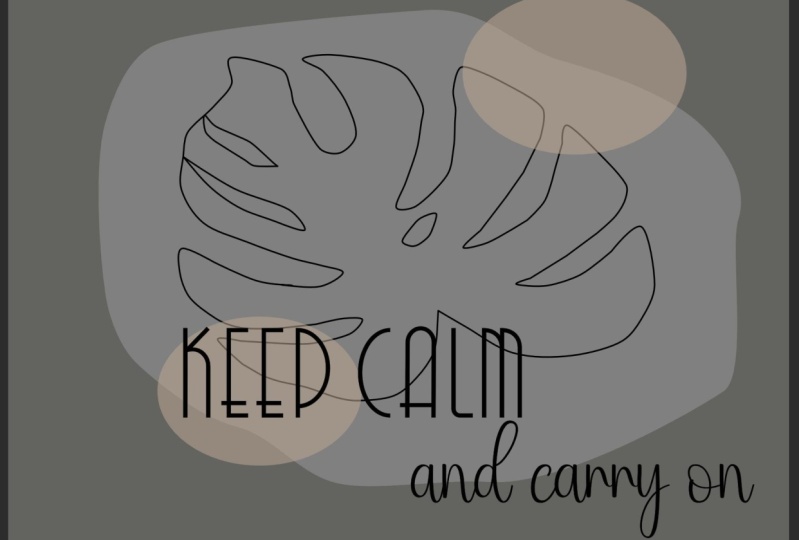
8. Place your Boho Leaf: So now we need to
grab the ornament, the leaf from one of the previous documents and
add them to our new one. So I just open it
and go in here, tap on that, so make sure
everything is marked. And once you have
that click on Copy, you already know
that's how it works. We go just from one document to the other and paste it in. Pretty easy paste. And it's pretty big. So I'm make it smaller. I can scale infinite app. And now thanks to
the lines I have, I can go to the middle with it. I make sure both lines are
showing green and thread. And then I know
it's in the center. So now I need to change the colors right now it
looks a little bit strange, so let's do that. I click on the pellet
here on my layers, and I go to my ornament
and turn it on. So here you see
the little arrow. When I click on it, it, it goes up here. And I can access
each of the layers. So now I go to the colors and the colors we have created
and see which one works best. I like this one, but I could also change easily
to whatever color I want. So you see, it
doesn't look too bad. So I want these creamy one. I could also change the colors of leaves and
they would do the same. I just go to the palette here, tab on whatever leaf, use one of the leaves and go to my color palette and change
the color of the leaves. So let's go here. All there. It's pretty easy to do that. I'm going to leave it
like that for now. I could, if I don't like it
anymore for whatever reason. Also modify my splash here to the layer and
then go to the neutral. And you see here are all
the nodes I can change, I can get more and
change it then. I just want to make it a
little bit smoother here. And that's it. I have placed my ornament. Now we can move on with
the lettering with a fall
9. Add Text: Keep Calm and carry on!: So I just go in here, make sure it's not marked. And then I go to my Text
tool and just drag it here. So you see the a goes away
and I can now tap here. Here, I need to tap on the
icon for the keyboard. And now this little, tiny little keyboard comes up. I just type in, Keep Calm. Of course, you can type
in whatever you want. Once you have done that, make sure you turn it off
again, hide keyboard. And now we need to tap in here as long as
everything is marked. And then we can go to
another fall here. And the one we have
now, it's cupcakes. Now, let's what I
choose cupcakes. And then I need to make it smaller again
to have an overview. And now this keyword is here. So you see, it's a little bit hard to get to the
point where CFC. So now I can just move
that a little bit Art. So I just show you what
we want to come up with. Have written here, Keep
Calm and carry on. And that one has
the cupcake for, and here is the
hint written false. So let's go back here
and pick the other four. We do it the same way. We just have on the a here
and get my keyboard again. You don't have the right form. Again, just tap in until
everything is smart and then change to the
other phone you want. In this case, handmade is fine. Then make sure this one is a little bit smaller
than the other one. That's how I wanted at least you can of course,
do it differently. But unlike when those two are over each other and
this a little harder, we see how that works now. Okay. If I want to move
them to gather, I just need to mark
both of the layers and then I can just
move them both. I could also change the color. Of course, I want to. If I would want to do that, I go again to my color
palette and go to swatches, and then I just tap inherent
change to the other color. In this case, I want
to keep it black. And once done, card
is Friday for now
10. Export your Card: So at this point, I want to save everything
we have created and then place it on a document
we can just print out. So to do that, I first of all, export my color palette. So I am here my color palette. If you are not there, you need to go here
on the circle, then click here on swatches. And then you can easily exported by clicking on the three lines and
say export palette. And you see it already
says postcard and you can click Save
and it's there. And now we need to
export document. So to do that, go
to the Move tool. Mark every sink which is
on your artboard here. We are right now it
doesn't really matter because we don't
want a PNG file, we want a JPEG file. So I can just click here on the three lines
and say export. Which one I grabbed,
doesn't matter. So I can just go
here, click Okay, and I then need to
move to the folder. So click on iCloud
Drive, Boho Postcard, and save, and whatever the name is,
doesn't really matter. I have the first one exported. Now export a second one
is also called Artboards. So that's why it's a
little bit confusing. But the main point is that
we have both of them. So I can now again go
to the next app board. Maybe that's right one. You never know if
course of the name. Whilst a little bit silly,
doesn't really matter. I can see it here
on the bottom left, so yes, it's the right one. So go to Boho Postcard and
I just say second, Sri. Actually, I just need to export these two loads. Fine. Okay, once done, let's go back to
the gallery view and I create a new document. This time, I use the A4
and I use it horizontally. Again, I make sure that the
bleeding is turned off, the margins are turned off. Make sure I have the
right color profile, as we already said. And you don't don't
even need an artboard. I just need my right sizes here. Then I click okay. And once I have done that, I can import now with the placing the two
images we just saved. I go here, say place, go to my folder. You already know how that works. And here they are. I first set untitled. So I just opened that one. Would be nice to have snapping
turned on as well as size. Not getting stretched because
we are now it's no longer. Vector is actually
its pixel now. So because we have
saved it as a JPEG, so don't worry about Vector
anymore at this point. So now we need the second one. Place. We can rearrange
that in a bit. So I scale here, Boho Postcard 23, open that one. And again, I just
draw over it here. And now when it's on, it's turned upside down, so I need to turn it around. Okay. Once you have placed your card, make sure it has
here the right size. You are done. So now you have your here, your card, Postcard
ready if you print it now and then fold in
the middle, it's done. You would need to save that. So let's export
the entire thing. Again. We just say JPEG and now we use
the entire document. Whole document is already
marked because it's a JPEG, then its whole document anyway. So click OK, name it, whatever. I just say, postcard. And then click Save,
and it's there. Now we can print this thing out and have our Postcard ready.
11. Your Project: Congratulations, you are
done with your Postcard. And now of course It's
time for you to try that. And I want you to create
a postcard like that. It's of course, up to you
what text you put here, what the background color is. And if you use a leaf from
the previous workshops, but I believe it's easier than drawing everything
again from scratch. So make sure you try it out. And also that you have your
Postcard ready like this, that you have a tear turn
round and that you have put the lines here which look pretty handy if they
are not too straight. Make sure you have
your Postcard. Of course, you can change
the colors on forever. So what? You have finished it, please take a screenshot, just present two buttons here. And you can easily
take a screenshot and upload that to the gallery so we can all see what you have
come up with them looking forward to see your card
and what you have created.
 Monja Wessel, Graphic Designer and Teacher