Transcripts
1. Welcome to the Halloween Shaker Card Class: Welcome to the Halloween shake a card class. In this class, I show you how to create this beautiful Halloween card from a few scrapbook papers and elements you can print out on your home for into and kept them with your silhouette or cricket or just misuse gizzard. My name is ammonia and I'm a graphic designer teacher and an entrepreneur. And I have digit design resort.com, my website since 2008 first it had a lot of designers, but today it's just me and my little team there. And we create not just resources for designers and scrap this, but also teach you how to use them. I really hope you enjoy this class and if you have any questions, do not hesitate to let me know. Please join me know, and let's have some fun together.
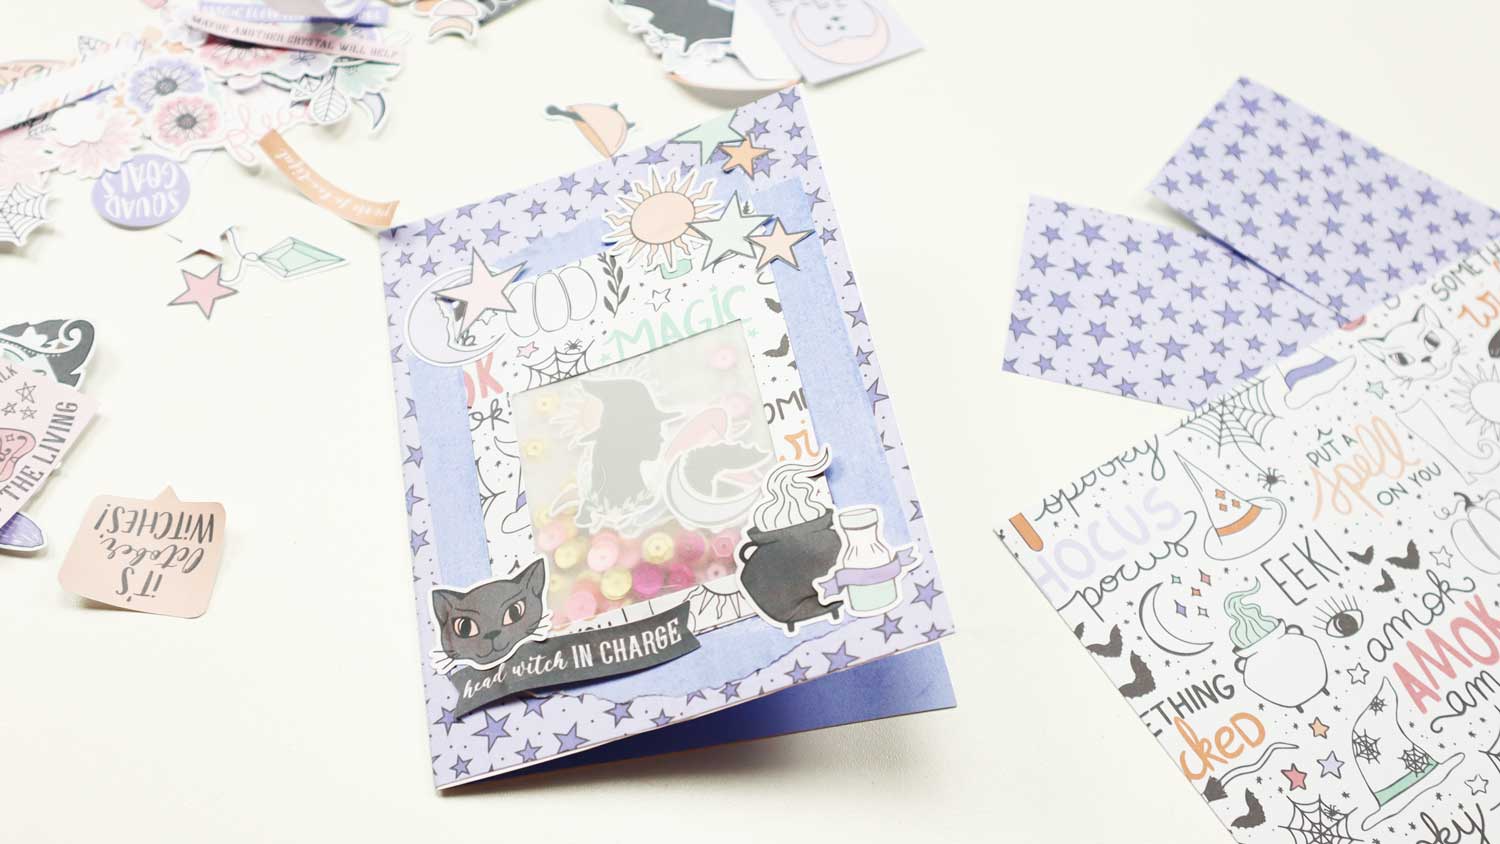
2. Material for the Halloween Card: So let's talk about the material you need for this class. You see it's not that much the best thing you can use as your velum because we needed to create the shaker back and we just need a little stripe here. And then of course we need the elements sequence. Roll of tape. Skills are fine liner. Here is my adhesive tape and maybe some washi tape things to fix them and get rid of them later. So and also a fine liner for yeah, maybe some word and scatter, of course. Yeah. Basically that's all. I also have a paper tremor, which is pretty important, but you can use a scalar if you don't have one, but it's really handy when you cut things later on here, especially for now when you cut the velum, for example. Then it comes in pretty handy because we can measure it and really be precise what we need here. The most important thing besides the velum, we have fear. Other papers. I've burned it from the scrapbooking kid hocus pocus by Tracy read, as well as the elements which I have here, my little plate. They are in the size she gave them, but I also made them some smaller because I need them later on for the little back and then I need them a little bit smaller author shakeup back.
3. Let's create the Shaker Bag: So first things first, we start by creating our little bag for the shaker card. And for that, we use the velum I have here in just a little stripe we need and we are going to cut them with a paper trimmer. Then we go ahead and use of the papers I have printed for this project and create our cat from that. I'm going to cut off the paper a little bit because I don't want it that large, but it's totally up to you as you prefer. So always make sure that you measure the pieces you add to your capitals. Always depends on the size you create the card. So that's why we are going to make our shaker back in seven by 15 centimeters and then fold them in the middle and fill them with little goodies and here with a sequence and such things. So let's get started by cutting the velum for now. And I'm using my paper trimmer because I think it's pretty handy and it gets really accurate when I do that. So now let's cut this piece of vellum here in 15 by seven. And then we're going to fold it and fill it with little, yeah, good 0s here. So let's get started. Okay, I have my piece here and I'm going to fold it in half. And now I need to glue it together once I really get the full fright. So make sure it's really accurate here. And once you've done that, use your adhesive because I believe it's much better than the wider tape because you really just need to fix the edges and we're going to put it all together later on anyway, so it gets a little bit more stability later. Yeah, you see I just use this small here is a small adhesive glue this back together. Okay. Make sure you press it really well because we don't want, wanted to open for now because a little sequence, they are really tricky and they go everywhere just like confetti. What do so make sure you really make that close, close that and I'm fluid together and then open the little back and fill it to your liking. As I said, I'm going to put in some sequence, but I'm also adding some of the elements. I made them a bit smaller before I printed and kept them. That's pretty easy when you have, for example, SUID program or you have a creative programs, it should be the same actually. You just make them a bit smaller and print and cut them. Them. You don't have to go with the size of the designer offers here. So they fit into this little bag recurs if you don't do them might be just too big. I know for many different shaker cups I created that it's much better if you add some diversity here. So make sure you add different colors. Best things, of course, when they all fit together, you cannot add some. Let's say black if you don't have black in your, in your scrapbook kid. So make sure it all fits together. And also make sure that they that there are not too many things recurse if that also doesn't look that good and you cannot change it anymore. So maybe take some out or yeah, you know, it's up to you, But once you're happy with it, just close it and go ahead and use your adhesive. Get it inside and close your little back. It's a little bit tricky to get it inside, but don't vary too much again, we're going to cover that later on. So make sure it's inside and then glue it together.
4. Adding the Frame to the Shaker Bag: So now that we have our little back, we are going to create the card and the window on top of the card. So first of all, we're using this paper. I'm, I've decided to use a purple one where the start. And I'm going to cut it off a bit because for me it's too big. As I said. You can totally just folded in the middle and use it then, but make sure you a little back fits to the rest of your card. It's not too big or too small, so yeah, I'm going to cut off five centimeters. And then I'm going to fold it. And then it's even too much because it has a wierd size. If I, if I do that now you see it looks pretty weird. So I'm going to just cut off a bit from that as well. You see it? I'm doing a pretty intentionally. It's not about marrying it into detail. It's more about what you like, what you prefer, what you want for your cart. And don't forget, you can even use this current node as a card for Halloween, but as a little mini, mini book to add some pictures and have like a scrapbook from the Halloween night. So why not? You would just need to add a few more papers inside so you can add some pictures here too, and use what we are going to create right now as a cover. Actually, you can sue it even here. So these are just options and just ideas. So now I'm using this paper because I really like it. And I wanted as a back for my little shaker back. And I also want to have a window and put it on top. But as you can already see, it is a bit busy. The stars on the bottom and then this crazy paper on the top. What we're going to take care of that in a bit. So for now, I'm just cutting cutting it a little bit bigger than I did with the shaker back. So let's say it's about not seven centimeters but nine. So I have one centimeter on each page, on, on each side. And also measuring it here. You see, I just have a little bit of space right and left. And now I can see that a wants him space on the top. And cat, it's somewhere above the above the shaker back. Maybe I give it two centimeters as well because once you have a little window and that's the main problem here, well, not even a problem, but I just put it as I want it. And then I'm going to get the base ready. So now I need to cut out a little window here from my piece of paper. And you can do that on different ways. I'm using not the best one I guess, because I'm using my paper trimmer alphabet, but you can totally use the pen and mark it and just leave a little bit of space on the right and on the left, I'm using one centimeter on each side. And the rest I cut out. And I'm doing that now with my paper trimmer. As I said, it's not the best way to do it, but it works. And I'm just adding it here so it gets straight. That's the most important thing. And I just put it in the middle and then cut a little bit to talk to a top and to the bottom and right and left. And then if needed, I use, I cut the rest with the scheduler. So that works somehow. You have say somehow because it's not the best way as I said, it's just yeah, it's not about luck, but you really need to be careful when you do it like that. Or you just go ahead and do it and if it doesn't work, you start from scratch, shoot, you just go ahead and do it again. Okay, you see this strange method turned out pretty well. It worked and it straight. So I just need to cut the edges and get the inside out here and just try it. It works somehow. Yeah, it's a bit tricky. Okay. So we now cut it out and you see I have on the left dried and on the bottom a centimeter left and on the top I have a bit more. And needing that because I want to add some element there. So now we put that on top of everything. And you see, this is how my shaker, I just need some adhesive now and glue it together. And then we added on top of the card. Okay, What already sought would happen happened. It looks much too busy. So you see the background with all the stars. It's really super busy. So we need to get something in-between, between the cart and the shaker card, actually on the shaker back to make it look less busy with both really patterned and colorful papers.
5. Decorating the Halloween Card: So I decided to go with the purple paper to put those in-between. So on the inside of course, but also here between my shaker cut on the outside. So yeah, it's, it looks a bit too empty. That's why. So we start by using the purple paper and cut off the edges all around. There is still a little bit of white guessed the printer hasn't printed appropriately, so you can totally put it in your settings, but I obviously forgot for that paper. So I need to cut it around here now. And then I use a stripe of the whole thing for my cart. A set by just dripping off a strip of paper. Just, you know, just as as it turns out, I don't worry too much about it. And then I tried to get it under it, but you can see it's much better when I put the edge on top with the rip off the edge. And I'm going to just strike off here. So it's much easier for me to get it under it. And it most appropriately, it will look much better. Yes, going to see that in a second. But I bet it does. So I'm going to use a little bit of the ripped of paper here on top and on the bottom. So I hardly through any leftovers away because usually I need them at the 11 other time when I'm going to create something and I'm not sure how it turned out yet. So whatever you have some pieces left, you might just keep them for now. You can always throw them away later because otherwise you have a huge mess. I am guilty of that. So that's why I'm saying that. But you see, now I have that P is which is not tripped and it fits perfectly to the right side. You can see these little stripes already make a huge difference. And now we are going to add the elements which are in the original size. Now, the small ones are in my shakeup bag. And now the bigger ones are here for the decoration. And you see how it goes with the frame around the shaker card, sovereign to shake a bag. Actually, it it comes out much better and it gets, you know, it looks much calmer or more sorted wherever you want to call it. So for now, I'm just adding my elements and getting a feel for them. And m The everywhere I want to have some because it's, you know, it can easily change. So for now, I don't glue them on my card. Okay. So far so good. I guess I will start gluing them now. I'm usually using liquid glue for these small things because otherwise I don't get them on my card properly. So let's go about that and we see how it turns out. Okay, here you go. The last finishing touches, I'm going to add that little pause on the button right? You see the cat is already there and some weren't, are the stars, the moon, and the sun because I thought I like these contrasts between moon and sun because in Halloween night it there, everything is possible. So that's why I put it all on here. And I'm also adding something on the edges so you don't see the corners here. So because I wanted it like that. So now I'm going to cut off what is over the edge here. And then we need to take care of the inside because right now, yeah, I said is pretty empty. But we can easily do that. I have a special technique is estimated. It's easier to glue something inside after you decide to go like that and to have it straight there. So what I do is I just add some glue on the wide and then I put on the paper and flip the whole card and then I count it off. Okay, here you go. That's my cart. It's done. And you see the inside on the one side is purple and the other side is y. T can also put purple on both sides totally up to you. And it's always, always, always to your liking. And as I said, I'm using hocus pocus by Tracy read it's perfectly prepared for printing. So that's why I've chosen that one. So now let's heat to the project for this class.
6. Your Project: I bet you already guessed it. Your project for this class is, of course, to create such a Halloween card with the techniques you've learned. And what I mean by that is at one shaker cars, at shakeup back and make your code look a little bit layered. So at some different layers are here or use Papers would really don't owe together and challenge yourself to get it done anyway. And then try to add something to the inside, whatever you choose as a set, you can make a scrapbook as well as a cart. It's totally up to you. And then show me what you've created in the project gallery. So looking for work to see that, and I really hope to see you in another clause as well for me here, you might check out my profile and you will see His. There are many other classes you can join and where we create something from scrapbooking papers and elements.
 Monja Wessel, Graphic Designer and Teacher