Transcripts
1. Introduction: The Traveler's Notebook Class: Welcome to menus class here on Skillshare. In this class, I'm going to show you how to create this lovely notebook was no more than a few pieces of paper and some shipboard. And I'm also going to show you that you can screw up beautifully inside of this log book. It's a traveler size notebook, but you can create it of any size. Of course, my name is ammonia if we haven't met. And in this class, I'm going to show you a very detailed how you can do this notebook. And I really hope you're going to enjoy this class. I hope you're Jeremy, and I see you on the inside.
2. Creating the Traveler's Notebook: For this project, I'm using the xlab risk Alexia collection from Tracy read, but you can of course use would ever printable scrapbooking kid you choose, or you can of course use any other scrapbooking kid which you already have. So for our travelers join, we are going to cut the Shephelah shipboard. Here's my shipboard. And what I did, I put one of the papers I'm going to use for my travels journal here on the shipboard. And I add two marks here with my pencil here and there. So I have the exact size here. And then I'm going to cut that. If you don't want to do that, you can use a traveler's notebook size, which is 8.254.25 inch. Now then you have the same size like I have here right now. So let's get started by cutting the shipboard. I have to cut it from both sides actually be course. It's not going through as you can see. So I need to cut it from yellow side as well. That's why I'm using my pencil and I mark it from the other side. So I have the exact size. Now it's true. I'm going to cap the rest. Okay, that's the first part. And now I need a second one. As you see, they have the exact same size, which is pretty handy. Otherwise, it might be hard to help them really well. So next step. I kept out with my silhouette, Camille. I cut out the papers SSH in 8.25 by 4.25. But the cover pages, I've made two inch of bigger. So 1, 2 inch in width, and two in height, which means it is now in height 10.256.25. And that is really nice because now I can just glue the chip board on the paper, cut the edges, and then flip it around. And that is what we are going to do now. But before we do that, I'm going to use the Folder here and fold one inch all around. So now you can see that you see inside and then I can just put it here and it fits perfectly. And now I can flip it much easier because I folded it. So let's do that and glue it onto the ship. To get it really well onto the paper, I use adhesive tape first, and then I use a little bit of strong clue just to make sure it really year, it's really on the shipboard and not going anywhere once I pull the paper around. The other good thing is I know where I need to put my paper and it's not guesswork that I haven't in the middle. But now because of the lines, I really know where to put it. So now next thing, I just cut off the edges. Don't make it too steep to leave a little bit of space here. So you can better pull around your neck missing pieces here. So we need to take that because it's a really strong paper. I'm going to use one piece of tape here. I add some extra strong glue just to make sure it's really on the ship board here. So you see that fits just fine. I'm just cutting off a little bit of the edges. And now I have a really will cover a now I'm doing that for the backside as well. And here on the inside, I put these paper and I'm going to do that right now just to make sure it's already dried. Once I start with the rest, I'm going to let that dry. The second one. So we just want to show you, you can also use these adhesive here. Maybe easier to use, especially in this place. You can also use the other tape. Doesn't matter. Actually. It just needs to go really around. So you have a strong belief, especially on the edges. Okay, so you see it also fits perfectly. And now we put these behind. And once again, I've used this one around the edges and then put some strong glue inside. So now we need to get the holes into the cover. And for that, I have created a stencil. And now I can put that on top here. I use the rest of the shipboard. I have created this tensile. I put three holes, I just measured two centimeters from each side, and then in the middle another one. So what I do now is I am, I don't think I will always be the exact thing in the middle, so I can just do my best. I guess. I'm going to put the stencil here on top. And then I and I were just print stands, true. It might be an option, but it's not very shrewd, so it depends on your report or you're just market here where you need your your holes to be. And I guess now you just do your very best to to find the exact hole here. And I'm using the bigger sized one here, as you can see here is a bigger size and here's a smaller one. I'm using the bigger one now. And I'm just going here into that. And I put that on 1.5 centimeters here. And now I just need to go over the whole and make it here. Yeah, it works. I can't see through. And then I can just add my hope here. And you see that works perfectly. And now we go ahead and do that five more times. Okay? Three holes are inside. And now I'm doing the same thing on the other one. She has to be 100 percent sure. I put those on top and use that one as a stencil just to be just to be sure. It might be the one or other millimeter I have missed. So I just want to be sure I have the same distance here. So now I can add my weeks. And what we need now are the papers where I do the same thing. I just put holes inside and then I put them in here. And you see already the beauty of this because now you can add several pages here. And even when you are done, you can just go ahead, take off the papers and put in some new and you decide how many of the rings you put in. I put three. If you just want to, maybe here. That's fine too. It's totally up to you. What I'm going to do now just to make it look a little nicer. And because I have the crocodile here, as you know, I'm using that one. I'm adding these things here inside. And I can just pick the color I like APA to the hole here. And I think I'm going to need something which matches marine. I guess it will be better just checking. Yeah. So once I decided on that, I'm going to add that here, press it and then see it. So great, isn't it? So now you just go ahead and do it. What are the three things here?
3. Creating the Inserts for your Scrapbook: Okay, so now we have our book covers ready, and you see it really looks good. What do we do now? Well, it takes a little bit of time, but it's well worth it. So I have printed the papers in this traveler journal sides LSAT 8.25 by 4.25. The thing is, I cut it with my silhouette, which is really nice actually. Because then I don't have to cut it all out. What I didn't do and maybe could have done I could have told the silhouette to the holes here would have been possible, but it didn't think of it. Now I need to do it manually. So if you have a silhouette or a cricket, whatever you have, or you can of course, add that to your program and have the whole it's already inside. Or you just do it like I do with a crocodile. And what I do now, I put two papers together. So I have the looking nice on both sides. So I just used to and glue them together like this. And then I ask them to my journal. So let's get started with that. Somehow. I don't have a specific order, not just an IT most protein and a lot of schools. But I believe it's well worth it because I can script for a long time. Once I have that book worthy. I just tell you no one paper. And then I go off and do it myself and show you the result later. So the good thing is my paper gets the lipid thicker but not too much, which is really nice. And now I use this one once again as as my stencil. Put it here on top. So once again, we need to see where. Okay, so just to give you an idea. Now, putting that here on top. Now I put my rings true. Okay, I messed it up. Let me do that again. Okay. So now I do that with more papers on them. I put three of the holes inside and then they have a really nice book I can use for my scrapbooking. And I'm going to show you the result in just a bit. Okay, So you now you see what I have done. I put here on and used to crop it out to get the holes inside. Now, I'm done with the entire papers. I have so far. I say so far because you can always add more at a later time or you can change your mind and put one here and the other one there. Whatever you decide, you can do that layer. So it does matter. So now I just want to show you how it looks when it's finished. And that's why we're going to add the rings, true it. So one edit and you see there's still a lot of space. You can have more. Okay, that's it. So now you see my book is ready. And now if I want to script, I just take out the papers I need and starts creeping. What you can also do is you don't have to add printed papers like this. You can absolutely. Those just white papers playing where papers and just add whatever you want on top when you are scrapping.
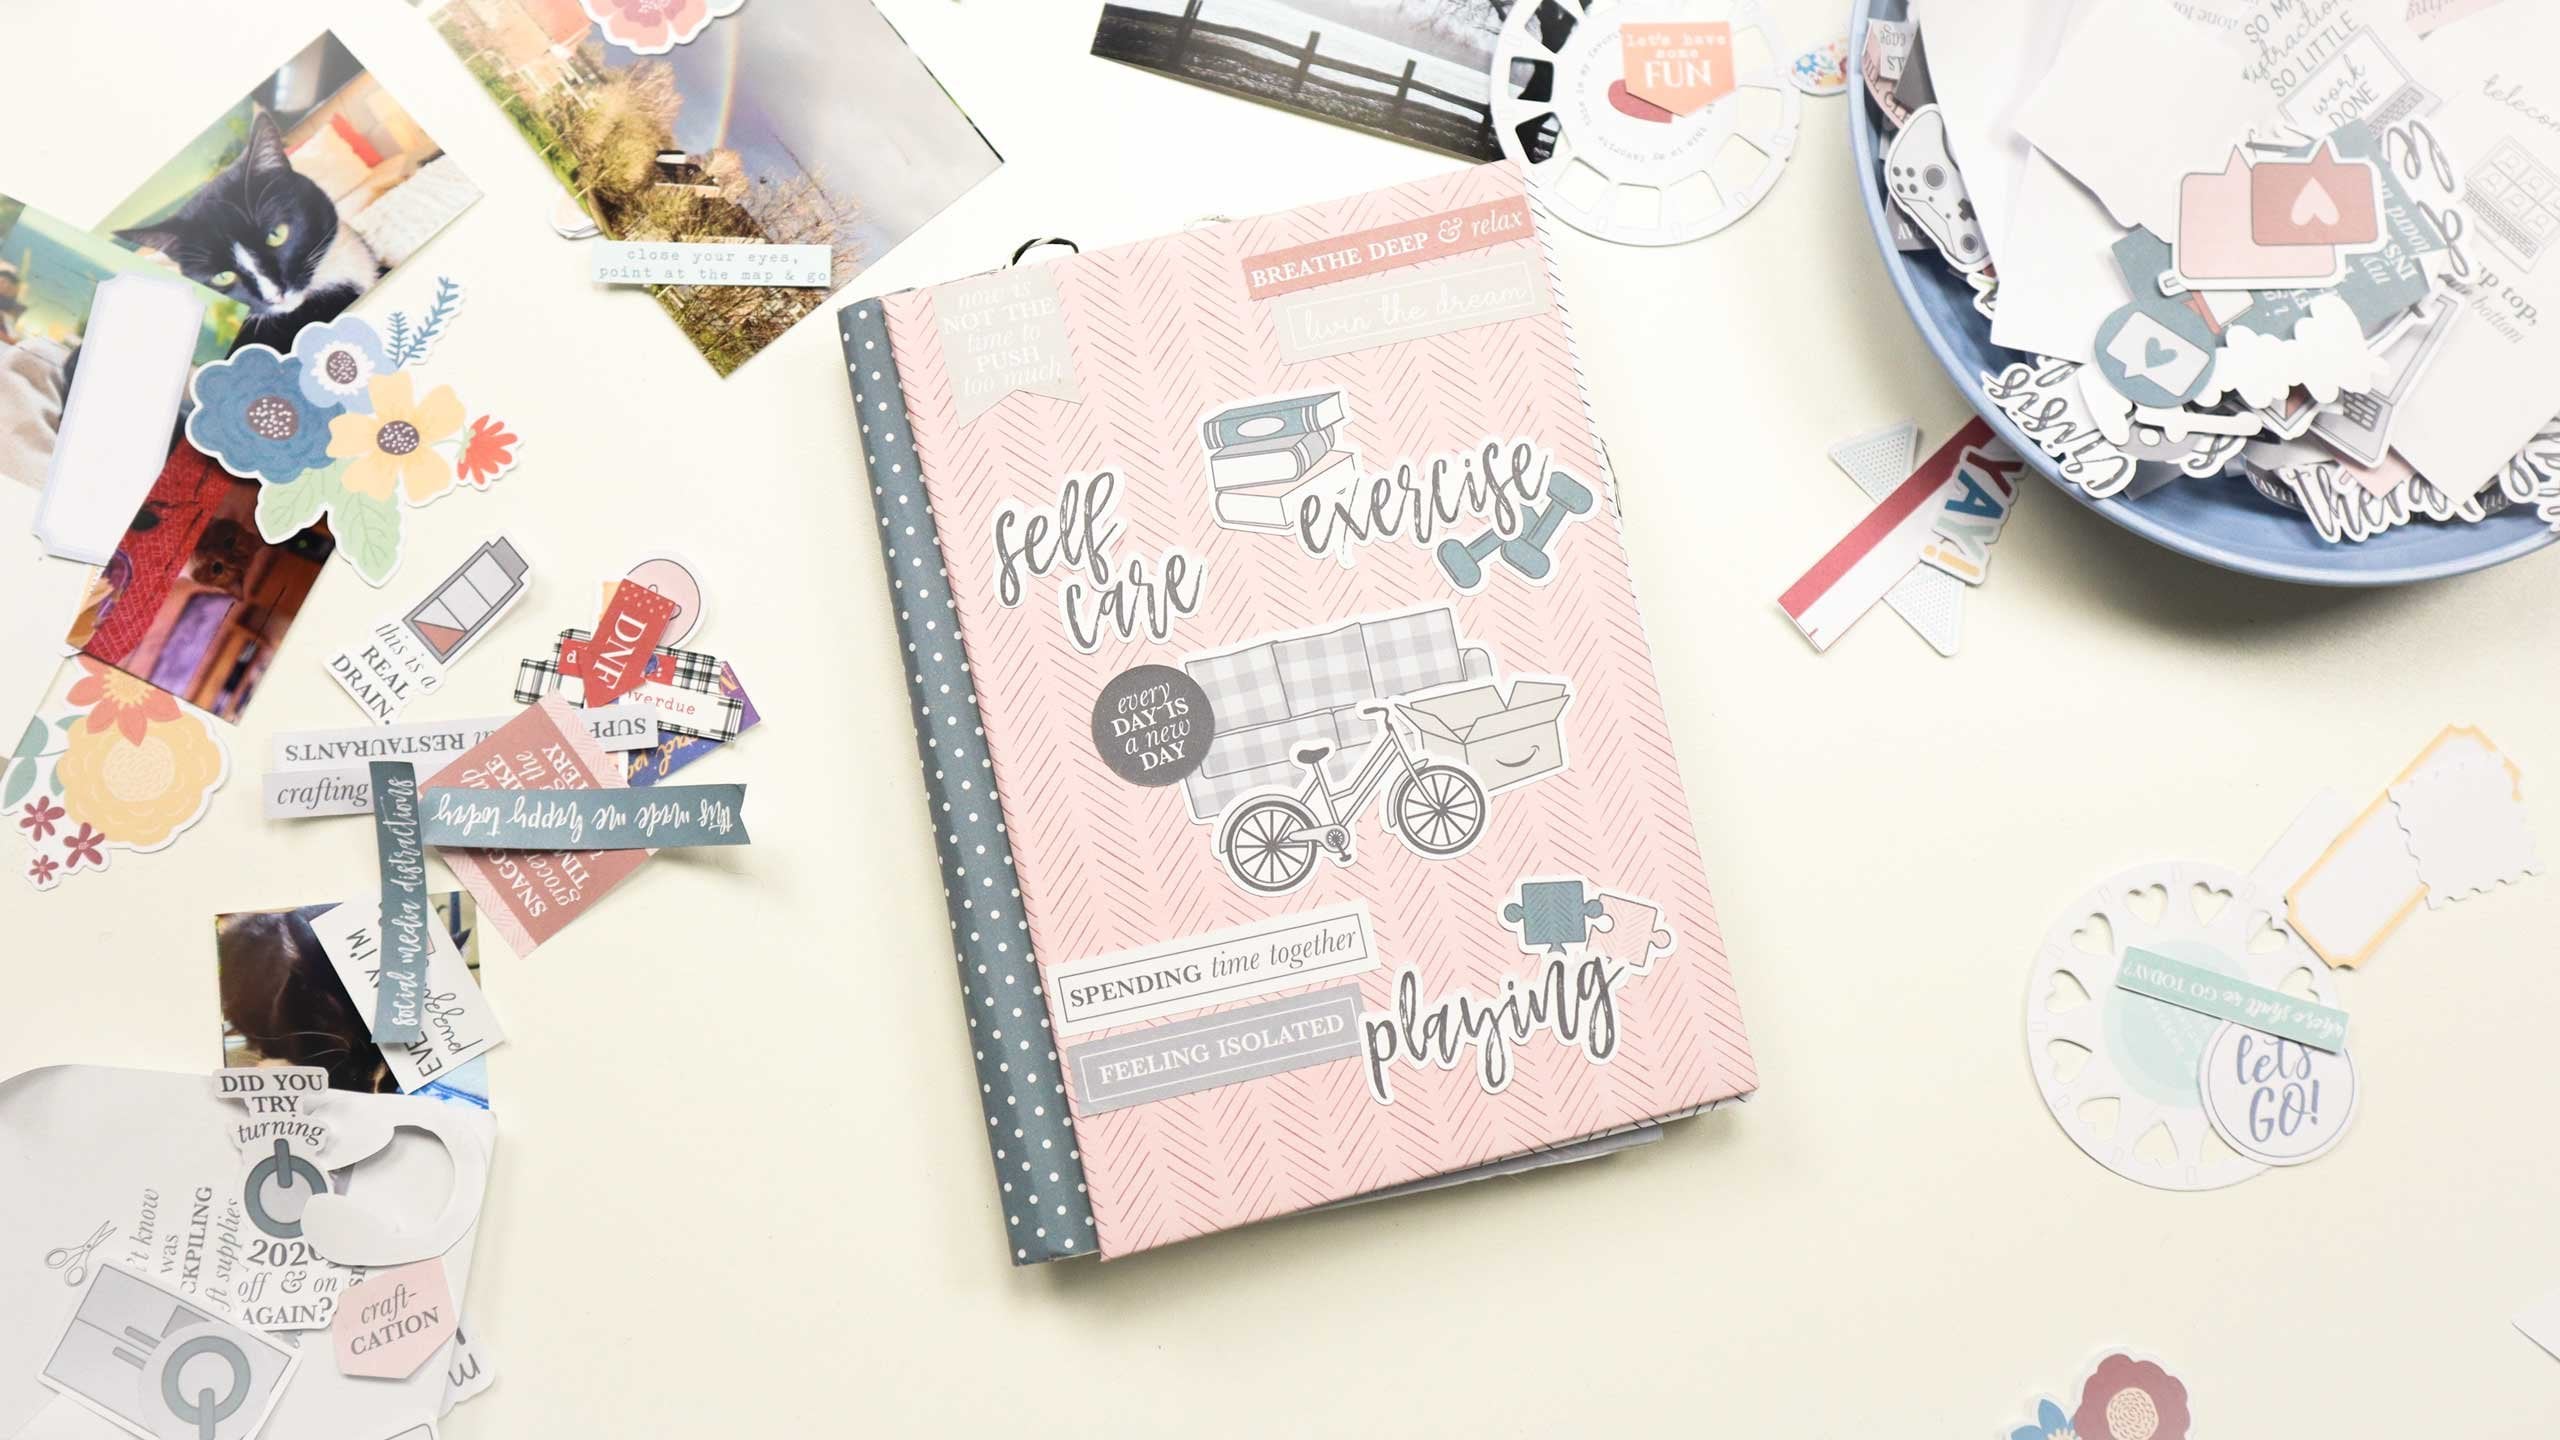
4. Decorating your Traveler's Notebooks Cover: Yes, So book is ready. Now, we need to create the cover. And for that, I have printed all the included elements. And now it's totally up to me when I want to have here on top. The point note is that I first put it here, just see how it goes, how it looks. And then I start gluing it on top. I don't want to have the rings here, you see it? It's not working very well. So I take that off once again. Put it together, helps the old holds in here so I'm not messing it up. And then I blew it and then I put it back. So now there is no right or wrong. Just to your liking. You could even make the sticker smaller. You don't have to have them that big as I have. But also totally depends on you and you just go ahead and do it as long as you want and put it wherever you want to. That's a great thing about this kind of scrapbooking. You just basically make layout here on your book cover. You could even add a picture. Maybe if this holds for reading it, it's totally up to you. You can take a picture of you reading. Okay, I put a layer together. I wanted it really colorful as you can see. And I wanted the moon and the stars here and a rainbow. So that's how it should look later. And then I'm going to add a tag. I glue them onto each other. And then I put hang it here on my book. Weight are going to start your glute here. I put the whole thing together so far before we get this one ready. So just I can just put it in there as well. So far. I'm going to get rid of the bow, but we are going to see, just leave it there for now. And now you can start decorating your book. Each side or each double side is one layout if you want it. Or maybe you add some white papers in between. You can do that as well. And you have an even thicker book, more pages and when it's full and you want to keep your cover, you can just take out the pages, put them separately, and start all over again. So now, happy scraping.
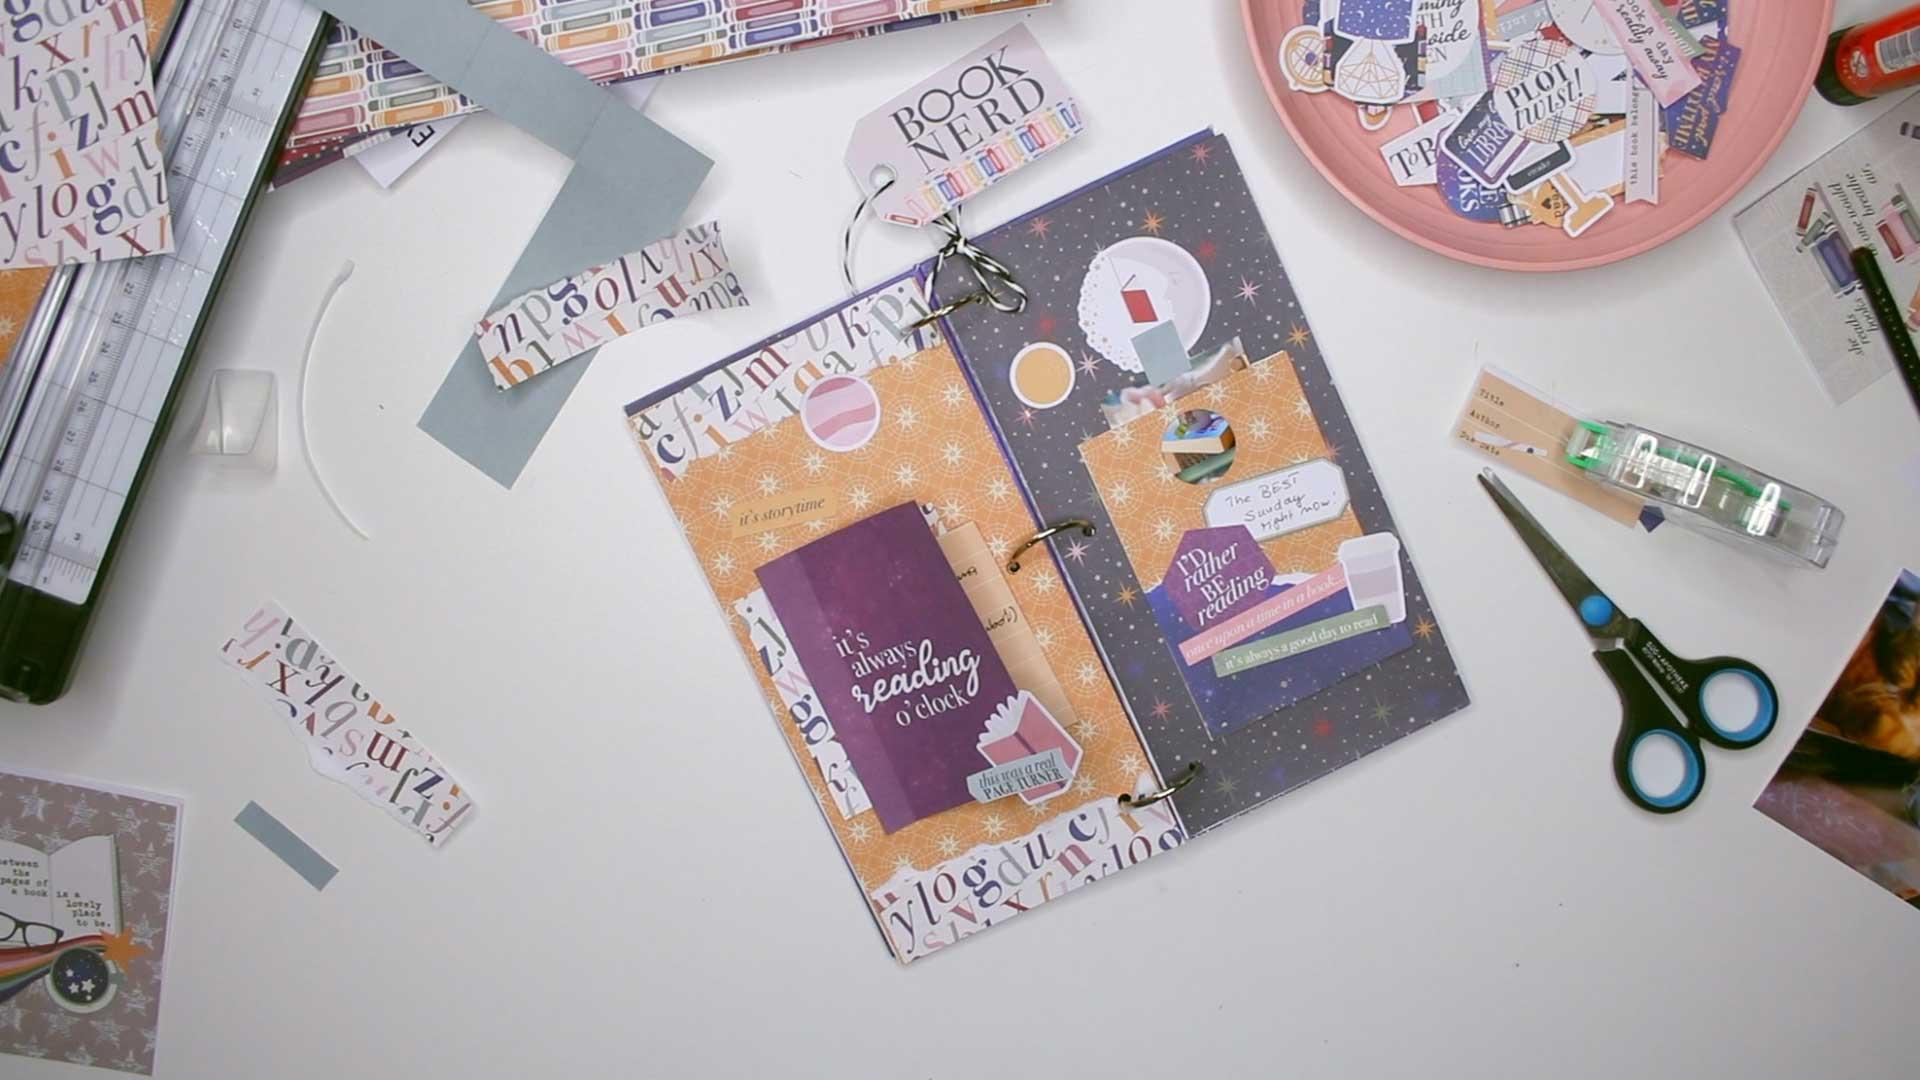
5. Scrapbooking Layout: Best Sunday: In this video, I wanted to show you a new scrapbooking idea with some pictures and how you can implement them into your layout. I'm using the X liver Galaxy S collection from face you read for this layered and I really love it because it has so many different papers which play the garages. But what I'm doing now is I use a punter, a whole partner, and I'm cooking a little pocket and I at some pictures into it. And then you can out again and just have different pictures in your travels notebooks. And I really like the idea, or maybe a half, I might have a better editor, bigger hole. What I really like, how it turned out so you can pull it out again, have a picture somewhere. And now I'm just going to decorate this traveler's notebook, but age was different elements. Yeah. And now it just about adding different elements and papers and papers stripes to live page here. And you see I'm using strong glue. And yeah, I'm just trying what different elements I can use. But you can always choose something else if you're interested in that. And never forget to Epicurus, Zhang linked to your pages. I'm personally totally enjoy the journey because when I look at this layout a year for a year from now, I most probably don't know anymore what this is about. And for me is just about the perfect Sunday right now. Right now, I totally enjoy someday staying at home. I'm just reading, having fun, scrapbook king or watching, watching a criminal story, something like that, something crazy, or binge-watching a series on TV, whatever. And that is for me right now, perfect Sunday. And you never know what you think about this in a year from now. So it's always a good idea to document that and add it to your journal. And the good thing about such a journal is you can always increase it. So right now, it's about these books and binge-watching and what I do on a Sunday, but I will leave that in a few months from now. It's completely different because right now we are in the pandemic and we can't do much other than there. But soon everything will be open again, that I guess, and we will go to the song again or somewhere and have maybe a walk. We are now having a walk as well, but it's winter sun is pretty cold outside and most likely I'm not going out as much as I could. So yeah, it's different. Like I said, I want to remember that. And that is why I'm scrapbooking with this.
6. Outro: Let's start creating your own Traveler's Notebook: Congratulations. At this point, you already know how you can create your own traveler's notebook. So now it's your turn. Gather all the materials you need. Of course you don't need to use traces collection, but you can get any digital collection you like and start creating your journal and do your scrapbooking. Once you are done, please post your scrapbook layout in the gallery. I love to have a look at it. If you have any questions, I'm here for you as well. Of course, enjoy creating.
 Monja Wessel, Graphic Designer and Teacher