Transcripts
1. Welcome to the Class: Welcome to the class Lettering Design for Artists, Illustrators, and Designers. In this class, I show you how to create your own
lettering design and what you can do with your
ready made quotes if we haven't met yet. Hi, my name is Monia. I'm an artist, a graphic
designer, and a teacher. I love to create
a product to help creators like you build an
appealing product portfolio. First, we explore where you get the material you
need for your quote. And then we create a design and Photoshop and export it
in different formats. In our Finity designer, you can download both programs
for free for 30 days. Then we will use
the mock up with a pillow to present your
design in a unique way. If you enjoy lettering
design and creating quotes, join me in this class.
2. Why Lettering is everywhere: This class, we talk
about lettering design. Wherever you go, you
can find lettering. If you look around, look at
Max pillows and T shirts. The poster behind me, you can find
lettering everywhere. Because of that, it's a really famous
product you can sell. You have basically two
options to sell them or to create something from them and sell what
you've created. For example, you could go to C, just purchase a package
of bird out lettering and apply the lettering to different products as T shirts
or Max pillows, whatever. And sell them over Ets with
your production partner. That could be your
business model and totally legit made,
you could do that. But you can also
go ahead and use some phones and create your
very own lettering from them. Then you can sell these
letterings as a bundle yourself. This is very popular as well. In this class, I'm
going to show you how much others sell and
why it's a good option, it's a good business
model to have. For this project, we
will use Photoshop on the one hand and affinity
designer on the other hand. Photoshop, because
I'm familiar with Photoshop and I like
to work with it and save my file
format because I have the PSD files I
can work on later. But affinity designer is
great for this as well because you can save it
in different formats, for example in EPS and Fg. You can give that to your
customers if they are using, for example,
Silhouette or Cricket, to print and cut their files. It's also totally possible. We will explore
that deeper and put that into the package to
sell. Let's move ahead. Let's have a look
at different shops, what they sell,
how they sell it, and what you can make from it. Once you've figured
that we're going to create our very own digital
product and you can go ahead and make a few hundred more and have
a lucrative business model.
3. Successful Lettering: Now I would like to show
you some lettering shops on Ts where these lettering is selling basically
like hot cakes. Okay, now I have opened
the different stores here. It's A, it's called A, then it's called Bailey's
and Ginger, whatever it is. And then I have this wife life. You will basically find
many shops, at shops. If you search for lettering, you will find them or search for subplimation,
something like that. You will find a lot of shops
which are selling lettering. Now let me show you what
they are actually selling. Here is a lettering. When I click on it,
you can see it better. Happiness is mood. Positivity is a mindset. It's something for the front
of your T shirt or pull over and something which you
can put here on your arm. Maybe the person who wants to print it does it
the other way around. It's also totally perfect. You have two options
with one lettering. The whole thing costs two euros or $1
something, whatever. And wherever you are, it's
really a cheap investment. You can use that commercially, which I personally really like. Because then you could even go ahead and sell it
in your C store. Maybe you want something
like that or you want to create it on your
own, but it doesn't matter. Please look at the sales here. When I look here, she has
sold 101,216 products. When I track this
lady, Brenda tomorrow, she will have at least
sold 700 more products. Yes, that's crazy. I'll do the March.
Even if you sell 700 products and you don't
sell them for two euros each, maybe just for 150. We are still talking about
1,000 euros per day. I don't want to tell
you that it's really easy done and you could
do it by tomorrow. I wish I could, but
that won't happen, Because what you
really have to do is you have to have a lot
of listings look here. Brenda has 418
products in her store. 418 lettering products
in her store. Nothing else, just lettering. You would have to create all these lettering
and you would have to create all these previews for your products and
the product description. It will take a while
until you are there, but you see it
might be worth it. Let's have a look
at another store. Here is Bailey and Ginger. That Lady Adrienne
is selling less, but she still has
sold 20,492 products. If you would ask me, I would say the reason for this is
because of the presentation, for the fact that she
tells you also to put it, for example, here on
Max or something. Which is or not just
Max but also here. These things, this
is not as popular as T shirts because actually we all need T shirts and followers, if she would present that, I guess she would
sell much more. But it could be just me guessing that can be
totally different. But what I like about
her products is that she has put them in
different categories. For example, this product
here is for dog lovers, for just positivity or for
moms or dads or whatever. This is another factor I would really highly
recommend to consider. Create products for
several people, for example, moms. Dads do lovers. For cat lovers, there are
endless groups of people. I guess you could then even sell more and
have more products. What you need to
figure is what is a nice quote for this
group of people? I guess you can do that
if you are a dog lover, you won't have a hard time to find quotes which are
perfect for dog lovers. Right. That's what
I would highly recommend to do that and
create many listings, and then you are good
to go and then you most probably will sell that
as well, like hotcakes. Let's have a look at
the last store here, this wife life. She is selling? Yeah, she's selling tumblers and it looks a bit
more Otic here. She's selling also planners
and all that stuff. She's selling a lot of different products which is
nice. Nothing against that. But I would say that this
is costing her sales, she still has 76,000 I
guess she can be happy, but you might want
to reduce it to just one product and then let
your customers do the rest. If you present whatever you're selling
lettering on a T shirt, that might be just fine
because we all need T shirts. And then you go ahead and let
your customers choose that. They can also put it on Max
or pillows or whatever. On planar, of course. Yeah. You see there are many, many options with this project. So you reach a large group of people and tell them what they can do
with these products. It's a great option.
Yeah, that's it. At this point, you might want to decide if this is
for you or not. If you could go ahead
and do some lettering and present it in a way that
people will love to buy it.
4. The Material you need: In this lesson,
you learned about the material you need
for your business model. First of all, of course, you need your computer,
no question about that. Because somewhere
you need to put together your
lettering, your quotes. And you need to put together your products and
put your quotes on your apps and save them to sell them on
Ts or any other site. The first thing you
need then of course, you need the material for that. This means you need
fonts, for example. You also need mockups. Yeah, yeah, that's
basically all. Now is the only question
you need to ask yourself. Where do you get those things with a commercial use license? For that, we go to the computer and I show you some examples. I'm now on my computer. I've opened the brother,
and you can see now I have three tabs open and one
of them is design cuts, which is one place
where you can get fat. I think it's a
highly created sign, which is a pretty good
thing because then you don't get all the gabs, you really get high
quality design. Let's check that out. Here is a section fault and you see there are a lot of
different faults for spring, for vintage, for tattoo, graphiti, Art Deco, whatever. I just click on it
and you can see them. Now you see the pricing here. A phone costs between $11 to 20, $30 Well, it's worth it. I don't want to make it smaller because is a lot of
work to create a fault. If you create a good one, which has the right
sizes, which really fits. Yeah. Because if you
type your words, they need to fit together. The question is, if you
want really good fonts, then this is a place to go and you really need to
invest into your fonts. Yeah, you get a
commercial use license with each phone here, but you cannot try it out. Sometimes you are lucky
they have bundles. They always have bundles. But sometimes you are lucky
and you get a phone bundle. This time we have
a mockup bundle. Sometimes you can find here for bundles
which means there are tons and I really mean tons of different forms
into in one bundle. And you get it for $29 I
think with that bundle. Yeah, you can do your first 100, 200 products without
any big deal. This is one option. You need to check that and you need to find your own phones. Don't go to Font.com and
download from there, because the fonts might not have a commercial
use license. That's important thing,
because you want to sell it, you need the
commercial use rights. You see here, each product has this extended license included. That is what you
pay for as well. You also pay for the license, make sure you have one and make sure you have high quality. That's your material. That is where the cook
goes to the market and purchases his
ingredients there. They are of much more quality than if it goes to
the supermarket. Right. It's always
better to have a look where you
purchase your products. That's the point. Another
option where you can purchase your funds
is Creative Market. I'm not a big fan of Creative Market anymore,
and I can tell you why. Because they have now a
subscription model where you get some credits and then
you can purchase something. So you can purchase
it just as it is. And then fees applied
when you check out. I haven't figured
yet where the fees for me, I'm selling there. So it's not a bad side. It's a great side, but I don't like their model
they have right now. But maybe Let's let me
show you here the files. You see they have
thousands of files. That's a great thing
because you have a myriad of things
to choose from. Wherever. Just click
on Fancy now and you see there are tons
of beautiful files here. They are priced
between $17 to 20, $30 depending, maybe on the
amount of files inside. But you can make sure that the people who are selling there now what they're
talking about, because it's pretty hard
to open a shop there. You have to apply, you
have to have a portfolio. They are going to
check your things. If you sell there, your products should be okay. Should be highest quality. You can really think
about a product here. When you purchase
such a bundle for $59 you know it is
of high quality. Just let me quickly click on it and see you get a bunch
of different fonts here. If you search a bit, you
most probably get even more. For less, or more
for a bit more. Just have a look around. Let me quickly show you what
I'm talking about here. You can sign up for the newsletter and
then you get 15% off. But if I click by now
and go to check Out, you see that here an
estimated taxes is applied. Okay, great thing I see they no longer apply these strange fees. Maybe they hate to
see that as well, that the customers disappear. Great thing. I can
recommend Creative Market again because this fee has okay. Taxes are applied, of course. Then you have to pay, check
out and get your funds. You get a commercial
use license. Yeah, that's all you need. Then there is another option. Maybe it's a great
fun for beginning. I don't know, I'm going
to show you that one. Let's go to Create a fabric. It's a place where
anyone can open a designer shop where anyone
can upload their products, their phones for example. I just say for example, because there are tons, I really mean tons
of other products. It's like a buffet
because you go there, you type in something and
you can download everything. If you have yearly access part, you can have a
monthly access parts, but actually the price
is ridiculously low. If you purchase an entire, you can see it here on top, it's 399 per month. For 12 months, it's
about 50 Euros or $50 And then you have access to all products available on this
side. It's a great thing. Let me quickly go to Fonts, you can see what I mean. Click here, whatever
you are looking for, it is most probably here, Sometimes there are also very
well known designers here. Those also offer the product. Just scrolling through
it now and you see what a variety
of products here is. That's a great thing if
you're just starting out. This might be your
option because you pay one fee and you can
download it all. And then there's a tricky
thing about the license. You download a product and yes, you have the commercial use
license for whatever you do from that product for as
long as you are a member. After the year, if you are canceling your
subscription, that's okay. Because you can still sell all the products
you have created. But no future products means I download the
vintage phone here, I create a product, I put it to my SD store and
sell it. It's okay. I can sell it forever no
matter if I'm a member or not. But after a year, if I'm not longer a member and I create another product
with this vintage phone, I'm no member anymore, then I'm not allowed to sell it. I need to be a member to have
a commercial use license. That's a little bit tricky,
but on the other hand, I believe for four
euro per month, we really don't need to
talk about that because you basically get all
material you need. You see what I recommend for beginners because I think it's a great return
on investment. If you purchase a
yearly subscription here and you create products,
that's a great thing. Because you can create as
many products as you like. For such a low cost then your entire business
obviously doesn't cost Morris $100 to set up. Right. The other thing you need to sell your lettering
products or are mock ups. You need to somehow present your products and to
put them into shops. That is where mock
ups come into play. And that is why creative
fabric is great as well. Because you can just
type in mock up and you get basically any
mockup you need, it's included in your 50 fee
for the entire year or 600. Yeah, that's an option. I just say option. You can mix and match. You can go from one side to the other purchase
wherever you want. I'm just showing you the
deepest possible option because one thing I want to tell you is more listings
on C equal more money. That means the more
products you have, the more often you are found and the more often
you make a sale. The really great and
highly successful shops have thousands that really mean thousands of products
they are selling, they are found more easily. Then of course, they
make more sales. If you really want
to create products, if you really want to dig deep
into this business model, you should have option
where you get tons of material and can create
your products from those. Yeah, I like to browse
there because I'm always getting a new inspiration from
the material I find there. Yeah, that's up to
you, but that's my suggestion for
you to get started. Yeah, maybe you go for that. You find the links to any
of the marketplace below the video or in the PDF
I add to the class.
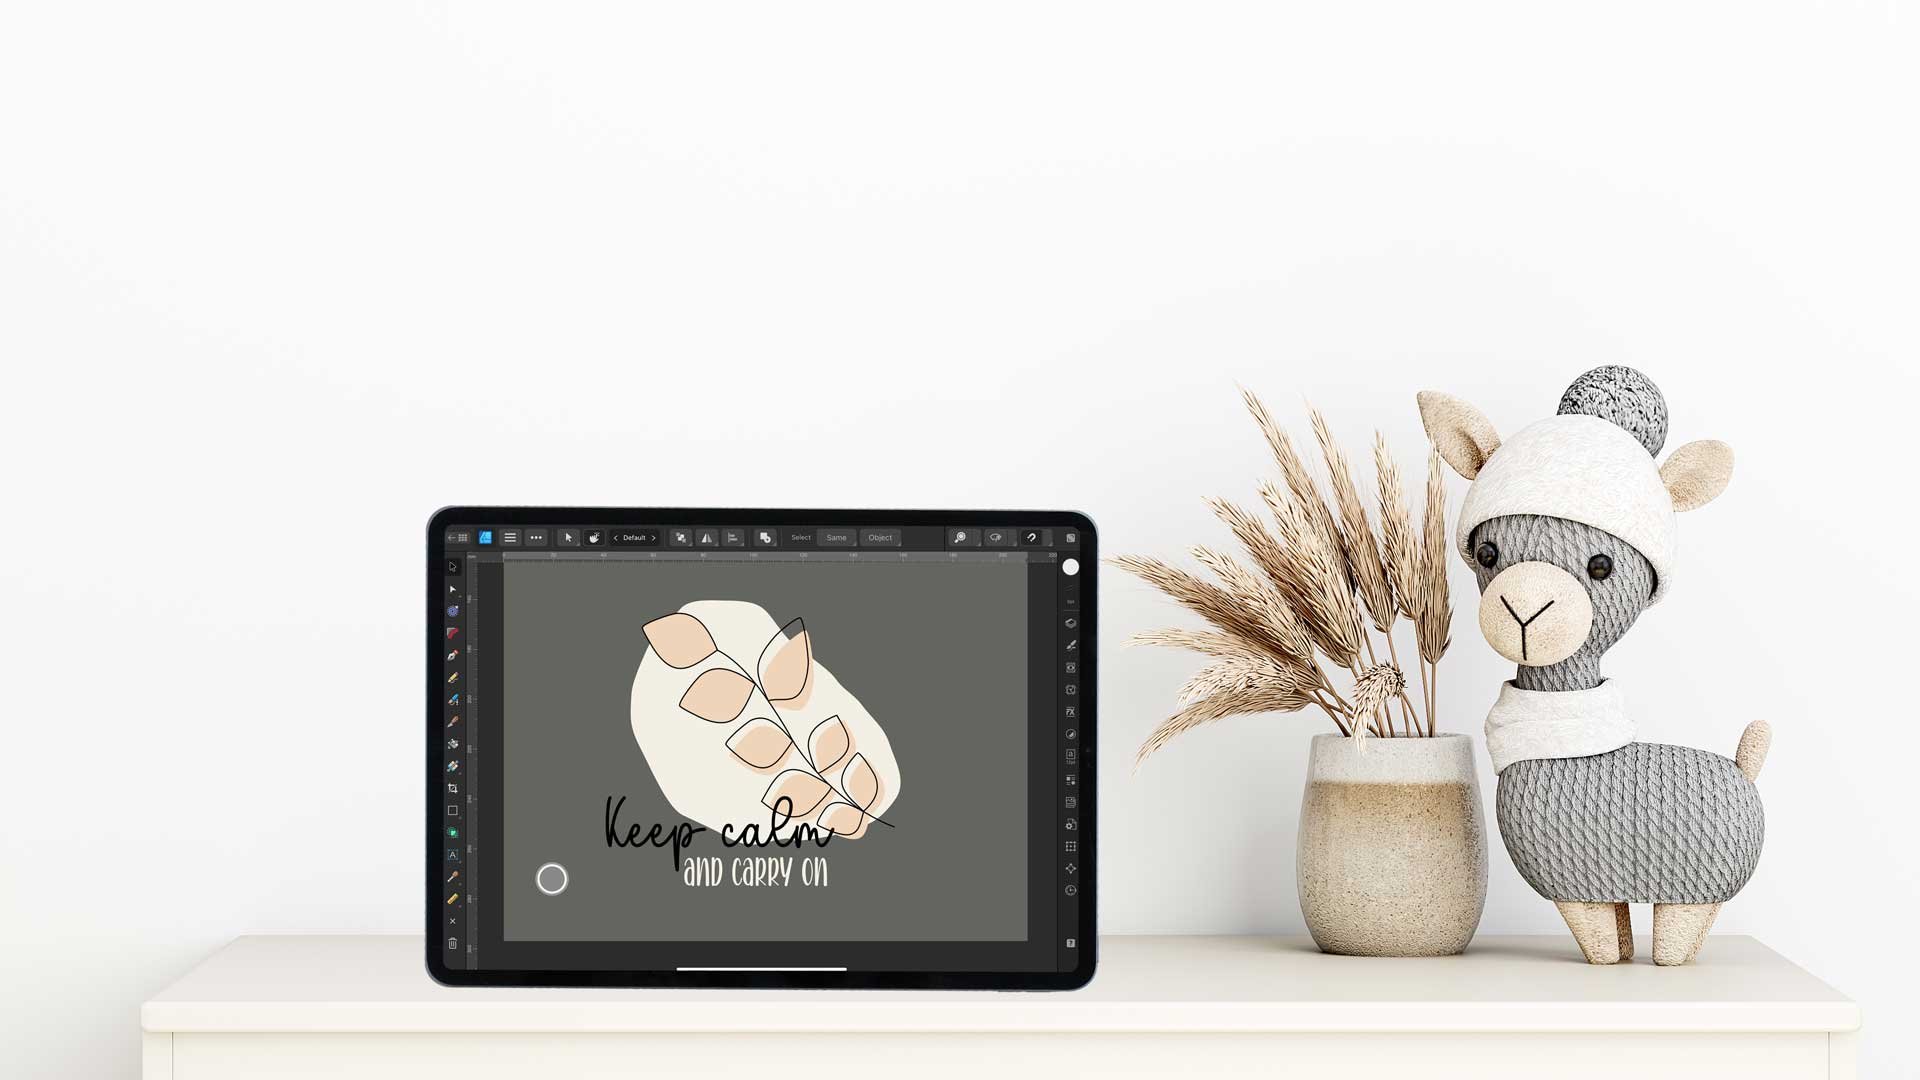
5. Lettering Design in Photoshop: Now let's create
a quote together. You can use for T
shirts, Macs pillows, whatever you sell the
lettering, the quote. But your customers can use it for tons of
different products. That's the thing
here, of course, you want to sell
it commercially. Now I go to the
computer with you and show you where
I get my phone, why it's not an ideal set, and how we can put it
together in Photoshop. I'm now here on
Create Faber Cap. I took advantage of the ten products I get
for nothing for free. Actually, I've downloaded this. It's called homemade and you see home is like a
calligraphy phone. Lemonade is more a clear, we are going to use
that one for the quote. I show you what I have
already created from it. For that, I've went
to my store here. You can see make
that a bit bigger, leave a little sparkle
here is wherever you go. I've also added some sparkle, in this case, some stars. And I'm going to show you how to create exactly
that in Photoshop. I'm using Photoshop,
but you are free to use another graphic program.
That's totally up to you. But you can get a
30 days free trial from the Adobe website. You might just use Photoshop for that right now to follow
along in this class. Now let's download the
phone, you register, you have to add your
credit card number, because after the
ten products they actually charge your credit
card or Paypal account. You can avoid that by just going here and
checking my downloads. And then you see how many things you have already
download for free. If you want to upgrade, you see here is a great price. Usually in the top left corner, maybe you want to take
advantage of that. Just download it then. I have that here in
my download file. Let me show you. I have the home lemonade. You see this? This dual has
an OTF file and TTF file. You can install basically
whatever you want, but you might better install TTF file, but it's up to you. It's a little bit
different in Windows, but I'm on a Mac now. I'm just going to double
click to install my phone. I double click it here
you see super easy. I do a right click
and say open with, and I say phone book. Right now it's
connected with Inshot. If that happens to you, you can easily change that
when you go to information. But I'm just going to
phone book right now. It will install my phone
here. Just click install. That's it. First is installed. We do the same with the other
here, usually double click, but I now do a right click
and say open with phone book, otherwise it opens with in shot. What I don't want, I click install,
it's done as well. Next step, I want to
have some sparkle, just as you have seen here. I want the sparkle here. This clear one here, leave a little sparkle. I'm going to go to Photoshop. I'm now creating a document and I click whether command or
I go to file and say you, then I set up my document. Yeah, I bet I need a big one because you never know
where you need it for. It's a good option to
have a bigger document. I go here to pixel and I say
4,000 by 4,000 Basically, there is no need to go to vector as long as you make
it big enough. Big enough. In this case, you can imagine
how you can put it on a T shirt or on a pillow. And a pillow, it should
be about 40 centimeters. On your T shirt, it shouldn't be that big. 40 centimeters is a good size. That is much bigger, but I'm going to
use 4,000 pixel, which is about 40,
45 centimeter. I also put pixel per
inch so that it is 300. Make sure you have
that 4,000 pixel. 4,000 pixel in 300 DPI. I just now say white
as a background. I can change that if I want to, but for now it's white. We need to go to the type
tool here, Click on the T. And then you need
to get the Pam. I just tip homemade
and you see two falls, one the clear one and
the handwritten one. I click here, just say
leave, I just need leave. Click command A and
change to a darker. For right now, I just click on black so we can
see it clearly. I'm also making that bigger. Of course log has 48, but just to make
sure you can see it and to just make it
as big as possible, maybe just like that, it doesn't really matter. We can increase it in a bit. Leave then it just to hear the error and
make in a second row. And therefore on a second
layer I write a little, I don't know why this year
is still there, but okay. Okay, so I put it there somehow. I play with it in a bit to make sure I
have the right size, the set up, and the right distance of the
letters from each other. First of all, I just type
what I want to have, leave a little sparkle. Sparkle should be in
the handwritten form. I choose the other one here, See and increase the size of it can now just
increase just 300. I just type manually
to 200 here. Okay. That's okay for now. Now we need to position
the entire thing. We can back on what I
have already created. But actually I
would want a little here between the S and the L and leave on top it doesn't have to be 100% the
same, just market. Now we need to go into
the options here. If you don't have that
window, just open it. If you don't have it
open open character, you can set the distance
with this tool here. Right now it's zero, but
we can decrease it a bit. I say -20 for example.
A little bit more. Maybe -25 it is right now, -50 I just now play with it. I just go here and press
Command and modify it. I have it here in the
middle and see what I like. It fits because a
little means small. This can be smaller
than the other one. I put that now on top can increase it
a bit, not too much. If I increase it as much
as the one on the bottom, I believe that it
gets overwhelming. I better make it smaller. Okay. Maybe like that, maybe we change that.
I don't know yet. I go to my market and see
if I need to change here. Maybe the foam weight? No, definitely not. Maybe I also make it
a bit smaller here. No, I don't think so. I'll leave it to zero.
I like that more. You see that is now about your preferences,
what you like best. We said leave a little
sparkle. We need some sparkle. Now for that, we go back to what we have
downloaded from Tipica, and I go to the folder
where it says Sparkle. You see I have
several files here. What I just need now is, in best case, a PNG maybe
where I can grab that from. Also I can use the SG. That's also fine, but
that's just fine. I just drag and drop
it into Photoshop. Now I grab the
selection tool here, I grab some stars
I want maybe these here I go around Selective
because it has no background. I can click Z and get it to my document with I can
position them right now. You see that's how it looks. Make it a bit smaller.
Okay. Maybe like that. Let's see how we did it. You see it's similar
to this one. It's not the same, but similar. Maybe here I give it a bit
more space, we can do that. We don't need that anymore. I close, but let me go back. Yeah, we increase the size
here, distance a bit. I go here and say maybe
25, maybe like that. It starts on the
second letter here and it goes to the last.
But the one before. Yeah, I like that. Okay. So far we have now, you see it's not a big
thing to create something. You need an idea, of course, and you need to
position it somehow. But it's not, it's not such a big thing that you
need hours for quote. What you can also
do now is you could give the different
letters different colors. I'm going to show you that. I
will leave it now as it is. But if you want to, you can go to the T, just click in here and
mark just one letter. Then you go here to the colors and you just change the
color of that letter. You can now have a different color pet or have
a color palette for you, quote, and then give each
letter another color. You could totally do that
and play around with it. I just wanted to show you
that this is possible. You don't have to
do it, of course.
6. Saving the Quote in different Formats: Now let's save our
file for that. We are going to save it
in some file formats. Actually, I do that
because I've seen on a C when people sell that they
have not just a PNG format, but also EPS and the SVG format. We're going to give
that to our customers, not that they really need it, we are going to give it to them. Hopefully we make
them happy with that. Now, I'm here on our
document now. Mark it all. Go to the move tool
here. Mark everything. You can see that I've done that because here all the
layers are marked. Let me move that one here. You can see
everything is marked. Now press command T. I increase that and also
click on the shift key. It's proportionally, I'm
just making it larger. As long as you have
set the chain here, it is already increasing
proportionally. I don't have to click
the shift key anymore. But if you haven't check here, you need to press the shift key. I guess that's big enough. Then I click here on my arrow. Now I'm going to delete
the background layer. Just click the escape
button and then it's gun, or you can do a right
click or mark it. And then click here
on the little bin. And it's gun as well. Now I
go to Image and then trip it. Cuts off here, all
the white space. Let's do that now. We are going to save the file. First and foremost, it's
very important that you save it as a PSD right now. Because then you can
always go in again and maybe move something around or change something
or change colors. Or maybe you have a customer
who wants different. You can do that if you
have your PSD file. Let's do that. First file
and then click Save. I now name it 001. It's an SKU number. It's very important that
you put SKU numbers. If you don't do that, when
you are a product 100 150, you will no longer get around. Make sure that you
have really set an SKU number and then
give it your name, 001 and then leave
a little sparkle. I put it on my desktop. I just take your desktop
and say Safe click Okay. The next step is I export it as a PNG back again to
file, and then export. Then I can check here, everything is set quickly. Of course, it's now smaller
than 4,000 because I've cut the top and
the bottom scale, 100, it's all fine. Click export, I want it in
the same name of course, but I don't go to documents, but on my desktop once again. And click Safe. Okay, that's it for Photoshop. We now need affinity designer to save it as an
EPS and SVT file. First of all, we need
to open the PSD file. Just do a right click
and say open with, then click affinity
designer two is mine. In this case it opens
and you can see that there are still the layers
in the layers palette. Now we need to switch
to the export persona. Affinity has the
affinity persona, the A persona, the
pixel persona, and the export persona. You need to click
on export persona to pick the right formats
to export your file. Once you've done
on the right side, you can find slices. When you click on
the circle here, it opens and it shows you that you right now have a PNG file. Click on it and choose S G, the first format we want. Then click plus sign and
then click the EPS file. You could basically choose as many as you want
because the plus sign. And you could just click on it and export even more formers, but we just need these two. Once we have that, we
can click Export Slices, and choose where we want to
put them on the desktop, say Export and we're done. Isn't that handy? Because then you don't have to
save again and again, you just have to click there and it's there on the desktop. On the top right, you can see there is now the
EPS file and the SVG file, and that is what we can
give to our customers.
7. Creating the Mockups: In this lesson, we want to
put our quote on a mock up. For that, I have gone
to create a fabrica, once again, you can see here, I have picked a file
from mock up Central. It's a pillow actually, but he or she has tons of other markups in
his or her shop. When I just scroll through it, you see they all have
the same look and feel. I could totally use
another pillow here or I can also add a T
shirt or a mark, whatever, and put my
quote on those as well. You should not just
pick one mock up, you really need to
put four or five, maybe better even six
different mark ups and present your product there. It's a good thing
to create a fabric, otherwise you really
would have to purchase each of
them separately. I have now picked this
one, the pillow one. What I actually usually
don't like Creative Fabrica, is that people there usually offer their mock
up as a JPD file. It's always better to have it as a PSD file because then you
can open it and bed the file, and I just say burnt in. You would have to see the
difference here, but it works. And I'm going to show
you that because that's the low cost solution
for that problem. And to have nice previews
for your project, I have downloaded this file and I have it now here
in my download folder, and I put it into Photoshop. Let's open that now, we just move our file
from here to there. You see I have marked all
the layers here and I just do click with the left mouth and drag it here over
and now it's pretty big. I press Command and
make it smaller. Now as I said, as long as I have already
the chain on here, I can just increase it. Otherwise, I need to click on the shift key and then I just
make it fit to my pillow. Of course, you say
what size you want, but I don't want it to
be that overwhelming. Yeah, I leave it like that. Maybe once I'm done,
I double click. Then I have all the layers here. All the layers which are now
marked should be merged. I do a right click and say
merge here, merge layers. I have them now on one layer. That means I can use here the blending modes to make
it look a bit better. To make it look like burned in. Now I just need to find
the right blending mode. Everything is still, you
see here in it light, you can't see the sparkle
anymore just in light. But when you use linear light, you can see it all. That's what I'm going to do now. It's not looking as if it
lies on top of the pillow, but as if it is inside. That's why I'm going
to close that. Now, you can say now it's
just black. Yes, it's true. You would have to
change all the letters here if you want another color. I leave it now as it is. I say here, down safe because
I have it already safe. Now, I need to modify my map. Let's go to my cut tool here. Crop tool, I say
just ratio one to one square because that is the size I need for S
and also for my webshop. It's up to you, of course. If you need a different format, you just pick it here. But one to one is fine. For now. I just double click. So I have a one to one format also because it's that large. I press command and you see if I set it to
centimeter pixel here, you see it has 2,400 As
long as it is 2000 pixel, that's fine, because for C, they recommend 2000 pixel
for the largest side, I would set it to 2000, Now it has 2,400 I click okay. I could even crop it
a little If I don't want this bottom here.
Which I don't want. I just cut that off. Maybe I cut that a bit off. Yeah, I set it like this. Okay, again, I
want to export it. Now I press Shift Alt command, which is safe for web, actually. Now I set it here to JPG
format to medium quality. That's important. Otherwise
it gets really large. Now it has still 380
something kilobyte, but I want to have 2000. You see it has 304 kilobyte. But I guess As can handle
that for your website, you should have a
smaller format. I'm going to save
this preview image now as 2000 picture again, I put it on my desktop. At the end I just put
preview 101 and then 2000. So it is the 2000 size
because I'm going to create this one in 800 by 800 because I need it for my
own website, much smaller. Okay, Click Save, and it's done. Now we do that again. Shift alt command or export
for web and devices. I now set it to 800. Click Return, and you see
now it has 68 kilobyte, or 60 kilobyte, which is five. I click Save, now I
say there are one, and save it as 800 again. 800 at the end click
and it's done. Now you do that 45 more times. You have several,
several preview images for your website and S, then we can add it to
E and start selling.
8. Listing your Product: Now I want to show you how to get a great
product description. I know it's hard if
you want to create a great product description
for C. There are so many advices like use the right text and
the title and in text. And at the beginning
of there are so many things to
optimize your listing on. But I think one of
the secret secrets with quotation marks on C is that you have
a lot of listings. Because actually if you
have a lot of listings, it is much more likely that a customer stumbles over yours. What you need is the
ability to create a lot of products in a short amount of time with a great
product description, but maybe not 100% CO optimized. You can of course,
maybe you do that later and put more
time into that, but I want you to get started. Because of that, I have now used Chat GPT because
then you can have a new product description for each product you
create. Let's go there. I just pulled up the store or one store which is actually selling something
like we do a quote. In this case it is, Happiness is a mood and
positivity is a mindset. She actually sells 21 for the sleeve and one for
the T shirt itself. You can do that as well, but we just created now
one for the T shirt. I went to shed GPT
and as let's say it's him to create a
product description. You see, I haven't just written one sentence but I wrote many. I just talked about
what I'm presenting, what I'm giving my customer, which file formats I'm
giving it and what is on it. I also want shared GPT to
mention what this file is for. That is what it made out of it. It gave a title, leave a little sparkle. Inspirational quote,
design, commercial, use, PNG, SVG, EPS files. This is something you see
often on T that people put all the files they
have created in the title. Actually, yeah, we can do that. Then I ask also to give
me text and you see here, quote, design, commercial
use, expiration quote. All the kind of tax you can get here is the same as before. The more different tax you have, the better it is
for your listing. Because imagine you have, let's say, 1,000 listings. You always use the same text and you can just be found
for certain text. Let's GPT help you because
it can easily think of maybe 500 more
tech than you can do. Let's start with these quotes. But of course with each
new product we add more text because they are those which are valid for
each of the product, but those which are actually valid for just that one
product with that quote, go ahead and use that. And then it yeah, then it starts to
describe the product. We would need to go
through it now in detail. Maybe change something up. Don't just take it as it is
and believe in the best, but read it, see if it works, if it fits to your product. Of course, it's a machine. It's not working like a charm, is great, but it's
a support for you. It helps you to generate a great product
description in no time, but you can't use
things as they are. Just make sure you read it and adapt it to your
needs if necessary. Once you have that,
you can just go list your product on C in
your very own store. Basically, that's it. That's your whole
business model. You have your product, you have a Zip file. You can upload the Zipa
because it just has 5 megabytes and you have
a product description. You have your images, and now you can
put it in stores, Maybe start with C, maybe start with
your own webshop. That's totally up to you, but start. Let's get started.
9. It's your turn!: Okay, I already said
that in the last video. Let's get started, and
that is what I mean. I want you now to design
your very own quote. Go ahead, go to your
computer, look for quotes. Maybe go to Google and ask
for quotes about, let's say, for affirmations
or inspirational, something like that for moms. Quotes for dads, for
cat lovers, ever. You can have tons of
different groups of people. That's a great thing
because then you have tons of
different quotes and you can go ahead and create
products from those. Most probably easily four
to five listings per day. If you want to get a
lot of products done, don't think too much about it. Of course, make it look nice, make it look in a high quality. Use the right mark ups. You can of course, use similar
or same markups again, but don't always use
the same markups. It's a little bit of
variation because one thing talks to the one customer and the other thing to
the other customer, we want them all to
purchase in our store. Maybe you want to
keep that in mind, but after all, go ahead and
start creating your quotes. It's a pretty easy
business model. You can totally, you can start with no more
than 50 bucks. That's a great
business thing, right? Go ahead, get started. And I love to see your
quotes here in the class.
 Monja Wessel, Graphic Designer and Teacher