Transcripts
1. Introduction : Hello and welcome. My name is Karen dawn. And in today's class, you are going to learn
how to make a shadow box. Now what's different about this shadow box is that
I'm not going to require you to have any
materials other than a clocks and whatever
you have on hand. And in this class, you're gonna be able to tap into your own innate
creativity and use what you have to create your
own unique shadow box. Let's get started.
2. Gathering Supplies: It's only one material that
I'm going to ask for you to actually have to get started. Alright, it's gonna
be the base for this, but you can fill to get
creative as you want with this. You don't have to have this. But I am gonna be
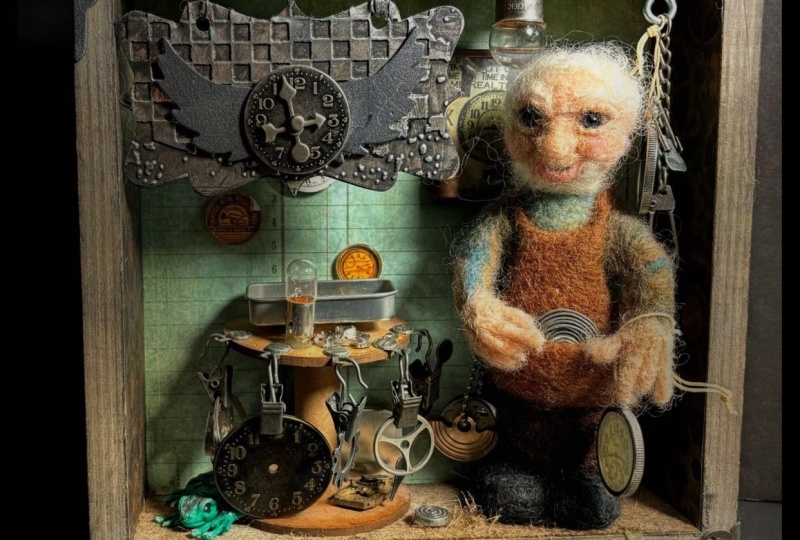
using a box now. This is a wooden box that I just picked up on a clearance
rack somewhere. And I'm gonna be using
this as my base. You can use a cardboard box. However, you'll
want your edges of your cart and you want the
cardboard to be straight. And then you're going
to gather materials. Now there's nothing
specific that I'm going to ask
you to gather this, you are going to learn
in this class how to intuitively just pick things and then allow them to come together into some
sort of creative art. The next thing you're gonna
do is you are going to go around your art
room, your house. If you have to go out to a thrift shop or
go garage sailing, anything that you can think
of to do to gather supplies. I have a huge resource of
supplies just within my room. So I have just one. Literally wandered
around my room for about ten minutes and
gathered some supplies. I have found some tissue paper that is an old packing material that I got when I ordered
some ribbon on Etsy. I have actually gotten some
ribbon and my tissue paper. I have gathered some fabrics. I have some paper papers. I've got some
interesting metal pieces that I picked up at an
artist garage sale. I have some washi
tape, at least fun. I have some paints. These are just
inexpensive, Kraft pink. I have some metallic
colored pencils. I have some fancy tissues. And I managed to find something that I do believe is
going to be my subject. This is one of those
you might have made. I made one of these when I was a little girl and Girl Scouts. I don't know exactly
what they're called, but they are like a
musical instrument. And I wanted to I pick this I also pick this up at
the artists garage sale, which is an annual
event that they have. I'm near me in
Everett, Washington. And I've picked this up
probably four years ago, I would say, and I'm gonna do
something with it that day. So what I'm envisioning
now, I'm like I said, this is all just an
intuitive collaboration that's happening here. I'm envisioning that
this is going to be the subject in my box.
3. Getting Started: Let's go down to my desktop and see how we can
bring this together. Now, whatever you have, whatever you have gathered, have it already before you
watch this next video. And I want you to just kind of play along with me, but player, play along using what
you have, alright? And just allow it
to come together. This is the magic of
intuitive creativity, and it is one of the most spectacular energies
that I've experienced that can move through me and out and make
an amazing things. So not everything works out. So I'm going to
preface this class, would that not
everything is going to work out and that is okay. It doesn't everything
isn't going to work out and it's not supposed
to work out, but you'll get
something from it. Trust that, trust yourself. Trust that you can move this creative energy
through you in an intuitive and trusting way. Alright, let's go down
here and just play. All right, Okay, here
we are on my desktop. I've got my box, my subject, and I did, I originally
had more supplies in this, but I kind of
filtered things out a bit so that I have more
of a color theme now, instead of just random supplies, everything is fitting
nicely together. Now the only thing that
doesn't fit my color scheme, which is more of a natural
color scheme, is my box. So that's first thing that
I'm going to work out. I have some choices to make now. I can go ahead and maybe
do the outside edge. It's still wet in there. So I'm not going to, I'm just going to
keep going and not, and not worry about
drawing this just yet. But I might play
around with this edge. I might do something
with the outside. So now I can look at some of these other materials
that I have. The maybe my tissue paper at UW. Now I just kept an idea. See this is what happened. Since my paint is wet. I can take one of I could take this tissue paper
with my dragonfly on it. I can put it right
down in the wet paint. So I'm just going
to flow with that. I'm I'm gonna do a few more. I never liked to do just one. I like to work in odd
numbers, particularly threes. So I'm gonna go ahead and
put down, read dragon flies. Now of course, as
I'm doing this, my paint is drying
and I might find it gets too dry to put it
down and that's fine. I can always put a little
bit of glue or medium underneath the edge
and get that down. But there's a start.
4. Adhesives and Opportunities: One of the things that I did not gather when I got
started on this, which you might want to, you might have also realized at this point is I need some glue, some sort of adhesive to start putting stuff down of
the things that are really good to have on hand is Elmer's glue all hours glue all, unlike the school glue, this is going to be a
lot more permanent, okay, so I'll prefer the
Elmer's glue all for this. You can even use glue sticks, although not as good for what
we're doing, still works. Get the all-purpose goes to x. There's something that says
it's permanent, alright? Any sort of matte medium
is also a thumbs up on. You happen to have one
of these, a glue gun. This can really come in handy, especially things
like Two-sided. Two-sided takes,
really, really cool. And I also found this rapid
dry mixed media adhesive. This could be an alternative
to the hot glue gun. Okay. My paint is wet and I've got this really wonderful
tissue paper with some texture on it. I wonder what would happen
if I stuck this down. Alright, I got all
of the edges covered and the blue is still
showing through. It's almost like the sky is
appearing through the clouds, which is the tissue
paper that I put on top. So you can see that that texture is really showing
through on that. And I really love
how that came out. May not love love,
but, you know, it's it's growing on me. Okay. I mean, when you first started out and you're at this point, you might be like, oh God, I'm totally ruin it. Just keep going. This is part of the process, is part of the
trust that you are building within yourself to creating this intuitive
way to not have to know everything is
going to happen and how it's supposed to
come out and what's next. You don't know what's next, you won't know what's
next until you do what comes next, right? So allowing, giving it that
space for things to happen. Okay. So the lab before I started, before I went off on a tangent
with the paper on that, I was playing around
with this fabric. And I'm still thinking that this could make
a really nice edge. I really like this. So what I'm gonna
do is I'm gonna, I'm gonna adhere it on the
top edge and the inside edge. I'm gonna go with
that. So I need to decide what I want to
adhere this width. Now, I want to glue
that's not going to go, That's not going
to bleed through the fabric, at
least not too much. So I probably won't want
to use my Elmer's glue. I couldn't use my
two-sided tape. Although two-sided tape and fabric might not be
the best thing, I can. Certainly try it out. See how sticky my
two-sided tape is. Scrap piece of paper. Just testing the strength of it. So yes, that's pretty good, but it's still going
to come come off. Now, you may not be
big deal because, you know, this is going to
go up on the wall, right? So, you know, maybe
not a big deal. A lot of times, you know, surprise you what
glue sticks can do. And I know that there
is glue sticks out there that are
designed for fabrics. I don't know if they really
work any better than, than this glue all where will they know that they
are pretty good for fabric. So I'm gonna go with
the glue stick. I know it's not going
to bleed through. So I got that
covered right side. So I want my, I want to glue it on
the top and the inside. Wow, I'm thinking that
the glue stick is going to if it starts
to come up later, I can always tack it down
with some more glue. I might get creative. I can see all of these ideas when she started getting the creativity flowing, things will start to happen. I can see, I have these little brass nails
that I use for woodworking. I can see putting
those on the edge. Cool. I even have some little
metal edge pieces I might dig up to
do these edges. Or maybe I just
leave these public. It is maybe I just paint
them a dark paint. In fact, let's go ahead
and ran with that idea. So it did quite a bit. I've been at this now
for about an hour and I'm thinking this is a
good time to take a break and come back to this
again when I have another reserve of creative
energy can flow through me. You will get to a certain point in your artwork
where you're like, Okay, I need I need a rest. I need to recharge my batteries. And to step away. It can be a really
powerful experience. So at this point, I am going to step away
from my, my artwork. I'm really loving
how it's coming out, but I'm also like, I don't know what to do next. And I'm feeling like
if I kept going, I would be I would
just be forcing it. I would be just
pushing through it. And that is not
allowing the energy. That's not what we want when we work in the creative flow. We want our energy
to be natural. We, we want it to
be in abundance, so it's flowing freely. We don't want it to
be stuck someplace. And at some point
when you are doing, your are going to start to feel that at first you might
not recognize it. But the more you listen
and tune into your body, What's going on in there? The easier it's going to be
for you to identify when it's time to set things
aside, take a break, get recharged, and then you
can come back to it with a fresh burst of I will see you in my
next burst of energy, whether that's tomorrow or
later today, I never know. You will never know. It will just come when it comes. Okay. So that's it for now.
5. It's All Part of the Process: So I have my, my box and it's nice and
dry now, which is good. Everything the fabric
held on really well, just with the glue sticks. So pretty happy about that. One of the things I wanted
to pay attention to now is on the back of my box. It's got these little hangers so you can hang it on nails. So I want to make
sure that I'm aware that this is the direction
that it's going to hang in. Otherwise, I'm going
to have to reset those which happens, that's fine. It's time maybe to revisit, okay, this is my, this is my subject that's
going to fit into this box and remind myself that this is what I'm
building around me. So let's go down to my desktop and see what's
happening down here. At this point, I don't know if it goes with the rest of it, but I'm gonna go with that. I am going to go with that. I'll lay them out in
such a way that they're all going to fit
back in here, right? Okay, so I have to be
a little careful about this because these
pieces are not perfect, so they're not going to go
back in and any different, they're not going to go back in this way in a different order. Alright, so that is, I've got some really
different stuff going on in here now. At this point, if it feels
a little disconnected, like I've got two different
types of things going on. But this is just part I think it's just
part of the process, you know, when you just
allow yourself to play. And don't worry
about the results. Don't worry about
where it's going. And just start piecing things together in a way that maybe you didn't
make sense at first.
6. Needs More Funk: Okay. I'm back. I did not end up playing around yesterday
at all with this. So this is a couple
of days later. The reason why is I started to feel a
little stuck with it. And I know I wasn't sure
exactly what was going on and what were my hesitation was a couple of things
came up for me. For one, I started
to feel like it was it was getting a little
too symmetrical too. I don't know if symmetrical is really quite the
right word for it. But I really kinda pictured this being a little more funky. And this what I did
on the inside here, although I really like it, I just didn't think it really set off the
mood that I wanted to. And I think part of that is because this piece
right here is so organic and funky in its own way that it didn't
really fit in here. So my challenge now is to
how do I match these up? I could just say, okay, well this is no longer the subject and do
something else for this. Or I can find a way to make what I've done here
so far match with this. And I think I already
have a good start. These, these on the sides on these are just a little funky, really imperfect
and my frayed edges on that, on the fabric. One of the things that came to mind as I was waking up
this morning was I have this distress ink which could kinda grunge
it up a little bit. I could do some other
things to grunge it up. And I had another
idea because I was, I was playing around
with another project yesterday and I was using wire. And I have a couple
of different wires here that may or may
not fit into this. But I thought, you know,
I've got this wood box. Why not get out my
power drill and Jolson holes in it and then
wrap some wire in there. And I don't know, I also have some of
this some some yarns here that I think
these are like hemp. There might be, there
might be some wool in it and maybe it's,
well, I don't know. But this might I
don't know if there's something there's something
that happened in here. So I wanted to pop back in and keep working
on this project. And let's see where
we can take it. Okay, let's go down to my desktop and see
what's going on here. Some of the things that
come to mind is possibly using some gesso
in it that could, that could do something
to that effect. And I've got some
other mediums and some other paints
that I might try out. Like a, a heavy gel
medium might work. I've got some of
these glass beads. I've got some some chalk paint, and I have some modeling paste. So these are some
things that I could put down and maybe get some
different effects going here. Maybe, maybe, maybe I put down a little bit of
this molding paste, which is pretty thick in here. I got all my dear,
I guess me an idea. Molding paste and stencils. A paintbrush may not
be the best thing. I also have a little
silicone spatula. This might work even better, much better, much,
much, much better. This is just going to give me
some texture to work with. Making sure I'm just
putting that down in a nice perfect way. Maybe do a little bit
of this on the sides. When I do a little bit here
and see what this one does. I'm always curious to see
what is this going to do. Some fun stuff there. Okay. I don't want to
overdo it too much, which is something
that I tend to do. Once I do something I'm like, Oh, that's so cool. And I just kinda wanna
keep doing more and more. Sometimes it's like
no, no, Baca, Baca. That's enough. That's
good. Good. Karen. I really like how what's
going on with this? Wouldn't mind
getting some of this like in the corners though. Yeah, I'm going to do a little bit more
because I just feel like there's just it's
it's right in the center. This is going to
have to dry before I put anything more down on it. I think, Oh, here's an idea. So I have like extra, I have more molding paste on the outside of
these stencils. Why not just clean them off
on the outside of this? You can't do that. Put it down on the
side anymore now. So just do like this. Well, that's just going to add a little bit more texture
too, this outside. So that is some
interesting things to it. Now, at this point, yep, I'm gonna go ahead and
let this let this dry. I might let it dry overnight. But I think that even
though I just sat down here for a brief ten
minutes and work on it. I think it was enough
to kind of shift me so that when I when I
come back this to this, either later today or tomorrow, I will be able to keep
going on and really feel like been able to
get rid of that, that perfection part that was really kinda messing
up and find, find more ways to get my
subject incorporated into it. Okay, so I will see you
when you get back and yes, probably going to use
some power drill. But if I drilled through it now because I put
it on the sides, I'm just going to get all of
that molding paste all over my drill bit and that's
just gonna be a mess. So I will I will wait. I will be patient.
7. Adding a Layer of Tissue: Well, I have let this dry. It's pretty hot day today, So it dried almost completely. It's been a few hours
since I put down the flexible molding paste. And I have just a few minutes before I'm going to
get started on dinner. So I thought I'd steal
away a few more moments to play with my
box, my shadow box, and take an opportunity because this will be the last
time that I played with it for today. And so I can do something
can be really wet, so take like overnight to dry. So this is a perfect
opportunity to just kinda steal away a few minutes and get a little bit
more done with this. Now, with this molding paste
that is, That's inherit. These are really textured, okay, So they're really raised
up because I push the push the molding paste
through the stencils. And I thought it would be fun to play around with Tom tissues, some of these tissue papers and kinda mold them in
there a little bit. Maybe bring back out some
of my dragonfly paper. Some of these other
papers that I have in my nice little
collection box here. So that's what I'm gonna do. I'm probably going
to spend about ten, maybe 15 minutes before
I'm up to make dinner. And it's good on my desktop. Okay, so here we are. And what I, when I
do tissue paper, I like to use not anything
that's going to be heavy. So you don't want to use
the heavy gel mediums. She really just want to
use a a matte medium. And this is if you only
have the heavy gel, just go ahead and water it down. You don't have to have
anything special for this. If you have something
like Elmer's glue this content to be
a little stickier. You'll probably want
to water it down. Although the more water you
add, you're going to end up, you could potentially
end up with a soggy mess with
your tissue paper. The first thing I'm
gonna do is I'm going to take a little bit of my matte medium and
just put it down. Don't know exactly where I'm
going to put all this stuff. So I'm just kinda put a
bunch of that down on there and just start
carrying off pieces. Get in there and push this down. And, you know, even
just risk it tearing. I'm just being okay
with if it tears. In fact, I almost
want it to tear. Wow, that's really starting
to get very interesting. Like I said, I do, I love working in threes. So, um, having just
three pieces of that, that that feels right. And I've just got some
other things here. I don't know if I'm feeling
put them down or not. I'm just playing around seeing if there's something else that might
want to go in here. Almost just want to put
a little bit of this. I have some glitter. One of them is gold. I think that is going
to do it for now. I'm going to let
this dry overnight. And like always, at
the end of my day, I like to clean up a little bit, but I don't want to
put things away. And he paints that I've used. Even in the beginning, parts are still
here on my tables. Even these fabrics, even
though I might not use them, keep them all out. Yesterday, I put
everything in the box. Obviously, I can't do that today because
everything's really wet. But I do like to do a little bit of
straightening up and of course it go wash
my brushes out. And that is it for, for now. See you in the next video.
8. Fun with Wire: Everything has
dried really nice. I'm just loving the way
that this was coming out. So I have these these edges, the insides of the box that
just have the texture on it. So I think we're going to
work primarily on that during this session and maybe do
something on the outside too. But before I get started and
get things all wet again, I don't want to drill
some holes in it. Now. I'm just going to do this in a way that I
don't really have any definite plans for
this for this wire, but I want to have
someplace for it to go. So maybe crisscrossing
in-between. There might be some rapping
I can do around the edges. There's just a lot of
different possibilities. So I'm gonna go ahead
and drill a few wholesome this before
I get started with, I think I'm going to use this distressing along with
maybe some other stuff. So you never know when you
are working intuitively. Just have a look
at what you have. What materials are
available to you, where you are in your project? What inspires you what she wants to come out
and play for you. For me, it's this
I have the wire, I have the distress ink, and while I have a lot of different stuff
here on the desk, might want to come out and play. And when you work in
an intuitive way, and I really hope that
you are playing along with this in your own way
and doing your own thing, you're really going to get
the most out of it when you engage in your
intuitive creativity. Okay, so let's go down to my desktop and drill some holes. Now, I'm gonna, I'm gonna do a little bit of this
distressing, but I also, I know working in this, I've got to go into
this knowing that this is a water-soluble mediums. So it's not going
to be permanent. That may or may not
worked to my advantage. We shall see I'm going to
get out a cosmetic sponge. Green would be better. I even have one of these
fancy little tools here. I'm going to play with
that for a minute. I don't know if there's
enough pink left in these ys are getting pretty old. Llc. I've kept my inexpensive
craft paints here, but I also have some fluid acrylics which
are more transparent. So if you've just got this, you can always just
water it down. But the fluid acrylics
are way more transparent. And what I'm going
to try to do is just lightly rub it
on there and places where I can see the fibers from the tissue paper that I put down and see what happens
when I do that. Of course, always having
some sort of rags around. Really helpful. Because I'm looking at this
point home a little too much. So I've kept my rag out now. And of course those are, something interesting
is happening here. Those were, those are water-soluble ink
so that I put down. So this is going to impact that. As I'm running on some of
that white coming through, it's interesting where
it's coming through. Whenever you're working
with right now. Allow it to just play. Be playful with your materials. Ask them, what do
you want to do? This wife says it
wants to be key. We will cut you go. That's always a great
way to get unstuck. If you're not sure what to do, ask your art materials, would they want to do? Let me find the top of my box. Again. I can always change
the position of these. These are just put
it in with screws. Might want to orient it so
that it's that's the top side. See if it changes anything
that I'm working on. It may or may not
affect anything, but sometimes moving
things around in different perspectives can
really shift what you doing. Here's some green
fabric that's like the same green that I put
on the outside the box.
9. Allow Creativity to Happen: So wherever you are
in your project, just know that you are
exactly where you need to be right now and pay attention to those
feelings that you're having. Maybe you're having feelings that maybe you don't
like what you're doing. Maybe you really like it, maybe you're really
excited about it. But then you might go from excitement to know what's
going to happen if I do this, I might ruin it and pay
attention to those feelings. Let those feelings happen. Be aware of them, but don't necessarily let
them drive you or stop. You. Just bring them into your consciousness and
know that they are valid, they are real, and they don't have to interfere
with your process. But if they do start getting
in the way and you start to feel and you've
seen me do this as I move through this project. If they start to be intrusive, where there really are
getting in your way, just take a break, just walk away from it for
as long as you need to, but do come back
within a few days. I take no more than a few days. Usually an hour or two a day is enough to step
away from a project and come back and make some
more progress on it. But don't you don't even
have to set a time. Don't feel like, Oh, this has got to be like in I'm
gonna do this for an hour. Yeah. Just say I'm
just going to do this for a few minutes
and see how it goes. And go from there
and allow yourself that space to, to play. Just to play. Stop being consumed. Serious. I get really bogged
down in serious stuff. This is my time to
just play and open up. Okay. My, my glue is dripping, so let's go back down
and blue this fabric on. Hey, I'm, I want to
start at the edge, but I'm thinking I'm going to
start right in the middle. I'm going to start right here. In fact, right where
I know I want to cover up that wire or maybe I just let the
wire kind of peek through on the edge like that.
10. Wire Wrapping and Fabric: I have decided that the
next thing that I'm going to play with is this
other wire that I have. And I already got it, got out a piece and just auditioned it in there
to see if it would work out. And my idea of thinking
here is that I wanted to do something to
these wires just to, just to do something
to them, you know. And I had thought about doing
some sort of paint on them, which may still end up doing, putting some paint on there. But I like this idea of playing around with
some more wire in here and just kind of
seeing where that goes. So wherever you're
at in your project, pick something that you just want to play with and you don't have to commit to it. It's just something
that you're ready to play with and you're
just gonna see what would happen if
you did this thing. All right, so let's
go down to my desktop and you can watch
me while you play, and let's have some fun. Okay, I'll go ahead
and bring it up here so you can see
what I'm doing is I'm just taking this red wire and wrapping it around
this copper wire. And it's just giving it a
little bit of texture to it. And the way I did this
was they took a length of wire and I started
in the middle, so I just put it on there. So I've got one end that's
really long over here. And then I started
wrapping the shorter end. My, my thinking was that
if I started at one end, it would be really, really
hard to keep wrapping this big end all around it. So just kinda
breaking up that wire so that I'm not trying to go
crazy wrapping it around. So I started wrapping
it around so it was nice and
spaced like that. But then I did this
one little area here where I wrapped
it all close together. Another idea just
popped into my head. And this is what happens when you start
just, just playing. Without any idea of
what might happen, where you're going with it. We can find that ideas
just happened here, had finished wrapping that. And so I'm gonna go
and I'm gonna get some b psi of all these
colorful beads here. And could go with a red, because this is a red wire. Or I could go with this
this beige which is really matches the background
that fits right on there. Yes, I do typically
can go with the first the first thing
that catches my eye, I mean, obviously I
have a whole box of beads here that I can pick from. But I often just go with the first thing and
I don't question it. I don't, I don't
like to get lost in in too many possibilities. I mean, possibilities are
really important to me. But I don't, I don't
like to get dark. Really liked that. I'll let came out with the
beads on there. I've got a lot of stuff going
on in the background here, kind of hard to see, but this is, this
is interesting. It's definitely
adding a layer of texture that he
didn't have before. Now, I have a decision to make. I could go ahead
and keep wrapping this wire around these
other two in here. Or I can leave them
like they are. And right now I'm feeling
like I'm going to leave them. I think I'm just
going to leave them. Something that I thought of was gluing that town was I have these coconut shell
beads came on a pillow. Sprinkle some of those around. Or maybe do something with the with the edge
or the corners. Wow. Wow. That's
really coming along. Really nice.
11. Playing with the Center Piece: I'm so glad that I
started to paint this. Because if I wouldn't
have painted it, I wouldn't never
wanted to cover it up. And then I would have never gotten to this point with this. And I'm just really I'm just really loving
this at this point. And let's bring it over here
for a minute before I go. Yes, I can wrap it up
wrap it up for today. And now we can start to see
how this is going to fit in. You know, I'd been struggling
with it this whole time. But now, look at that.
12. We’re Almost There!: Okay. Today might be the day I
actually finish this up. I don't know. Anytime I approach any
type of art project, one of the first
things that I do is I just let go of expectations. Expectations generally only
lead to disappointment. And I don't like disappointment. I just don't have
any expectations. I'm really, really, really, really loving how
this is coming out. And yesterday was I
just felt like it was a major breakthrough for me as I worked on my
centerpiece in here. And it's still not
a fixed in there. So I haven't quite set on
exactly where it's going to be, but I'm thinking that the
location that I have it in now is going
to be a good one. Today. I'm going to work on just a couple of
different things and just had some ideas I really liked how I put this green piece of fabric loosely in the corner, so it just kind of wind it, but I only did it on one side. So I was thinking
I'm going to add another little piece
of that in there. I also want to find ways to incorporate the fabrics that I laid down the little circles. Because I'll do just
kind of look like I put some circles of
fabric in there. I really loved the dragonflies, but I wanted to find a way to incorporate that and I
had an idea last night. In fact, I started
to play with it. I went No, no, I can't I can't do this job because
I'm not on camera. I backed off. And so I'm
going to do that today. And the other thing
that's really unfinished, I think the backside of this, I've got I've got that. But the sides There's really not much I've done
with the sides in it. So that gives me some ideas on doing some finishing
techniques with this. And we'll just see how
it goes, how far I get. Well, let's go
down to my desktop and see what is happening. Okay, so I'm gonna go ahead
and temporarily remove this. And you can kinda see here
where I started last night. I told you I was off camera. I started putting
down some paint because I wanted to find a way to incorporate
diesel dragonflies. And a technique that is really simple to use is
to use paint to over lap. So I was just simply using a flat paintbrush and
some white paint. Now, I'm just kinda going with the fact that I
had white paint on my brush and I'd already done since dental
work on these sides. He's seeing the molding
paste through the stencils. Leftover scraps of metal, the wire that go in there. Okay, so put put some odd
things in there. Let's see. Still have my space for this VM. Just mess it up now. Just messing it up. This little thing
that I'm doing right now is kinda coming out of this. I put down a big blob
of glue and I was like, that's kind of slightly, so what can I cover it up
with and cut this, This yarn? I'm liking that,
that actually helped brighten it up a little
bit. On the inside. I still think I wanted to
do some more shading work, signing to see this
county gather. Okay. So at this point
it does look like it's just just one more one
more setting, one more day. I've done enough for now and we'll come back
and you never know, I might have some, some other ideas for some finishing techniques
though really make this. I don't know. I mean,
I think it's already popping pretty pretty
pretty nicely here. So bad for my first shadow box. Okay, I will see you
in the next video.
13. Finishing is Awesome: Okay, I'm back. I have an idea on how to incorporate my, my
centerpiece here. I decided that, Wow, I have a little bit
of this wire lacked. Why not? Just put a couple of holes in the back and
just tie it in with this. I think some other things that developed as I was
taking this all in was one of the
areas I was really struggling with was
the base on this, on the inside and on my desk, I have this piece of
cinnamon, cinnamon stick. And I laid it in there on
top of some of that fabric. Really liked how that came out. So I am going to work on
finishing the bottom here, the base and getting
that attached. That's kinda beat it. We shall see, let's go down to my desktop and make this happen. So I want to get an idea of
where this is going to go. Think I'm actually going
to get out a ruler. Don't use rulers that often, but I think this is
going to actually help with Julian the halls because I was thinking I was going to have
to drill the holes from the back but maybe not. Maybe I drill them
from the front. So here. Here. Okay. I think that
this is going to secure it pretty well, but just to give
it a little extra, I think I will do
a little bit of hot glue down here towards
the bottom on the back. Some other things
that I found on my desk are these beads. They were they were
actually part of a couple of bracelets, bracelets that my
daughter had made. And because when I
was thinking about how can I put some things
along this bottom here too. Make it look a little
bit more inviting. The other thing that
I have leftover, remember when I started
with a sheet of paper and I was cutting it and
cutting it and cutting it. There might actually be a place for this now and then maybe
lay some beads on there. And I might do some reason I'm picking Harry jealous because the surface that I have
down here is really rough. So I think this is probably the best putting this down That's going to give it the
best chance of adhering. So now I go a little bit of a creative mess here
that I need to. Get crafty with because you can see I put so
much glued on that. You can see it which
really just looks tacky. So what I could do is I can find ways to maybe put some
beads in front of that. I could obviously put down
another cinnamon stick. But I'm almost thinking
that some other beads going along there might be good
so I can get back out. Maybe these feeds, I
get a straight pin. This is one of those really
large dress maker pins. So when I'm thinking
of is if I can get enough of these beads onto here, keep that glue up, then I can get them
all facing forward. This could work out really well. Wow, that is really,
really cool. Okay, I got the
same thing going on here with these beads. Okay, I'm having
some problems with these beads coming out. So I'm gonna take this, this piece of yarn and glue
it in front of those beads. And that's going to
hopefully give those beads a little bit more stability. It's an interesting
though. Touch there.
14. Class Project: Okay, it's your turn. I cannot wait to see
what you create. And remember, you don't need any specific supplies for this. You are going to need a box. You are going to
need some adhesives. You are going to need some
stuff to glue into the box. But other than that, it is really what you
have available to. You. Get creative, get involved, and make this 0.
 Karen Dawn, Creative Soul Journeys